Many people who have a summer residence, believe that the garage in the country is more a luxury than a necessity. Indeed, if a person visits his dacha only in the summer, he does not need to spend money on building a structure that will empty 250-300 days a year. The construction of a garage at the dacha is only necessary if the person plans to visit his summer residence at any time of the year or simply live in a country house permanently.
The garage option at the dacha should be chosen depending on the amount of space on the site.
It should be noted that building a house for your favorite car is a procedure to which you must take a very responsible attitude. First, the car is an extremely combustible thing, and it must be carefully guarded against fire. Therefore, the garage must be built of non-combustible materials. Secondly, when a car engine is running, a significant amount of carbon monoxide is released, which even in relatively small concentrations can suffocate a person. Therefore, when constructing a garage, good ventilation should be created. Thirdly, any machine is made of metal, and the metal has the property of rusting, and therefore it will be necessary to make a good waterproofing in the garage.
Main types and types of garage buildings
In terms of architecture, there are 3 types of garages:
- Classical.
- Built-in.
- Attached.
Classical garages were extremely common during the Soviet era. These buildings are located separately from the house. They have both advantages and disadvantages. For example, in case of fire in a detached garage, the flame is rarely spread over the house. In addition, in such a room you can retire from the intrusive attention of family members. Among the shortcomings of this type of buildings is the need to leave the house in frosts to sit down in the iron horse, and also problems with inscribing a detached building in the landscape of the suburban area.

Constructively classic garages are divided into 4 types:
- The capital.
- Prefabricated.
- "Shells".
- Underground.
Capital and underground classical garage buildings are usually built of bricks and reinforced concrete. Collapsible and "seashells" - from various grades of low-carbon steel and aluminum alloys.
Built-in garages can be located right in the house. Most often these garages are located in the basement or semi-basement. Less often - in a specially equipped room on the 1st or 2nd floor. The main advantage of such garages is the lack of the need to go out in bad weather from home to get into the car. In addition, they do not spoil the landscape of the country plot. However, they have many drawbacks, ranging from the high cost of designing and building a non-standard home and ending with the appearance of unpleasant smells of technical fluids in living quarters.
Attached garages are a consensus between classic and built-in views. Similar extensions are most common in traditionally practical English-speaking countries. On the one hand, you do not have to go outside for access to the car, and on the other - between the living quarters and the garage there is an external wall of the house, which greatly improves fire safety and positively affects the prevention of the spread of unpleasant odors.
Materials and tools for erecting a wooden garage-extension
In order to build a garage in the country house with your own hands, you need to correctly choose the type and type of structure. A person who does not have any practical experience as a bricklayer or a welder can easily build a garage outbuilding with wooden frame, without a cellar and a viewing pit. A simplified diagram of the framework of such a structure is presented in Figure 1.

Picture 1. The scheme of the garage extension.
Distances and dimensions constructive elements in this scheme the following (in meters):
- between the wall and the columns - 2,2;
- between the columns - 1.5;
- between the rafters - 0,5;
- height of the columns (above the ground) - 2;
- the depth to which the columns are piled into the ground is 0.4;
- length of transverse beams - 2.5;
- length of rafters - 6;
- length of longitudinal beams - 6.
To build an extension, the following tools are required:
- electric saw or chainsaw for cutting wood;
- electric screwdriver;
- hammer drill;
- furniture stapler;
- a hammer;
- wheelbarrow;
- buckets;
- bark;
- bayonet and shovel.
List of consumables for the construction of the frame:
- a beam (10х10 sm) - 12 meters;
- edged board (10x5 cm) - 30.5 meters;
- rafter rafters (5x5 cm) - 24 meters;
- slate - 18 m²;
- any waterproofing material - 29 m²;
- self-tapping screws (10 cm) - 180 pieces;
- spacer bolts - 60 pieces;
- nails (10 cm) - 2 kg;
- rubber (5 mm) - 2 m²;
- grid-rabitsa - 13.2 m²;
- aluminum or steel sheets (1 mm) - 16.62 m²;
- gate with hinges or shutters;
- gravel - 2.64 m³;
- concrete - 1,16 m³.
Since screws and nails can bend and break during operation, they should be purchased with some margin.
Preparatory work

Before starting work, it is necessary to prepare wooden structures. In particular, cut the grooves in the columns under the transverse beams, in the transverse beams - grooves under the rafters, and in the supporting longitudinal beam (fastened to the wall) - grooves under the transverse beams.
All grooves should be located in the junction of the structural elements, exactly opposite to each other, and have a width and depth of 5 cm.
In addition, wood must be treated with a means to protect it from fire and rot.
After the preparation of the wooden structures, it is necessary to proceed with earthworks:
- First, level the area under the garage floor, removing a layer of soil 20 cm thick.
- Then put the chosen waterproofing material on the floor of the garage.
- After that, fill the area with gravel, ram it and throw it on top of the mesh-netting, first straightening it.
- Further over the gravel and the rabitsa it is necessary to make a concrete screed 5 cm thick. The mesh-netting will reinforce concrete and will not allow it to crumble due to temperature changes and dynamic loads.
- After two days, when the concrete is solidified, it is necessary to wrap the lower parts of the columns waterproofing material, install the columns in the holes prepared for them, align and pour the base of the columns with concrete.
To ensure that the columns do not squint until the concrete freezes, after alignment they can be joined together by a longitudinal beam with the help of self-tapping screws.
Basic work
Two days after the installation of the columns, you can start assembling the wooden frame:
- The first thing to do is to drill holes in the longitudinal beam, which is attached to the outer wall of the house, every 10 cm.
- Then it needs to be raised to a height of 2.3 meters and used as a template, in order to drill holes in the wall.
- After this, the beam must be attached to the wall by spacer bolts.
- After finishing the work with the longitudinal support beam, crossbeams must be attached to it (from above) and columns using self-tapping screws.
- Then you need to attach the rafters to the crossbeams.
- On the rafters and beams put a waterproofing material.
- Then attach this material to the top elements of the frame with a furniture stapler.
- Next - to spread the slate sheets on the roof in a row so that they overlap each other.
- After that, in each sheet, drill holes (in the upper part of the waves) and nail slate to the rafters with nails.
It should be noted that first you need to attach slate sheets, located below. In addition, between the slate and the nail must be a rubber gasket.
After overlapping the roof, it is necessary to attach the metal sheets to the columns with the help of nails or self-tapping screws. The sheets on the back of the extension should be bent and attached to the outer wall at home. The gate hinges can be attached to the front column and the wall of the house. Here in such a simple way you can build a cold garage for suburban area.
Unlike the canopy, the construction of a garage at the dacha will require more special skills, time and materials. Usually, the construction of such structures is resorted to in the event that the garden site is not from time to time, but regularly, including in the winter. This structure will protect your car from weather disasters, and from intruders. And if you equip the correct pit in the garage, you can always carry out diagnostics or perform a feasible repair of the car.
The parking lot is an integral part of the garden plots. If you have certain knowledge and skills, you can build a garage of your own with your own hands: Built-in, built-in-built and stand-alone. In the first case, the developer saves on building a separate building and preserves the free space of the plot, but at the same time part of the useful area of the house goes to the garage.
In order not to reduce the living space, it is possible to partially extend the garage from the volume of the building. In this case, the costs will increase for an additional erection of the foundation, walls and roof, but on such a roof you can arrange a veranda or a terrace with landscaping.
A detached garage in the country house, built by own hands, also has its pros and cons. On the one hand, it clutters the site and requires serious investments for the construction of the box and the supply of utilities, on the other - in a separate garage it is easier to organize a working area for minor or even thorough car repairs. In addition, a certain location of the garage and partially enclosed parking can enhance the protection of the site from noise and make the private area visually more isolated.
On this page you will learn how to build a garage in your country house made of metal, brick and armo cement.
How to build a metal garage for a car in the country with their own hands
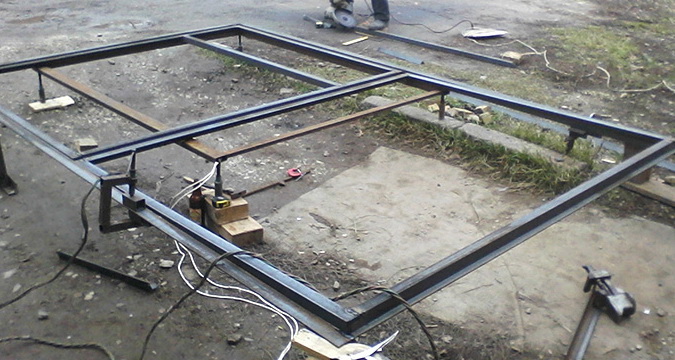
Metal garages for dachas have long proven themselves due to low cost, as well as simple and convenient installation. The frame of the desired size is welded in place from profile pipe section not less than 30 x 30 mm or a corner with an edge of 40 mm.
The lower frame on which the carcass racks are assembled can be made from the same pipe or the channel can be used and the racks can be placed inside its shelves. Then the frame is covered with sheet metal 2-3 mm thick. Sheeting sheets can be fixed with screws (in this case it is worth using galvanized hardware to avoid corrosion) or welded to the frame.
As shown in the photo, when building a metal garage with their own hands, all the sheets of the construction should preferably be lapped together, which increases the waterproofness of the room:

A gable roof is laid on transverse welded beams-trusses, which must be at least three (two gables and one in the middle). At the top of the farm, the ridge is fastened with a ridge made from the same corner or pipe that was used to create the walls. For the device sill roof The length of the garage is fixed to the transverse load-bearing beams, which are then clamped steel sheets or proflist.


All metal structures are primed on both sides and painted with oil paint twice.


The advantage of a metal garage built by one's own hands is that a powerful one is not required for such a construction. Tapes of a width of 30 cm and a depth of 30-40 cm are enough. To speed up the work, floors and foundation are performed simultaneously. To do this, a trench is excavated along the perimeter of the future garage, and a formwork is set up from the outside so that the poured concrete protrudes above the ground level by at least 10 cm. Lay the concrete immediately over the entire area. The dimensions of the concrete platform together with the foundations are such that 10 cm of concrete protrudes from outside the garage.
![]()

However, to build a metal garage with their own hands, as practice shows, even such a tape do not necessarily. It is quite enough just to asphalt a site of the right size or to lay concrete slab thickness not less than 100 mm. It is possible to fill the area with a layer of concrete of the same thickness, pre-laid for strength metal mesh. But in any case, the platform should be raised above the level of the surrounding terrain so that rainwater does not fill the garage floor.
Metal construction of the garage is fixed to concrete with the help of anchors. The easiest way to make the anchors is from reinforcement with a diameter of 12-14 mm and a length of 15-20 cm. They are clogged in holes drilled with a perforator, the diameter of which exactly corresponds to the dimensions of the anchor. To the clogged rod, electric welding is welded to the lower belt of the metal garage. One and a half dozen of these anchors, installed along the perimeter, can reliably fix a garage size of 6 × 4 m.
How to make a gate for a metal garage by yourself: step by step manufacturing with a photo
Homemade garage doors of swing type can be made by any master. It will take a metal corner, a sheet of galvanized steel with a thickness of 1-3 mm and a profile.

First, to construct the garage door, you must assemble the mounting frame, which consists of the inner and outer frame. The basis of the frame is made of a metal corner 65 x 65 mm. The entire structure is first formed on a flat horizontal surface. For ease of installation, you should use pads - for example, from whole bricks of the same size. The corners of the frame are set on the angle piece and the diagonals of the structure checked, which should be the same in length. The frame parts are fixed with clamps, and then seized by welding. The clamps are removed and must be checked once again for the diagonals and overall dimensions of the structure. Only after making sure that all dimensions are sustained, the seams are welded.
As you can see in the photo, with the garage door paneling, the usual use of galvanized steel sheets with a thickness of 2-3 mm:


To strengthen the structure from the inside at a height of 1 m horizontally weld the metal belt. It is also useful to weld an additional vertical stand.
After the frame of the gate is fully assembled, a frame is made for the flaps of the profile. When making the garage door for yourself, the guides are inserted into the frame and carefully leveled. In this case, it is necessary to leave a gap of no more than 20 mm between the frame and the guides, it will be necessary for the free movement of the leaflets. After checking the right angles of the frame, the profile can be welded.

The gate is hung on the power loops and equipped with a bolt with a vertical pin. When the structure is completely assembled, the gate should be primed and painted.
How to build a capital garage yourself: step by step instruction
Building materials for the construction of the walls of the capital garage by garage hands can be different. But it should be remembered that wooden garage does not meet the requirements of fire safety, and metal prefabricated garages have, perhaps, only one advantage - fast and simple installation. They are strongly cooled in winter and heated in summer. In winter, it is important to provide a favorable microclimate for the car (temperature - 5 ° С, humidity - 30-50%). Also, after a long stay in the cold, the car should not get into a too warm garage. Sharp changes in temperature are fraught with the formation of condensation inside the car, which increases the likelihood of corrosion of its metal parts. For the same reason, it is not worth doing metal gates in a brick garage. In addition, steel structures must be protected against corrosion, which means periodic staining (once every 3-4 years) with special paints.

The best material for building a capital garage is brick or. Concrete and block walls are plastered, or faced with a brick. To build a warm garage in the country house with their own hands, use a porous brick. With the same purpose erect three-layer walls - between the bearing wall and the lining have a heater (mineral or glass wool, foam).
The most common garage size is 6.5 x 3.5 m with a room height of 2.2-2.5 m. The width of the gate is equal to the width of the car plus a minimum of 40 cm.

Before you build a brick garage on the cottage on a concrete foundation, you need to dig a foundation ditch. The depth of the excavation under the foundation on sandy grounds should be about 50-80 cm, on clay - 70-100 cm. To melt and rainwater does not wash the ground under the basement, which can lead to an uneven draft of the foundation and the appearance of cracks in the walls of the garage provide for the drainage of streams of thawed and rainwater from the walls of the garage, build an external blind and do not wash the car directly near the garage.
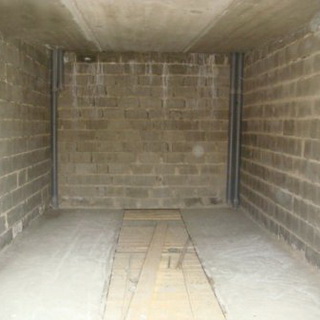
The end of the pavement and the beginning of the garage floor should be at the same level, and the floor level should be 20-50 cm above the main soil so that rain and melt water does not penetrate into the garage.
![]()
The floor of the brick garage, built by own hands, is poured after the erection of the basement. Cover the area with a layer of sand 10 cm thick and carefully rammed. On the sand lay a layer of roofing felt or roofing felt. The ground is mixed with crushed stone or gravel, leveled and compacted. After that, prepare a thick cement slurry (1 part of cement for 5-6 parts of sand) and lay a layer 3-4 cm. After 3-4 days the floor can be covered with a second, thinner layer (1-2 cm) of liquid cement mortar (1 part cement on 2-3 parts of sand). This layer should be well leveled, wiped or fused.
To build a capital garage as practical as possible, to drain oil, water and other liquids, you need to provide a small slope of the floor to the exit - about 1 °. In addition to facilitating cleaning in the garage, this will allow, if necessary, to easily roll out the car from the garage by hand. Therefore, parallel to the walls at a distance of 60 cm from them put 2 wooden slats of the desired slope and height, and then on these slats flat board smooth out the concreted surface. After removing the strips, the floor is rubbed with a float. As a result, the surface should be rough (not smooth and slippery!).
Cement floor for the next 3-4 days is recommended to water 2-3 times a day. This procedure will increase its strength. The surface should be flat, uniform thickness.
Since the concrete cover is classified as "cold", to fulfill repair work In the winter, you should have several wooden lattices. The use of tiles in the garage is not justified - heavy objects fall on the floor, tiles will crack. In addition, in frosty or rainy weather, the floor of the tile will be slippery, and this is dangerous.
Pay attention to the photo - the walls of the garage in the country house, erected by their own hands, are dressed in polkirpicha with corner and intermediate posts in a brick:


This clutch, in addition to high profitability, is also good in that niches between pillars inside the premises can be used for the equipment of racks and shelves. Under the first layer of bricks, when constructing the walls, lay two layers of tarot, not covered with sand.
In the photo of the capital garage it is seen that the roof near the building is sloping, one-run, made of wooden beams placed on the edge:


The beams are supported by poles, with a solid sheathing of planks 40-50 mm thick. To build a capital garage at the cottage, the beams are made from dry wood of pine, larch or spruce. To prevent decay between the walls and the ends of the beams, leave space. For this purpose, the nests left in the brick walls for laying the beams, it is necessary to make more bulky than the ends of the beams. The depth of the nests is 25 cm, and the ends of the beams are laid at least 15 cm in length. The ends of the beams are worn out, covered with antiseptic antiseptic, dried, milled and wrapped in two layers of roofing. The ends of the beams do not smolder and do not cover with tar. The lateral and upper sides of the beam are strewed with mortar and rubble after laying.
Planks for the crate must be dry, without knots, with a width of 40-50 mm. Roof waterproofing - from roofing material in 3 layers with hot bitumen pouring and subsequent sanding.
The video "Capital garage with your own hands" shows how to build such a structure:
Gates for the capital brick garage
In the garage of this design, there are two pairs of folding wooden gates, which ensures entry and exit, both from the street and from the yard. Optimal internal dimensions of the garage (3.5 x 5.2 m) allow the rational use of space along the walls. For this purpose, the gate of the garage garage door is not provided in the middle, but is slightly offset to the left wall for easy exit from the car. When constructing a garage with one gates, its optimal size is 2.9 x 6.4 m. In this case, the area for workshop equipment at the end wall is freed.


The gates of the gate size of 185 x 170 cm consist of metal frame, lined with lining. From the side of the courtyard in one of the wings is provided a gate with an internal lock. In the side walls of the garage there are two windows filled with glass blocks. is provided by an exhaust asbestos-cement pipe with a diameter of 150 mm with a deflector made of a conical nozzle and a cap made of sheet galvanized iron. The nozzle (you can use a small metal bucket without a bottom) is attached to the pipe using a clamp, and the hood is in the form of a single, and even better double cone - to the attachment on three legs. The bottom-end of the ventilation pipe should be located close to the floor, but above the level of the exhaust pipe of the car.
Having read step by step instructions erection of the garage, it's time to find out about its interior decoration.
Finishing of the capital brick garage (with photo)
The most acceptable types of finishing the walls and ceiling of the garage room - plastering or cladding with wooden lining. Plastered surfaces can be whitewashed with lime (the chalk will be discarded) or painted with water-based paint. Do not paint the walls and ceiling with oil paint, enamel or oil varnish: in the cold season, the surfaces stained with these compounds will accumulate condensate. For the same reason, vinyl siding is not very desirable, despite the ease of installation and attractive appearance.


The wooden lining for finishing the brick garage is best covered with a tinting compound and 2-3 layers of acrylic water-soluble lacquer, which will protect the wood from contamination. As a tinting composition for finishing the capital garage, you can use stain or mordant, but it is more rational to perform a tinting operation with a colored antiseptic that will protect the wood from decay and mold formation.


To warm the garage is easiest with the help of foam panels. To do this, you must first install a frame of plywood rails or guides for gypsum board. Between them stack foam plastic panels. After this, the frame is covered with panels of fiberboard or other facing material. First you need to insulate the ceiling and the gate.
These photos show the steps of finishing the garage with their own hands:

![]()

To illuminate the garage, an electrical network with a voltage of 12-36 V is usually used. Using the 220 V network is strictly not recommended for security reasons. It is better to spend money on a lowering or at least separating transformer than to receive a strong or even fatal electric shock, in addition, even a slight electric shock in the close space of the garage threatens also with a mechanical wound.
Across the garage under the ceiling, it is desirable to run a beam or pipe with a diameter of at least 100 mm, so that it is on the engine line in the car. This will allow yourself to remove the box, remove the engine, etc.
Organizing a basement under the garage floor is quite dangerous. Paul can not withstand the load, and one day the car may find itself in a deep hole, from where it will be very difficult to get it. It is better to extend the observation pit in the opposite direction from the exit and use the place for storing vegetables.
The next section of the article is devoted to how to make a pit in the garage.
How to make the right observation pit in a brick garage with your own hands (with photo and video)
There are various opinions about the need for a garage of brick inspection pit. If the car you are repairing a hundred, it is hardly necessary to get your own ditch, especially since it is often a source of dampness, because the evaporation resulting from it creates a condensation due to the temperature drop, which causes corrosion of the metal parts of the car's bottom, which usually stands above the pit. If you are convinced that it is necessary, try to make the inspection pit away from the permanent parking lot of the car, but if this is not possible, keep the observation pit in the garage closed, for example, with a light, tight lid that can consist of 2-3 parts.

Usually the observation pit in the garage, erected with their own hands, is made in the center of the building. Its width depends on the distance between the two wheels of the car, but in any case not less than 1 m. The length is planned along the length of the car. The optimum depth of the pit is 1.8 m. Of course, both the inspection pit and the cellar are possible if the level groundwater below 2.5 m.
Dimensions of the excavation must exceed the dimensions of the finished pit by 30-40 cm for each dimension, this is necessary for the walls and pit of the pit. On the perimeter of the excavation for the device form a ditch width of 25-30 cm and a depth of about 20 cm. When the pit is ready, its walls are smeared with clay or a waterproofing carpet made of roofing material, after which they arrange the formwork for concreting the walls. For formwork use board boards, which fix spacers. The thickness of concrete walls should be at least 10-15 cm. For concreting a solution consisting of cement, building sand, gravel or gravel in a ratio of 1: 2: 3.5 is prepared. Dry ingredients are thoroughly mixed and poured with water. Plastic concrete mass is laid between the soil walls and formwork layers of 15-20 cm, carefully ramming. Concrete walls are covered with wet matting or sacking and left for 2 weeks, after which the formwork can be removed. To further decorate the walls (plastering or facing with tiles) proceed no earlier than 28 days from the date of the concrete mass (when the concrete will gain sufficient strength).
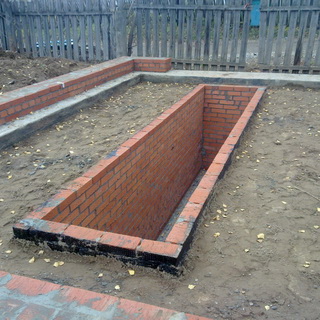
As shown in the photo, the walls of the observation pit in the garage can also be executed bricklaying thickness of half a brick:


For this, only high-quality burned brick of red clay is used.


One of the short walls of the pit is set up with a ladder. It can be portable (preferably metal with a protective anti-corrosion coating), and stationary - concrete or brick. To coat a concrete or brick staircase ceramic tiles It's not worth it: on its smooth surface it's very easy to slip and get injured.


The edges of the pit can be reinforced with a 50/50 mm metal corner section. In this case, you get comfortable flaps, on which the lid is laid.
To better understand how the inspection pit is done in the garage with your own hands, watch this video:
How to build a framed arched garage with your own hands (with photo)
It must be said that the structure of the structure discussed above has minuses. The all-metal construction does not hold heat well. Due to sudden changes in temperature, a condensate forms in the interior, which has a disastrous effect on the car and the garage itself. In winter, locks are badly opened, and the car itself is difficult to warm up and start. In addition, if such a garage is not concreted, it can be dismantled, jacked up and penetrated inside. It is even easier to open the garage from a galvanized profile, the construction of which almost does not differ from the plasterboard wall, only with a sheathed profiled sheet. Therefore, a reliable stone garage is preferable. But not everyone can afford such a construction. In addition, many do not like the standard one- or two-pitch concrete box.
The output in this situation can be the construction of an arched garage of armo cement. Armored cement construction is one or several layers of a metal fine mesh net on a metal welded frame. All this is enclosed in a thin layer of sand (without gravel and crushed stone) concrete. For any reinforced concrete construction, a minimum amount of materials is required. The proposed garage is characterized by small labor costs for construction, relative cheapness and reliability, in addition, the size of the building will be as you want.
Look at the photo - the frame garage built by itself represents a arch structure on a low-lying ribbon foundation:


Its shape suits best for car owners who, in addition to the car, also have a boat of the cartop type (from the English cartop). Such a boat is securely attached to the trunk with a keel up, it is easy to carry on the roof of the car, hence the name. This boat will comfortably be located at the top of the garage. Well, "land" car owners will easily adapt this place to the spare parts warehouse or they will place a telpher for lifting the engine during the repair.
Before constructing a carcass garage measuring 72.9 x 4.0 m, having a height of 2,8 m, prepare the following materials:
- water pipes 1 1 \\ 2 - 100 m;
- iron corner 36 x 36 - 20 m;
- iron Taurus - 4 m;
- a metal grid with a cell of 10 mm - 50 m (at a width of 1.5 m);
- concrete sand on cement M300 and above - 4 m3;
- sheet steel thickness of 1.5-2.6 mm - 4.5 m2;
- reinforcing bar 08-10 mm - 75 m;
- a strip of metal with a cross section of 3 x 60 mm - 22 m.
Two people will erect such a garage for 20-30 working days, without using even a concrete mixer.


Before you build a garage with your own hands, you need to form grooves for the basement with a lint width of 30 cm and a depth of 40 cm. A sand cushion 20 cm thick is placed on the bottom. Sand is poured in layers of 5-7 cm, spilled and tamped.
To create a horizontal top surface of the foundation on the sides of the grooves with the help of a level, pegs are put in pairs at a distance of 1 m from each other. They should protrude above the ground level by 1.5-2.0 cm.
Instead of water pipes, the frame of an arched garage can be made of a metal reinforcing bar with a diameter of at least 16 mm. The distance between the arches should not be more than 400 mm.


From the reinforcing bar make a box foundation reinforcement, exposing it in place in the grooves. Where the tubular ribs of the carcass (10 on each side) should approach the fixture, the pieces of reinforcing bar are welded at the same intervals. These anchors should protrude above the ground surface for 7-10 cm. Concrete the foundation using a solution of the brand M200-M300.
The installation of the arched frame can only be done after the concrete basement has completely dried and cured, and while concrete is drying, there is time to prepare the details of the garage frame.


The first half-frame of the frame is bent from the water pipes according to a pre-calculated and ground-drawn stencil. To do this, in the land with an interval equal to the width of the future building, fix two wooden pegs. Then determine the middle of the segment connecting the pegs, and through the resulting point, a perpendicular straight line is drawn, the highest point of which should be at the height of the structure. As a result, an isosceles triangle is formed. After this, you need to find the middle of the segments corresponding to the hips of the triangle, and build through them perpendicular lines. Then on each segment you need to find the centers of circles. Their arcs will denote the location of the arch ceiling. By this stencil, the first rib is bent, and the rest are first.
Pipes are conveniently bent by the simplest device, which is a section of a thick-walled pipe whose inner diameter is somewhat larger than the outside diameter of the bent pipes, with a welded massive lever - for example, from the same tube.


After the foundation concrete has dried, two layers of waterproofing (roofing felt or roofing) are laid on top of the mastic. The semi-arches are exposed according to the project (recall, they should be 10 on each side) and welded to the bottom ends of the reinforcing bars by the lower ends. Their upper ends are temporarily tied in pairs to the cross-pieces of the mounting ladder, which was knocked down from the boards. Then the structure is reinforced with reinforcement fixed along the overlaps. First, tubular longitudinal bonds are welded in place 2. In the places of their welding with the ribs of the pipe, it is necessary to flatten a little. After that, to the converging ends of the half-waxes are welded along the ridge of the Taurus. At the far end of the door of the end of the brand the lower shelf should be removed at the right distance to refuel the telpher carriage, by means of which the boat-cartop is hoisted and stored or the engine is taken out of the car.
After mounting the arches, you can proceed to the front entrance panel. To do this, weld the jamb to install the gate from a 45 x 45 mm angle and fixing its struts (spacers). In order to make the construction of reliability and stability similar reinforcement bars should be provided and the rear wall of the arched garage.


When the frame is ready, you can begin to reinforce it. To do this, to the arches on both sides, starting from above, twisted wire two layers of steel mesh. First, the grid is attached to the ridge, and then lowered along the arch from the inner and outer side, fixing in several places with a strong wire. The same should be done from the end faces of the structure (the door opening in the front panel, of course, is not reinforced). To the corner of the doorpost, the grid is screwed through specially drilled holes. After that, the mesh ceilings are covered with concrete.
Sand for concrete, from which the walls of the garage will be cast, must be thoroughly washed. The ratio of cement grade M200 to sand by weight should be 1: 1.6 (with the brand of cement M400, this ratio increases to 1: 2). Water takes 50-70% of the mass of cement. When concreting the upper part of the garage, it is desirable to use a rigid solution (50% water from the cement mass), which does not flow from inclined surfaces. Such a solution is difficult to shovel (stir), so various additives are used. It is desirable to mix superplasticizers in concrete (usually their amount is 0,3 - 0,7% of cement mass). All superplasticizers significantly (in 2-3 times) increase the frost resistance and waterproofness of concrete, significantly increase its strength (up to 25%), not having a negative effect on steel reinforcement. Most importantly, they increase the shelf life of the solution and facilitate its shoveling. But keep in mind: concretes with plasticizers must necessarily be subjected to vibration treatment.
The end walls to the end and the side walls to a height of approximately 1.5 m are concreted in a double sliding formwork. Above 1.5 m, the side walls are concreted only with an internal permanent formwork.

Sliding formwork consists of 4 planed boards (2 on each side of the wall), the width of which is 20 cm, and the length corresponds to the length of the building. The boards on the inside are covered with thick polyethylene film. If subsequently the surface of the garage is pasted with roofing felt (or roofing felt), the internal surfaces of the boards are coated with any grease.
The pairs of planks, placed opposite each other, are connected by means of through bolts so that small wooden rusks rest against the arches (carcass ribs). The distance between the boards is approximately 45 mm.
Work with formwork so. Install one board on each side of the wall. Put the solution into the working space. When reaching 0.75 of the height of the board vibrate the concrete, applying the vibrator for 1-1.5 minutes outside and inside the wall in increments of 30-40 cm. Install the second row of boards, fill the working space with concrete at 0.75 heights of the second belt of boards and vibrate the concrete .
When the height of the side walls of 1.5 m is reached, a permanent internal formwork is installed, and concreting is carried out only from the outside. Vibrate the concrete from the inside. Surface of concrete must be glued.

Constant internal formwork consists of 5 uniformly located along the length of the garage (and reliably connected with each other by braces) structures. Cross and horizontal board make of a board with a thickness of at least 60 mm. The vertical board is made of 40 mm thick wood. Of the same material do the curly boards. From top to top shaped boards flooring laths of boards with a thickness of 20 mm, put the plywood on the lath, which, in turn, is covered with polyethylene film. The inner formwork is set so that the thickness of the reinforcement cement is 45 mm.
Internal formwork should be at least half a moon, for this time the concrete will completely harden. In the first week the concrete is covered with burlap, which is constantly moisturized.
All the holes and sinuses in the armocement are made by laying down wooden (foam) plugs in the right places. After that, as the concrete hardens, they are extracted.


The edging of the gate is made of a steel corner. Each half of the gate is hung on two loops. In order that the gates can not be removed after removing the hinges, at the edges of the fringe, 3-4 pins are welded, which, with the gates closed, are heated into the jamb holes.


Each half of the gates of the frame garage for the car in the country house is covered with two layers of sheet steel. And between them in a step of 30-40 cm welded grating of strip iron with a cross section of 3 x 60 mm. Do it this way. To the outside edge around the perimeter, an outer layer of sheet steel is welded. To it from the inside with a step of 30-40 cm weld a grid of strip iron (the ends are welded to the fringing). The second layer of sheet steel is welded to the grid in the form of horizontal or vertical strips 30-40 cm wide. At the joint of both halves of the gate (to one of them), a patch of strip iron is welded.


When the garage is ready, it must be protected from the external environment, so that the water, falling into the pores of the concrete in winter and freezing, does not destroy the concrete. For this purpose, the concrete surfaces are covered with 2-3 layers of roofing material (roofing felt), glued with suitable mastics, or painted with special paints. Among such paints is of interest one homemade paint (very cheap), which does not let water pass air and has an amazing adhesion (adhesion). The period of its operation is 1.5 times greater than that of any existing paint. An indicator of the amazing properties of this paint can serve as the fact that it is impossible to remove traces from glassware, even soaking this dish for a year.
Paint composition (in parts by volume):
- lime-pushenka - 9;
- lime (dry) paint - 2,25;
- calcium chloride - 1;
- water - 30.
On the paint bucket you need to add 20-30 grams of laundry soap. For the preparation of paint, lime-pushers are mixed in 5-6 liters of water. Lime (dry) paint is first carefully ground in a small amount of water, then add water to a volume of 1 liter, mix thoroughly and pour into the lime mortar. Calcium chloride is added to the resulting solution and mixed until dissolved. In 0.5 liters of hot water, the soap is dissolved and poured into a common solution. All filter through one layer of kapron stocking and add water to a volume of 10 liters.
Stain the concrete with a roller or brush twice, drying the first layer for 12-18 hours.
This video shows how to build a skeleton garage with your own hands:
If you live in a big city and you were lucky to have a country house outside the city, then you probably thought about equipping the garage near the cottage. A car for a summer resident is like a faithful helper, and for saplings to go and buy products and old things from the apartment to transport. But after coming to their site many are faced with the problem of parking the car. It is clear that leaving it on the road in the village, where at night you can simply simply remove the wheels is not very tempting offer. Therefore, you need to decide on the best solution for building a shelter for the car.
Basic requirements for construction
It is clear that every motorist before starting to build a holiday garage thinks about its basic functionality, and, of course, its cost and reliability. Let's look at a number of solutions that need to be understood before starting construction.
1. Reliability. Of course, the stronger the garage wall, the better. But how much will the construction of a capital construction be justified? Or will it be enough to install a garage from the corrugated board and not fool yourself? You must give the answer to yourself.
2. The cost of the issue. The metal structure can cost you around $ 1000 + shipping and a small tape of the foundation. You will manage in the shortest possible time. Get perfect solution to protect the car from rain and sun, which is quite enough in the country.
The capital garage will be much more expensive, it all depends on whether you will do everything yourself, or hire workers. Delivery of construction materials, and equipment for construction. Cons - high cost, time of construction. Pros - reliability, durability. If you plan to move to a dacha in the future, or if you are building a garage for your parents, you definitely need to be inclined to this option. Plus, do not forget about the design of all the necessary documents, for which you will have to defend in the queue for more than one month.
3. You do not need to equip a chic interior, conduct communications, such as heating and water. In fact, the garage in the suburban area is more of a hiding place for a car than a workshop. Shelves, racks, all this is not necessary. You can make a small rack for the garden tool.
4. No inspection holes. You do not need it, just superfluous problems with waterproofing.
As you can see, we are making an emphasis on economy. And we are considering a dacha, not as a place of permanent residence, but as a site with a small garden and a house for summer rest and growing vegetables. If you live in the country, then you obviously need to look towards capital construction.
What is the most optimal variant of construction?
To our opinion this is a metal type of garage, which is also called temporary. But there is one more solution, you can attach the premises to the already finished house. Yes, you will also need all the necessary papers, but in this case you can significantly save on materials and do all the work yourself.
 The foundation for such an extension can be made columnar. And the walls can be made using wireframe technology, which we already mentioned earlier. The material will be a tree.
For those who are interested in reading the above article, here we briefly describe the process itself. The waterproofing is laid on the foundation, after which the lower strapping is made.
After that, the vertical bars are installed and fastened to the lower and upper straps with the help of fasteners. They are also strengthened by cross bars.
Roofing is done according to the standard one-pitch technology. At the same time it is reinforced from below by means of supports from the building wall.
The construction itself is covered with any facade material, for example, siding or lining.
Such a solution will be sufficiently reliable and less expensive than capital construction.
We gave you three examples of how you can build a garage in the country with both minimal additions and a "wide pocket".
Everything depends on your needs and whether the dacha is a permanent place of residence.
Also take into account the fact that in the winter months in the villages, when the owners are not at the dacha, they can disassemble part of the building, local "celebrities". In advance, provide for this and possibly for the winter to hide the instrument and valuables in the house. But if you have a reliable neighbor, then you can not worry about it.
In order to find an excellent version of the project for a summer garage you need to spend a few evenings and look through ready-made solutions, which are complete on the Internet. With them, you can take the most relevant for your purposes and draw up a plan for future construction.
The summer garage is a very convenient and multifunctional building. It, except for its main purpose - a haven for the car, is used as a workshop or storage. Therefore, often summer residents are asked the question: how to build a convenient, safe and economical garage at the dacha with your own hands at the same time?
For example, a wooden garage does not meet fire safety standards. In addition, giving durability to wood is a complex and expensive process. Yes, and quality wood - the material is not cheap.
AT metal garage no optimal conditions for motor transport. In such garages, due to winter cold and autumn dampness, condensation is formed, which will cause corrosion of the car body. Therefore, the optimal material for building a garage in the country is a brick.
The equipment of the brick garage should include lighting, ventilation, shelving, which will store all kinds of tools and parts, it is desirable and the availability of water. And, of course, you can not do without an inalienable attribute of any garage - a viewing pit. For the garage is important microclimate. It should be sufficiently dry at an air temperature of 5-15 ° C and a relative humidity of 50-70%.
Laying the foundation
Foundation for a garage
After determining suitable place for the future of the garage, you need to carefully prepare the construction site. First, it is necessary to remove a layer of soil with a depth of up to 20 cm and make a marking with observance of right angles. Then, focusing on this markup, you should dig a foundation pit to lay the foundation. The depth of excavation depends on the ground. For example, if there is dry sandy soil on the site, the depth of excavation should be about sixty centimeters, and in clay soil - from 80 cm to one meter.
The best option is band foundation, which will give the construction the necessary rigidity and strength. In the foundation pit 150 mm thick slabs are laid. To lay the socle on top, formwork is constructed from planks into which reinforcing bars are inserted, after which the whole structure is poured with concrete.
Floor arrangement

After the construction of the foundation, after about 2-3 weeks, you can proceed to the next stage of construction - the device of the floor. The building site is covered with a layer of sand (15 cm), which is superimposed on the roofing material or roofing felt. The optimal thickness of the floor for this type of structure is 20 cm. Here it should be taken into account that the slope should be directed to the exit. To make the floor evenly tilted in the desired direction, it is necessary to lay the boards at an appropriate angle, which will serve as a guide.
Walls

The walls should be made of silicate or red bricks. The next stage construction works should be the installation of brick or concrete pillars in the middle of the walls and in the corners of the building. Such poles will give strength to the construction. And they are also convenient because you can install racks between them. Only after their installation, the openings are laid with masonry.
Roof

The roof can be made single-skinned and sloping with a slope of 15 °. The construction of the roof begins with rafters resting on brick or concrete pillars. Then on the rafters a solid board board is fastened. The roof, which is also a waterproofing, is made of three layers of roofing material, which is poured with hot bitumen and covered with ordinary sand.
Garage Doors

Gates in the garage can be:
- sweeping;
- sectional;
- roll;
- lifting and turning.
It's a matter of taste. But given the climatic conditions and the lack of free space on the average summer cottage, the most acceptable option is the sectional gate. They consist of separate modules and climb the special guides to the ceiling, without occupying valuable space. This type of gate does not have the typical drawbacks of swinging or lifting-turning models.
Furnishing

In principle, one of the most important purposes of the garage is to maintain the body of the car in good condition. Therefore, it is necessary to create the most favorable conditions for its storage and maintenance. For the insulation of walls you can use mineral wool or polyurethane foam.
The simplest variant of the basement is an ordinary concrete floor, which is reliable and unpretentious. But it is possible to use special building polymers, which also have high performance characteristics. True, this option will cost a little more. In the floor is a viewing pit and a cellar. The edges of the inspection pit must be covered with a metal corner.
The garage is simply unthinkable without good ventilation. It is provided by an exhausted asbestos-cement pipe with a diameter of 150 mm, equipped with a hood. The lower end of this pipe should be located closer to the floor.
Became the owner of a piece of land? They settled the house, planted a vegetable garden, built a pavilion with a barbecue, created a pond and, satisfied with satisfaction in the hammock amidst the rustling leaves of the trees, realized that they had not taken care of everything: your iron horse was orphaned under the fence and overheated in the sun. So, it's time to make the final jerk - to build a garage for a dacha, because the car is almost a "member of the family", and it must also be baked.
Dachas are different, so when building a garage you should proceed from the size of the territory, the features of existing buildings and plantations, as well as their location, your financial capabilities, time and desire.
What are the types of garages?
- Built in the main building.
- Attached to the country house.
- Isolated (separately standing).
Comfortably settled in nature, take care of your iron horse
In which cases should you choose the first option? As a rule, the construction of built-in garages is planned simultaneously with the construction of a summer cottage. It also happens that part of the premises of the main building is simply empty, then the owners come to mind the logical idea: why not build a garage in the country house inside the house itself?
If one of these options suits you, then take into account, except for the pluses (the garage will occupy the minimum space on the site, in the cold time get the heat from the main building, you can get into the car straight from the house), you can expect the minuses (unsatisfactory waterproofing). To avoid problems with the penetration of excess moisture, you will have to build a special area in front of the garage in order to make the angle of inclination of the entrance at a level of 20 degrees. Some gardeners (to save space) do without a site, just sharply increasing the angle at the entrance.

So it looks like a built-in garage
Attach a garage in the country house with your own hands to the main building is recommended if the house is close to the gate, when the site is tiny and it wants to plant with greens, rather than pour concrete. This "auto-stable" has a common wall with a dacha, as well as unified communications for water, electricity and heating supply.

And this is an attached version of the "auto-stable"
A detached garage is the most common option for country estates, which is built separately from other buildings and is as close to the road as possible, sometimes the entrance is straight from the street. Due to the popularity of this species, it is proposed to consider it in detail.
![]()
However, the most popular version of the garage in the country is a detached building
How to choose a place for erecting a detached garage
Where does the construction of a garage start in the country? Regardless of which budget is allocated and the project is selected, you need to find the most suitable place for the garage on the site. From what to proceed? If a piece of land is tiny, then make the entrance as close to the gate as possible, and even from the road.
Are there any requirements for choosing a construction site for fire safety and sanitary standards? Of course, yes. When choosing a site for building a garage, follow the following rules:
- the distance between neighboring windows and the entrance to the garage should be from 10 meters, otherwise you will cause inconveniences to the surrounding summer residents;
- to avoid a fire at home, if there is a fire in the garage, you should observe a distance of 9 meters between them;
- if there are buildings finished in the neighborhood polymeric materials, then the distance between them and the garage should be from 15 meters.

When building, adhere to safety standards and take care not to disturb the peace of neighbors
Designing a garage
Design to choose now - not a problem, the benefit of the Network is full of variations of the garage photo at the dacha, and, in the end, beauty is not the most important criterion for this type of structure, first of all the building must be functional and reliable. How to create a competent garage project?
First, decide on the size. For this you need to take into account both the dimensions of the machine itself and the free space in the country.
Secondly, think carefully about why you need a planned construction. Only for car parking? Or do you still want to make a car repair shop? Then you need a viewing hole, as well as an additional area for placing tools and free movement. Some summer residents also make a cellar for food under the garage. Answer yourself to these questions and only then start drawing the project.

True motorists will never leave their four-wheeled "pet" to spend the night on the street
Suppose, you need a garage only for parking a car of standard dimensions, which should be the minimum size of the garage? Experts advise to build a place to store the car, at least 3 meters wide and about 5.5 length. In height, proceed from the growth of family members, some summer residents make the same height as in the house, then you definitely will not go wrong.

Construction of the garage start with the project
Preparatory work
When the project is ready, it's time to move on to compiling the list necessary materials.
First, decide on what you will build a garage. The most reliable materials are of course proven by stone materials (slag blocks, bricks, foam concrete blocks, gas silicate blocks). However, it is not necessary to build from such expensive materials, sometimes gardeners use what is on the farm, for example, metal, wood or buy less expensive materials, for example, profiled sheet. First of all, consider your financial capabilities.
When the materials are purchased, you can go to the markup of the territory. For this, the scheme depicted in the draft is simply transferred to the land allocated for construction. In the professional language of builders, this stage is called "snap to the terrain." How's it going? In the corners of the future garage, pegs or pieces of reinforcement are driven in. Make sure that the marking corners are not curves, for this you need a square. Between the pegs, pull the cord. This block of work requires about 10 pegs and about 40 meters of twine.

Step # 1 - marking the territory
Earthwork and foundation
Construction begins with the erection of a foundation. The most suitable option is tape. To do this, you need to dig a trench about 40 cm wide. But the depth may vary, depending on the level of freezing of the soil in your land. Sometimes enough and 60 cm, and sometimes you have to dig a ditch twice deeper.
Make sure that the bottom of the trench is not loose. This is observed if you build on the site of a mound. Then you have to dig to a layer with a normal density. The walls of the ditch must be leveled with a shovel so that they are vertical.
Then you can fill the foundation. Experienced holidaymakers recommend to stop on the concrete-concrete version, which is both reliable and will cut expenses. The process consists of placing rubble stone in the trench and pouring cement mortar (sand should be 2.5 times more cement). Do not forget to pour mortar on each brick, otherwise the foundation will not be strong enough.

A qualitative foundation is the guarantee of the strength of any structure
Erection of walls and roofs
As already mentioned, for the construction of the garage is suitable as a stone, and wood or metal. However, remember that the wood must be carefully treated with an antiseptic, and the metal with an anticorrosive mixture. But the most reliable material is brick. The walls are built according to traditional technology. The thicker the wall, the stronger the building. However, sometimes there is enough thickness and a half-brick, especially if you do not plan to spend the winter at the dacha.
The construction of the roof is also no different from the standards. The installation of the rafters requires the laying of the roof. The only thing is, do not make the roof flat to avoid moisture penetration. A small slope will prolong the life of the structure. Do not forget about the quality waterproofing of the roof (tile, roofing material or slate).

If your family is in the country and in the winter, then you'd better build a capital garage
Floor installation and installation of gates
The machine is a heavy device, therefore the most optimal material for floor construction is concrete. What is the order of work for this stage?
- ground leveling;
- covering the ground with a layer of sand or small gravel (about 10 cm);
- ramming;
- pouring of concrete solution (1 part of cement, 2 - sand and 3 - gravel).
It is worth paying attention! If an increased waterproofing of the floor is required, lay ruberoid between the layers of concrete (preferably in 2 layers). To do this, make the first pour on 10 cm, allow the mixture to freeze (about a week), and then fill the surface layer.

If the budget allows, you can buy a special one flooring favorite color
As for the gate, then everything is simple, because you can get ready and just install them. However, do not forget that the fasteners should be in the masonry, that is, they need to worry about at the stage of the construction of the walls. The gate, of course, must be painted.
The garage is ready, there were only finishing works and arrangement of the premises inside.
Video: how to build a garage with your own hands
Building a garage for a dacha is a troublesome business, but useful, because then your iron "horse" will live longer.