Pouring the floor in the bathroom can rightly be considered the most difficult task in all repairs to the home.The reason for this is the water pipes, which need to be hidden unnoticed, and the conditions of high humidity, requiring the use of special materials. And if you want to fill the floor in the bathroom with your own hands, then for sure you will be interested in the question of the following character: how to fill in all the rules to be reliable, aesthetic and durable.
As a rule, the flooring in the bathroom differs from its device in any other room only with the finish of the floor. In general, the device is produced in the same way, especially for multi-apartment buildings, and is like a pie consisting of layers with different properties and functions.
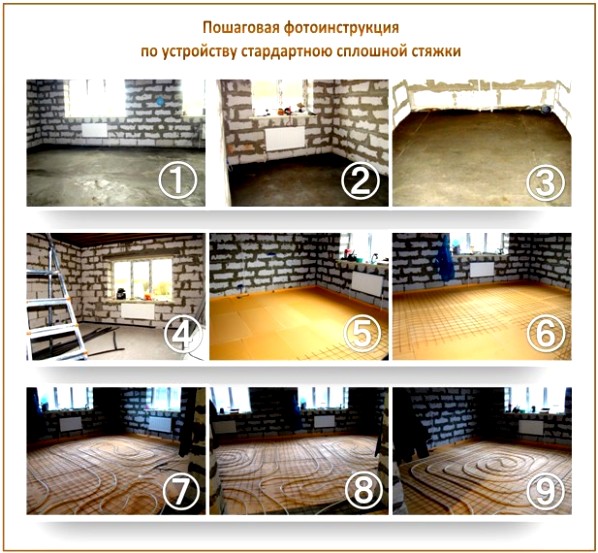
Stages of pouring the floor in the bathroom
Often, the floor is filled in the bathroom with the following layers:
- Plate of concrete overlap.
- Rolled or bitumen waterproofing.
- Cement-sand screed about 50 cm thick.
- Layer of painting or coating waterproofing.
- Cement-sand or self-leveling screed.
- Finishing of the floor (for the bathroom, as a rule, ceramic tiles are used).
For the installation of additional comfort, some mount in the bathroom system "". Its installation must be done at the stage of laying the cement-sand leveling screed, for this reason the installation of the system should be thought out in advance.
Before you start work stock up a large dose of patience, because when you install a floor in the bathroom, you will need it. Any stage of pouring can be delayed for a while. If you are planning to make a durable design with your own hands, you will have to wait until the materials gain enough strength (that is, as it should dry).
Pouring the floor in the bathroom is done in several stages. Let's consider each of them in detail.
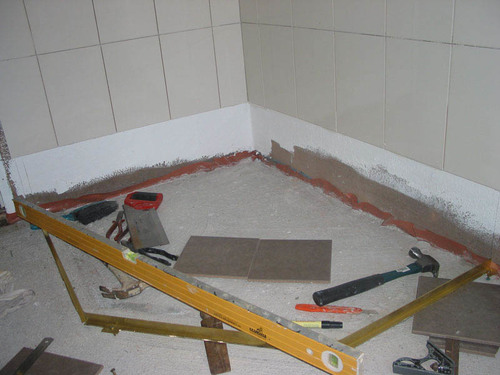
Preparing for pouring the floor with your own hands
There are two scenarios for conducting preparatory work; the choice depends on what condition the bathroom is in now.
The preparation of the bathroom of the apartment in which you already live implies the removal of the finish coat and, together with it, the layer of the leveling screed. Since in most cases a ceramic tile is put on the floor on the floor, it is necessary to use a perforator to remove it. With this tool, tile is broken and taken out of the room. While you are shooting the tile, you at the same time partially deform the leveling screed: it will be covered with cracks, splits and holes. It must also be deleted. Do not regret anything: if the building was built in the Soviet era, it does not have a special quality.
In the case where the floor covering in the bathroom served linoleum, remove it using a sharp knife. If the floor is wooden, pile several panels and then remove the remaining ones. The leveling screed must then be removed in order to place the waterproofing layer in a qualitative way.
If you work in an apartment "after construction", the preparatory work will take much less time. They consist in cleaning of construction debris, if available.
Vacuum concrete slab Basics and get rid of cracks (if they are). This item is required for both a new apartment and a residential one. When the substrate dries, go to the next step - the device for waterproofing the floor.
Features of the self-contained waterproofing device
To ensure that the waterproofing material is properly adhered to the floor, the surface of the latter must be treated with a primer. And only then it is possible to begin the direct laying of the waterproofing layer. There are several ways to carry out their own hands in the bathroom: roll, guided, paint and lubricating. Let's dwell on each of the types:
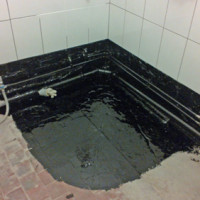
- Waterproofing of a directional type is used for the processing of slabs. It is made with an opening on the walls of approximately 250 mm. It is poured concrete floor, on top of which you can also mount the guided type of waterproofing, and you can use for this more modern material.
- With the help of a roll type, it is possible to equip the waterproofing layer in the areas of the bath or shower enclosure.
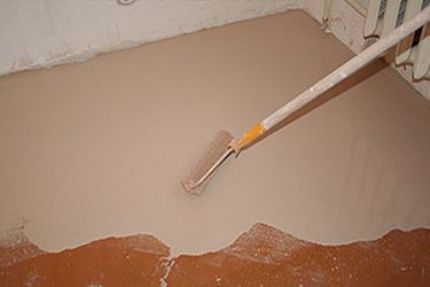
- On concrete floor there is the possibility to use a waterproofing paint, but it does not differ in durability. It will last approximately 3 to 5 years. At the same time, this method is the simplest: using a roller or a brush, the solution is applied to a concrete surface in a 10 cm opening on the walls.
- The optimal version of the waterproofing layer is the lubricating type, which is characterized by a long service life.
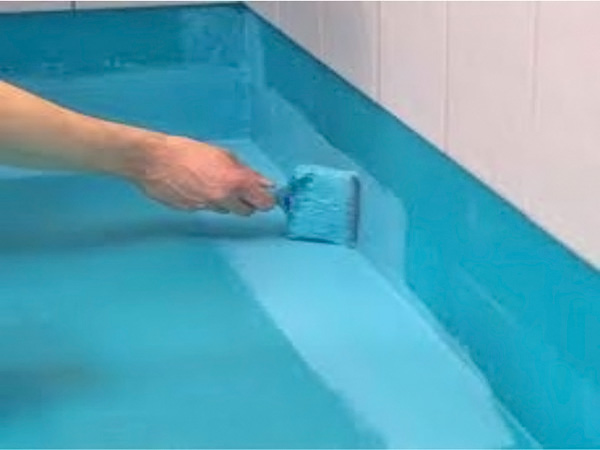
The self-lubricating waterproofing is made as follows:
- First, you need to prepare the solution by mixing the powder with water in a 1: 1 ratio with thorough stirring until a uniform mass is formed.
- The resulting mixture is applied with a brush or roller to the entire surface. In hard-to-reach places, use a brush or spatula. On the packaging, the manufacturer usually gives instructions on the consumption of the mixture to 1 m 2, try to stick to it.
- Glue the tape of the waterproofing to the places where the floor joins the walls and other structures.
- Make two layers of waterproofing. Please note that the first layer to dry should be from 4 to 6 hours, and only then you can apply the mixture again.
- Wait until the waterproofing layer has dried completely. Before you proceed to the next stage of work, you must pass at least a day.
Qualitatively, the floor screed can be made only if the base is level. Therefore, this stage must be treated with great responsibility.
Most often, a cement-sand mortar is used to fill the leveling screed. It can be replaced with a mixture for a self-leveling screed, but it can not be used for large surface irregularities or for any other significant defects. It can be applied at will to repeat the layer.
Concrete screed by hand is done in this way:
- First a mark is made on the walls of the bathroom, to which you will fill the floor.
- The level should be installed beacons in steps of 1 m. To fix them, make hills of cement-sand mixture with the addition of alabaster. Put the beacons on them and level them.
- Prepare the screed mixture by mixing it well with a drill.
- With the resulting solution, fill the floor with the upper half of the beacons.
- Be sure to allow the screed to dry completely. During this, observe the conditions of the microclimate that are indicated on the bundle, make sure there are no drafts.
How to choose a bathroom floor
The final straight erection of the floor with their own hands will be a montage floor covering. There are many ways of final finishing. Let's consider some of them.
If you are going to make a bulk floor, then you should familiarize yourself with the technology of its implementation:
- Dilute the powder in water in the proportion indicated on the package, and stir the mixture with a drill. Pouring the available floor requires a temperature regime of +15 to + 25 ° C and an air humidity of not more than 80%.
- Pour the first piece of the mixture, moving from the opposite door of the corner.
- Align the layer with a spatula, while adjusting its thickness.
- Use a needle roller to remove air bubbles.
- Fill the rest with the same principle.
Today, the popularity of cork is gaining popularity. This floor has many advantages: it is warm and pleasant to the touch, does not rot, does not absorb moisture, prevents reproduction of the fungus.
And, of course, does not give up its position as a floor covering in the bathroom tile. This is a proven and aesthetic option finishing finishes floor in the bathroom.
Whichever type of coverage your choice is, remember that the most important thing is the correct execution of all stages of floor pouring in the bathroom. On a flat screed, any material will look good.
Floor covering for the bathroom. Video
Arrangement of a floor in a bathroom, perhaps, the most difficult stage of apartment repair. Communication pipes that need to be carefully hidden, high humidity in the room, which requires the use of special materials, all this only complicates the task. And if you decided to do the repair yourself, you probably wondered: how to make the floor in the bathroom correctly, so that it is strong, and beautiful, and neighbors do not flood. In this article, we will try to answer this question as closely as possible.
Sex in the bathroom with your hands - a responsible job
In most cases, the device of the floor in the bathroom differs only in the final floor covering. In other respects, the design is approximately the same, especially for apartment buildings, and is a kind of pie from different materials with different purposes.
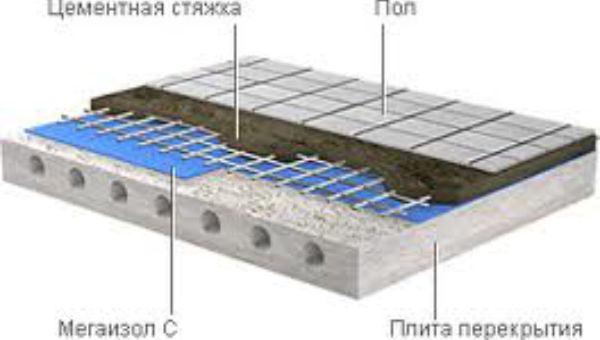
The scheme of the device of a floor in a bathroom
Most often the device of a floor in a bathroom looks so:
- Concrete slab of overlapping;
- Waterproofing (fused from bitumen or roll);
- Screed from a cement-sand mixture with a thickness of about 50 mm;
- Waterproofing (coating or painting);
- Leveling screed (cement-sand or self-leveling);
- Flooring (tiles, linoleum, wood, laminate, flooring).
For additional heating of the bathroom and, in order to warm the legs, equip the system "warm floor". It is mounted at the stage of the leveling screed, therefore it is necessary to plan it in advance.
How to equip the floor in the bathroom with your own hands
Having decided to do all the work yourself, be prepared for the fact that you have to "tinker" with the bathroom. Arrangement of the floor will require a lot of strength, patience and attentiveness. Each stage of work can be delayed for a relatively long period. To make the structure long-lasting, the materials should gain their strength - dry. Therefore, it is not necessary to hurry - we do not need a poorly executed floor.
The technology of floor arrangement in the bathroom is unified and consists of several stages. Further more details about each.
Preparatory work
For the preparation work there are two scenarios, and they are conditioned by the state of the bathroom at the moment: "after the builders" or residential.
Repair in a residential apartment will require removal of the floor covering and leveling screed. Most often in bathrooms, ceramic tiles were laid on the floor, a perforator is required to remove it. With it, we break the tile, then we take out its remains. In the process of dismantling the tile, the leveling screed will surely be broken. Remains holes, cracks and splits after the perforator. Therefore, the screed is also removed. In addition, if the apartment is old, it is unlikely that in the Soviet time this screed was made qualitatively, so you should not be sorry. If linoleum was used as a floor covering, it must be carefully poked with a sharp knife and ripped off. If the floor was wooden, saw off some of the boards and then dismantle the remaining ones. Removal of the leveling screed is also needed in order to qualitatively make the floor waterproofing.
Preparatory work in the apartment "after the builders" will be significantly less. It is only necessary to sweep away all the garbage, if any.
Then the concrete floor of the floor is preferably vacuumed and. This applies to both residential apartments and new buildings. To make holes and crevices do not increase with time, we fill them with tile adhesive. After it dries, you can proceed to the next step.
Floor waterproofing
For better adhesion of the waterproofing material to the floor surface, it must be primed. Therefore, we first treat the floor with a soil mixture and then proceed to the waterproofing.
Variants of waterproofing of a floor a little: наплавляемая, roll, обмазочная and painting. Each of them is good at its stage of arrangement.
Waterproofing the floor in the bathroom with the help of welded materials is one of the most reliable
Welded waterproofing It is used for the processing of overlapping slabs, it is executed with an opening on walls of not less than 25 cm. A concrete floor is poured on top of it, on which it is also possible to apply welded insulation, or it is possible to use more modern materials.
Rolled waterproofing It is useful for applying to walls in places where the shower or bathtub adjoins.
Painting method can be used for, but this option is short-lived. The average service life of the paint waterproofing is 3 to 5 years. Although this method is the easiest and easiest: with a brush or roller, the mortar should be applied to the floor with an allowance of 10 cm on the walls.
Lubricating waterproofing is considered the most optimal and durable in this case.
To execute it you will need:
- Prepare the mixture by pouring the dry component into the water and stirring thoroughly. The ratio of components should be 1: 1. Mix thoroughly, so that a uniform mass is obtained.
- On the entire surface of the floor, apply the mixture with a roller or brush. For hard-to-reach places, you can use a spatula or a brush. The consumption of material per square meter is indicated on the packaging, try to take it into account.
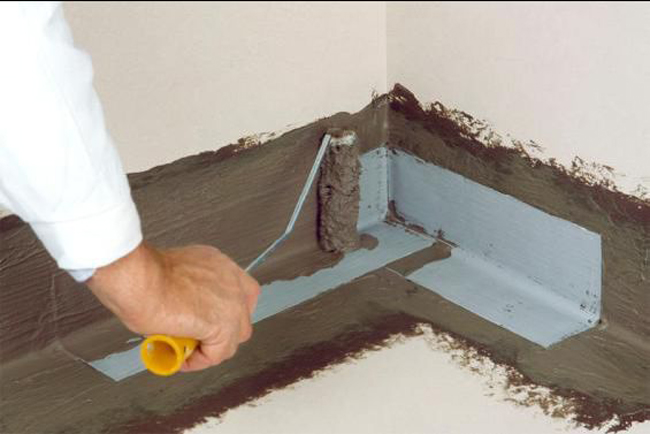
- Apply a waterproofing tape to the joints of the floor with walls and other structures.
- Coat the tape and the wall with a mixture of 10 - 15 cm up, thus forming a "trough". This will protect against seepage of water through the cracks between the walls and the floor, and also through the walls themselves. If suddenly there is a flood in the bathroom, the "trough" will be able to restrain part of the water so that it does not pour into the neighbors or in adjacent rooms.
- Mixture of waterproofing must be applied in two layers. After the first layer, take a break 4-6 hours. Then apply a second coat.
- Wait for complete drying of the waterproofing. Begin the subsequent work can only after a minimum of 24 hours.
At this stage it is necessary to stop and think: will you make any significant changes in the bathroom. About what changes, and how they affect the next stages of work, a little lower.
Constructive changes in the bathroom
Since you still started repairs and completely change the floor in the bathroom, it is possible that you want to make structural changes in the device of the room. By improving and increasing the comfort of the bathroom, it is possible to install a system of "warm floor", equip the drain for water or move to another location the toilet, if the bathroom is shared. Determine whether you will do something of the above, it is necessary at this stage, before pouring the concrete screed.
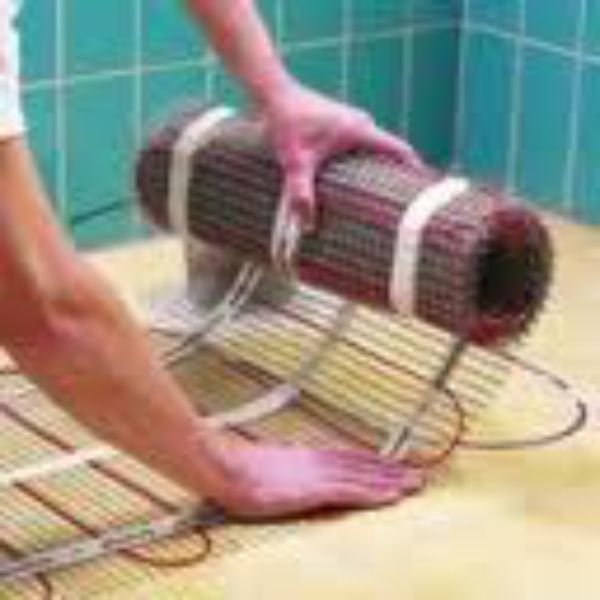
Electric "warm floor" in the bathroom is laid on top of the first layer of screed
Installation of the system "warm floor" significantly increase the comfort and convenience of staying in the bathroom barefoot. After all, tiles are often laid on the floor, and it is very cold to the touch. Especially unpleasant to tread on the tile in the morning, when only woke up and got out of a warm bed. In the bathroom you can install an electric "warm floor" and water. Contrary to popular doubts, the "warm floor" in the form of an electric heating cable can safely be mounted in the bathroom. Moreover, it is very simple to install, and leaks are impossible. But there is one very significant drawback: high energy costs. The so-called "water-heated floor" consisting of pipes that carry hot water can be connected directly to heating pipes, hot water or heated towel rails.
Water drain equipment will protect the apartment and neighbors from accidental flooding. And in everyday life, water poured on the floor, will immediately go to the sewer. In order to make a drain, the floor surface will have to be made with a slight inclination towards it. Thus the general level of a floor will rise on 10 sm a minimum. It is necessary to mount a drain and a discharge pipe, in the course of further work, the neck of the drain must always protrude above the level of the screed. For this it is worthwhile to constantly monitor, and while it can be plugged with a rag so as not to clog the pipe.
If required toilet bowl transfer, will also have to carry out a number of constructive changes. The toilet must be connected with a sewer pipe, placing it at an angle for a good flow of water. To hide this pipe, you will either have to raise the overall level of the floor by 15 to 20 cm, or equip a separate pedestal for the toilet. At this stage, it is necessary to remove the toilet bowl and lay the pipe to a new place. You can still not put the toilet seat in place so that it does not interfere.
Important! Avoid flooding the entire apartment or house, as well as neighbors, helps low floor level in the bathroom in relation to the general level of the floor in other rooms. If you do not have such a possibility, you can equip a high threshold. He will also restrain the flow of water to a certain point.
Before you pour the floor in the bathroom, you need to mount all the additional communications and know exactly what level the floor will be on. Once everything is ready, you can proceed to the screed.
Bathroom tie in the bathroom
The more level the floor is, the more qualitatively it will be possible to perform the laying of the floor covering, the more durable the floor will be. Therefore, it is necessary to approach the floor screed with all responsibility.
Align the floor in the bathroom you can cement-sand screed or a self-leveling mixture
The most common material for the leveling screed is a cement-sand mix. An alternative to it may be a self-leveling mixture, but it will not work if the floor is too uneven or has significant flaws. In extreme cases, you can use it for the second leveling layer.
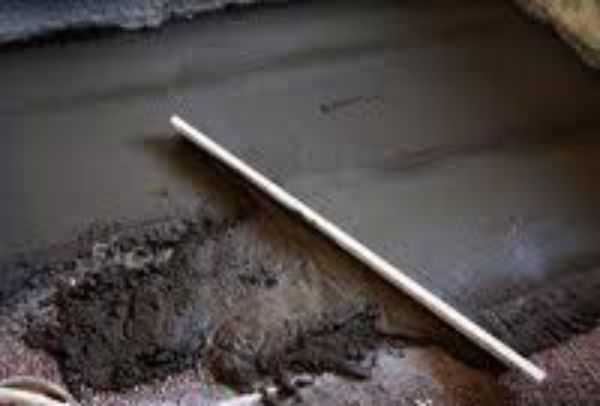
The order of execution of the concrete screed looks like this:
- On the walls it is necessary to determine the level to which the floor will be poured.
- Set beacons with an interval of 1 m. To fix them, on the floor should be expanded bugorochki cement-sand mortar, which added alabaster. On them are placed beacons and leveled on the level, guided by the marks on the wall. At the same time, slightly press into the solution.
- Prepare the mortar for the screed, carefully kneading it with a drill.
- Pour the solution to the top of the lighthouses.
- For leveling, you can use a rule of at least 20 to 30 cm longer than the distance between the beacons. The rule is applied to the beacons and stretches on itself, distributing the solution over the voids and removing the excess.
- It is very important to wait until the screed is completely dry. In doing so, observe the microclimate indicated on the package with the mixture, and avoid drafts.
For installation of an electric "warm floor" the screed must be poured in two stages. After pouring the first layer, you should wait for it to dry completely. Then decompose the insulation and spread the "warm floor". Top with a second layer of solution.
Flooring in the bathroom
The final stage of the arrangement of the floor is laying the floor covering. There are a lot of options for making a floor in the bathroom.
As an example, consider the technology of filling floor:
1. Prepare the mixture by pouring a dry component into the water and stirring with a drill with a mixer nozzle. It is important to observe the proportions indicated on the package.
Important! During filling of the filling floor in the room should be a temperature of +15 - + 25 ° C, humidity up to 80%.
2. Pour the first strip, starting from the corner opposite the doorway.
3. Align with a squeegee or spatula, adjusting the thickness of the layer.

The poured mixture is rolled with a needle roller to remove air bubbles, walking on the floor can be done in "paint jets"
4. Remove air bubbles by rolling with a needle roller.
5. Pour the remaining bands using the same algorithm.
You can use the floor after 6 to 12 hours, by this time it will already gain enough strength, but will finally dry for 3 days minimum.
Important! If the bathroom was installed with a system of "warm floor", it can be turned on not earlier than a week after the floor has been poured.
Floor coverings for the bathroom - which to choose
Variants of a floor covering for a bathroom a little. Determining what to choose, it is necessary to take into account personal preferences, budget and operational features.
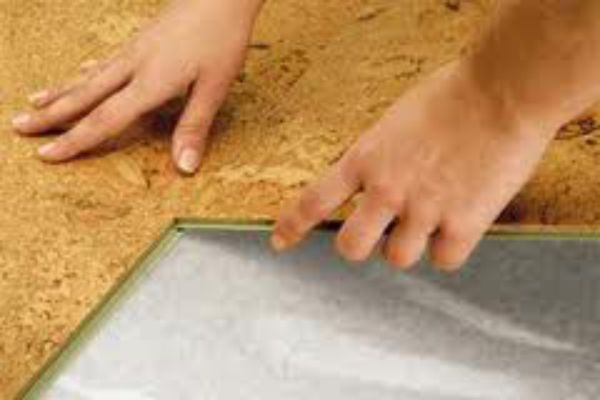
Cork floor in the bathroom - eco-friendly, pleasant to the touch and hypoallergenic
Recently, more often in the bathroom lay a cork. She really has a lot of advantages: warm and pleasant to the touch, does not rot, springs, does not absorb water, fungi do not multiply on it. On the cork floor it is almost impossible to slip, unlike tile. Under the feet of the cork is a nice spring, always returning to its original position. In addition, it is hypoallergenic and absolutely natural. But note, the ability to not absorb moisture has only an array of cork. To floors on the basis of HDF this does not apply. Therefore, choose a cork with a thickness of 4 - 6 mm, glued to the base.
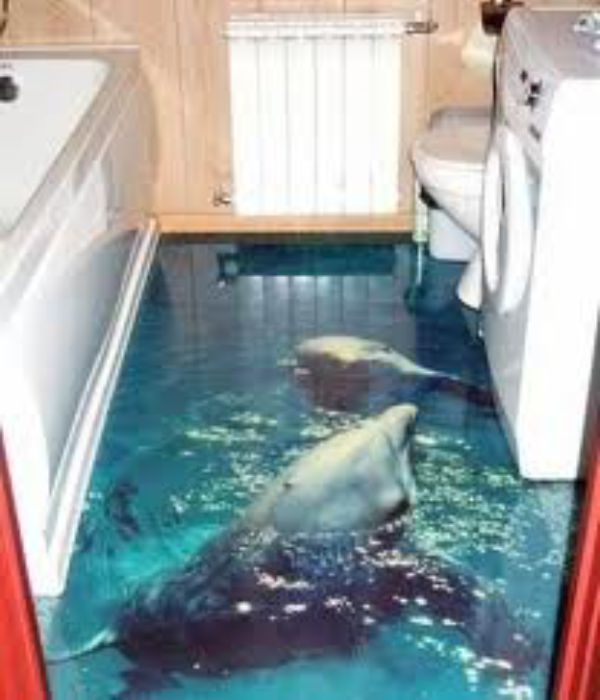
The floor in the bathroom will make it possible to fulfill the wildest dreams
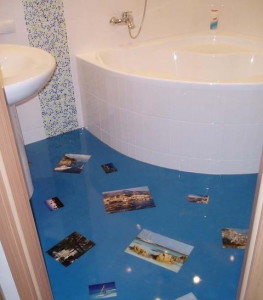
One of the simplest in the arrangement is the floor. He gained popularity just recently. Its essential advantages are: ease of installation, waterproofing properties, a variety of patterns and shades. In addition, under it you can mount a system of "warm floor". At the same time, there is an undeniable flaw in the filling floor: the freshly prepared mixture has a toxic composition and easily ignites, requires a perfectly flat base, unnatural, which feels good to the touch.
Ceramic tiles on the floor in the bathroom - classic of the genre
Still the most common and sought after material for the floor in the bathroom is ceramic tiles. And, despite the relatively complex technology of laying and the fragility of tiles, the variety of shapes and colors, as well as the naturalness of the material, tend to induce consumers to choose tiles. It does not stop even that in case of damage to one tile in the process of operation, it will be necessary to change the whole site. Because during the dismantling of tainted tiles, the neighbors are likely to damage themselves. Yet aesthetics and some tradition are more important.

Wooden floor in the bathroom - warm and cozy
Such a floor is a rarity for today, because not every wood will withstand an increased level of humidity. For a wooden floor use teak and larch, while providing additional waterproofing. Such a floor is very beautiful, healthy and warm.
Experts instead of wood advise to lay moisture-resistant laminate.
Linoleum
As a flooring in the bathroom flooring can be linoleum. It will serve as additional waterproofing, it is extremely easy to clean and apply. But has a significant drawback: quickly wiped off and becomes "unpresentable." Therefore, linoleum is used only as a temporary cover or an economy option.
Whichever flooring you choose, you know, the main task is the qualitative implementation of all previous stages of work. On a perfectly flat screed, any cover will fall. A properly made waterproofing will protect against flooding.
Many of us are accustomed to the fact that in the bathroom on the floor is installed such a finishing material as tile. But now an increasing number of owners of apartments resort to the help of a new floor covering. What is the floor in the bathroom? Read further.
1 The floor in the bathroom - advantages and disadvantages
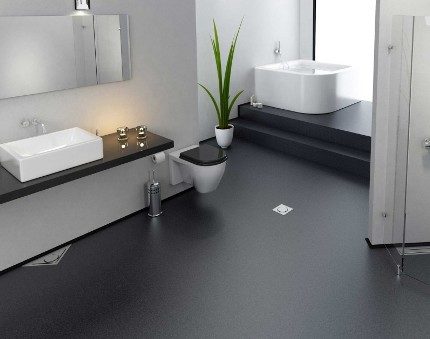
Better than tile, there can be only a new floor covering made of polymers - so those specialists who already highly appreciated the properties of this novelty believe. According to experts, the properties of such a polymer coating far surpass the familiar to all of us tile. If the usual (traditional) coatings are floored on the floor, then the filling is poured. However, the flooring is very often called "liquid linoleum" in everyday use. It really looks like a smooth and brilliant linoleum, while it, thanks to the technology of filling, goes seamlessly.
This type of flooring was used to a greater extent in domestic and industrial premises, in recent years, thanks to the latest developments and designers, and experts in the construction industry, the polymer floor has increasingly become used in apartments. The most convenient place for this is the bathroom. A big plus with this choice is that you can choose a variety of decorative finishes. The main advantages include an even surface, which does not require special care. At the same time, such a floor does not need waterproofing and is not afraid of water. From minus 35 degrees to plus 65 - this is the temperature range that this coating withstands. Installation of a "warm floor" is also not a problem. Well and one more big plus - appearance can pleasantly surprise you. Such a floor can transform your bathroom beyond recognition thanks to new decorative designs and fillers.
But as for the minuses, they also are - in order to get such coverage, you will have to work hard to prepare the surface for work. This is cleaning of dust and dirt, and priming of the surface with special mixtures, and repair of the basis of the coating, the elimination of cracks and hollow holes. Otherwise, unevenness of the floor after pouring you can not be avoided. All defects will be as in the palm of your hand. It is impossible to discount the high flammability and toxicity of the liquid mixture being poured. It is necessary to strictly observe the rules of fire safety so that polyurethane does not ignite. However, this "outdoor masterpiece" when stacking has a rather unpleasant smell and long weathering.
2 What can be a bathroom floor for a bathroom
Polymer floor can be of different types - cement-acrylic, epoxy and methyl methacrylate. For living rooms, as well as for a bathroom, you better choose a polyurethane. Others are more often used for industrial (industrial) premises. Experts are more inclined to the polyurethane coating, because such a layer is thin and environmentally friendly. In this case, the floor will be durable, and shiny, and beautiful.
As for characteristics, the thickness of the floor layer can be from 1 to 7 mm. For the bathroom, a thickness of 1.5 mm is recommended.
The colors can be completely different - both neutral monochrome and bright multi-colored. Experts will recommend you filling floors on the basis of the following considerations: such a coating will not have cracks, which means that even in a too warm and important room bacteria will not multiply. You do not need to spend money on waterproofing. In addition, such a floor is very easy to clean and keep clean, while cleaning can be carried out even with the use of abrasive cleaning agents.
Another advantage - the material does not fall apart and will not crack in a short period of time, since it is very durable, and therefore, it will be possible to use it for several decades. By the way, all the shortcomings associated with flammability and toxicity when applying the mixture, as well as a very unpleasant odor, after pouring and the drying process ends, disappear. The smell disappears, the fire resistance increases, and toxic substances volatilize. If you plan to pour the floor yourself in the bathroom, then you will have to seriously address this issue. The floor in the bathroom will require a lot of effort from you, and the first thing you will encounter is the preparation of the foundation.
The simplicity of the flooring device is stated in its name: it is enough to connect several components and fill the surface with the obtained composition, as it will turn out to be a perfectly smooth, beautiful coating. However, the composition of the mixtures, as well as the order of their preparation, affects the specifications and the decorative properties of the result obtained.
We will try to understand the technological nuances and determine whether it is possible to make the floor in the bathroom on its own, without the involvement of specialists?
Doing repairs in the bathroom or building a new apartment, traditionally use ceramics, but in recent years, such a novelty as the floor is gaining popularity.
It is universal for use in any living space, from the corridor to the bedroom, but for the bathrooms is ideal because of the following characteristics:
- exceptional water resistance;
- strength, wear resistance of all layers, no seams;
- high thermal and noise insulation properties;
- hygienic and easy to clean.
A smooth, visually brittle coating is not really afraid of any sharp objects, no hot water, no constant humidity of the air, characteristic of the bathroom.
The chemical components that make up the mixture do not harm the apartment owners, since they are safe and do not emit an unpleasant odor (in some formulations, a specific "chemical" flavor appears between the moment the mixture is prepared and completely dry)
The high cost of the material was considered a disadvantage, but now it is possible to buy budget mixes and primers, which are much cheaper than the collection ceramics.
There is a difficulty in applying layers, but with careful study of the material it becomes clear that it is not so difficult to arrange a floor in a toilet or a bathroom with your own hands, it is important to follow the instructions and observe the drying time.
Types of filling surfaces by manufacturing technology
Despite the variety of coatings from different polymer materials, the technology of pouring liquid floors is identical. The main differences relate to the composition, the formulation of the preparation of the liquid mixture and the drying time.
Let's consider the basic kinds of liquid floors (each of them has varieties).
Polyurethane
Compositions based on polyurethane are used everywhere: in production workshops, in children's public institutions, and in private homes. They perfectly "coexist" with cement-concrete screeds and adapted finishing varnishes.
The advantage of the coating is that, regardless of the area of coverage, it has no seams and is a single solid monolith. It is logical that for a bathroom polyurethane also fits, but not any of its kind. The fact is that there are two types of material:
- thin-layered;
- highly filled.
Thin-layer coatings have a thickness of not more than 0.4 mm and easily withstand medium intensity loads. They carry light bumps and, if necessary, are quickly restored, but they are not suitable for the bathroom.
High humidity leads to delamination of the material, and constant repairs in a room that is operated regularly are uncomfortable.
Higher and such qualities as wear resistance and resistance to temperature changes.

For the bathroom in the first place - water resistance, thanks to which a beautiful decorative coating in the bathroom will last 10 or even 15 years without repair
If you follow the filling instructions, observe the time intervals for drying and do not start to exploit the floor ahead of time, strength will reach a level where abrasive powders, sharp objects and aggressive chemical environments are not terrible.
This means that accidentally spilled bleach will not cause damage to the decorative coating, and the fallen scissors will not leave scratches.
Methyl methacrylate
Polymethyl methacrylate, better known as plexiglass, has been improved and has been successfully used as liquid floors. At first glance, the best material for the bathroom is not found - it serves up to 40 years, it is considered the most wear-resistant of liquid coatings.
Its strength is such that this material is chosen for the construction of garages, shops, warehouses. It easily carries overloads and is not afraid of any impact: chemical, temperature, ultraviolet.
A property that will appeal to lovers of quick repair: the process of pre-hardening lasts only 2 hours - the material dries so fast (under the conditions of pouring)
It would seem that the solution is just perfect! However, not all so simple. There are a number of technological subtleties, without knowledge of which repair can not begin:
- requires a professional knowledge of the skills of the filling floor, because the fill must be done promptly and without flaws (due to rapid drying);
- good ventilation in the bathroom is necessary - the chemical smell is not only unpleasant, but also harmful to health (for the same reason - mandatory use of overalls and a respirator);
- there are about 30 basic colors, plus toning with color and chips, but still, according to the variety of the palette and, if possible, the decoration, methyl methacrylate floor is inferior to the analogues.
It turns out that for industrial applications better option not found, but in the home, methyl methacrylate should only be dealt with by specialists.
For the experimentally decided small advice on the choice of the material: having bought the components of the domestic manufacturer, you will spend money 3-4 times less. For composites and dry mixtures manufactured in Russia, components are purchased abroad, so they are not inferior to foreign analogues.
Epoxy
The technology of pouring epoxy floors does not differ from previous ones, the difference is only in the components. The resin hardens under the influence of the hardener and forms a very strong seamless layer. The solution is usually prepared in small portions, since within an hour ready mix should be distributed over the planned site.
The drying time depends on the temperature, humidity, the set of components and the texture of the substrate.

A pattern or pattern is produced as follows: the finished image is placed on the lower base layer, then filled with a transparent or translucent, rapidly solidifying solution
For strength and durability of epoxy coatings are not inferior to polyurethane, but crystallized epoxy resin is inherent in some brittleness. For this reason floors of this category are not used, for example, in rooms where heavy equipment works.
For the bathroom, the option is suitable, since the surface of the epoxy layer does not react to the effects of chemicals and is resistant to moisture.
If you like to experiment with a decor, then epoxy resin coatings are a real find. With their help, you can implement a wide variety of designs:
- monochrome contrast patterns;
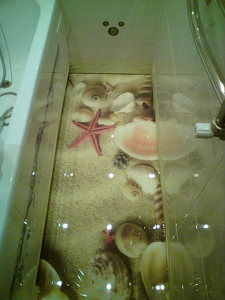
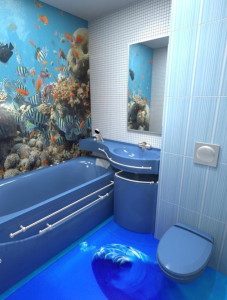
- 3D coatings with images of marine animals, floral cascades;
- imitation of precipice, waterfall, cloudy sky;
- jewelry macro decor;
- colored fillings with chips;
- neutral glossy and matte coatings.
A variety of shades is reflected in the color charts and RAL tables, which are attached to the products of a particular manufacturer in the form of folders and fans.
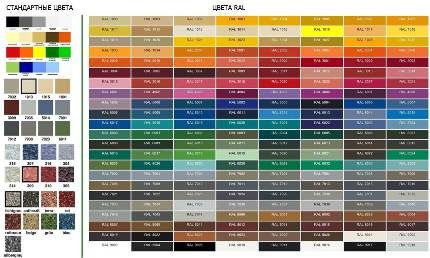
Approximately 15-30 colors are usually declared as standard, but by mixing the base with the color you can achieve exactly the shade that you need
Self-leveling floor: brief instructions
It makes no sense to give a general instruction on the device of liquid floors, because, depending on the components, the order and conditions of filling may differ. For the sample, we describe the process of creating an economical filler coating that quickly solidifies and is universal.
With one version of the device flooring can be found here:
Selection of materials and tools
As the main material for filling the floor in the bathroom we take a one-component dry mix "Leveler Express" from the company "Volma", which serves to level the concrete floor and is an excellent basis for styling ceramic tiles or a decorative polymer coating device.
You can choose a cement or gypsum option, in both cases, the mixture will include synthetic modifying fillers and binders that allow the solution to "self-level".
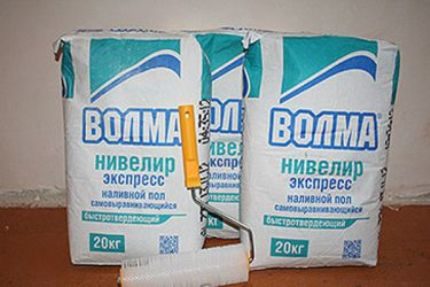
The cost of one bag is 4,5-5 $, which is cheaper than analogues of foreign manufacturers (Ceresit or Knauf). For bathrooms typical urban housing will require 3-4 bags of dry mix, that is, the main material will cost no more than $ 20
Characteristics of the mixture:
- the width of the working layer is 8-10 mm;
- bond strength - 2 MPa;
- the initial setting period is 5-6 hours;
- time of full maturation - 7-10 days;
- packing - kraft bags 20 kg.
In addition to the dry mixture, a primer (for flooring, deep penetration) is required, and if this layer is planned to be made sole - the final fixing coating.
Instruments:
- a vacuum cleaner;
- solution tank:
- a drill with a mixer nozzle;
- brush or roller to distribute the primer;
- wide mortar spatula;
- needle roller with telescopic handle.
How to calculate the consumption of the material? With a layer thickness of 10 mm per 1 m², 12.5 kg of dry mix is required. Suppose that the area of your bathroom is 4 m², which means 12.5 x 4 = 50 kg. Therefore, you will have to buy 3 bags "Level of Express".
Surface preparation
Often, the concrete cover in new and old houses is uneven, covered with cracks, so the surface of the floor must be thoroughly cleaned.
To do this, remove construction debris, expand the cracks (if any), mask large grooves and holes with cement mortar, grind a relatively flat surface, and afterwards - vacuum cleaner. Self-leveling floors like a perfectly clean and smooth base: the smoother it is, the less the layer of solution and the better the coverage.
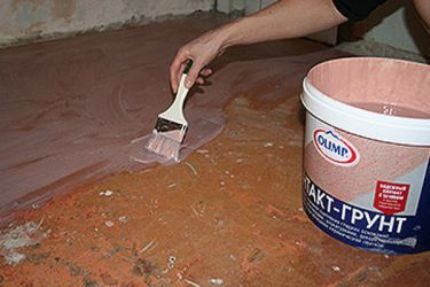
When choosing a primer, be guided by the manufacturer: materials of the same brand are better in contact with each other, which affects the strength of the coating
One of the nuances of the technological process of the device of any multilayer coating is the drying period. Priming, as well as the main material, takes time to completely dry (indicated in the explanation on the package).
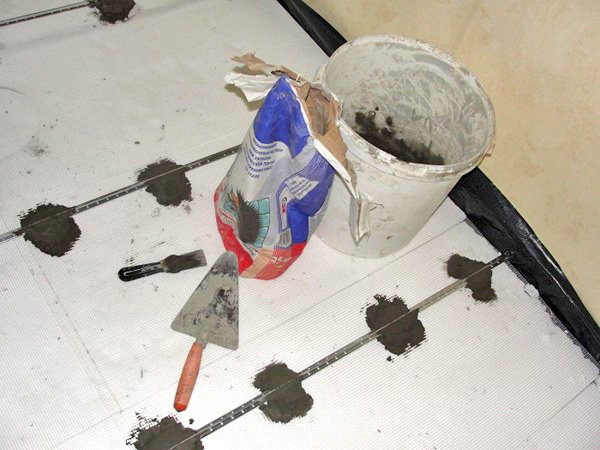
To dilute the mixture it is better to take water at room temperature, hot use is not recommended, since the pour time will dramatically decrease. The amount of water depends on the volume of the mixture, approximately 20 liters, approximately 6 liters of water are needed. If you prepare the solution in parts, then water, respectively, need less (10 kg - 3 liters, etc.).
The bathroom of a large area is better divided into technological zones, as it is unlikely that you will have time to fill the entire surface immediately.
In the container (a bath, a basin, a tank) we pour water, and then gradually, not one portion, we fall asleep the necessary volume of a mix. The technology involves mixing twice. The first time in 5 minutes after the dry powder completely absorbs water, the second time - 5 minutes after the first mixing.
It is necessary that all components, including fine fillers and plasticizers, are dissolved.
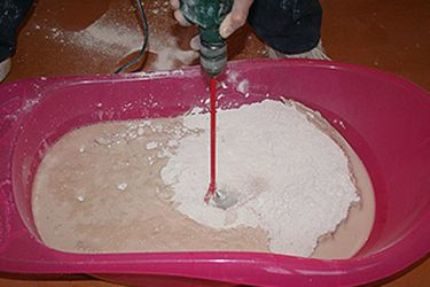
To mix the solution, a construction mixer or a drill with a special nozzle is suitable. Homogenization provides only a thorough mixing of components, so the "stick" that lovers like to use is not good enough
There is a practical way to check the optimal density. One liter of the solution is poured onto the floor - if a circle with a diameter of 0.5-0.6 m was formed, then the mixture is prepared correctly.
Filling order
Despite the fact that the mixture is self-leveling, it can be "helped" with a wide spatula, distributing the composition along the length and width. This method helps to control the thickness of the layer, making it optimal (up to 10 mm).
If the room is large, an assistant will be needed, due to which the pouring time will be halved: one prepares the solution, the other distributes it over the surface.
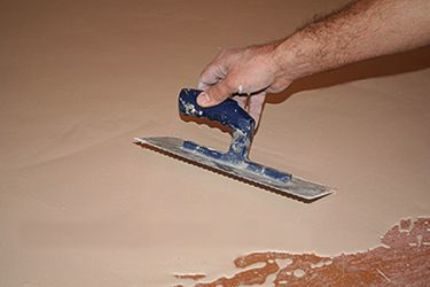
If the surface does not immediately get smooth, do not try to level it with a spatula to the ideal state - after a few hours, when the whole room is flooded, the solution will be leveled out on its own
We apply the solution squares or stripes along a long wall, as a result, individual fragments merge and form a monolithic coating. However, work should be done as quickly as possible, since the homogeneity of the mass is a pledge of an attractive appearance (which will be necessary if the floor is left without ceramics).
To expel air bubbles from the solution, use a needle roller with a long handle.
The larger the area of the bathroom, the wider the roller, for a typical bathroom a 20-30-centimeter tool is sufficient. The length of the studs depends on the thickness of the working layer
It is possible to level and fill the finished solution for an hour, until crystallization occurs. If there are no special skills, better prepare the mixture in small portions. Make sure that windows and windows are closed in the whole apartment, otherwise the floor surface will be covered with small cracks from the draft.
After about 4-5 hours the bulk floor you can walk, 2-3 days later - laying ceramics, and for installing laminate and linoleum it is better to wait about a week. With the installation of heavy furniture and sanitary ware is also better to wait.
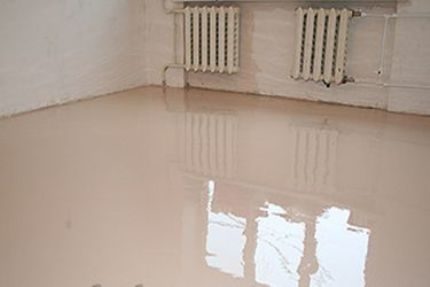
The finished result - the bulk floor "Volma" - looks presentable and without further processing, so when small area bathroom can completely do without decor or clothe solution under the color of the walls
Time to dry: is it worth adjusting the process
The quality of the floor for the bathroom depends on the filling rules, among which is the drying time of each layer.
If you take into account the general factors, then for a period of complete drying affect the temperature and humidity in the room, the presence of drafts and sunlight (if the bathroom has a window), the type of solution, single or multi-layer, the thickness of each layer.
It is necessary to distinguish the time necessary for the ability to move around the freshly-ground floor, and the period of complete drying-there is a considerable gap between them.
The principle is the same as for the device cement screed: a layer 10-15 mm thick already within 5-6 hours without deformation can withstand the weight of a person, but full availability only occurs on the 4th-5th day.

Filling 3D floors are powerful only for professionals, so beginners are better at experimenting with a lighter decor. For more complex design, we advise you to contact specialists
Speed up drying does not make sense, and the opportunity is not provided. Methyl methacrylate mixtures and so crystallize very quickly - after 1.5-2 hours, and the remaining types of solutions must "mature" in a natural way, even if the process takes several days.
Otherwise, the coating will lose its most important characteristics - strength and durability. If you need an urgent repair, we recommend quick-drying mixtures.
Drying conditions:
- air humidity - 60-65%;
- air temperature - 22-24ºC;
- no drafts (doors and windows must be closed);
- protection from ultraviolet radiation;
- compliance with the thickness of the layer.
These averaged figures and rules, the instructions for dry mixtures and composites indicate the exact parameters, and they need to be followed.

The table shows the approximate drying time of the mixtures in the cement and polymer base - from 2 hours (possibility of walking) to 4 weeks (full availability)
If you purchase the necessary mixtures, carefully study the instructions and fulfill all the conditions of pouring, in two weeks in your bathroom there will be a beautiful floor in the style that you prefer.
When repairing the floor screed in the bathroom is a very important stage. Especially it concerns old type houses. How to fill the screed with a tile? Thanks to the screed in the bathroom, you can achieve the best load distribution of plumbing and furniture on the floor. And the impact of small leaks can be minimized.
Substrate preparation
People who believe that before you fill the floor, you just need to remove the old floor, are mistaken. Removing the rough floor is just the beginning of the floor pouring process. Fiber of old screed and disposal of garbage in the process repair work - the easiest, with what you can encounter during repair. The entire process of replacement and installation of the screed consists of a number of works, one of the most important of which is waterproofing. It is carried out after dismantling the old floor and thoroughly cleaning the base.
All even the smallest mote must be removed. Then all communications are put in and all the cracks are covered, if any.
Preparing the floor for screedThe prepared surface should be flat, as well as the layer of the laid screed, otherwise it may crack over time, which will lead to a lot of additional hassle.
Waterproofing the floor, made of high-quality materials, will eliminate the risk of flooding neighbors with the slightest leakage for years to come. Some people assume that installing a waterproofing is sufficient for laying a polyethylene film. This is fundamentally wrong! This material is waterproofing for a couple of years, after which it is gradually eroded by cement, which will be contained in the screed. Therefore, to avoid water leakage to neighbors, waterproofing should be carried out using roll materials and bitumen mastic.
 Tools for floor screed
 Step-by-step actions how to implement:
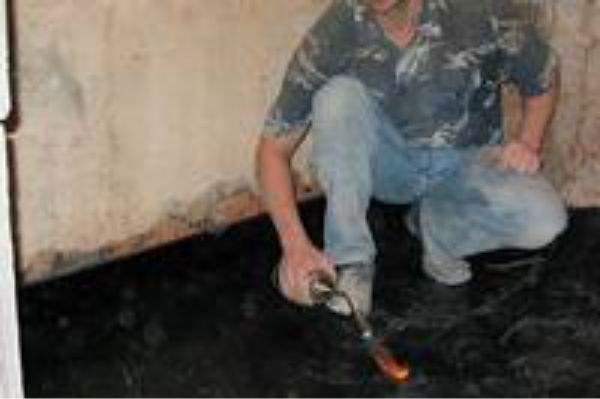
- first clean the slabs - then ground them;
- on each side a wooden beam or a special T-shaped profile is required, forming a beacon. Each wooden or profile beacon should be evenly arranged according to the level of the screed height. All lighthouses can both be left and dismantled before installing the screed. If there is a desire to leave them - every wooden bar is treated with means against moisture and rot, and metal - with anti-corrosion;
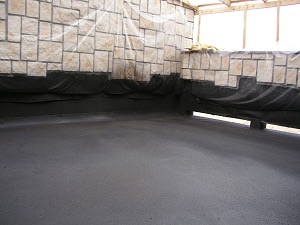
- then a layer of bitumen or other waterproofing material is laid on the slabs. Can be used roll rubberized waterproofing;
- covering the floor waterproofing material, they should be treated with about 15-20 cm of walls so that visually the waterproofing layer creates a semblance of a "trough". Especially carefully should work out the area of the risers and ceilings.
 Waterproofing the floor before the screed tile
 | Types of waterproofing | |
| Material | Application |
| Cement and polymer | This universal mixture is used for waterproofing the roof and floor. Only the use of combined compounds today has practically replaced the use of cement-polymer materials. |
| Bitumen | One of the most economical materials for waterproofing. It has been used since the time of Soviet construction. Cold type of waterproofing is better not to use because of contact with alkali concrete. The use of hot bitumen is more appropriate in pouring the bathroom floor in a private house than in an apartment because the finished material can be heated to 160 ° C. |
| Bitumen and polymer | Thanks to latex fillers and plasticizers, the mastic perfectly adheres to the concrete. In this case, this type of waterproofing is very strong. |
| Acrylic | This type of water-based waterproofing has no unpleasant odor, is ductile and durable. Also, it does not collapse under the influence of concrete and has a special durability. |
 Particular attention during waterproofing should be given to the corners
 It is worth noting that the floor screed in the bathroom can be of several types, but in any case the main components will be:
- water;
- sand;
- cement;
- crushed stone;
- for strengthening - perlite, expanded clay.
For the floor in the bathroom can be used wet, dry or half dry screed, each of which must be flat. Therefore, before it is poured it is very important to set up the lighthouses correctly.
Beacon Installation
The correct installation of lighthouses and floor screed in the bathroom is good because final stage the floor is absolutely smooth, so the costs of tile adhesive are minimized. Lighthouses in most cases can be installed using a two-meter lath level. Lighthouses are installed in slides along the wall with a step of about half a meter. They are pressed into the solution, controlling the level of the position. All beacons are set equally with respect to the first. Between the first and the subsequent should be formed a clear horizontal.
 Beacon Installation
 If the coupler needs to be poured onto the foam, then it is cut out at the locations of the lighthouses. Otherwise, the beacons will not be able to be set evenly on the level, so laying the tile will be much more difficult.
Be sure to make sure that the thickness of the screed is not less than half a decimeter. This is especially important if it is poured over foam - its thinner layer can quickly crack. Checking the height of the installed beacons, which is measured from the plates to the ceiling, you can install metal or wooden beacons, and then proceed to pour the screed, the technology of which you should also know.
How to make a screed depending on the type
There are several types of screeds, differing in the way of arrangement, used materials.
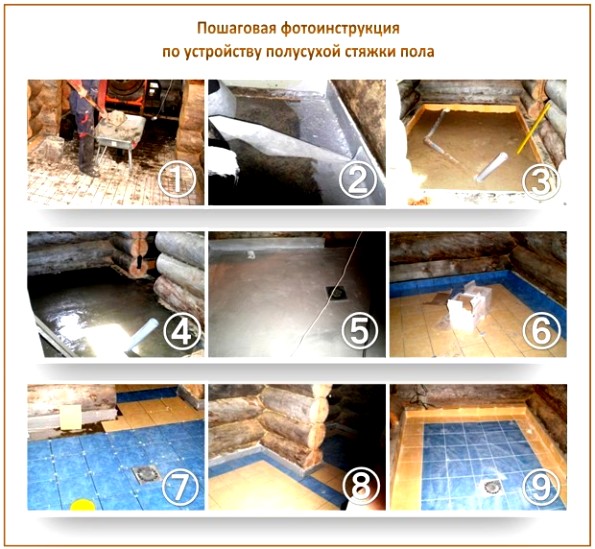
Semi-dry
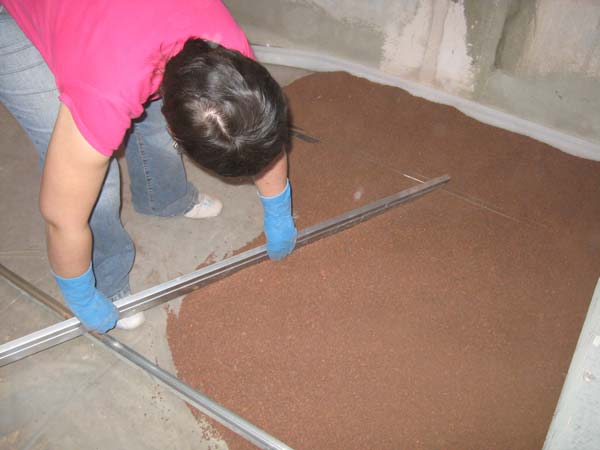
In the manufacture of semi-dry screeds it is desirable to use special aggregates, by means of which an additional reduction of the load on the floors in the bathroom is carried out. In comparison with a wet screed, it costs more, but it dries much faster. First mix the mixture, distribute it on the floor, and after it has dried - rubbed to remove all the irregularities and bumps.
 Semi-dry screed
 Before you start pouring the screed, you should calculate everything in such a way that the height of the floor in the bathroom does not exceed the height of the floor in other areas of the living space, and was even slightly lower. It is equally important to correctly calculate the necessary amount of materials for the preparation of the solution. If the cast concrete is to be poured, then it is safe to use a proportion of 1 part of cement to 4 sand. In the case of pouring the prepared solution over the foam, the ratio will be 1 to 3, where 1 part is cement and 3 sand.
The resulting solution is poured into the prepared area and leveled with a level. Each time, a strip after a strip, the solution is poured and leveled until the required height is obtained. After it, you need to let it dry for at least a day, after which - remove the guides, and fill the empty places formed with cement mortar. For pulling lighthouses it is better to use wide shields. They contribute to the gentle extraction of lighthouses, as a result of which the floor will not crack.
Then the screed is cleaned until the whole surface is perfectly even. After it is covered with polyethylene to reduce the rate of water evaporation and increase the concrete strength, it is allowed to dry. On the floor it is better not to walk for at least a couple of days. After completely drying the floor, you can start laying the tiles.
Wet
Wet - perfect solution for rooms with high humidity. Before choosing this type of flooring, it should be noted that the thickness of the wet screed is at least 3 cm. Therefore, dry or semi-dry couplings are preferable to wet if the bathroom has low ceilings. The advantage of a wet screed is the possibility of applying a waterproofing layer under it and over it. Under it, you can arrange a layer of thermal insulation.
 Wet screed
 In the manufacture of cement-sand mortar, one part of cement is required to 3 parts of sand. For hardening in the solution, you can add a bag of glue mixture for the tile. The finished solution should not be excessively flowing. Pour better to do in 1 approach, given that you can grasp the solution for an hour, after which it will be very difficult to level the floor surface. Filling is carried out layer by layer, each of which in some areas should be pierced with wire to release the collected air.
The next day, you need to remove the beacons, fill the empty space and align with the grout. Therefore, it is better to use a drywall sheet or chipboard to form reference islands. When the screed is dry, it should be polished with a Bulgarian. It is worth noting that it can dry for a week, and to accelerate the drying process is highly discouraged. To improve adhesion and adhesion, it is best to ensure that the humidity in the room is high. Within a month there should be no drafts in the bathroom, they, like overheating of the floor, lead to microcracks.
Dry
Dry screed requires special care. This is due to its gradual cracking due to constant contact with moisture. Therefore, in the bathroom it is extremely rare. Consumption of consumed materials is also much higher than with other types of screeds.
Dry screed is carried out in several stages. First lay layers of crushed stone and expanded clay, then cover with the mixture itself and moisture resistant materials. It should be noted that the dry screed has several advantages:
- it does not require a lot of effort;
- from her, in the bathroom and in the whole apartment, there is only dirt remaining;
- there is no need to cover with additional materials, you can immediately lay the tile.
Before filling, prepare the floor, fill the cracks with cement, and then apply waterproofing. Be sure to make sure that during the laying the water does not fall on the screed. If it is laid on a wooden floor - it is worth using cellulose paper impregnated with bitumen. The waterproofing layer should not be much higher than the level of the screed. For cushioning, heat-resistance and noise insulation, foam polyethylene can be used, the thickness of which is equal to the thickness of the screed, or mineral wool.
 Dry screed
 The main material of dry screed can be sand from expanded clay. With the help of rake or rule, it is evenly distributed throughout the area. The thickness of poured claydite should be below the level by 20 mm. Further, the beacons are installed and proceed to leveling the surface from the far corners to the entrance door.
Next, mount gypsum fiber sheets (they are stronger than plasterboard), their laying starts from the entrance door. To fix them among themselves, use a seam edge and glue. Fix them with screws with a step of 50 mm in all places of joints. Then give to stand screed for 24 hours, install an additional waterproofing layer and proceed to finish and lay tiles.
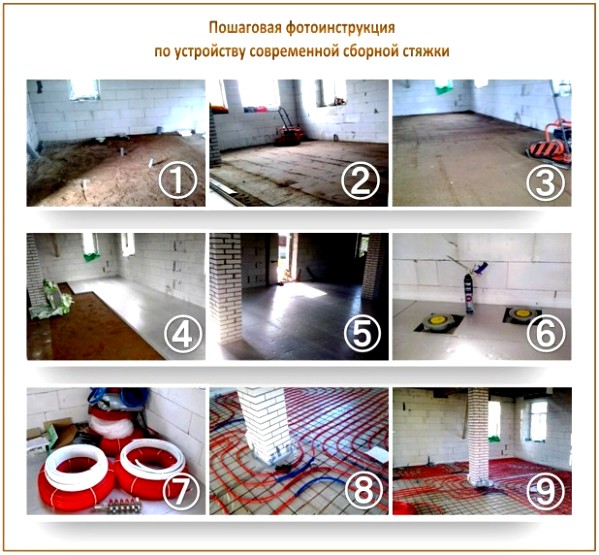
National team
For the assembly screed you can use:
- gypsum-fiber sheets;
- plywood;
- oriented particle boards.
The assembly screed is installed only in a room with low or moderate humidity and at a temperature of at least 10 o C.
When assembling the assembly screed, the different slabs or sheets are laid in 2 layers on top of each other with offset joints. All the plates are fixed with glue and screws. Plates should be laid in such a way that between them and the walls there was a gap of up to 2 cm, filled with edge band.
Make a team screed in several stages. First lay the waterproofing layer, pour the expanded clay, rammer, level and lay one layer of sheets or slabs. Shift joints should not exceed 25 cm.
Each sheet of 2 layers is covered over the entire area of the glue, laying at least 25 cm offset with respect to 1 layer. Glue mastic can be used as a glue for gypsum-fiber materials. All sheets of 2 layers are fixed with screws. Then the joints are shpaklyuyut and primed. If tiled layers are laid, an additional waterproofing layer of pergamina should be laid between them and sand.
Floating
Floating type screed called independent. It is rigidly attached to the base and adjacent surfaces. The technology of installation of such a screed is simple, therefore its installation does not take much time. Thanks to this screed, heat is stored in the room and sound is isolated. Its leveling layer is practically not deformed.
It is advisable to mount such a screed with:
- installation on the soil of the rough layer;
- frequent contact with water;
- humidity and temperature changes, which often occur in the bathroom;
- installation of "warm floors";
- the desire to exclude the damage to the floor at a constant load on the coating.
When installing, first prepare the substrate by cleaning and washing it. When all defects are found, they are removed by filling with cement or polishing. Next, the floor is treated with antiseptics and begins to mark the screed. After the level of insulation and cement-sand mixture along the walls, 2 horizontal lines are carried out, which will help for perfect alignment of each layer.
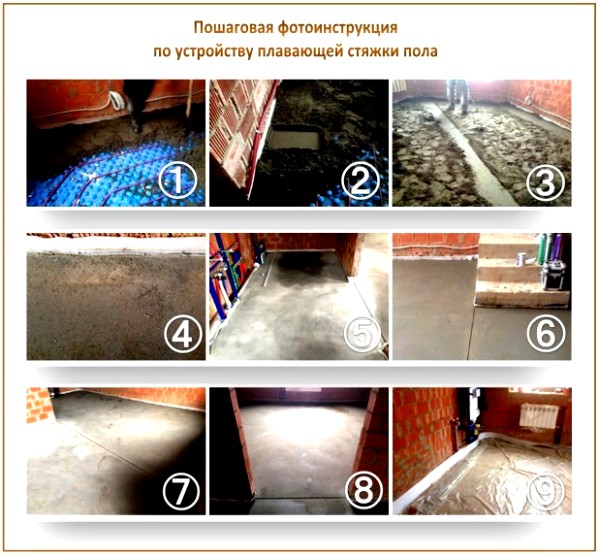
Waterproofing is best done with bitumen mastic. The material used must go to the wall. Further along the walls is installed a damper layer from the roll insulation. For sound insulation on the floor, it is possible to lay a foam plastic, sealing joints with adhesive tape, or pour claydite crumb. For reinforcement use reinforcing bars or metal mesh, distributing in the center of the floating layer. Further, the beacons are installed and the base is cemented.
After poured screed. The proportion of cement with sand is 1 to 4. To this mixture, to impart plasticity, it is better to add plasticizers. After pouring the mass, it is leveled. Then, to reduce evaporation and uniform drying, it is covered with a film. Each "penny" on the screed should be leveled, and after all its area.
Solid
It is better to make a continuous screed from a self-leveling mixture, however, gypsum or cement-sand is also suitable. If it is necessary to fill it in a bathroom with high humidity or in a private sector - experts recommend using cement sand in the proportion of 1 to 3. If you observe all proportions, the filled mass quickly dries will be strong and smooth.
With the help of such a mixture, it is possible to eliminate all irregularities reaching a height of 200 mm. The shrinkage of such a screed is quite long. It should also be noted that concrete floors are always cold, so when pouring cement-sand mixture it is desirable to lay heat-insulating layers. Pouring a continuous screed is recommended in the apartments of new buildings.
A continuous type of screed is considered one of the most common. Her production is as follows:
- first mix sand with cement;
- then water is added to the mixture until a characteristic "flop" is formed, however, it is impossible to overdo the liquid, as this can greatly affect shrinkage, leading to the formation of cracks as soon as possible;
- the resulting mass is poured onto the previously prepared floor and leveled.
Installation of screed on wooden floors
An unbonded screed is installed on the wooden floor. For its preparation, a compacted film, cement M400, plasticizer and sand will be required. First, epoxy fillers or cement fill slits and cracks, joints are sealed with silicone. The prepared wooden floor is treated with a waterproof primer. On a wooden floor, regardless of the type of screed, it is better not to lay heat-releasing coatings and "warm floors" in order to increase the level of fire safety.
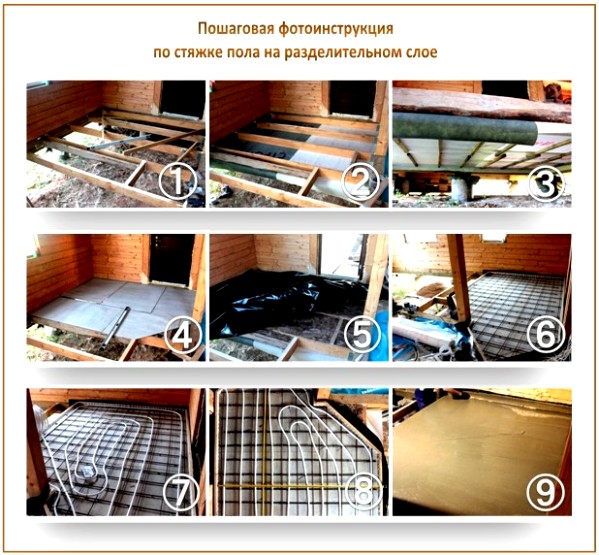
After that, a plastic film should be placed on the wooden floor. All joints should be pasted with adhesive tape. The material to be laid must be larger than the floor area in the bathroom, at least 7 cm on each side for allowances. After the beacons are exposed and the reinforcement is laid from the metal expanded mesh. Then, pour the solution and evenly distribute it throughout the area. The height of the screed must not be less than 50 mm.
What you need to consider:
- since the type of screed is unconnected, it must be very heavy;
- instead of the film, another waterproof material can be used;
- before pouring the screed onto the wooden floor, make sure that the film is tightly fastened;
- if there is a desire to lay a tile on a wooden floor using a screed - it is better to refuse this idea. Instead, it is better to cover the floor with a waterproofing or pergamon, then with DSP sheets, with a fiberglass or metal mesh, then prime and glue the tile using a special tile adhesive.
If you want to fill the screed on a wooden floor - to give a mixture of strength and plasticity, plasticizers should be used. Another advantage of this material is that it contributes to an additional reduction in water permeability. After pouring the screed it will be necessary to let it dry for at least a couple of days.