Can an ordinary house-master build the roof of the house with their own hands? At first glance, the task seems rather complicated, but after training at my own dacha, I realized that everything is real. I will show you step by step and tell you how to make a roof with your own hands, from which nodes it consists and what roofs in private houses in general are.
Briefly on the types of roofs and common terminology
Before making a roof, you need to understand what structures exist and what are called their main elements. Otherwise, you will not understand anything in the special literature, plus it will be difficult for you to talk with sellers in a store or on the market.
On what design it is better to stop
| Types of roofs | Short description |
 | One-run. The simplest, affordable and economical in terms of materials option. The problem is that for medium to large houses it does not fit. More often saddle roof mounted on garages, barns and other outbuildings. |
 | Gable or gable. Traditional and quite comfortable design, which is suitable for any home with a rectangular or square "box". Now more than half of the owners of private houses and cottages choose the gable roof. |
 | Shatrovaya. The hipped roof looks like a tetrahedral pyramid, consisting of isosceles triangles with a common apex. Now it is rare, the main reason lies in the complexity of the beam-lingering system on which this design is based. |
 | Four-stop or hip. This design is also based on the beam-lingering system, but is more common than the hipped roof. Fans for these types of roofs should not be taken. |
 | Semi-Walm. In the classical version, the half-roofed roof is no longer used. The construction is collected by a gable saddle pattern using puffs and bent up "fillets". |
 | Multiscate. Of all the existing multi-pitched roof is considered one of the most complex structures. It is installed only on buildings with an "original" layout or houses with several annexes. With such roofs only high-class professionals can work. |
 | Mansard. This type of roof in popularity is only slightly inferior to the gable construction. People are attracted to a residential attic. With your own hands mansard roof You can build it, but you need some experience, so it's better to start with gable roof. |
Analyzing the popular types of structures, I realized that for an amateur, the best way would be to install a gable roof.
General terminology

- Ribs - all the outer corners and bends, except for the upper edge, are called ribs;
- Valva - the front plane in the multi-pitched roof;
- Endowa - the internal angle between adjacent planes on roofs with several skates;
- The horse - the upper edge of the roof, on which the skates converge. There is no skate on the tent and single-deck construction;
- Dormer window - a small triangular or spherical tie into the roof slope with a window frame inside. Mounted more for decoration, the functional load on the auditory window is small. Fans with such designs are better not to mess with;
- Cornice overhang - this is a section of the lower part of the roof, more precisely all that is outside the wall. It is to the edge of the cornice that the rainwater is attached;
- Gable - vertical sector on the facade of the building located between the roof slopes;
- Fronton overhang - lateral inclined section of the roof plane.
Now let's look at the inner structure of the roof.

- Mauerlat - The support beam, which is mounted on the walls along the perimeter of the house box, it can still be called the foundation of the roof. Section depends on the weight of the roof and the dimensions of the house, most often it ranges from 100x100 mm to 200x200 mm;
- Rafter Legs - almost the main element of the design, on them and keeps the whole roof. In the gable roof they join at an angle and form a stable isosceles triangle. For medium-sized houses, beams 50x150 mm are taken, and in large houses 100x150 mm or 100x200 mm;
- Rack - a vertical beam supporting the rafter's legs. Can be based on ceiling beams or lezhnyah;
- Lying Down - this is a kind of Mauerlat, only sets are not set on the perimeter of the box, but on the piers of the big house. These elements are used only in the "stacked" system, which I will mention later;
- Tightening or bolt - a horizontal beam that connects two adjacent rafter legs of a gable roof and forms an isosceles triangle with them, thereby increasing the strength of the entire structure;
- Run - installed in the case where the tightening is not installed on all rafters. Runs are needed for additional support for rafter legs and save the forest;
- Ridge bar - (in this scheme it is not specified) is mounted horizontally and is installed at the top of the gable roof immediately below the junction of the rafter legs or between the rafter legs.
Preparation and installation of a gable construction
At the stage of preparation, you make a calculation of the rafter system, draw a sketch or drawing, after which you purchase the material and prepare the instrument.
Calculation of the roof
The first thing you need to know is the angle of the roof plane. All pitched systems are divided into 3 types:
- Flat roofs - in them the angle of inclination does not exceed 5 °. AT residential buildings practically do not occur;
- Roofs with an average gradient - here the bias should be from 5º to 30º. Well suited for steppe areas, where strong winds and little snow;
- Roofs with a steep slope - they include all the slopes with a slope of more than 30º. These roofs are placed in areas with snowy winters, because the steeper the slope, the faster it will snow.

As for the calculations themselves, it is necessary to divide the height of the roof from attic floor to the ridge, half the length of the span along the horizon. If you want to get the value in percentage, multiply the result by 100%.

| Illustration | The difference of the nasal system from the suspended |
 | Suspension system. Rafters in this system are installed only on the Mauerlatt between the bearing walls. If rafters are supported by posts, the posts are attached to the ceiling beams. |
| Layer system. This system differs from the suspension system in that the racks supporting the rafters are based both on the bearing walls and on the walls inside the house. |
Tools and materials
From the tool you will need:
- Ax;
- Hand Hacksaw wood and metal;
- Chainsaw or an electric saw;
- A hammer;
- Plane;
- Drill;
- Screwdriver;
- Set of locks.
- Roulette, level, plumb.
It is desirable to bring down from the boards at least 1 stand for work at a height, popularly known as the "goat".

Materials:
- Beam under the rafter feet - the most common section is 50x150 mm;
- Mauerlat beams - You can take a solid bar or collect it from the material under the rafter's legs. In both cases, the price is approximately the same;
- Tightening bolt, runs and racks - I took a bar of 50x50 mm, but you can use rafters 50x150 mm;
- Bars for counter battens - standard section 30x40 mm;
- Roofing board for roofing - selected for roofing material, the most common option is an unedged board;
- Metal studs with thread and nut to them - section 12-14 mm;
- Mounting brackets and plates - Sold ready with holes for self-tapping screws;
- Self-tapping screws
- Nails - in the range starting from the length of 50 mm and more;
- Staples, metal - made of reinforcement or rolled products with a thickness of 10 mm.

Mounting the Mauerlat
| Illustrations | Operating procedure |
 | Arrangement of block basis. If the house is blocky (brick, cinder block), then under Mauerlat you need to pour a concrete reinforced belt over the wall. The height of the belt is 250-300 mm, the width of the belt is equal to the thickness of the wall. Do wooden formwork, put inside the reinforcement cage and fill everything with concrete. |
 | Bookmark the hairpins. Even before the concrete is poured, it is necessary to vertically install a series of threaded studs or simply pieces of reinforcement in the center of the future bundle in steps of 0.6-1 m. Mauerlat will then be attached to them. In the houses of aerated concrete the reinforced belt is poured directly into the interior of the U-shaped shaped gas units. |
 | Mauerlat in wooden house
. In wooden houses Mauerlata as such is not present, its function is performed by a bar or log of the upper strapping. |
 | Align the base. Under Mauerlat the base should be perfectly even, if at first you missed this moment, then before laying it will have to be leveled. The basis can be leveled with a cement-sand mortar or glue for gas blocks (the glue is used in houses made of aerated concrete). |
| We equip the waterproofing. The beam should not directly contact the concrete, so before laying the Mauerlatt we cover the roofing material on top, preferably in 2 layers. |
|
 | Installation of timber. Drill holes in the Mauerlat under the studs embedded in the wall, put the bar on the studs and pull it to the wall. At the top, place a wide washer and tighten the bracket. The one-piece cantilever joins the half-tree, that is, you make the cut-out as in the photo, join the two sectors and pound 5-7 long self-tapping screws or nails on top. If the Mauerlatt is recruited from the rafters, they are simply laid back and sealed with screws. |
 | Mauerlatt. There are times when the Mauerlatt is recruited from pieces of overlap between the beams, but the strength of such a structure is much lower, plus anchors on the fastenings you will take 2 times more. |
 | Wood processing. Absolutely all the wood that goes to the roof construction needs to be treated with antiseptics and fire retardants at least 2 times, otherwise the roof will not last more than 10-15 years, then it will be eaten by bugs. |
 | Moisture of the tree. You can not make a roof from a freshly scraped forest, during the drying process under load, beams and boards may lead or they will begin to crack. To reduce costs, you can take a freshly cut forest in advance and put it in piles under a canopy, for a season the wood will dry, the order of installation is shown in the diagram on the left. |
Installation of rafter structure
| Illustrations | Operating procedure |
 | We install the outer rafters. The first are 2 triangles at the edges. So that they will not stagger, I strengthened both triangles with a temporary stand and a diagonal support. In addition, I also fixed the temporary vertical stand with two boards diagonally. |
 | Starting fastenings for rafters. On the Mauerlat I installed and fixed metal corners bars 50x150 mm. The bars are cut at an angle of inclination of the roof.
|
 | Fixing rafters from below. As the rafter legs are installed, the base of the beam is clamped with the same emphasis and is fastened with screws. Later I plan in addition to self-tapping the whole of this construction with a through-hole stud of 12 mm. |
 | Additional fixation. In principle, such fasteners are sufficient, but I decided for certain to support the bottom of the truss leg with triangles. |
 | On the extreme rafter triangles, I put two metal corners from inside. On the outside, a metal lining is screwed, and then the gable will be covered with a 25 mm board and siding on top. |
 | Gain. In addition, 1 m from the Mauerlat to the outer rafters, I secured additional prop struts. |
 | Ridge bar. From above I let go the skate beam, for this I fixed on the rafters 2 pins (crossbars) with a gap of 150 mm, between them I inserted a bar and fixed it with metal corners on the screws. |
 | Build. The ridge beam was longer than the rafter's leg, so it had to be increased. I on each side attached 2 pads of the same beam and pulled it all from both sides with 12 mm studs. |
 | Fixing rafters from above. The rafters have turned out to me at 6 m, and the whole span is 7 m wide. At the top point the load is solid, especially in the extreme triangles, so I cut out steel sheet a 5 mm thick lining, drilled them and pulled them together with five pins. |
 | Fastening of puffs (crossbars). Intermediate crossbars on the outer rafter triangles are inserted inward and fixed by metal plates on both sides. |
 | Hairpins. All the other truss triangles are fastened together by two puffs (after tightening from each side). On the rafters, the tightening torques are fixed with two pins and four screws. |
 | We pull the cord. After the final installation of the extreme rafter triangles, a string is stretched between them. This landmark will help us put all the other rafters in one plane. |
 | Landing of rafters. In my case, each rafter at the point of connection with the Mauerlate was clipped, as shown in the photo. But this is not the only way to connect the rafter with the Mauerlate. |
 | Variants of landing rafters.
|
 | Docking in a wooden house. In a wooden house the rafters can not be rigidly fixed to the Mauerlat, when they shrink, they will not bend. For fixation, a floating attachment is used here, in the photo on the left you can see how it is arranged. |
 | Litter. I have a cornice overhang the continuation of the rafters. If the length of the rafters is not enough, then they rest in the Mauerlat or the extended beams of the ceiling, and the cornice overhang increase due to the so-called "mares". Usually, these are bars with a section of 50x100 mm, which are attached to the rafters by screws. Each such bar should be superimposed on the rafters at least half a meter and at the same distance to hang over the wall. |
 | Roofing system. The assembly of the rafter system is over, now I will show how to properly mount the underlay crate. |
Roof Mounting Regulations
| Illustrations | Operating procedure |
 | Mount the chapel. The first on the edge of the pediment overhang is mounted a "drip" - a corner of a thin metal sheet, which is needed to seal the cut. For this, I cut out niches in the rafters and fill them with a 25x150 mm board on both sides, so that the angle turns out. On that outer corner self-tapping drip mount. |
| Barrier for thermal insulation. Between the rafters parallel to the wall is inserted and the barrier is fixed, it will not allow the inner under roof insulation to slide down. Barrier I made from a board of 25x150 mm. The board is fixed in 3 points on the screws, along the edges to the rafters and down to the mauerlat. Self-tapping screws are angled. |
|
 | Adhesive tape. In order for the waterproofing membrane to fit tightly to the dropper, I first glue the butyl-rubber tape "K2" to the edge, and I glue it to the double-sided adhesive tape. |
 | Waterproofing membrane. I used a waterproofing vapor permeable membrane for the roofs "Strotex-V".
|
 | Stacking the membrane.
|
 | Control Grating. As soon as one band of the membrane is fixed, we begin to fasten the regrowth. I used a bar of 30x40 mm and screwed it to the rafters with self-tapping screws 80x5 mm.
|
 | Sealing. From below the bars of the control unit I glued strips of cross-linked polyethylene with a thickness of 3 mm, on one side this tape has an adhesive layer. With this seal, the strap holds the membrane along the entire contact line, moisture can not penetrate under the bar, plus the staples from the stapler close. |
 | Bundle fixing. The step of the outer roofing depends on what kind of roof you have, in my case the metal tile will be mounted, so I fill the board with a step of 300 mm. The thickness of the board is 20-25 mm. The next band of the membrane is rolled out and fixed with the approach to the previous one. The photo shows the marks, the edges of the next tape will pass along these marks. Plus the joint is glued with a double-sided adhesive tape. The outer crate was fixed with self-tapping screws 100x5 mm and additionally nailed 120 mm. |
 | Waterproofing of the ridge. When the ridge is waterproofed, the membrane needs to be wound with a single cloth under the control bar. I on each side made an overlap of 350 mm, according to the rules enough 200 mm. |
 | Chimney. It is advisable to remove the chimney before you start to mount the waterproofing, so it will be convenient for you to bypass it. |
 | Finished roof. I decided to make a roof of the house from metal. One of standard sizes sheet metal tile 6 m, just under this size I have made rafters. You can choose any other type of roof, by the way, the most accessible option is slate, but it will have to be changed in 10-15 years. |
 | Warming. Insulate the roof can be differently, I laid between the beams thick slabs of mineral wool, and on top of everything I sewed up a layer of vapor barrier and stuffed the lining. Instead of cotton wool, foam plates can be used, but this insulation does not allow air to pass through.
|
Conclusion
Perhaps, the detailed instructions that I have written above are not perfect, but I succeeded, and so you will succeed, too. The video in this article will help you understand this topic in more detail. If you have any questions, write in the comments, such a discussion will benefit everyone.

Do you need to install the roof yourself? It is not always easy to find an answer to these questions.
It is necessary to have a constructive understanding and knowledge of the necessary information: awareness of the dismantling of individual elements, components, details, the roofing used and the correct technology of equipment.
Today, a large number of the most diverse types of roofs are beyond the usual view of them. Forms pitched roofs and structural elements can vary depending on the design and architectural tasks. Under the roof you can organize the used space - an attic (living quarters) or a technical room.
The scheme of the components of the roof construction
Types of modern roofs
There are many types of roofs: flat and pitched, monotonous and multicolored, thatched and iron, attic and mansard.
Experts classify the roofs on flat and pitched (inclined) roofs. Flat is called the roof, the angle of slope of which does not exceed 5º.
Pitched roofs in their geometric form are divided into:
- Single-deck
- Gable
- Multigate
- Squamous
- Broken
- Round
- Shatrovye
- Valve
The geometric forms of the roof are much larger, and everything depends on your preferences.

Materials that will be needed when building a roof
When you are already certain to know, to cover on buildings, you will need to decide on the choice of coverage. From this directly depends the strength and the number of necessary materials for the rafter system (frame).
The most sturdy system is to keep the tile roof. Compared with metal and slate, the tile of baked clay weighs the most. Therefore, before you make a roof, better determine the material of the roof.
When installing rafter systems to build a roof with your own hands, you will need boards, slats, bar, as well as a waterproofing film, a heater, nails and screws.
The material consumption directly depends on the size of the building, the complexity of the roof and the nature of the coating.
Components of the rafter system

The rafter, or the rafter's leg, is the main element of the frame, it is the skeleton of the roof
For a proper understanding of the structure of the rafter system and the perception of the installation instructions, it is necessary to understand the names of the components of the rafters system and their main functions.
Mauerlat is a detail of the rafter system, which serves as a transition from non-wood (brick, concrete, metal, etc.) to wooden construction. It is a bar made of softwood.
The most common dimensions of the Mauerlat are 150 × 150 mm, 150 × 100 mm, the sizes 100 × 100 mm and 200 × 200 mm are less commonly used.
Such an element of the frame, as a leg, is designed to remove the weighted point load from the floor (floor), which is transmitted through the racks from the roof structure. That is, through the ladder the load distribution goes on a larger support area. You can draw an analogy with skis: if a person is on the snow on skis, he does not fail, if without skis - fails.
The size of the levers is influenced by the size of the racks. The main condition is that the rack needs to be completely put on the left.
The racks in the rafter system serve as pillars holding the run and leaning on the legs. They are designed to support the run.
Progonom is a wooden beam supporting the rafters (more precisely, not allowing them to bend). Progons are used for heavy roofing on long slopes.
The rafter, or the rafter's leg, is the main element of the frame, it's the skeleton of the roof. Any calculations related to, are reduced to. Their size is taken according to project calculations.
What determines the angle of the roof

How to properly make a roof ventilated
In the insulated roof, it is necessary to ventilate the under-roof space between the roof or its base and a heater. This need is caused by:
- To avoid condensation on the surface of the crate from the side of the cold attic; The natural ventilation of the attic should be provided with ventilation apertures - exhaust chutes, ventilation windows, etc.
- The need to remove moisture from wooden structures and thermal insulation.
- Reduced the possibility of icing of the roof (along with a vapor barrier and a heater).
The air inlet is provided by the device on the bottom surface of the eave of the gaps with a total width of at least 20 mm with a wooden binder; when filing with aluminum or plastic siding - by using perforated species.
To air circulating because of the pressure difference, come out of the under-roof space, to the ridge from the ledge, arrange a ventilation exhaust outlet at a distance of not more than 1 m from the ridge.
How to make a ventilation gap on the roof?
Ventilation is an element of the ventilation system of the under-roof space. Accordingly, it is arranged under the roof. Ventzazor is a gap between the roof and the hydrobaryar, through which the air circulates from the roof cornice to its ridge, deflectors, aerators and other vent vents located in the upper part of the ramp (most often at the ridge).
The ventilator can be installed with a wooden bar (counter-rail) made of coniferous wood, size 50 × 50 mm. This is due to the fact that in the cross section the width of the rafters is 50 mm in size.

The lower vent clearance below the deck along the entire length of the structure must be at least 100 mm
Calculation of the beam (counter-rail) for the ventilator assembly
The dimensions of the inlet ventilations and the height of the ventilated channels depend on the slope of the roof and the humidity of the inner layer of the roof.
So, with a roof slope of up to 5 °, the height of the ventilation duct should be 100 mm, from 5 to 25 ° - 60 mm, at 25-40 ° - 50 mm, and at 45 ° and more - 40 mm. These values for the height of the ventilation duct are appropriate for the length of the ramp not exceeding 10 m. If the length of the ramp is greater, the height of the vent is increased by 10% or additionally the installation of the exhaust devices - aeration nozzles.
The height of the vent is also the size of the counter-rail. The standard length of the bars offer sawmills - 3 m.
Install the counter-rail on top of the hydraulic barrier, which is mounted on rafters. The bar is fastened with 90 mm nails. The nails themselves are hammered at a distance of about 5 cm from the edges with an interval of not more than 0.5 meters.
Adjacent roof to pipes

Bypass pipes for each type of coating is carried out in different ways, with the help of components for the roof
Often the question arises about the correct abutment of the roof to the pipe. After all, it is necessary to do everything not just aesthetically, but also correctly.
Cut the roof (tiles, slate, etc.) will not be difficult. But the installation of all contiguity is particularly important to prevent leaks and reliability of the roof.
Bypass pipes for each type of coating is carried out in different ways, with the help of components for the roof. For example, metal profiles, metal roofing tiles and other similar materials are used with metal abutment strips matched to the color of the coating. For a slate roof, less expensive zinc planks are used. For bituminous shingles Endovy carpet serves as an abutment to the pipe. For ceramic and other natural tiles, a special adhesive tape is used in the set with a metal apron (a salary), matched to the color of the roof.
And it is worth recalling that if you make the roof of the house yourself, it is better to take care of insurance when performing high-altitude work. Remember that everyone can make a roof with their own hands - you only need to prepare yourself as best as possible.
How is the roof of the house built with their own hands? The answer to this question will be considered in this article. You will learn how the frame assembly works, how to cover the roof, and what coating options exist.
For the construction of the roof frame it is desirable to use larch or pine wood. It is believed that these are the most durable materials.
Planks and beams must be free of defects: cracks and chips, with a moisture content of not more than 15%. It is desirable to pre-treat the material with antifungal and refractory substances. Particular attention should be paid to the processing of the elements of the cornices, since the parts there are practically not protected.

There are several options for roofs:
- One-run - used to cover utility rooms, outbuildings and baths.
- Gable - consists of two rays, converging at one point. The most common option found on private homes.
- The four-hipped hip consists of four ramps, two of which are triangular in shape, and the other two are trapezoids.
- Semi-Volum - hybrid a four-slope roof at the bottom, and gable at the top.
- Tent - four identical ramps, in the form of isosceles triangles.
- Mnogoschtsovaya pitched-is a combination of gable and hip roof.
Despite the variety of options, if you catch the essence of building the roof of the simplest kind, you can raise yourself almost any option.
In general, the roof of the house with their own hands is built in several stages.
Mounting Mauerlate
The basis on which the bulk of the structural load falls is called the Mauerlat. Simply put, this is the basis on which the roof will be built. Beams with a cross section of 15-15 cm should be used. They should be installed parallel to the roof ridge.
In order to ensure that the roof of the house can successfully resist winds and weather disasters, it is necessary to secure the beams of the Mauerlate securely. It is advisable to take care of this even at the stage of laying the walls. To do this, starting from the upper 4th row of the masonry, between the bricks (blocks), lay thick wire. Call it - wire rod, it should be apart from each other at a distance of a meter.
The wire is fixed in the middle in bricklaying, and freely dangling ends should be left so long that they could later be tied up the bar. If it is assumed that the house will not be plastered, then the outer edge of the wire should be mounted in the solution, so it will not be noticeable.
Please note that the minimal deviation of the Mauerlatt from the edge of the wall is 10 cm. To protect the beams from rotting, several layers of toli are placed under them.
Mounting the frame. How to make the roof of the house more solid?
When the construction of the roof is underway, it is absolutely certain that without a solid skeleton is indispensable.
Rafters attached to the Mauerlat, and there is a frame. Remember that if the beams will exceed 4.5m, additional installation of the runs will be required.
Optimum for construction brick house, are considered beams, section of 7-15 cm.
To the Mauerlat, the rafters are fastened with a special neckline, which is fixed with nails of 20 cm. The nails should be hammered in the following way:
- one is nailed through the rafters in a Mauerlatt diagonally;
- one more is slaughtered in the same way, but on the other hand;
- the third - from above, perpendicularly.
Thanks to this technology, the rafters do not move to the sides.
The upper ends of the beams are attracted overlapping. The end of one beam must overlap the end of the parallel beam. They can also be fastened either with nails or with a bolt.
How to make the roof more solid?

For the strength of the structure and in order for the spacer force to act less on the Mauerlat, the rafter legs should be fastened together by beams with a cross-section of 5-15 cm. This element of the structure is called a bolt. Thus, the length of the crossbar corresponds to the distance between the rafters beams, which must be connected. Fastening is made by nails.
The construction of the roof also involves fastening the filly to each of the rafter legs. In fact, this board, with a cross-section of 50-100 cm, which must be fixed with screws and metal brackets from one side of the rafter's leg. Its length should be calculated as follows: length of overhang + 50 cm.
To the roof of the house with their own hands erected without unnecessary difficulties, it is recommended to make a preform of the filly in advance. To do this, on the board, 15 cm wide, you need to make a cutout, with which it will be attached to the mauerlate. It is necessary to make sure that all boards and rafters exactly converge with each other. Usually these works are made even before the construction of rafters, so that later the entire structure could simply be assembled.
At the stage of mounting the frame, the same question often arises: how to build a roof at the right angle?
This moment can not be missed. The roof slope is selected taking into account the standards for the terrain. So, for cold regions with a large amount of precipitation, the optimal inclination is 40-45 °. Thus, the snow can not accumulate, which will allow to avoid pressure on the floors. In this case, the rafter's feet should be installed at a distance of 1 m from each other.
In dry, hot areas, the lowest inclination angle may be 3 °. In a region with strong winds, it is preferable to erect a roof with a slope of 20 °.
If we discuss in more detail: how to make a roof with the right bias, then it is necessary to turn to the rules that professional builders apply.
So. The angle of the roof can be measured with a special tool called the "inclinometer". But before starting the measurements, it is necessary to calculate the required angle. Builders use a special formula. Thus, the angle of the slope will be equal to the height of the ridge divided by the value, which was obtained by dividing the length of the roof by two.
Oblochettka
In order to block the roof, it is necessary to make a crate. For the tile, the trough is made solid.
We need boards with a thickness of about 25 cm, with maximum integrity, without chips and cracks. The length of each about 2 m, that is equal to two spans between the rafter feet.
Thus, joints can only be on the supports, and the distance between them should not exceed 5 mm. The boards from which the horseshoe is formed should be located at the closest possible distance from each other. Fastening is made by nails on 20 cm.
For each roofing material is chosen its own version of the dredging. For soft, roll roofing, the sheathing flooring must be continuous. For slate, a metal roof - the discharged shed is suitable.
If necessary, you can make a double decking. In this case, the first layer is laid in a standard way - parallel to the ridge. The second layer, respectively, is perpendicular, that is, along the descent.
Ventilation
In order to block the roof, only a little crate. It is necessary to take care of its integrity in the process of operation.
To ventilate the shingles, it is necessary to leave gaps in the crate. Each side has two or three ventilation ducts. The beginning of the channels should be at the bottom of the overhang, and the end - as high as possible. The width is about 5 cm. At the top, to extract air, set the outlet under the hood.
Installation of drippers and lining layer
To ensure that the roof does not suffer from the effects of condensation, it is necessary to lay a backing layer on the crate. Mount it, as a rule, only along the edges, where water can leak, that is, to internal valleys, to the horse, near the pipes.
The backing layer should be about 40 cm wide. The entire carpet is nailed or screwed, at a distance of 25-30 cm. If it is necessary to lay the second layer, then it is already placed on top of the first one, nailed down. The overlap can be glued with bituminous glue.
The next step, before closing the roof, is the installation of droppers. These are metal plates, which serve as protection from moisture on the cornice. Planks should be nailed at a distance of 10 cm, an overlap of 5 cm. In the same way, you should fix the droppers on the ridge.
Flexible tiles are attached to the plates, which contributes not only to improving the functions of the drop joint, but also to improving its appearance. Self-adhesive plates. It is necessary to first remove the protective layer, and then glue it to the cornice. For reliability you can nail.
Installation of shingles
As you know, there are several options for the roof. Raised roof of the house with their own hands assumes an independent choice of tiles by the builder. But for each option - their conditions and principles of installation. Let's consider the basic.
Bituminous flexible tiles

In order to easily cover the roof, start laying it from the middle of the eaves, so that it can be evenly distributed. From the shingles, remove the protective film and glue it to the base. Then nail the edges. It is advisable to use galvanized nails with wide hats. The ledge should cover the joints of the shingles.
If the architectural design assumes the presence of pipes, then along the perimeter of the cut of the shingle, special passage elements should be attached.
On the site of the ridge the roof tile is glued overlapping.
If the pipe is brick and heated, then the angle of the roof and the pipe is correct to put a triangular bar. The underlay carpet is laid at a distance of 20 cm from the pipe, on which a special connector is put on. Slots are sealed with a sealant.
Metal tiles
Under the metal tile is laid a discharged crate.
Total necessary material is calculated by adding the length of the ramp from the eaves to the ridge, the overhang of the cornice and the vertical overlapping of the sheets.
The first sheet is laid and leveled along the cornice and the butt. The second is stacked on top. The third one is on the side. Above the second is the fourth sheet. The entire structure is leveled and fixed with screws to the crate. According to this scheme, the whole roof is assembled.
Ridge bars and outer corners are mounted overlapping 10 cm and fastened with screws. From the ends, the horseshoe should be closed with plugs.
We also advise you to install snow holders. They are mounted parallel to the cornice, screws, directly to the roof. There are several options: planed, mesh, tubular. In regions with a large amount of snow, it is desirable to install tubular snow holders.
Ceramic tiles
Cover the roof with tiles, you must start from the bottom, moving up, and left to right. Tiles are pre-arranged in small stacks, five pieces, which will be placed on the slopes. Thus, the load on the rafters will be distributed evenly. All the shingles should be attached to the rafters with galvanized screws. In each sheet there are special wells, that is, holes, through which the sheets are attached to each other.
Eaves file
Answering the question how to build a roof of the house, you can not miss the moment of filing the roof.
The filing is carried out at the last stage. It is necessary that the walls have already been insulated, since the binder box is closely adjacent to them. Otherwise, you will either have to break the file, or leave a section of the wall that is not insulated.
It is advisable to make a file of wood, so it is possible to avoid additional ventilation. The file itself is a kind of box that is attached to the filly and the continuation of the rafters. The frame of the box consists of two boards. One goes from the edge of the overhang to the wall, and the second descends from the rafters. It turns out that the boards are connected at right angles. The connection points are fixed with screws or self-tapping screws, metal plates can also be used. Between the boards it is necessary to leave small gaps. The corners of the box are cut at an angle and fastened with metal staples and self-tapping screws.
Then the bottom of the frame, along the entire length, is covered with boards. Since they are subject to the influence of weather conditions, they should be firmly secured, especially at the edges. Also, keep in mind that the joints of the rows of neighboring beams do not have to coincide. The corners are filed by 45 °.
Internal Roof Insulation

How to properly build a roof without taking care of the insulation? This is a rather important process.
There are several options: on top of the lath and from the inside.
If you do not intend to use the attic as a residential area, then the insulation can be carried out from the inside. In addition, in this way you can hide the space between the rafter feet.
First of all, it is necessary to cover the roof of the house with a waterproofing foil around the perimeter. As the rafters protrude above the crate, the film can not be stretched by the canvas. It is necessary that it densely cover all the elements of the structure. Thus, in the corners between the lathing and the rafters, wooden slats are beaten on top of the film.
The next layer is a vapor barrier film, the lower edge of which must be fastened to the rafters. Joints of vapor barrier and waterproofing films should be superimposed on each other and fixed with a building tape.
How to make the roof of the house more warm, if you plan to use an attic space?
In this case, the heater and the film are laid on top of the crate and truss structures.
It is undesirable to use polyurethane foam plates, since this material is not able to densely adhere.
It is more reliable to use mineral wool as one of the layers and make sure to use a waterproofing film. In fact, the principle of insulation works is not too different.
As you can see, the roof of the house with your own hands is not a very long process, but painstaking. There are many nuances that must be observed for the long-term operation of the entire building.
We advise you not to save on building materials. Choose, perhaps, more expensive, but reliable designs. Seriously approach the choice of boards and cover. Pay attention to their integrity and quality. Study materials on how to properly build the roof of the house.
In this article, we will again talk about gable roofs of the house this time with layered rafters.
Gable roof with nylon rafters.
I think many have heard that the roof can have rafters that are layered and hanging, but not everyone understands the difference between them.
So, the layered rafters have two points of support at the edges. Those. The lower end of the rafters rests on the Mauerlat (or the overlapping beam), and the upper end rests on the ridge beam, which in turn either lies on the middle bearing wall of the house, or rests on it through the racks (just this case will be described in this article).
STEP 3: We install the ridge bar.
First of all we put under it racks (section and racks and a ridge beam 100х150 mm). The distance between them is no more than 2 meters. The racks are temporarily fixed with jigs, controlling their verticality by a level or plumb line (see Fig. 5). In the figure, the skeletons are shown only on one rack, and in the following figures they are not shown at all, so as not to clutter up the images.

Figure 5
At the bottom of the rack we attach to the Mauerlat with the help of roof corners. Here it is better to use corners reinforced with an extruded edge of stiffness (see Fig.6):

Figure 6
Also, with the help of roofing corners we fix the ridge beam on the posts (see Figure 7):


Figure 7
Here we put the ends of the ridge beam directly on the pediment (supporting 12 cm - polkirpicha). There are other options. For example, you can also put racks here, or fix the ridge beam on the pediment with a metal bracket.
STEP 4: Determine the cross-section of the rafters. The calculation is carried out in the tab "String 1" of the settlement program (see Fig.8):


Figure 8
Please note, in the initial data in the column "Insulation (Mans.)" There is a value of 25 kg / m 2, although we will not have a heater between the rafters. This value is set when the device is mounted on a solid floor. We have such a flooring, because the roof is covered with soft tiles.
As a rafters we choose boards with section 50х200 mm with a step of 0,6 meters.
STEP 5: We manufacture and install rafters.
First we make a template. We take a board of suitable length, set it as shown in Fig. 9 and make the markings:


Figure 9
The depth of the cut is made 7 cm. In my previous articles I already said that we will not take it more than 1/3 of the rafter's cross-section height.
The lower end of the rafters can also be marked differently (see Fig. 10):

Figure 10
In doing so, we get a slightly different shape of the cornice. You are free to choose the option that you like best. It is only necessary to immediately take into account that when mounting the drainage system in the first variant, any brackets of the gutters can be used (and metal bends - on the left, and plastic overheads - in the figure on the right).

With the second option, plastic overhead brackets can not be used.
So, having made rafters, we establish them on a roof and we fix (see fig.11):

Figure 11
If the ends of the joists overlap the upper plane of the rafters, we cut them (see Fig. 12):

Figure 12
There are several ways of fastening the rafters to the Mauerlat. I want to show you two:
1st method: Two crossed nails (150 mm) are slaughtered in a rafter under a slope and a clamp (Ø 8-10 mm) clamped the rafter with a mauerlate (see Figure 13):

Figure 13
The photo, of course, is not very. It was not found, had to be taken from the Internet. It is evident how many incisions are not accurately made. But that's not the point. We are now talking about the method of attachment.
Before hammering the clamp, its pointed ends need to be turned out so that they are not in the same plane, but in mutually perpendicular ones. This can be done, for example, in a vice, or using two pieces metal pipe suitable diameter. In the photo, you see that the clamp works on tension, it prevents the rafters from breaking off from the mauerlat under wind loads acting on the roof cornices from below. This is the correct use of staples in this node. Notice, it is in this.
If, for example, you see such a photo (see Fig. 14):

Figure 14
this means that the rafters are hanging here. Now we are looking at the rafters.
2nd method: in rafters from one side it is hammered on a slanting nail (150 mm), and from the other side a roofing corner is put (see fig.15):

Figure 15
The photo shows reinforced corners. They have in the middle of an extruded rib of stiffness, which greatly complicates the bend-extension of the corner. In this load node working on the flexion-extension of these corners there, so you can use simple, not reinforced. They are cheaper.
The unit for fixing the rafters to the ridge beam looks like this:

Figure 16
Rafters are pulled together by a metal plate. At the same time, each rafter is nailed with two nails to the ridge beam. Instead of a metal plate, you can also use a clamp, or sew a rafter cut from an inch board with a triangular piece, as was often done before.
Another small digression. Unfortunately, very often it happens that the constructed box of the house does not have a very good geometry, so do not make all the rafters at once on the same pattern. First, do one, attach it around one pediment, then near the other, then onto the opposite ramp. If it is suitable everywhere, fine. If not - make adjustments already in place. This applies to all other roofs, which we will talk about on the pages of this site.
STEP 6: We make and install cornice fillets (see Fig. 17):
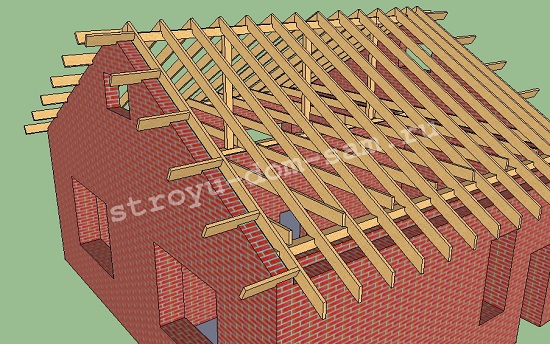
Figure 17
We produce them from boards of the same cross-section as the rafters. The distance between them is about 1 meter.
STEP 7: If you have read my previous articles on the construction of roofs, further sequence, I think you are already clear: we sew up the windboards, we sew the cornice belts from the bottom, we fasten the waterproofing film to the rafters, we do the bridging, we make solid flooring from plywood or OSB under soft roofing, we produce roofing (see Figure 18):
![]()


Figure 18
Now let's consider a variant of such a roof, when we have a large snow load, or large overlapping spans. Under certain conditions, we can not do without additional amplifying truss system elements.
For example, let's imagine that the roof described above is not built in the Leningrad region, but in Norilsk. The amount of snow and wind loads here is 594 kg / m 2. This is almost 3 times more than in the previous example, so we strengthen the rafters with struts (see Fig. 19):

Figure 19
We put the struts at an angle of at least 45 0 to the horizon. Calculations for strength will look like this:
![]()
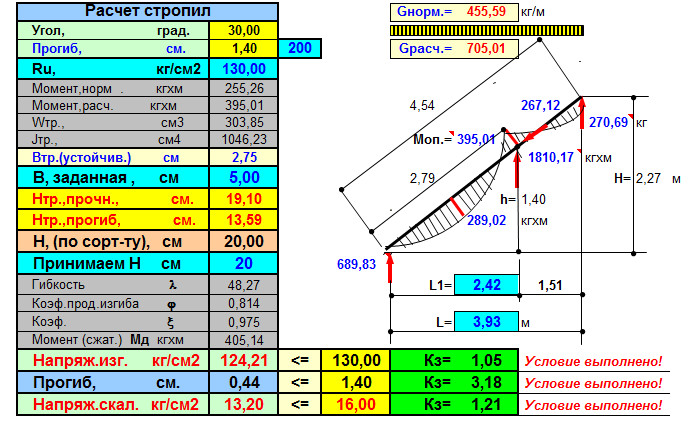
Figure 20
Please note that with the same section of rafters 50x200 mm, we can increase their pitch to 80 cm.
How to mark the bottom of the swath is shown in Fig. 21

Figure 21
Upper wash is then marked in place. Thus we manufacture and install all the struts (see Figure 22):

Figure 22
To fasten the hanger to the bottom of the Mauerlat with a pair of nails. Thanks zapily, he will not go anywhere. With the rafters, we also sew stitches with nails and metal plates:

Figure 23
In all other respects, a gable roof with struts is made as well as a roof without struts.

A country house is a dream of many townspeople. The desire to escape from vanity, dust and smog, to enjoy the singing of birds, virgin nature, fruits and vegetables grown in their own garden, gives impetus to the construction of the dacha.

In the process of installing roofs, it is also necessary to take into account the fact that the attic space should not be idle. In this case, you can build an original roof shape and use the attic as a rest area or an additional floor. If you are interested in using the attic as an additional floor, then we advise all its features.
So the form of the roof depends on the desires and possibilities of the owner of the future house. It is best to choose the one that fits the design and decorates the building, as well as take into account the sufficiency of experience in its construction.
How many skates will be, what role they will play and whether or not they should be done at all - these are the issues that the owner must solve at the design stage.
Materials and tools that will be required for the device
Building a building means not only erecting a foundation and walls, it is also building a roof. The complex of works includes the construction of rafters, the device of hydro and steam insulation and the laying of the finish coat.
Each type of material requires a special device rafters, and this in turn is the determining factor in the quantity and quality of the required materials.
So, for the construction of the roof you will need:
- Waterproofing material or film;
- Material for insulation;
- Bars, boards, slats;
- Staples are metal, nails, screws, screws;
- Tools required for work: hammer, screwdriver, drill and others.
The number of materials depends on the. For example, ceramic tiles are the heaviest material, so we build a rafter system of sturdy beams with a lot of nails, screws and staples. Thus, the amount and consumption of materials directly depend on the selected form and coating material.
Also, the square of the house plays an important role. In this issue, it is worth considering all the nuances, because they will further influence the strength of the structure and its durability. It is possible to build a roof independently with the help of modern materials and technologies.
Installation work: stages and sequence
The walls are erected, the frame is trimmed, all the materials for covering the house with the roof are purchased. Now you can proceed to the stage-by-stage work on the roof of the house. Everyone can build all systems and properly insulate, following the instructions below.

First of all, fasten the Mauerlat. This is a large beam with a section of 150x150, which is a kind of foundation for the rafter system. Its size depends on the thickness of the roof truss system and the weight of the selected roofing, as well as it is designed to evenly distribute the roof load on the walls of the house.
That is why, when attaching it, it is necessary to use the building level and other devices in order to do everything correctly and smoothly.
For fasteners, you need to choose the most reliable materials and tools.
Anchor bolts fit as well as possible to fasten the Mauerlat. They are installed during the construction of the reinforcement belt, leaving protruding ends for fastening.
The installation is carried out with a sledgehammer. At this point, you need to ensure that the Mauerlat tightly "sat down" on the bolts.

The next stage of erecting the roof with your own hands is the device of the farm. To do this, you need thick boards and boards. This need is due to the fact that the rafters bear the main load, so the wood must be of good quality in all respects. Building rafters is not difficult, the main thing is to do it right and smooth.
It is important to choose the right beam, or rather their size, because when constructing rafters, they are fastened together by crosspieces, screeds, crossbars and other elements.

The gable roof, which is built with your own hands, consists of triangles that you can assemble and fasten on the ground, and then install them on the roof. Between each other, triangles are fastened with crosspieces. Installation of the structure is carried out after the ceiling beams are arranged.
Installation of a gable roof begins with two extreme triangles, which are fastened with a ridge beam.
Then all the rest are attached. After that it is necessary to make fastenings with the help of ties and jumpers, where necessary. Find out more about fixing the rafters. When the structure is fastened, the slats of the control unit are nailed.

Mounting the rail on the roof
It is necessary to create a gap between the insulation and roofing. The reels of the crate are stuffed onto the grill. In this case, all the slats are fixed across the rafters with a certain pitch. At this stage the device of the rafter system is coming to an end.
The next and no less important stage is the construction of protection and warming. This type of work allows avoiding the flow and penetration of cold into the room.
We disassembled in more detail, but external thermal insulation is considered. Protection of the roofing of the house follows the following sequence:

- A layer of vapor barrier. It protects all other layers from steam and moisture.
- Heater. It will keep the heat of the house and will not allow it to penetrate into the cold air.
- Waterproofing. It protects the attic space and the house as a whole from moisture and precipitation.
- Finish or roofing material.
First of all, between the rafters is laid insulation. As a heater used mineral wool, which is distinguished by its lightness, durability and non-toxicity.

In order to achieve the best effect, the insulation should be laid in several layers. Thus, the roof will not only protect the entire house from cold and precipitation, but also from extraneous sounds.
Next, you need to make insulation from the steam with a modern film. This work is carried out from the inside, from the attic space and a vapor barrier film is attached to the rafter system. It is designed to protect the insulation from steam, which can come from residential premises.
In order for the roof to be warm and reliable from above, a vapor-permeable waterproofing diffuse membrane is laid on the heater.
This material misses steam, but retains moisture. In order to do this stage of work with a stapler enough to attach the film to the crate. Thus, the vapor from the heater penetrates outside, and the moisture from the sediments remains on the surface. Now the question of how to build the roof of the house with his own hands will find clear outlines in the form of a stage-by-stage work plan.
The construction of the roof is completed by laying the finish coat. Sheets of slate, metal or other material fit in a certain sequence. Each new sheet seems to come out from under the other.

The overlap must be at least 15 cm. This approach allows the water to roll down and not penetrate the roof. Modern materials have some peculiarities in their laying, which are set out in the instructions for each type of roof. Nevertheless, any roofing material begins to be fastened from the bottom corner.
It is possible to do it on their own. The material sheets are leveled by the crates.
If it is necessary to enlarge the cornice, the sheet can be pushed out of the borders of the crate and fixed in this way. The first sheet is fixed from one corner, having arranged an overlap, both sheets are fixed by one screw or in another way.

The nails are clogged only in the bottom of the sheets, as it will then be necessary to put one more sheet and make an overlap. This work is done simply especially with assistants.
Construction of the roof is carried out in rows. The first row of coatings are leveled over the cornice, and then proceed to stacking the subsequent ones relative to the first one. Correctly laid coating and insulation will serve for many years, and the house will be dry and warm.
All kinds of work can be done with their own hands or with the advice of those who have already worked on the construction of the roof. Step-by-step actions and correct materials will allow to build the roof in the shortest possible time and begin finishing work inside the house.
Selection of coating material
Today, it is quite easy to cover the roof with a beautiful, modern and durable material. Huge selection different materials allows to make qualitatively, both budgetary variant, and to cover a roof with expensive materials.
The most accessible and reliable is the slate. Its not presentable appearance is compensated by its physical properties.
Although to date, manufacturers offer Euroshow or ondulin. It is similar in its physical characteristics to the ordinary slate, but externally it has an attractive appearance.
Also easy to install and strong is metal. It is perfect for building a roof with your own hands. Choosing between slate and modern materials, it is better to focus on the area of the structure, the complexity of the roof construction and the properties of the material itself.

Today, many are interested in the question of how much each type of material costs and where it is better to buy them. The most accessible and reliable is the usual slate.
It can be bought in any building hypermarket in any quantities. Modern materials include ondulin and metal tiles.
These materials are also not very expensive, but their appearance is more elegant than slate. Thanks to a large number of shades, you can choose one that fits the color of the walls.
These materials can easily cover the roof of a complex shape. Ceramic and bituminous tiles have a high cost, but their appearance makes it possible to create an exquisite design of the building.
How much is needed for the roof and which is better to choose to judge only the designer or the owner. Since, only knowing the specific parameters of the roof, its complexity and the number of skates can be calculated, how many slate or tiles will be needed.
Starting work on building a roof without luggage knowledge and experience should strictly adhere to advice and consistency of action.

If you move away from the intended plan, you may experience trouble that will lead to frequent repairs of the roof, to its leakage, instability or unevenness. In the worst case, mistakes will lead to the need to rework everything, how much it will cost today.
Part of the work on thermal insulation and protection from moisture is carried out from the attic space, and part of the roof surface.
In particular, the insulation and vapor barrier are attached from the attic, and the vapor-permeable film is laid already from the roof. The device of these layers requires special attention.

If the house is built not far from the road or the railway tracks, then for insulation, you can lay the heater in several layers. It is important to remember that the foam keeps the heat well, but it is toxic. Therefore, in order to avoid trouble with health, it is best not to apply it. It is better to consult with specialists and get the material more expensive, but safe.
Prepared a comparative analysis of mineral wool and polystyrene, with which you can read the link:
The rafter system is wood, which requires protection from moisture and insects. Today, the chemical industry offers a wide variety of different means. Therefore, during the construction of the structure, you can cover all the bars and slats with them. With their properties, these products will protect wood from rotting, deformation and destruction by insects.
How to make a roof with your own hands? This issue should turn into a system of theoretical knowledge that will be easily applied in practice.
Thus, properly assembled and fastened beams, slats and slats make it possible to build a strong roofing system that will support the roof of the house for many years with its powerful supports.
How and what better to choose a system or type of construction to solve only for designers, since the roof is the original completion of the ensemble of the building. It complements the design of the entire building and emphasizes its style.
Continue reading about installing a drainage system under the link:, which will provide additional protection of the walls of the house, as well as the foundation.