When choosing roofing, users try to give preference to strong materials, with high performance characteristics and attractive appearance. To such products can be attributed and ondulin. However, not every consumer is familiar with this product, knows about its properties and knows how to properly mount it. But putting ondulin on the roof is a relatively simple procedure, which you can do on your own, without attracting expensive specialists. Of course, before proceeding to the flooring, it is worth to carefully read the features of the product and the correct stowage technology.
Technical data ondulin
Ondulin refers to leaf wavy roofing and is not an invention of modern industry. After all, this material was first produced in Europe in the early 40-ies of the last century. Today the product has become so popular that it is produced in almost every country. Such a rapid spread across the world can be attributed to the fact that the products are characterized by high performance characteristics, and, in addition, the sheets are easy to handle and stack. To get an idea of onduline, it is worth exploring its main parameters.
| Characteristic | Value | Note |
| Differences in length up to 10 mm, widths up to 5 mm and thicknesses up to 0.2 mm are allowed. In addition, the parameters may vary from manufacturer to manufacturer, for example, in the US, the standard width is 1.2 m, and in France the standard width is 0.95 m. | |
| Wave |
| The specific value depends on the standard of the country of manufacture. |
| The weight |
| The parameter varies according to the overall dimensions of the product, and also varies from the useful area of the coating. |
| 50 years. | ||
| Guarantee period | 10-15 years. | |
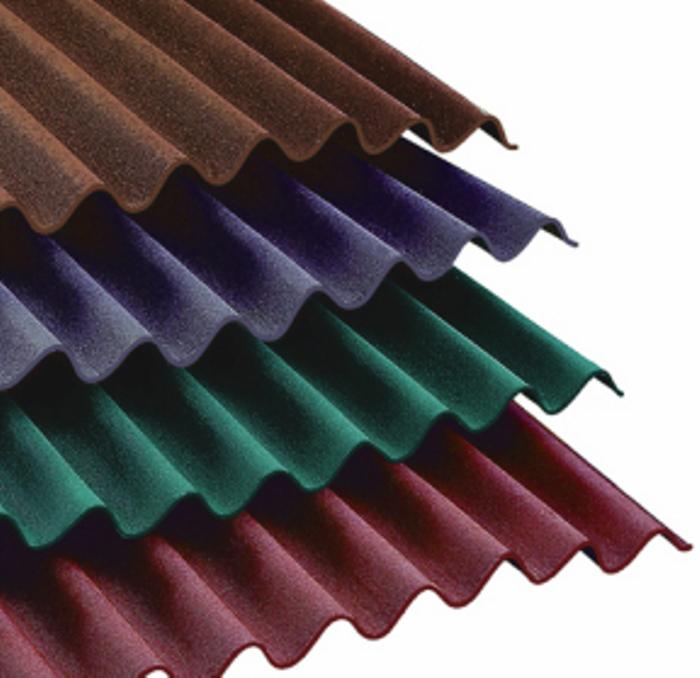
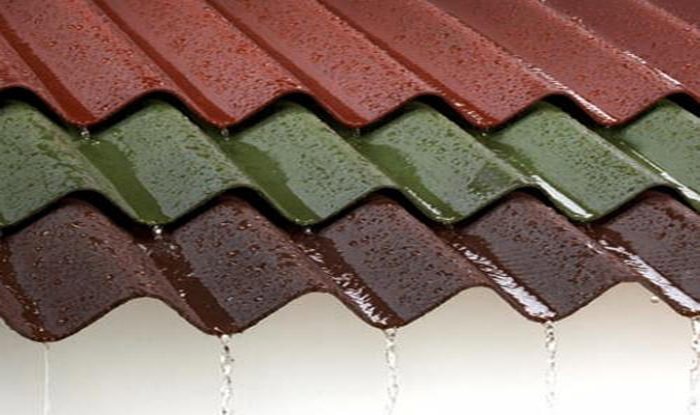
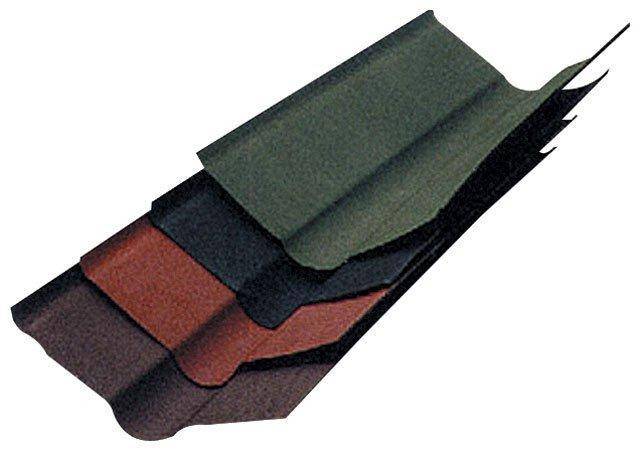
| Colors | Shale, red, blue, brown, green. | Colors can be both matte and glossy. |
| Temperature Range | -40 / + 80 degrees. | Some manufacturers specify a value from -60 to +120 degrees. | Up to 300 kg / sq. M. | Provided that the product is not frozen or overheated. |

It is necessary to distinguish two varieties of ondulin - slate and shingles. Most often, in private construction it is used onduline slate, it is distinguished by the large size of the sheets and it is much more convenient to work with it. Also, for understanding the right technology laying and further care of the coating should know the composition of the material. Ondulin can be attributed to a composite product, that is, it is a layered product consisting of the following components:
- fibrous cellulose base;
- purified modified bitumen;
- impregnation of polymer resin;
- sprinkling of mineral filler;
- pigments on a mineral basis for coloring the surface.
The composition of the material is quite simple, however, it is very important that the instructions to the product clearly state what the product consists of. Since only a properly selected composition can guarantee a really long operating period and a high quality coating for the roof. This means that even if the technology of laying the ondulin is fully complied with, but the composition does not meet the standards and norms, then the security and reliability of the roof will be in doubt. Before considering the basic rules of laying ondulin, it is also worth mentioning a few words about the superiority of the product. 
Material Features
The roof covered with an ondulum has an attractive appearance and high strength. And this is not all the advantages of this coating. Among the main advantages are the following properties:
- environmental safety, since the material is produced on the basis of natural components;
- long service life of the roof;
- high tensile strength;
- lightweight ondulin allows you to save on the construction of a reinforced foundation and wall structures, also due to the small weight of the product, you can put on-roof on the roof without help, and transport it in a car;
- wide design range, thanks to a variety of colors and textures;
- high heat resistance, but with prolonged exposure to temperatures over 250 degrees, ignition of the material is possible;
- ultraviolet resistance, this means that the color of the flooring will remain original after many years;
- simple installation, that is, laying the ondulin with your own hands is a task that is accessible even to users with minimal experience in construction;
- high hydro and thermal insulation, in addition, the material perfectly absorbs noise generated by rain, hail, wind, birds and so on.
However, it should be taken into account that in severe frosts the material becomes more fragile, which means that it is undesirable to conduct any manipulations with the onduline at low temperatures. In addition, it is desirable to perform laying on a more frequent crate than, for example, in the case of metal tiles, reliable base and freely withstood even heavy snowdrifts, and also did not sag at overheating and softening under direct sunlight. Having considered the questions about the features of the material, you can go on to the topic of how to put ondulin, and what tools, accessories and accessories will be needed for the job. 
Installation of the ondulin
In order to fit the ondulin according to all requirements, instructions and regulations, it is necessary to prepare not only the finishing coat for the roof, but also a certain set of tools and components. First of all, you should have at your fingertips:
- ondulin in the required amount, that is, starting from the roof area and taking into account overlapping sheets, in addition, we should make a reserve of about 10%;
- additional elements;
- a hacksaw for wood or a jigsaw for cutting the material;
- hydro- and vapor-barrier membranes or roofing material;
- a construction stapler and staples to it to secure the insulation film;
- carpenter's hammer;
- knife building;
- level, cord, marker for marking;
- pliers, screwdriver or screwdriver;
- drill for drilling the mounting holes;
- self-tapping screws with a sealant or special roofing nails.
It is not difficult to put the ondulin correctly with your own hands. The material is fixed with a hand tool on. For work, it is desirable to choose a clear and warm day, without rain, snow and scorching sun. As a result of works, users receive a luxurious roofing view, which will please their owners for many years. So, the installation of ondulin can be divided into stages. 
1. Preparation of the roof. It is necessary to say that the laying can be done even on top of the existing coating. Of course, old roof must be properly prepared. That is, the garbage has been carefully cleaned, defects have been eliminated, if it is a metal roof, then it is desirable to treat the surface with anticorrosive compounds and so on. 
When the ondulin is the first coating for the roof, then before you lay it, you should carefully read the manufacturer's instructions, for example, it is there that is detailed in which roof slope is required:
2. Laying of the coating. To properly build ondulin, you should take into account the prevailing wind direction. This will help extend the life of the material for several years. The installation work starts from a ramp that is located in the opposite direction from the wind movement. Mounting is done on nails or screws with the calculation of 20 fasteners for each whole sheet. Cut the ondulin easily with a hacksaw for wood. The layout of the installation is quite simple. Laying the first row begins with a single sheet, and the second row is recommended to stack with half and alternate this sequence throughout the roof. Nails or screws should fix the sheets to the crate. Mount them at the ends of each sheet and in the middle of all the waves, as well as in overlapping areas with a gap of 1 wave. To make the fastening more evenly, it is necessary to pull the building cord and orientate on it. 
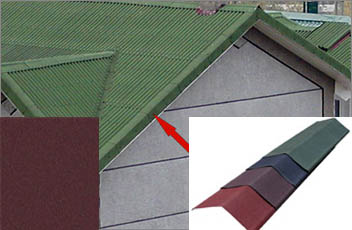
3. Final works. Completing the procedure for laying ondulin installation of additional elements. At the same time, many elements, for example, such as valleys, apron, abrasion and so on, are easily carried out with the help of ondulin sheets, it is enough to cut them correctly or to bend them. Also, do not forget about the processing of joints, which can get moisture during operation. To conduct their sealing, you can use a special self-adhesive tape, for example, Onduflesh. 
In general, it can be noted that putting ondulin with their own hands is not at all difficult. It is important only to approach the process responsibly, to prepare everything necessary materials and tools, as well as study the installation technology. With the help of ondulin, you can not only quickly cover the roof of a new structure, but also restore the roof of a long-exploited building. It is worth noting that it is fairly easy to put onduline even alone, however, it is important to strictly follow the manufacturer's instructions and then the coating will serve not only a guaranteed period, but will exceed much the specified period.
To date, there are different materials for roofing. One of the most popular is the ondulin (Euroshifter). Over the years, roofs of houses, garages, cottages, shops, roofs, etc. are covered with such material.
The reliability and appearance of it will depend on how well the technology requirements of each stage of such a process are met. The owner of the house has the opportunity to block the roof with the onduline by his own hands.
After all, not everyone can afford to hire specialized workers, all the more it will not be at all cheap.
Definition of ondulin
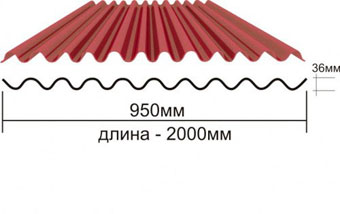
Ondulin is a durable and environmentally clean material (does not contain abscess). Evroshifer will last more than 50 years. Outwardly this roofing material is similar to the ordinary slate, but this is the only resemblance to the latter. - 2000 by 950 mm. The width of the sheet is 3 mm.
The composition of the material includes such elements:
- cellulose, which practically does not decompose;
- mineral components;
- bitumen (impregnated with this substance before painting the sheet for the purpose of long preservation of the original color);
- resin-curing agents, providing thermal resistance of the roof;
- mineral pigments, due to which the paint does not peel and does not crumble;
Due to all these components, the roof will look great and does not deteriorate with the expiration of time.
The basic rules of stacking ondulin
In order for the result to please you in the end, you must adhere to certain:
- roofing masonry of sheets of ondulin can be performed only at a certain air temperature (from 0 ° C to 25 ° C). At low temperatures (already from -5 ° C), the material can crack, and if covered at t above 28 ° C, the ondulin will become too soft and will melt. But the finished roof is very resistant to any temperature;
- the sheets can only be fastened with special fastening means (roofing nails). The number of such nails per sheet should be 20 pieces, due to which your roof will be securely fixed.
From the bottom of the sheet, each wave must be fixed (10 nails), top and middle through one (5 each); - when fastening, it is necessary to accurately monitor the linearity of all joints. Before you fully fix the Euroshifter, you need to make sure that the material is evenly distributed throughout the roof;
- it is impossible to attack the sheets, since this material is capable of bending. You can step on top of a wave, and only on already fixed sheets;
- start work should be on the opposite side of the direction of the wind;
- sheets are easily cut;
- in order for the mount to be even, you need to use a stretched cord;
- depending on the gradient of the roof slope there will be different crates (this will be discussed in more detail below);
- the installation of the ondulum is performed in a chess piece. The first row begins with a whole sheet, the second and a half. Thus, the upper plates cover the joints of the lower (middle);
- ondulin itself stretches, but it can not be used for economy reasons, because temperature drops will negatively affect such a roof, there may be no desired defects or even crack. Therefore, it is better to cut off the necessary piece from the whole and fix it
Advantages of the ondulin coating
Ondulin is known and in demand in different countries of the world. But before deciding to cover the roof with such material, it is still necessary to know the main advantages and disadvantages.
Direct advantages include the following:
- durability of the material. Metal tile will not last as long as the ondulin;
- light in weight (one sheet weighs 6 kg), due to which such plates are very easy to install, even one person. Moreover, it is not difficult to cut the sheets;
- in its composition does not have harmful substances for the human body (asbestos and others);
- noise insulation. Do not hear even the sound of falling drops (even if there is no insulation under the cover);
- does not absorb water, even there are lingering rains;
- the material does not deteriorate if the temperature is too high or strong frost (but not during installation);
- onduline coating does not promote the appearance of various bacteria or fungi under the roof, is also resistant to acids and not spoiled by insects;
- corrosion does not appear on the coating, mold or rot;
- the original color is not rapidly deteriorated from ultraviolet rays. But still, like any other materials, it can burn out. In this case, Euroshafer can simply be repainted in any color;
- manufacturers produce ondulin in different colors. Standard: red, black, brown and green well suited for brick, wood or stone. Also, you can make a multi-colored roof, in general, it all depends on your desires;
- withstands strong snow marks and wind (up to 150 km / h);
- low price of materials ;
In addition to positive qualities, there are also several negative ones, namely:
- flammability. The material is not capable of spontaneous combustion, but in the fire it will burn completely. Although other materials also burn, from metal, for example, there will be only iron.
- discoloration of the roof (but this will happen approximately in 7-9 years);
- from the effect of frost, ondulin will be more fragile, and from the rays of the sun - soft and plastic;
Necessary materials
In addition to the onduline sheets and the battens, it is also necessary to purchase other materials for installation. The roof will not leak if the cornice is installed on it, the core filler, the horse, the valley and the wind bar, the self-adhesive tape or the sealant.
Also needed: an apron, a vent pipe, windboards. Do not forget about special nails.
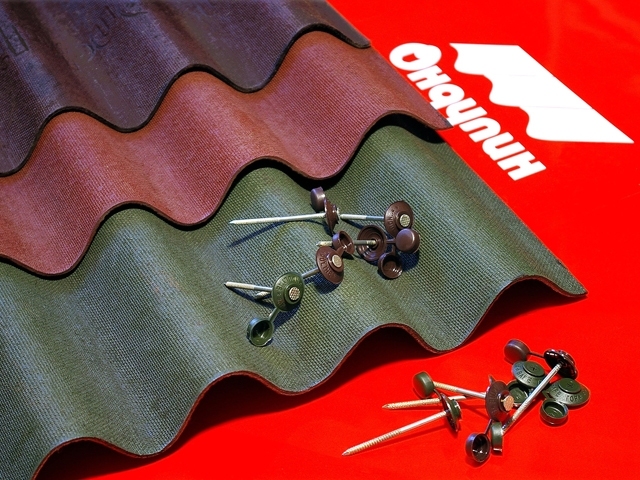
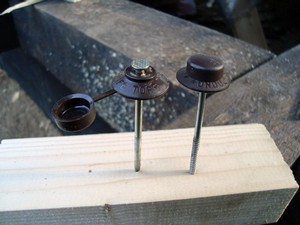
For such a coating, nails made of steel (carbon), whose caps are made of substances such as polyvinyl chloride or polypropylene (do not allow the penetration of liquids under them) are used.
Calculation of ondulin on the roof
Before you buy materials, you need to make a calculation. To do this, you can use a special calculator (online) or a consultant service on the company's website, offering such products.
If you can calculate the amount yourself, then you need to do the following: divide the entire surface of your roof into rectangles or squares; calculate their area (each); sum up the sum; multiply the amount by 1.2; the resulting number divided by the area of the sheet, the size of which is 2х0.95 m;
Also it is necessary to take into account that there will be waste materials. Their number depends on the complexity of building the roof. If you are repairing, then just count the used sheets.
Required Tools
To cover such a roofing material as ondulin does not need a lot of different tools.
Only need to stock up:
- hacksaw;
- hammer;
- screwdriver;
- tape measure;
- with a colored pencil (but not a marker);
- a rope for reliability of correct marking.
How to prepare the roof
Before fixing the ondulin sheets, it is necessary to prepare the roof. For the installation or repair of the roof you need to prepare it. The first stage is, for which often use a small thickness of the board or plywood.
Construction of a crate for ondulin
Ondulin is a fairly flexible material. Therefore, it is usually attached to a wooden base. For this, logs 50 x 50 m or 60 x 40 m are used.
The installation of the battens will depend on the degree of the roof slope:
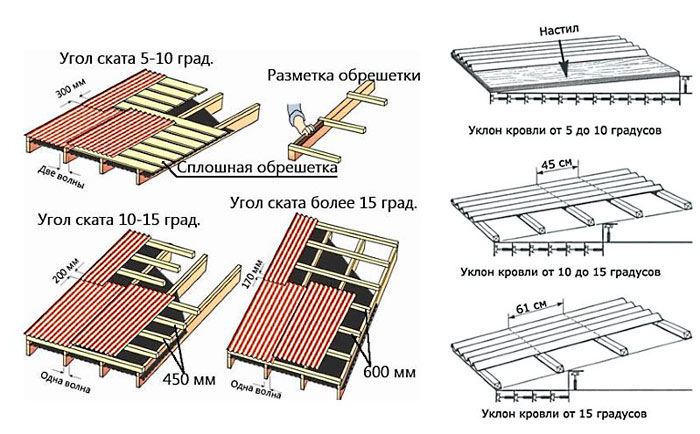
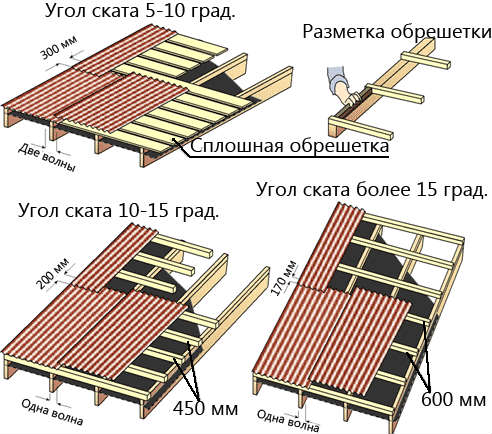
- if the slope is not more than 10 °, then the crate must be made continuous, otherwise the sheets will sag (it is better to use moisture-proof plywood, boards can also be used). Lay sheets stacked with overlap for 2 waves (lateral) and 30 cm vertical;
- at a slope of 10 - 15 °, the step of the crate will be 450 mm (you can use the bar). Lash (lateral) for 1 wave, 20 cm - vertical;
- if higher than 15 °, then 610 mm. The overlap is also 1 wave, 17 cm is vertical;
Experts generally advise making the crate solid, regardless of the slope of the roof. And then the sheets can not bend under any weather conditions.
To keep the boards parallel, take a bar and adjust the distance from one end to the other.
Fasten the beams to the rafters using self-tapping screws. You also need to treat the tree with an antiseptic.
Waterproofing under the sheets of this type of roofing material is not necessary, but it is desirable.
You can also use insulation and vapor barrier. This is especially useful if we have an attic or a massander.
If you have a metal crate on your roof, then you need to fasten the Euroshield with screws using a screwdriver.
Material cutting technology
It is not difficult to cut off the ondulin sheets. To do this, you will need a hacksaw for wood (small teeth) or a hand (as well as an electric) saw, pre-lubricate the sheet with oil so that the hacksaw does not get stuck.
The process of laying ondulin
To begin with, make the layout of the sheets with a pencil numbered them. The stack should be started from the bottom row (from the corner opposite the wind). The lower words will act on 7 cm for the crate. Fasten each sheet with nails, driving into horizontally located boards.
At once it is necessary to fix the second wave, then the penultimate one. See exactly whether it turns out, after which you can completely record. They must be clogged so as not to spoil the roof.
They should sit tight, but not too depressed. Otherwise, the roof can fly off in a fit of strong wind.
If you need to pull a nail, then use a bar under the nail. For a uniform arrangement of nails, it is necessary to use a cord for the landmark. Electric jigsaw or grinder will help to gently trim the sheet.
After you manage the first row, start the second one. The first sheet of the second layer must be cut, dividing into two equal parts. Such a technology is provided to avoid fixing ondolin on all corners of the plate.
It turns out that next time it is superimposed on the bottom: vertically - on 1 wave, and horizontally - on 15 mm. This stage of work completes the installation of the components of the ridge.
Installing fasteners, ends and how to cover roof skates
To begin to fasten the skates it is necessary after all the roof became covered with roofing material.
Fix skates with nails for each wave, which are under the ridge with a hit in the bar.
The overlap at the junction of the elements is 12-13 cm. If additional ventilation is needed, then install one more skate.
Under the hinge, a self-adhesive tape needs to be fitted. Without it, in winter, the snow will fall under it. If there is no ventilation, then it is better to replace the tape with hermetic means.
For endov and forceps, additional elements of the crate are needed. Sharps are attached to the boards in order to evenly position the ribs. The required overlap is 12 cm.
Stack the valleys as well as ondulin sheets from the bottom. To fasten it you need from all sides at the very edge of the coating. After that, attach the rest of the elements with an overlap (15 cm). Sheets that enter the valley must be cut off (at an axis distance of 5-6 cm).
If at the end of the roof there is a wall, then with the help of grades you can attach sheets and make a sealant (silicone) waterproofing.
Attachment of an apron
For attaching to the wall or bypassing the protruding elements, use a special tool - an apron, with which the roofing material will be more stable. An apron is attached to each crest of the sheet.
It is used on joints of walls, as well as smoke and ventilation pipes. Joints are sealed with a sealant. Near the vent will be overlapped.
- it is not recommended to use conventional nails when using materials from ondulin. Special in its base similar to the screw, so it keeps better than usual.
The cap of the special nail also has a rubberized lining, which will ensure a tight fit to the material. Choose the color of the hats in accordance with the roofing material; - special attention should be paid to the place where the sheets touch the wall. Good waterproofing is required here.
In the modern world, new varieties appear every year roofing materials, but at the same time long known types of flooring are not inferior in popularity. Especially appreciated among users are coatings that have high strength, a long period of operation and a simple process installation. It is to such products that one can attribute roofing ondulin, that is, sheets of cellulose impregnated with bituminous mixture. Of course, this is a fairly general idea of this material, as it includes many components and additives that make the product durable, resistant to aggressive environment and durable. Today it is not difficult to cover the roof with onduline, without even involving professional builders. However, before deciding on such a procedure, it is worthwhile to carefully study all the subtleties of the work, as well as the properties and features of the material. In order to properly cover the roof with undulated, it is first of all necessary to familiarize yourself in detail with the composition of the product.
Onduline characteristics
More than 70 years ago, at one of the Parisian factories, it was decided to release a new product based on cardboard and bitumen. This product was the onduline flooring, which was appreciated by consumers from all over the world, because this material with its low cost has quite high reliability. Manufacturers give a guarantee for the roofing covering of undulins up to 15 years, however, in practice you can be sure that such a flooring can serve a much longer time, up to 50 years. At the expense of what it is possible to achieve such an effective result? Many users know that to cover the roof with onduline - this means providing a reliable shelter from negative environmental factors, as well as giving the house an aesthetic appearance. Let us analyze the composition of the material in more detail. The following ingredients can be considered the main ingredients:
- purified bitumen;
- cellulose fibers obtained from cardboard waste;
- fiberglass;
- mineral fillers;
- various impregnations from resins.
However, you can get a quality product only if you follow a certain manufacturing process. 
Technology of ondulin production
To obtain a quality material, which allows to properly cover the roof with undulated material, the raw material must necessarily be subjected to preliminary control. First of all, all waste is removed from the waste paper, then the processed paper is processed into a pulp. Further, the paper pulp passes the drying step on a special conveyor, where the mass is shaped into wavy sheets. In the next step, the web is cut into segments of the same length and subjected to impregnation with a bituminous mixture. This process is accompanied by an increased temperature and high pressure, due to which the sheets are impregnated evenly and as qualitatively as possible. To increase the strength of onduline to break, as well as to give products greater elasticity, resin, fiberglass and mineral fillers can be added to the composition. Painting of sheets is carried out in the total mass, before impregnation with bitumen, due to this the saturated color persists for many years. And this is not all the positive aspects of the material. 
Advantages of ondulin coating
First of all, it is worth noting that the sheets are produced on the basis of only natural components, which means that one of the advantages of ondulin is its ecological safety. It is also possible to name such positive aspects of the use of the coating:
- minimal water absorption, due to which moisture does not get into the under-roof layer;
- frost resistance of products;
- resistance to weather factors, that is, the floor is not afraid of snow storms or torrential rains, and the cover is resistant to hail, strong wind and UV radiation;
- antibacterial, this quality allows to prevent the development of fungi, mold, bacteria and other microorganisms on the surface of the roof;
- resistance to chemical components (acids, alkalis, gases);
- simplicity of installation - to cover a roof by the ondulin it is possible to use tools of the house master;
- ease of care;
- affordable cost;
- low specific weight, which makes it possible not to exert significant pressure on the bearing walls of the structure.
Also do not forget that this product is a long life. Ondulin has a wide choice of colors, but mostly matte colors - red, green, black, brown and their shades. 
Physical and mechanical properties
The main characteristics of the material are shown in the table.
Many compare onduline with slate. However, the main difference between the undulphurized roof and the slate is that asbestos is not contained in this material. Yes, and work with ondulin is much easier, because it does not crumble and does not break even when it is driven into nails. In addition, it is a fairly economical material with affordable value. However, the answer to the question of how much it costs to cover the roof with onduline clearly does not work. It is required to know the dimensions of the roof, and also what technology was chosen as the main one. But to calculate the approximate cost is not at all difficult, it is enough to know the cost of one sheet and the parameters of the roof. Experts recommend to add 5-10% to the final figure. 
1. . In the instructions to the material, it is recommended to arrange a continuous crate for covering the roof with an ondulum. This allows you to maximally secure the products and keep their appearance for many years, not allowing subsidence during heavy snowfalls. In addition, only in this way it will be possible to move on the roof without problems. The cladding can be made of a beam of 60x40 mm, OSB-boards or plywood. The concrete step will depend on the angle of the roof slope:

2. Cutting the ondulin. To cover the roof with undelin, you need to properly prepare the material. Since the sheets have a wavy profile, then marking the first time can be problematic. To cut off the ondulin of the required size, it is enough to use a pencil, a long ruler or another onduline leaf and a Bulgarian. Also, the size can be done with a hacksaw on the wood, it is enough just to apply the lubricant to the blade, which will help to avoid jamming of the saw. 
3. Mounting of ondulin. You can attach the sheets with the help provided in the kit. Such products are equipped with a special decorative cap in the tone of the sheets and rubber lining, which prevents the damage of ondulin. However, it is also possible to cover the roof correctly with onduline using conventional self-tapping screws. The sheets are not very heavy, so they can be transported without the use of machinery. Installation begins with the bottom edge of the crate, for this purpose the sheet is leveled on the roof and is punched with nails for each wave. The consumption of screws or special nails is approximately 20 pieces per sheet. Then the second sheet is overlapped on the first sheet and also fixed. Thus, the whole series is passed, after which it is possible to start fixing the second and subsequent rows with a layering of the previous at least 20 cm. 
Important! One of the drawbacks of the material is its combustibility. Therefore, when deciding how to cover the roof with the onduline near the chimneys, it is necessary to take care of the arrangement of additional layers of hydro and thermal insulation, and also to use a special element (apron) made of rubber.
The easiest way is to cover the roof with an ondulum with your hands in case the house has a gable roof. The situation is more complicated if there is hip roof, in other words, designs with four rays ( gable roof). The first step is to measure rafter systems and make sure that the sides of the triangles and trapezoids are of equal length on both sides. If one of the sides is larger, then it is necessary either to saw off this side constructive element, or, conversely, add the corresponding length with the opposite. In addition, during the installation of the crate, the angle of inclination should be taken into account, since the trapezoidal and triangular slopes have a different angle, the step of the crate will also change. In general, such a covering of the roof with the onduline practically does not differ from the device of the gable roof. That is, it is desirable to adhere to the following rules:
- to carry out installation is required only at a temperature range from -5 to +30 degrees on a calm day;
- the leaf is fixed in a natural state, it should not be stretched or squeezed;
- overhangs should not be too small (leads to rainfall in the under-roof space) or large (with time deforms the sheet and spoils the aesthetics of the roof).
Roof from ondulin differs in many positive qualities, it is durable, attractive externally, and besides, it has affordable value. Of course, the main undisputable advantage is that it is possible to cover the roof with an ondulum even on its own.
Ondulin is a modern material with good performance and quality. Perfectly suitable for the arrangement of the roof of private houses. At a relatively low cost, the ondulin copes with all the tasks assigned to it. At the same time, the installation of the onduline roof can be done manually.

Ondulin is environmentally friendly material, which is used in the manufacture of modern technological achievements.
At the base of the onduline leaf is cellulose and various additives. To provide the roofing with the required indicators of water resistance and rigidity, it is treated with special materials - bitumen and resin, which have undergone preliminary treatment.
Finished onduline sheets are painted with special compositions that provide an excellent appearance of the material and contribute to improving its performance properties.
Externally, the ondulin can have the form of metal roof tiles or slate. The quality of the roof is not different. Sheets under the "slate" are produced in the amount of 200x95 cm. "Tile" also has a reduced size. Material in the form of tiles are better suited for roofs with a complex configuration - it is simply more profitable, because the volume of waste is reduced to a minimum.
Ondulin in the form of slate is optimally suited for simple roofing structures. Such sheets are easier to install and allow you to do the work in the shortest possible time.
Advantages and disadvantages of ondulin
![]()
![]()
Ondulin perfectly tolerates aggressive atmospheric effects. It is easy to install, does not require large monetary costs and allows you to obtain roofing structures with excellent aesthetic properties.
Among the main advantages of ondulin, we can distinguish the following:
- excellent indicators of environmental cleanliness;
- impressive service life;
- beautiful appearance;
- richness of color scale;
- simplicity and good speed of installation;
- convenient dimensions that contribute to reducing the amount of waste and increasing the speed of installation work.
The listed characteristics made ondulin very popular among private developers. The absence of harmful components in the composition of sheets allows the use of ondulin even for the arrangement of the roof of wooden houses.
In addition, ondulin allows you to repair the old roof without first removing the existing coating. Sheets comparatively weigh a little - about 3 kg per 1 m2 of cover, so there is no need to worry about a significant increase in the load on rafters, walls and the whole house.
The manufacturer provides a 15-year guarantee for ondulin. In practice, it is established that a properly equipped roofing structure without any problems serves more than 50 years, without requiring repair.
In addition to the number of advantages can be attributed to the ability of the material to maintain its original external data during almost the entire lifetime - the paint does not crack and does not exfoliate.
The main advantage for private developers is the possibility of laying ondulin with their own hands.
The technology of laying ondulin sheets is in many ways reminiscent of the installation of slate. However, the ondulin is superior to slate in terms of mass, strength and environmental friendliness.
However, with all the merits of ondulin, he has a large disadvantage - high flammability. True, modern materials in the production process are treated with special flame retardants, which significantly reduces their flammability.
Also the disadvantage of modern roofing sheets is their tendency to lose color saturation with prolonged use. This is especially true for sheets of dark shades.
How to distinguish quality ondulin?
Many unscrupulous sellers will try to mislead you by giving out absolutely different materials for quality branded ondulin. Remember these simple recommendations, and you can choose a really high-quality roofing material.
To distinguish the original from a fake it is possible on the following grounds:
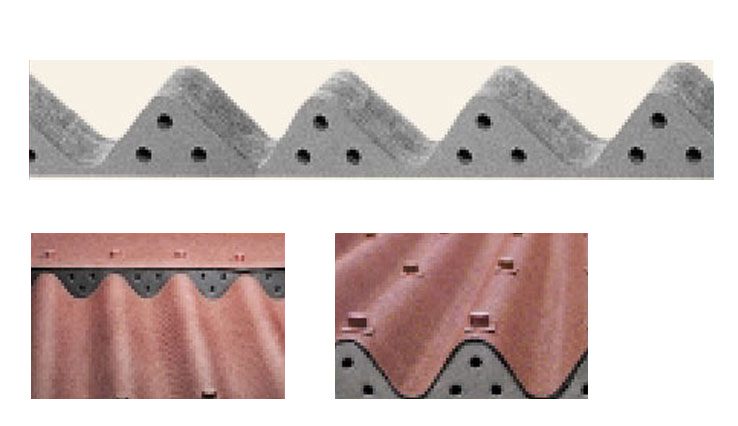
- the back of quality sheets is covered with a black mesh;
- the original sheet consists of ten waves;
- wave height - 36 mm;
- the outer side of the sheet is rough to the touch, something like gauze;
- quality sheets have a saturated matte color;
- on the extreme wave there is a seal with the marking of the plant-making fir;
- the material is accompanied by a brand certificate and a guarantee coupon valid for 15 years.
To install at the lowest cost and in the shortest possible time, and the finished coating for as long as possible fulfills all the tasks assigned to it, follow a few simple recommendations.
First of all, remember: Ondulin can not be stacked if the air temperature in the street has dropped below 0 degrees or has risen above +30 degrees. In the heat, the bitumen softens, and the sheets may become deformed. In the cold, the ondulin can simply crack under the weight of the fitter or when piercing with a nail.
Although the manufacturer and allows the possibility of laying the roof at a temperature of the order of -5 degrees, it is better to abstain from such experiments.
When stacking in the heat, make sure that the sheets are mounted without stretching. Ignoring this requirement will result in the fact that in cold weather the coating simply deforms and even is covered with cracks in the locations of the fastening elements.
For cutting ondulin, it is best to use a wood hanger, pre-lubricated with oil - with such processing, the hacksaw will not get stuck. Also ondulin can be cut with a circular saw. Bulgarian can not be used - the sheet covering will melt, and it will very quickly fail.
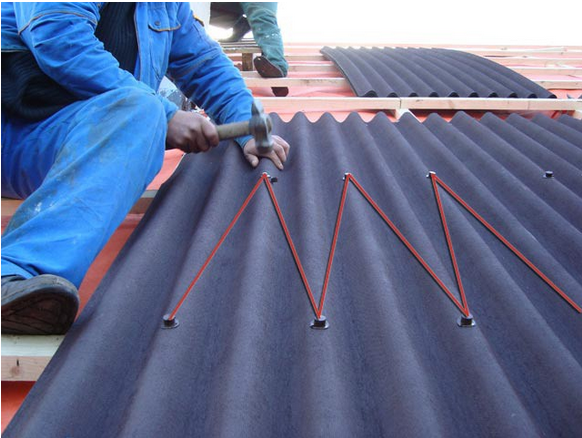
To fix the cover sheets to the lath, only nails specially designed for fixing this material can be used. Better buy them right away with the onduline. On the fixing of one whole sheet should go 20 nails: 10 pieces from below, 5 on top and 5 on the middle part.
When choosing the design of the crate for the ondulin, it is necessary to take into account such an indicator as the slope of the ramp. If the roof slope is not tilted by more than 10 degrees, make a solid and reliable crate of pile-faced boards or plywood sheets. If the slope is 10-15 degrees, you can use a crate with the placement of elements at a distance of about 45 cm. And if the slope of the ramp exceeds 15 degrees, fasten the elements of the battens in 60 cm increments.
Regardless of the type of skeleton frame chosen, the lath on the ribs, valleys and skates must be strictly continuous. These places need particularly careful insulation, so the thinned lath will not work.
Step-by-step instruction on installation of ondulin
Ondulin - installation by technology
Fill the cells of the roof with a heater, and on top of it fasten the waterproofing film to the rafters.
Fill over the laths of the slats of the control unit to create a technological ventilation gap.
The second step. Start laying the ondulin. First fix the row, beginning with the bottom of the roof slope. Side choose the opposite of the prevailing direction of the wind - so the airflow will not blow out under the roofing.
Fix the sheets so that their lower edge extends slightly beyond the cornice board. Select the length of the protrusion individually. It should be enough for a normal drainage of moisture approximately in the middle of the cornice groove. At the same time, the projection should not be more than 7 cm.
Ondulin stack with an overlap in one wave. The end overlap depends on the slope of the roofing skate and can be from 17 to 30 cm.
Lay the first row of ondulin completely.
The third step. The second and each next even row stack, starting with a half sheet. So you "will dissolve" the joints of roofing elements in adjacent rows.
Lay out the ranks of such a scheme, until you reach the roof ridge.

The fourth step. Before assembling the finishing rows, fix the additional crate for the ridge profile. The hobby is best done with standard profiles from the same manufacturer, whose ondulin you use. Profiles should overlap each other by 12.5 cm. Nail the roof ridge to each wave of the sheet.
Fifth step. If between a wall and roofing structure there are joints, decorate them with the help of standard profiles of the same manufacturer. Also the profiles form the joints of different planes of the roof covering (valley).
The sixth step. Provide a reliable waterproofing of the joints of the roof and the pediment board. This can be done in two ways. The first is to bend the edge of the onduline sheet and nail it to the pediment board. The second is to impose on the roof edge an ordinary rectangular profile, also known as a gable element.
Care of the finished roof
Roof construction of ondulin does not need special care. You will only need to remove excessive contaminants in time to prolong the life of the coating.
After some time, the ondulin may lose its original color. To restore an attractive appearance it will be enough to cover the sheets with special paint.
Thus, the roof of ondulin without any problems fits with their own hands. Follow these technological recommendations, and the finished coating will serve you faithfully for dozens of years.
Video - Roof from ondulin with your own hands
Ondulin is bituminous material, which consists of sheets. In addition, in its composition (no harmful substances), in the composition of cellulose, as well as fiberglass coatings, with additives of cardboard, which is topped with bitumen. The environmental friendliness of the material is the determining factor in the choice of roofing. In shape, this wavy, slightly rough material is represented by four shades: red, black, brown and green. This helps to beautifully decorate the roof of the building.
Covering this building material is done without using special skills. It is necessary to follow the instructions. If the roof was previously made of metal coating, slate, roofing material was laid, then it is not necessary to remove these materials. It is possible to produce a slight deformation of the ondulin sheets. They are elastic, which allows them to be bent without difficulty. Moreover, the sheets lie unproblematically on any surface.
Preparation for work - the necessary materials
So you decided to make a roof of ondulin, now you need to pick up tools, materials. Work better together. The following materials are prepared:
• A huge number of onduline sheets are 200x95 cm. The roof is measured, the total figure in sheets is counted. By the way, do not forget to add 10 percent, and sometimes 20 percent for the projections along the edges.
• We also need a beam for the construction of the crate. The cut is 40x40 mm.
• Also in the kit, which is supplied with sheets, you will find special fastening nails. Of course, if you have chosen a red ondulin for flooring, then also select the color of nails red. They are similar in shape to screws, have a rubber frame at the top - this is an additional layer of waterproofing from water leaks after fixing ondulin, also in color. Material - carbon steel.
• A horse is a corner. Its place is located near the junction near the roof slopes. Waterproofing here should be done very carefully. It is also used at the joint of a roof and a vertical wall. Around chimney used aprons of rubber.
• Required for the border with the window from the roof - insulation tape. It serves to seal the joints. Can be used as a valley. Pay attention before fixing the insulation it is necessary to eliminate the cause of the contamination - this will allow to get rid of the bad joining of the insulation.
• In addition, we still have a special pipe for ventilation and cornice filler.

Required Tools
The following tools will be required:
- To cut the sheets we need - a hacksaw.
- Ordinary pencil
- Simple lightweight hammer
- Building centimeter or ruler
- Cutter
- Screwdriver
- ordinary thread in order to make the borders of the crate
It is worth noting that it will not be superfluous if you have a special ladder available, with which you can fasten it to the skate.
How to prepare the roof
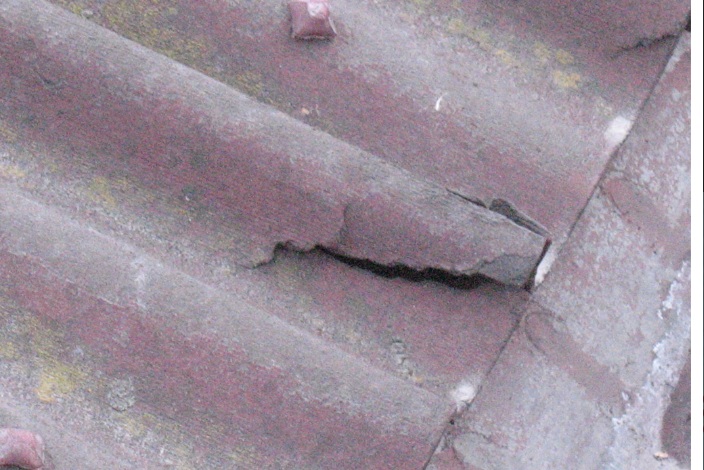
Before laying out the onduline it is necessary first of all to make sure that the old roof is still able to withstand a new load of + 100 kg, because wet snow in the spring will give the roof a heavy load, if you are not sure then we advise you to dismantle the roof.

The roof must be cleaned. Use any materials for cleaning. It is perfectly suitable for a broom, preferably on a long handle. From the surface of the roof you need to remove all debris, the remains of ash trees, or for example if you make a roof in the fall - leaves.
Construction of a crate for ondulin
According to the recommendations of the builders and special companies that sell ondulin, their instructions say that the ondulin should be laid on solid sheets of the crate - this will ensure stability before deformations due to sun rays in the summer and the severity of the snow in winter and, of course, of the melting snow in the spring.
You can do it yourself from a long beam of 5 to 5 cm. Firstly, a longitudinal crate construction is installed, and then we begin to fasten the beam with long self-tapping screws to the old bar. First, the extreme elements are fixed. Then a string is stretched across them. In its direction, the other bars are fixed. Then comes the time of laying the horizontal crate. Bars we will install already across the reinforced bars. The intersection points are fixed with screws. To facilitate the laying process, a special block with a section can be used.
When the roof is flat, it is better to make a longitudinal construction from the crate. Plywood is used which is not afraid of moisture. Please note that the design of the crate must be carried out extremely reliably. After all, onduline is a pliable material, with large clearance between the crate, it can take a little time. Swaying or protruding sheets will give our roof a sagging look and then leakage will begin.
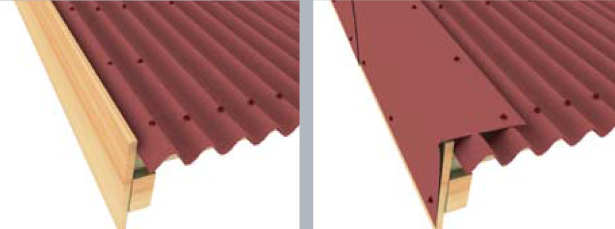
The process of laying ondulin
On the design of the battens that we made we begin to try ondulin (as shown in the picture below). Please note that when attaching ondulina sheets from the bottom, they must act without fail, otherwise the sheets will be stacked incorrectly, that is, they must close the so-called "Windboard". This part of the roof closes the gap and warns against getting wind currents under the roof.

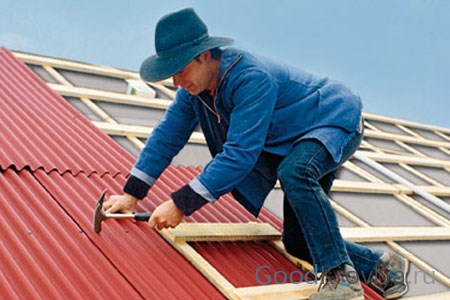
Put ondulin, according to the rules, start from the bottom, from one corner. Usually this is done exactly from the edge where, as a rule, a strong wind does not reach. Also know that you need to fix the ondulin in the transverse bars horizontally. Nails with "hats" are used. One sheet consumes about twenty nails. Having arranged the initial series, they pass higher. The first ondulin sheet should be visible on the half-width of the standard sheet so as not to load the corner fixing point.
Sometimes when laying a metal crate is arranged. The sequence of work is preserved, there is no difference. Only the metal sheets of the crate are fastened with screws.
To achieve a good result - a neat, beautiful roof - you should consider some features of the styling.
• Sawn unduliated sheets with a better-oiled hacksaw. Then they will not crumble. Sometimes for cutting use circular, saber electric saw.
• You must not break the stacking technology.
• High temperature will interfere with operation. Ondulin will become flexible, and it will become difficult to mount them on the roof.
• When you move, you can not step on top of your head. You can only become part of the bulge.

Advantages of such coating
The demand for roofs from ondulin is growing. This is easily explained by the merits of this roofing building material:
- The roof, neatly, properly covered with a crescent, has a beautiful view, a flat surface. It is reliable - the material repels moisture, drowns out the sound of rain, bird fuss on the roof.
- Stacking ondulin is not an expensive exercise. In addition, you can lay it yourself.
- Coverage is long.
- Ondulin sheets are flexible, therefore practical for mounting uneven roofing.
- The roof of ondulin does not tolerate acid, does not contribute to the appearance of fungal plants and moss.
These characteristics will help homeowners do right choice. Ondulin - best material for the device of a roof.
Video - montage of ondula by one's own hands