As it is known to summer residents who have the opportunity only once a week to get to the site for watering the garden, a sad picture in the arid hot summer: drooping leaves of courgettes and cabbage, tired cucumber, the yellowed feathers of onions. You just have to grab buckets and watering cans and carry water to a thirsty earth. Not less than a liter of 15-20 per square meter is necessary to pour out, at least a little to alleviate the life of the plants, which have suffered from moisture. And the gardens are not measured in meters, but in hundreds. How many tons of water do unfortunate summer residents have to carry in buckets for the summer, even to calculate scary.
Meanwhile, the solution to the problem has long been found: drip irrigation allows you not to manually carry water, do not injure plants with a long absence of moisture, save up to 50% of the liquid for which you have to pay money. And for some garden crops, radical watering is preferable to water that falls on the leaves.
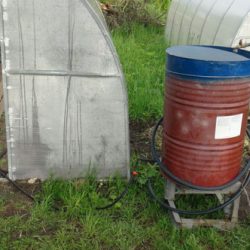
Installation ready-made kit drip irrigation will take only a few hours, even if it is the master himself, without the involvement of specialists. For the installation of the system, it is not necessary to have a water pipe in the area, enough capacity, which will be raised above the ground to a height of about 2 meters.
A pair of 200-liter barrels will be able to provide moisture to all 6 acres during the working week.
The owner will only have to remember to fill them before leaving for the city.
What is the drip irrigation system?
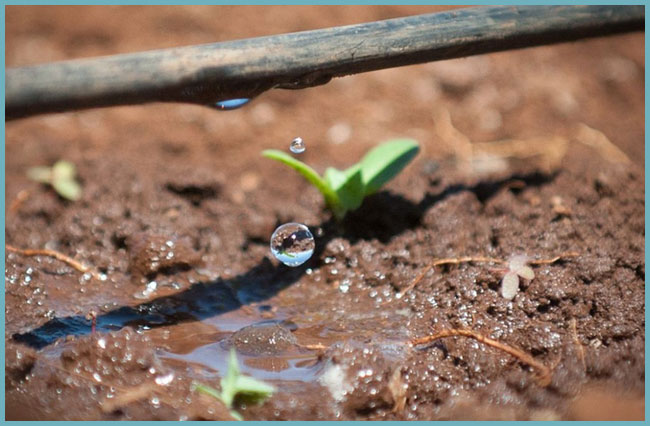
This is a special equipment consisting of spreading pipes connected to a water source and drip hoses (tapes) through which water is dosed to each plant. When growing crops in the open field, they usually use drip hoses and tapes. Special emitters are built in the hose, providing a certain water flow (1.5-2 l / h). The drop tape differs from the hose in a smaller thickness.
For the cultivation of various plants in a greenhouse or at home, use adjustable external droppers. Each dropper is connected to the dilution tube individually. With a large number of plantings, this system takes a lot of time to install. But with non-standard arrangement of plants it is very convenient.
The use of drip irrigation has several advantages:
- water saving up to 40-50%;
- reduction of the risk of occurrence and spread of fungal diseases of plants;
- increase fertilizer utilization up to 80%;
- less weed, due to irrigation of the soil only near the roots of cultural plantings;
- increased yield of commercial crops.
Back to contents
How to make the installation yourself?

Before starting work, it is necessary to draw up a diagram of the pipeline, considering the length of pipes and tape, the number of connections and cranes to be installed. For you need to do the following:
- to make distributing pipes;
- make connecting elements for connection to the water supply;
- connect the system parts and connect it.
1. Dilute pipes can be made independently from plastic pipe d 4 cm. This diameter makes it easy to fix the cranes for mounting the drip strip.
Measure the pipe of the required length (from the connection point to the end of the irrigated area), close one end of the tube with a plug. At the other end, install the tap.
According to the scheme mark the holes in places that will correspond to the watered rows of vegetables. The diameter of the holes corresponds to the diameter of the dispensing cranes. If it is supposed to dilute the drip bands on both sides of the spreading pipe, drill holes on the opposite side.
On plastic dispensing taps, fit seals and install them in the openings with the valve facing up.

2. Install a water purification filter and a tee on the pipe from the source of the water supply (barrel or water supply), if you need a free tap for other purposes or to connect another drip irrigation hose. Install on the bends ball valves, which will turn off the drip irrigation system.
Using the adapter, connect the dilution pipe to the outlet of the ball valve. The connection is best made detachable, this will allow dismantling the system and remove it for storage at the end of the season.
3. Hose or tape drip irrigation roll on the surface of the soil at the planting site from the spreading pipe to the end of the row or ridge. Attach one end of it to the dispensing valve on the dilution tube, and plug the loose end. You can squeeze and bend the hose or use stubs.
If you want to lengthen or connect the broken tape, use special connecting elements of a suitable diameter. Completely mounted system should be filled with water and check its efficiency. When all tapes are filled with water, you can adjust the amount of water supplied by the cranes to the desired volume. For irrigation of most plants, it is enough to receive water in the amount of 1 drop in 10 seconds. For seedling, the number of drops should be reduced to 1 in 30 seconds.
Do not include water from the centralized water supply at full capacity. The drip irrigation system requires a maximum pressure of about 2 atmospheres.
Back to contents
Cheap ways to drip irrigation their own hands
A set of materials for mounting the system is quite cheap and affordable, but sometimes you can save even on this. Experienced gardener, forced to rarely visit the summer cottage, use ordinary plastic bottles for drip irrigation.
1. In order to make a mini-system for watering the garden from the bottle, you will need the container itself and the used rod from the ballpoint pen. The rod must be cleaned of the rest of the contents, removing the metal part and rinsing the tube with gasoline. Then one end of it to muffle a match or a stick, at a distance of 0.5 cm from the cap to pierce the hole with a thick needle. The free end is inserted into the hole punched in the bottle, whose diameter is slightly smaller than the diameter of the rod. In the lid make a small hole.
Fill the bottle with water, close the lid and observe the speed of the water: for 1 minute, 2 drops of water should drip. With a capacity of 1.5-2 liters, this will be enough to maintain moisture for 5 days. This bottle is installed near each plant.
2. If the farm has more capacity, 5-10 liters, then it is possible to organize simultaneous watering of several plants at once. To do this, in a bottle or jar make 3-5 holes, in which rigid tubes are inserted 3 cm long. If necessary, the joints are blotted with a varnish or clay.
Pipes are pulled the same lengths of thin flexible tubes (for example, from a medical dropper). The free end can be muffled and pierce the hole in order for the water to drip slowly.
When using a medical system, you can use the existing dispenser. Tubules are placed near the stems of plants.
For such a device, it is important that garbage can not enter the water tank, which can clog the watering hole, so the container must be covered with a lid.
In order to receive air inside, leveling the pressure inside and out, in the lid make a small hole or tighten the top of the tank grid.
Installation of a drip irrigation system requires a lot of money and time. But it will help to save water and will serve as a guarantee that when visiting your site occasionally truck farmers will never be disappointed with the crop.
Each vegetable grower understands perfectly well that timely irrigation of the plot is important for intensive growth of cultivated crops. Therefore, in order to increase crop yields, drip irrigation is used. A comparatively inexpensive and easy-to-use micropolyte installation not only relieves gardener from monotonous work, but also reduces water consumption by more than 60%.

The drip irrigation system supplies water strictly to the root zone.
Principle of operation and main advantages of the system
The operation of the system is based on a dosed mode of supply, during which a low water flow occurs.
The soil structure does not change and water starvation does not occur in plants. The supply of moisture is carried out continuously or as necessary in small doses for each plant. In the process of irrigation, the movement of the water flow through the pipes is slow, which allows the water to warm up to a comfortable temperature before entering the basal zone.

The principle of watering drip irrigation is to feed water through the pipeline in small doses. Through special droppers, it drips outwards, moistening the soil to a depth of 1 m.In this case, the row spacing remains dry, which significantly reduces water consumption. On household plots a private type of water supply to the system is usually regulated manually, and on large areas of cropping, automatic controllers are used.
The advantages of the irrigation system include:
- excellent work both on open grounds and in greenhouse conditions;
- ease of use for both garden crops and hedges, and for fruit trees and shrubs;
- possibility through the drip lines to fertilize plants with liquid fertilizers.
Back to contents
Arrangement of drip irrigation system
Since the work of the installation of the microfilm does not cause difficulty, therefore, even an aspiring amateur vegetable grower can assemble and install it on its site.
For drip irrigation, you need to purchase the following accessories:

- the water tank (if a well is not being used, a well or an open reservoir);
- pump;
- the main pipeline;
- filter;
- manometer;
- the counter for water;
- starting fittings;
- drip tapes;
- droppers;
- connecting fittings.
Back to contents
Assignment of basic elements and their main functions
The water supply to the drip irrigation installation is carried out with the help of low- or medium-pressure pumps. The first type is preferable, since it allows the use of large-sized droppers, which are much less likely to clog. In small areas, the pump does not make sense. Therefore in most cases it is replaced by a tank or a tank. It can be filled with a hose or connected directly to the water supply system. To obtain the required pressure in the drip irrigation pipeline, the water tank rises above the ground to a height of 1.5-2 m.
Arranging the drip tube.
For the supply of water to the system, pumping stations of the type BV, BTSP, BZ, whose productivity is 1-6 m³ / h with a head pressure of 10-40 m are most often used. The period of operation of the pumping unit is usually from 3 to 10 min with a break of 30-60 min.
The purpose of the filter is to precipitate, coagulate and flocculate the supplied water to the specified values. When using open reservoirs, wells and wells, two kinds of filters must be consistently installed: for primary and for final cleaning.
For primary filtration of the water flow from mechanical impurities, claydite, sand-gravel, and crushed stone cassette-type devices are used. Final cleaning is carried out by open hydrocyclones, filters with expanded polystyrene loading and mesh nozzles. The cost of organizing the filtration station on average is 10-15% of the total cost of the project. The filter is selected depending on the pump capacity and the diameter of the outlet.
When laying distribution lines, it is better to use PVC pipes. They are characterized by good wear resistance, elasticity and long service life (more than 5-6 years). In addition, the pipes have high resistance to temperature fluctuations and can be used in the range from -40 ° C to + 50 ° C. They are also able to withstand water pressure in the pipeline up to 3 kg / cm².

The water tank must be 1.5 meters from the ground.
When purchasing the product, it is desirable to give preference to the black color of the pipes - this will help prevent water blooming and clogging of the droppers. When laying the main pipeline, pipes Ø38-51 mm are usually used, and for water lines - polyethylene Ø3-10 mm. When choosing the type of irrigation lines, it is necessary to take into account the assortment of growing crops on the site. In the ratio of the service life / price the best option is a drip band with a wall thickness of 0.2 mm.
Droppers for installation of drip irrigation are of two types: with batch and continuous feeding. Their installation depends on the type of the drop system: for the above-ground installation of the pipeline, the dropper is located directly on the tape, and when buried in the ground they are installed on the outlet pipes. The optimum diameter of the drill holes for irrigation tapes is usually 0.3-0.2 mm with a water consumption of 0.9-12 l / h.
Back to contents
Installation of the drip irrigation system: DIY
Required Tools:
- drill;
- scotch;
- scissors;
- shovel.
Installation of the system is better to begin with the construction of the drawing of the site and the schematic layout of irrigation tapes in the beds. Then, the required length of the main pipeline, distribution pipes and irrigation lines is determined. At the same time, the width of the rows (about 0.6-0.8 m) and the distance between the holes are taken into account.
Installation of irrigation lines in beds is carried out in the following sequence:

- If it is intended to use a water tank, then it should be installed at an altitude of 1.5-2.5 m above ground level. And to pump water from the well at this stage, you need to connect the pump.
- Distribution pipes are laid perpendicularly to irrigated beds and fixed to the ground by staples made of thick wire.
- The distribution pipe must be connected to the water tank. Before connecting, filters must be installed, and, if necessary, a pressure gauge and a water meter.
- On the pipe markers mark the points of connection with the drip tapes and drill a small diameter drill. Also, holes can be cut with scissors or made with a soldering iron.
- In the received holes, the starting fittings are inserted.
- Along the beds the drop strips are laid out as close to the plants as possible. If it is not possible to use finished products, then in a Ø3-10 mm pipe, drill holes should be drilled, the distance between which should be equal to the distance between the holes.
- Drop the droppers into the holes.
- On the one hand, the drip band should be put on the fitting, clamped with a nut and connected to the distribution pipes. At the other end of the irrigation line, insert the plug or edge and bend it with adhesive tape.
- The cutting of the main pipeline into the tank is made slightly above the bottom, which will allow the trash to settle on the bottom and not get into the pipe.
This completes the installation of the system. To operate the drip irrigation, the vegetable grower itself fills the tank with water or turns on the pump, selects the necessary water pressure and starts watering.
Summer heat is becoming a test both for summer residents, and for plants of open ground and greenhouses. It is necessary to run around with a watering can or a hose every evening and water the plants, but not all gardeners have such an opportunity. From the current situation, you can find a way out by arranging the irrigation system from various improvised materials, because the factory design is worth a lot. Drip irrigation will not only save time and health, but also save the amount of water consumed, each plant will receive as much moisture as necessary for a full-time life. With their hands, the drip structure can be collected even from medical droppers, using a barrel as a reservoir for heating and storing water. The video will demonstrate the drip system in action.
Advantages of drip irrigation
The first drip irrigation was used by the Israelis. How effective was the idea can be judged by the fact that today Israel is the leading exporter of agricultural products. Let's look at the main advantages of drip irrigation.
Council. Algae can multiply in a barrel of translucent plastic, which strongly clog the irrigation system. The same applies to the transparent water hose. Choose opaque products.
Where drip irrigation is applied
Droplet system It was created for watering plants planted in the ordinary way. It's not just crops, but flowers, trees and grapes. It is very convenient to irrigate greenhouses and greenhouses in this way. Drip irrigation is not suitable for wetting lawns. It is impossible to water a large area with tubes. Sprinklers are used in this case.
Efficiency and ease of use allows you to care even for a large garden or a berry, without spending huge funds for watering and forces to implement it. Correct application allows to achieve impressive results, which is very difficult to achieve by ordinary spraying.
Council. The efficiency of drip irrigation increases if the root circle is straw or other organic matter.
Device of the system of medical droppers
To collect the simplest irrigation system you need such materials: a barrel, a drip irrigation hose, tees, joints and plugs to it, droppers. The hose can be a plastic water pipe or any rubber. The stages of installation of the system are as follows:
- First lay out the water supply pipes along the beds. If you need to irrigate a few beds, then do the wiring and use the tees to connect the hoses to a single system.
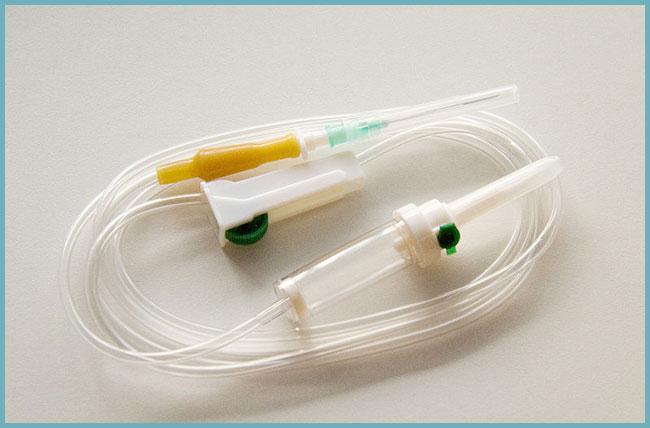
A medical dropper can be used for drip irrigation of plants
- Make plugs at the ends of the water pipe.
- Opposite to each plant, holes are made in the supply pipe. For this purpose, an awl or self-tapping screw is suitable.
- Insert the dropper tube into the holes. The amount of water supplied is regulated by a wheel. Each culture requires a different volume of water supplied and the frequency of irrigation.
- Connect the water supply to the barrel through a coarse water filter - it will protect the system from clogging.
- If you notice that the amount of incoming water has decreased, you must disassemble all components and rinse.
Council. In order for the system to work correctly, it is necessary to ensure proper internal water pressure. This can be achieved by lifting the barrel above the ground level by two meters.
Underground drip irrigation
Underground irrigation differs from the drip method of supplying water to the roots of plants. Moisture enters through the holes in the tubes, which are laid underground. Usually used polyethylene pipes diameter from two to four centimeters. Holes make a round or slit every 30 cm.
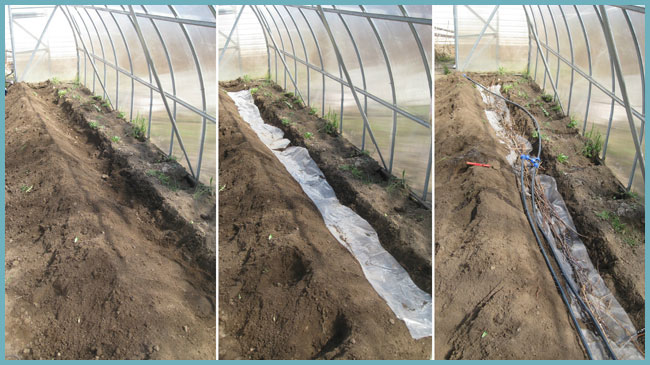
The depth and pitch of the pipes depends on the composition of the soil and the crop. Consider a similar device for the example of a greenhouse bed:
- dig a trench to a depth of half a pint of shovel (to the depth of the roots, but not higher);
- at the bottom lay a strip of film, which will serve as a waterproof barrier, so that the water does not go immediately into the depths;
- on the polyethylene, scraps of twigs or pebbles are laid, and on top of the low-pressure polyethylene pipe, it will not break in the winter at low temperatures if there is water inside. A very important point: the water supply is arranged in the middle of the pipe through a tee so that the water is distributed evenly;
- at the ends of the water pipe make stubs;
Organization of the system of underground drip irrigation
- now start drilling holes every 15 cm of pipe on both sides. A drill for metal with a diameter of 2 mm is suitable;
- the end of the pipe is withdrawn and connected to the water intake;
- test the system;
- so that the holes do not wallow in the ground, the tube is wrapped with non-woven material, ideally - with geotextile, but old kapron tights or. They take up not tight tape or ties;
- on top of the structure is laid another layer of branches and the earth is sprinkled;
- control moment. Turn on the water supply for a couple of minutes, dig out the soil in several places and check the degree of wetness. If the irrigation is even, you can start planting seedlings.
Council. With irrigation, apply fertilizers that have a chelate form. They dissolve well in water, leaving no particles that can clog the drip system.
Drip irrigation from plastic bottles
From plastic bottles you can build a simple drip irrigation, which does not require any financial injections. Of course, the full system of drip irrigation, this design will not replace, but demanding for moisture crops such as pepper, cabbage, cucumber, eggplant or tomato, is quite suitable. There are several types of similar devices.

Watering of trees and berry
Here are a couple of ways to simply water the raspberry and fruit trees.
All types of drip irrigation can be combined with each other. Their autonomy will achieve the best results when growing plants. Assembly does not take much time and effort. In any case, the efficiency of the homemade irrigation system is undeniable and high, you can verify this by starting from the simplest device as an experiment.
Drip irrigation system with your own hands: video
Drip irrigation: photo


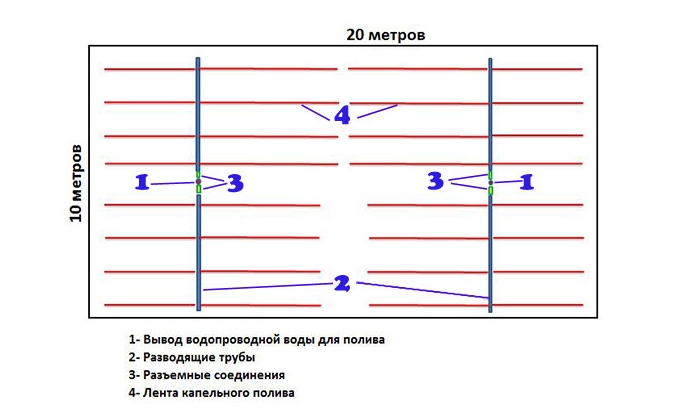
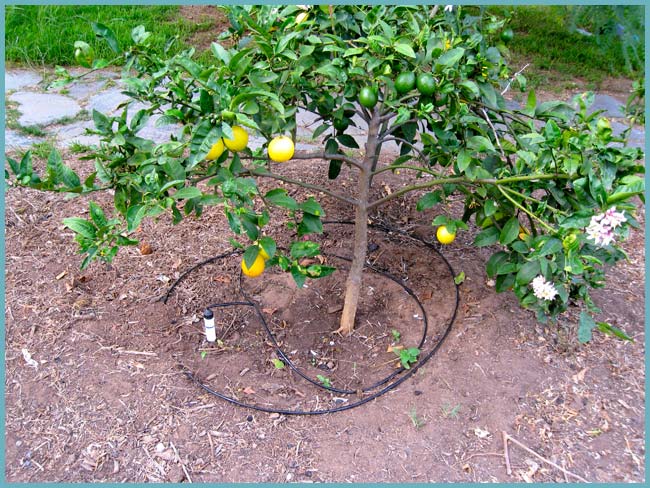
A couple of years ago I decided to make a full system of drip irrigation in the garden. Has bought 100 пог. m hose with a diameter of 15 mm, tips-droppers, a set of plastic tees, corners and fittings of the appropriate diameter and built a classic scheme (see the figure).
Water comes from an ordinary 200-liter barrel mounted on a stand about half a meter in height.
I may be noticed that this is too low, but in fact, given the volume of the barrel, this is enough to ensure a constant pressure in the hose.
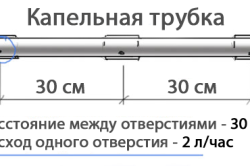
Droppers in it are laid along its entire length at a distance of 10 cm from each other, and as a result, the water evenly falls straight onto the soil, forming a continuous wet line along the entire length of the irrigation system.
On a note:
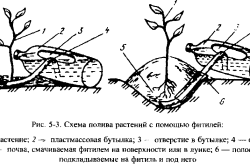
You can use drip irrigation and for irrigation of domestic plants - for example, recently transplanted seedlings of flowers, which at this time is particularly sensitive to lack of moisture. The simplest system of such watering is vertically stuck plastic bottles in the ground.
And here at this moment I want to stop especially. Now in the hosi-shops are selling hoses with distances between droppers of only 20-30 mm. In my opinion, these are too small intervals, which leads to an unjustifiably large flow of water.
Homemade filter for drip irrigation
Now one more trick.
In any normal water supply system, there are filters. They are installed from my inner side of the barrel in front of the drain cock. And this is nothing more than fragments of kapron tights. Very convenient: the water passes through them freely, and any dirt inevitably gets stuck, you just have to cut off a new clean piece once a month from old pantyhose and fix it in a barrel in exchange for the polluted one. When I collected the irrigation system, I began to find out its effectiveness, using the mobile phone timer for this. Having brought the system into working condition, it included an alarm for one or two hours and switched off the irrigation on this signal. Experienced by determining, knowing the parameters of the barrel, how much water flowed during this time, as well as the upper and lower water levels. In that season, summer was not particularly arid, and I managed to get some data for further practical use of drip irrigation.
So, to get a good harvest of tomatoes and cucumbers, I needed water for one plant for one calendar day - 1.5-1.7 and 2.0-2.2 liters, respectively. Without false modesty, I will say that this is valuable information, because in any scientific and specialized literature, the authors operate either on the production scale of irrigation (per hectare), or relatively conditional (in square meters). I know that many summer residents orient themselves to the second option. But after all, he does not take into account either the weather features or the number of plants growing on this unit of the area, and therefore it is not necessary to talk about the universality of data on irrigation.
Another important conclusion I made for myself: every plant should be watered from two sides!
Drip irrigation in drought and heat ...
Last season I organized watering according to the worked out scheme, but July, August and September were unusually arid, not reaching their temperature maximum for the last 20 years, only half a degree. Still not knowing this, I conducted careful monitoring of the water consumption in the greenhouse, where six bushes of tall tomatoes Pink Pink and seven bushes of tomatoes Pink Bush grew. When the drought came, I increased the rate of water consumption to 2 liters per each bush for a calendar day and received an excellent result in both quality and quantity of fruits.
In another greenhouse, 13 bushes of Shchedrin F1 cucumbers were planted. In July and August, ie. in the peak of the drought, I gave each plant daily 2.5 liters of water. And the harvest of cucumbers was simply stunning for me, a gardener with half a century of experience! Approximately the same expenditure was required for planted in open ground 50 bushes of tomatoes (I do not know the name of the variety, but it does well without shelter), 40 pieces of Bulgarian pepper and 20 cucumbers Khabar and Phoenix (second term).
I also drank beets, carrots, garlic, onions, beans, potatoes and a few dozen trees and shrubs in the garden. And all these plantings, too, have perfectly survived the drought and heat, and did not offend me by harvest. It's me all to the fact that if I poured from a watering-can or a hose, then to get this result I would just use a breathtaking amount of water. And, most of all, he would not have achieved success anyway: either he would fall off his feet with fatigue, or the well would dry up.
Absolutely right one of the readers who noticed that the young truck farmers do not take up energy and energy, but there is a catastrophic lack of time. But in the elderly, on the contrary, there is time, but not enough strength and energy. Therefore, I call on them to protect their health and water their gardens in their own pleasure. I also want to note that during watering from the hose and leks, involuntary sprinkling takes place, which most plants react negatively: drops of water reflected from the soil surface, after hitting the plant, can infect with some muck.
The earth, with direct watering, forms a crust due to its swim, and the roots can not breathe.
Herein lies the advantage of drip irrigation, which allows water to be supplied in small fractions with no flow across the ground.
Water temperature for drip irrigation
Our science, and many readers believe that the optimal temperature used for irrigation water should be in the range of 15 to 25 °, otherwise the plants will fall into a stupor. In general terms, the correct statement, but there are a number of nuances. For example, if there is no way to warm the water, then the negative effect of the cold "bathing" can be leveled, after covering the bed with water, - let the sun warm up the soil itself. This way out of a hopeless situation is also good when planting plants on the hydrogel: in this case, it becomes possible not to water them for 10-15 days! This experience I have tested, the result is great.
But watering with hot water does not greatly increase the temperature of the soil, but the roots are better served by moisture and oxygen dissolved in it. My experience shows that the temperature of the soil in a drought is above the air temperature by at least 10 °. Therefore, it is better to pour hot water than not to water at all. A special role in this case will be played by mulch: it, like a cotton wool of the Central Asian, warms in the cold, but in the heat it does not allow the soil to overheat. If I did not attach much importance to mulch, then now I do not grow any culture without it! Moreover, it eventually turns into humus.
Drip irrigation: for your own pleasure
What else is convenient in the drip irrigation system - turned it on and forgot, do yourself other business. But she still requires a delicate attitude.
For example, a hose made of a thin film is at least light and durable (and punctures can easily be covered with tape or tape), but is afraid of sharp kinks and bumps.
If the full rupture could not be avoided, there is only one way out - insert an additional choke. At the end of the season, it is best to screw the hose onto a plastic bottle with a volume of 1.5-2 liters, again attaching it with adhesive tape.
I usually produce the installation of the irrigation system, covering the beds of the most different mulch. Do not be afraid that it will be over the hose: even if it is slightly pressed by it, the system will still work fine. All the beds I first fertilize with useful solutions with a watering can. Then I spread the fertilizer in a bucket, put it in a bag of sugar, stand there a couple of days and pour into the barrel, where the water comes from for the drip irrigation system. Plants better assimilate fertilizers in low concentration. I will add that usually I do not cover anything from the top, washing them from the silt before the beginning of each season.
Friends, water the garden for your own pleasure and get good harvests!
Arrangement of drip irrigation by one's own hands: drawing
1. The tank. 2. Ball valve with filter. 3. Hose d = 15 mm. 4. Tee d = 15 mm
5. Angle d = 15 mm. 6. Irrigation hose with droppers d = 15 mm. 7. A plant. 8. Stopper
Drip irrigation with your own hands: a dropper to help
There is something to learn and what to adopt, but there is something to argue with, but it should be so. For example, readers like to talk about their drip irrigation systems. I do not argue, this is a convenient thing, but personally for me it is quite an expensive pleasure. And I made a simpler and cheaper device for watering tomatoes planted according to the scheme of 50 × 50 cm in a greenhouse (it is, incidentally, of polycarbonate, 6 × 3 m).
I took a metal-plastic tube a little longer than the length of the greenhouse. In the local hospital I took silicone tubules from the droppers. Cut them into pieces 30 cm long and inserted them into the holes that were drilled through the top of the plastic pipe every 25 cm (their diameter is 0.5 mm smaller than the diameter of the droppers). They keep it there firmly and do not pass water at the seams, and I did not use for their fastening either glue or sealant. Just folded the ends with a "boat", put them in the holes, and they straightened themselves there. (All this is clearly visible in the photo.)
To each bush tomato summed up one flexible tube. As a storage tank for water I use a 50-liter barrel, into which I put in a tap connected by a hose with a metal-plastic pipe (the opposite end of the pipe was plugged). At the beginning of the test of my system there was an incident: the water did not reach the end of the pipe.
 I cut it in the middle, reconnected it via a tee, stopped the ends, and everything went fine. Water slowly comes through the tubes directly to the plants, does not fall on the leaves, does not wash away, does not compact the soil.
The barrel was raised to a height of 1.3 m. Everything works, tomatoes bear fruit.
I want to note that for other crops with a different planting pattern, there must be, respectively, another location and number of watering pipes from droppers.
I also want to tell the villagers about one insulting mistake I made the year before last. I bought seedlings for the seedlings in the store, sowed it, and everything went well until I suddenly noticed white-winged tomatoes on tomatoes. She lived right on the windowsill! Before that, I only heard about it, and that year I saw firsthand. Apparently, the reason for this was the contaminated soil, in which peat was added. Seedlings treated with a chemical, although I'm the enemy of this method, but there's nothing to be done. And in fact all the same the whitefly has removed to a greenhouse, and there with her to consult was much more difficult. In short, it bred higher than any measure, using chemistry in the greenhouse - no-no!
I brought it out only by freezing in the winter: I left the doors of the greenhouse open for three months, and the temperature at that time often dropped below -30 °. After that, I buy the necessary soil, and even better - to harvest my own. Yes, I almost forgot: in the previous winter, without opening the doors of the greenhouse, the whitefly successfully hibernated.
How to make a system ...
Every garden and garden needs regular watering. This is especially true for hot summer days. Many summer residents do not have the opportunity to regularly water their crops. To the aid can only come the system of drip irrigation. Drip irrigation is the most rational way of delivering water to plants. It's automatic - just set up the system once for the entire season.
Drip irrigation will never allow the root system to dry out. He also does not allow the formation of a hard crust on the surface of the soil or the erosion of the fertile soil layer. Very many gardeners and owners of personal subsidiary farms want to install a drip irrigation system on their garden. In this article, we will tell you about the system of drip irrigation, tell you how to mount it yourself, etc. All tips will be accompanied by photos and videos. One of the videos will tell you how to make drip irrigation with your own hands from scratch from improvised tools.
Arrangement of drip irrigation system.
Before buying or making your own hands the drip irrigation system, you need to understand its device.
The device of the drip irrigation system is not anything complicated. The principle of operation is the direct supply of water to the root system of plants. Water can be fed to the surface of the earth, and maybe to some depth. It depends on the equipment used.
Water can be supplied both under the influence of gravity, and forced. With a gravity feed system, water comes from a pre-filled tank under the influence of gravity. That is, the whole system should be under a certain bias. In the case of forced delivery, water comes from either a water pipe or from a pump that is connected to the well. All drip irrigation systems are not designed for a pressure of more than two atmospheres, as a rule, this pressure is much less. Therefore, in the forced system, there must necessarily be a reducer, which regulates the water pressure.
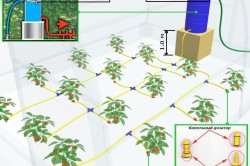
 Photo: Gravity drip irrigation system
 In the gravity system of drip irrigation, in order to create the desired pressure, the tank is raised to a height of at least 2 meters.
From the source, water enters the irrigation site through pipes that have special branches.
From the branches there is a drip band (special thin-walled tubes with holes). passes along rows of plants. The end of the drip tapes is closed with special plugs.
A good drip irrigation system should have a fine filter for longer life of the drip bands. If there is no filter, then the drip band will quickly clog and become unusable.
Designing a drip irrigation system for your site.

It is very important to properly design the site for your site before you buy and install the drip irrigation system.
For a small suburban area It is necessary to choose a drop tape with the arrangement of droppers at a distance of 25-35 centimeters from each other. This will allow very carefully to water the garden. When the droppers are located at a distance of 30 centimeters from each other, the fertile soil layer is completely moistened within 1-2 hours. More watering is not necessary, this can lead to decay and diseases of the root system. During this time, approximately 20-25 liters of water per 1 square meter are spent.
This mode of watering is considered the most optimal. To achieve this mode of drip irrigation, it is necessary to correctly calculate the length of the drop band and the system as a whole, the capacity of the tank in the gravity system of drip irrigation.
Forced watering system allows you to control the process manually and automatically. Manual mode is advisable to install in the garden in walking distance. Turning on the tap, you can safely go to do their own thing. Automatic mode is suitable for those who do not have the opportunity to visit the cottage often and follow the watering process. To organize automatic drip irrigation, you need to purchase a special controller, which can be programmed as you please.
How correctly to calculate the volume of the tank for the drip irrigation system?
 Photo: Watering your own hands
 It is very important to correctly calculate the volume of the drip irrigation system. It directly depends on the area of the territory, which must be watered. It is necessary to proceed from the fact that 30 square meters of water is needed per square meter of water (this water is consumed in about 1-2 hours). If the watering area is 35 square meters, then the tank should be 1000 liters.
For a gravity system, it is important at what height the tank will be located. To provide pressure in the system 0.2 atmosphere, it must be raised to a height of 2 meters.
Much easier things are, if there is a pump that is designed to increase the pressure in the system.
Calculation of the diameter of pipes and drip bands.
With a larger area, it is more advisable to choose a pipe with a larger diameter. For example, for irrigation of 100 square meters there will be enough pipes with a diameter of 25 millimeters.
The length of one drip line should not exceed 100 meters. Droplet tapes are placed in parallel at a distance of rows of landings. If it is supposed to water fruit trees, then the drip lines should be placed at a distance of 0.5-1 meter from the trunk.
Types of drip tapes.
Tape for drip irrigation is a thin-walled tube in which holes with a certain pitch are made. Instead of holes, there may also be cracks, emitters, nozzles, etc. The holes are made in such a way that a certain amount of water is poured out of them. For example: 1 liter per hour, 2 liters per hour, etc.
Today in stores there is a huge number of types of drip tapes and they differ among themselves in the way of making holes. The most common slotted and emitter droplets.
Slit tapes for drip irrigation have a kind of labyrinth, which is integrated over the entire length, in which holes are made with a certain pitch. Droppers of such a tape are quickly clogged with content, therefore it is not recommended to use it for more than one season. The price of this tape depends on the pitch of the holes. The more holes, the higher the price.
Slit tape requires very deep filtration of water - some species up to 80 microns. This requires buying a good filter, which is not cheap.
The main advantage of slotted tape is the low price. It is much cheaper than an emitter drip band.
Emitter drip tape is more technologically advanced than slotted tape. It has a flat labyrinth emitter built in. Due to its wide inlet and filter, it has very practical protection against clogging. Emitter drip tape can serve several seasons.
Emitter drop can be divided into two types - compensated and uncompensated. They differ in that, in uncompensated tapes, the water flow rate depends directly on the slope of your site and the length of the watering tape itself. A compensated has no such dependence, the water flow is always the same. This tape is considered the most practical and has the best performance.
All drip bands are made from thin materials. Therefore, the working pressure in them is limited in the range from 0.8 to 1 bar. In order to connect the dropping tape to the water supply, a pressure reducer is required.
 Photo: Installation of drip irrigation system on the site with their own hands
 We proceed directly to the installation of the drip irrigation system with our own hands on the site. Installation of the drip irrigation system is not such a difficult thing, as it may seem at first glance.
The first thing to do is to draw a detailed layout of the pipes and accurately calculate the exact number necessary materials, elements of the system and equipment.
What is required for mounting the drip irrigation system:
- Buck, in advance calculated volume. Or it could be a pump that pumps water from a well or well.
- Valve cock.
- Ball valve.
- Pressure reducer.
- Fine filter.
- Controller (if you want to do automatic drip irrigation)
- Adapter for connection to the irrigation system.
You will also need:
- Plastic pipes of the required length, cross section from 16 to 40 millimeters.
- Droplet tape
- Cranes
- Tees
- Mini cranes
- Start Connectors
- Adapters for connection of a drop tape
- Caps.
If you have all the components in the assembly, then you can proceed directly to the installation.
First, let's say about installing a gravity drip irrigation system. First of all, the tank is installed at an altitude of 1.5-2.5 meters. An adapter is fitted into the tank to which the valve cock is fitted. The valve valve regulates the water supply.
After the crane, it is necessary to install a controller that will feed water to the roots of the plants, depending on the installed program. In it, you can set the watering mode (days, time, etc.). After the controller, install the ball valve. With it, you can block the water.
Then a deep filter is inserted into the system. It will help you avoid blockages and premature wear.
After the filter is connected through splitters or ordinary conductors of the pipe, which must be cut beforehand so as to insert drip bands between the segments. The pipes are connected with tees. After installing the last pipe, a plug or flushing valve is installed on its end. A wash valve will clean the system in case of clogging. It is very convenient and practical.
Droplet pipes are already connected to the tees. The end of the dropping tape is bent, a special clamp is put on it, which plays the role of a cap. To the holes of the drip strip, special drippers can be adapted to supply water directly to the roots.
Similarly, a forced drip irrigation system is installed. Only instead of the tank everything is fixed directly to the well or to a water tap.
To install a drip irrigation system with your own hands does not present any particular difficulty. The most important thing is the availability of all elements and the availability of a good tool.
Drip irrigation significantly reduces the costs of your forces and time to care for plants. With the correct setting, this system allows you to increase the yield almost several times. For the winter, the drip irrigation system must be cleaned, otherwise it will become unusable.
Video: Connecting the drip irrigation system with your own hands.
Drip irrigation - Application in the garden and in the greenhouse:
Drip irrigation with your own hands for a small section - Video:
With the onset of the growing season, there is a need for watering and fertilizing. Most effective way is drip irrigation.
Video:
The theme is immense, read the same:
Composting
Greenhouse from old window frames with own hands
Greenhouses for summer residence
Caring for a greenhouse made of polycarbonate
How to season seedlings?
Beds in the dacha with their own hands