Corner shelves are very convenient and take up little space, and still allow you to properly use the nooks in the apartments. They are often used to place audio boxes, phones, vases, books and other items.
In the stores corner shelves and racks are sold, but such a product can easily be made with your own hands, because for such shelves you need a minimum of material and fasteners. The principle of manufacturing corner shelves can be used in the manufacture of kitchen cabinets, cabinets in bedrooms and hallways and other furniture.
In this article, we offer two options for the manufacture of corner single shelves - the first one with the help of grooves-guides, and the second - with the bottom stop-stand.
Corner shelf in guide grooves
Shelves with fastening on support bars, attached to the wall, occur quite often, but this option is slightly different. Here the supporting bars are made in the form of guides, and the shelf itself is inserted into the grooves of these bars.
- The main thing in this case is to make grooves in the bars and perform this work in several ways:
You can apply a circular saw. It is exposed to the desired height and along the guides make several cuts. You can also make the profile edges of the bars with this tool. You can work with a hand saw, but in this case it will not be convenient to cut from above and you will have to come up with a bar fixing on the desktop. It is better to use a mechanical circular.
The grooves are also made with a hand mill with a quarter cutter and a support bearing.If such tools are not at hand, then you can use the simplest method - to make the bars composite. They can be glued together from three parts - a flat wooden slat and two brusochkov square section 15x15 mm. Between these brusochki leave the distance of the thickness of the shelf. It is possible to supplement the fixing rails with screws with a side facing the wall, so that they are less noticeable.
- The corner joint is made on the studs or smooth, the main thing is to exactly align the sides and make a right angle. Fasten the slats in the corner with the help of screws from the inside.
- To the wall, the straps are attached with dowels or self-tapping screws. Their hats must necessarily be drowned in the wall, so that they do not interfere with securing the shelf in the grooves.
- As the shelf itself, veneered plywood, a joinery board or a piece of MDF or chipboard are used. The optimum material thickness is 12-20 mm. When sawing a shelf it is important to measure the angle on the walls themselves, as they do not always converge at an angle of 90 degrees. Then draw a part, cut it with a saw or jig saw, and then trim the front rounded edge with a ribbon to match the veneer color.

Corner shelf with stand-support
Such corner shelves can be made immediately in all four corners of the room and used for placing candlesticks of audio boxes or vases with flowers.
 To produce such shelves you will need: a sheet of laminated chipboard (dimensions 68x68 cm or others at your discretion), vinyl edge for processing the edges of the shelves, jigsaw or saw.
- The workpiece is divided into 4 equal sectors, divided at right angles. When cutting a sheet of chipboard or MDF, do not divide the circle into segments at an angle of exactly 90 degrees. In our apartments the corners are rarely straight, so it's better to measure them in place.
- First, the workpiece is sawed in straight lines, and then the rounded edges are cut with an electric jigsaw. It is important not to crumble the laminate, so it is better to use a saw with a fine tooth. After cutting the shelves on their edges, glue the vinyl edge (using a slightly heated iron)
- In this case there will be no waste, since the part remaining after the cutting will serve as a shelf for the shelf from below. The shelf and the stand are fastened together by screws or metal corners.
- For fastening to a wall use metal plates with slots, which are fastened to the ends of the shelf with screws. Opposite these slots in the shelf, you need to make grooves for the screws of the screws, with which the shelf will be fastened.
To fix the shelf in the wall, it is applied to the chosen place, marks the fixing points, drills the two holes with a drill, screw plastic plugs there and fasten the shelf with screws.
You can make yourself, what can we say about the very elementary details of the room furniture. This master class will show how it is possible to quickly assemble a corner shelf for kitchen from scraps of chipboard, and also will tell about some features of assembly of cabinet furniture.
Work with furniture is an occupation that everyone can do, who knows how to hold an instrument. Only desire is necessary. For the production of shelves for the kitchen were used cuttings of sheets of chipboard, spent 5 hours.
Tools required for work
We will need the following electric tool:
- screwdriver;
- iron;
- belt sanding machine (to give the ends an ideal view).
List of hand tools:
- screwdriver or bit on the screwdriver PH-3;
- set of drills for wood;
- hexagonal wrench 4 mm;
- mounting knife with replaceable blades;
- marking tools: pencil, tape measure, gon.

Consumables that can be purchased in the store for the sale of furniture accessories:
- edge ribbon of the corresponding color - not less than 10 m;
- confirmates - 16 pieces;
- screws - 8 pcs .;
- stubs - 16 pcs .;
- hinged hinges - 4 pcs.
Let's get to work. Sketch and detailing
Making furniture always begins with drawing a sketch with the following details:
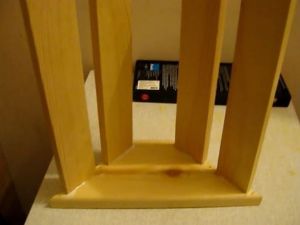
- shelf with a radius of 190x900 mm - 2 pcs .;
- shelf with a radius of 190x1100 mm - 2 pcs .;
- rack 600x265 mm - 2 pieces;
- stand 440x265 mm - 2 pcs.

Radii and chords of bends in the drawing:


Manufacturing of sidewall shelves
We will make the sidewalls of our shelf. On the existing segments of the chipboard, you need to mark out the contours of the curly details.

This is easier done with the help of an improvised compass.

Begin the bend should not be from the arc, but from a flat area of 30-100 mm, otherwise there is a risk of getting untidy mating when pasting the edge.

Two identical parts can be cut out one by one, clamping two sheets of laminated chipboard with clamps.

The inner stand has no upper lip, it is slightly shorter than the outer one.

Even with the use of high-quality saw and jig saw, such ugly chips can appear on the edge.

You can get rid of them by processing the ends with a grinding machine with an abrasive tape with grain size K80 or K100.

After grinding, the edge has this form.

Edging
The parts are ready for pasting. The tape is glued with a hot iron, heating and pressing it hard against the peeled edge.

When pasting, you need to consider several important points:
- Correctly choose the temperature - between the I and II stages of the thermostat.
- Place an cotton cloth under the iron so that the edge does not shine.
- On the inner bends, press the iron only with a spout and do it as little as possible.
The tape is wider than the end face by 3 mm, it is pierced on both sides, the excess is cut with a mounting knife.

After trimming the band, the edge must have such a neat appearance:

After cutting, the corners can be processed with fine-grained emery paper - this will eliminate the contrasting white strip from the glue. The result is two pairs of vertical racks.

Assembling the finished product
For crossbeams rectangular pieces of laminated chipboard of the same length are suitable. It is important to choose the correct width: the shelf should not protrude beyond the vertical stand.

To give the design an originality, the inner stand was additionally trimmed in two places to the depth of the shelf.

In the slot, the shelf board will be inserted and fixed.

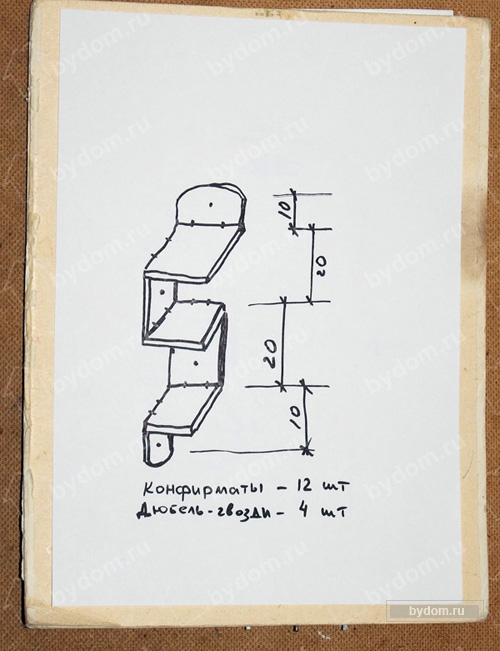
First, the lower shelf and the outer rack are held together by confirmations. For correct positioning, use a square or corner clamp.

At a distance of 8 mm from the edge, a hole is made for the Confirmate, the second step of the cutter should not be more than 2 mm deep.

After drilling, the parts are fastened with a confirmation. The tightening must be done until it stops, until the junction between the parts disappears. Weak crackling during tightening is normal.

The next stage is fixing the inner vertical stand at an arbitrary distance from the outer one.

Then you need to install the top shelf. First it is attached to the external rack.

We drill it and attach it with confirmation letters.

Note: when drilling, it is necessary to keep the drill strictly perpendicular to the surface of the part, otherwise after twisting the confirmation there will be a "bump".

Quite originally, the upper shelf was fastened to the inner rack. Even the elongated confirmation letters were not enough to fasten all three elements, so the groove was made by hand drills.

For clarity, see the photo with the drills used, their diameters: 6, 7.5 and 10 mm.

First a 6 mm hole was drilled to the full depth, then two countersinks were made: 7.5 mm for the cap and 10 mm for the flange. A ready-made groove is screwed in a confirmation key, which now extends to the bottom of the rack.

The length of the Z-shaped key was not enough, because the longer L-shaped was taken, for convenience, the bits extended by the usual holder.

Now it remains only to fix the canopies. Black screws are not suitable for this - they can burst under load. However, they are convenient to make the first pass for more convenient screwing of furniture screws.

After gluing the decorative blinds, the shelves can be hung in place.


On the corner joint, no additional fasteners were used, since the chipboard board has sufficient bending strength. But purely for aesthetic reasons, the shelves can be joined together by dowels or a metal plate.
Redrik Adlynx Shewhart, rmnt.ru
This is the simplest product that can be easily made by hand, drawings for it do not need to be designed on a computer, here comes the drawing sketched with a conventional pencil or pen. As a material, you can adapt any trim, so the cost of such a thing will be very small.
How to make a corner shelf with your own hands?
- As a basic material, we will have an ordinary board purchased in a construction shop. Its width in each case is selected individually, based on your plans.
- In addition, we take the semi-circular cross-section rails for decorating the shelf, PVA glue with the dispenser, screws 3,0х25 mm.
- At an angle of 45 ° mark our rake and saw it on the workpiece.
- We put the first part to the wall, if everything is fine, then we need to make three more pieces.
- Sawing can be as a hacksaw, and jigsaw or other convenient tool.
- In total, we make four corner platforms and ten vertical shelves for the shelf. We clean the surface with sandpaper.
- We proceed to assemble the structure. You can attach details to the wall and estimate how everything will look on the spot.
- In the lower compartment of the shelf we will have 4 racks, on average - two racks, in the top row there are 4 more racks. We fix the posts with screws, strengthening the quality of assembly with PVA glue. We mark the board. So that it does not crack, we drill the holes for the screws with a drill a little smaller diameter than the diameter of the screw.
- The lower part of the shelf is ready.
- First, we screw the screws into the lower platform by half, then anoint the PVA bar, wait a while (1-2 minutes) and tighten the parts with screws for the final. Remains of the adhesive carefully wipe.
- Similarly, we collect the remaining parts of our design.
- Decorate the shelf will be elements cut from the rails of a semicircular section.
- The corner wooden shelf, made by own hands, is ready. We have attached decorative fences that do not allow us to fall down on our things, painted all the paint with gilding, and installed the product in place.


Corner wall shelves are fairly easy to make by hand. Such products serve well in the office, in the kitchen, in the bathroom. On them you can place flowers, books, ornaments, various trinkets. The thing is very functional and you do not need to buy it, if you can do it yourself.
The problem of space is relevant for small and large apartments. It is very difficult to accommodate everything needed in limited square meters.It is almost impossible to imagine a house, an office or an apartment without convenient shelves. The element performs an aesthetic, decorative role.
Shelves help to make room and diversify the familiar interior of the room.
Shelves are used absolutely in any room and for completely different purposes. Excellent in bathrooms, kitchens and living rooms.

Let's consider features and advantages of a construction of corner shelves independently.
Previously, handicraft production of any furniture was considered the lot of the poor. Secured people preferred to buy interior items in stores. But everything there was almost the same design, so even thirty years ago the interiors in different houses were almost identical.
Today, original furniture of its own making is a matter of real pride.
In modern stores there are dozens of different models of furniture, but even among such a variety it is difficult to choose one option that can match all the preferences of the owner of the house. In this case there are only two ways out: to order furniture directly from the manufacturer, or to build it yourself.

Making shelves on the wall with your own hands is not at all difficult, and you can use a wide variety of materials.
The first option may seem ideal. However, not every master will be able to make furniture qualitatively, inexpensively and take into account all your wishes. Find such a specialist is not easy, and there's no point in doing searches if you need a simple wall shelf.

This design element is easier to build on its own.
Self-production shelf has a lot of advantages.

We make the shelf independently: how to decide on the design and materials?
Any wall shelf can have a different shape and design. They can be complex (with additional elements), or simple. Simple shelves can be used in the kitchen.

They are used for storing seasonings or kitchen utensils, so it is useless to come up with a complex design.
The shelves in a semicircle are very easy to make. This option is ideal if there is no time and no desire to do something more difficult. Also, simple shelves can be used in apartments and houses, decorated in minimalistic directions.

Similar styles do not welcome complex shapes and intricate designs.
Shelves with additional elements can be used in living rooms. They can consist of several sections, or have an unusual shape, for example, in the form of the letter "G".

Often such furniture occupies not only the angle, but also some part of the wall.
To decorate such furniture it is possible and original way of cutting if you have experience in this business. The shelves placed in the corner also differ in the presence of the rear wall. It can be present, or be replaced by a wall. If there is a desire to preserve the finish of the walls, then it is better to build a furniture wall.

It does not require much effort.
In this article, we will consider the process of constructing a corner shelf in the classical form. This form is very simple and versatile. Its production will not take even two hours.

To get started, you need to determine not only the shape of the product, but also the material.
Consider the types of materials and their advantages.

To quickly determine the raw material, be sure to consider the comparative characteristics presented in the table.
| Characteristics | Materials | |||
| Tree | Plastic | Glass | Metal | |
| Aesthetics | + | + | + | +/- |
| Durability | + | — | + | + |
| Ease of processing | + | + | — | — |
| Cost | high | low | high | low |
| Resistance to moisture | + | +/- | + | — |
| Resistant to high temperatures | + | — | + | + |
| Strength | + | — | +/- | + |
After analyzing all the characteristics, you can see that it is easier and easier to create a corner shelf from wood.

In this article, we will consider the detailed instructions for manufacturing such furniture.
Instruments
To make a shelf of wood, you need to properly prepare raw materials and tools. You should start with the preparation of tools. To build a corner shelf made of wood, you need to find:
- Electric jigsaw;
- A regular ruler of 50 cm;
- Hacksaw;
- Glue;
- Drill;
- Building level;
- Sandpaper;
- Shelf support.

Shelf making tools.
Materials
In the role of the main raw material for the creation of a shelf the most ordinary board will fit, which fell over the balcony after repair. You can also use the remains of old furniture, or buy a board in the store. When selecting the main raw material, consider several criteria:
- Design. The board should have a suitable coloring and a beautiful ornament;
- Quality. Rotten and old boards are best not to use;
- Integrity. A sheet for making furniture should not have scratches and potholes.

From the prepared board you need to cut the workpiece.
Cut the pieces of plywood diagonally, peel the edges of the nazhdachkoy.Iz of wood residues, you can cut the rack in a number of four pieces. They should be the same size.
Manufacturing process: step-by-step instruction
Apparently, the manufacturing process of the shelf does not require special costs and tools that are difficult to find at home. Virtually all materials and equipment are available from any owner. In this section, we consider in more detail,how to make a corner shelf.

VIDEO: Master-class on making a corner shelf.
Corner shelves in the interior - 50 photo-ideas:


Shelves in the design of the apartment have not only a functional purpose, but also decorative. It is the shelves that can decorate austere interior and make it more emotional.
And they succeed in this due to the appearance and design, which for each case is selected individually.
For example, a bookshelf is designed in such a way that you can conveniently place books on it, the shelf is designed for storage and a kind of exhibition of memorable knick-knacks, figurines, frames with photos, there are shelves for flowers , under office equipment etc.
Shelves differ also in their configuration - usual hinged for mounting on one wall and angled, which are attached in the most unoccupied place, in the corner of the room.
It is this corner shelf that we will make for our apartment.
First, we choose the material of manufacture. The choice depends on the purpose of the shelf. If it is not planned to put pots with flowers or other heavy objects, then almost any material, up to drywall, can serve as a "raw material" for manufacturing this piece of furniture.
But most often the shelves are made of MDF, chipboard, plywood, wood, plastic or furniture plate.
That's the last and we will use to create our angular structure.

And for the work we will need a drill and electric jigsaw, a tape measure and a square, fixing elements.
First you need to sketch out the scheme of the product and determine the size.
In height, this "trelyazh" will occupy about 75 cm, and the shelves themselves have a size of 20x20 cm.
Mark all the elements on the plate, and if it has a picture, you need to think about how it will be located on the finished product.

In case the surface of the material has a dark color, the trace from the pencil will not be noticeable and it will be extremely difficult to conduct the sawing.
You can correct this situation with a simple knife, whose blade, pressing lightly, needs to be drawn along the boundaries of the marked parts.

The resulting thin white trail will serve as an excellent reference point for the saw blade.
When all the details are marked, you can proceed directly to the sawing itself.
For this process we use electric jigsaw and the corresponding file for him wood. It must have a shallow tooth. The jigsaw itself can be adjusted with adjusting elements to work with wood and at low speed.

Sawing is done exactly along the line of marking.
Small dimensions of the shelf allow using for confirming the confirmation of the diameter of the screw part 5 mm.
Accordingly, holes for them will need drills with a diameter of 5 and 8 mm.


To maximally match the joint in the corner joint, you first need to make holes in the horizontal element, then, applying this shelf to the vertical, drill the corresponding holes already in it.

Thus, it is possible to achieve a tight connection without divergence of parts.
At the same time, it is possible to identify the places of fastening to the wall in the supporting parts of the future "trellis".

For fastening we will use dowel-nails, in which the dowel itself does not have a headband.
In all the holes made, countersinking must be done. This is to ensure that the fasteners' hoods are invisible and do not protrude beyond the surface.
After sawing and drilling, the ends of the obtained parts must be cleaned of sawdust and burrs, as the next step will be the processing of the edges.
Decorate the edges will be the edge band, which requires a well heated iron.

The tape should be flat on the end face and, while controlling the overhangs at the edges, iron iron cloth before melting the adhesive layer.
After the gluing process is completed, it is necessary to cut off the protruding part of the edge with a knife.

Act carefully, so as not to damage the decorative surface of the plate.
For the final processing of the ends, the fins of the parts should be lightly sanded with fine-grained sandpaper.

This removes unevenness and small defects.
The stage of assembly of our design has come. All parts are assembled in sequence, moving from the top down.

Confirmates are wrapped with a special key designed for them.
Assembled the shelf we try on the place of installation and through the corresponding holes we mark the points for fastening. Then we use an electric drill with a drill having a winning tip, drill holes for the dowels.
Again, apply the shelf and insert the plastic dowels through the support elements of the shelf.

Then we wrap nails in them.
The final decoration of the shelf is the installation of special stubs on the hats of confirmations and nails. Our corner shelf is ready!

Masterclass was held by Irina Shandruk especially for the site.
Also see an excellent example of making a corner shelf in the video below.