 In this master class on making plastic dolls we will share with you various tricks that will help you to make your first doll yourself. Just note that this lesson is divided into two parts, the second you will find by clicking on the link at the bottom of this article.
To find your own traits and style, you need effort, time, the desire to seek, change, improve. We wish this to everyone who opened the pages of this article.
A plastic doll can be molded from different masses for molding, now their choice is huge. It is better to stop on plastic (it is also called polymer clay or model), specially designed for modeling dolls. Some masses harden in the air, others need to be burned in the oven. With the first you need to work more quickly, because small parts quickly dry up. Such a model is most often white, so the doll needs to be painted and toned.
Burnt plastic for making dolls - plastic, it can make even the smallest parts. It does not dry and allows you to perfect the sculpture for a long time.
But such work requires a lot of time, if you do not have it, but you want to create a doll, then we advise you to make another doll with your own hands made of fabric, which is quite simple to manufacture.
Additional pieces of material adhere well to the substrate, the surface is easily leveled. In order for the polymer clay to harden, it is fired in the oven - about 15-20 minutes at a temperature of 100-130 ° C. Before burning, it is recommended to perform the test blind and burn several balls in the oven with a diameter of approximately 2 cm. If the mass darkens during the roasting, yellowed, reduce the temperature.
If the mass is easily separated by the nail after firing, the temperature was too low.
This plastic is produced in several different shades. They all resemble the natural skin color, so you do not have to paint the whole doll - just a little bit, to indicate facial features, wrinkles, etc.
Having become acquainted with the basic material, now start making plastic dolls, and the master class that is offered here will help you in this.
Necessary materials:
Baking plastic for making dolls.
Foil for baking.
Synthepon.
Different tools.
Wet wipes.
Thick wire.
Combed ribbon of wool.
Universal glue "Moment".
Acrylic paint of several colors.
Cloth, lace or bows for clothes.
Thread and needle.
Mirror.
Brushes.
Preparation for modeling
If you do not know how to make a doll, then after looking at this lesson, you will understand that it's better to start with such a doll for the first time, only the head, hands, feet or legs to the knees, which does not require professional skills of the sculptor and deep knowledge anatomy, which are needed when modeling a nude figure. We suggest starting to work with scorched mass for modeling - the work will be greatly facilitated by the fact that you do not have to paint the whole doll.
Everyone who decides to make a doll, we recommend that you first draw a sketch. This will set you up to create something that will not work out, but a specific character, with your mood and history will help you find the best pose, the color solution. For example, our doll is a little girl in a beautiful dress and with big eyes.

A doll made of plastic with their own hands. Modeling the head
Form the head from the foil for baking, planted on a stick (the shackle from the brush perfectly fits). The wand is needed in order to leave a hole, and the made head could be put on the frame.
Try to make the shape as much as possible like a real skull - it will be easier to sculpt further. Form the occiput, press the eye cavities along the line dividing the face in half. The length of the head should be about 1.5-2 times its width (for example, if the head is 4 cm wide, then the length should be about 6-8 cm). 
Now we can begin to sculpt a doll made of polymer clay. Break off a small piece of plastic and warm up, shifting in your hands. Cover the foil blank with an even layer of model about 3 mm thick.
To avoid seeing the contours of individual pieces, level the model with a damp cloth and wait a little. And while the plastic dries up, study another article on how to create a soft toy with his own hands plush Mishka.
In order for the doll to turn out pretty nice, it needs to correctly mark the location of the eyes. To do this, draw a line of symmetry, then divide the face in half - this will be the line of the eyes. Divide it into five equal parts. In the second and fourth parts will be inserted eyes.
Mark the place for the eyes, prepare the pre-fashioned and burned balls it will be the eyes. 
Eyes
Cut the foil on the received head and create eye hollows. 
Insert your eyes and level the models around them. 
Creating a Spout
Also, a clay doll made with its own hands has a small spout, although it will be the same as you create it. So, find a place for the nose (it should occupy the middle third of the face). Form a pyramid of the right size and stick it to the surface. 
The nose is pressed, align, so that its edges merge with the face. To both sides of the nose, stick one thin roller from the model.
Use the sharp tool to make the nostrils. 
Forming the lips
Under your nose, stick an oval cake, press it and flatten it. 
Find a place for the lips to make a slit and open.
To the lips of the dolls with their own hands were more plump, on both halves of the upper lip, place a piece of polymer clay in the form of a drop and level. The lower lip is formed with the help of a tool, and under it at the chin press the dimple. 
Eyelids
To make doll eyes with your own hands, you need to put on already prepared eye sockets on a small piece of polymer clay, and form the upper eyelids. Using the tool, press the plastic and level it. 
Puppet cheeks
Cheeks are two pieces in the form of a drop. Stick them and align. If necessary, "grow" and chin. 
Forming ears
Roll out a round cake and cut in half - this will be blanks for the ears. 
In height, the place for the ears, (if viewed from the front) is between the tip of the nose and the eyebrows. If viewed from the side, the ears are located on the line separating the head on the face and occiput. In this place and stick them.
To make it easier to form the ears, one must look at the photograph of the present ear in an encyclopedia or other reference book. Thus, you will have an interesting doll with your own hands, or rather her head. Then proceed to create the neck.
Neck for the doll
Now cling to your neck. 
When the head is ready, on the vertex cut a hole - it will be needed when you start to glue your hair. 
So you learned how to create a doll with your own hands from baked plastic - a master class to create a head. Now hurry to find out how you can make a torso from part 2 of this master class about how to make a doll with her body, hair, draw a face and sew clothes.
If you have not tried to create your own, author's dolls, today's master class is just for you. Today we have a doll made of polymer clay for beginners. This master class will be conducted by Natalia Shanaeva, whose work is devoted to a whole section on the manufacture of such toys.
When creating dolls, you can use different materials. There are needlewomen who make dolls entirely of polymer material or of cold porcelain. But for this you need a skill. Therefore, it is easier for beginners to start with a combined product: the head, handles and legs are made of polymer clay or other material, and the trunk is made of carcass and sintepon.
Clay doll
Polymer clay doll for beginners
Frame for a doll made of polymer clay for beginners
This doll does not have a pattern. It is made on a wire frame with elements of polymer clay - so it will have to bend handles and legs. To do this, you must first imagine the size of the future doll. To do this, you just need to draw it on paper in the form of a 1: 1 scheme. In the process of working, you can check the dimensions.
It is necessary to begin with a wire frame, which corresponds to the growth of a doll without a head. Wire for the frame can be taken any, but that it bends well and withstands the weight of the head, and the legs - the weight of the entire doll. For beginners at this stage, it is important to observe the proportionality of the body, so that in the future it is easy to create any skeletons for future toys.
 Frame for clay dolls
 Polymer clay doll for beginners: details
Further - work with polymer clay. Here it is necessary to proceed from what you want to make your doll. In order for the head to have the ability to rotate and bend over - it should be sculpted separately from the neck, if your doll is a lady with a decollete - then you should sculpt your head separately and your shoulders with your neck, if you plan to sculpt, for example, a cowboy with a shirt open on a torso, then the torso itself needs to be done with anatomical matching. Therefore, beginners should consider all these nuances.
For our doll we blindly separate the head, legs and pens. The head will do this: roll a ball of foil of this diameter, which is one-fourth of the growth of the doll, we will apply a layer of polymer on it. Instead of polymeric clay, you can use cold porcelain. Next, we sculpt our nose and lips, with the help of beads make out the eyes. Everything is done arbitrarily, but taking into account the correct arrangement of details on the face of our future doll from polymer clay for beginners. On the upper part of the head, in the center, an additional hole is made for gluing the hair.
The dolls are molded from a single piece of clay, so that the fine details do not break, and the legs are made to the height of the knees.
 Elements of dolls made of clay
 Polymer clay doll for beginners: assembly
We collect our doll. The wire frame is wrapped with a double-sided adhesive tape, to which the sintepon will subsequently be glued. Instead of sintepon for making the body of the doll, you can use any other material - paper napkins, foam rubber, stripes of cloth or even toilet paper ... Where necessary you need to use glue. When winding the wire frame of a doll, one should strive for anatomical similarity of the figure obtained.
Now we need to attach to the frame parts of polymer clay. There are two ways.
First
Hands and feet immediately stuck on the frame. To do this, it is necessary to preliminarily wrap the arms and legs for the foil. As soon as they have fashioned the details, they have to be removed. They dry up separately and when they are ready - the foil should be removed.
Second
You can simply make a separate pair of handles and legs, in the process of making them to drill holes to the required depth for further fixing them on the frame. When molding the legs, you can immediately fashion them with shoes - sandals, shoes or boots.
To fix these details on a doll made of polymer clay, beginners will need to apply glue and glue the parts with the frame.
 We wrap the frame of dolls
 The hair for this doll is made in this way: pieces of yarn of the same length are cut and tied on the string. On the head are glued, starting from the occipital part and up to the crown. On the top of a few strands are pasted into the hole to create a bang.
For beginners, this will be the easiest way to make hair. If you do not like this way, you can use it, you'll need to tie a small cap, tie the yarn and then glue it to the head.
 We make doll hair
 On the hands of the dolls we'll bring a manicure. Face make expressive with the help of markers, and the lips denote the nail polish. Facial expressions should be considered at the stage of modeling. Then it will be easier to give the doll the necessary expression.
 Guiding dolls manicure
 Now beginners can only dress up a doll - sew clothes for her. In our version - this knitted long red dress.
 Dress for a doll made of polymer clay
 A doll on a wire frame can stand, sit, change the position of the hands - it is multifunctional and mobile.
So one more master class on creating dolls made of polymer clay for beginners was completed, as a result of which you were able to master the manufacture of doll parts from different materials. Such a toy will certainly be popular with children, because it can be given any position.
In your version, a doll of polymer clay for beginners will, of course, look different, as the basis for its production allows you to create completely different toys on the subject.
The modeling of polymer clay has become very fashionable today. No material has previously provided such wide opportunities. Making beautiful figures became a matter of simple and fascinating. It is especially pleasant that each of your works is an author's work existing in the world in one copy. You can make an original gift to your friends by depicting them in the form of small figures, or you can fashion yourself.


![]()


![]()


Gift doll
All girls love princesses. Such a beautiful girlfriend can be made by her own hands and given to a child. It will be wonderful if she herself will take part in the creation of a gift: bend procrastination, twist the fabric.
The child can be entrusted to draw a doll's eyes and lips. Nothing, if from the first time they do not turn out even. Any paint can be wiped off and applied again.

Princesses dresses are always with a deep neckline, so we'll do our head with the neck and shoulders. We, of course, can not make movable hinges in the knees and elbows, but the flexibility of our plastic beauty will give the fabric parts with filler.
Tools and materials
In order to make a doll made of polymer clay, it is necessary to prepare:
- polymer clay;
- metal and plastic sticks, stacks;
- "Knitting" wire;
- glue "moment";
- pliers;
- sandpaper №0;
- pencil, paper;
- filler;
- linen cloth, scissors, thread, needle;
- oven or oven with thermometer.
Making dolls from clay


- First you need to make a separate head. Her modeling will be presented later.
- We will make the hands of our princess. To do this, take two pieces of wire, bend it in half and slightly twist.
- We make clay on them, forming handles. A true master will pre-arrange the hook at the end of the wire to make it easier to dry the workpiece.
- We twist 8 thin fingers and do brushes.
- It is necessary to make fingers and nails with the help of stacks. Thumbs are done separately.
- Author's modeling of two legs is the same. Let the limbs dry out and "bite off" excess pliers with pliers.
- Grind the skin with our feet and hands. A good master must constantly make measurements of the details.
- And the master always tries to make patterns on paper before cutting out the workpieces from the fabric.
- We cut out of the fabric and sew soft parts of the doll.
- We turn it out and stuff it with filler. You can use cotton wool or sawdust for this.
- We put our legs and hands inside, paste them, fixing them with tape.
- Sew all the details, including the trunk in the decollete.
- We glue the head. Now she can make her hair, draw a face and a doll made of polymer clay is ready.
Make the head of the doll
For the head dolls must be prepared:
- foil;
- wire;
- polymer clay;
- instruments.
The order of performance of work


- In the beginning of work it is necessary to make portraits (facet and profile) of the future doll. Any author's work is valuable in that it is unique. At this stage, the master can make a new work of art. Can even make your self-portrait.
- Bend the wire and on the bend to form a foil ball a little bit smaller than the diameter of the future head. You can do neck and shoulders, as for a princess, or just a head.
- Author's modeling of the head begins with the production of a conventional ball. 3-5 mm of clay is applied to the foil.
- Now the master must make tools for the eyes and lining where there will be cheeks, nose and chin.
- The modeling of the face - the author's jewelry work, which the real master can do, ends with the baking of the product in the oven.

We make hair dolls

To conduct a master class to create a magnificent head of hair, you need to prepare:
- maher or artificial fiber, or a lock of hair of the neighbor's Ball;
- glue;
- thin strong thread and hook.
The order of performance of work
- Author's hairdo for an exclusive toy begins with a hole in the head, if it is not done in advance. It is necessary to separately crochet the "wreath" from a strong thread, weaving hair strands into it. You can tie a whole cap. Gently missed the "moment" in a circle and glued to the head.
- Now let's do the bulk of the hair. To do this, bind the beam and, dipped in the glue, fix it in the hole on the vertex.

After complete drying, comb the hair, cut the edges exactly and make the most beautiful hairdo.
Plastic doll
From polymer clay it is possible to do not only toys. This wonderful material allows you to engage in pure art, making small sculptures. For example, it produces charming pups, babies.

First you need to make a head, leaving a small end of the wire. The skeleton is also denoted by wire, rigidly connecting with the head, twisting the pliers ends.
We put clay on the frame, giving the necessary form with the help of tools. We polish the resulting figure and bake it in an oven or stove. The final touch is the decorative color.
Of polymer clay, not just zeal and a lot of free time. Also you will need certain skills of drawing, modeling and sewing. Particularly difficult moment in the process of creating a doll is the drawing of facial features (after all, the doll should turn out to be very natural, practically "alive").
To date, for the creation of dolls of plastic mass, most often used material such as plastic, it is also polymer clay, it is also a model. Plastic for the creation of dolls can be different: one must be left on air for a while, so that it can freeze: the other needs a higher temperature, so it is kept for some time in the oven (burn).
It is more difficult to work with the first one, because it quickly hardens and, moreover, it is white, that is, it will be necessary to paint the finished doll to create a natural skin color. But the second is very plastic, so it is suitable for creating the smallest details, such as facial features. Burnt polymer clay can be several shades, imitating the natural color of the skin, so it does not require additional painting or processing. In today's master class we will work with such polymer clay.
Preparation of the necessary tools and materials
To create a doll made of polymer clay at home, we need a certain set of tools and materials to make the work quality and beautiful:
- flexible wire;
- plastic and metal sticks;
- pliers;
- a sheet of paper and a pencil;
- holofayber / foam rubber;
- calcined polymer clay;
- a small cut of fabric (20 x 30 mm is enough);
- scissors, thread, needle;
- super glue;
- a small wig / patch of artificial hair;
- paints (acrylic), nail polish;
- decorative elements (beads, laces, etc.).
After all the necessary materials are prepared, you can start creating your own clay masterpiece.
The process of making dolls from clay
To begin the process of creating a doll is best with the most difficult part - the head. This is exactly what we will do.
We make doll head
Consider the process of creating a puppet head step by step:
- Form a foil for baking a small tight ball - it will serve as a frame for the head. Plant it on a small stick (even a skewer will do). This is necessary in order to later on the bottom of the head left a small hole, which will help put the finished head on the puppet body.
Council. Try to give the ball made of foil a shape that resembles the human skull as much as possible: be sure to form cheekbones, chin, etc. Observe also one important proportion: the ratio of length and width of the head should be 2: 1.
- Strip off a small piece of polymer clay and warm it up a little to make it plastic.
- Cover the form of the foil with a layer of clay a few millimeters thick and with a wet wipe gently smooth out any irregularities in the surface. Leave the plastic for a while so it can dry out.
- To make the face of the doll symmetrical, divide it vertically into two parts. In each of the parts form on the eye cavity and insert there pre-prepared and burned balls - they will become eyes. Gently smooth the eye area around the plastic.
- Make a spout and sponges. For this we need two small pieces of model. One of them (in the form of a small pyramid) stick to the surface of the face. Then gently form a small sharp object wings of the nose and nostrils. Here everything depends on your imagination. The second - to the person below the nose (in the form of a flat cake). Cut it gently in half and form the shape of future lips.

- Remained only a little - ears and eyelids. To create eyelids, use two small pieces of a model - attach them on top of your eyes and adjust the shape. To understand where to attach the ears, visually divide your head into two parts: the front and the occipital (side view). Ears attach on the line, which you figuratively carried out between these parts.
Create a body and limbs
So, the most difficult part of the path is passed, it remains only to make the basis. To create a puppet frame use a thin enough flexible wire. You should get a "spine" with "branches" of hands and feet. Wrap it with paint tape.
Before modeling the body with plastic, make a sketch of the doll on paper to imagine a completely finished image. Thus, you can simplify your task and quickly understand how to make a puppet frame better.
Cleave a few small pieces of plastic and glue them on the frame. Make a line of the neck, chest, waist (if you want) and hips.
Council. If the doll model has an open neckline, then you should take care that the breast has a natural attractive look.
For the hands and feet, the frame must be made of a thinner wire. Make five small lengths of wire and fasten them together with a fan using a conventional tape. Then nalepite a small piece of modelin and form from it hands to the elbow. By a similar scheme, we model the legs to the knees. All blanks are baked in the oven.
Then we put it together. Try on the head. If necessary, we undermine it or the details of the body with small nazhdachkoy. On the places devoid of clay base, we reel the thin pieces of foam rubber and wrap them with threads.
We begin to create a head of hear. You can use either a ready-made wig or a large strand of artificial hair for these purposes. Also ideal for mohair. On the top of the head, drill a small hole (you can make it in "fresh" clay). Then draw a spiral on your head, starting from the center. Moving in a spiral, paste strands of hair. Then in the hole made in the center, pass a bundle of hair (attach it with glue).

Think about the details of clothes for the doll in advance. Hands, feet and waist are covered with pieces of cloth, then sew the missing items of clothing and decorate them with decorative elements. Draw a doll eyes, eyebrows and eyelashes with acrylic paints. On the lips and eyelids we apply a little nail polish. The doll is ready!
Our master class came to an end. His goal was to help you in such a difficult matter as creating a doll made of polymer clay. Follow the instructions provided in the article and you will be able to create an incredibly beautiful and original doll - just show a little bit of zeal and include fantasy.
Creating a doll from polymer clay: video
Each girl remembers, and sometimes carefully keeps her favorite doll. Secretly, of course, so as not to laugh.
But times change, if earlier a doll on a bed and a shelf was considered a sign of infantilism, today dolls are made for quite respectable ladies and men. Of course, nobody wants to play these dolls, but they give the interior a unique atmosphere of comfort and warmth.
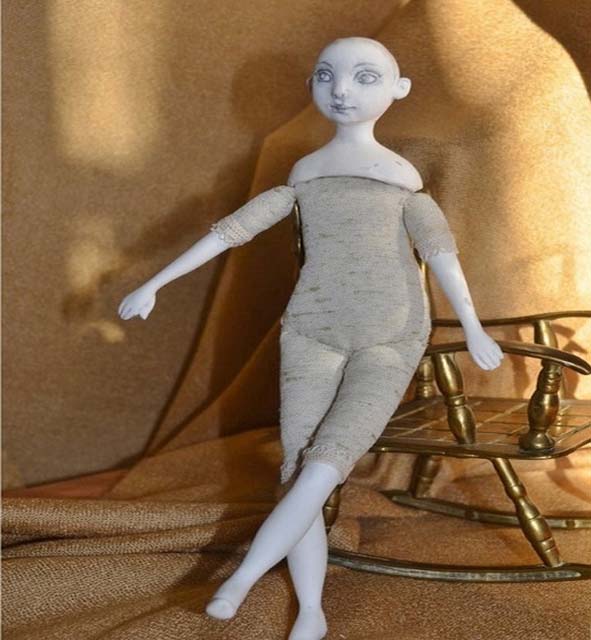
One of the most popular materials for the manufacture of interior dolls is inexpensive and plastic polymer clay. It is from him that we try to create a blank for the doll.
Dolls that delight in their perfection of each - the result of a long and painstaking work. Let's be honest: such a beauty will come from the very first few very few. First, you need to master the technique of creating a simple bolvanchika.
So, we do not need so many materials:
- polymer clay;
- strong wire;
- foil;
- stacks of different sizes, round pliers, pliers, pliers.
Proportions
The simplest method of calculation, which generously divides the experienced puppeteers - the size of the body of an "adult" doll is about 7 puppet heads. If you want to create a young lady with a model appearance, then add one or two more heads, and if the figure is stocky - six is enough.
The size of the palm should correspond to the width of the face, and the length of the foot should be 1.5 puppet palms.
By the way, the scheme on paper, where you estimate all the parameters of the future doll, will greatly simplify the calculation.
Head
The head is what is done first. At first everything seems simple enough:
1. Take the wire, twist it so that the top formed a loop - this will be the "brain" of the future workpiece. On this blank, wind the foil until the head reaches the right size. It is necessary to tighten the foil tightly.

2. Now take a piece of polymer clay, knead it in the hands, so that it becomes soft and neatly glued head. All the strips and cracks must necessarily be smoothed out, otherwise they will be visible when painting.

3. The most difficult moment - modeling of features. To do this, you must first outline where the doll will have eyes, nose and mouth. Do not forget to leave a place for your forehead and chin. Now, detail the features. Add cheeks, eyelids, wings of the nose, lips from individual pieces of polymer clay. All parts must be convex. And do not forget about the neck.


4. The last step is to bake the head in an oven or oven, in accordance with the instructions of the manufacturer of polymer clay (usually present on the box).

Arms
1. We give a piece of clay a cylindrical shape, after which we begin to unroll these pieces until the doll's palm reaches the required thickness.


2. Stack the fingers and carefully gently spread them, especially the thumb.


3. Round the doll's fingers with your hands, make wrinkles on the folds and nails with the stacks.

4. It was left to put the handles on the wire (the length can be adjusted) and bake.

Legs
1. From a piece of clay we roll out a part that should be a little thicker and wider on one side. Thus, it turns out a semblance of a foot.


2. Stack the fingers, then detail.


3. To the foot, add a piece of polymer clay so that the leg turns to the shin.

4. We take a long enough piece of wire (a free piece of wire will become a body), we put our feet on it and bake it.
Body
We already have three blanks: hands, feet and head. Business for small - we make a doll body.
1. In order to get the body, you need to take the doll's head and pieces of wire sticking out of the neck with hands. The long wire that remained after molding the legs is also screwed to the frame of arms. In the region of the "waist" we twist the wire. Superfluous cuts.

2. Now let's start building up "muscle mass". You can pre-wrap the wire frame with foil, then gently roll out pieces of clay and glue them one by one, starting from the neck.

3. If the female doll should not forget about the breast, which is easy enough to make out of two identical balls.

4. Look at the workpiece in profile - the figure should not be flat. If necessary, add a little polymer clay in the places that you seem "not alive." The workpiece can be baked.

So, the preparation of the doll is ready. But, in fact, all the fun is yet to come. Hair, coloring, costume - all this will make this yet faceless and uninteresting workpiece a bright interior doll. Who will she be? A beauty or a monster? It all depends on your imagination!
Photos of the master class are taken from the site: