People have long understood all the properties of water. Over time, we realized that water has a calming effect. They say that if there is water near the house, it will bring prosperity and comfort. Of course, not every site can be found a natural river or pond. Most often they are created. It is about such a structure today and will be discussed. We will tell you how, with the help of improvised means, to arrange a fairy corner in the form of a pond on your site.
Before creating an artificial pond, you need to analyze the state of the relief and think over the design of the pond. Carefully inspect the site: maybe it has some natural depressions or holes that can be used.
It is best to install an artificial pond as close as possible to the house. This is the only way he will receive daylight. In addition, it will be easy to control children who can play near water. As a rule, the reservoir is located on the eastern or southern side.
However, it is not advisable to place ponds near fruit trees or shrubs.
The fact is that these plants have powerful roots. Sooner or later, they can reach for the water. And then the walls of the pool will be violated. The water will often spoil if leaves fall from it from the trees. Only clean and well-kept pond will look beautiful on your site.
If you create an artificial pond, then do not necessarily make it profound. No one will bathe in such a lake. It will perform an exclusively decorative function. Moreover, caring for a small "lake" is much more convenient than for a large pond. Occasionally it will be necessary to clean the pond, change the water in it. Therefore it is advisable to do so that the source of water is not far away.
Choose a place for a pond
Materials for creating a pond
There are many containers that can be used to create an artificial pond on the site. So, it can be flexible plastic bathtubs, polyethylene tanks and so on. You can just go to the barn or garage. And there will always be an unnecessary bath, barrels, which can be used to create artificial ponds.

Photo: Artificial pond from an old bathtub step by step
It is best to start construction works in the summer, since at this time the groundwater level drops. The tasks will be easy to accomplish.
Most the best option - is the creation of a mini lake from a ready tank.


As an addition, it is possible to create a system for illuminating a reservoir. For this, multi-colored light bulbs are used, which are placed in special tubes.
We use polyethylene for waterproofing a mini pond
Excellent for creating an artificial reservoir of high strength polyethylene. In order to create such a reservoir, you need to dig a stepped pit. Carefully you need to look through the bottom. It should not have roots, stones and other foreign objects.

It is recommended to make a sand mound 10 cm thick. A screed is made of cement. Dry the construction should be about a week. Then you need to pour sand and lay polyethylene. You can use a membrane that is stronger than polyethylene.

However, specially to buy a membrane for a lake is inexpedient. Material - expensive. You can use the membrane when it remains after construction work. At the edges, you need to leave more than half a meter of film for fixation. From the edge you need to dig a trench, into which a stock of polyethylene or membranes is placed, and then fixed.
Filling with water is carried out gradually. It is important that there are no air bubbles under the film. At the bottom of the digging we spread sand or pebbles.

From the northern part of the small decorative reservoir you need to protect the bushes from the wind. And on the edges you can plant any plants that are not afraid of moisture. As an option - we run fish into the pond.

All these were ponds that are lowered above the ground level. But now we will talk about how to make a pond that will protrude above the ground. All the works are similar to the previous operations, but only after the excavation is excavated, the foundation should be laid along its edges. Resist ready-made foundation should two days.

When the house is under repair, do not rush to throw out an old cast iron or any other bath. It can be used to create an artificial pond. So, to install a bath, under it you need to dig a hole. The cement is made on the bottom of the screed. In this case, the groundwater will not wash the pit. As soon as the week passes, the screed will dry. Then you can poke the gravel into the bottom of the pit and lower the bath. To the reservoir was natural in appearance, you need to place the edges of the bath so above the ground level that they could not be seen.
Video: Pond in the country with his own hands from Geophlenka
But that's not all. To create artificial reservoirs, you can use old barrels, kadushki. As a rule, they are installed on their sides.

It is only necessary to dig a hole and put a barrel into it, which then becomes filled with water. Then you can plant the plants in an improvised pond, overlay it with stones.

Pond in the country with their own hands: photo step by step from tires

You can do both in-depth and elevated reservoirs. Next, we use scenery, stones, plants and anything.

Photo: A small pond in the dacha with their own hands

Photo: strengthening of the walls of the reservoir by gabions


So, to create a reservoir on your site with your own hands, you need to make some effort. To create all kinds of materials are used, which remain in the house after repair. In order for the reservoir to be constantly in perfect condition, it needs to be taken care of. For the winter, the water merges.
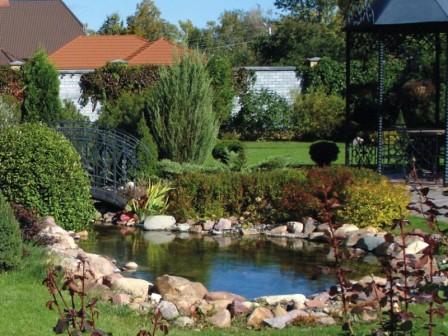
Even the smallest and outwardly unremarkable homestead can be made cozy and interesting if equipped with an artificial pond. Decorative pond in the garden is not only able to harmoniously fit into the landscape of the infield, but also visually expand the space.
Artificial pond in the backyard landscape

The presence of a pond or a small artificial waterfall on the a household plot is conditioned not only by aesthetic considerations, but also by the practical component. On a hot summer day, even from a small body of water, it's cool, the air seems much cleaner and fresh, and a calm surface or measured gurgling will help relieve nervous tension and fatigue.
The most popular types of artificial reservoirs in landscape design:
- pond;
- creek;
- fountain;
- waterfall.
According to the form, the reservoirs on the personal plots can be either rounded, with an irregular coastline, and of the correct geometric shape - square, rectangular and rhomboid. It all depends on the style of the site in general, its location, features of the site and your imagination. The main rule in this case - the water body should ideally fit into the surrounding landscape, become its integral element.

The most common form for an artificial reservoir is round or oval. This is how natural lakes look, so if you want to create a corner of nature near the house or in the garden, then this option will be the most acceptable. In this case, even the wrong coastline and the asymmetric planting of the pond may appear.
If a pond is located on a site where everything is done in the classical style, straight lines prevail and there is no place for natural forms, then they equip the pond with the correct form. Often, this is the foundation under the fountain, which is the center of the exposition. Since there is no natural barrier in the form of vegetation and stones, such a pool does not have to be placed above it to prevent falling into the water. As an option - to protect such a pond with a low forged lattice.
It should be noted that the most common and least expensive in terms of labor and financial investments is a pond. But it is quite possible to equip one on its own plot without involving specialists.
Here the main experience. When it appears, the pond created by you can become the first in the whole complex, connected by waterfalls, streams, decorative bridges.

Decorative pond with their own hands - where to start?

If you have a wonderful idea about arranging an artificial pond on your own plot, do not rush headlong behind a shovel. First of all, you need to find a good place. In this case, you need to consider the following factors:
- the size of the plot;
- illumination;
- relief;
- degree of gardening;
- type of soil.

It is best to equip the pond closer to home. In this case, it should be placed in such a way that the entire area of the reservoir was illuminated by the sun for at least 5 hours a day. Otherwise, once a beautiful pond with time can turn into a fetid bog.
The terrain is also of great importance. The optimal site is a low-lying area where the water level in the well or in the well is closer to the surface of the earth.
In the selection process, attention should also be paid to the presence of vegetation - large trees along the coasts will pollute the fallen leaves in the autumn season, and the roots of trees can damage the protective film on the bottom.
The type of soil is important. Loose and clay soils, as well as peat soils, are suitable for equipping a pond, chernozem is less preferable - it contributes to silt formation. On acidic grounds, it is inappropriate to equip the reservoir without reliable protection of the side walls and bottom.
After the site is selected, the shapes and sizes are determined - it's time to stock up necessary materials and tools. Most often, for the creation of a pond, ready-made rigid tanks are used, which can be purchased in a specialized store or flexible waterproofing, much less often - concrete (the most costly and laborious process).

Types of waterproofing for artificial ponds:
- polyethylene film - inexpensive material, not resistant to ultraviolet;
- LDPE - polyethylene high pressure. Visually practically no different from polyethylene, but it has more flexibility and durability.
- PVC - polyvinyl chloride - a strong and durable material, the edges of which are welded together.
- rubber and butyl sheets - the most optimal, but expensive option. The service life of this material is almost unlimited.

Specialists recommend to avoid waterproofing of polyethylene film. With her function, she copes, but she does not have more than 2 years. If you want the pond to rejoice for a longer time, choose more durable materials.
Materials and tools:
- shovel;
- protective film or reservoir;
- pipes for supply and discharge of water;
- valve;
- geotextile material or sand
It is better to see once. The whole process of arranging the pond in pictures looks like this:
Construction of a decorative pond

There is another way to equip the pond - a concrete bowl, but this method is time-consuming and expensive, so at present it does not apply. Construction begins with the fact that on the selected site make a marking and remove the layer of turf. After this, you can start digging the pit of the desired shape. In this case, be sure to leave the edges slightly oblique (sloping, rather than steep). Further, if you plan to make a decorative pond using a PVC film, rather than a finished tank, you need to lay the bottom of the future water body with a waterproof material. For these purposes clay is quite suitable. To lay it it is necessary in two layers - the second after complete drying of the first (between them it is necessary to lay a waterproof film). After that, you should fill the bottom with gravel.
Important: if you plan to plant a pond with plants - at the bottom should make special depressions and fill them with fertile soil.
How to make a decorative pond so that the water in it is always clean and fresh?

To ensure that the external appearance of the reservoir located on your site is always happy with its appearance and gave freshness and coolness, it is necessary to make sure that the water in it is flowing. For these purposes it is necessary to lay two pipes: flow and sewage. Through the flow-through pipe, water will flow into the reservoir, and through the sewer will be discharged into the ditch. Please note: the level of the ditch for drainage should be somewhat below the level of the pond. For ease of use, it is possible to install a valve on the drain pipe or simply close the hole with a stopper as necessary. The first option is the most practical.
Arrangement of a decorative reservoir with the use of "galoshi"
It will take much less labor, if you get a special reservoir for an artificial reservoir. People called these containers "galoshes". Why is that? Everything is very simple: they are made of plastic black, and the shape of such tanks in their external outlines resembles rubber shoes. But if you want, you can always find and buy a bowl for a pond suitable for you shape.

In order to equip a decorative pond in the country , you will need to purchase a special tank of suitable size and shape: the cost of such relatively small.
The main stages of the construction of the reservoir:
- contour marking;
- digging foundation pits;
- installation of capacity.
In order to correctly identify the contour of the reservoir, it is necessary to install the reservoir on the ground and vertically to install along its perimeter the slats with an interval of 40-50 cm, then tie them with string. Thus, you get the outlines of the future pond.
Install the container must be strictly horizontal. The reservoir should be filled with water gradually, while the gaps existing between it and the walls of the pit must be carefully filled with sand.
Note: if you want to equip a fountain in an artificial pond, it is important to purchase a special pump and nozzles in advance, which are installed during the installation of the reservoir.
The final stage is the design of the reservoir. In order for your man-made pond to look really stylish and beautiful, for example, just like the quaint decorative ponds whose photos we have placed, we need to correctly draw its banks.
Decoration of shores of artificial ponds
At this stage of work, you can not limit the flight of your imagination. To decorate an artificial pond, you can use ceramic tile, marble, granite, fake diamond, pebbles, wood, etc. These materials need to disguise the edges of the reservoir, by the form close to the natural one. It is important to fix them with cement mortar. If you plan to additionally equip your pond with a fountain - in the process of work you need to make sure that the pump hoses are hidden under the tile or stones.

Then you can sprinkle the bottom of the reservoir with pre-washed sand, lay small pebbles and plant aquatic plants in pots or baskets. You can plant a decorative shrub around the pond or just a flower bed.

Decorative inhabitants of ponds are always in joy. It can be both aquarium fish and dwarf turtles. And if you hold the backlight on the bottom of the pond or arrange floating flashlights on the batteries on the surface, you can create a real extravaganza of light and water.

Care of the pond
- To maintain an artificial pond in good condition, he will need care.
- First of all, you need to get a floor vacuum cleaner to collect garbage.
- During the fall of the fall, you will need to cover the pond with a net, so that the foliage does not fall into the water.
- If fish live in the pond, they will need filtration and water aeration.
- To avoid the greening of water, it is either filtered and cleaned (for this purpose the reservoir must be flowing), or planted with oxygen-releasing plants: a swamp, hornwort, elodea.
- If you put lilies or egg capsules in a pond, they will prevent sun rays and overheating of their wide leaves.

An artificial pond on your garden is an important element of landscape design, the construction of which must be approached with sense, feeling, and arrangement! And then the beauty created by your hands will please both you and your guests!
A small pond is able to decorate and diversify any suburban area. And it will be even more pleasant if you build such a pond with your own hands. This may seem difficult, but if there is a quality instruction, there should not be any problems.
Floating flock of decorative fish - the best decoration of the pond
Traditionally, work begins with preparatory activities.
Step 1. Determine the location and dimensions
First, we determine the place where the decorative pond will be located. For this we take into account the following points:
- near there should be no trees, because their roots can damage the bottom of the structure, and the leaves - clog the water;
- the place should be open, and also be illuminated by the sun at least 6 hours a day (this will increase the intensity of algae reproduction without infringing on terrestrial plants);
- if possible, it is advisable to leave room for future expansion of the pond;
- the area of the reservoir should not exceed 3% of the total area.
In short, the smaller the area, the easier it is to build. In terms of depth, the reservoir will be divided into three levels:
- for plants near the shore;
- shallow water for a winter-resistant water lily;
- depth, in which the fish will winter (if we breed them).
Note! It is undesirable to make the reservoir too deep - it is enough to make a deepening depth of 1.6-1.8 meters (that is below the freezing level of the soil). The depth should not exceed a fifth of the entire pond.
Step 2. Determine the material
Materials that can serve as the basis for a decorative pond are quite a lot, but the most popular ones are the following options.

In view of the fact that the construction of a decorative reservoir from the form is unlikely to cause any difficulties, we will consider in more detail the second variant of the construction.
Step 3. Prepare consumables
The work will require:
- a film from PVC;
- ruberoid;
- stones round;
- rope;
- stone slabs;
- shovel;
- sand;
- bricks;
- fine gravel.
Having prepared everything necessary, we proceed to the next stage.
Stage 4. Roem digging
Step 1. First, create a sketch of the future reservoir on a scale, indicating the dimensions and width of the curtains (the shelves for plants, that is, the upper stage of the structure). This will help to avoid possible difficulties, not only during construction, but also during planting.
We also consider the accent of the composition - a large original stone, for example, a sculpture or just a tree.
Step 2. With the help of a rope or sand, outline the intended contour of the reservoir. Be sure to check that all the banks were on the same level, then using a shovel, we make a cut of sod around the perimeter of the pond.
Step 3. Now proceed to excavation. First, dig the foundation pit to a depth of the first level (about 30-40 cm) and mark the line from which it will be buried at the second mark (90 cm). Then we create the deepest level (up to 1.8 meters, if we plan to breed fish), we extract the last portion of the soil.
Note! It is recommended to regularly check the level of shores during excavation. In the absence of a water level of the appropriate length, you can take a simple long board and fix to it a 50-centimeter device.
Step 4. To dig a pond, it is advisable to use the services of specialists in this type of work, accompanied by a small excavator, because this work is quite difficult. But if it was decided to carry out this stage of work with one's own hands, then you should be prepared for the fact that moisture will accumulate in the pit and you will have to dig in the dirty slurry. For the withdrawal of water, you can use a pump (but only specifically designed for pumping liquid with solid particles). Nearby you can dig another pit to dump the water.
Step 5. We carefully inspect the bottom of the finished pit for the subject of branches, sharp stones and everything that can damage the film. Check the horizontality of the shores, if necessary align them.
Step 6. On the perimeter of the pond we excavate a moat 20 cm deep to fix the film. Then, using a rope, measure the dimensions to determine the required film size, add 0.5 m on each side.
When carrying out excavation work you can face the problem of where to put land from the pit. An excellent solution to this problem is to raise the level of the plot by uniformly distributing the soil throughout the garden area. Another option is also possible - to use land to build an alpine hill.
Stage 5. We lay the film
Step 1. Cover the bottom of the pit with a 15-centimeter sand pillow, carefully rammed it.
Step 2. To protect the PVC film from damage, we lay a layer of ruberoid (the lining is made overlap).
Step 3. We spread the bowl of the reservoir with a film. We do this freely, with a small margin on the shores. Press the ends of the film with bricks.
Note! To increase the elasticity of the film, it is desirable to carry out laying on a sunny day - under the influence of temperature the film will stretch better and easily curve all the protrusions of the excavation.
Step 4. We fill the pond with water, but we do not hurry to cut off the excess film. It is necessary to wait about 24 hours for the PVC coating to take the final volume. Then cut off the film, lay its edges in a previously made trench, turn it up and fall asleep with rubble.
Stage 6. We equip a decorative pond
Step 1. In order to prevent the earth from shedding in the bowl of the reservoir, we strengthen the edge. This can be done with the help of:
- stone blocks;
- plastic pipes, nailed to pegs.
Spread the edge with a natural stone (although you can use brick, tile, other materials), decorate a group of boulders or one large block.
Step 2. We spread the bottom of the pond with rubble or stones. Then we place the pre-cooked plants in plastic containers and arrange them on the curtains. It is desirable to use plants that saturate oxygen (such as hornwort, water lily, swamp, etc.). After that, the pond can be completely filled with water.
Note! For proper selection of hydrochemical preparations and a pump, it is necessary to measure the volume of the reservoir. To do this, when replacing water, read the water meter reading before / after the filling procedure.
Step 3. We can make a small stream for the permanent circulation of water - this will prevent stagnation of the latter. To do this, raise the source slightly above the water level and install a submersible pump to feed water from the bowl. We plan the decoration of the mouth of the stream, for which you can use:
- stones;
- containers of glass or clay;
- vegetative planting.
Step 4. At the bottom of the pond we install the submersible pump, pull the pipes to the source and connect them to the cleaning filter. The latter should be pressurized, that is, with the reverse cleaning provided, since it is much more effective than usual.
Installing the pump
All, pond in the country Ready! It remains only to regularly clean it of dirt, use special tools that revitalize water and prevent excessive spread of algae, as well as harvest plants for winter time.
When building a pond, it is difficult to avoid certain mistakes, especially the composition plan. For this reason, you need to know about common mistakes that gardeners make.
| Zones of growth of plants | Plants |
|---|---|
| Coastal zone | Conifers, elder eggs, ferns, tavolga, lilies of the valley, badans, etc. |
| Coastline | Gubastik, fuzzy, kaluzhnik, veronika, the serpent mountaineer, forget-me-not, etc. |
| Plants to decorate shallow water (to a depth of 5-20 cm.) | Air, cane, umbrella umbrella, cattail, arrowhead, etc. |
| Deep-sea plants 30-150 cm | Water-lily, egg-box |
| Plants to decorate the surface of water (floating on the surface of water) | Duckweed, water-color, telesis |
The most attractive corner of the garden
Good luck in work!
Video - Creating a pond in the country
For those who want to beautify their land, you should pay attention to the ideas of landscape design using reservoirs. an artificial pond in the country is not only original, but also will give the site a richness and beauty, but it can also serve as a useful element of design.
You can both buy ready-made options for setting up such a decorative pond, an artificial pond can be bought at all, but still make an artificial pond yourself and cheaper and more original, because you can realize your ideas and create!
There are many embodied ideas, photographs of which can serve as an example of design, or simply push the owner to their own project. But first you need to understand what types of water bodies are used in landscapes. Let's talk about how to make an artificial pond.

Types of water bodies:
- pond;
- creek;
- fountain;
- waterfall.

What is their difference?
Pond
Pond and similar water places imply structures in which water does not move, and in this case it communicates with groundwater. The advantage of such a reservoir is that water logging is excluded here. In addition, such a place can be decorated with boulders, stones, favorite plants on the shore, run fish and build a large aquarium. Make a pond an artificial pond is quite simple.
![]()
Creek
The stream on the site is a narrow stream of water with a current and a winding channel. With the arrangement of this type of reservoir, a diverse and a large number of bends, rapids, and overflows are favorably looked. It should be taken into account that the speed depends not only on the head of the supplied water, but also on the channel width and its inclination angle.


If you want to add more naturalness, then you can use the advice in order to shortly decorate the stones at the stream with moss: for this, you only need to smear stones with kefir. This will accelerate the process of ripening moss on stone surfaces.


Fountain
For a long time fountains were considered a beautiful ornament of a garden or a plot. Fountains well moisturize the air and bring aesthetic pleasure when watching it. They can be either individual or in combination with a pond.

An important detail of the construction of the fountain is its accessibility from all sides, that is, it must be visible so that they can be admired. Fountains are of two types: fixed and submerged. The first are used to create a fountain in the pond, and the latter for individual designs.

As an original design of the fountain, you can use a mascaron: a mask in the form of a person's face or the head of an animal from whose mouth water flows into the bowl. Under the action of the pump, this water then again enters the mascaron. Any fountains look elegantly, if you decorate them with lighting. How to make an artificial pond with a fountain, let's talk further.

Waterfall
This option is also a beautiful design element. To its appearance is also added the ability of the noise of falling water to drown out some noise (for example, traffic noise with a nearby road).
![]()
It is necessary to know that the volume of the falling water is regulated by the height from which the water will drain and its amount. Several steps of the waterfall will create a cascade. This will add to it originality and saturation. It is recommended to decorate waterfalls at the slopes of flower beds and slides. This gives naturalness.

All types of water bodies are beautiful in their own way, but in order to harmoniously look at a particular site, one must assess the relief of the earth and design its idea in advance. Only in case of comparison can you decide on the most the best option landscape.

Now let's talk more specifically about an artificial pond with our own hands
Creating artificial ponds is both simple and difficult at the same time. Simply, this is when you can just dig a hole and fill it with water. But what would this reservoir have acquired the necessary form, it is necessary to exert some effort and imagination.
Usually artificial ponds are large ponds. Ponds for garden plot It is customary to do in the foundation pit with concrete waterproofing, and the form can be any: square, round, oval. A pond is an artificial pond with the use of concrete, although this is a laborious work, for many the best option.
Modern materials allow you to make artificial ponds from a lighter and more flexible fabric that does not allow water to pass through. Plus such material is that it can easily take any form that will be in the future pond.

Butyl rubber rubber belongs to the class of the most expensive materials in application to artificial ponds. Although the material is more expensive than others, but it is not subject to temperature changes and is not afraid of cold or heat. In addition, the period of its operation is quite large, from about 10 to 20 years. Artificial pond to buy with butyl rubber rubber, the price is at the level of 15 000 rubles.

To strengthen the banks and the bottom, plastic ponds can be approached and polyvinyl chloride film. With regard to rubber, it costs two times cheaper. By its qualities it is strong enough, flexible and can last for 10 years. If you decided to build a pond that will be raised above the surface of the soil, then you will have to use a brick, or you can also press a stone. Artificial pond in the country will become a beautiful addition, decor and a highlight of your summer residence.
![]()
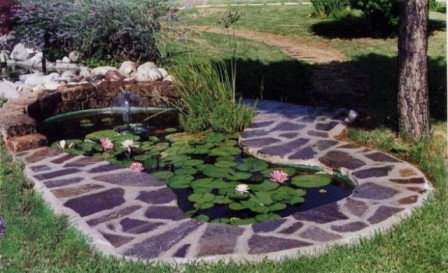
Sometimes it is not necessary to have a spacious place to create a pond. You can do with a small pond, in a complex with it, erecting a small bridge, make a miniature creek or a small waterfall.

Some experts say that it is impossible to create an ideal pond that would suit everyone. How many people want to have their own artificial pond, so many projects. Classic pond usually make 4 or more square. m. With such volumes of the pond, the normal relationship between water, fish and plants is most easily achieved.

Artificial ponds look very original, if you use a backlight when decorating them. If you lower the lights in the water, the pond can change beyond recognition. An artificial pond in the cottage with the use of lighting will look fantastic. On the surface of artificial ponds in addition to lighting, you can have lamps that work from batteries and create the appearance of wandering lights.
You can use music in combination with light. The result of such a combination will create a unique impression. This, of course, is expensive, but if it is possible to do so, the money will not be wasted. All the device of the artificial pond will bring joy, but do not forget, without constant care the reservoir can become neglected and unsightly.
To build a pond in the country house with your own hands is the opportunity to create an original design solution on your site.
An artificial pond will help you relax and relax by the water, without having to go somewhere or even go outside the site.
In this case, the arrangement of the pond is possible even in a small area - it is not suitable for bathing, but will beautiful decoration and will complement the overall design of your dacha or country house.
The price of such a pond will please - it can be built from improvised means - use even old tires and wheels.
The construction of a reservoir is a business that is accessible to everyone, because it is not at all difficult to make it yourself: it is possible to build both the simplest small pond and an impressive pond suitable even for bathing.
It all depends on your desires and the size of your site.
In the article you will learn how to make a pond in the country, what are the options for its design and how to choose a design.
A photo different types of water reservoirs, as well as step-by-step video instructions for their construction will make your work easier.
The structure of the pond depends on several factors: the size of your site and the density of construction, purpose (for example, for swimming) and, of course, on your desire.
Below you will see several photo options for mini-reservoirs for the site - they will help you decide what exactly you want to see on your land.

![]()


And the video instructions will help you make any type of pond.
A dacha or country house is the most massive and important building on the site, so it's logical that you need to start choosing a design from it.
The decorative pond should be suitable for style and color, to fit organically into the site.
Pay attention to the materials - if your house is made of wood, you can equip a pond with a wooden bridge or put wood benches next to it.
If a stone predominates among the material, you can lay out a pond and a pavement, make paved paths or arrange a coast line for them.
It's great if your site is large and there is a lot of vegetation on it - it's better to place a mini-pond in the shade of trees, and not next to the beds.
Near it, you can build an arbor or place benches and chairs so that you can relax in the shade and coolness.
Such a pond is not intended for bathing, but it will look as if it was created by nature itself, i.e. have a natural design, which can not be said about the pond near the beds.
Depending on the amount of vegetation on the site, you can choose the design of the pond: if there are many plants, you can use the Chinese style - it is distinguished by lush trees and bridges.
If there are not many plants, then we can stop on a more strict Japanese minimalism - the trees are rather monotonous, the conifers prevail, and the pond is complemented by stones and boulders of various sizes.
Look at how these ponds look in the photo to see how they fit into your site.
The simplest, but very beautiful option is the so-called "nature garden", when plants plant (or are already present on the site) only those that are specific for your region.
Such a mini-pond looks quite organic, albeit without special natural delights, but you can fix it by adding it different elements decor (see their video and photo for their options).
If your house, and the plot as a whole, is distinguished by strict regular geometric shapes - it makes sense to make the same pond so that it reflects the overall style of the site.
Such a pond is better located near the flower beds and paths, or simply in the open area. If you have a courtyard or patio - there is such a pond there is a place.
Such mini pools can be both round and rectangular. Nearby you can plant tall grass, build mini waterfalls or put sculptures - the finish depends on your imagination.
Look at the photos of different versions of artificial reservoirs and decide which one you want to make on your site.


Location of the pond
Once you have decided on the style of the pond, you need to choose a location. From where you put it, it will hang how long and qualitatively the artificial pond will serve you.
Ideal place where there is a small shadow from the trees.
The fact is that if you arrange a homemade pond in the country in direct sunlight, then algae will appear in it much faster, but if the shadow is too large, then the plants around will grow poorly, and the appearance of the reservoir will suffer.

To make the decorative pond look good, for lighting it will be enough 5 hours a day.
Shady trees are not the best choice for a mini-pond - you will have to constantly scoop out the fallen foliage, which can significantly spoil the quality of water in the pond.
To choose the size, proceed, first of all, from the area of your site.
Do not be discouraged if there is not enough space, first, making small ponds is much easier; the material will be needed several times less. Well, make it beautiful to help decor elements.
Ideally, a mini-pond should occupy about 3% of the size of the site. But you, of course, can allocate more space for the pond in the dacha with your own hands.
Most dacha ponds are not designed for swimming, but still have different degrees of depth.
If you want to breed fish in the pond, its depth should be about 2 m, and necessarily below the depth of freezing of the ground. In this case, the depth occupies about 1/5 of the total area of the reservoir.
For plants planted along the perimeter of the reservoir, the depth is not critical, but if you want to use aquatic plants, for example, water lilies, you need to make a shallow water zone (about 1.2 m).
Before the final decision, do not forget to view as much as possible photos and videos with options to immediately determine not only the location and general style of the pond, but also decorative elements for it.
How to build a pond
The construction will depend on the size of the pond you chose, as well as the material that will be used for construction.
Artificial pond, contrary to popular belief, can do quite cheaply and be made literally from improvised means.
It can be built from an old bath, a tire, using film and tires.
The most cost to you is the construction of a reservoir with concrete base - it is likely to require the help of specialists, tk. it will be necessary to build formwork and reinforcement.
If you want to make everything simpler and cheaper, then it's better to use ready-made plastic containers, which you can buy - their form can be any you want.
The very same a budget option - use of a special moisture-resistant film.
To understand how an artificial pond will look, start its device from the plan, which will reflect its size, depth and width, shape and places for planting plants and future decor elements.
It is better to draw a visual sketch - then in the course of the work you will not have to change the course and redo what you started.

Now that the sketch is ready, draw a contour of the future mini-reservoir in the place where you decided to arrange it.
You can select the boundaries using a conventional water hose or sand, which is poured around the perimeter of the future building.
After marking the territory, make sure that all the banks of your reservoir will be on the same level - otherwise the construction will be difficult, and it is better to move the reservoir to another place.
Now about how to dig a pond in the country. In this there is nothing difficult - you need to dig a pit, based on the depth of the reservoir, which you have determined for yourself.
The easiest way is to use a mini excavator or other professional equipment. independent work will be difficult. The water at the bottom of the pit will have to be pumped out by the pump.
After the pit is ready, measure it and add to the resulting size of +50 cm on the sides of the bowl - this is necessary to correctly choose the size of the film, which should be slightly larger than the size of the pond.
By the way, you can start digging out the land for the design of the site: make a stream or mound with it, or simply distribute it evenly over the site.
Use the purchased film to cover the bottom of the pit. The first layer below the film should be put geotextiles - it will serve as a protection for the film from plants and stones.
To make the edge of the reservoir, you need to dig a trench along its perimeter to fix the film: its edges are filled with crushed stone and securely fixed.
Additionally, you can strengthen them with stones or plastic pipes - then the earth will not crumble.
The pond using the film is almost ready, it remains to arrange the plants and pour water. Water is poured with a pump, and plants are placed on the territory in special containers. The bottom of the pond needs to be covered with stones and rubble.
Also, do not interfere with the arrangement of the stream, so that the water in the reservoir does not stagnate. In addition, it will improve the overall design.
This is the scheme of work. Look at the help video, as well as photos - they will help you figure it out.

Pond from the bath
An artificial pond from an old bath is another original and profitable solution that can be implemented from improvised means.
The shape of the bath can be any. In the photo you can see how the different design of reservoirs from an old bath can look.
Ground for reservoirs from the bath should be hard, better from sand and clay. In winter, the reservoir must be covered with snow, so that the fish do not freeze.
For any pond any type of bathtub is suitable, the main thing is that there is no hole in it.
The construction of such a pond requires a pit, the depth of which is more than 30 cm of bath height - that is, in the ground it should be located so that the edges are completely immersed in the ground.
After installation, check how much it is worth using the level.
If the device is executed correctly, it remains only to fill visible slots with sand, and proceed to the next stage of work.
Watch a video on how to install a bath so that the work was done qualitatively.
The construction of the pond from the bath is as follows: first mix the glue with the cement base - it you will cover the bath.
The mixture should turn out dark, in consistence to remind the dough.
Begin to distribute the mixture you need from the walls, and the remainders are applied to the bottom. It is best to carry out this procedure after the bath is immersed in the ground, otherwise there is a risk of deformation of the surface.
The mixture very quickly sets, so almost immediately after its application it is possible to stretch the mesh from the edge of the bath to the middle. At the corners you need to fix the rings, on which you later fix the shelves.
The bottom of the bath is covered with dry clay about 3 cm, the walls are also coated with clay, premixed with water. In this mixture it will be possible to plant the plants.
Photo and video instructions will help you to properly process the bath.
After the clay dries, you can start pouring the bath with water. This can be done from a conventional hose.
It is best to put a nozzle on it and lay it on the bottom so that the clay layer is not damaged during operation.
The edges of the bathtub are better laid with stones and planted by plants - they will visually outline the border of the shore.
The design of such a pond depends only on your imagination - you can place the figures of ducks on it, lay out footpaths with stones - all this will significantly improve its appearance.