"Water grinds the stone" - this statement is true not only in the allegorical sense that is embedded in it, but also in a perfectly straightforward way. Water can destroy very much. Including concrete (about its waterproofing read here -). Therefore, in rooms with high humidity (or where there is a threat of increasing humidity), you need to make a waterproofing floor.
There are requirements to a snap to the floor waterproofing; of course, if you build a private house for yourself, no one will force you to follow these requirements, but these requirements are indeed necessitated, and their non-compliance will lead first to an uncomfortable existence in the house, and later - to its destruction.
There are several methods of waterproofing. In this article, we will consider them in detail.
Coloring waterproofing of the floor
Painting of the floor for insulation
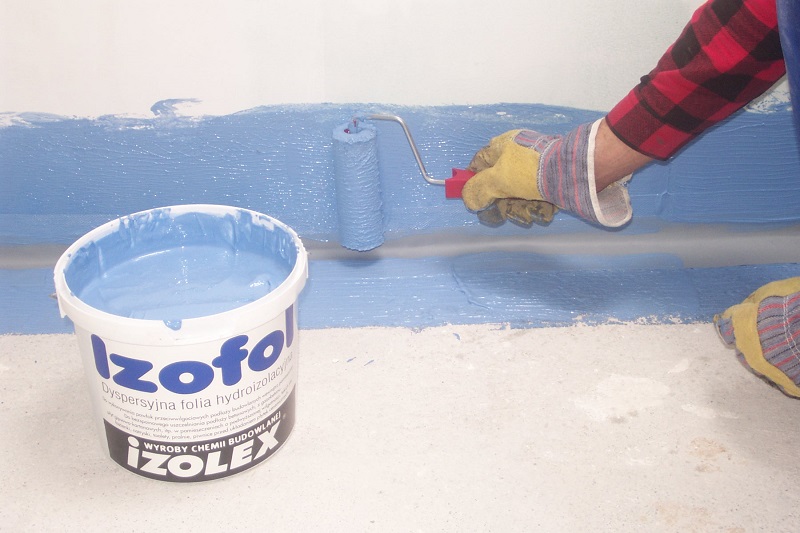
This is the simplest version, to do it you do not need to have any skills, just patience: just apply varnishes (polymer or bitumen) to the insulated surface in several layers.
This method is most often used for waterproofing a wooden floor.
This type of insulation coating is not very durable - its elasticity decreases over time, especially in case of serious temperature changes, such as in a bath (it is heated irregularly, the temperature in winter even inside the room is low enough, then rises sharply, then again drops sharply) . The insulating layer begins to crack, after about 4-6 years it will have to be restored.
Plaster Insulation
It is executed by a solution from a basis and a polymeric or binder filler; the basis for which is most often cement.
The base must also be cleaned and dried; cracks are sealed with a special putty, then a solution is applied in several layers. The mixture is sold in dry form, it is diluted with water as indicated in the instructions. The interval between layers is from 5 to 10 minutes.
Works on plaster insulation are performed at a temperature above + 5 ° C, but below + 30 ° C.
Backfilling waterproofing
A man makes a backfill to isolate the floor from water
Also, an effective enough method, besides it can easily be performed by anyone.
The method consists in using special bulk materials that become gel-like; The resulting gel-like mass practically does not pass water. This waterproofing is also a thermal insulation.
Preparation for the implementation of this waterproofing is standard: the surface must be cleaned and dried. Before falling asleep set the formwork.
Molded version
To date, this is the most reliable way. And, accordingly, the most expensive. Used materials such as bitumen, asphalt, pitch.
The preparation of the substrate is, as usual, in its cleaning, sealing of cracks. Then the base is primed with hot bitumen, then the formwork is built, and then the whole surface of the floor is filled with heated material.
If you want to make several layers - please, however, after applying the first layer and leveling it (done with a special metal scraper), you need to wait until completely hardened, and only then apply a second layer.
Oaklaychny method
As it follows from its name, okleechnaya insulation involves gluing the floor with special roll materials. It can be polymer or bitumen (or mixed polymer-bitumen) materials, consisting of components that have increased resistance to decay.
The roll waterproofing for the floor is easy to use and can last for a long time (on average - 15 years), besides some of its varieties can be laid and at minus temperature, from this the quality of insulation does not suffer.
So looks okleechnaya insulation
One of the modern insulating roll materials is a hydroisol (hydroglass). It is rather not even material, but a whole group of materials, since they are produced on different bases (fiberglass, fiberglass or polyester), with different types of top and bottom coatings (this can be fine-grained or coarse-grained or polymer film).
Recently, the liquid waterproofing for the floor is also gaining increasing popularity, which is a mastic based on polymer-bitumen emulsion. It is applied by spraying, has a high adhesion to any surface, is resistant to temperatures and ultraviolet rays. Perhaps the only drawback of it today is the price. The elasticity of such coating does not decrease with time, the service life can be 20 years and even more.
More detailed about the method of pasting.
We examined various types of waterproofing. And now let's talk about what types of waterproofing are used in this or that case and what are the features of isolation of premises depending on their purpose, and also depending on the type floor covering.
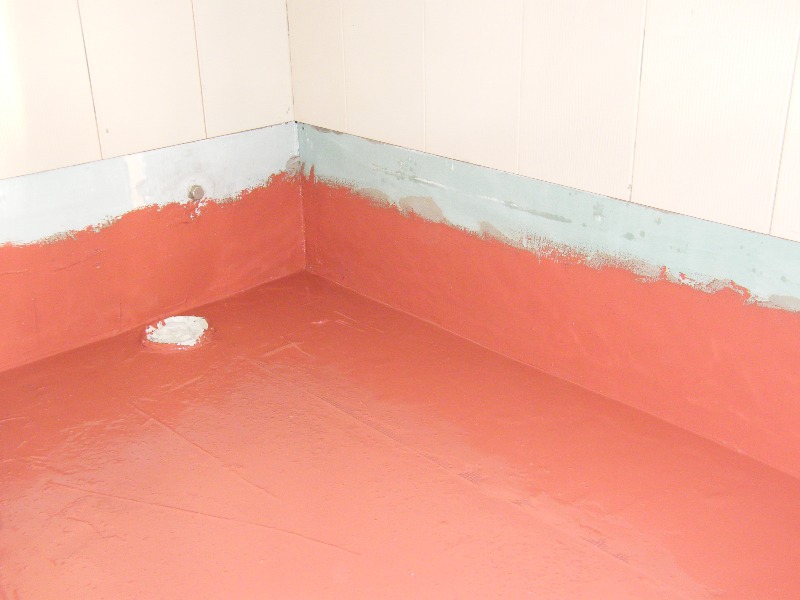
We make the waterproofing of concrete floor
The scheme of the device of concrete floor
Concrete itself does not pass water. However, there are "weaknesses" - the joints between the floor and the walls. For the waterproofing of the concrete floor, the lubricating and overlapping options are well suited, which we examined a little more.
Be sure to first clean the base well, then carefully primed it. After the drying of the primer, cracks are embedded (it is advisable to do this not only on the floor, but also on the walls).
If you are going to perform insulation coating (), this is enough, if it's oklechnuyu - you have to first level the floor.
Wood flooring
Wooden floors need insulation from moisture much stronger than concrete floors.
Correct insulation of the wooden floor, if the house does not have a basement, must be completed even when the foundation is erected. If the basement is available, then it is necessary to correctly calculate and perform its ventilation.
From the cellar side, it is necessary to make insulation with an isoplastic or roofing material.
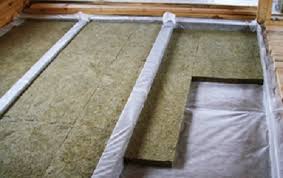
Insulation with cotton wool is also allowed
As for the waterproofing itself, the wood needs to be treated with special means, which increase its water-repellent properties, as well as means against mold formation.
For wooden floors, casting, pasting or painting insulation is more often used.
Whichever version of waterproofing materials you use, the wooden floor before insulation should be properly degreased and dried.
Features of the waterproofing of the bathroom
If in other places it is simply desirable, then waterproofing the floor in the bathroom is a must. Unless, of course, you are not a fan of regular repairs to the lower neighbors.
In addition to "flooding neighbors," high humidity also spoils the interstorey overlap. Doing waterproofing floors with their own hands is quite simple.
If you are going to do waterproofing only the floor, then it is better to use the lubricating method. If funds are allowed, it is better to give preference to German insulating mixtures.
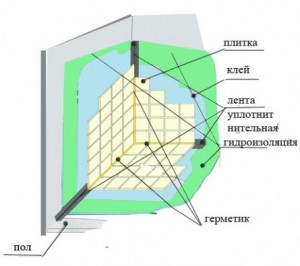
Useful scheme for the arrangement of the bathroom
It is also possible to combine the coating and bonding methods.
We make the waterproofing of the floor under the screed
If you are only going to make a concrete screed and have not even thought about what kind of floor covering you will use, remember that the insulation needs to be done before the screed is made.
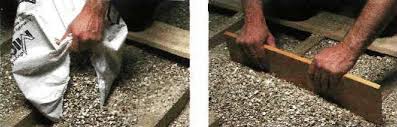
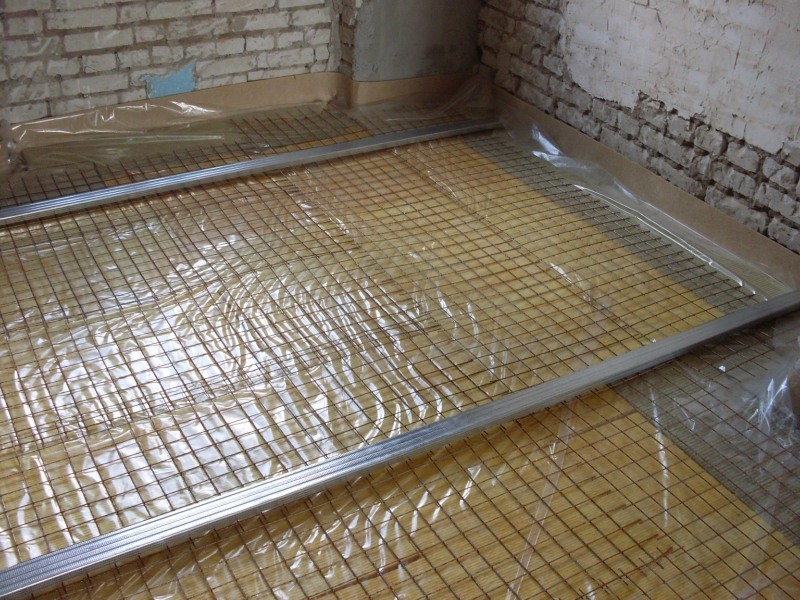
In houses that do not have a basement, they most often perform a gravel-sand pillow, on top of which a film is laid. On a well-compacted layer of gravel (crushed stone), a layer of sand is poured from above - this pillow will protect from lifting moisture from the ground through the capillaries, the film protects against water vapor.
It is possible (especially in the case of a basement) to perform waterproofing with mastic. Also it is necessary to treat concrete with special waterproofing solutions (impregnating waterproofing).
How to make a waterproofing floor, which way and materials to choose - it's up to you. Just remember that trying to save money on waterproofing can lead to a much higher cost of repairs and bringing the house in order.
Thank you. And a good day!
Waterproofing the foundation in modern low-rise construction is almost an integral part of the process of erecting the zero cycle. This is due to the presence of moisture in the ground on the vast majority of the territory of our country. By itself, water is not particularly scary concrete, on the contrary, in a slightly moistened state, concrete continues to gain strength over many years. However, there are three large "BUT".
First, concrete has the property of capillarity. It is the rise of water upwards through the smallest pores that are inside the material. The simplest example of this phenomenon is the wetting of a piece of sugar, slightly lowered into a glass with tea. In construction, the capillary rise of water leads (unless of course waterproofing) to the penetration of moisture first from the outer layers of concrete to the interior, and then from the foundation to the walls that are on it. A damp wall - this increase in heat loss, the appearance of fungi and mold, spoilage of interior decoration materials.
Secondly, the modern foundation is still not concrete. This is reinforced concrete, i.e. in it there is an armature, which on contact with moisture begins to corrode. At the same time, iron in the armature is converted into ferric hydroxide (into rust), increasing in its volume by almost 3 times. This leads to the formation of a strong internal pressure, which when a certain limit is reached, also destroys the concrete from the inside.
Third, we do not live in the tropics, and the minus temperatures for our climate in the winter are the norm. As everyone knows, the water turns into ice when it freezes, increasing in volume. And if this water is in the thickness of the concrete, the ice crystals that are formed begin to destroy the foundation from the inside.
In addition to the above, there is another danger. It is not uncommon for the groundwater to have chemical elements (salts, sulphates, acids ...) on the plot, which have an aggressive effect on the concrete. This is the so-called "corrosion of concrete", leading to its gradual destruction.
Qualitative waterproofing of the foundation allows to prevent all these negative processes. And how it can be implemented, and will be discussed in this article.
By and large, the foundation can be protected from moisture by two ways:
1) to use when pouring the so-called bridge concrete with a high coefficient of water resistance (different brands of concrete and their characteristics will be discussed in a separate article);
2) cover the foundation with a layer of some waterproofing material.
Ordinary developers often now follow the second path. What is the reason for this? At first glance, it would seem that it can be simpler - ordered waterproof concrete at the factory, filled it and everything, sit rejoice. But in reality, not everything is so easy, because:
- an increase in the price of a concrete mixture with an increase in the coefficient of watertightness can reach 30% or more;
- not every plant (especially a small one) can produce a concrete grade with the required water resistance coefficient, and attempts to manufacture such concrete on its own can lead to unpredictable consequences;
- well, most importantly, there are problems with the delivery and laying of such concrete (it has very low mobility and quickly grasps, which in most cases limits the possibilities of its use).
The application of the waterproofing coating is available to all and with certain skills can be done even with their own hands.
Materials for waterproofing the foundation.
All materials used to protect the foundations from moisture can be divided into the following groups:
- lubricating;
- sprayed;
- roll;
- penetrating;
- plastering;
- screen waterproofing.
Let us dwell in more detail on each of them.
I) Lubricating waterproofing is a material based on bitumen, which is applied to the surface (often in 2-3 layers) with a brush, roller or spatula. Such coatings are commonly called bituminous mastics. They can be made independently or purchased already ready to be poured into buckets.
The recipe for homemade bitumen mastic: buy bitumen bitumen, split it into small pieces (the smaller, the faster it will melt), fall asleep in a metal container and put on fire until it melts completely. Then remove the bucket from the fire and add to it the waste oil, and preferably diesel fuel (20-30% of the volume of the mastic), mix everything thoroughly with a wooden stick. How this is done, shown in the following video:
Finished bituminous mastic is sold in buckets. Before use, for more convenient application, it is usually mixed with the addition of a solvent, for example, a solvent, white spirit, etc. This is always reported in the instructions on the label. There are several manufacturers of such mastics with different prices and different characteristics of the finished coating. The main thing when buying them is not to make a mistake and not to take the material, for example, for roofing coverings or something else.
Before applying bitumen mastic, the surface of the concrete should be cleaned of dirt and primed. The primer is produced by a special composition, the so-called bituminous primer. It is also sold in stores and has a consistency that is more liquid than mastic. Apply omazochnaya waterproofing in several layers, each of which - after solidification of the previous one. The total thickness of the coating reaches 5 mm.
This technology is one of the cheapest compared to those that will be described below. But it also has its drawbacks, such as a small longevity of the coating (especially prepared independently), a long duration of work and a high labor input. The process of applying mastic with a brush is shown in the following video:
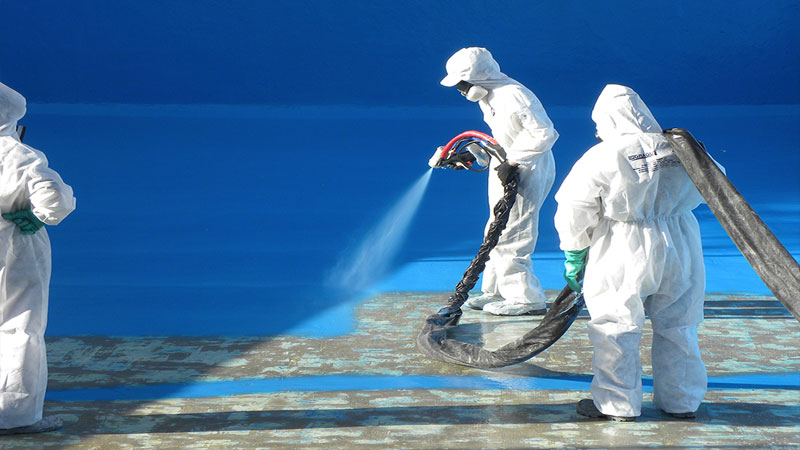
II) Sprayable waterproofing or so-called "liquid rubber" is a bitumen-latex emulsion, which can be applied to the foundation with a special atomizer. This technology is more progressive than the previous one. allows you to perform work more qualitatively and in a fairly short period of time. Unfortunately, mechanization of work significantly affects its value.
The characteristics of liquid rubber and its spraying process are shown in the following video:
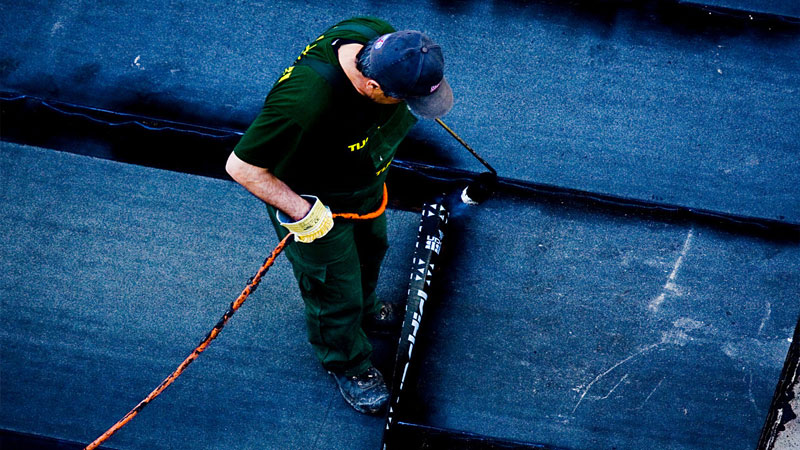
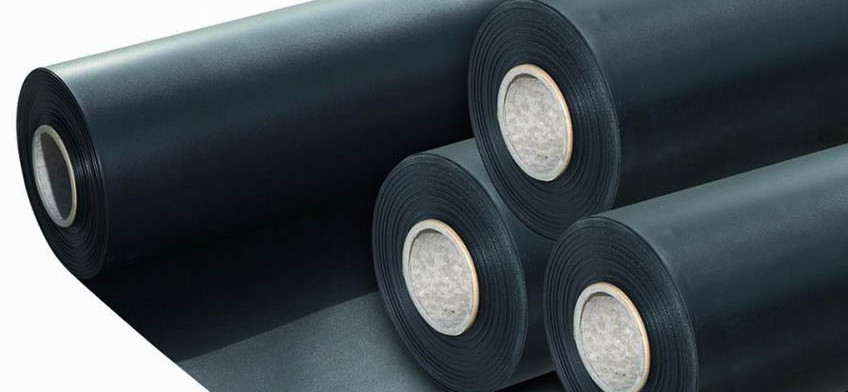
III) Rolled waterproofing is a bitumen or polymer modified material, previously applied to any substrate. The simplest example is a ruberoid with a paper base known all over the world. In the production of more modern materials, glass fiber, fiberglass, polyester is used as a basis.
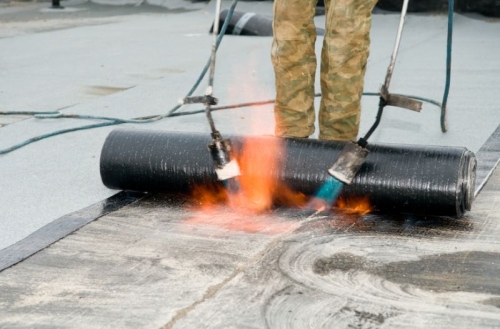
Such materials are more expensive, but also much more qualitative and durable. Doing work with a roll-on waterproofing can be done in two ways - by gluing and fusing. The gluing is done on a surface pre-primed with bituminous primer with the help of various bituminous mastics. Fusing is performed by heating the material with a gas or gasoline burner and then gluing it. How this is done, shown in the following video:
The use of roll materials significantly increases the durability of the basement waterproofing, compared, for example, with lubricating materials. They are also quite affordable. The disadvantages include the complexity of the work. It's difficult for an experienced person to do everything qualitatively. Also do not cope with the work alone.
Significantly easier to work with a roll-on waterproofing allowed the appearance on the markets a few years ago, self-adhesive materials. How to protect the foundation with their help is shown in the following video:
IV) Penetrating waterproofing - this coating of concrete with special compounds, which through the pores penetrate into its thickness for 10-20 cm and crystallize inside, thereby clogging the passages for moisture. In addition, the frost resistance of concrete and its protection against chemically aggressive groundwater.
These compositions (Penetron, Hydrotex, Aquatron, etc.) are quite expensive and have not been widely used for complete waterproofing of the foundation in a circle. They are often used to eliminate leaks in already built and operated cellars from the inside, when it is no longer possible to repair the waterproofing from the outside by other methods.
More details about the properties of penetrating materials and their correct application are stated in the following video:
V) Plastering waterproofing By and large it is a kind of coating insulation, only here are not used bituminous materials, and special dry mixtures with the addition of water-resistant components. Prepared plasters are applied with a spatula, trowel or brush. For greater strength and to prevent the appearance of cracks, plaster mesh can be used.
The advantage of this technology is the simplicity and speed of application of materials. The downside is the low durability of the waterproofing layer and the lower water resistance compared to the materials described above. The use of waterproofing plasters is more expedient for leveling the surfaces of foundations or, for example, for sealing joints in foundations of FBS blocks before their subsequent coating with bitumen or roll waterproofing.
VI) Screen waterproofing - This is sometimes called the protection of foundations from moisture by means of special swelling bentonite mats. This technology, which is in effect a replacement for the traditional clay castle, appeared relatively recently. The mats are attached to the foundation by dowels with overlapping each other. More information about what this material represents and about its properties is stated in the following video:
How to choose a waterproofing for the foundation?
As you can see, at present there is a huge amount of all kinds of waterproofing materials for the protection of foundations. How can one not get lost in this diversity and choose exactly what is suitable for your specific conditions?
First, let's see what to look for when choosing a waterproofing:
- presence or absence of a basement;
- ground water level;
- type of foundation and method of its erection
A different combination of these three factors determines which waterproofing is preferable in this case. Consider the most common options:
1) Columnal foundations.
can be protected only by roll-up waterproofing. To do this, pre-roll the cylinders of the desired diameter, fix them with an adhesive tape, lower them into drilled wells, install reinforcing frames and pour in concrete.
The cheapest option is the use of a common ruberoid. If it is sprinkled, it is better to turn the smooth side outward so that in winter when it freezes, a lesser ground will adhere to it. It is desirable to make so that the thickness of the waterproofing along the entire circumference is not less than two layers.
When used for columnar foundation asbestos or metal pipes, they can be preliminarily coated with any bituminous bitumen waterproofing at least 2 layers.
If you are going to erect on poles, before filling it for more reliability, the tops of the pillars should also be covered with coating waterproofing (even better not as in the figure below, but directly from the ground). This will prevent a possible capillary rise of water from the ground into the grillage.
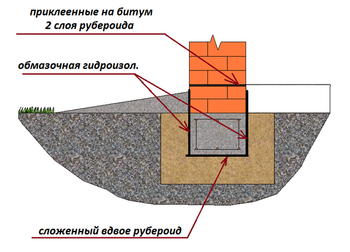
2) shallow banded foundations (MZLF).
in fact, must always be above the water table. Therefore, for its waterproofing, a common roofing material and bitumen mastic will suffice to prevent capillary suction of moisture from the ground.
The figure shows one of the working options. Before the formwork is mounted on the sand cushion, the roofing paper is folded in half with a small discharge. Then, after pouring and setting the concrete, the side surfaces of the tape are covered with omental waterproofing. Above the level of the blind area, regardless of what you base (concrete or brick as in the picture), is an isolation waterproofing, by gluing two layers of roofing material onto the bituminous mastic.
3) Recessed ribbon foundations (a house without a basement).
The waterproofing of the buried strip foundation, regardless of whether it is monolithic or from FBS blocks, when there is no basement in the house, can be done according to the scheme shown above for MZLF, i.e. bottom roll material, and the lateral surfaces are covered with omental insulation.
The only exception is the option, when the foundation is not poured into the formwork, but directly into the excavated trench (as you understand, it will not be possible to make the coating). In this case, before installing reinforcing cage and pouring of concrete walls and the bottom of the trenches are covered with roll-up waterproofing with sizing or fusing joints. The work is certainly not very convenient (especially in a narrow trench), but there is nowhere to go. This was mentioned in the article.
Also do not forget about the layer of the shut-off waterproofing above the level of the blind area.
4) Recessed ribbon foundations that are the walls of the basement.
Use for waterproofing the walls of the basement outside the coating and spraying materials is permissible only in dry sandy soils, when the groundwater is far away, and the perch flow quickly through the sand. In all other cases, especially with the possible seasonal rise of groundwater, it is necessary to make a roll waterproofing in 2 layers using modern materials based on fiberglass or polyester.
If the foundation is composed of blocks FBS, before its waterproofing seams between individual blocks it is desirable to cover with a plaster waterproofing mixture, at the same time leveling the surface.
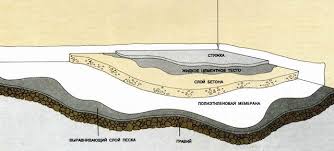
5) Plate foundations.
Foundation plates (basement floors) are traditionally protected from moisture from below by gluing two layers roll waterproofing on previously filled concrete preparation. The second layer is perpendicular to the first. This was discussed in more detail in the article.
In order not to damage the waterproofing layer in subsequent work, try to walk as little as possible on it, and immediately after installation, close it with extruded polystyrene foam.
At the end of the article, we draw attention to two more points. First, at a groundwater level rising above the floor level of the basement, drainage should be done (a system of drainage pipes laid around the perimeter of the house and wells for revision and pumping out water). This is a big topic, which will be discussed in a separate article.
Secondly, the layer of vertical waterproofing of the foundation requires protection against damage that may occur during backfilling and compaction of the soil, and also during frost pooching of the soil in winter, when it adheres to the waterproofing and drags it upwards. This protection can be provided in two ways:
- the foundation is covered with a layer of extruded polystyrene foam;
- mount special protective membranes, available now on sale.
Most builders prefer the first method. it allows you to immediately "kill two birds with one stone." EPPS and protects waterproofing and insulates the foundation. On the insulation of the foundations, the
Waterproofing - an important stage in the overhaul of virtually any gender. It reliably protects the structure from moisture penetration from both sides. Usually waterproofing is done in the bathroom, bathroom and kitchen, but professionals recommend protecting it floors and in living areas. Especially if it is a private house in which the floors are made on the ground, or a multi-story building, the apartment is located directly above the basement.Floor waterproofing keep the concrete screed from the incoming moisture from below and protect your neighbors if you experience leakage. Therefore, do not save and do it throughout the apartment when carrying out repairs.
At the moment there are many types of waterproofing, with which you can create in the room a reliable waterproof and waterproof layer. It will protect your ceilings, walls and floors from the appearance of dampness, rot, mold, fungus, pathogens, etc.
Waterproofing can be divided into two large groups:
- For internal works.
- For external works.
We are more interested in waterproofing for internal works, so we will consider its types of working water-repellent effect. It happens:
- polymeric;
- bituminous;
- bitumen-polymer;
- mineral.
Also the waterproofing can be divided by the method of application and laying on the work surface. In the building store you will find the following options:
- The film.
- Rolls.
- Membranes.
- Penetrating.
- Plastering.
- Lubricating.
- Powder coating.
- Oakleading.
- Coloring.
Each of the above options has its advantages and disadvantages. We will tell you more about them.
Film and roll waterproofing
These are the most popular materials that are used in private homes, apartments, offices, commercial and production buildings. Film and rollwaterproofing floors appeared in the middle of the XX century - it is represented different types of roofing felt, roofing felts, fibergroup. This is a good choice for creating a high-quality waterproofing floor, foundation and flat roof. Usually roofing felt and roofing felt are made from a thick sheet of cardboard, which is impregnated with a mixture of bitumen and sprinkled with crumb from basalt. This material is excellent for retaining moisture, but can be pushed from high loads. Therefore, it is usually placed in several layers or additionally treated with resin.
Waterproofing floors with rolls should be made monolithic and overlapping
As a protective layer can act and a classic double polyethylene film. But you can use it only if you decide to save. Its strength is very low, and the requirements to the base are high. The slightest tubercle can lead to the fact that the material will tear or rub through, and the layer will pass moisture.
More modern options are polymer membranes, which not only protect the room from moisture, but also reliably keep the heat. Usually the membranes are produced on an adhesive basis - they are simply rolled out on the base, not forgetting about the overlap (7-10 cm). With the help of membranes, it is possible to create a high-quality waterproofing for a classic or dry floor screed. The basis is polyvinyl chloride, polypropylene or polyethylene. The main advantage of film and roll waterproofing is the speed of application: just roll rolls over the surface and connect them with each other. To ensure better protection, the film is wound around the perimeter on the walls, and after finishing the finishing floor, it is cut and the edges are fixed with a plinth.
Waterproofing mastic
No less popular in construction and repair is mastic, consisting of bitumen, resin, liquid rubber, various polymers and plasticizers. Mastics are usually divided into two types:
- Hot type.
- Cold type.
This is an excellent option for creating a reliable waterproofing in the kitchen, in the bathroom, the pool, the toilet, the sauna. It is treated as floors, and various seams, joints, surface swings.
Note:mastic is a very practical and reliable option. It creates a dense protective layer, filling all the irregularities and cracks on the surface.
Waterproofing the floor with mastic allows to level the surface and fill all the roughness of the floor
Liquid waterproofing
Strange as it sounds, but the waterproofing is liquid. Under this concept, various impregnations, varnishes, primers, paints, etc. come into play. The principle of action is simple: the drug is applied to the surface, it penetrates into the pores and cracks, and after drying forms a strong film that does not allow steam or moisture to pass through.
Waterproofing based on powder
This group includes all kinds of dry mixtures that require dilution with water before use. They include a variety of adhesives, cements, plasticizers. Typically, these drugs are not used in a separate layer, but add to the screed at the stage of pouring. As a result, you get a durable layer that does not allow moisture to pass through. Powder materials are often used to treat surfaces and walls in wet cellars and underground, in pools and saunas.
Principles of creating a waterproofing layer
All of the above materials are applied to the surface in various ways. But the main thing in them is that the installation should adhere to the principle of continuity. If you lay the membrane, then make an overlap and wrap it on the walls. If liquid preparations - then do not allow omissions.
Note:do not skimp on the material. Handle various protrusions and walls touching the floor, to a height of 20-25 centimeters.
Waterproofing on a liquid basis
Liquid insulation is divided into two types:
- Impregnating.
- Cast.
The first type is applied to the surface with a roller, brush or special spray. Drying, the material covers the surface with a solid, monolithic film that passes air, but retains water molecules.
Floor waterproofing with liquid materials
The second type usually consists of bitumen components with the addition of plasticizers and polymers. The material is heated to the required temperature, after which it becomes liquid and flowing. It is poured over the surface and smoothed, resulting in a strong, even and reliable film. Usually bituminous mastics are used for waterproofing foundations and rough floors. It can be applied both in one layer, and in several. In some cases, the thickness of the waterproofing can reach 100 mm.
Paint waterproofing
Painting materials for floor waterproofing assume the application in a cold way (without heating). Usually they have an epoxy or rubber base and are applied like ordinary paint. To carry out the work you will need a regular roller (it is advisable to choose quality rollers that will not lose pile) or a brush.
The protective layer in this case is rather thin - no more than 2-3 mm. But this is enough to ensure that the surface does not miss steam and moisture, not covered with mold and fungus. The average service life of the painting waterproofing is not very large - it usually lasts about 5-6 years.
Oak waterproofing
The principle of application of this material is quite simple: a special glue is applied to the base prepared and cleaned from dust and debris, on which sheets of insulation are laid. There are three application options:
- Laying sheets on the floor and fixing them with glue.
- Laying of sheets and their connection to the surface and each other by soldering (usually using a blowtorch or special device that supplies hot air).
- Stacking sheets or rolls with overlapping and fixing them with adhesive tape. This option is usually used when pouring screeds or when arranging rough floors. Overlap in such cases it is necessary to do not less than 15 centimeters.
Note:most modern roll materials are produced on a self-adhesive basis. To ensure that they adhere well to the surface, it must be thoroughly cleaned from dust.
Oak waterproofing can be done in several layers
Stucco method
There are many dry mixes on the market to ensure high-quality waterproofing of the floor. Usually they are applied like ordinary plaster: first they are bred with water until they get a creamy mass, and then they are laid on the surface with a spatula. There are also dry fillings - they simply cover the floor, after which they will absorb all the moisture. Remember that it takes at least two weeks to completely dry the plaster. To the layer does not burst, it must be periodically moistened - this information is indicated on the bag with the mixture.
In principle, this is all information on how to make a floor waterproofing. Which materials to choose depends on your requirements and capabilities. Usually, for apartments and houses, rolls are used, in particularly difficult cases - by coating. The remaining methods are considered situational.
To maintain the integrity of the finishing materials and other elements of the floor construction, it is waterproofed. Absence of moisture on the protected objects will prevent the development of fungi, corrosion on them, will help to increase their service life.
Important features of floor waterproofing
If the housing is in the old house, where the repair has been done repeatedly, the most successful solution will be to dismantle the whole floor covering up to a concrete screed or foundation. If the floor is equipped with wooden ceilings, and they were installed long ago, the need for their dismantling can only be installed by an expert, since they can be decrepit, which can make the new repair short-lived.
The floor must be leveled. To create a smooth base, a special repair composition is used, sometimes self-leveling mixtures are used. Use non-expensive waterproofing materials to seal uneven surfaces, small cracks are not necessary. However, the floor must be as level as possible, so that the owners can use floor coverings sold in rolls, or quickly install the floor with a polymer filler.
If the waterproofing of the floor is part of a large-scale repair, during which the redevelopment will take place, you must first dismantle all unnecessary partitions, ledges, only then waterproof. The layer must be applied sealed by capturing the entire floor or all its possible parts. Excess objects and old structures will not allow to cover completely, therefore can greatly reduce the quality and usefulness of the waterproofing in general.
On the material for waterproofing and ensuring a high level of work can not be saved. The purpose of the protective coating is to prevent moisture from entering the room, which is necessary to prevent the accumulation of dampness, deterioration of qualities building materials. For residents of apartments, this aspect is especially important, since if a significant amount of water is leaking, for example, in the bathroom, a quarrel with neighbors may occur, there is a possibility of imposing obligations to pay compensation for the damaged furniture.
The floor in the bathroom and kitchen according to building standards should be located a few centimeters lower than in the rest of the premises. Moisture is retained in a restricted area, allowing it to be quickly eliminated. To comply with this parameter they make a step, sometimes they are limited to packing a special curb.
How to choose the right material for waterproofing
Depending on the type of floor, the reliability of the waterproofing and the way it is applied, the following options are distinguished:
- materials sold in rolls or intended for gluing;
- compositions and mastics, for the application of which a brush or roller is required;
- mixture for pouring;
- substances for backfilling;
- penetrating waterproofing, simultaneously protecting the floor from corrosive environments;
- plaster;
- polymeric compositions for spraying.
For the installation of waterproofing with their own hands, the most appropriate are coating materials, which can be quickly applied, and wait for drying to be a maximum of several days, and plastering options, ready for further application of the floor covering the next day. Use roll materials are more difficult, so non-professionals should first learn how to lay this waterproofing, and then carry out large-scale work in their own home.
To master the technology of use penetrating waterproofing but it is necessary to read the instructions and clearly follow the instructions covering the proper distribution of the material, care for the drying coating, perform all prescribed procedures. In the apartment, the use of penetrating formulations is undesirable, since the floor should be strongly moistened prior to application. Such an event may cause water leakage to neighbors and related proceedings.
Bulk waterproofing It is used if it is possible to create a screed. It should be remembered that its layer will be thick enough and can visually reduce the height of the ceilings after repair. Pellets can easily be poured onto the floor evenly and poured with water, the amount will be indicated on the package. After water enters the granules will turn into a paste resembling gel, it will prevent further water flow.
Do not need protection from water, as they are not able to detain it. They are often called 3D floors. They look beautiful, it's quite difficult to create them yourself. It is necessary to follow the application instructions written on the packaging, which can be misunderstood without professional explanations, however, with care and patience, one can create an unusual coating combined with waterproofing at one time. Sprayed polymer coatings require special equipment. It is necessary to stock up on overalls, it is advisable to see how professionals apply this coating.
It is necessary to distinguish finishing materials from waterproofing. For example, floor tiles It is not a reliable barrier to water leakage. Even with the use of polyurethane or silicone grouting, which can handle seams, when a significant amount of liquid hits the floor, there is a risk of its rapid leakage to neighbors or absorption into non-destructive building materials.
Lacquer and oil paint do not have waterproofing properties. At first, they can be a reliable barrier, but after 7-10 years, microcracks appear, then considerable cracking of the material can be seen, therefore before any application, any material should be used to ensure a durable protection against moisture.
Floor leveling before flooring insulation
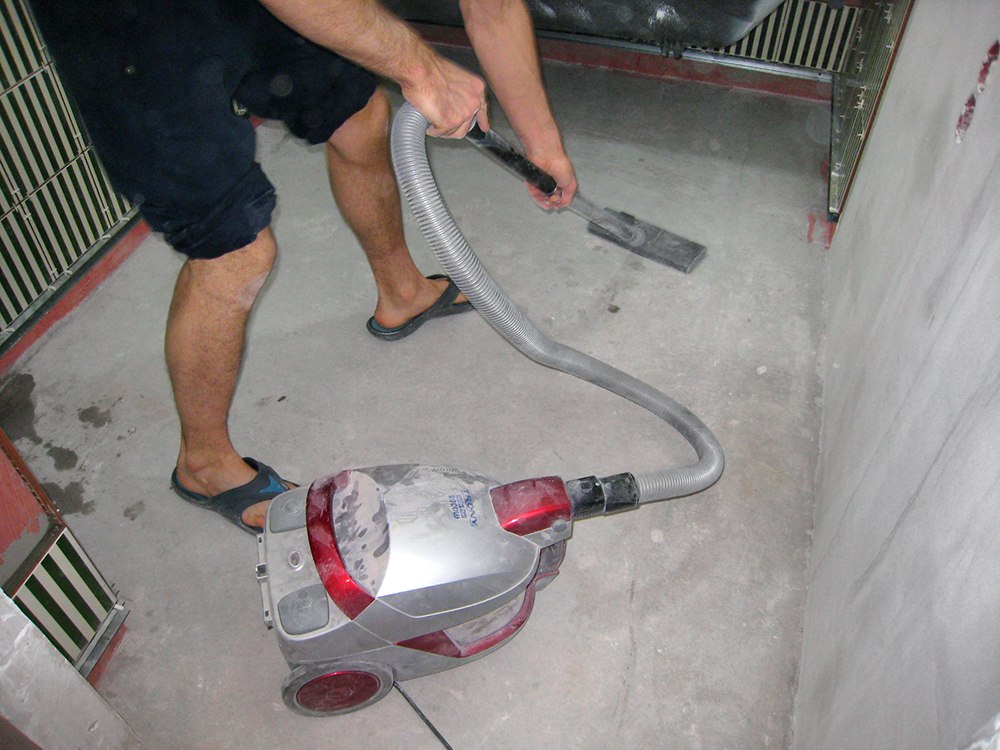
Applying a self-leveling compound, it is necessary to accurately level the surface concrete foundation before laying the roll insulation. Between the concrete and the waterproofing coating there should be no gaps, so alignment is carried out carefully. The floor is completely cleaned of dirt, you can use a vacuum cleaner. Clean surface must be primed in one layer.
Depending on the quality of the material, the dry mixture is diluted with water or liquid, which must be purchased separately. The composition is evenly applied to the entire surface of the floor, you can not tolerate lumens. If there is a risk of formation of small air bubbles that can remain inside the coating, the waterproofing is rolled with a roller equipped with a continuous layer of needle nozzles. He simultaneously participates in the correct distribution of the solution and removes all the bubbles.
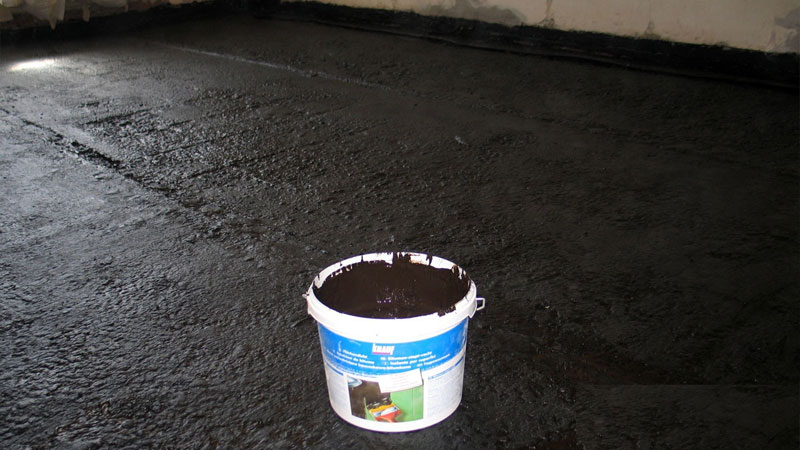
Application of mastic
To protect the floor from moisture with adhesive material, it will be necessary to purchase an additional adhesive or special mastic. Professionals use an additional coating for mastic, which differs depending on its composition. For the polymer variety, you can choose from PVC film, fiberglass or polyisobutylene. If bituminous is used, then briol, hydroisol and the like can serve as an additional coating.
The prepared base is completely covered with bitumen emulsion. Its use is recommended, since its composition is the most neutral, does not harm the body of workers, and in the future the occupants of the building. It is made with the use of ordinary water, after mixing the solution, no harmful solvents evaporate. The primer must be applied in two equal layers, according to the rules of the second, it is perpendicular to the first.
During the drying of the primer, it is necessary to glue a special tape, it should cover the corners, the joints with the walls along the perimeter. During the sizing, the tape is deeply immersed in the material. After carrying out this stage of work, the primer once again carefully covers the places covered with tape.
Stacking
When the preparatory layer finally dries, the layer of waterproofing begins to be laid. Self-adhesive carpets need just to be well leveled out and using a little force, using a roller or hands to press to the floor.
Waterproofing carpets of a standard type can be fixed by connecting a building hair dryer, in the absence of a burner. The bottom coating slightly melts outside, after which it is immediately pressed against the base. The overlapping points must be straightened, if necessary, you can re-secure the peeled or crumpled strips.
When the material has formed a flat surface, you can fix the strip by applying welding. During the execution of the work, it is necessary to make an admission to the walls, preferably at least 25 cm. After the screed or the finish coat is completed, all the excesses are easily cut off. The corners can be additionally glued with a repeated layer of material, forming patches, they must be securely sealed.
The result of the work is absolutely flat, sealed coating, through which the liquid can not leak. Fill the concrete screed is allowed only after the complete drying of the adhesive or bitumen mastic, which usually takes no more than a day.
For warm floors mastic may not be suitable, as with prolonged heating it is able to evaporate an unpleasant, characteristic odor. In the hallway it should be used safely, and for waterproofing of other premises it is necessary to pick up other substances.
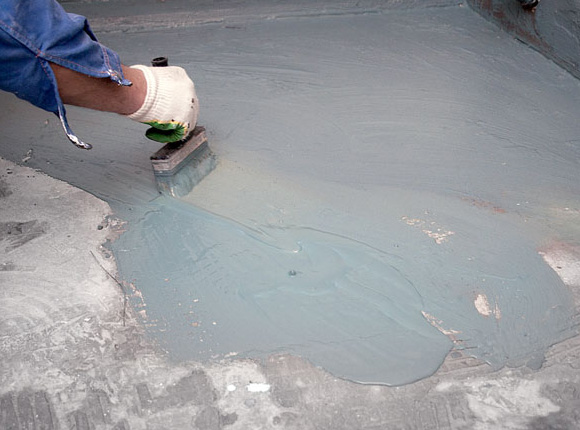
Produced dry, similar in consistence to powders, sometimes in the form of mastics and pastes. Before the work, the mixture is diluted with water or emulsion. Liquid waterproofing or a consistency similar to the ointment is initially sold in a form ready for immediate application after the opening of the can.
Application of coating waterproofing
Lining waterproofing, depending on the consistency, differ in terms of application.
- Liquid compounds should be applied in thick layers, completely sealing the space, at least 2 times. Most often, they are made from oxidized petroleum bitumen of a rather small thickness: about 1 mm and above. On the coating is usually poured screed, so after it dries it should be checked that no damage is formed on the basis, there were no wet places left. Do not allow surface contamination, so the next layer should be applied as soon as possible. If this is not possible, the coating can be covered with a film or monitored for keeping it clean.
- Bitumen-containing pastes apply a layer of 3 mm. They can simultaneously serve as a quality insulation and replace the concrete screed. The material is superimposed with a thick enough layer, so its reinforcement is necessary. Before applying to the entire surface of the floor, a PVC mesh is applied and fixed. The laying of the coating takes place directly on it.
After the creation of the first layer, it is necessary to wait for its complete drying, the time of its occurrence is indicated on the production packaging. When the surface hardens, a second layer is applied, it is desirable to apply it perpendicular to the first. Sometimes in the instruction it is stipulated the superposition of the third layer on still wet surface. In this case, the master needs to purchase special shoes or attachments with thin, but frequent spikes, so as not to damage the material.
As a basis, elastic polyester, fiberglass or fiberglass is used. Bitumen is applied from both sides of the material. To ensure reliable adhesion to the rough floor, the adhesive is located in the lower part. Qualitative waterproofing includes on the top of the special component, which is activated by interacting with the glue for the finish coat, improving its effect.
Sometimes it is necessary to sprinkle the entire upper layer of the already installed waterproofing with medium-grained sand. It increases the adhesion of the adhesive. When the insulation material hardens sufficiently, it can be removed from the coating.
There are two groups of materials that can be applied with glue. One of them is fixed by a burner or a construction hair dryer. The second is equipped with a system that facilitates installation. It is enough to separate the working part from the film and paste it on a horizontal surface, preliminary leveling.
Qualitative waterproofing of the floor allows to protect its construction from the action of moisture, which can destroy or damage some of its components. For apartment owners protection against water penetration through the floor will help to avoid flooding neighbors and, as a consequence, the obligation to pay money for repairs.
In contact with
Classmates
AT
any house, apartment, social buildings always have rooms with high humidity (toilets), where the waterproofing of the floor is not only desirable, but necessary. Moreover, if we take into account the increased risk of accidents for such premises, when a considerable amount of water gets onto the floor.
Content.
1.
2.
3.
3.1
3.2
4.
5.
6.
7.
8.
8.1
8.2
8.3
9.
General tasks of waterproofing
Waterproofing the floor with your own hands is required for:
a) protection of materials that lose their properties from water (for example, insulation) or are destroyed;
b) protection of adjacent premises from water ingress, incl. in the event of an accident.
Why do I need a waterproofing floor?
Waterproofing the floor in the bathroom and similar rooms has a dual task:
- Protection from the effects of moisture structures, rough floor (screed), or overlapping (if the room is located in a multi-storey building).
- Protection of the room lying lower, both from exposure to high humidity, and from water ingress in the event of an accident.
Concrete overlapping or roughing floor is quite resistant to water, which can not be said about the reinforcement laid in its thickness, so the question of how to make waterproofing of the floor before the screed is serious enough.
Being exposed to moisture, the metal begins to become covered with rust, gradually reducing its bearing capacity, in addition, the adhesion of the reinforcement to concrete is lost, and the concrete itself begins to break down.
Types of floor waterproofing, what materials and tools are needed
Waterproofing the floor with your own hands, of course, can not be made without insulating materials and tools for their application.
There are two main types of waterproofing coating.
It is represented by various kinds of mastics, compositions based on cement, magnesia, or bituminous binders, as well as the "penetron" type.
Each material has its own characteristics and although, in most cases, the waterproofing of the concrete floor can be performed by any of the types of coating materials, the best effect is given by their combinations.
Compositions are delivered ready-made or prepared directly on the construction site.
For the preparation of bituminous mastics in significant quantities, special adaptations are required - bitumen-making machines. A small volume can be made in a bucket or other metal container.
Waterproofing of concrete floors with their own hands with the help of such compounds will require brushes, a roller or a spatula. For large areas, mechanized application facilities are used.
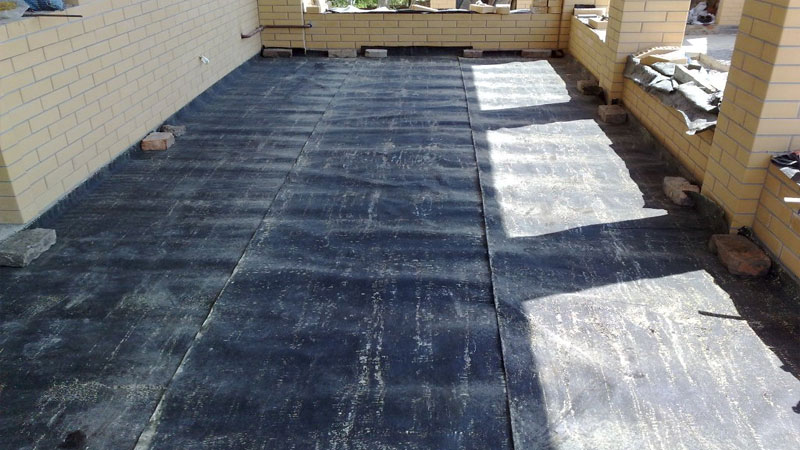
Rolled (pasting) floor waterproofing
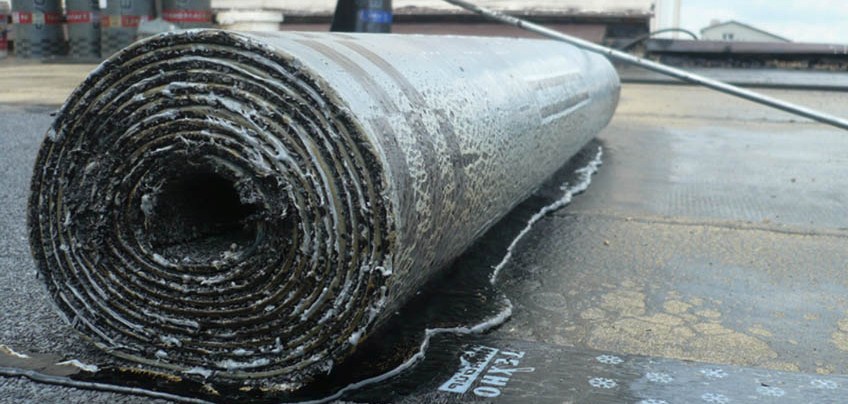
Rolled waterproofing is a relatively thin (up to 2-3 mm) film made of waterproof plastic (polyethylene, polyvinyl chloride, etc.), quite complex composites based on various types of resin (usually based on bitumen).
Rolling materials used for waterproofing floor screeds in turn are divided into basic and unsupported.
Unaddressed Is a film of uniform composition in its section. An example is butyl rubber membranes, plastic films, complex mixtures based on bitumen, various resins.
Basic materials are distinguished by the presence of a base of fiberglass, synthetic fabrics or paper on which is applied waterproofing material. With success can be used as a waterproofing before the floor screed or over the screed.
For the cutting of roll materials, various types of cutters and mounting knives are used. The glue is applied with a brush or a spatula, and for industrial materials, an industrial hair dryer or a burner is required.
Preparation of the room for waterproofing works
To prepare a room for a floor waterproofing device, you must remove all the dignities. technical equipment interfering with communication. Remove all intermediate layers of the floor covering, including the old waterproofing.
On the perimeter of the room at a height of 14-15 cm from the floor from the walls, knock off the facing and plaster.
Preparation of the surface (base) for applying waterproofing
To waterproof the floor with their own hands performed qualitatively, thorough preparation of the substrate is necessary.
Tasks of preparation:
a) Ensure good adhesion of the structure to the material;
b) ensure uniform and high quality application of waterproofing;
at) prevent possible damage to the insulating layer during its application (laying), during the construction of subsequent layers, as well as during operation.
First, with the help of a puncher, all the projections are knocked off. If it is a metal of the reinforcement or the edges of the embedded parts, they are cut off by the "Bulgarian". The cracks are minted.
Just before making a waterproofing of the floor, the surface is primed to increase adhesion and dedusting. Bituminous primers, penetrating compounds based on acrylates, etc. are used for the soil.
Waterproofing of the floor under the screed and under the tile
As a rule, in bathrooms and toilets the waterproofing of the floor is arranged before the screed, to which then the tile is laid.
When installing a screed over the waterproofing layer, care should be taken not to damage it. Up to the fact that the coupler is done in two steps: first as a protective layer for waterproofing (it needs to be done at least 3 cm), and the next day, directly leveling, under a clean floor device.

As for the question of how to make a waterproofing floor in the bathroom under the tile, which sometimes interests people, then what specific features in the device for waterproofing the floor is just before laying the tiles. And under the tile and under other types of coverage, for example, 3D floors, waterproofing is carried out the same way.
How to make self-leveling floor waterproofing
Lime insulation usually represents a viscous mixture that is poured on a prepared substrate and spread with a spatula with a slight pressure, achieving uniform distribution and equal thickness of the layer. For more liquid formulations use a brush.
In order to better protect the structures and the underlying premises, the waterproofing of the bathroom floor should go 10-12 cm to the walls of the room, forming a kind of "trough" from where the water does not pour out, even with a significant leakage.
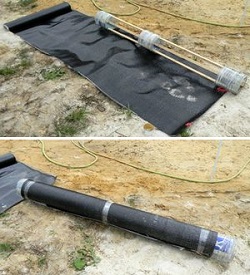
How to make roll floor waterproofing with your own hands
Laying the roll-up waterproofing is done on the glue or "dry". The type of glue can be the technology of fusing.
Waterproofing the floor with your own hands (especially fused) is best done together: one rolls the roll, pressing the tape to the base, the second runs the burner, brings the materials, applies glue, etc.
Construction and laying of waterproofing
When melting, the adhesive is bitumen applied directly to the material.
The material is cut to the size of the room, taking into account the admission to the wall. The cut strips are again rolled into rolls, which are fused to the outside. Working, rolling and cutting a ten-meter roll "in place" is very inconvenient, cut the material, each time neatly does not work. The cut strips are again rolled into rolls, which are fused to the outside.
Slicing is best performed immediately on the entire volume, so that you do not have to change tools every time, put the burner aside, etc.
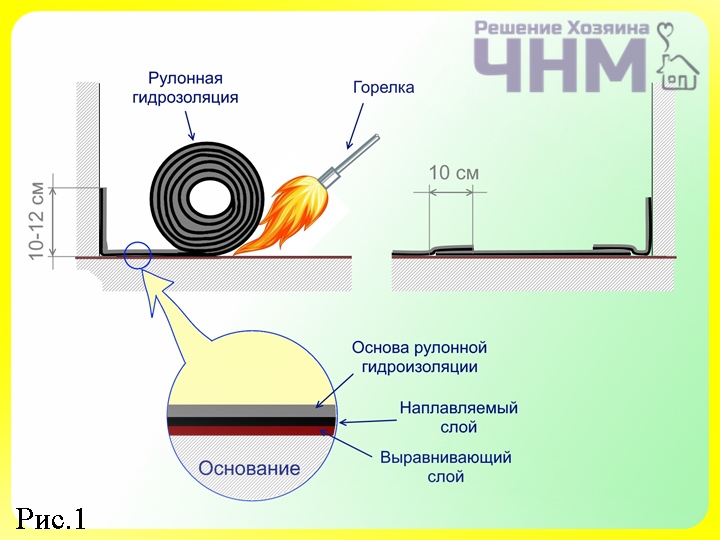
Strips of waterproofing floors are laid parallel to the wall. The first roll starts to roll out, having deviated from the wall 2-3 cm, so as not to cling the wall to the edge of the roll.
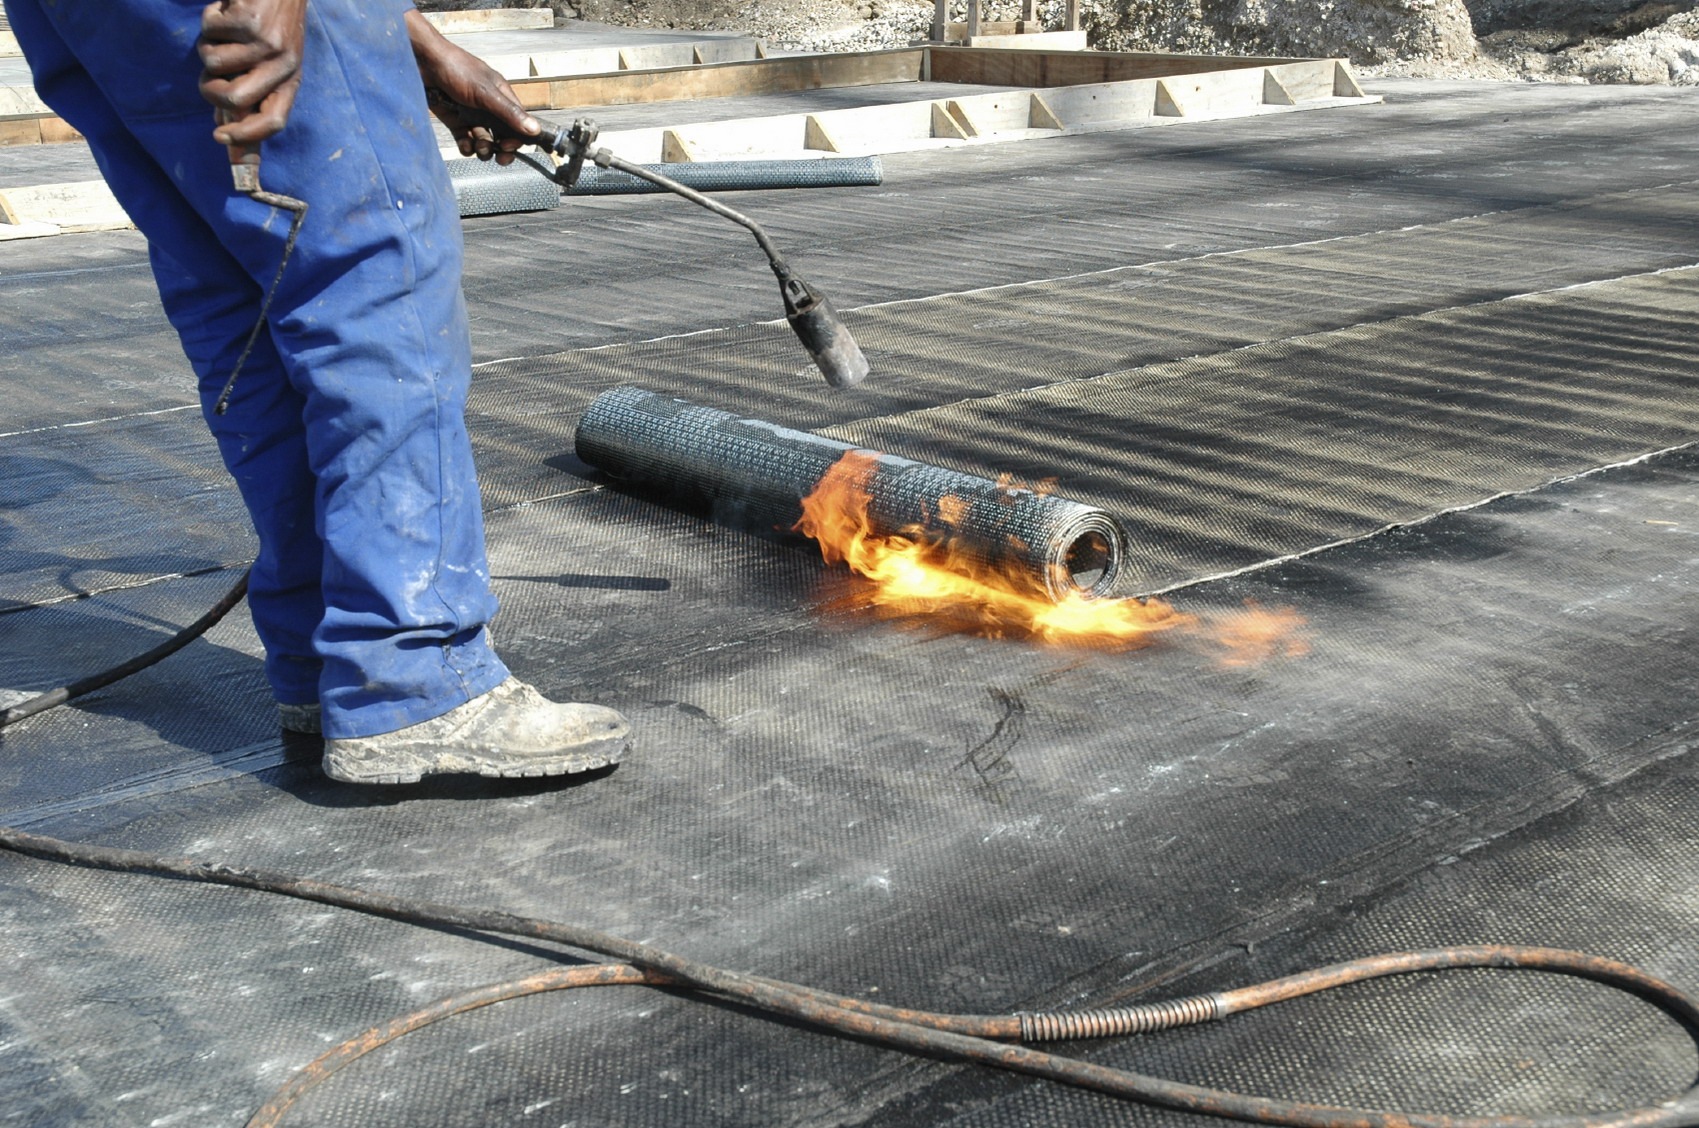
The lower surface is heated up to the "sub-melting" of the bituminous coating with the help of an industrial hair dryer, while simultaneously heating the surface of the base, while the roll is unwound, pressing and smoothing the material.
The next strip is laid parallel to the first with an overlap of 10 cm (the overlap line is marked on the outside of the sheet). After the waterproofing of the floor, stripes 20-30 cm glue the corners of the adjoining wall and floor, along which the roll was unfolded ().
Particular attention is paid to the corners of the room. For high-quality insulation, bitumen is additionally impregnated in them, or they are smeared with mastic.
When the strips are crossed in the transverse direction (if the strip is not enough), overlap is not less than 15 cm. The place where the transverse seam is covered by the next strip is additionally sealed by the fusion of bitumen or mastic.
Laying of roll-on waterproofing on glue
Waterproofing of the floor of the bathroom or other premises on the glue is carried out, as well as the welded, but instead of melting the surface of the material with adhesive mastic the surface of the floor is smeared.
Laying on the mastic is more convenient when the floor waterproofing device is required not in one, but in two, three layers.
Waterproofing "dry"
The easiest way to lay insulation "dry", without using glue at all.
This type of waterproofing is used in rooms where high humidity is not a permanent phenomenon, and the risk of a significant water spill is small. Therefore, before making the waterproofing of the floor with your own hands in this way, you need to take into account the mode of using the room.
When the waterproofing device is dry, in the longitudinal direction the strips are made at least 15, and in the transverse direction 20 centimeters.
Safety measures for waterproofing floors
How to make a waterproofing floor we've covered, now a bit about.
The work uses quite harmful substances based on bitumen, various synthetics, this primarily requires good ventilation, especially in small rooms that do not have windows.
The use of burners and even a relatively safe hair dryer requires the mandatory use of personal protective equipment: clothes with long sleeves, protective gloves, glasses.
Take this responsibly, and the work will bring you pleasure from the result, not injury and poisoning. Ask questions either. , photos, we will publish them on the site. Order work for specialists! Support the project! Good luck to you, Good to Your Home!