Filling the screed in the apartment implies leveling the floor plane in one level. And indeed, no one wants to step on the steps between two adjacent rooms, the more stumble. Of course, for some guests, I would leave a couple of traps, but that's it, a joke. In the houses that the Communists built, the so-called San cab was often used - a design in which the floor level in the bathroom and toilet is below the floor level of the entire apartment.
Once upon a time, I started to figure out why this was done. The answers seemed a little far-fetched to me. A few centimeters of the drop, supposedly served as protection from leaks, overflow of the bathroom and so on. But the bath itself has protection from overflow, but let's say the breakthrough of the pipe assumes two options.
You are at home - that means you block the incoming tap on the apartment and wait for the emergency; You are not at home - then a "container" for a few buckets of water will help a little. In my opinion, the argument is rather weak so that during the overhaul, the entire floor can not be leveled to the same level. Unfortunately, we assume, but the realities laid down by the builders dictate otherwise.
The company that replaced the risers several years ago came to the question creatively. Cast-iron sewage was dismantled, and a new fan riser was taken out where it was more convenient.
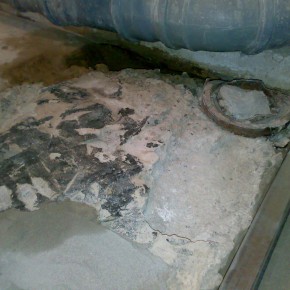
There is one point, namely, the height at which the fan pipe is located, the level at which If the floor level is lower, the toilet will not work.
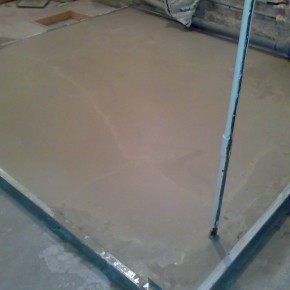
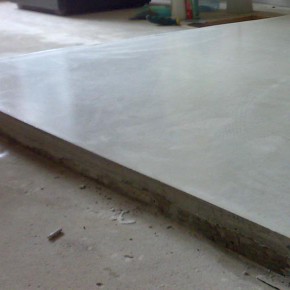
Of course, you can lay out for him a separate podium, but it's still not beautiful and the aesthetic component is broken. I had to go to the victims and pour a minimal layer. A universal equalizer with a promising title "Horizon" was suitable for its characteristics.
The thickness of the layer is from 5 to 40 mm., Rapid drying and the guarantee of operation for 15 years (I myself take the liberty of guaranteeing myself in 15 years ...). So. screw the profile of 60/27 mm around the perimeter of the future bathroom. Ideally, the profile should also serve as a formwork (do not let the solution flow) and a beacon that sets the fill level.
Be sure to ground the surface well before applying the leveling compound.
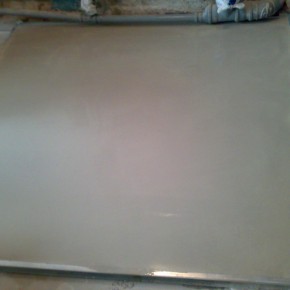
We had to do in two stages: the first fill is a rough alignment + the realization that the solution is too liquid and flows out of the cracks that have not been noticed. Then picking up the leaked pieces, flattering reviews to your address, a break for drying and the final pouring.
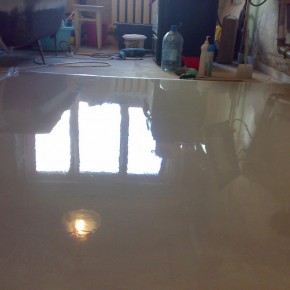

The next day, delete the profile, check the level that it turned out and muttering under his nose "nothing, I'll bring out these tins and I'll bring out the tiles," aloud declaring to the wife that everything is EXCELLENT.
The most important stage bathroom renovation is correct waterproofing of a bathroom. The unquestionable importance of this process is to protect against the negative consequences of the appearance of excessive moisture inherent in such types of premises and are expressed by destructive effects, both on facing materials and on sanitary ware in general. Thus, in the future causing irreparable harm to all the repairs done. A particular advantage in the waterproofing of bathrooms in the apartment of a multi-storey building is to minimize the consequences of flooding neighbors as a result of the breakthrough of water pipes. In addition, this process will protect the walls, floor and ceiling from strong temperature changes, which in turn will have a positive impact on their wear resistance.
To date, the optimal technology of waterproofing the bathrooms with their own hands, implying the use of the following materials:
- bitumen putty, including a wide range of universal coating materials, easily applied to a variety of substrates. Their main advantages are economy, reliability and functionality;
- various pasting hydrobarriers, impregnated with bitumen, perfectly coping with its basic functionality, but much more difficult to fit in the process of repair work;
- cement-polymer compounds, ideally suited for insulation work on the walls of the room (laying tiles).
The procedure for using bituminous putty
1) First of all, you need to prepare a room. To do this, all layers of the old coating are removed, to the concrete base, after which it is thoroughly cleaned, washed, dried, it removes rough irregularities, at the end is applied a deep penetration primer suitable for the putty you have chosen.
2) After drying the primer, according to the instructions, the selected hydrobarrier mixture is prepared and applied to the joints of the wall and floor, as well as the corners of the room smoothly passing to the rest of the area. It is mandatory to apply insulation up the wall by 20 cm. Then the next layer is applied. On average, 2 to 4 layers of coating material are required (each subsequent layer is applied only after drying the previous one, to dry without draft in an enclosed space).
The procedure for mounting the barrier insulation barrier
1) First, a preliminary marking is carried out on the cleaned surface, then all gaps, corners and joints are sealed with sealing tape (it is important not to forget to cover the wall surface 20 cm from the base level).
2) Further, depending on the selected adhesive material, it is necessary, according to the instruction, to glue the cut film, following its stable setting with the substrate. In addition, it is important to smudge all the joints between the sheets with mastic.
3) The final stage is the "pressing" of the hydrobaryar with bituminous mastic. After that the room is finally dried.
Another way of waterproofing floors in bathrooms is to create a combined layer, in a process that rolls onto the original layer of bituminous putty with the same technology as described above.
For high-quality waterproofing walls used putty from cement-polymer mortar, especially suitable for laying tiles. The technology of the whole process is similar. On the cleared, leveled and twice primed surface, the waterproofing material is applied in two layers, going from bottom to top, starting from the corners and joints pre-glued in a special tape. On this process of waterproofing the premises can be considered finished. For more visibility, see the video at the bottom of the article.
Moisture is the main enemy of building structures, so the waterproofing of the bathroom is the first task that must be solved when building a residential house. Especially if this house is built of wood materials.
The penetration of moisture from the "wet" areas of the apartment in the rest of the premises is fraught with many problems. The main one is the increase in humidity in general, which leads to the appearance of foci of mold, and this does not improve the microclimate in the house. Most of building materials, which are used in construction and repair, has organic substances in its composition, and this is a nutrient medium for fungal diseases and mold. If wallpaper is glued in adjacent rooms, especially vinyl, this is almost a 100% chance of getting a hotbed of microorganisms underneath.
Water destroys building structures. Over time, it can damage and brickwork, and even concrete, not to mention a tree or plaster. The swelling and scattering of the plaster and putty layer, paint and whitewash, the appearance of white "owls" resembling salt or fluff are a typical picture of poor-quality waterproofing of damp premises. Meanwhile, there are many ways to avoid these unpleasant phenomena.
Even in wooden house you can equip a real "palace of ablutions"
How waterproofing works
Materials that can protect the premises from the entry of moisture from outside, there are many, but they all operate in approximately the same way: they are applied to the surface and create a coating that does not allow moisture. Some of the modern waterproofing coatings go further and manage to leave the ground breathing, i.e. Passing air through the smallest pores, which for penetration of moisture is not enough. Thus, two problems are solved simultaneously: a water barrier and conditions for air circulation are created.
Especially "advanced" waterproofing not only fulfills its direct functions, but it is also capable of increasing the strength of the base on which it is applied over time. In a word, there are plenty of opportunities to protect your home from moisture in a qualitative way.
The device of vertical waterproofing
Types of waterproofing coatings
To date, several types of waterproofing materials are known, which can be divided into two groups: rolled and coated.
Rolled waterproofing is carried out with the help of materials based on bitumen. This is ruberoid, rubemast and other similar materials that are produced by many manufacturers and have approximately the same structure. They are a basis of cardboard (roofing paper) or glass fiber (more modern samples), impregnated with bitumen, modified by various additives. They give the material strength, flexibility, good adhesion to the surface. Although roofing felt has been used by our builders for decades as a waterproofing coating, there are many materials that are much more modern, which are able to solve this task much better. Yes, and the service life of the roll waterproofing does not exceed 15 years.
Lubricating waterproofing is represented by a wide variety of materials. These are bitumen-based mastics, polymer and polymer-cement compositions, penetrating waterproofing, etc. The choice of this or that material depends on the type of foundation to which it will be applied, the material possibilities, the amount of work, etc.
Bitumen mastics - compositions based on modified bitumen, enriched with polymers. They create a strong water and vapor-proof coating that looks like molten rubber, which is why such materials are called "liquid rubber". This waterproofing has a rather long service life, it is applied easily, at the cost is available to most consumers. The peculiarity of it is that to protect the layer from damage it must be laid cement screed.
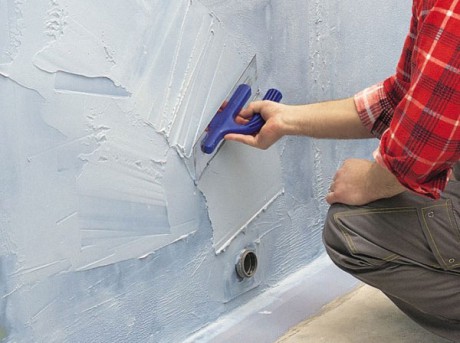
Polymer mastic is easy to work with and very reliable
Polymeric waterproofing compounds are made on the basis of polyurethane, acrylic or epoxy resins, thanks to which the layer of waterproofing is very plastic. Such a coating lets pass water vapor, but the water itself stops reliably. These materials are safe for health, very easy to apply and quickly dry out.
Polymer-cement waterproofing compounds are produced on the basis of a cement-sand mixture into which polymer additives are introduced. Such materials are used for concrete, cement-sand and brick foundations. They create a vapor-permeable membrane that does not allow water to pass through. The resulting layer has good adhesion, is very ductile and durable. Polymer-cement waterproofing is produced from substances that are safe for human health, easy to use, and can be applied even on a wet base.
Penetrating waterproofing - a new "word" in the technologies to combat the penetration of moisture. In its composition - Portland cement of high quality, fine quartz sand and special chemical components. When the mixture is applied to a moistened base, these substances react with the concrete constituents and form crystalline compounds that tightly seal its pores. At the same time, the surface remains vapor-permeable, and over time the strength of the waterproofing layer and of the concrete base itself only increases.
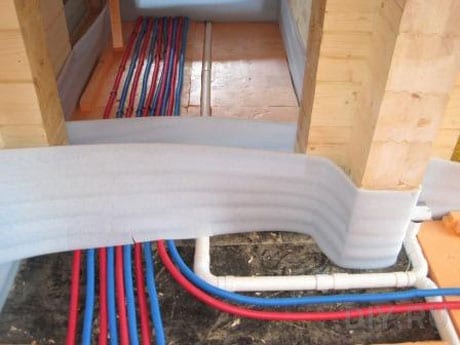
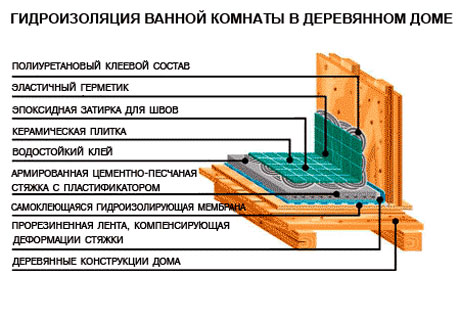
Waterproofing of a bathroom in a wooden house
The bathroom, located in a wooden house, needs increased attention to the device of waterproofing. Moisture - the greatest danger to wood, not counting fire, it can completely destroy wooden walls and floors for literally several years, and the appearance of mold - in general, the worst thing for wooden house, because it is almost impossible to get rid of it. Therefore, the waterproofing of the bathroom in the wooden house can not spare any time or money.
It is necessary to apply the latest technologies and use the most flexible waterproofing materials that have high water repellency, water resistance and good adhesion to any surface
What to consider when working with wood
First of all, the properties of the wood itself. This material can be called alive - it "breathes", letting air through the smallest pores. It swells up, picking up moisture, and drying up, giving it away, the wood bars can bend, widen and narrow: this is the main feature that must be taken into account when waterproofing the bathroom in a wooden structure:
- Materials that can be used for this purpose must have a high plasticity to compensate for linear expansion of the substrate without loss of integrity of the waterproofing layer.
- Waterproofing should not prevent the penetration of vapors through the wood, i.e. must be vapor-permeable.
Based on these conditions, it can be concluded that roll waterproofing the least suitable for such a task. It does not have sufficient flexibility and ductility, does not let steam pass. Therefore, it is better to abandon such an option and prefer more modern materials.
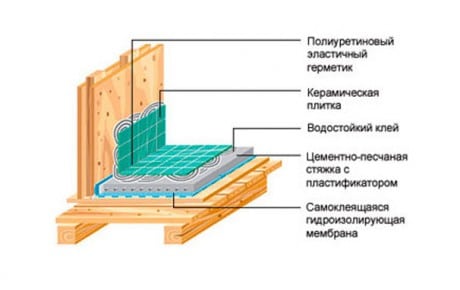
Waterproofing wooden bases is a multi-layer system
One of the most acceptable options may be bitumen-polymer mastic. It can be used in case when tiling is planned on the floor, because the layer of bitumen waterproofing is necessarily covered with a layer of screed. In such a situation, a polymer-cement composition can be used, which is applied to the screed from above.
If the wooden walls and the bathroom floors will be finished with sheet or running materials - lath, lining, plasterboard, the base under them must be waterproofed. To do this, you can use polymer compounds based on acrylic resins - they perfectly adhere to the tree, do not clog its pores.
In cases where the use of tiles or other finishing coatings in the bathroom is not planned, wood materials are used - lacquers are most convenient in this respect. They simultaneously solve the problem of giving the surface a beautiful, well-groomed appearance and protecting it from increased humidity. For this, the following types of coatings can be used:
- Bituminous varnish - contains a modified bitumen base, so it is used in places that will not be visible - under the bathroom, under the flooring of the floorboard, etc. This is the most simple and budgetary way of waterproofing wooden foundations.
- Primer varnish - creates a durable waterproofing coating, prepares a wooden surface for applying parquet varnish.
- Parquet lacquer is a decorative coating that protects wood from external influences and gives it an aesthetic appearance.
- Hydrophobic coatings are various impregnations and compounds that are applied to wood to make it resistant to moisture.
Processing of wood with special compounds significantly increases the resistance to moisture
Because the waterproofing works in a wooden house are significantly complicated by the characteristics of this type of buildings, the best way out in this situation will be to seek help from specialists. The price of a possible error in such a case is too great to risk the future of your home!
Waterproofing of the floor in the bathroom
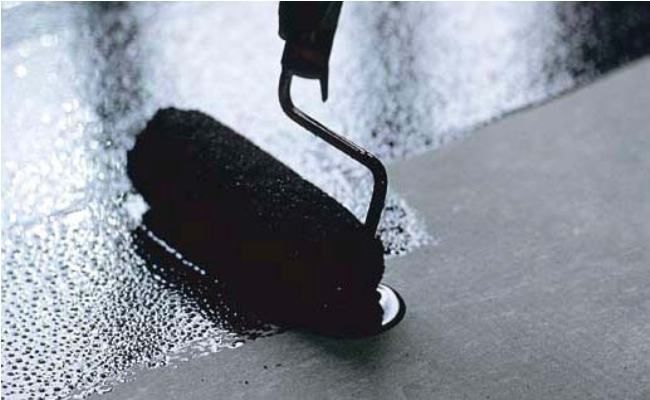
Latex mastic as a waterproofing floor.
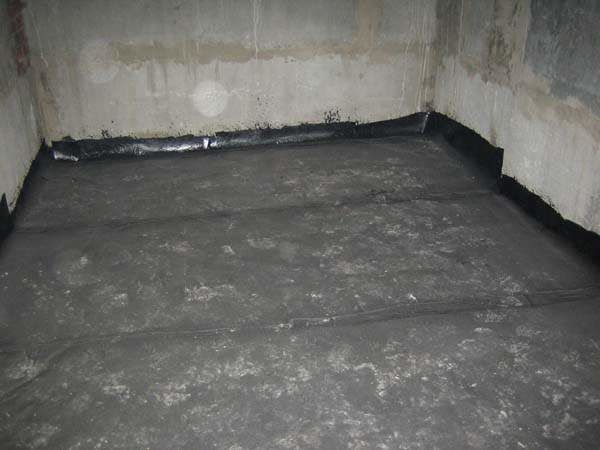
The bathroom can be shared or separate. In this case, the waterproofing of the bathroom in the apartment is performed in both cases, and you need to start from the floor. The main task is to create a watertight trough with a height of 10 cm. To begin with, you need to create a doorway under the entrance door, if there is not one. It is made of brick, foam blocks, but most often cast a monolith.
After the padding is ready you need to seal the cracks between the floor and the wall. For this, the joints are opened with a perforator. Having punched the joints, it is possible to detect fairly large cavities, and sometimes through cracks. To seal the joints, a bentonite cord can be used. Upon contact with water, it increases in volume, which somewhat complicates the situation, since it can be squeezed outward. To avoid this, you need to fasten the cord with a special net and cover with a thick layer of plaster.
If you use a cord for waterproofing the floor in the toilet does not work, then the open seams can be sealed with a special waterproof plaster.
When the joints are ready, you can start creating a watertight trough. Waterproofing of sanitary facilities according to SNIPs can be carried out only with materials that have been tested. These include:
- latex mastic;
- bituminous mastic;
- bitumen rolls;
- polyurea.
Bituminous materials have one drawback - it's a strong smell, which greatly complicates the installation. But by bitumen rolls you can create a very reliable protective layer, although under the tile it is not critical. Many use latex mastic on acrylic basis. It is odorless, it is easy to work with it and the price unlike polyurea is available. Features of waterproofing floors in the bathroom:
- application in two layers;
- the admission to the walls;
- the working surface must be flat and clean.
There are no difficulties. You just need to take a latex mastic and apply a brush to the floor like a paint. Try not to apply chaotically, but vertically or horizontally. It is advisable to change the direction of movement of the brush on the first and second layers. You can also pour the mastic on the floor and distribute it with a wide spatula, most importantly, do not overdo it with the thickness of the layer.
Waterproofing of walls in a bathroom
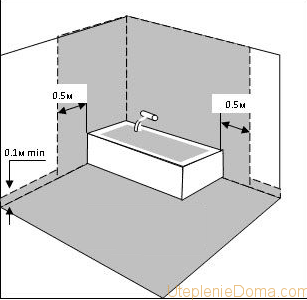
Scheme of applying waterproofing in the bathroom zone.
To say that the waterproofing of walls - this is an obligatory measure in the bathroom can not, rather it can be classified as recommended. Many masters agree that with quality tiling and trowelling, moisture will not enter the walls, and waterproofing in the toilet is not needed at all. In principle, there is a certain amount of truth in this, because nobody used to break his head about this before, and everything was fine. At the same time, it is never superfluous to be reinsured.
Waterproofing on walls is applied only in certain (wettest) places. These include the bathroom area, above the sink, near the toilet and bidet. It is not necessary to treat vertical surfaces from floor to ceiling. For these purposes, latex mastic is best suited, for example, Knauf Flehendiht. Sense to buy bitumen in rolls or mastics is not, from it strong smell, and the result is the same. Latex mastic can be applied to concrete, gypsum board, brick and in general, anywhere. After polymerization, it can be dyed or laid over the tile.
The hood and the heating system in the bathroom
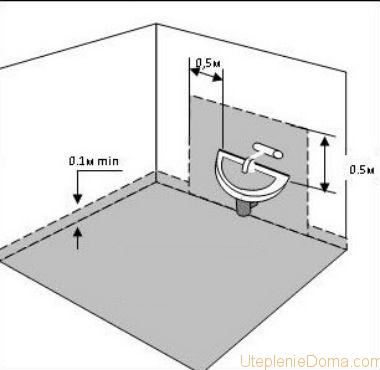
Scheme of applying waterproofing in the washbasin area.
Waterproofing in the toilet and bathroom is necessary in order to not flood the neighbors and so that the concrete walls do not absorb moisture, as this makes them moldy. At the same time, water is not the only source of moisture, there are also steam. To reduce the concentration of steam in the bathroom you need to do good hood, preferably compulsory. At the same time, the power of the hood must be in accordance with the building standards, otherwise it will be cold in the bathroom.
In the bathroom according to the standard either in the heating system or in the DHW circuit. This is primarily heater, so you can not remove it, you can even fined it. In extreme cases, you can . If there is a towel and a good stretch, the waterproofing of the walls can not be done, as it was before. On the floor, it is desirable to create a watertight trough. Cases are different, then the machine will flow, then something else. But whatever one may say, the cost of waterproofing is lower than repairing the ceiling to neighbors. Once you did and you can not worry, and accidents, unfortunately, can be repeated.
At the device of floors it is necessary to observe requirements SNiP 3.04.01-87 "Insulation and finishing coatings" (Section 4 "Arrangement of floors"), Instructions for the installation of floors in residential and public buildings VSN-9-94 DS, SNIP 2.03.13-88 "Floors" and specifications for materials used in the device floors.
The ground under the floors (in the basement, on the first floor) should be planned according to the profile and level of design marks and compacted in accordance with the requirements SNIP 3.02.01-87 "Earthworks, foundations and foundations."
Glued waterproofing with the use of bitumen, tar and mastics on their basis should be carried out in accordance with the requirements of Section 2 SNiP 3.04.01-87, and polymer waterproofing according to SNiP 3.04.03-85. Waterproofing from rubble with impregnation with bitumen should be made in accordance with the requirements SNIP 3.06.03-85.
The preparation, transportation and laying of concrete mixtures in the construction of the underlying layer must be carried out in accordance with the requirements SNIP 3.03.01-87 "Bearing and enclosing structures" (Section 2).
Work on the installation of monolithic screeds using dry cement-sand mixtures and special additives should be carried out in accordance with the requirements VSN 226-87 "Instructions for the installation of self-leveling screeds using dry cement-sand mixtures."
Work on the installation of cast-in-situ gypsum self-leveling and porous cement screeds should be carried out in accordance with the requirements VSN 196-83 "Instruction on the technology of the foundation of non-defective materials (phosphogypsum) under the floor" and BCH 187-82 "Instruction on the technology of production of works in the installation of screeds from porous solutions."
When carrying out work on the installation of floors, the requirements SNIP III-4-80 "Safety in construction".
1. The device of waterproofing of floors in a bathroom and a bathroom.
Premises with wet operation (baths, washing, laundry, etc.) must have from the inside reliable closed water and vapor barrier - waterproofing, leakproof, wetting, the formation of condensate inside and outside the enclosing structures.
Waterproofing - layer (or several layers), antiperspirant across the floor water or other liquids.
Waterproofing of floors in the premises with wet operation MANDATORY.
It should be directly under the floor covering and deduce on walls and columns to a height of not less than 30 ... 40 cm from the level of (finished with a coating, lined) sex. Wherein horizontal waterproofing carpet must be conjugate with vertical carpet of walls.
Emptiness between the wall and the waterproofing layer NOT ALLOWED.
For floor protection in wet rooms carry out pasting waterproofing by preliminary prepared concrete surfaces.
For this all cracks and holes in floors and adjacent walls on the height of the waterproofing cover with a cement-sand mortar and level. Floors cleanse from construction debris.
For pasting waterproofing should be apply only rotten roll materials:
- tar-bitumen (DB);
- hydroisol (GI).
ATTENTION! Use for waterproofing non-resistant materials (ruberoid, pergamine, roofing felt, etc.) is PROHIBITED.
Waterproofing, possessing high mechanical strength and chemical resistance, has a high protective level from water absorption. Waterproofing of waterproofing coating is provided layers of adhesive mastic and to a large extent depends on the quality of production. Waterproofing it is preferable to apply in combination with gluing and cover materials.
Wherein waterproofing carpet have, usually, on an insulated surface, clenching it between insulated floor construction and protective fencing - walls and partitions (for pressure waterproofing basements) or finishing coatings (for non-pressure waterproofing) - as in our case.
Oakleychnuyu waterproofing arrange in the form of a waterproofing carpet from roll or flexible sheet materials, pasted layer by layer bitumen or mastic on smooth, primed liquefied bitumen and dried surface insulated floor structure.
Device Diagram waterproofing floors on the slab for a bath and a bathroom is shown in Fig.
Device Diagram waterproofing floors on a dry ground base for a bath and a bathroom is shown in Fig.
Sticker of roll materials on floors and walls should be produce mastics with a softening point not less:
- in soap and laundry premises - 75 ° C;
- in the steam premises - 90 ° C.
At the interfaces adjacent insulating surfaces (rounded or chamfered) and in places of pinching of waterproofing (for deformation expansion joints and for flanges of embedded parts) it is necessary reinforce a waterproofing carpet sheets of roofing steel, steel mesh with cells 5x5 mm and glass netting. Strengthening layers must be wide 50 ... 70 cm.
In the corners, formed by three surfaces, reinforcement should be metal or polyethylene sheets, which have between the first and second layers waterproofing.
Device Diagram floor waterproofing in the corners of the room is shown in Fig.
For temporary fastening waterproofing carpet to vertical surfaces, before the device of protective fences, it is necessary install wooden antiseptic racks or other devices every 1.5 ... 2 mi.e. height workers clutch carpet stickers. Separate layers of carpet in these places follows overlap - step seam.
After the device backfilling, concrete preparation, screed, before tiling - bracket vertical carpet remove, a surpluses waterproofing carpet cut off from the wall and covered with plaster under the tiles.
To avoid water penetration to the ground between the floors on the ground and the foundations, subject to shaking or vibration from the operation of the equipment (washing machine, centrifuge, etc.), through expansion joints with expansion joints from a soft metal sheet (roofing steel).
Deformation seams from below up to the compensator must be tightly etched decocted in bitumen with rotten or antiseptic fibrous materials. A above the compensator - are filled elastic cold mastics with fibrous fillers and the softening point is not lower than 90 ° C.
ATTENTION! After stacking waterproofing floors is necessary test for watertightness by pouring the room with water 15 ... 20 cm on 3-4 days. For the test period ladders and thresholds of doors should be temporarily glue or lay with soft clay.
For insulation of thresholds doorways etc. should be use bituminous plastering with fiberglass reinforcement. Reinforcing material after bending the corners must cut off insulation basic planes of walls and ceilings.
Device Diagram waterproofing the floor in the doorway between wet and dry rooms is shown in Fig.4.
Insulation of doorways, serving for communication between wet rooms bathroom, bathroom and dry rooms apartment or house, arrange with the establishment of it inside dry premises.
Protection of floor insulation in the bathroom and bathrooms is coated ceramic tiles on cement-sand mortars. How do the flooring - look at the following sections of the site.
2. Preparation of materials for waterproofing the floor.
Waterproofing device - key question of the ability to build. Insulating materials Not as well-known as brick and mortar, but on their application in general, sometimes they do not know anything.
Under the insulation of structures must accept waterproof materials, but not everyone knows, that only, laid without ensuring a good flow of water, sooner or later rot.
The reliability of insulating cardboard depends on from the amount of bitumen or tar contained therein, which are insulating materials, but they are easily damaged and give cracks. For the basis, on which they are applied, use cardboard, especially good if it is jute, but because of its high cost of use only in the most important places (to cover the razlozhelkov and angles).
To work with bitumen, you need a boiler for warming up - hot asphalt flowing, well spreads over the surface. but work with hot bitumen is dangerous. Splashes of hot bitumen cause burns. The heating and transport of bitumen must be carried out under the guidance of a specialist and with the help of special tools and devices.
At factories often confused cold bitumen for coatings with white spirit, which the extremely flammable and explosive. When hardening such a mixture of mass evaporates white spirit, a when heated the mixture explodes, forming a large number of harmful gases. Thus, in addition to burns from the explosion, people also get poisoned.
A. Preparation of waterproofing roll materials.
Preparation waterproofing roll materials before gluing lead in accordance with the requirements SNIP III-B.12-69. Preparation roll materials bituminous (briol, insula, hydroisol, folgoizola, glass refractor) to the sticker consists in aligning them and in cleaning from mineral sprinkles or withdrawal films (folgoizol).
To align roll materials roll out and stand (at a temperature not lower than + 15 ° C) in stacks not less than 20 hours, then turn over to the other side and stand still during 4 ... 6 hours.
Then remove mineral sprinkle (talc, chalk) by treating the surface of the roll with green oil, kerosene or gasoline applied by a spray or manually rag and dried. Before the sticker surface of roll materials must be dry and free of traces of solvent.
In the preparation room for materials on a special workbench or striker roll materials cut out on the cloth required size. The cut pieces are rolled into rolls and transported to the place of production.
B. Preparation of waterproofing mastics.
Bituminous mastics, hot and coldapplied for gluing rolled waterproofing materials on bitumen basis, are prepared, as a rule, centrally at factories or workshops and delivered for construction in autoguns and in insulated or heated containers in finished form.
Mastics, the most often used for gluing roll materials, are indicated in Table 1.
Table 1: Recommended mastics for gluing of roll waterproofing materials.
| p / p | Roll or sheet waterproofing material | Recommended mastics | |||
| hot | cold | ||||
| mastics | mark | mastics | mark | ||
| 1 | 2 | 3 | 4 | 5 | 6 |
| 1 | Glass-superbright waterproofing C-RM | bituminous | MBK-G-55 ... MBK-G-100 | bituminous | MBK-X-65 ... MBK-X-75 |
| bitumen-rubber | ICBM-G-55 ... ICBM-G-100 | bitumen-kukersolnye | BK-X-65 ... BK-X-75 | ||
| БЛК-Х-65 ... БЛК-Х-75 | |||||
| 2 | Double-layer waterproofing tape LGD-1 | bituminous | MBK-G-55 ... MBK-G-100 | bitumen-kukersolnye | BK-X-65 ... BK-X-75 |
| bitumen-rubber | ICBM-G-55 ... ICBM-G-100 | bitumen-latex-kukersolnye | БЛК-Х-65 ... БЛК-Х-75 | ||
| bituminous | BMG-1 | - | - | ||
| bitumen-polyisobutylene | BPM | bitumen-polybzobutylene | BPMC | ||
| 3 | Folgoisol | bituminous | MBK-G-55 ... MBK-G-100 | bitumen-kukersolnye | BK-X-65 ... BK-X-75 |
| bitumen-rubber | ICBM-G-55 ... ICBM-G-100 | bitumen-latex-kukersolnye | БЛК-Х-65 ... БЛК-Х-75 | ||
| bituminous | BMG-1 | mastic insoles and BCS | - | ||
| bitumen-polyisobutylene | BPM | bitumen-polybzobutylene | BPMC | ||
| 4 | Waterproofing | bituminous | MBK-G-55 ... MBK-G-100 | - | - |
| bitumen-rubber | ICBM-G-55 ... ICBM-G-100 | - | - | ||
| 5 | Briisol | bitumen-rubber | BRG-4 | - | - |
| 6 | Isol | bituminous | BMG-2 | bitumen-rubber isolates and isolates | - |
| bitumen-rubber insulating (insulating) | |||||
| buzzing | |||||
3. Implementation of waterproofing coating.
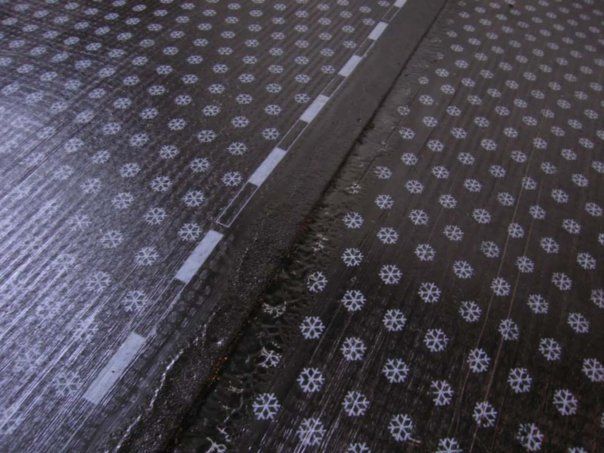
Rolling materials paste on horizontal surfaces through a coherent rolling out pre-cut strips by the way "from myself" with simultaneous application of mastic first on the insulated floor surface, and then on the roll material.
NOTE: Wherein application of mastic to the surface should not be ahead of grease more than 0.5 m. Mastic layer thickness for gluing each layer isolation should be 1.5 ... 2 mm.
Cloths of waterproofing coating glue the whole surface (without lumens and bubbles) and carefully smooth paint roller or roller with a soft shell.
Scheme of rolling and lapping cut to size panels of waterproofing is shown in Fig.
ATTENTION! On the surface floors and walls roll materials glued overlap overlays each subsequent patch of the previous on 10 ... 12 cm in longitudinal joints and on 15 ... 20 cm in transverse joints (Fig. 3). Stitches of panels dispose of. Overlap seams should be smeared with mastic.
On vertical, inclined and curvilinear surfaces floors and walls roll materials paste from the bottom up separate seizures (see the figure of gluing the corners in Fig. 3) corresponding to the height of the tier with preliminary preparation of panels roll material.
Non-core materials (isole and briol) n and vertical surfaces are glued, gradually rolling out cut strips with a round core and pouring the mastic between the cloth and the insulated surface.
Temperature pasting bituminous mastic when applying them must be within, indicated in Table 2.
Table 2: Temperature of mastics for gluing of roll waterproofing materials.
| p / p | Name of mastic | Adhesive material | Temperature of the mastic when used, T ° C |
| 1 | 2 | 3 | 4 |
| 1 | Bituminous hot | Isol | 120…130 |
| Briisol | 120…140 | ||
| Hydroisol, glass refractor, foil-isoizol | 160…180 | ||
| 2 | Bituminous-rubber hot | Briisol | 120…140 |
| Waterproofing | 160…180 | ||
| 3 | Bituminous cold and mastic isolate | Isol, glass refractor | 60…80* |
| * Up to the specified temperature, mastics need only be heated if they are used in winter conditions. | |||
Using materials with a base (waterproofing, folgoisol, glass refractor) apply the mastic first on an insulated surface, a then on a roll material.
Plastered with mastic immediately stick to the surface and carefully smoothed.
4. The device of a sound-proof and concrete underlaying layer.
A. Soundproof layer of sand.
NOTE: Soundproof layer from sand (Fig. 8 of pos. 3) arrange, evenly scattering dried (humidity up to 2% ) fine-grained sand without clay, thickness 60 mm (in the condensed state). To increase the degree of compaction sand moisturize before 7…10% and compact hand roller, protecting from damage insulating layer.
Often the unqualified device of the soundproof layer and screed lead to difficult to remove defects. If the sand during the installation of the soundproof layer transport directly by isolation - the insulation layer is damaged.
therefore sand is necessary sprinkle and level for isolation directly from the entrance to the room "on my own," with further laying of running boards on the leveled sand layer.
B. Protective or underlayment of concrete.
Protective or underlaying concrete layer (Fig. 8 pos.4) protects the insulation from any damage. Undercoat of concrete perform stripes in width 3 ... 4,5 m.
ATTENTION! Concreting sand pillows perform on the chassis boards. For styling apply concrete such a consistency, so that after compaction it could be immediately lay the flooring of boards. Flowable concrete for this purpose unsuitable.
Protective layer of concrete compact and smooth metal smoothing shown in Fig.
NOTE: The essence of consolidation of concrete mixture is to as much as possible to supersede excess air from it. Regular concrete is necessary even and in that case, if it has a plastic consistency, since the remaining in it the air will not allow to dial sufficient strength. Manual mode can be satisfactory compact concrete thick 30 ... 40 cm.
Manual tamping for compaction of concrete mixture is shown in Fig.
Concrete compacting carry out Only with small amounts of work and in case of damage of the underlying insulating layer. Tumbling is necessary continue until cement milk will not appear on the surface.
Sometimes the surface underlaying concrete layer in order to speed up the work level somehow, most often a shovel. And horizontality is achieved by laying the leveling layer of the screed, and then perform the flooring.
The use of this method of performing work is erroneous, because cement mortar exfoliates from concrete and in most cases breaks down. The pieces of mortar, as a rule, are glued to the flooring. The reason for the peeling of the leveling layer and its destruction is that two adjoining layers were not at the same time and not with the same amount of cement in solution, what led to a different shrinkage when drying.
ATTENTION! The detachment can be avoided, if leveling screed inflict not later than 48 hours after laying concrete preparation.
Floors on cement binder, not primed with bitumen solution, must harden in a damp environment. For this in a day after laying the coating pour the sawdust layer not less than 10 centimeters and during the day they splash water at least once a day.
ATTENTION! Artificial drying cement-sand screeds in the hardening process is NOT allowed.
5. The device of leveling cement-sand screed.
Thickness of ties is set by the project. Deviations of the thickness of screeds from the project are allowed only in certain places and should not exceed 10% from a given thickness.
Solution grade for cement-sand interlayers leveling layer and screed take for the project, but not less M-150. The composition of the solutions is given in Table 3.
Table 3: Compositions of cement-sand mortars (in parts by weight).
| p / p | Brand mortar | Compositions of cement-sand mortars | ||
| cement not lower than M-400 | sand | water | ||
| 1 | 2 | 3 | 4 | 5 |
| 1 | M-150 | 1 | 3 | 0,55 |
| 2 | M-200 | 1 | 2,8 | 0,48 |
| 3 | M-300 | 1 | 2,4 | 0,40 |
| 4 | M-400 | 1 | 2,0 | 0,30 |
For strong adhesion and improvement of physical and mechanical properties cement-sand mortar layer into it introduce additives plasticized polyvinyl acetate dispersion and latex SCS-65GP brand "B" in the amount of 10…15% from the mass of cement in recalculation to the dry substance of the polymer.
Surface of leveling screed (Fig.8 pos.5) should be horizontal or have a given slope.
Layer-by-layer arrangement floors for facing with ceramic tiles in a bathroom and a bathroom is shown in Fig.
Indoors with medium and large intensity of exposure to liquids on the floor should be provide for slopes of the floors. The size of the slopes of the floors should be accept:
- 0,5…1% - for seamless coatings and plate coatings (except for concrete coatings of all kinds);
- 1…2% - with coatings from pavers, bricks and concretes of all kinds.
Slope of floors on floors should be create application of variable-thickness screeds, a floors on the ground - appropriate ground plan layout. Cracks, potholes and open seams in screeds NOT ALLOWED.
NOTE: Desirable carry out small floor slope in one of the corners bathroom, opposite from the doorway. You want it or not - the water gets to the floor and so that the mat in the bathroom does not get wet, it is better if the water will be collected in one place, where it can always be discouraged, and not spread throughout the floor, including under the mat for the feet.
Often, a screed is manufactured From a concrete mix in which sand or sandy gravel in the interests of weight loss replace light perlite or blast furnace slag, and apply such a concrete in places with high humidity.
Blast furnace slag special sensitive to humidity. Coal in the combustion chamber is not completely burnt, and in the slag there are substances entering into a chemical reaction in a moist environment with the emission of gases or with increasing volume.
Slag Concrete not suitable for waterproofing , because the under the influence of moisture it is capable over time destroy adjacent wall constructions and floor coverings.
A. Leveling screed of cement-sand mortar.
For the device monolithic screeds from cement-sand mortar apply all types of portland cement, slag Portland cement, pozzolan Portland cement ( GOST 10178-85 *). Sand ( GOST 8736-85 and GOST 10268-80) should have a grain size of not more than 5 mm.
At the device concrete and cement-sand screeds surface of the underlying floor element on a cement binder (n bedding, overlapping) is necessary cleanse thoroughly from dirt and dust, humidify water (without visible accumulations of water) and priming with cement milk 1:2 (cement: water) to prevent excessive suction of moisture from the solution and thereby increase the strength of the screed.
Smooth surface of screeds should be check with a 2-meter control rod, moving in all directions. Clearances between screed and rail should not exceed:
- for coatings of ceramic tiles , slabs of artificial and natural stone, mosaic-concrete slabs and a mosaic mixture - 4 mm;
- under cover other materials - 6 mm.
NOTE: Underlaying layers and screeds on a cement binder for the 7 ... 10 days after stacking under a constantly moist layer water-retaining material.
B. Leveling screed of polymer-cement mortar.
Allowed for leveling the surface reinforced concrete floors or cement-sand screeds, for which the coatings are laid of rolled, tiled materials alignment layer device from a polymer-cement mortar. Thickness of the leveling layer from such a solution should be no more than 8 mm.
Before the leveling layer the surface of the substrate is cleaned from dust, dirt, necessarily ground aqueous solution of plasticized polyvinyl acetate dispersion 5 percent concentration, dispersion-water ratio by weight 1:9 .
Leveling polymer-cement mortar cooked on the spot works from a dry cement-sand mixture grades M-150 and plasticized polyvinyl acetate dispersion 10 percent concentration, dispersion-water ratio by weight 1:4 .
Polymer cement mortar strips on shelter rails with leveling rule. After the extraction of lighthouses, the remaining furrows close up polymer-cement solution, flush with the plane leveling layer and smooth grates or plaster trowels.
The technology for performing the cladding works will be considered in the next section of the site.