Finishing the attic with gypsum board provides a smooth surface for decorative coating of any type, it allows to lay insulating, soundproof and vapor-insulating materials, gives an opportunity for maneuvering during the laying of communications.
Attic floor
- Water resistance - the spaces under the roof often have high humidity, in such conditions it is better to use gypsum boards, reinforced with gibbophobic impregnation (GKLV - green color);
- Refractoriness - to protect wooden roof rafters non-combustible GCR with fiberglass filler (red marker);
- Manufacturers produce a modified type of drywall with a combination of properties and qualities inherent in fireproof and waterproof slabs;
- Acoustic gipsokartonnye sheets possess sound-absorbing characteristics.
Calculating the nominal load on the frame, take into account the weight of the GCR. The standard gypsum board thickness of 12.5 mm weighs about 10 kg. It is important to remember that specialized analogues of plasterboard of a larger mass.
The number of necessary sheets for the cladding is calculated by dividing the area of all surfaces that are planned to be sheathed with the material by the area of one sheet. It is advisable to make a small stock of drywall.
 An example of an attic interior
 Materials, devices and tools
Before you can decorate the attic with gypsum boards, they carry out a complex of activities for the selection, purchase and preparation of all consumables, devices and associated tools for installation work:
- The composition for sealing seams - for 10 m ² GKL will go 3,5-4 l;
- Putty knife;
- Reinforced material - 10 m 2 GCR will take about 3 m;
- Corner with perforation;
- Metal profiles - straight and angular;
- Suspension;
- Hardware - self-tapping screws, screws, dowel-nails, rivets (it is better to use stainless steel grades so that stains from rust do not form on the GCR);
- Pencil;
- A laser device or another analogue of a level - for marking and checking axes;
- Drills of hard metal;
- Universal gajkovert - assembling the frame and fixing the sheets;
- Roulette;
- Cutting tools for metal;
- Screwdrivers of different types and sizes;
- Crabs;
- Bulgarian - cutting the required lengths of metal profiles;
- Saw on the SCL;
- Drill with attachments.
Technological course of work
Finishing of the attic with plasterboard provides for such stages:
- Preparation of the space of the attic type of the room for finishing - free the premises, clean the grounds, carry out work to eliminate leaks in the roof, check the reliability of the beams and rafters of the roofing system;
- Design and calculation work;
- Perform markup according to the drawings;
- Laying and wiring of communication systems;
- Installation of plasterboard sheets;
- Corner protection;
- Preparation of surfaces for decorative finishing.
 Facing GKL
 Frame construction
The frame method is reliable, with its help insulate the attic floor of the dwelling. Mounting of the frame is mandatory:
- With too much attic space;
- If plasterboard sheets can not be attached to the inner lining of the roof;
- If the interior design of a complex or non-standard configuration is conceived.
Mansards have a difficult-broken nature of surfaces. The wall bases are perpendicular to the floor or are inclined under different degrees. The installation of the frame in accordance with the level of the planes and the precise measurement of the surfaces with the help of the building level and the tape measure are the key to the successful erection of the carcass construction. The better the frame is made, the longer the service life of gypsum board.
Fix metal profiles by marking. On the floor and ceiling, drill holes equal to the holes on the metal slats. Direct fastening is carried out by means of hardware and brackets with an interval of 0.6-0.8 m.
Suspended brackets or brackets are mounted on vertical axes. Then, vertical markings are attached to the guides along the perimeter and suspensions, vertical slats.
Warming of the attic
Algorithm for performing work on laying for the cladding material of insulation boards, air conditioning and communication systems:
- Fastening of hangers for pipes;
- Installation of main clamps;
- Laying of vapor barrier materials;
- Installation of holders (mushrooms) for a heater;
- Wiring of lighting wiring.
Mansard floors are insulated:
- Mineral cotton wool - roll or tile;
- Plates foam - a productive and popular material.
 Stages of work
 Lay the heater loose or fastened between the sections of the frame:
- On liquid nails;
- Adhesive composition;
- Fix with wooden slats or pieces of profile - preferred for reliability and practicality of execution.
In all cases, the bookmark is made so that there is air gap between the drywall and the heater.
Steam insulation products are sold in rolls. Therefore, the material is cut for convenience in work, the pieces are overlapped, and fixed to the base, using a specialized stapler.
The final layer of the entire structure is a water vapor barrier membrane.
Facing works
Mansard spaces of irregular shape may have defects in the corners. Facing begins with a single sheet. The surfaces from the bottom, side and frontal walls, then the roof slopes, the openings are cut and go to the corner joints, after having made the cut of the material.
Gypsum boards are installed by two methods:
- Vertically - with a step of 25-35 cm;
- Horizontally - with a step of 45-55 cm.
Install on a metal frame with a screwdriver. Hardware is attached perpendicularly to the surface, sinking their heads into the material for several millimeters.
Each new row of material is mounted in such a way that the seam lines do not continue the previous row. Between the sheets make gaps of 3-5 mm.
In case of double-layer plating, fastening is performed alternately. Fix the first layer, then the second.
Finishing of windows, arches, doors I carry out along the perimeter of the opening.
The ceiling from the GKL is also mounted on a metal frame or tied to the bearing beams of the roof.
 Simple and reliable
 If the whole plaster board is difficult to install between the sloping ceiling base and the beam, the material is then sawn into two parts. To do this, an incision is made along the intended line, then they are broken by pressing along the incision line.
The partitions are perpendicular to the genital base, they are mounted with a profile pitch of 40-50 cm.
Holes for communication are performed by the drill in the marking, for this purpose a sheet of plasterboard is placed on a flat surface.
At the last stage of work perform:
- Sealing joints and joints with putty;
- Fill the sealant with gaps in the openings and fixation points;
- Strengthen corners;
- Shpatlevanie;
- All surfaces are primed.
GKL mounting on rafter feet
This option is suitable for a small attic. For frameless facing, gypsum boards with a thickness of 20 mm are required.
Making sure that the rafters are installed firmly and reliably, are not damaged by rodents, are not susceptible to mold and cracking, they proceed to fix plasterboard sheets directly to the roof rafters.
On the wall surfaces gypsum boards are put on a layer of glue. For a ceiling use also samorezy. High-pitched irregularities and differences equalize the lath rails.
Mounting on a wooden frame
The moisture content of the wood used is allowed in the range of 15 to 40%. The wooden elements are pre-dried, treated with antiseptic preparations, fire retardants.
The parameters of the used rails are determined by the pitch of the rafters. At a step of 75-100 cm, elements with a section of 45x60 mm are used. Take into account the thickness of the gypsum boards used.
Racking with wooden slats is done transversely to the rafters. To them fix plasterboard plates.
In contact with
3464 0 0
Finishing the attic with gypsum plasterboard in 6 stages or how to avoid mistakes of beginners
12 December, 2016
Specialization: finishing of facades, interior finishing, construction of dachas, garages. Experience lover-gardener and gardener. Also there is an experience of repair of cars and motorcycles. Hobbies: playing a guitar and a lot of other things that do not have enough time :)
This article I prepared for home craftsmen who want not just to trim the attic with plasterboard, but do it right. Next, I will describe in detail how the attic is finished with plasterboard. Also we will look at the common mistakes of newcomers, which will allow you to avoid them.

Finishing technology
The mantel cover of plasterboard can be conditionally divided into six main stages:

Stage 1: preparation of materials
First of all, to finish the attic you need to prepare gypsum board, and two types:
- walled - it will be required for the skin of vertical and inclined planes. Its thickness should be at least 12.5 mm;
- ceiling - used, respectively, for the ceiling and sloping walls. Its thickness can be 8 or 9.5 mm.
It is desirable to use moisture-resistant plasterboard on the attic floor, since the humidity level here is often increased.

Since GCR sheets will be mounted on the frame, it is also necessary to prepare the parts for its assembly:
In addition, you need to prepare materials to plaster drywall in the attic. To do this you will need:
- a deep penetration primer;
- reinforcing tape;
- starting putty;
- finishing putty (needed if the surface of the plasterboard is subsequently painted).
As the final putty use polymeric compounds. Their price is slightly higher than plaster fillers, but they are easy to work with. In addition, these coatings are not afraid of moisture.

Stage 2: preparation of the attic and execution of the layout
Finishing the attic has a number of its nuances, which relate to the preparation of the room for finishing. A frequent mistake of newcomers is that they pay insufficient attention to this operation. This leads to a number of negative consequences, in particular, the durability of the rafter structure may even be reduced.
The preparation of the attic consists of the following actions by one's own hands:
- the wooden elements of the roof must be treated with antiseptic impregnation, which protects the wood from all possible biological influences. Instructions for handling antiseptic compounds are usually available on their packaging.

- then the roof must necessarily be insulated by using mineral mats or other thermal insulation material. On the pages of our portal, I have repeatedly talked about the technology of attic insulation, so I will not repeat myself;
- so that the insulation does not gain moisture, be sure to cover it with a vapor barrier membrane.
After preparing the room, you need to mark up. The lack of detailed markup is also often a mistake for beginners. This leads to the fact that the finish will be uneven.

The process of markup is as follows:
- first of all, you need to determine the location of walls and ceiling. If the attic is large and high the room can be made U-shaped, as shown in the diagram on the right.
If you want to get more space, you can do so-called "broken walls", as shown in the diagram on the left;
- then you need to designate on the crate the location of the corners between vertical walls and inclined, as well as between inclined walls and horizontal flow. In fact, at this stage, determine the size of the walls and ceiling, which also affects the space of the room.
To do this, first mark the points on the opposite pediments, then connect them with lines. For drawing of lines it is possible to use a painting cord;

- then the points on each pediment should be connected by lines. It is for them to level the ceiling guides.
After their application, make sure that the ceiling lines are not deviated from the horizontal and are on two pediments in one horizontal plane. To do this, you can stretch the threads between them and check their position with a level; - the joint line of vertical and inclined walls should be transferred to the floor in one vertical plane. To do this, use plumb lines to move a few points to the floor, then connect them with lines;
- now mark the lines of the location of the PP profiles on the inclined walls and ceiling. To do this, mark on the pediments the points with a step of 60 cm, deviating from the edge of the corners 10 cm, as shown in the diagram below;

- next, using a paint string connect the points on opposite pediments with lines. If the length of the cord is not enough, stretch the rope between the points, and apply marking on it manually;
- on the obtained marking of the position of the PP profiles, it is necessary to designate the places for fixing the suspensions taking into account that the step between them should be 50 cm.
Step 3: Assembling the frame for walls and ceilings
Now you can compile the framework by markup. The instruction for doing this work looks like this:
- prepare guides for the size of the lines on the pediments, then attach them with screws or dowel-nails. In the process of fixing the horizontal guides, be sure to check their position by the level;

- then attach the guides to the vertical walls on the roof slopes. Use profiles designed for, as the racks will not be attached to the hangers;
- now you need to fix the guides on the floor, aligning them on the markings;

- further it is necessary to cut racks on height of walls and then to establish them in a step of 60 sm. Profiles need to be fixed in directing samorazami from above and from below. In the process of fixing them, use the level;
- now you need to install the suspension for the ceiling profiles by using the screws;

In the photo - an example of setting the PP profile in the guide
- after installing the hangers, prepare the ceiling profiles and insert them into the guides. If necessary, profiles can be "increased" using a special extension;
- now profiles must be fixed in suspensions. The most difficult part at this stage is to align them. The fact is that profiles bend under their own weight, especially if the span is long.

Beginners often do not pay enough attention to leveling profiles. As a result, the finish of the attic floor with gypsum plasterboard turns out to be uneven, which is noticeable even with the naked eye.
Therefore, first fix the extreme profiles on the ceiling. To align them, stretch along the twine, which should be located on the same level with them. They will serve as beacons.

After setting the outer profiles, twist the twine between them, i. E. place them across the rails, and along them, set the intermediate profiles;
- similarly, install the PP profiles for inclined walls;

- next, you need to attach to the profiles of the bridge with a pitch of 50 mm, which will make the frame more rigid. The jumpers can be made independently by cutting, as shown in the diagram above. You can also use special crosses (crabs) for this purpose.
This completes the installation of the frame.

Step 4: Skinning the frame
So, with the most difficult stage of work, i.e. assembly of the frame on broken walls and ceiling, we sorted it out. Now consider how to trim the attic with plasterboard. The essence of this operation is reduced to attaching sheets self-tapping screws.
Despite the fact that the whole process is quite simple, it contains a number of nuances:
- self-tapping screws should be installed at a distance of 250 millimeters from each other. The distance from the edge of the sheet to the screw should be at least 10 millimeters;

- the screws of the screws need to be deepened by about a millimeter, otherwise they will not allow the surface to be plastered. At the same time, do not twist them too deeply, because in this case, the caps break through the cardboard and the sheet will cease to be fixed;

- the joints of the sheets must fall on the center of the profile. The presence of "hanging" seams will lead to cracking of the finish;
- cut out the sheets so that the seams are placed with a bandage, i.e. there were no cross-shaped joints.
The process of fastening is carried out without any difficulties. The only thing is to mount the sheets on the ceiling with an assistant, as they are bulky and heavy enough.
Step 5: finishing the gables
The decoration of the pediments reminds the plasterboard plastering of ordinary walls. This operation is performed in the following sequence:
- step back from the pediment 4 cm and mark on the ceiling and sloping walls points from opposite sides. Then connect these points to the lines;
- the resulting line is projected onto the floor in a vertical plane with the help of plumb bobs;

- immediately fix the wall guides on the ceiling and on the floor, aligning them along the planned lines;
- between the rails on the ceiling and the floor, install the vertical NP profiles, fixing them with screws on the walls;
- now retreat from the walls 10 cm, and apply to the gable a marking in the form of vertical lines with a pitch of 60 cm;

- on vertical lines make a marking for the location of the hangers. The vertical pitch should be 500 mm;
- then install the suspension according to the layout;

- since the length of the vertical racks will be different, measure the length of the lines on the wall. According to the received data, cut the rack-mount profiles;
- now insert the prepared JV profiles into the guides and secure with screws in the suspensions. In the process of securing the racks, check their position with a level.
Similarly, assemble the frame on the second pediment. Then coat the gable with gypsum boards, taking into account the above rules for mounting the GCR.
Stage 6: finishing of plasterboard
We can say that our gypsum plasterboard attic is ready. The only thing now is to reinforce the joints and prepare the surface for finishing. This is done as follows:
- work should begin with jointing - cut with a sharp mounting knife chamfers from all unrounded edges. The chamfer width should be about 5 mm. If the chamfer is uneven, there is nothing to worry about;

- now the surface of drywall must be treated with a primer of deep penetration. Apply liquid to walls and ceiling with paint.

Hard-to-reach areas and seams should be treated with a paint brush. After the surface has dried, repeat the procedure;

- after the soil has dried, reinforce the joints. To do this, the selected joint should be filled with starting putty, applying a composition across the seam with a narrow spatula. After filling the joint with filler, level the surface - trowel along the seam.

Immediately apply a reinforcing tape to the putty, and cover it with another layer of putty. Align the surface with a spatula.

In this way it is necessary to reinforce all available joints;
- while the putty dries, you need to fill the hats of the screws. To do this, put the putty on a narrow spatula and simply draw the tool over the cap;
- after drying the puttying surface should be lightly cleaned with a spatula or even nazhdachkoy so that irregularities do not interfere with further shpatlevaniyu;
- then the treated surfaces must be cleaned of dust and covered with soil using a brush;

- now you can start filling the walls and ceiling. Use a wide spatula for this work. Try to apply the filler gently and evenly so that the surface is smooth.
At this stage, glue the perforated corners to the outer corners to align them and protect them from chips; - after drying the putty it needs to be sanded with a sandpaper or mesh with abrasive P100-120. For convenience, use a special jointer, on which the net or skin is stretched;

Grinding is carried out in a circular motion. In this way, try to get rid of all the serious irregularities that are on the surface;
- at the end of grinding the surface must be cleaned of dust and primed according to the scheme described above;
- if you are planning to paint the ceiling of the attic of gypsum board, then it must be covered with a thin layer of finish putty. With its help it is necessary to get rid of small irregularities and traces of grinding;
- the ground surface must be carefully sanded with fine abrasive. To check the quality of grinding, bring a bright lamp to the surface. If defects are found, grinding should be continued, then the surface must be cleaned again of dust and primed.
To divide the attic space into several rooms, it is possible to install partitions from gypsum board. They are installed on the same principle as the vertical walls. The only thing, the space of the partition should be filled with mineral wool to provide noise insulation.
That's all the information on how to decorate the attic with putty.
Conclusion
Despite the fact that the decoration of the attic with gypsum board has its own specifics, the work is quite simple. So you can deal with it without the help of specialists.
I advise you to see more videos in this article to consolidate the material. With all the questions regarding the finish of the attic with plasterboard, if they arise, you can contact me in the comments.
December 12, 2016.If you want to express gratitude, add a clarification or an objection, something to ask the author - add a comment or say thank you!
Owners of large houses very often have in their arrangement such a premise as an attic. Its finish has certain nuances, which when working with plasterboard are very easy to solve.
Finish mansard gypsum cardboard will help you to make yourself an excellent repair and get a beautiful and insulated room at the exit.
The attic is a rather unusual room, which has a sloping roof, as well as a lot of uneven corners. As a result, the roofing of the attic floor requires from the person foresight and prudence. Of all the modern materials it is gypsum board that is suitable for finishing this floor the best. With its help you can achieve:
- excellent appearance of the room;
- to cover all non-uniform angles;
- to qualitatively sew up all the elements of the attic floor;
- mask all irregularities and defects in the floor;
- hide communications;
- create a variety of functional and decorative designs: niches, shelves, arches, etc .;
- align and warm the room.
It is also worth noting that the plastering of the attic floor with plasterboard is quite feasible. It will pass easily under certain rules.
What calculations are needed
Finish mansard floor involves extensive work. Therefore, in order for the cladding to be of high quality, it is necessary to take into account certain nuances of this room:
- location. Since the attic is located on the top floor, it makes sense to conduct additional warming of the room;
- the presence of uneven angles;
- roof slope.
In order to take into account all the features of the attic floor, you need to draw a drawing. It is composed as follows:
- we measure the room;
- we put on the paper the parameters of the attic;
- indicate the location of the frame, especially in the corners;
- we apply the passage of wires for additional lighting (if available).
Also it should be noted the dimensions of gypsum plasterboard structures that are planned. On paper, their parameters are plotted: height, width and depth.
The drawing will help you calculate the exact amount of materials you need to work. To ensure that the materials are accurate enough, 10% should be added to the final figure.
Materials and Tools
Attic Finishing plasterboard assumes you have the following list of materials:
- gips pasteboard sheets:
Note! For the attic floor, use only moisture resistant sheets that will prevent the appearance of fungi and mold.
- metal or wooden profiles;
- dowels and self-tapping screws;
- heater;
- putty;
- primer.
To carry out all the work ahead, you will need these tools:
- drill-screwdriver with a set of drills;
- perforator with safety glasses;
- building level;
- knife for cutting gypsum boards;
- scissors for metal;
- tape measure with a pencil;
- set of trowels;
- roller or brush.
With such a set of materials and tools, the attic casing with its own hands will pass "without a hitch and hitch".
Beginning of work
At the very beginning of the work should be trained, which will allow you to quickly and efficiently finish the repair. The preparatory stage includes the following procedures:
 Warming
 - clearing the floor of things and trash;
- purchase of the necessary quantity of materials, as well as the tools required for the work;
- we conduct room warming;
- on the ceiling and walls, we mark out the layout according to the previously drawn drawing.
Having done the above-described actions, you can simplify your work as much as possible during the assembly of structures.
Warming of the room
Before starting the installation work, it is necessary to conduct the insulation of the floor. Attic - a premise under a roof, because it, especially in the winter, can be much colder than the rest of the house. Therefore, before plastering the plasterboard, the attic is insulated.
As a heater, you can use different materials:
 Polyfoam, cotton wool, film
 - styrofoam. It can be of different thicknesses: 20, 30, 40, 50 and 100 mm. The thickness of foam sheets should be chosen based on the temperature of the region of residence, blowing walls and roof. Their installation is very easy, therefore with warming you will cope quickly. Slots between the plates are closed with mounting foam;
- mineral wool. It is also very often used to insulate attics. But it has certain shortcomings, among which a significant place is carcinogenicity. Dust, which is formed during warming, is harmful to human health. Therefore, when working with mineral wool, you must adhere to security measures. The thickness of mineral wool can be from 20 to 200 mm;
- vapor permeable film. It should be used in the presence of damage to the roof or walls. Mount it in such a way that the rough side of the film is facing you. This film should be simply pulled between the rafters and fixed with a stapler. For a stronger fixation, you should use thin wooden beams, which are nailed along the rafters.
It should be noted that it is possible to apply foam plastic and mineral wool even during the installation of the frame for gypsum boards. In this situation, they are inserted into the frame and then closed with sheets.
Note! In the course of warming, pay special attention to windows and doors, as it is here that most often there are drafts in case of poor quality insulation.
In any situation it is necessary that there are no gaps left in the insulation. To seal the remaining after the insulation slots, you need to use a mounting foam (with insulation foam) or the remnants of the insulation (when insulated with mineral wool). On top of the heater, after its installation, it is recommended to pull the vapor-permeable film (rough side inward to move moisture towards the street). We fix the film with a stapler. Also, this film can be fixed with your own hands after the end of the carcass assembly, before fixing the gypsum boards.
Mounting the frame
At this stage it is necessary to prepare a frame for the installation of slabs of plasterboard. Material sheets in the attic can be installed in the following ways:
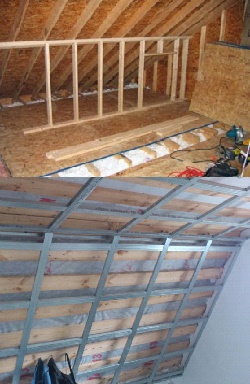
 Fastening to rafters
 - to the rafters. It is used when the distance between adjacent rafters is 60-75 cm. It is considered to be the fastest and cheapest, but does not give an ideal alignment of the skin, as the rafters themselves are uneven. Therefore, sheets with a thickness of 25 mm should be used here;
- on a wooden frame. In this case, to create a frame, you need to use specially processed wooden slats. Allowed if the distance between the rafters is 60 cm. This method makes it possible to install a heater between the rails, which will improve the insulation of the room. For leveling the surface, you can lay the underlays under the slats;
 Frameworks
 Note! It is allowed to replace wooden rails with hat profiles. They must also be attached to the rafters. With their help, you can achieve greater flexibility, but they exclude the possibility of using an additional layer of thermal insulation.
- on the metal frame. It is considered the best option. Here, the metal profiles are attached to the ES suspensions. With their help, you can easily level the surface. Typically, the metal frame is installed on the anchor bolts. Anchors are placed so that the distance between the profiles does not exceed 50 cm.
In any case, first carry the crate around the perimeter (use the profile guides "UD"), and then mount the cross jumpers (rack-mount "CD") or beams. This will stabilize the construction and make it more rigid.
The distance between the rafters depends on the type of insulation. For foam, this distance increases by 2-3 mm, and for mineral wool - by 5-7 cm.
During the installation, you must constantly check the level to get a smooth design. In the finished frame you need to conduct wiring.
Finishing plasterboard
At the end of the installation of the frame, according to any of the above methods, it should be laminated with sheets. Drywall in the attic should be started from the ceiling, and only then go to the walls and only at the very end - to the slopes.
If you do not need to design a structure with a load, thin sheets should be used. In the presence of niches and shelves we take thicker plates.
The paneling is as follows:
 Gypsum boardboarding
 - first we attach whole sheets;
- further on the sheets we make markings and cut them with a knife;
- attach it to the attachment point and, if necessary, cut it so that it fits perfectly. Especially it should be done in corners and places with sufficient curvature of the room;
- the cut sheets are fastened to the carcass by self-tapping screws. Here it is worth paying special attention to the immersion of self-tapping screws. They must enter the material at 1-1.5 mm.
Note! Put the sheets in order to make your work much easier.
When the cladding is completed, go to the final finish of the structure.
Finishing
For the final finishing of the attic, the following operations should be performed:
 Processing of joints with a sickle
 - we process the junction sites with a serpent;
- shpaklyem places of fastening screws and sickle;
- we erase all roughnesses by a nest;
- we ground the entire structure with a solution of deep penetration;
- apply the final layer of putty. It is applied very thinly.
After that, you can apply the final finish. Due to the properties of plasterboard it can be painted, wallpapered, decorated with decorative stucco, stylized as an artificial stone, etc. Therefore, you should choose the option of finishing, only based on your own preferences.
Guided by the above instructions, you can easily bespoke the attic floor of your house. The main requirement is strict adherence to the stages of work and the use of high-quality materials. As a result, the attic will become an unequivocally beautiful and warm room in your home.