Modern plumbing devices every year become more and more perfect and aesthetic. Installing them in bathrooms and toilets, designed 20-30 years ago, there is some dissonance with the surrounding environment. Virtually everything can be dissonant, ranging from finishing materials, ending with the floor and, of course, with pipes. Pipes, valves, drifts, hoses, risers, sewer and plumbing - all this greatly hinders visually, and when cleaning to wipe the dust from each individual pipe is not particularly desirable. The only solution is to create niches and pockets for communications.
What we will hide
Before you hide the pipes in the toilet, you need to know what we will hide. At least, in order to determine how far this will be hidden and do not have to get everything tomorrow. In the toilet can be installed sewer pipes, which are connected to the central riser. Usually in the apartments installed cast iron or plastic drain pipes - to connect the toilet directly to the riser using a pipe diameter of 110 mm, and for shells, baths and other, the diameter of the pipe will be 50 mm. Cast-iron pipes it is better to replace it with plastic immediately, since the service life of cast iron is short. If replacement of pipes is not foreseen, it is better to provide full access to the pipe for possible repair.
All toilet communications can be installed only in two ways:
- Open method.
- Strobing method.
Usually in the apartments pipes are simply installed and diluted in the open, that is to all pipes and throughout their length open access is available. Seldom there can be a setting by shtrobyvaniem, in this case pipes establish in grooves which are executed in a wall. This is a good method of communicating, saving space and hiding the pipes from the eyes, but for this you will have to make grooves in the walls and this is only possible at the stage of laying the pipes, so this method is not considered.
How to hide pipes
Aesthetics is aesthetics, but still there are some rules and regulations that need to be guided before beautifully hiding the pipes. These rules should be taken into account at the design stage of pipelines, but not always everything can be foreseen. Nevertheless:
- It is necessary to take into account the location of the meters for cold and hot water, so that they always have easy access to them. For this purpose, an inspection hatch or a removable panel is provided.
- Before you pack the pipes in the toilet, you must again check the tightness of all connections, and in addition, check the nominal inclination angles for sewer pipes.
- If the water supply is designed check valves, it is also necessary to provide access to them for periodic inspection, cleaning and repair, and, possibly, replacement.
- Threaded elements, bushings, adapters, fittings and sleeves must not be subjected to mechanical stress during the installation of false panels.
If you comply with these rules, then problems with the water supply and sanitation during operation and maintenance will not be.
Hide the pipes for drywall, or for plastic? Advantages and disadvantages
Both variants can have their advantages under certain conditions. So, if you carry out a box or a screen for masking pipes from plastic panels, then no more finish will be needed. In addition, in a combined bath and toilet plastic panels are not afraid of any moisture. Another advantage of repairing the toilet panels is that you can choose any of the color, texture and design of the panel, and it is not difficult to make a hatch in them, for this you can simply make one removable panel. As a result - finishing of niches and openings with pipes plastic panels will be useful in the event that for more expensive options for finishing money is not.
Gypsum cardboard in this case does not look so attractive, because in general the construction will cost more, because the GCR must be somehow cladded or at least plastered and dyed, and this is more expensive than the panels, and it will take more time. Nevertheless plasterboard structures are good in that they allow you to hide pipes with maximum efficiency, because you can also make a shelf, a locker, and the box itself can be of any shape. The profile for fixing the GCR allows you to cover any, even the most complex surfaces. Therefore, the option of finishing niches for communication with the GKL is greater, but it will be more expensive.
Revisions and hatches, locker in the toilet
In terms of aesthetics, it would be very good if the hatch, the removable screen would not be very visible, but if necessary, provide free access to the meters and, if possible, to most of the pipes. There are some difficulties associated with the fact that it is not always possible to achieve a close fit of the hatch or screen to the general plane and it thus stands out against the background of the entire structure and all this may not look very neat.
Alternatively, you can go a completely different path and if you allow space in the bathroom, especially if it is combined, then you can design a special locker. Thus, it is not necessary to hide and mask the hatch or audit. It will be enough just to take a separate leaf for them, and in the rest of the locker room, arrange the shelves. The design and configuration of the locker can be absolutely anything and you can do it by hanging the marked finished panels (chipboard or MDF) on the frame prepared and fixed with dowels to the walls. Beautiful, practical and inexpensive, especially since such a locker can be made from old furniture.
There are many options, it remains to determine the size and configuration and start working. Good mood for everyone and good work!
How to hide the pipes of a bathroom, this idea comes when it is time to go to the repair of this room. Namely, this applies to those who live in panel house. In the toilet there are many pipes of water supply and sewerage, as well as cranes, cold and hot water meters. In order to aesthetics, the right decision will, hide them neatly with their own hands.
But the reality is that on cold water pipes, if there is insufficient ventilation or a temperature drop, condensation forms, which inevitably leads to corrosion and damage, which is a consequence of the formation of the toilet, and in the event of damage to pipes and fittings.
Before you hide the pipes in the toilet, taking into account the nuances, you should take care of the open hatch. The main function of the technological hatch is free access for emergency maintenance of the riser, cranes and water meters.
Due to the fact that the construction market offers a rich selection of finishing materials, to hide pipes in the toilet, you can tile, plastic panels or roller blinds. In this material, we want to disassemble in more detail each of the proposed options, fixing the material with the photo instruction, having studied which you can perform such works even with your own hands.
How to close the pipes under the tile
Ceramic tiles, is one of the popular materials and toilet. This option, like to hide pipes with tiles, is successfully combined with a common interior, if the walls of the toilet are finished with the same tile.
To hide the pipes in the toilet with tiles, the first thing to do is to mount gypsum board (box), of moisture-resistant material, and the frame itself, constructed from metal profiles. To the cranes and to the counters must be free access (the opening as in the photo). The size of the opening should be made so that it is possible to easily and conveniently conduct plumbing, remove the counter, for example, or replace the tap with a wrench.

Tile, it is very easy to glue on plasterboard, but with the lining of the opening, you have to tinker. Here it is necessary to think over, so that the wall in the toilet, looked solid and desirable for aesthetics and beauty of the homogeneous. To do this, make an opening and pick up the hatch, with the dimensions of the tiles, that is, the tiles should evenly close the opening.
The wiring itself, going to the bathroom and to the toilet, if the repair stage of the toilet is in the draft version, you can hide it by making a stinging in the wall. The same way, after making a box of drywall, you can in the apartment.
How to hide pipes in the toilet with plastic panels
Close the pipes with plastic panels is the easiest way. PVC panels are very convenient material for the toilet, not inferior in design and performance tile. Such material as, plastic is very light and flexible, easy to lay and operate, the distinguishing feature is the most affordable cost.

The way how to hide pipes with PVC panels by oneself is done by analogy, as with tiles, only without the use of drywall. A load-bearing frame is being built, for fastening the panels. Here you can use both metal profiles and wooden slats. For the technological opening, you can use a plumbing plastic hatch of white color (pictured) or choose a color that is suitable for contrasting the panels of the toilet.
How to close pipes in the toilet with roller shutters
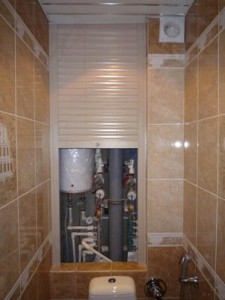
Hide the pipes with plastic roller shutters (rolls) can be called a modern and convenient option. And it's no accident. Previously, the use of a roller blind in a panel house could only be seen on windows.

Innovations in technology and thinking designers have no boundaries, shutters can completely cover a certain part in the wall from top to bottom (pictured), giving the toilet an elegant and pleasant appearance. By making hidden, but at the same time possible free access to any plumbing elements.
Carrying out repairs in the bathroom, we want everything to be not only practical and functional, but also beautiful. But water and sewer pipes on the wall behind the toilet, do not contribute to improving the aesthetic qualities of the room. That's why many owners are wondering how to close the pipes in the toilet. They can be sealed in various ways, for example, use blinds, close panels or plasterboard. However, at the same time, access to meters and shut-off valves installed on the pipes should be maintained. Our tips, photos and video instructions from the article will help you choose the appropriate method by which you can hide the utilities in the toilet.
Overview of materials
To hide sewer pipes or water networks, you can use a variety of materials. For example, blinds that will close a niche in the wall. Plastic panels or plasterboard can be sewn a box in which the engineering communications will pass. In the network, you can find photos of various uses of these materials.
Drywall
Most often, the method of sewing pipes in gypsum board is used. A detailed video of the installation instructions for the box can be found at the end of the article. This material has many advantages:
- If necessary, the structure can be dismantled.
- Perform installation work pretty easy. First you need to build a frame of timber or profiles. Then cover all with plasterboard.
- It is an environmentally friendly material that is harmless to humans and animals. It does not exude harmful substances even when heated.
- With gypsum cardboard you can get a smooth and smooth surface, which is suitable not only for styling ceramic tiles, but also for gluing wallpaper, as well as painting.
Advice: for such premises as a toilet and a bathroom, it is better to use a moisture-resistant drywall.
The only drawback associated with the use of drywall is that if you replace or repair pipes, you will have to completely dismantle it and then do it again.
Plastic panels
Sew the same box as under the plasterboard, you can plastic panels. This material has its advantages:
- These products are very easily and quickly mounted on a frame of a beam or guide profiles.
- The material is safe for humans.
- If the box is sealed with plastic panels, it is much easier and quicker to dismantle them in case of an accident than drywall. After doing this, repair work the product can be installed in the old place.
- Impressive service life with preservation of the original species.
- Such material is not afraid of moisture. It is easy to clean, not exposed to mold and spoilage by insects.
- On sale there are many variations of colors and textures of this material, so you can easily choose a product for the style and color of your interior. Also there are coatings with photo print and various geometric prints.
- After you encase the box with plastic panels, you do not need to do any finish finishing, because the panels have a decorative coating.
The only drawback is that this material may not harmonize well with the tiling of the walls.
It is important: when installing a box of any materials, a revision hatch is mandatory, which will facilitate access to engineering communications.
Jalousie

The simplest and most affordable option, how to hide pipes in the toilet, is the use of blinds. It is suitable for small toilets in which all pipes are on the same wall or in a separate niche. Thanks to the use of blinds, the following advantages can be obtained:
- Do not require difficult installation - no need to make a box or frame, just fix the fastener on the ceiling. Thus, you can quickly and easily close the wall, where the sewer pipes and water communication pass.
- This product saves space in the room.
- Depending on the size of the blinds, you can close the wall partially or completely.
- To gain access to pipes or water meters, you just need to raise the blinds.
- A large assortment of colors and textures, as well as blinds with photo printing make it easier to choose the right product for the color and style of the interior.
- Thanks to the fact that an impressive section of the wall will be closed, shelves for storing household chemicals and various household implements can be installed behind the blinds.
The disadvantages of blinds are almost none, it is important to choose products from quality material that does not change its color during operation. It is also important to consider that the product should be easy to wash and not absorb the smells.
Homemade or finished box

To close the pipes in the toilet, you can use a ready-made or self-made detachable box. This option also has its advantages:
- The finished product remains only to install (see the photo below).
- If the finished structure is not suitable because of the features of the room, then you can make such a box yourself. Its manufacture and installation will not cause problems either.
- Due to the fact that the structure is removable, at any time there is access to engineering networks.
The main drawback is that this is a rather oversized product that may not be suitable for your small room. Also, the price of the construction will be slightly larger than the production of a non-removable gypsum board box in the manner described above. Also, there may be problems with connecting the toilet bowl in case of using a finished box.
Ways of installation

What materials can be used, we figured out. It remains to understand how to close the pipes in the toilet with the help of these materials. First, let's look at how to make a framework for gypsum cardboard or plastic panels. The works are conducted in several stages (see the video at the end of the article):
- First, you need to mark the future frame on the walls of the room.
- After that, along the markings are attached longitudinal guides from the bar section of 20x30 mm or a special profile for gypsum board. The guides are attached to the wall with dowels and screws.
- After that, install cross bars or profiles. Mount the screws to the already installed guide. The step of the transverse elements is usually 30-50 cm. At the same time, we do not forget that we will need to install inspection hatches. Usually they are mounted in the place where the meters are installed, shutoff valves, or where there is a revision hole for cleaning the sewer. The place for the future hatch should be further strengthened with brusks or profiles (at the same time it is necessary to adhere to the hatch dimensions).
- At this stage, you can begin to sew the box with sheets of gypsum board or plastic panels. Gypsum cardboard is fixed with screws to the box, and for fixing plastic panels we use special plastic guides and corner elements. Leave a hole under the hatch.
- If panels were used, now you can install the inspection hatch.
- If the installation of the box was carried out using plasterboard, then we perform it finish with the help of ceramic tiles, wallpaper or painting. And only after that we assemble the hatch.
There are several options for the device box:
- In the form of a continuous false wall. This option is suitable for small toilets, in which the pipes are concentrated on one wall behind the toilet. Also, this method is applicable for the installation of a hanging toilet bowl, since it can be hidden behind the supporting frame of a sanitary appliance. The only drawback of the false wall is that in this case the access to the pipes is limited and in the event of an accident it will be necessary to dismantle the entire wall.
- If all the pipes and risers are assembled in one corner of the room, then it is better to make a square box, behind which all communications will be hidden. Do not forget to make a hatch in the place of installation of meters and stop valves.
- A sloping false wall is made in the event that from a group of risers the thinner tubes depart, which must also be hidden. In this case, it is not advisable to make an even false wall, since it will take a lot of useful area of the room. In this case, a slightly skewed construction along the wall through which the pipes from the risers pass.
- If you do not know how to hide pipes in the toilet, where communications pass so that in order to hide them, you have to fence off almost half of the room, then you can use a multi-level box. In this case, the pipes are closed with a box only up to a certain height, and not the whole room.
If you plan to use blinds, then the fastening under them is mounted on the ceiling. In this case, the blinds themselves can cover the wall completely (from wall to wall) or partially. The second option is used when the pipes are in a recess located on the rear wall. Also, the height of the blinds may vary, depending on the features of the installation of communications. So, the louvre design can be to the entire height of the room or only as long as the pipes are laid.
Video instruction for installing a drywall box in the toilet:
Doing repairs in the bathroom, many face a very important problem: where to hide the intricacies of pipes, faucets, valves, which are inevitably present in the toilet? With the help of modern materials, it is easy to solve this question literally the other day without even being a specialist in the field of repair.
How to close the pipes in the toilet with plasterboard: solutions
Repair in the toilet does not look finished, if the communications and water supply are not open. To give a neat look to the wall near which the pipes are located, there are several ways, any of which can be easily realized in the premises of any area, and therefore they will fit even the most compact toilets or combined bathrooms.

We offer the following options for your choice:
- The first way to design the zone where the pipes are located is the installation of blinds. With their help you can hide the impassive look of the pipes, they do not need to be fastened for a long time, besides, the blinds are easy to clean. The disadvantage of this design is that the blinds are not very reliable, they can break and then you will need to replace them completely.
- The second option for decorating pipes is the communication cabinet. It can be made on the principle of a conventional cabinet built into the wall, assembled from improvised materials or matched to the size, and mounted in a niche on request. The advantage of the cabinet is access to all pipes and valves. In addition, in such a cabinet you can additionally supply shelves for household chemicals or textiles. Unfortunately, cabinets of this kind do not fit in all the interiors, but in a small bathroom together with the regiments, they will also take up a lot of space.
- The best option for any design solution is a gypsum board, in which the pipes and the ventilation shaft will be closed. It is easy to manufacture, can be finished in a variety of ways, and the shape of the box can be given, based on the characteristics of the room.
Close the pipes in the toilet plasterboard can be with a minimum of tools and materials, while spending quite a bit of time. We will describe this process further.
How to make a gypsum board in the toilet: materials and tools
The first step in designing a bathroom box: select the size of the future design. If the bathroom is narrow, and the pipes are located along its short wall, you can sew it completely to the full width and along the entire height.
For a small number of pipes in the lower part of the wall, you can make a parapet box, which in passing will serve as a shelf.
And in a spacious toilet the box can be effectively disguised as a ledge or column. One of the most popular modern construction material - sheets of plasterboard. They are attached to a special profile, which can be bought at any construction store.

For the box you need:
- A sheet of gypsum plasterboard moisture-proof (GKL);
- Profile rails (PN);
- The wall profiles (they are also called rack-mountable, PS);
- Dowel-nails 6x60;
- Self-tapping screws for;
- Frog loops for hatch.
To save space, you can replace the wall profiles that have the dimensions 50x50, the ceiling PP 60x27, and the guides 50x40 - on the ceiling guides PPN 27x28.
Toolkit for making a drywall box with your own hands, come in handy such:
- Screwdriver;
- Percussion drill / drill;
- Knife Paint for;
- Level;
- Scissors for metal / Bulgarian for cutting profiles;
- Roulette;
- The plumb line.
If the issue of saving money is acute, you can replace the metal profiles with a wooden beam, and drywall with cheaper plastic panels. When all the tools are assembled, and the material is purchased, and the size of the box is determined, you can start the work on sewing plumbing pipes.
How to close pipes in the toilet with plasterboard: step by step instructions
We start with the marks on the walls and ceiling, where the profile frame of the future construction will be fastened. We expose them with a marking pencil or marker.

- The profile of the wall is cut by scissors or a bulgarian and fastened to the wall by dowel-nails in places where the connection with plasterboard will take place. Separately, sections of the profile of the same length are attached to the floor - they will perform the function of the frame for the future box. Align the position of the profile with a level so that it is perpendicular to the floor.
- We cut the PPN guides with pieces equal to the width of the box from the wall to the front wall. These pieces are attached from the end to the floor and the ceiling or wall at the height of the box if it does not close the communications from floor to ceiling. A few more of these segments are mounted between the wall and wall profile As the stiffeners of our design.
- Plasterboard cut into pieces of the right size. We fix it on the profile on each side of the box with screws every 5-6 centimeters along the entire perimeter. On the front wall we need a viewing hole for access to meters, taps and valves. Therefore, before fastening the front wall of the box, mark out and cut out the hole for the door or hatch. Then, similarly to the side walls, attach to the profile.
The base of our box is ready, now it is necessary to decorate the door and attach it to the front panel of the structure.
We decorate the door for the box in the toilet
The door for the plumbing box can be made from different materials. Here is just a small list of how you can arrange access to communications in the toilet.

Among them are:
- gypsum board - the simplest and natural option, the more that you already have the workpiece under the door;
- wood panel or veneer;
- a small curtain-roll;
- plastic panel;
The most practical and inconspicuous option is the door made of plasterboard. The finished piece of GCR can be lightly sanded around the edges with sandpaper and put on a frog-loop, which can be bought at any construction store.
The most popular are four-hinged furniture frog-loops.
We fasten loops screws to the front wall of the box and check whether the resulting door is buried densely.
How to decorate a tubing box in a toilet
To the box hiding the pipes in the toilet, it looked finished, it must be prepared for finishing, and then trim with suitable materials. Preparation is the same as for any.
Soil treatment can not only reduce the consumption of putty, but also protect against the appearance of fungus and mold.

We process the box with the soil, cover with several layers of putty, then rub and grind the surface. The edges of the box can be decorated with corners for plasterboard made of plastic or metal. They can easily be "planted" on the same shpaklevku.
As the finish of the box you can use:
- Tiled tile, which is finished with a bathroom, and with tiles you can finish the door of the box;
- Moisture-resistant wallpaper;
- Water-based paint;
- Wooden or plastic lining.
Try to choose the finish for the box in the same style in which all the rest of the repair is done in the toilet and give preference to the easily washable and damp proof materials. Detailed instructions for decorating the walls of the box can be found on the video on the Internet.
Installation of the gypsum board in the toilet (video)
A box in a gypsum board toilet is a very simple design that will reliably hide a not very attractive and ventilating shaft. You can make it in the premises of any area, and the variety of options for boxes and their decoration will create the most convenient structure that will give access to plumbing communications and at the same time look beautiful.
Quality repair in the toilet provides attention to all the details. Pipes, the confusion of wiring, counters and filters, without which communications in a modern apartment are unthinkable, will not add beauty to freshly tiled or decorative panels. They just need to be hidden. The same desire can arise and the owners of toilets without fresh repair, to somehow improve this room. There are many options for masking pipes, and for each case, you can choose the appropriate one.
Locker
The simplest and decades-proven method is to hide the pipes in the locker. This is the most suitable option for toilets, in which repairs are not planned in the near future. The cabinet is convenient because there will always be free access to pipes, meters and filters for their maintenance and repair. In addition, there is a place for storage of household chemicals and hygiene. The locker is placed above the toilet, in the place of the greatest accumulation of pipes and the passage of the sewer riser. The space under it to the floor can be hidden behind a decorative screen.
Sanitary locker is easy to assemble by yourself. In the beginning, the walls are fastened to the corners and dowels of its frame of timber. Between each other the lengths of the beam are connected by screws. The frame must be in the form of a parallelepiped, its faces must be strictly horizontal or vertical (checked by level), so that later there are no problems with hanging doors or installing shelves. Vertical faces in 2-3 places are joined by horizontal pieces of the bar, you can have a smaller section. Shelves will be attached to them in the future.
If the walls are curves, then you need to use wedges and gaskets, which can later be covered with panels in the color of the walls.
The hinges are attached to the external vertical hinges and the doors are hung. For them, you can use chipboard or laminated MDF, cut to size, with pasted edges, and you can choose suitable for the size of the door for kitchen facades (they are sold separately in building supermarkets or stores like Ikey). Inside the shelves are mounted, the grooves for the pipes in them are cut using a jigsaw.
For the screen under the cabinet similarly fasten the frame in the form of a simple rectangle. This design should be the height from the floor to the locker and snug against the walls. Another make exactly the same frame and fix it with screws or nails sheet of plywood or chipboard with holes for the pipes. The screen is connected to the carcass by screws in the upper part or by means of metal plates and a screw connection, the second is easier to unscrew if you need to take off the screen for access by pipes urgently.
Shutters
The locker is undoubtedly convenient, but in a small toilet there may not be room for even opening the doors. In such cases it is possible to cover the pipes with shutters. This is a modern and convenient option, albeit more expensive. Roller shutters can also be used for major repairs of the toilet, picking up their color under the tiles or plastic panels and closing them niches with a boiler and other equipment. An additional advantage is that they are locked, and, therefore, dangerous cleaning products will not be available to children.
In the rolls, you can not make a hole, so, under them, as well as under the locker, mount the screen, but at a small height, exactly to the level at which the pipes go to the toilet. The roller shutters themselves are attached to the ceiling, and the shaft to which they will be wound should be horizontal, only so they will not get stuck.
Stationary version
If the toilet is repaired with the replacement of all pipes, it makes sense to hide them behind a fixed box or drown in the walls. To do this, make sure that a number of requirements are fulfilled:
- all connections are made qualitatively and hermetically,
- in the event of an accident, communication should be accessed via a hatch,
- door or hatch installed and before the valves, counters and filters for their maintenance,
- on sites to which access will not be possible, there should be a minimum of connections,
- if it is intended completely closed box or a false wall, it is necessary to take care in advance that the condensate on them does not lead to the appearance of mold.
Before tightening the pipes, it is better to observe for a while (a week or two) behind them, whether it is airtight, there is no leakage.

In the most common case, when the pipes are located vertically in one of the corners or go all along the floor, they can be closed with a non-detachable box.
- First, the frame is assembled from a bar or metal profile, the choice of material depends on what the box will be finished later on. All faces of the frame must be parallel to the floor or walls, unless a bevelled or curved construction is provided.
- At the stage of assembling the frame, there are places under the hatches and for them contours of the appropriate size are made. Less than 15 * 15 cm do not do them, because it's difficult to work through a small hole.
- The frame is covered with sheets of gypsum cardboard on self-tapping screws or plastic panels, if the walls in the toilet are finished with them. For the panels you will have to install additional profiles, the same as they are attached to the walls.
- The gypsum-pasteboard box is glued with tiles or wallpaper, as well as the rest of the walls in the toilet.
- Holes for plastic doors are closed with plastic doors (sold standard sizes in plumbing stores).

If the toilet box is assembled from drywall, moisture resistant material is used, since condensate is difficult to avoid. Lined with tiles, this design looks attractive and does not stand out against the background of the rest of the walls. However, in the event of an accident, the gypsum board must be completely dismantled and then made of new material, whereas the plastic panel can be dismantled and reassembled.
Thinking over the camouflage of pipes in the toilet, you need to take into account not only the aesthetic side, but also the convenience of repair and operation. Let it be better to have more removable parts and hatches, than it is necessary to break the whole structure.