Option brickwork in half a brick is the most common option. It is a fairly simple phenomenon, which serves as the basis for many subsequent works. With the help of this type of masonry are successfully built interior partitions and facade cladding.
In addition, the process of such a plan makes possible significant savings building materials. In particular, the consumption of bricks is reduced by half. Naturally, this factor entails saving the solution.
The basic principles of masonry in polkirpicha
This kind of masonry involves turning out only a spoonful of bricks. The whole principle of the process can be reduced to the following: the material is laid in one row on the previously applied solution, each subsequent row is shifted to half a brick. This is done to ensure that joints of joints do not coincide with each other, because this phenomenon will no longer be a solid construction.
The thickness of such walls is 120 mm. Of course, this is only done if the material has standard sizes. For the construction of the partition, this parameter is optimal, but for a bearing wall it is better to increase it. In particular, in this way the load-bearing wall is not erected almost never, because in that case it will be quite shaky and unreliable. According to the current regulations, such an element should have a thickness of 380 mm or more, and this already.
You can use a parameter of 250 mm, in other words, to erect. However, such figures are applicable only for the construction of buildings in one floor. Naturally, such a wall can not withstand a large load.
If it is also used as an external wall, then it is necessary to further insulate this element. You can also resort to cross reinforcement to further strengthen such a wall. In particular, to implement the process through a few rows, a special material of metal is laid.
Sequence of brickwork in half-brick
When implementing this type of masonry, you must adhere to a certain algorithm of action.
The process begins with the construction of corners. The first bricks are laid on the sides next, the resulting brickwork of the four bricks is supplemented with further bricks, so that overlapping of one row with the other is carried out. This phenomenon forms a so-called dressing, which subsequently determines the strength of the entire structure.

After the formation of angles, a layer of solution is applied to the row. The material is placed on it and carefully pressed against the surface. Checking the smoothness of the series is done using the level. The brick is best pressed only in the center.
A fishing line is being raised, making joints, and the next row is being made. The location of vertical seams should be strictly in the center of those bricks that are on top.
This method significantly reduces the price of the material and increases the speed of the masonry. For the implementation of the fastest process, you can use double silicate brick M 150, which has increased height and increased strength. It is used both for the erection of internal partitions, and for the formation of facing works.
Increasingly popular are beginning to use brick baths. Masonry in half a brick will be the most practical and economical solution, if you decide to build a bath of this material.
With the advent of new types of construction and finishing materials brick baths are becoming more relevant.
Advantage of the bath of brick:
- the service life and strength of the structure increase severalfold;
- the occurrence of a fire is minimized;
- more opportunities in the design and layout of the building;
- minimal knowledge of construction is needed to erect a structure.
Advice from the master!The disadvantage is that the brick slowly heats up and quickly cools. But with the right approach, this problem can be solved.
Technology and features of masonry in half a brick
Masonry assumes that only the so-called spoonful part of the brick will be facing outward. The laying scheme is that in each successive row laid on a layer of cement mortar, the brick is shifted by half, thus forming a stronger grip and strength of the wall. The standard thickness of one brick is 250 mm, this is quite an acceptable value for the construction of the bath wall and the strength of the structure.
The first thing you need to know is that the thickness of the wall of the building affects the strength and stability. An obligatory decision should be a reinforcing mesh, which is put every 3 brick rows, allowing to avoid possible collapse. Grids are rectangular and zigzag shaped.
Example and masonry process in half-brick
Tools and materials required for masonry:
- a sufficient number of building bricks with a reserve (approximately 50 units per 1 sq. m. taking into account the cement seam);
- cement mortar, carefully mixed with fine sand (in proportions 1: 4);
- working tools: trowel, shovel, container for solution, hammer-pick, plumb, gon, rule, level, fishing line.
To start work, you need to make a markup to avoid further inconsistencies. Also, marking is necessary to identify areas under the doors and windows of the bath. Marking can be done right on the floor. The first row must be erected on an absolutely flat surface in order to avoid further curvature of the structure. An obligatory component is a layer of roofing material between the foundation and the surface on which the building will be erected. First of all, put the brick on the ends of the row. If the floor is uneven in places, then the first bricks are laid on a higher surface.
Clutches usually run from left to right. We pull the line along the entire first row, so as not to deviate from the straight line. It is desirable to initially moisten the brick, so that it does not take moisture out of the cement slurry.
We need to start the clutch from the corners, from the top to the first row we put the two bricks of the next row so that they overlap the previous one and immediately put another row in two bricks. 
Such a scheme will provide the so-called binding and reliability of the structure.
Having finished with the corners, we put the solution on the entire first row, gently pressing and checking the level. Press only on the center of the brick, otherwise it can lead to uneven rows. Then cement mortar is tipped with a trowel.
Moving along such a scheme from row to row, we build walls. We do not forget to check the horizontal and evenness of the series on a tight line and level.
Advice from the master!If the process is delayed and interrupted for several days, then the constructed construction should be covered with a dense polyethylene film, pressing it from the ends.
Advantages of laying a half-brick
Masonry in polkirpicha is the most simple. The technology of construction can be mastered by almost any person who has at least a minimal idea of construction. Observance of all rules and norms will ensure the reliability and stability of the structure to the required conceived load. This type of masonry can significantly save, reducing the required number of building materials in 2 times, respectively, reduces the consumption of the solution.
Before proceeding to the masonry, it is necessary to get acquainted with the terminology concerning this case. So, everyone knows that the brick has the shape of a rectangular parallelepiped, which has 6 faces.
- The biggest face is called a bed. There are only two of them.
- Long narrow faces are called spoons. There are also two.
- The two remaining small faces are called tyches. There are two of them, too.
There are several types of brickwork.
- Continuous. With this kind of masonry, the first row of bricks is laid first along the length of the wall. Then the second row is laid on them so that the bricks of the second row overlap the seams between the bricks of the first row. This result can be achieved if at the beginning of laying the second row, put half the whole brick, which will give a half-brick shift. This laying, in which the bricks of the upper row overlap the seams of the lower one, is called the dressing of the seams. This is done in order to distribute the load in all directions.
- Lightened. This type is distinguished by the fact that the bricks are placed in two horizontal rows, that is, in such a way that as a result the wall will consist of two layers of bricks. First, on a flat surface, you need to put the bricks one behind the other in such a way that their spoons look outward. The inner series is placed in the same way. Then each row is constructed also, as was considered for the first type of masonry. But, when the height reaches 7-8 bricks, it is necessary to arrange them in such a way that they look outward with their pokes. In this case it should turn out that this row of bricks will be directed perpendicular to the previous row, and will lie on it. Due to this, the binding of the outer and inner layers is achieved.
- Facing. The masonry itself brick wall goes exactly as described in the first and second versions. But simultaneously with the erection of the wall, another brick layer is also being built, which covers the wall from the outside. Usually the outwardly facing brick face is decorated or has some part of the pattern that will eventually give a solid pattern on the wall. The facing layer is attached to the wall in the same way as described in the second paragraph.
Required Tools
Before you begin, you should check whether all the tools are available. Here is their list:
- Trowel this tool is a steel sheet, polished on both sides, and having a wooden handle. With this tool is applied brick mortar, and excess portions of the solution are cut.
- Edging. It can be convex and concave. It is designed for processing seams and giving them some form. Depending on the size of the joints, the size of the joint is selected.
- A hammer. This tool is necessary for cutting the brick to pieces.
- Scouring. Sometimes a solution enters the ventilation ducts. This tool is just used to clean them.
- Plumb bob. This tool is used to control the verticality of the walls.
- Level. This device is a rod made of aluminum, and designed to control the horizontal and vertical masonry. On the rod at equal distances from each other are attached ampoules, reminiscent of the liquid in which the air bubble is located. If the level bends one way, the air bubble changes location. On this basis, one can judge the unevenness of the masonry.
- Cord - pier. This cord is pulled between the pieces in order to ensure horizontal and straight masonry. Used as a guide. As soon as the next row is ready, the cord moves higher in order.
- Order. This device is a wooden rod, 2 meters in length, which, with the help of special clips, is attached to the wall. On the surface of the order, there are divisions every 77 mm (65 mm is the height of the brick, 12 mm is the thickness of the mortar). At the level of these divisions, the cord is fixed.
Solution
The solution consists of two components:
- Binder (clay, sand, etc.)
- Filler.
Solutions are simple and complex.
The process of preparation of a simple solution:
- The ratio is usually taken 1: 3, this means that for 1 part of the lime you need to take 3 pieces of sand.
- These two parts need to be mixed, then pour the water, while still stirring. Stir is necessary until the solution becomes denser. To check this, you need to tilt the container at some angle. If the solution does not pour out, then sufficient hardness is obtained.
It is also possible to prepare a complex solution, which, in addition to lime and sand, may contain other components, such as clay, etc. They impart plasticity to the solution, and also prevent loss of water, which facilitates rapid solidification of the solution.
Weather
In general, brick masonry can be put at any plus temperature. In no case should laying the masonry when the temperature has dropped to minus values, since in this case the water that enters the solution freezes. And this, in turn, does not allow the solution to harden.
But modern science has developed ways through which the construction of brick walls in minus temperatures is allowed. This method involves the use of special chemical additives, which temporarily inhibit the rate of freezing of water and promote rapid solidification of the solution.
How to lay brickwork in half a brick - step by step instruction

Masonry in half a brick is a method in which the bricks of the overlying row are shifted relative to the underlying bricks. This method is fairly simple to learn and is used to build walls that are partitions between rooms.
- The surface of the basement must be cleaned, it must be level.
- Then the surface of the foundation is applied to the roofing material, which is a waterproofing.
- After that, a layer of a solution 3 cm thick is applied.
- Then put the lowest row of bricks. When laying them, you need to consider that the bricks must be stacked so that their spoons are facing outward. After placing the first brick, follow the trowel to scrape off the top row of the already applied mortar, and apply it immediately, without tearing the trowel from the surface, on the sticky side of the brick. The next brick is attached with its poke to the poke of the first brick, and its free poke is also applied with a layer of mortar. So the vertical seams are closed.
- Then you need to cover the whole series with a solution.
- Now you can proceed to the next row. When laying the second row, it must be taken into account that the bricks of this row must overlap the seams of the first row. To achieve this, you can use half the brick, as described above, or build a corner of the building so that a half-brick shift is formed. When laying bricks of the second row, just as in the first row, carefully scrape off the top layer of the mortar and apply it on the brick peg.
That's all. The same actions will be repeated until it is achieved required height masonry.
In one brick - step-by-step instruction

This method is used for the construction of external bearing walls, since the first method is not suitable here. Masonry in one brick involves alternating the spoon and tumbling layers.
- In the same way as in the first case, it is necessary to cover the surface with a layer of ruberoid, then apply the solution.
- Then place the bricks of the first row. They need to be placed in such a way that their poking sides are facing outward. When they are placed, the edge of the trowel needs to be carefully scraped off the top layer of the solution applied to the ruber and applied to a spoonful of bricks where the spoon of the second brick will be joined.
- A layer of solution is applied to the entire row.
- Now begins the laying of the second layer. In this case, the bricks are arranged in such a way that their spoon faces face outward. Here, for the entire width of the first row, two horizontal rows of the second row will fit. Bricks of each horizontal row are also laid taking into account the fact that the seams must be closed with a mortar.
- Now a layer of solution is applied and the third row is constructed similarly to the first one, and so on.
That's all. So you can lay the brickwork in one brick.
Laying corners
In any construction, it is the laying of corners made of bricks that is a complex stage, which requires maximum attention. To cope with this and not make mistakes that will then affect the strength of the entire building, it is necessary to be guided by the following rules:
- Before you start laying, you need to make sure that the angle is even.
- Then the roofing material is laid on which a layer of mortar is applied.
- Now you can start laying bricks that form a corner. There are two options: masonry in polkirpicha and masonry in one brick.
Masonry in half a brick:
- First, the first brick is applied in such a way that its spoon and poke look at different sides of the corner. The second brick is placed perpendicular to the first one.
- Now you can start the second row. Here, the bricks must be placed so that they cover the seam between their first side of the bricks of the first row with their bedding. The next third row is constructed similarly to the first one, and so on.
Masonry in one brick. Here everything is more complicated compared to the laying in half a brick.
- The first row is put exactly as in the first case. But it should be remembered that this type of masonry provides for the presence of external and internal rows of bricks; This was mentioned in the paragraph "types of brickwork". The inner rad is laid in such a way that each brick is parallel to the bricks of the outer row.
- Now you can start the second row. This series should begin with 3/4 of the brick, laying it so that it overlaps the seam of the bottom row. And then everything goes along the chain, as in the first case. Here, 3/4 of the brick is used to form the necessary shear.
Nuances
With brickwork, it is necessary to take into account that there are several nuances that should be borne in mind.
- Before starting to work, it is recommended to soak bricks in water. This is done so that they do not take away moisture from the solution.
- Before the start of laying the next row, you need to move the cord upward by the next 77 mm on the order. This is necessary in order for the series to be strictly horizontal.
- In the process of placing the brick, it is necessary to press it into the solution, and the excess part of the solution that is poured on the sides must be carefully cut off by the trowel and sent back to the container.
- In any case, regardless of the type of masonry, it is necessary to put so that the bricks of the upper level overlap with their bed side of the seams that formed between the bricks of the lower level.
That's all! With brickwork you need some skills and skill, but having mastered all the basics and nuances, you can build a house whose walls will stand still for a long time.
The thickness of the masonry can have a variety of variations, but in all cases it is tied to the size of the brick - namely, its length. A minimum is a quarter of a brick when, when erecting partitions, it is laid on an edge, a maximum of 3, or even 3.5 bricks, when the foundations and columns are erected. But the most popular option was and remains brickwork in polkirpicha, which is the easiest way to do it yourself.
Where and for what purpose is this type of masonry used, what kind of brick and mortar, tools, tools are needed for this? Video in this article, as well as the following instructions, will answer all your questions.
Apply masonry to half a brick
Brick masonry in polkirpicha, can not be a carrier. So the walls on which the slabs, roof beams and rafters of the roof should rest, can not have a thickness of 120 mm.
But this type of masonry has its own, no less important spheres of application.
External cladding
If we talk about the construction of houses, then, above all, this exterior finish external walls. And, not only the brick wall, but also any other can be faced: panel, block, timber.
Note! For example, with the overhaul of old wooden houses, the facing in polkirpicha perform not only to improve their aesthetics, but also to provide additional rigidity to structures that lose their strength over time. In new construction, carried out with the help of wooden structures, brickwork in half of the brick often forms the top layer of the "pie" of the frame house wall.
Decorative wall, built according to the scheme in half a brick, allows not only to strengthen or improve the bearing walls of the building, but also gives them the opportunity to warm them qualitatively. At the same time, the lining is carried out according to the system of the ventilated facade - that is, the wall is separated from the base base at a distance necessary for the laying of the insulation, and ensuring normal ventilation.
How to do the brickwork yourself, we'll tell you - but a little later. In the meantime, consider in what other situations the masonry option is applied with a thickness of half a brick.
Internal partitions
Internal layout of premises by erection of partitions is another way of applying brickwork with a thickness of 12 cm. Despite the fact that these partitions are always non-load bearing, they have enough strength to withstand not only their own weight, but also the weight of cabinets, decor elements.
- Given the never-diminishing popularity of masonry texture, the use of bricks as a structural material for partitions, makes it possible to simultaneously carry out both erection and decoration of the wall.
- In this case, the masonry is made of a decorative brick, and left unplastered. Despite the fact that its price can be doubled, and even three times higher than that of a private soldier, due to the fact that the need for further finishing falls off in principle, the extra costs are fully paid off.
- Brick partitions are also good in that they allow to carry out design in architectural styles in which masonry made of bricks is an unchanging element of the interior.
Actually, this is the main advantage of decorative bricks, as such. Although, in fairness, it is worth saying that you can achieve the same effect with clinker tiles for brick, glued, for example, to the surface of a partition of gas blocks or plasterboard. Only in this case there will be more expenses: the cost of constructive material - and in the case of gypsum boards, also a heater, which is put inside for soundproofing; and the tile itself.
And then two in one - and the wall, and the decor for the same money. The only thing that will need to be done at the end of the masonry is to cover it with a hydrophobic compound that protects the surface from condensation of steam and contaminants, or, depending on the design variant, primed and painted with water emulsion. How such partitions look in the interior, you can see in the photos above.
Fences and retaining walls
Where else can the wall be built in half a brick? In modern high-rise construction, there are projects of houses with a frame-brick, or monolithic-brick construction.
So:
- The essence of such projects is that the building's skeleton is erected from reinforced concrete (monolithic or prefabricated), and the brick is used exclusively for erecting enclosing structures - in frame spans that carry no load.
- Of course, the walls in polkirpicha can not keep heat in the premises, so they make them double, and the space between them - the so-called wells, fill with a heater.
- When it comes to multi-storey houses, it can not be overlooked that parquets and side walls on balconies and loggias are also laid out in half a brick. In new houses, builders do this, and in old houses, the owners of the apartments make the masonry themselves.
On a private farmstead, the masonry has half the brick there is a wider application. For example, in the implementation of landscape design on a site with a complex terrain, it can be retaining walls, which do not allow soil to crumble.
This is the construction of economic and other outbuildings: pavilions, a chicken coop, a shed, a fence, a greenhouse, a cellar. The options are very different - it remains only to find out how to put the brickwork properly so that it is firm and lasts long.
How the masonry is made
Over time, everything changes, but the technology of making masonry - and not only in the half-brick, but also any other, has not undergone any fundamental changes. And what can you think of when the thickness of the wall 12 cm allows you to perform masonry only from the spoon rows.
- Only when brick walls are laid with simultaneous lining without ventilating, through each 3-6 rows (depending on the thickness of the main wall), the spoon rows alternate with the bouncing rows that connect the outer and inner versts.
- If, for the purpose of dressing, different kinds anchors, there is no need for tie-rods. However, one can make a beautiful pattern of seams from one of the spoon rows.
- In the standard version of the masonry, the bricks of the next row are displaced half their length relative to the previous one. In the next row, as a result of reverse bias, the vertical seams return to their previous position.

If the front wall or partition is built, which will not be plastered, the masonry can be made with an oblique displacement. In this case, the brick is shifted not half, but only a quarter of the length, and all the time in one direction.
Or the direction may change in the opposite direction, when the vertical row reaches the edge of the masonry. When facing the facade, individual rows can be highlighted with a brick with a different texture or color. In the rest, everything is done traditionally.
What tool is needed
Before you begin to implement the masonry, you need to prepare the necessary tools. It is clear that without such general construction tools as roulette, the level and plummet can not be dispensed with, but you will need a lot more.
So:
- First of all, it is packaging, which mixes the solution, mixer, and trowel (mason's blade). Separate the half of the brick, you can only use a kirochka (hammer mason).
- To control the smoothness of the rows and the thickness of the seams, you need to buy - or do yourself, the order (the bar with the height of rows applied on it).
- Clamps will be needed to fasten the strips.
- Between them pull the mooring - the cord, which will be the main benchmark, ensuring the horizontal nature of the series, and the uniformity of the thickness of the seam throughout its entire length. Just make sure that the cord does not hang. The vertical plane is very convenient to check by rule.
Tools used for brickwork:
If there are corners in the masonry, add a square to the list, and if the doorways - then you need to make a wooden template. To perform the cladding, masons usually use homemade devices that do not allow the solution to go beyond the face of the brick, as cleaning the brick at the end of the work will only be possible with the help of a special tool. In addition to all of the above, you should think about the scaffolding, which will allow you to work at height.
Performance of works
Of course, there is a difference: do you cladding, erect a partition, or build a fence. In each case, there will be some subtleties, so it's impossible to tell in detail about everything and at once. We will talk about those nuances that are common to all cases.
- The first rule says that under any brick wall there must be a strong rigid base. If this is an external finish, then the brick wall must be supported either on the foundation or on the concrete pavement constructed according to all the rules.
- In private houses, based on pile foundations, from the brick erect socle walls. Since in this case there is no masonry support, a shallow trench is digged between the piles, a formwork and a frame are put in, and a concrete strip is poured.
- When it hardens well, a strip is spread on it waterproofing material, and only then begin to lay bricks. The height of such a wall is usually 5-6 rows, and no reinforcement is required.
- The same shallow tape should be made in the case of building a fence, or gazebo. Here, as a rule, columns are placed at a short distance from each other (columns). Spans of masonry are small, so reinforcement is also not required.
- Internal brick walls can be supported by concrete overlapping. But if in the house of overlapping of a beam type, then it is possible to make a layout in the house only with the help of gypsum boards.
- As for the reinforcement of the masonry, then at a height of partitions up to 3 m, and the length of spans of up to 5 m, it is not required to perform it - it is enough that you will be binding the structure along the perimeter.
- However, if you are building a partition and plan, for example, to hang a heavy water heater on it, the longitudinal reinforcement can be made according to the usual scheme - a grid or strip steel in every fourth row.
- The attachment of the partition to adjacent walls and ceilings is carried out with the help of anchors for brickwork. They have, on the one hand, mounted in concrete, and the other end of the anchor is simply embroidered in the horizontal seams of the masonry. As an anchor, you can even use ordinary straight suspensions, which are usually fastened to a skeleton for a suspended ceiling.

All the rest is a matter of technology - once watch the video, and understand how and what to do. Remember only that the reliability of any masonry provides a properly prepared solution.
In construction brick house or other object, brick masonry in half a brick is most often used, which is suitable for the construction of internal partitions, but it does not allow the construction of load-bearing walls with a thickness of ≤ 380 mm according to the regulations of SNiP II-22-81. The document specifies that the minimum thickness of load-bearing walls for brickwork in Group I is limited to a range of 4% -5% of the height of the house or floor. If the height of the house does not exceed 5 meters, then the carrier must be at least 250 mm thick, that is, one brick. The thickness of the masonry in polkirpicha is 120 mm, which is not enough to withstand the weight load at home. Therefore, in order to save materials in regions with a warm climate, builders are cunning: the load-bearing wall in half-brick is laid out with a perpendicular dressing, which, taking into account the thickness of the dissolution layer, 8-10 mm allows to achieve standards for the thickness of the bearing wall of 250 mm.
Such a wall easily withstands loads from the weight of a low-rise building, and internal walls and the partitions are raised with ordinary masonry in half a brick with a wall thickness of 120 mm. The main load does not take such a wall, but it easily withstands the weight of objects of decor, furniture and household appliances. In addition, brick laying in this scheme is much stronger than gypsum plasterboard or wooden partitions, and the use of only a brick and mortar is the saving of the family budget, as the brick and mortar consumes half as much as brickwork, 1.5 and 2 bricks, and an undeniable saving in comparison with the consumption of materials for partitions from other building materials.
Building and lining the walls in half a brick
The main advantage, which reveals the brick laying - there is no need to strengthen the base of the floor, even the wooden one. The very process of laying is based on raising the walls in such a way that the front side of the wall consisted of the spoon surfaces of the brick. The spoon is the long side of the brick, the pin is the short side, the bed is the wide upper and lower surface of the product.
Masonry in polkirpicha is carried out in a single row, in checkerboard order, on a cement-sand mortar. Vertical mortar joints between bricks should not line up in one line, so as not to reduce the strength of masonry and walls. Without a plaster layer the thickness of the wall will be 120 mm. The bearing capacity of such a wall is small, but if there is a need to use the wall in half-brick as a carrier (for example, to support rafter systems or interfloor overlap), preliminary examination and permission from architectural regional or city services is necessary. The standard weight limit for such walls is up to 130 kg.
For lining the masonry in polkirpicha with bearing wall, the abutment is laid out in such a way that the end surface of the supporting wall is tipped, and the inner one - spoonful. The number of three-quarter bricks is calculated based on the thickness of the bearing wall. The adjoining series are laid out through one. If the thickness of the load-bearing wall is one and a half or two bricks, with the first row adjoined according to the "spoon-poke" scheme, the next row is laid in the "poke-spoon" scheme, etc.
Where else can you apply the masonry in half of the brick:
- As fencing.
- As interroom curtain walls with good noise suppression parameters and the possibility decorative finishes any materials.
- In the construction of economic objects - sheds, verandas, pavilions, garages.
- In the construction of limiting structures: the prevention of landslides on the site, the disengagement of the land plot, etc. In the process of construction of external fences, it should be borne in mind that the wind load of brick walls, whose thickness is 12 cm, a height of 1.5 m and a length of ≥ 2 m is not more than 350 kg.
Preparation for masonry process
A wall layout and the order of installation are drawn up, with all necessary dimensions and with reference to the plan of the room or house. Based on the scheme, the number of building materials - mortar and brick is calculated. Practice shows that for 1 m2 of a brick wall you will need 61 units of standard products, or 45 units of one and a half. The scheme also involves drawing the stacking taking into account the thickness of the mortar joints.
When building a wall inside the house, the surface of the floor and ceiling on the site of the future partition is leveled: planing for wooden floors and pouring mortar for concrete surfaces.
If the wall is erected outside, then under it a shallow foundation is needed, which is laid down as follows:
- A trench with a width of ≈ 300-400 mm and a depth of ≈ 500-600 mm is dug, the bottom is covered with a sand cushion, the thickness of which should be at least 100 mm. The sand is moistened and tamped.
- Mounted board or metal panel formwork.
- The moat is poured with concrete solution (sand - 3 parts, crushed stone - 3 parts, cement - 1 part) without reinforcement.
- After four weeks of hardening and drying of the concrete, the formwork is removed.
- Brick on the foundation foundation should be laid out so that the long axis of the foundation is aligned with the axis of the wall.
Then, tools and building materials for masonry are prepared:
- Concrete mixer or tank for cement-sand mortar.
- Building mixer, putty knives and trowels, furnace hammer for splitting brick, rule.
- Building level, plumb line, cord, metal square, jointing device for seams.
- The cement, sand, bricks are prepared.
How to lay the wall in half a brick
The sand must be clean - river or sifted. Cement for masonry in half of the brick must be used not lower than grade M 500. All the bricks must be impregnated with water, laying them in a tank and completely filling them. Time in water - not less than an hour. The wet brick will not take moisture out of the solution, which will allow the cement to set evenly, ensuring the design strength of the wall.
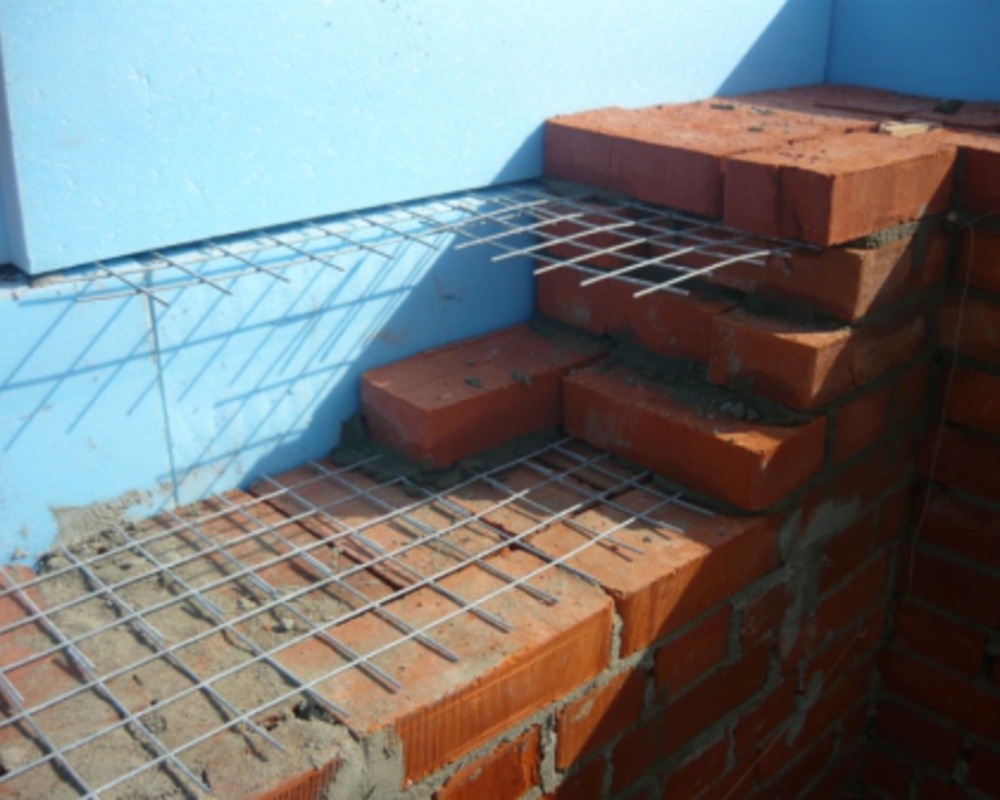
Beginning of laying: the first ones are the corner supports. On the first brick row the second one is laid, and the process continues to the upper row after the reinforcing wire mesh. The angular masonry has a height of 5 bricks laid in such a way that the guide brick overlaps (tie) each other at an angle of 900. Each row must be checked for verticality and horizontality with a level. Bricks are pressed into the solution only at the center of the product to prevent displacement to the sides.
After laying the brick to the first layer of the armopoyas along the first row, a cord is laid to control the laying. An even layer on the entire row is applied mortar and bricks are laid. After the third row, the evenness of the wall is checked. After stacking each subsequent row, the cord is raised to the height of the brick. To ensure the required strength, after the fifth row it is recommended to make a two-three-hour break in work to give the solution to grasp. To quickly build a wall, it is allowed to use double brick of the brand M 150 of high strength, which has the size: 120 x 138 x 250 mm.
Since the double brick is large, it makes sense to give the brickwork greater strength by using a more frequent grid reinforcement. On sale there are ready-made grids with a rectangular or zigzag profile, but you can make a stack and with your own hands. Rectangular felt must be laid horizontally every five rows. Grid with a zigzag profile is laid in the attached places of the masonry, its rods are connected by welding or knitting wire. When carrying out the reinforcement, the mesh is laid so that the ends of the rods protrude 5 mm beyond the wall. This is necessary to control the presence of reinforcement. After the solution has hardened, these protruding ends can be cut or bent.