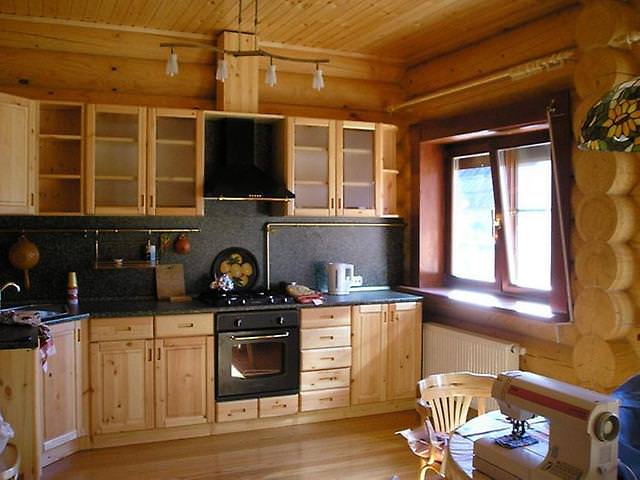
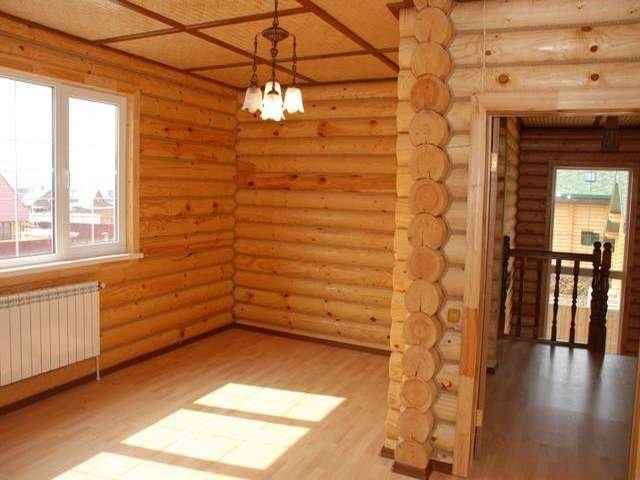
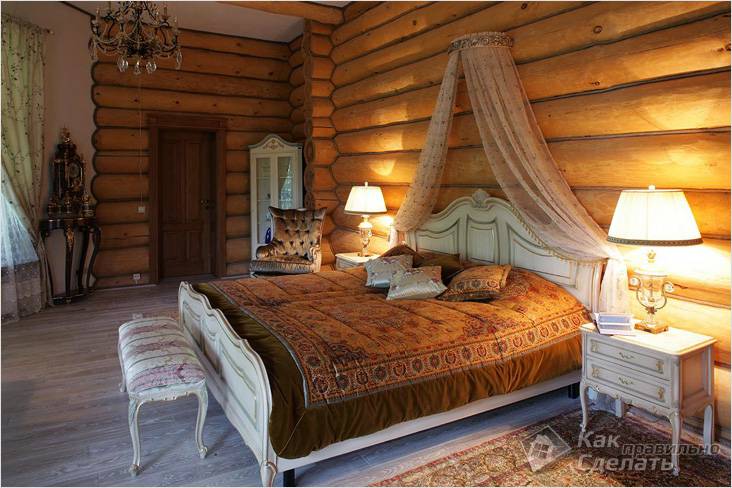
A country house made of rounded logs has not lost its popularity to date and just like a few hundred years ago it remains a favorite kind of home. Such houses are attracted by their unusual aristocratic appearance: inside you want to live, because wood conveys incomparable sensations of warmth and comfort.
Internal furnish of the house from logs
Finishing works are considered the final stage of construction. Interior finish It's easy to make rooms with your own hands: it's enough to know how to do it. Decoration of houses from a log inside will not cause special difficulties in work, after all it is not necessary to mask or decorate such walls or ceiling, they look very noble and aesthetic. The main task of finishing is to emphasize the natural beauty and attractiveness of logs.
![]()
Let's start with some features of the finishing works, which you need to know, so that the log house has served for many years:
- At the end of the full erection of the house do not rush to finish the walls or other surfaces. Finishing will not be of high quality, if you start it earlier than 1 year after the construction of the log house. The house should get stronger on the spot and settle. Only after this, the process of finishing works will be expedient. The installation of windows and doors is also delayed for 1 year after the erection.
- During the finishing works special attention should be paid to thermal insulation, including in the interstorey space, in the floors and on the roof. Do not forget about the vapor barrier. Otherwise, constant dampness, the appearance of mold and fungus inside the logs are unavoidable.
- If the house is built of natural materials, then for the finishing it is necessary to select natural coverings. Natural materials are best combined with each other.
- Many experts are strongly advised not to mask the log surface under the drywall. A country house brings you closer to nature. You did not build it from a tree in order to get another apartment in the woods?
How to trim a log house from the inside
Than to finish log house from within
Typical stages of finishing work are:
- Preparatory work that allows you to process the tree from external influences and mechanical damage, and also prepare the surface for the finish coat.
- Painting or covering the walls, ceiling and floors.
We draw attention to the fact that painting walls and treating them with absorbent protective substances is the most applicable method of wall finishing and less expensive. In addition, the tree is a beautiful material by nature, why should it be seriously trimmed? However, the lining of the log is used to ensure that the walls, both inside and out, do not seem to be exactly the same. It is best to make the lining of natural materials. If you disguise the beams under the drywall, it is possible to paste textured warm wallpaper. Probably, this way of finishing should not be done throughout the room, but only fragmentarily, in order to focus attention on certain areas.
Finishing materials
The first thing after shrinking logs is to protect the house from pests and from a fire. For this, the wood is treated with special varnishes and antiseptics. Followed by this follows the finish.
Before you begin to finish, it is necessary to plow all the existing gaps between the beams. The process is carried out by clogging holes with linen thread and moss. For a better effect, you can apply a concrete solution.
What materials can you decorate the room
Finishing lumber lining
What are the advantages of lining?
- environmentally friendly material;
- beautifully combined with any other surfaces, can be used in any room or throughout the total area;
- creates an incredible atmosphere in the house combined with a stone;
- ensuring durability and practical repair.
To fix the lining on the cobbled walls, it is necessary to build a lath, on which later the lining sheets are fastened. In the interval between the finishing material and the wall, it is recommended to create a thermal insulation.
We have already talked about the appointment and use of drywall in a log house, but we will repeat the advantages of using it:
- moisture resistant and protects from fire;
- excellent material for the erection of arches, structures of ceiling structures and erection of interior partitions;
- practicality and durability of the material allow you to save repairs for many years;
- easy to install;
- the material is strong enough, although it is mechanically damaged;
- the use of gypsum cardboard as a base facilitates the process of applying wallpaper or applying decorative plaster.
In order to erect plasterboard walls or partitions, it is necessary to pre-prepare a metal frame, which is a crate.
Subsequently, they are applied to drywall sheets and fastened with self-tapping screws. After their installation on the walls, you can apply additional finishing material, pre-primed surface.
Siding or plastic panels
Among the advantages of using wooden house plastic panels:
- very budgetary stuff;
- water resistant;
- is practical;
- from the panels dirt is easily removed;
- easy to install.
Installation begins with a battens, on which panels are subsequently attached. It will be useful to use the sealant, since it will be necessary to handle the joints.
Interior decoration of the house from the logs step by step
The rule of finishing works inside wooden house simply: work is carried out from the top down. Thus, the ceiling is first trimmed. After completing the finishing of the ceiling structures, you should begin to process the wall surfaces, and then the floor.
Preparatory stage
Wood coating should be prepared for any kind of finish. Finishing includes the following:
- Cleaning of wood from dirt and dust.
- Grinding to get a smoother and smoother surface. The main tool by which surfaces are grinded is the Bulgarian. Sandpaper will help you.
- Varnishing of wood for protection from pests and external influences. For these works, antiseptic solutions are used. Wood is desirable to remain in light natural tones.
- The surface of walls, ceiling and floor is treated with flame retardant. Fireproof strengthening of the tree will not be superfluous.
When finishing the floor, you should also choose natural materials, for example, parquet, cork coverings or boards.
Installation of communications
Communication in the house must be removed from public view. Therefore, the sewerage, heating system and water supply must be carried out before the beginning of the finishing works, so that they can be properly concealed or disguised.
An important emphasis is on electrical wiring. In a wooden house to conduct electricity competently is especially important.
In a wooden house to conduct electricity competently is particularly important
Finishing the ceiling
For the ceiling in the wooden house the most harmonious material is natural. It is chosen by successful designers and customers. The ceiling is fixed with solid boards. It is possible to use exposed beams as a wooden ceiling. The third option can serve as an unfinished wooden ceiling, which should only be varnished.
Materials for finishing the ceiling can also serve as: lining, veneer or wooden panels. Inexpensive and simple option will be white drywall. In the skeletons before the finish coating the ceilings are insulated.
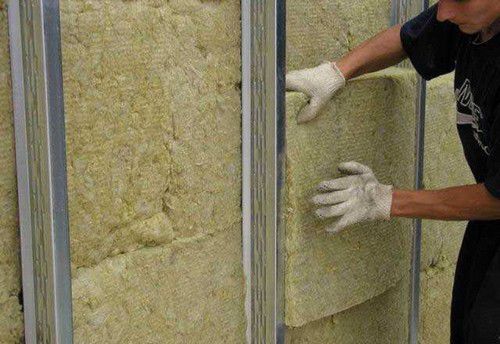
Materials for finishing the wall surface can be different: from wood veneering to plastic panels. An important point in the installation of the coating is the installation of the crate. Insulating materials are placed in the frame profiles (for example, stone wool).
If you want to paste colorful wallpaper or paint the walls in unusual colors - there is a way out if the log walls are covered with plasterboard. With the help of this material, it is possible to build arches, niches, complex structures, including on the ceiling.
Finishing the floor
To the house was warm at any time of the year and in any weather, especially carefully it is necessary to conduct heat and waterproofing of the floor covering.
The floor in the log house is placed on the beams already prepared during the construction phase. All of them are treated with antiseptic solutions. Held roughing floor, which can serve as ordinary boards or plywood. Finish coating can be natural materials. If you are worried about the humidity in the room, you can avoid the wooden covering by first making a screed and applying ceramic tiles on the rough floor.
Wood is an aesthetic material that looks expensive and aristocratic. Do not spoil it with plastic or other artificial materials. The main purpose of the finish is to only emphasize the aesthetics and natural beauty of the wood, to preserve the original appearance of the material for many years, and also to create a tangible atmosphere of warmth and comfort.
Log houses are also in demand today, despite the appearance of new building materials. The fact is that the tree perfectly preserves heat and regulates the humidity in the room, while the wooden houses are environmentally friendly. But it happens that with the onset of winter, the owners of log houses face the freezing of the walls. Consider how to properly warm the house from the log outside and inside with your own hands and show detailed video instructions at the end of the article.
It happens that with the onset of cold weather owners country houses collide with drafts. Old houses from logs often require serious measures to insulate the walls and, first of all, you should do caulking of the log house. That raises the question of how to independently carry out the warming of the log house, which ones to use for walls are best in work.
Is it necessary to insulate the house from logs
Owners of houses from the chopped and rounded logs, as well as owners of brick private houses, collide with drafts. Without due, the floor will blow on the legs, and the house will quickly cool down if in the winter suddenly turn off gas or electricity. The conclusion from this is simple - a log house should be properly insulated, and the work should begin with the underground.
Insufficient thickness logs log house - the main reason for the cold in the house in the winter. For a moderate climate with low humidity, there will be enough logs of 200 - 250 mm, for regions with cold winters, logs with a diameter of 400 mm should be used. Consider in the next chapter what thermal insulation materials are best used for the log, if a private house already built, but no proper comfort.
To delay heat in an apartment building, it is necessary to insulate the house from the rounded log. To do this, it is necessary to warm the roof of the house, process and trim the outer walls, trim the slopes of windows and the entrance door, etc. Make sure that columnar foundation and the basement of the house is qualitatively insulated, it is also necessary to make heating in a private house more efficient.
Materials for warming the log house
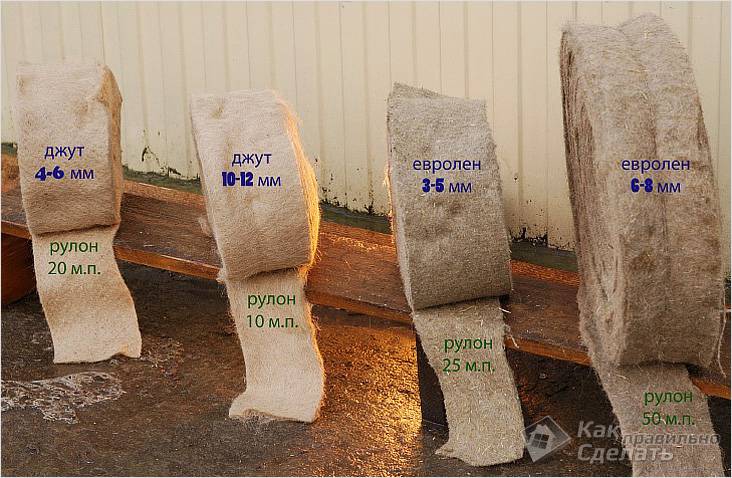
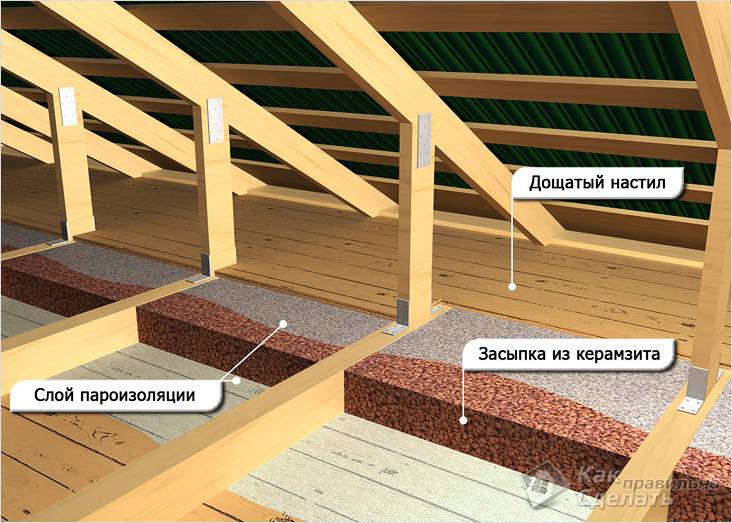
For wood it is better to use natural insulation - in the attic it is possible to lay claydite or sawdust mixed with the ground. Crested logs are produced with moss or jute - a linen insulation. Pakluk use undesirable, because the material quickly absorbs moisture. To fill the floor or basement you can use expanded clay, you can make a warm floor by laying the plates of extruded polystyrene foam.
If the standard procedures are not enough and the house is cool, then you can not do without additional warming of the walls of the log house. Thermal insulation material must be vapor-permeable (quickly give off excess moisture, which it absorbed from warm air). If the thermal insulation of the building is made from the outside, the material must be moisture resistant, environmentally friendly and fireproof.
How to insulate the house from logs outside
It is desirable to protect the house from the cold from the street. Thus, you protect the walls of the house from freezing, and when a ventilated facade is installed, the moist air will freely leave the wooden structures and thermal insulation and be eroded through the ventilation gap. If the house has just been built, then it is necessary to proceed to the insulation only when the frame sits down. Otherwise, all the structures may be damaged.
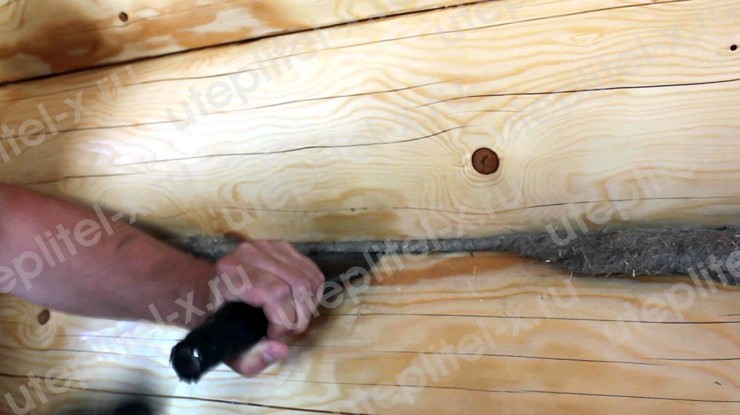
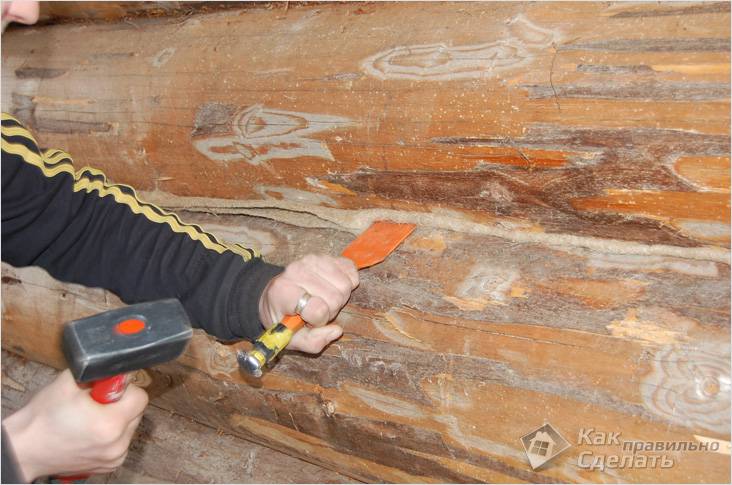
Cauliflower log house
Before the insulation of the log house, it is necessary to carefully wall the walls with moss or jute. These materials are able to quickly release into the environment all the accumulated moisture. Do all work should be done only in dry and warm weather. The interventure heater is pushed between the logs by a special spatula and is rammed until the material enters. Logs can also be treated with an antiseptic.
Ventilated facade device
Warming of the log is best done using the technology of a ventilated facade. This design will allow the log house to "breathe" and release excess moisture into the atmosphere. To visually see the entire process of installing a ventilated facade using siding, we added a video instruction from a Russian manufacturer of basalt heat insulation. Here are the main stages of warming the facade of a wooden house:
1. log-wedge and treatment of walls with antiseptic;
2. installation of the battens in steps equal to the width of the insulation;
3. laying of thermal insulation on the facade between the guides;
4. installation of a windproof film over the entire structure;
5. Padding for the ventilation grill and installation of the siding.
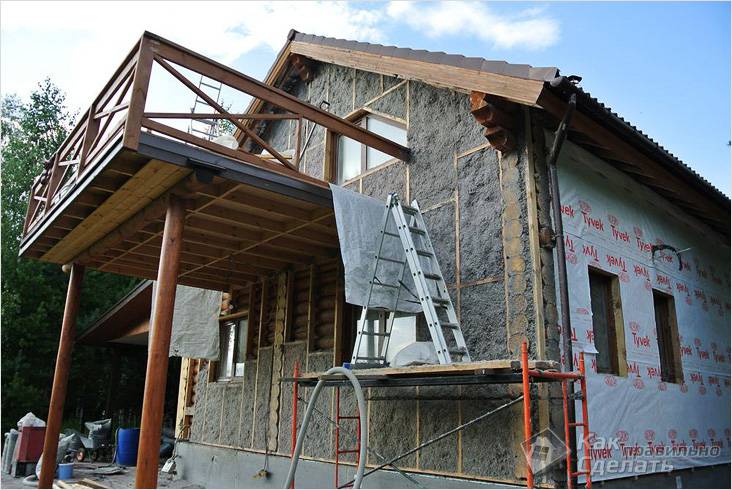
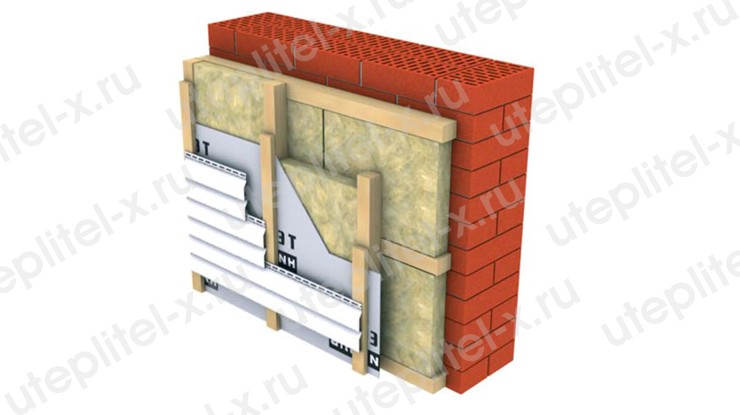 Warming the facade of the house with mineral wool under siding
 Windproof film and vapor barrier will protect the insulation from getting wet, but it will freely let the moisture out of the layer of insulation to the outside. For a better ventilation between the vapor barrier and the external cladding of the facade, leave a ventilation gap of 20-30 mm. Bottom and top should be arranged in the air, so that a stream of air penetrates underneath the skin and takes excess moisture from the surface of the film.
How to insulate the house from logs from the inside
This option should be used only in extreme cases. Builders are against the fact that the heater is mounted from the inside of the room. When the walls are insulated from the inside, you may encounter the problem of condensation and mold formation between the wall and the layer of thermal insulation. Inside the house there will be more than enough standard measures for floor insulation on the first floor, attic floor and slopes of windows.
Warming of the floor in a log house
To make the floor on the first floor warm, you need to lay between the lagged basalt insulation or pour keramzit. On the logs a rough floor of planks is laid, on which a linoleum or laminate is laid. If this is not enough, then you should make a blind area at home. It is not superfluous to make independent insulation of the base of the house with foam or thermopanels.
Warming of the attic in a log house
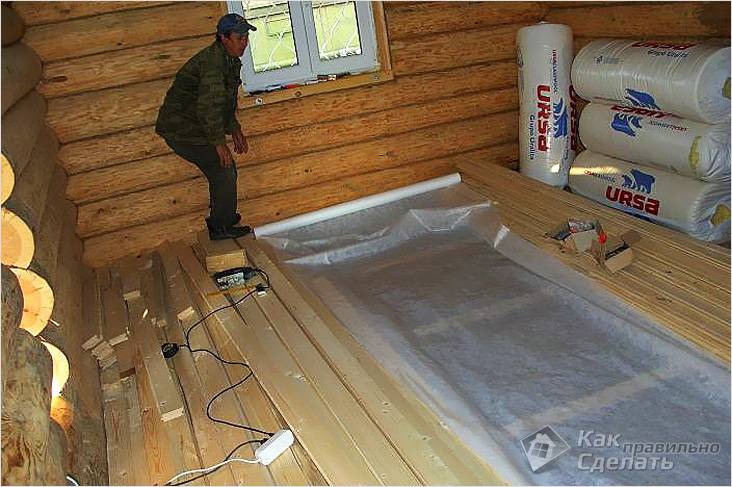
If you decide not to equip the attic, but simply to insulate attic floor, then to begin with it is necessary to lay a waterproofing film, and on top to lay a heater with a layer not less than 250 mm. If an attic is equipped in a private house, you need to insulate the roof with mineral wool with your own hands. Overlapping between floors should also be insulated with mineral wool to improve the sound insulation of rooms and premises.
Insulation of walls inside the house from a log house
Stacking insulation on the walls of the house from the side warm room It is not worth it, it's better to puncture the cracks between the logs and
The warmest and most ecological houses are wooden constructions, namely log houses. As you know, the tree conserves and stores heat well, so the walls of the house are also endowed with these important properties. There are many statements that the thermal conductivity of a wooden wall, whose thickness is only 24 cm, is equal to the thermal conductivity brick wall with a thickness of about 1 m. And it's really impressive. Nevertheless, it happens that during operation you notice that in winter your home is not as warm as you would like, and sometimes there are even drafts. In this case, you need to think about how to warm your home and remove all the bridges of cold so that the heat is stored inside, and the house was well insulated. It can be said that in the harsh regions each room needs to be insulated. Therefore, further we will consider with you how to insulate the log house, what exactly it is necessary to insulate, what materials are better for this purpose, and also we will in detail consider the stages of the performance of works on insulation.
Why is it cold in a log house?
Before you start to fight the cold, you need to determine its source. Although the tree is warm enough and accumulating material, it can be cold in such a house in winter. Why? Owners of log buildings often face such problems:
- Frequent drafts in the rooms.
- Cold in the legs due to the wind blowing in the legs.
- After switching off the heating system, the house starts to cool quickly.
- Cold walls.
There are a few more nuances that we will not mention. Yet this is enough to reflect on the urgent warming of the house. Let's look at what happens in the house when it is heated. For example, you have a log house that you heat with any heat source, be it gas heating or electrical. Heat exchange of the house involves:
- source of heat;
- air in the room;
- ceilings;
- walls;
How does everything work? From the school course of physics, we know that air, heated by a heat source, begins to rise up to the ceiling. When it rests against its surface, heat transfer takes place, at which air is cooled. What is the result? The most heated and warm part of the house is the ceiling. Now the air is directed to the walls, going down on their surface. Note that the walls are much colder than the ceiling due to the external influence of frost, so the air starts to cool faster, increasing its speed. Then the flow of air is directed to the floor, while gaining sufficient acceleration, moves along its surface with such speed that it seems to you that a draft is blowing on the legs, that there are no walls at all. Moreover, if a heat source such as portable radiator or a fireplace, set directly next to the inner walls, as often do, then the speed of the flow will increase even more. So it turns out that the rooms have a constant draft, which is caused by the owners themselves.
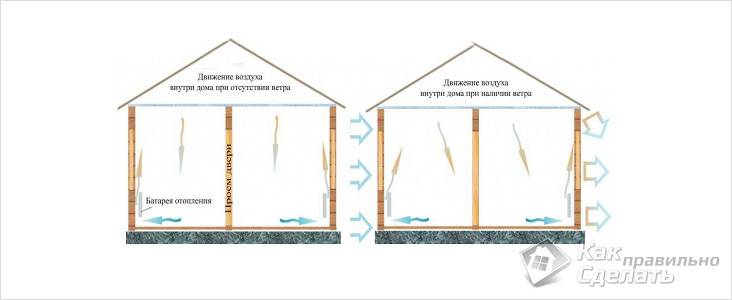
To avoid this, special construction norms have been created, according to which the heating radiators should be placed under the windows. It is clear that the cold walls themselves are the outer walls, while the walls inside are quite satisfactory. It turns out that with the location of the heat source under the battery, warm air prevents the penetration of the cold, and as it rises and falls on the walls, it will not cool so quickly and move quickly. Why? The flow of air will descend down the inner walls, which are much warmer, and when it falls external wall, he will face back with a heat source that will heat it, repeating the whole cycle. In this situation, the following is obtained: the house warms up much more quickly, and the whole structure keeps heat better, because it does not waste, but accumulates.
But this is not the only reason that the house can be cold. Often, heat losses occur because of poor-quality thermal insulation and cold bridges. To eliminate heat loss, you need to check:
- Ceiling. The first thing to check is it, because it is through the ceiling that up to 70% of all heat. It is important for you to detain the heat in the house and to insulate the loft or attic.
- Walls. All the external walls and elements in them, such as windows and doors, account for the lion's share of the loss of heat. Incorrectly installed doors or windows - this is the first reason why the house can be cold. The warm air will simply leave the room, and the cold will fill it. It will be very difficult to heat the room. Moreover, the cracks in the walls also lead to this effect.
- Floor. This is the last source of cold in your home. He must be sound and warm. In winter, the ventilation of the sub-floor should be reduced.
Requirements for insulation materials
Thanks to the warming of the house, you can reduce heat loss, while the cost of heating the room will be significantly reduced. This will make your living in the house much more comfortable. We suggest to remember to you, what and how our loggias were warmed by our grandfathers and great-grandfathers. In their arsenal were various materials, allowing to warm the walls of the building. It was also the so-called "mud hut", consisting of straw mixed with clay, as well as shingles of wood, which were plastered walls. Such a simple method helped the residents to solve the draft problem, moreover, the walls could still "breathe". It is worth noting that this did not spoil the appearance of the building, it seemed more well-groomed and neat.
But, as time goes on, the construction industry is developing, and the application of such grandfather methods is no longer relevant. Today we have a lot of insulation materials, which are much more effective, and it's much easier to work with them. Therefore, before dealing with warming, you need to familiarize yourself with the properties that such materials should possess. This will help to insulate your house correctly and 100% efficiently. What are the qualities of a thermal insulation material? These are the main properties:
- good vapor permeability. It is important that it be the same as that of wood;
- high resistance to moisture. As you know, wood and moisture are incompatible, so the insulation should not accumulate condensate, so that the tree does not rot;
- the material must breathe, easily passing air;
- high fire resistance to protect the house from fire;
- it should closely adjoin to the rounded structure of the wall and fill the cracks.
Given all these recommendations, you can choose the heater, which will perform its functions qualitatively. But the question arises, what to insulate the log house? Now we will consider the ideal options for warming the house of wood.
What to use
As mentioned earlier, the whole process of insulation is reduced to the warmth of the attic or ceiling, the caulking of the walls, the insulation of the door and window frames and the floor. If you perform all these procedures correctly, additional work not required.
It is worth noting that most often the reason for building a house from a tree is that it is a natural and environmentally friendly material, so it's silly to talk about using polystyrene for its insulation, because then all the meaning will be lost. Moreover, it does not suit its properties with those that are recommended. What then to use?
- sawdust;
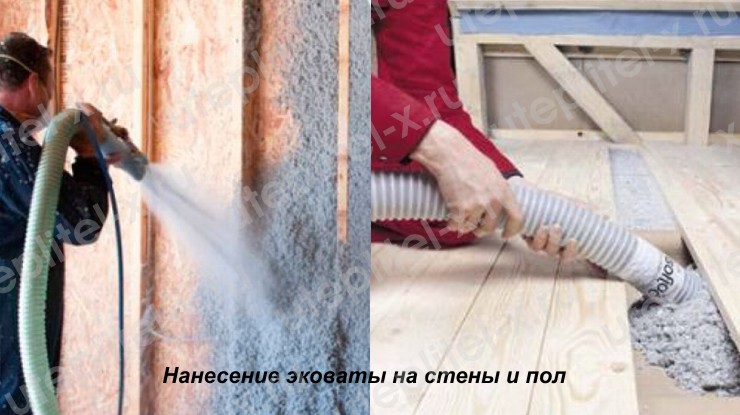
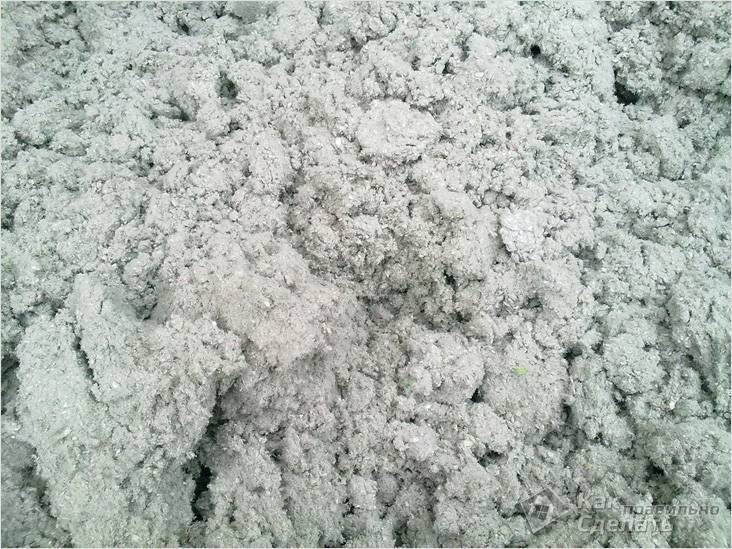
- cellulose cotton wool (eco-wool);
- straw;
- seaweed;
- mineral wool.
If we talk about the caulking of walls, then it must be done only from natural materials:
- tow;
- hemp;
- jute;
- heaters based on jute and flax.
The main requirement for materials is the similarity of their properties with the properties of wood.
To insulate the wooden floor on the logs, use roll mineral wool or natural backfilling materials. And as for the floor of concrete, it requires more dense material. It can be:
- bung;
- basalt wool in slabs, whose density should exceed 160 kg / m 3;
- expanded polystyrene;
- expanded polystyrene, extruded.
It happens that even after performing all these basic procedures in the room can be cold. Why and what do I do? The reason may be that even during the construction, the thickness of the logs was incorrectly chosen. Do not also exclude the fact that the house is already old or incorrectly calculated the heating. In any case, you will have to warm the walls. Considering all the requirements for the insulation of the house, for the insulation of the walls from outside you can use:
- Ecowool.
- Sawdust or sawdust-granules (filling material).
- Mineral cotton wool.
- Expanded clay (zasypnoy).
Wood is not easy construction material, because it is not only able to "breathe", but is also considered a kind of air recuperator. When air gets into the thickness of the tree across the fibers, then it is distributed along these fibers, leaving through the butt. It turns out that the tree "breathes" through the ends. That's why for such "living" walls you can not use:
- Styrofoam.
- Polyurethane foam.
- Extruded polystyrene foam.
- Mounting foam to remove cracks.
- Various sealants.
If you disregard this advice, such vapor-proof materials will contribute to the fact that during the operation the tree will simply rot. And if you protect the wood from the inside with a vapor-proof film, then the whole chopped house will turn into a thermos.
Ceiling
To begin with, it is important to do everything to insulate your house from the inside. We found out that the lion's share of all the heat flows through the ceiling, so the first thing to start warming the house is with it. Many are not entirely responsive to this event, and do not always want to insulate the ceiling. Nevertheless, it is undeniable that warm air always rises, and if the top is not insulated, it (the air) will simply go out into the street. Believe me, all the money spent for insulation will be fully paid off, since you will save considerably on heating.
So, what do you need to insulate the ceiling? These are the following tools:
- a hammer;
- hacksaw;
- electric jig saw;
- screwdriver;
- tile adhesive.
In order to build a shell and frame, prepare:
- nails or screws;
- glue;
- edged board;
- mounting foam;
- drywall.

As for the material for insulation, it is better to use eco-wool or mineral wool. If we talk about mineral wool, then this is a relatively inexpensive material that differs in its positive qualities. Mineral wool does not burn, is tear-resistant, has soundproofing properties and is easy to work with, so even a beginner will be able to perform the installation himself, without outside help. And to ensure good waterproofing, we recommend using parchment.
Prepare all necessary tools and materials, you can start working. The whole process can be divided into the following stages:
- The first thing to do is make a framework of edging. Please note that this will affect the height of the ceilings. Those who are high, it will even benefit. The boards should be fastened in steps of not more than 1 m from each other.
- To ensure a good waterproofing, the space between the boards must be filled with pergamete so as not to leave empty spaces. The material should adhere well, for this, slightly grease it with a tile adhesive.
- Now lay mineral wool on top of the parchment. Make sure that the heater is well attached to each other, leaving no gaps and holes. In the event that the mineral wool does not want to hold, apply a small amount of tile adhesive to it.
- After the entire ceiling is insulated, it must be gypsum plasterboarded to give a complete look. With the help of screws and screwdrivers, drywall sheets are screwed to the frame.
That's all, your ceiling is insulated. It remains only to trim the ceiling and make the cladding. Now the precious heat will remain in your room, which will reduce your heating bills.
To work on the insulation did not go to waste and were performed correctly, it is important to perform them in a warm period. Moreover, it is impossible to carry out the warming of the log house immediately after its construction. The building needs about a year to shrink. Given this, work should be carried out not earlier than 1 year after its erection.
You can not do without warming the roof, so if you have an attic, it should also be insulated.
Walls
When you decide to insulate and walls inside the house, you need to consider that the walls will form condensation. Especially it will be a problem for those who live in northern places, where winters are very cold. Condensation arises from a sharp temperature drop: outside the house is very cold, and inside - heat. So it turns out that the dew point will move to the layer of insulation. But this is not a problem, as everything can be fixed with a simple vapor barrier film, which is often used with a heater. Another option is to perform good ventilation.
To perform the work you will need:
- roulette;
- plumb bob;
- screwdriver;
- level;
- chisel;
- hammer drill;
- electric jig saw;
- mallet;
- a hammer;
- dowels and screws;
- screwdriver;
- felt, tow or foam;
- wooden beams;
- insulation, plasterboard and putty.
As a heater for walls, we recommend using ecowool (mineral wool can also be used instead). The advantage of the material is that it fills in the walls all the cracks and voids, preventing them from blowing. It is worth noting that the moisture does not penetrate inside, so the fungus is not terrible to you. Among other things, it's a breathable material.
Now let's start the technology of warming the walls.
- If there are crevices or hollows in the wall, they should be sealed with a mounting foam, a stick or linen felt. Choose what you like and with what it is easier to work with.
- From a wooden beam make a crate. Mark the place where the edge elements of the crate will be installed. Pay special attention to this work, since the fixation of subsequent elements will depend on the correct installation of the first bars. That's why you need to use plumb bows and a level.
- If you locate the first beam, you need to fix it with dowels and screws. To secure the cantilever securely against the wall, fasten it in steps of 25-30 cm.
- Place the following bars indented 1 m from the previous, parallel to it. Thus, you will make a frame around the perimeter of the wall. When there is a window opening on the way, it needs to be lined with bars in a circle.
- Now you need to mount the intermediate bars. Over the first vertical bars, screw in the intermediate, which will be in a horizontal position. Your wall should be divided into squares. To prevent fungus and decay, treat the tree with an antiseptic.
- Your crate is ready, it remains to lay a layer of insulation between the beams. In this case, you do not need to use glue. Ecowool will keep well between the wall and the crate, the main thing is to densely place it.
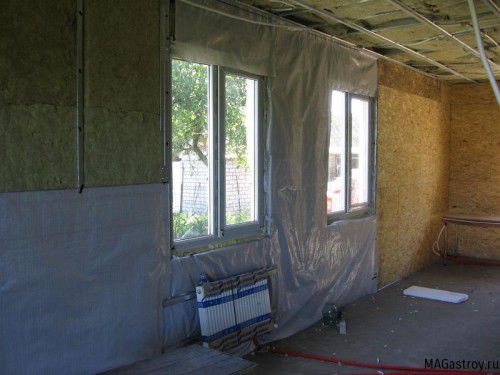
- At this stage, you should make a vapor barrier using polyethylene film. It is laid on top of the heater with a slight overlap of 5-10 cm.
- And in the end you need to finish. Walls plastered with plasterboard , fastening it to the crate. Plates must fit closely together. All slots required to putty.
Floor
The last thing to insulate in your log house is the floor. To work, you need tools and materials:
- a hammer;
- electric jig saw;
- saw or hacksaw;
- knife, pencil and nails;
- roulette and level;
- insulation material (mineral wool).
When you have a concrete floor in your house, it's just necessary to insulate it. The work, of course, is not easy, but following the instructions, having spent a little time and effort, you can do it.
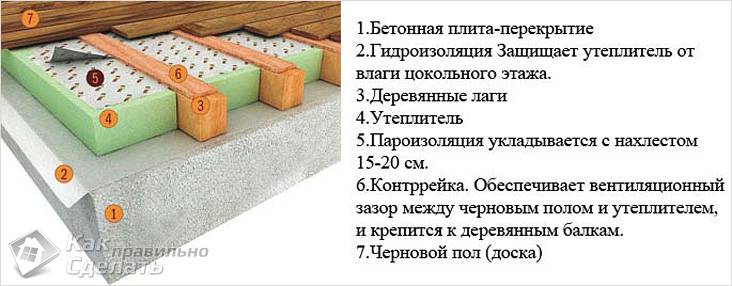
One of the methods of floor insulation is called "raised floor". The work boils down to raising the floor by 6 cm and warming it. The stages of work are as follows:
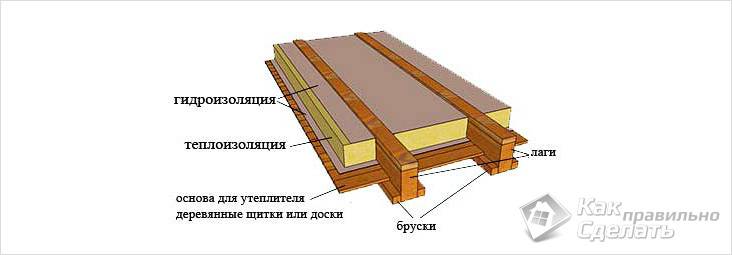
- The concrete covering should be leveled and various defects eliminated.
- On the concrete surface, lay a waterproofing membrane, which will not pass moisture to the heater.
- Now you need to lay the lags out of the beams. The distance between them should not exceed 50 cm. The recommended size of the log is 50 × 100 mm, with a thickness of at least 50 mm. It is not necessary to apply logs more than 30 cm to the wall. It turns out, your sex should be divided into equal lines from the bars, which serve as a lag.
- In the intervals between the lags, lay mineral wool. Again, densely fill the empty space, so as not to leave omissions.
- On the heater, place the PVC membrane.
- It remains only to lay the flooring, and your insulated floor is ready. As a material it is good to use particleboard or waterproof plywood.
That's all, your house is well insulated from the inside, and you can enjoy a comfortable stay in a warm room. As you can see, there is nothing complicated, but what a result. But, besides all this, you can warm your home from the outside. How to do it? Let's find out.
Wall caulk
Konopatka is one of the most important events that every owner of a log house must fulfill. Thanks to this you can repair all the cracks, and cold air will not penetrate the house. This is the process in which the frame is sealed with fibrous materials. All work needs to be done in warm and dry weather. What do I need to do?
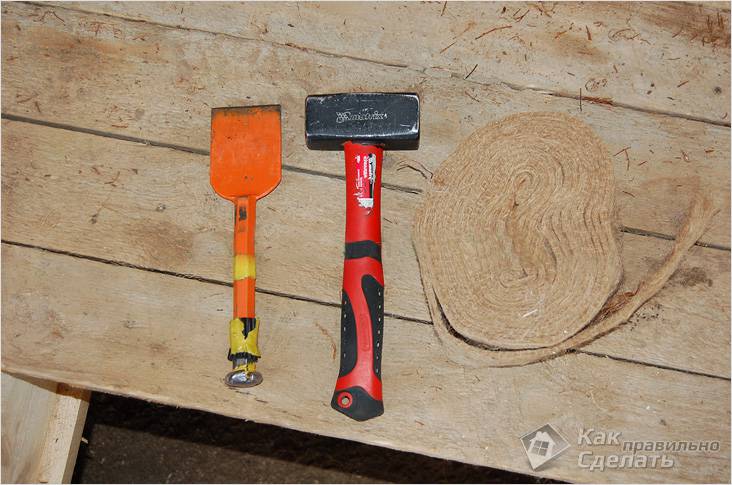
For work you need to prepare:
- a hammer;
- scissors;
- a chisel;
- caulking spatula;
- mallet.
Work on caulking should be carried out in the first place, even before any stages of warming. In addition, the caulk can only be performed after the shrinkage of the building. All work begins with the lower wreaths and as you need to move up. It is important to caulk the seams both from the outside and from the inside, and you can not completely process one wall, then the second. Everything should be even and go around the perimeter, otherwise the building may become warped.
For example, let's consider konopatku ribbon insulation or jute. It can be called the simplest. Cutting the ribbon is unnecessary, which facilitates all work. So, the work process is as follows:
- Begin with the first lower crown. Put the end of the tape on the ground and unwind it, gradually moving to the other end. Cut the tape is not necessary, the main thing - to ensure that it goes by a strip and does not roll over. Please note that the material should not be strongly stretched.
- Approach the beginning of the tape, lift it and from the end start to push it between the crowns. Once you have pierced the first crown to the opposite end, cut off the tape with a margin of 10-20 cm. Use a well ground scissors.
- Now everything can be reliably pinched using a hammer and caulk. Do this gradually so that no creases appear. In one stage, everything can not be done, so push it inside until it disappears in the log. Push the tape at a small angle, as if on a diagonal.
- Strangely enough, everything needs to be repeated again, between the same logs. There may be another 1 or 2 tapes, depending on the slots and the density of the tape. It turns out that the konopatkuy leaves more material than the original insulation of the crowns, and note that this is only outside. You need to repeat the whole procedure inside and move up the perimeter all the way.
It's quite a scrupulous and long work, but having made it, you will compact your design, and the air will not walk inside the room.
How to caulk frame, you can see in the video:
Warming of windows and doors
This is another important step in the warming of the house from the outside, without which you can not do without. You will be pleased with the fact that it will be very easy to seal all the cracks and holes in the window and door frames. For work you only need an aluminum ruler and a mounting foam, which you need to blow out all the cracks.
The first thing you need to determine the tightness of windows and doors. Aluminum ruler can be determined by slots, poking it into different parts near the window frame. In those places where she freely walks, cold air enters the house. All such cracks should be blown with a mounting foam. Under the same scheme, check the door frames and take all necessary measures.
When you find the slots under the windowsill, you need to eliminate them both from the outside and from the inside. In windy weather, just take a candle or matches and pass near the window sill. You can see the swelling by the flame. Eliminate all cracks with mounting foam.

Look at your windows. If they are old and lost their original properties, it is worthwhile to think about putting new ones that will store heat in the house much better.
By completing all these activities, or at least part of them, you can solve the problem associated with the loss of heat. Your wooden house will perfectly keep the heat, so that your accommodation will be more comfortable. It is also important that your heating costs will be reduced. Running the work is not so difficult, so even without outside help you can cope with the task.
Video
For the warming of houses from log houses, the technology of "warm seam" is sometimes used. How to make the insulation, see below:
Touching the topic of building a log house, one wonders how to heat a residential building without much expense in the winter season? Modern heating appliances can work day and night, ensuring a comfortable stay, but at the same time bringing a large bill for electricity. We bring to your attention a more efficient solution - the warming of the log house from the inside and out.
The first stage of installation works is the warming of the log house outside.
Preparation of walls for insulation.
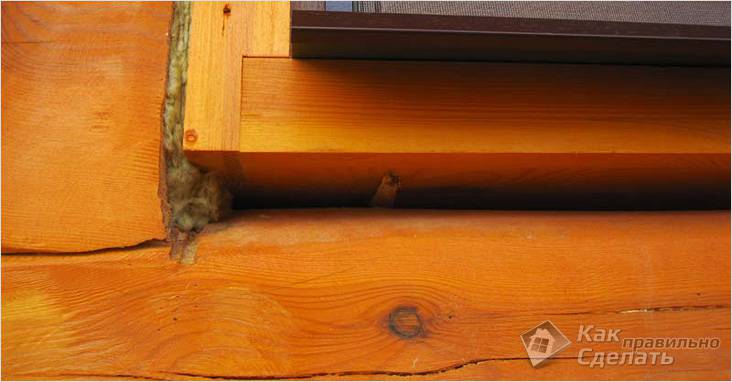
The wall surface of the building before insulating the house from the outside, without fail is treated with a fire-fighting agent (fire retardant) and an antiseptic. All available slots are sealed with a twist wrapped in a tape, with a jute fiber or with a mounting foam.
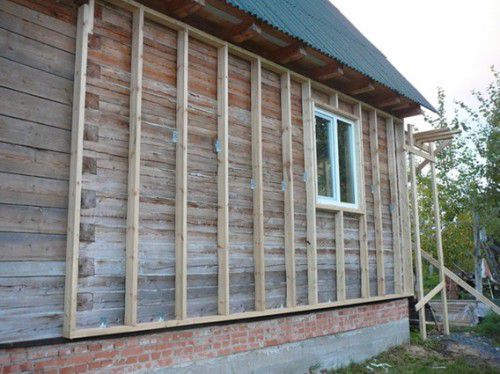
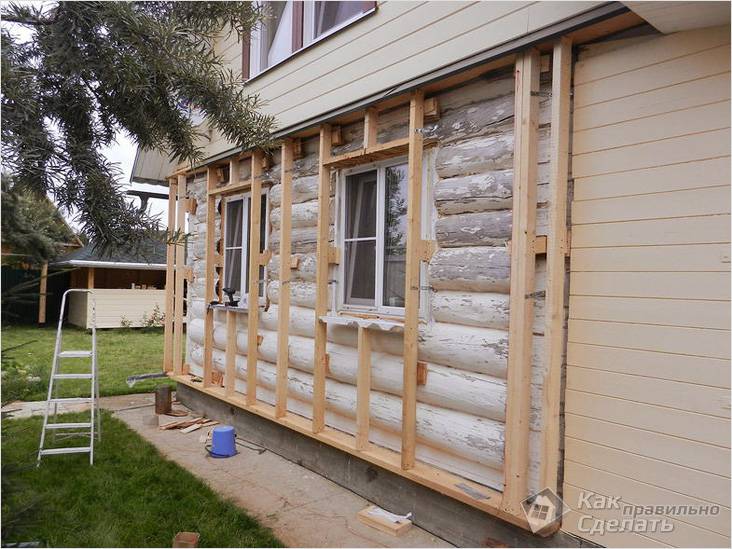
For the fabrication of the frame for the main material are taken boards, a width of ten centimeters and a thickness of five centimeters. Fix the beams to the wall surface in an upright position. The optimal step between the boards is not more than fifty centimeters, at the same time this distance should exceed the width of the heat-insulating material.
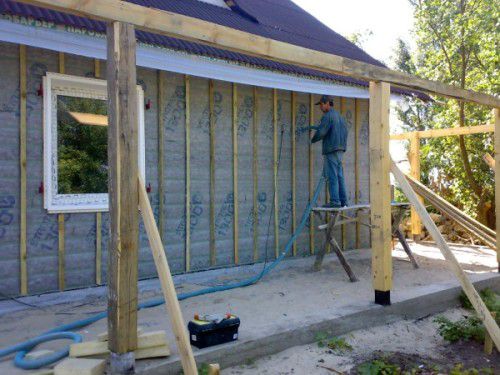
Laying the vapor barrier layer.
In order for the tree to "breathe" it is necessary to organize a ventilated facade system. As a vapor barrier layer, a polyethylene film or aluminum foil can act. Fixation of the material is carried out using nails and staples. They, in turn, are covered with protective tape.
We choose heat-insulating material:.
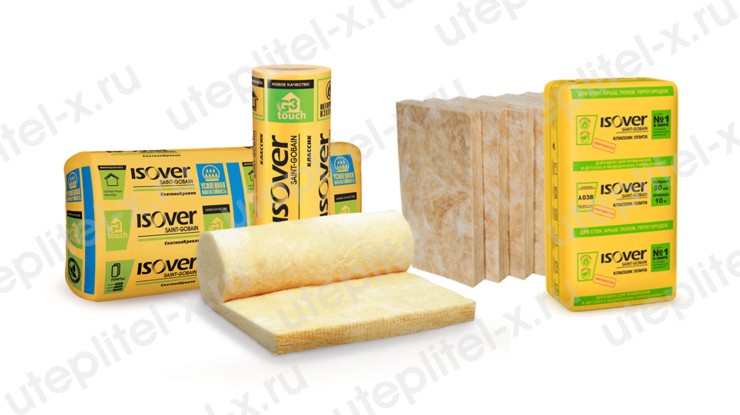
- mineral wool. Heater is available in the form of plates or mats, providing ease of installation, ease of use. The main advantages of the material: fireproof, resistant to rot. Among the obvious shortcomings of mineral wools can be noted its high cost, the ability to deformations (over the years, shrinkage);
- ecowool is an environmentally friendly heat-insulating material, obtained from cellulose fibers. Unlike the previous "competitor" has an affordable price. Another advantage of ecowool is its inability to ignite. Essential shortcomings: special equipment is required for installation works, the material is depleted with time due to external factors (moisture, wind);
- sawdust - insulation, which gained great popularity due to low cost and environmental friendliness. Probability of fungus and mold formation, flammability - its main disadvantages;
- polystyrene foam - cheap, simple, effective. Thanks to these three indicators, the material takes a leading position among other heaters. The only but significant drawback of foam is vapor tightness, which can cause rotting of the log structure.
About how to insulate a log house outside, a lot of literature is written, the recommendations of professional masters are presented, but the quality of the work performed depends not only on how responsible you came to the matter, but also on the choice of "worthy" thermal insulation material. Of all the above applicants for buildings from the timber, the ideal insulation is mineral wool. In addition, it is quite easy to work with mineral wool plates and it is not problematic.
To perform the work, elastic mineral plates with an average density of 100 kg / m3 are used. Due to its rigidity, the material is well held between the boards and does not require additional fastening. Plates are laid in the frame in the direction of the bottom-up.
It is important to know: excessive pressing of the insulation to the surface will lead to a deterioration in its performance.
Laying the waterproofing layer.
Its main function is to protect the heater from moisture. A special waterproofing film is nailed to a wooden crate. You can use a construction stapler. To ensure complete tightness of the layer, the material is overlapped, with a touch of five or more centimeters. Docking areas are covered with adhesive tape.
The construction on top of the waterproofing layer will ensure air circulation, eliminating the possibility of condensation. And it, in turn, can cause the appearance of fungi, mold and other pests. The frame is assembled from rails three centimeters thick and twice as wide.
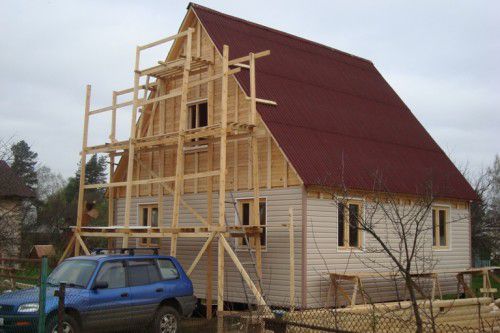
In order to transform the appearance of the residential structure, it is covered with any decorative and building material. Based on personal preferences, choose this or that kind of skin. Today, the most common materials are lining, siding, facade panels. Regardless of which of the options you have chosen, leave a gap of three centimeters between the cladding and the waterproofing layer.
The second part of this article is devoted to internal works. From it you will learn how to insulate a log house from the inside.
How to insulate the house from the inside
Insulation of walls from the inside will allow to increase the energy efficiency of the building. The main condition of the work - compliance with the scheme, providing an air gap between the wall surface and insulation. Failure to comply with this rule can lead to problems with condensation and high humidity, which adversely affects the wood.
Warming of the log house from the inside can be done in two ways - heat insulating plaster and building plasterboard. The first option is ideal for rooms with a small quadrature, as the gypsum board structure "eats" part of the useful space.
It is important to know: the plaster is not capable of withstanding low temperatures, and therefore can not be used for warming walls in unheated rooms.
Let's consider each method in more detail.
The first way of internal warming.
Its essence is as follows: on the wall surface a frame is constructed of profiles, then laid thermal insulation layer and, finally, produce plasterboard plasterboard sheets.
Installation work begin with the marking of walls and the preparation of metal profiles of appropriate dimensions. Of these, a special frame is built on the wall surface. Next, the insulation is laid between the installed profiles. For the basis of insulation material can be taken foam or mineral wool. Fix the heater with screws with wide hats, after which the resulting construction is closed with a vapor barrier film. It, as a rule, is fixed to metal frame double-sided scotch tape. The finishing touch is plasterboard padding.
It is important to know: the thermal insulation material can be stacked in several layers at once, it all depends on the squaring of the room.
The second way of internal warming.
To begin with, the walls are cleaned of old cracked plaster, and then fixed reinforcing cage and a metal mesh (the cell size is 50 mm). The finished plaster solution is applied in three sets. The first layer is obtained by spraying the surface with liquid stucco. Due to the second (priming) layer, the walls become an even surface without defective areas. Complete the work by applying a thin layer of solution.
Drywall or plaster?
Each of the listed materials is successfully used in construction and decoration. If considered from the point of view of the effectiveness of insulation work, gypsum cardboard takes a leading position. According to the price category, in terms of cheapness, an honorable place is given to plaster. Which method of insulation is better to choose, it's up to you.
- when working with mineral wool or glass wool, use protective equipment - gloves, respirator;
- choosing between mineral wool and polystyrene, give preference to the first. Polyfoam can gnaw the mouse;
- treat the walls with antifungal agents;
- the lower layer (with external insulation) of the ventilation space must be protected metal mesh with small cells from insects and rodents;
- it is desirable to carry out outdoor work in the summer season, in dry weather.
The oldest log house is almost the warmest of the known buildings. And all thanks to the fact that the traditional frame of logs can perfectly store heat and maintain a balanced moisture. It is known that wooden wall thickness of 24 cm gives the same insulation of the interior space, as well as a meter brick wall.
Penofol is a heat-insulating material used for the insulation of all surfaces of a house, bath, warehouse, work, car, etc.
But the tree is not an ideal remedy for cold weather.
Often tenants in a new wooden house discover that with the arrival of cold weather the house from the inside does not seem cozy and unpleasantly strikes drafts.
And then, despite the natural building material, we have to find a suitable insulation. Even more, this problem concerns old houses.
This problem is completely solved. For example, it is possible to mount a thermal insulation both inside and outside. But many want not only heat in the dwelling, but also the preservation of the unique log texture of the building. And in order to make the house as cozy as possible, it's enough to understand how to insulate a log house from the inside, and to translate this idea into reality.
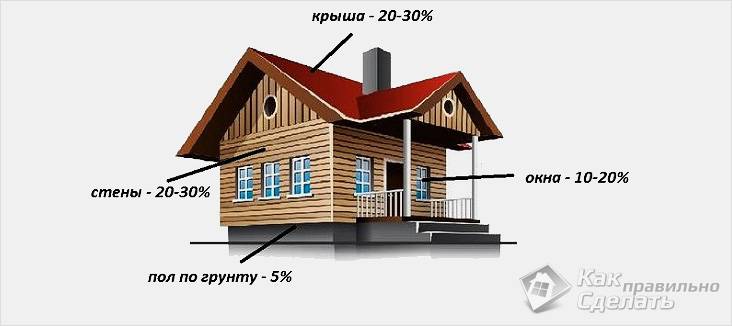
Surfaces involved in heat transfer
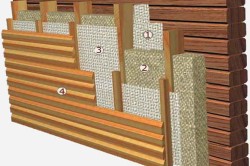
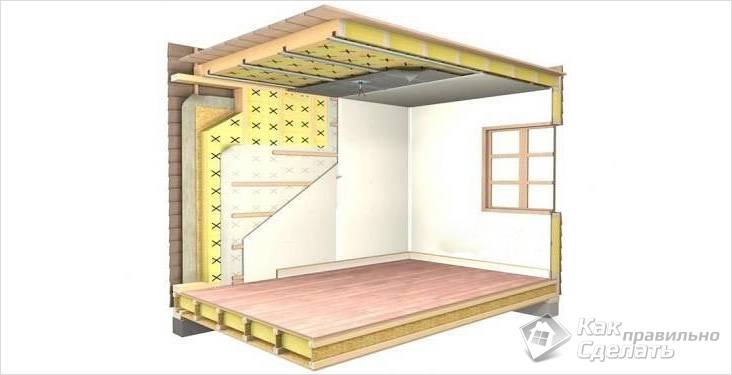
The scheme of warming the log house: 1. The system of vapor barrier; 2. heat insulation; 3. Waterproofing; 4. Sheathing by lining.
Before the warming of the house or bath, it is necessary to determine the areas involved in heat exchange. This list includes the ceiling, the floor and the walls. It is them that must be checked for heat leakage. On these surfaces will have to produce basic insulation, if the house is cool.
- Ceiling. Through it takes up 70% of all heat. To eliminate this problem, it is recommended to insulate the attic space.
- Walls. Here is the majority of all openings - windows, doors. In places where they are mounted, as well as in the walls themselves, crevices can form between the logs. To avoid drafts, you need to thoroughly puncture the joints of the logs.
- Floor. Checked for gaps. It is insulated in a standard way, as for all other floors. A good help for warming rooms can be the installation of warm floors. In addition, on the eve of winter, the ventilation of the sub-floor should be reduced by covering part of the ventilation openings.
When designing a log house project, it is necessary to take into account in which climatic zone the building will be operated. To determine the thickness of the walls of a future wooden house, the average temperatures of each of the seasons and the humidity of the air are of no small importance. So, the harsher the climate of the region, the thicker the walls should be. But low humidity, even in severe winter frosts, allows the construction of log buildings with a slightly smaller wall thickness than in cases with high humidity and milder climates.
Back to contents
Tools used for warming the house from the inside
For insulation work, you should prepare such tools:
- Hacksaw.
- A hammer.
- Screwdriver.
- Pliers.
- Scissors.
- Blades and devices for caulking.
- Measuring ruler (measuring tape).
Back to contents
How to insulate a log house from the inside: solutions
Full insulation of the house from logs involves the processing of all surfaces involved in heat exchange with the external environment: roof, floor, ceiling and walls, as well as window and door openings. Often, enough standard measures are provided to provide a home or a bath with guaranteed protection against colds and drafts.
Here we must bear in mind that usually log buildings, including wooden baths, are chosen for construction precisely because of environmentally friendly building materials. Therefore, an intelligent and demanding customer traditionally tries to insulate the log house from within with natural materials. In particular, the caulking of joints of logs in the walls is an obligatory operation for warming the room - in this case it is produced by well-known hemp, pastel, moss, jute, ribbon liners based on flax.
When spraying ecowool fills all cracks and cracks, so that later the walls, ceiling and floor of the log house should not be caulked.
Nevertheless, even after all the standard measures for insulation in a log house can be quite cold. Such, as a rule, occurs if the house or the heating system is incorrectly arranged, or the thickness of logs selected earlier does not correspond to the severity of the local climate. Then it is recommended that additional insulation above surfaces.
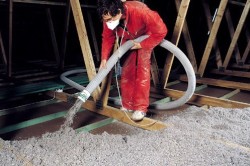
Insulation of the ceiling (roof). Produced at the first sign of cold in the room. For this, a special waterproofing foil is first laid on the attic floor, and then the insulant is laid on top (poured). Use in this capacity can be materials such as sawdust, dried seaweed, ecowool (cellulose wool), standard mineral wool in rolls or plates. For ease of movement in the attic, boards are laid on top of the heater.
If the residential building is not crowned by an attic but an attic, then the insulation requires not only an overlap between the attic and the lower room, but also the roof. Usually, in order to make the covering heat-insulating, it is sufficient for any insulation placed between the lag of the base layer with a thickness of 50 to 100 mm. At the same time, the roof slopes from the inside are covered first with a waterproofing film, and then with a 100-200 mm layer (depending on the climatic conditions of the terrain) with a heater (preferably a mineral wool).
Warming of the floor. After the preliminary standard padding and waterproofing, the wooden floor in the log house is covered with a heater. Plates of mineral wool are placed between the floor lags. The layer of insulation must be not less than 100-150 mm. From above it is sheltered by rough, and then by a clean surface.
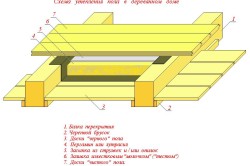
The scheme of warming the floor of the log house.
Warming of walls. As noted above, the minimum insulation of walls laid out of logs is reduced to the caulking of joints (slots) between the logs of the wall. Additional insulation of walls in such a house is provided by one of the options below.
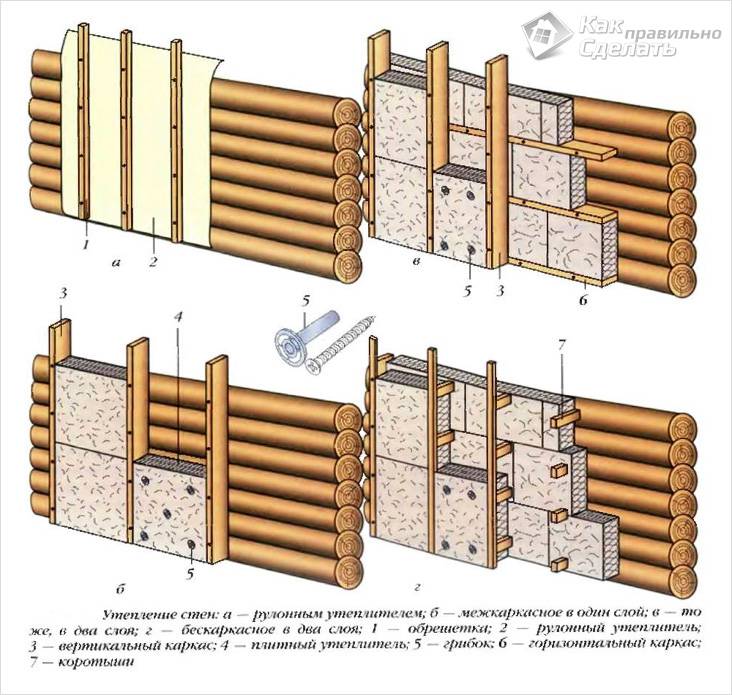
Finishing of a wooden house or a log cabin from the inside to make the premises warmer can be made with wooden lining. Do this without placing a heater between the main and additional walls. Thermal insulation is provided by the air layer formed between them.
Another option is the construction of false walls from gypsum boards with a depth of 50-100 mm on the profiles. In contrast to the insulation by the lining, this method gives a greater effect of thermal insulation and is used in buildings that are in the region with severe frosts. Persistent preservation of heat in the premises is provided by the presence of multi-layer thermal insulation (for example, mineral wool, foam plastic, etc.). However, with this option it is necessary to reconcile with some reduction in the useful area of the room.
To environmentally friendly ways of warming a log house or a bath is the finishing of walls with oriented particle boards (OSB). A solid insulation consists of 3-4 layers of chips of different types of wood. It is worth noting that this strong and durable material has a high degree of moisture resistance, which is why when using it as a heater, you can completely do without vapor barrier. These plates are simply fastened with dowels to the logs of the wall.
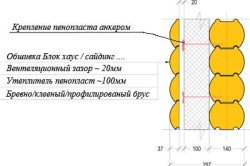
In recent years, a wide application has been made of the thermal insulation of walls, including log walls, through foam foam - a foil-based foam polyethylene foam. Along with the properties of a good vapor barrier foamfol perfectly keeps the heat thanks to the numerous air bubbles clogged under the polyethylene film. At the same time, the aluminum coating on the back side of the foam foil reflects effectively the thermal radiation directed from inside the heated rooms, preventing radiation from escaping through the wall to the outside.
The installation of this blade on the wall is quite simple. On the log surface, the guide rails are pre-packed in such a way that the step between them is convenient for attaching the blade and corresponds to its dimensions. During installation, the foam foam strips are fixed with an overlap of 10 cm. The gaps are glued with foil tape. Over the foam is a frame, on which the finishing finishing material is fixed. It is necessary to ensure that at the same time the air gap between penofol and lining is not less than 2 cm.