Now it's hard to say when the woolen carpet was replaced by modern materials and technologies designed for floor warming. Very quickly in the last decades the industry is developing. To date, it is common to divide the warm floors into two main types: water and electric. Both systems gain, in practice, the same number of pluses. And one common plus - the systems have a low-temperature heater, due to which the floor temperature does not exceed 30-35 degrees Celsius, and the heat spreads throughout the floor area.
We came up with an air floor, but it is still very expensive, therefore, again, for the time being, we do not consider it. The most popular is not only urban residents, but also owners of suburban private houses, use electric warm floors. The installation of an electric floor heating is possible in any residential space - be it an apartment, a country house or a garage.
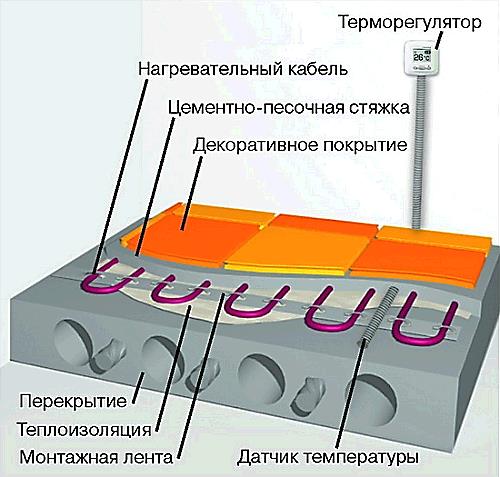
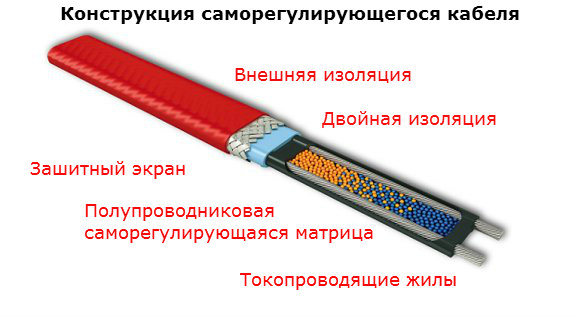
For laying the electric underfloor heating in the house, it is sufficient to install the heating cable correctly and connect it to the power supply system. They are also easy to manage. For this purpose, a thermoregulator is attached to the wall, and it is assigned the main function to maintain the set temperature in the premises of the house. There is also a self-regulating heating cable.
The principle of laying different kinds of warm floor, basically, is the same. The difference is only in the elements of heating. In the water floor - it's pipes, in electrical, respectively - the cable. Since today we lay out the laying of the electric warm floor in the house with our own hands, it will be very useful for us to learn more about the main components of this remarkable system.
Resistive and self-regulating heating cable: what to choose
There are two types of heating cables: self-regulating heating cable and resistive.
In the resistive cable, the main element is a heating core, on which layers of insulation are laid on top. In turn, the metal braid is superimposed on the insulation. The latter performs the functions of grounding, as well as the shielding element. The whole system is covered with a layer of protective shell.
Resistive cable is divided into: single-core and two-wire. A single-core cable is the simplest version of an electric warm floor. The name speaks for itself - in this cable there is only one core. The connection scheme of both ends of the cable is based on the principle of a closed circuit. It's very simple, but not without a "but". Around the conductor, which flows current, there is an electromagnetic field, which is very difficult to fight, even though the cable protects the braid.
In a two-core cable, as you have already understood, the two wires are heating and conductive. Accordingly, the level of radiation of a two-wire cable is much lower than that of a simpler version of the electrical floor.
If you are dealing with a resistive cable, you should take into account that the cable can overheat from strong pressure on the floor surface. The same will happen in case of poor contact with the screed.
On the contrary, in self-regulating cables (in its structure it is similar to two-wire), both veins are not heating, but conductive. A heating element is a special polymer matrix, the resistance of which directly depends on its temperature. Thus, when the cable in some place overheats, its resistance instantly increases. The strength of the current and, consequently, heat release are reduced. The rest of the cable continues to function normally.
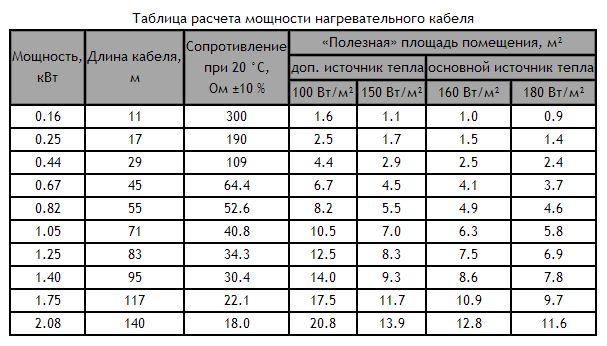
Tip: When choosing a resistive cable, refer to the manufacturer's table, which determines the specific power of the system per square meter. m area. To understand what capacity the cable should be for your premises (bedroom, kitchen, corridor, bathroom or toilet), you need to calculate the future heated area. This is done by simply subtracting from the area of the room the total area of cabinets, toilets, bathtubs, refrigerators and other items that greatly impede heat exchange. Further - the heating area is multiplied by the selected specific power and we get the desired result. Continue the lessons of arithmetic and calculate the step of laying the cable by dividing the heating area by the length of the cable. If everything is clear and, as a result of simple calculations, the power of the cable does not exceed the average power consumption of an ordinary city apartment by electricity consumption, then you can safely make a purchase.
Tools and materials
- a hammer
- chisel
- dowel-nails
- cement
- puncher
- scissors for metal
- marking ruler
- tape or tape
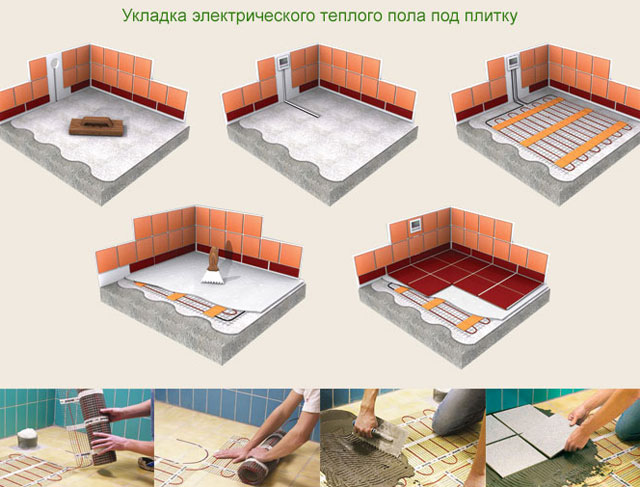
Laying the electric underfloor heating in the house with your own hands
Cable systems
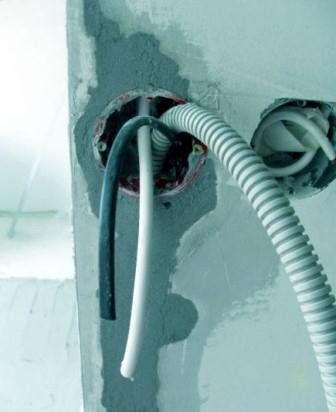
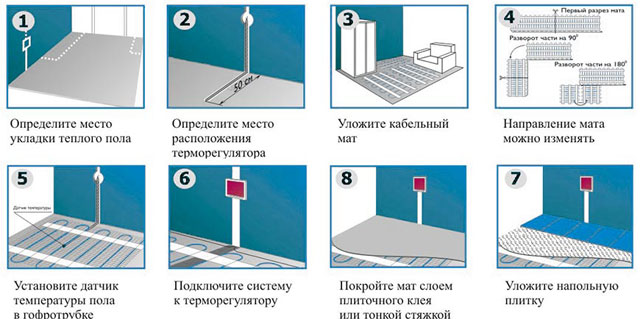
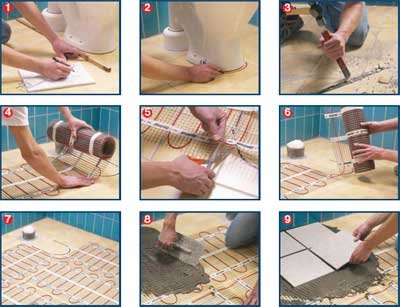
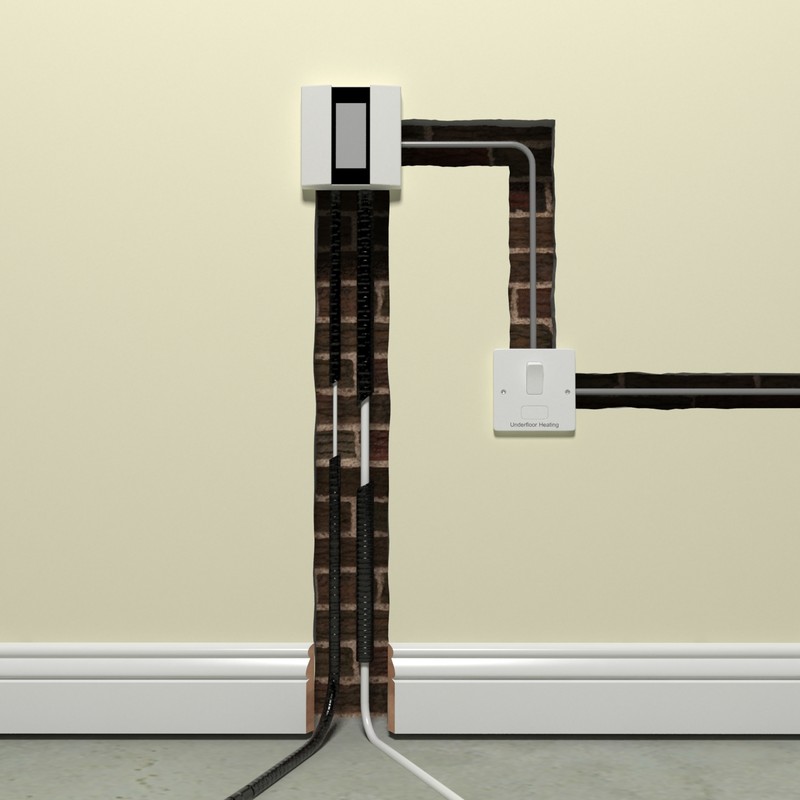
1. Install the thermostat. First of all, we need to knock out a hole in the wall in place of the installation box (height 50-100 cm).
2. From the junction box to the installation site, we bring the phase, zero and ground.
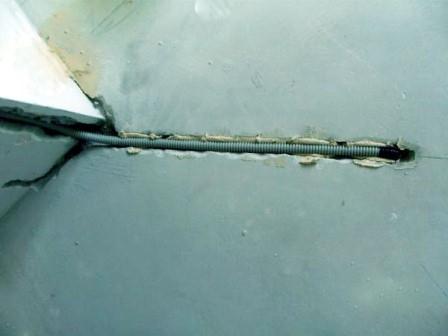
3. Break through the groove in the direction of the floor. In it we place two plastic tubes. In one, the power cables of the heating cable pass (its length is equal to the distance from the floor surface to the location of the thermostat). The second is for wiring the floor sensor. Its length is almost a meter more than the first. Such a reserve is made for additional laying on the floor surface.
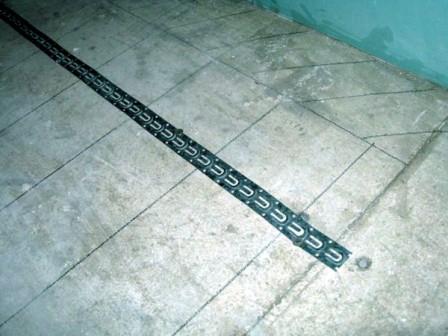
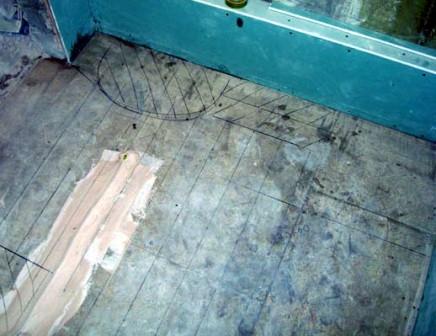
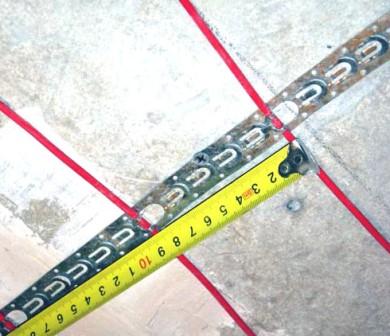
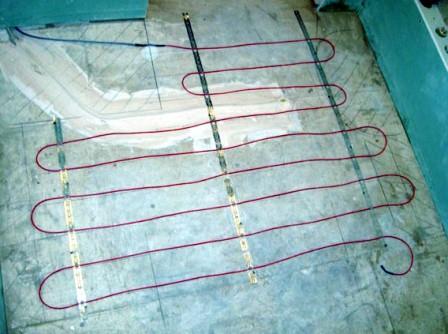
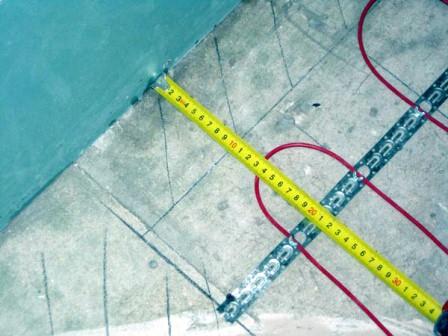
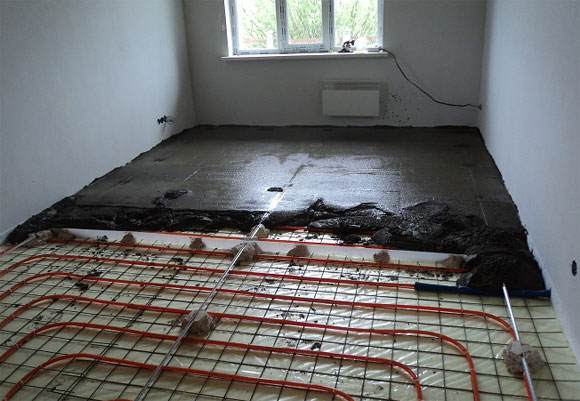
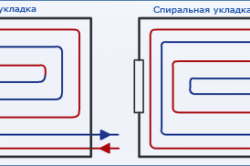
4. Align the floor surface - along the perimeter of the wall with adhesive damper tape. Then make a thermal insulation (the thickness of the layer is not less than 2 cm). On top of the heat-insulating layer we place a special mounting tape (with a step of 50 cm), with which the cable will be fixed. We will lay the cable "snake" (how to lay the cable - there is no fundamental difference), so these calculations are the most optimal.
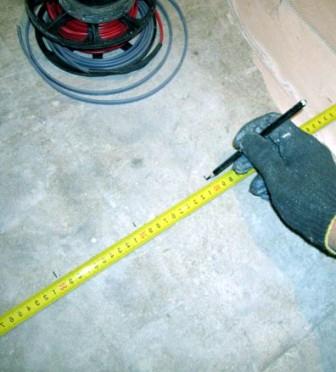
5. Pull the power wires to the thermostat box. At the same time, the coupling must be in a concrete screed. Measure the necessary step in laying the cable fairly easily - usually, this is the distance between the tape mounts. The length of the path between the fasteners on the mounting tape is a multiple of the short length. The cables are laid parallel to each other.
6. Install the floor sensor. At the first stage, we insert a plastic tube, which was previously knocked out in the wall, into the wall. We stretch it across the floor between the lines of the heating cable (the distance is about 50-100 cm from the wall). For security reasons, wrap the end of the tube with electrical tape so that no solution enters it.
7. We check the quality of the installation. We measure the resistance of the heating cable by the tester. It must correspond to the passport value (a tolerance of up to 10% is allowed).

8. Proceed to the penultimate stage - fill cement-sand screed. The thickness of the screed (with a hard surface of the rough floor) should be at least 3 cm (in the presence of a thermal barrier - at least 5 cm).
9. Connect the heating cable. To the screw terminals of the thermostat (located on the rear side) we connect the wires of the floor temperature sensor, the power cable of the heating cable. The chain of connections closes the wiring, which will feed the entire system.
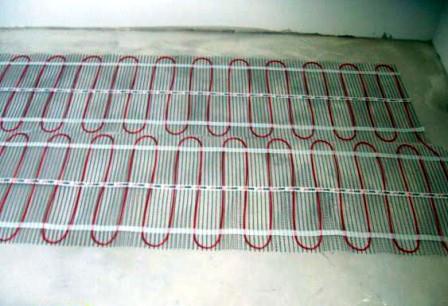
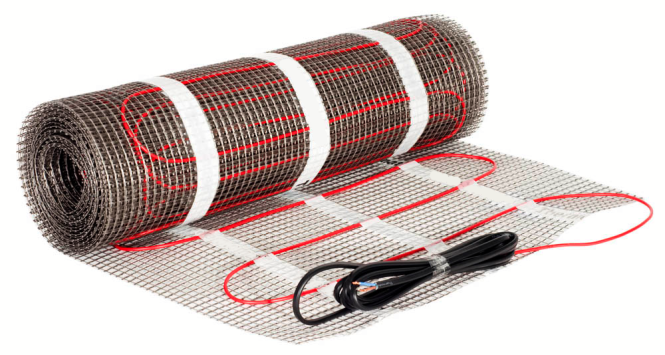
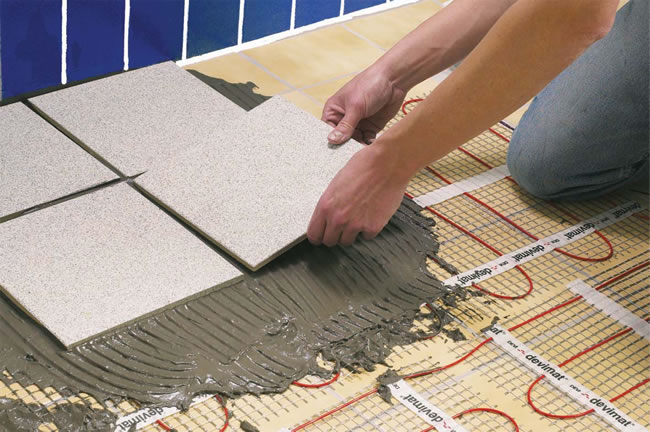
Thermal mats
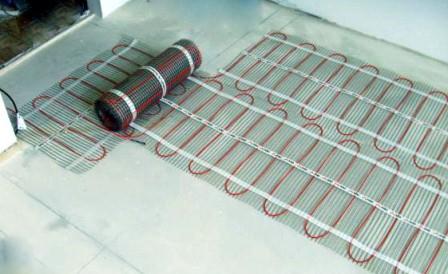
Thermal mat - this is the same heating cable, only laid on a special heat-resistant film. Here we also, before laying, first determine the coverage area and select the specific power of the system for the exact calculation of our further actions.
At once we will tell, that to be engaged in laying of a warm floor is a pleasure. In essence, the system is a "layered pie, which includes a rough concrete floor, heat mat, tile adhesive and tile itself. And the principle of its installation differs little from the installation of cable systems.
However, there are differences that need to be mentioned:
1. Stroby for laying the sensor of floor temperature must be cut in the wall and, most likely, on the surface of the floor, too. This must be done, since the thickness of the floor using a warm mat will be at least 1-1.5 cm.
For the same reason, the protective plastic tube passes below the level of the thermal mat.
2. After preparatory work, immediately go to the laying of the thermal mat, bypassing the process of thermal insulation. (In this case, thermal insulation materials can cause overheating of the cable).
First we roll a warm mat around the whole area. The width of the roll is decent (somewhere 0.5 m), so use the "snake" method. We will change the direction of motion using scissors, cutting the reinforcing mesh. To do this, we need to roll up the roll with the mat and roll out further in the opposite direction. We do not touch the cable, we work only with the grid (the distance between the bands is about 5 cm).
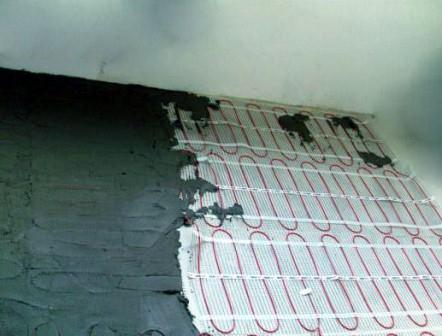
3. Cut the mate to the end again and roll it into a roll. We tear off a protective adhesive tape on its underside and roll the roll over the entire surface of the floor, after cleaning the floor of dirt and debris.
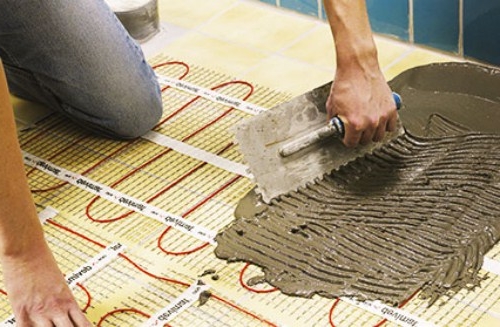
4. Cover the thermal mat with a layer of tile adhesive. In this case, the heating cable should not protrude on the floor surface. Leave the glue to dry for 3-5 days. After this period, we begin laying the ceramic tiles and then we finish the installation.
In total, the installation of such a system lasts no more than 7 days, and this is a big plus. On the other hand, thermal mats can not be used as the main heat source. But, on heat-insulating materials have saved.
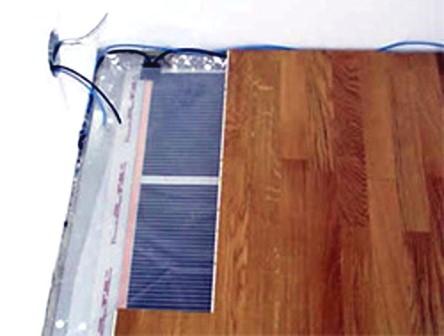
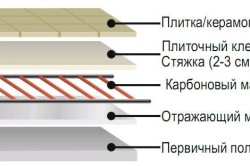
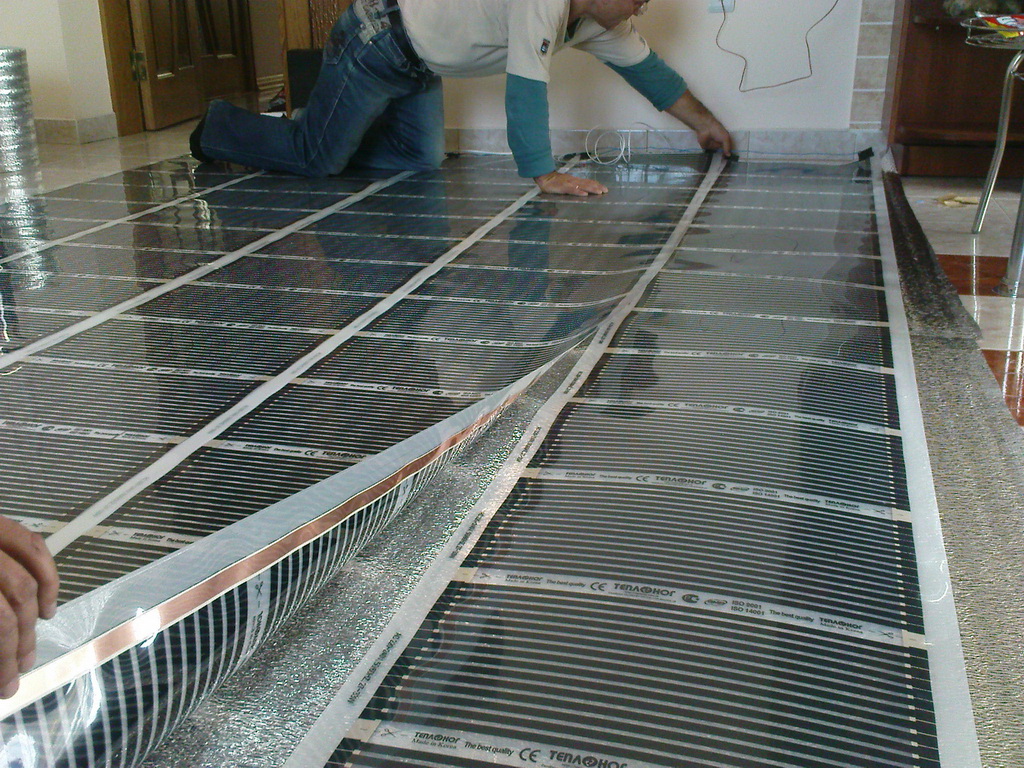
Heating film
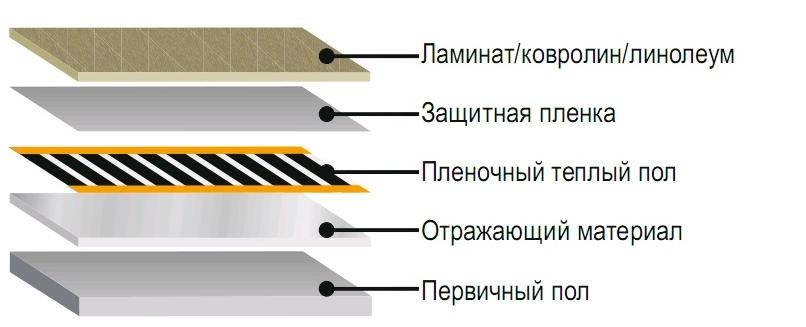
In this scheme, not a cable, but a special thin film (thickness of only 0.3-0.5 mm) is used as the heating element. "Warm" the film with two copper conductors (they are connected to a voltage of 220 V), and - bands of a carbon semiconductor located between them.
Film floors are laid on the same principle as thermal mats. The heating film is suitable for all types of coatings. For wood - the specific power of the heating film, preferably, should be 150 W / mi, for ceramic tiles - 220 W / m2.
1. The floor sensor can be laid in two ways. This is when the shtroba is in the floor with a padded plastic tube, and another option is to lay the temperature sensor directly on the surface of the film.
2. Laying the heat-insulating substrate. It unfolds over the entire surface of the floor. It is desirable that the surface of the heat-insulating material be covered with a layer of foil film (it will mirror the IR radiation).
3. We spread the strip of film across the entire surface of the floor. We do everything the same as when laying a warm mat, except for one - in this case, the film is cut in the place authorized by the manufacturer entirely.
4. Isolate the copper conductor strip at the place of the cut (the cut lines run across the roll every 20-30 cm) passing along the edge of the film. Isolation is done only from one end of the film, to the other - we connect the power wires. So, our floor is packed with sheets of film, each existing by itself. The whole system will work after we connect all the sheets. In this case, the sheets must be connected in parallel: the right conductive tape with the same, but only from the adjacent sheet.
5. We put on a heating film flooring. As we have already explained, the film is suitable for any coating. However, we still stop on the laminate floor. And that's why. Carpet is not beneficial for many reasons, and the main one is a strong susceptibility of mechanical pressure, which means that there is a risk of serious damage to the heating elements.
For laying ceramic tiles special glue is required. But, how many do not glue on the smooth surface of the heating film, it will keep it bad.
Remains only laminate. Laminate laying the heating floor nothing hurts, and the way of laying almost does not differ from usual. If necessary, only the noise absorbing substrate will appear. In addition, the laminate itself is an excellent protective coating.
The service life of each of the variants of the warm electric floor presented by us is not less than 15 years. A lot or a little, to judge you. I will say one thing, with the use of new technologies, not only does life simplify us, but it also lengthens to a considerable extent. We begin to feel an increased sense of comfort, and this factor always blesses our health with you. And what else can be more valuable than our peace of mind? Yes, what can I say, a new warm floor, for example, is also a significant saving in fuel and electricity, and not at all petty.
1.
2.
3.
4.
5.
6.
7.
8.
People living in harsh climatic conditions often face a problem when the heat produced by the central heating system is not enough. That is why many owners find a solution to this issue in the installation of a warm floor system. One of the most popular types of this work today is installation, but other floor coverings have not become an exception. In addition, one of the advantages of such a design is the possibility of turning on the heat just when it is needed.
Despite the fact that this equipment appeared on the construction market for a long time, many still do not know how to properly place the warm floor, that is, so that the coating does not swell and do not crack, and the thermal conductivity was at the proper level. It is to familiarize yourself with the installation procedure and learn the rules for laying the warm floor.
But, first of all, it is necessary to consider specifications two main systems underfloor heating - water and electric. Each of these systems has its advantages and disadvantages, which should be discussed in more detail.
Features of underfloor heating
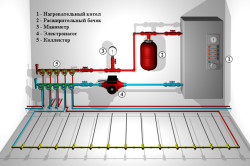
Experts argue that the main advantage of this design is the comfort of its operation. The principle of its installation lies under the surface, and it is for them to continuously circulate hot water, which is the main source of heating the temperature in the room.The structure of this system includes the following elements:
- heating part (thin flexible tube of copper);
- to the heating system, represented by the collector.
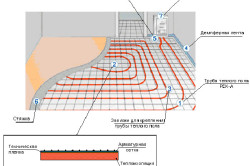
The laying of warm floors is carried out according to the principle of installing pipes on a system that is popularly called "snail" or "snake". The main advantage of this method is the simplicity of its device, so this option has become very widespread, both on the domestic market and abroad. The distribution of temperature in this structure is uniform, which is due to the alternate arrangement of hot water pipes and return pipes.
Perhaps the main disadvantage of this method of the device is the length of installation of such a design, as well as the need for its careful design. Nevertheless, the advantages of the "snail", of course, more, thanks to which this kind of floor heating is used in our time in many homes.
Technical characteristics of a warm floor, powered by electricity
Asking about how to build a warm floor of this type, it is worth noting that its installation is more complicated than the water system. But we can not fail to mention that the installation of such a structure can be performed under any coating, including tiles, laminate, carpet, etc.There are several options, and one of the weighty arguments in favor of the heated electric floor is that there is no need to install it around the perimeter of the room, it is enough just to equip them with those areas for which the residents of the apartment move. This will significantly contribute to a more economical consumption of both the energy carrier and the materials used for installation (for more details: "").
Before you begin to equip the floor with an electrical system, it is important to bring its surface into proper shape, removing all visual defects like troughs and bumps in order to achieve the most flat space. It can be helped by cement screed.
The equipment for the electric floor can be represented by a more common heating cable or carbon mats that need to be laid on a smooth and dry surface.
When installing an electrical cable, experts recommend laying under it a layer of material that reflects heat. One of the most popular samples is polystyrene, equipped with a special film. Such measures will allow increasing the heat transfer of the floor by about 30-40%, in addition, the expenditure of finance for the heating process itself will also significantly decrease.
The principle of arranging a warm floor for a laminate
To understand how to lay a warm floor under a laminate, it is required, first of all, to carefully study all the possible difficulties of installing this design. So, this floor covering should not be mounted without a substrate if the floor is made up of concrete or cement. In addition, the laminate can not be fixed sufficiently rigidly, which, in turn, can cause unnecessary noise. The use of a substrate will solve the problem associated with depreciation and correct the uneven ground floor, in parallel acting as a soundproofing.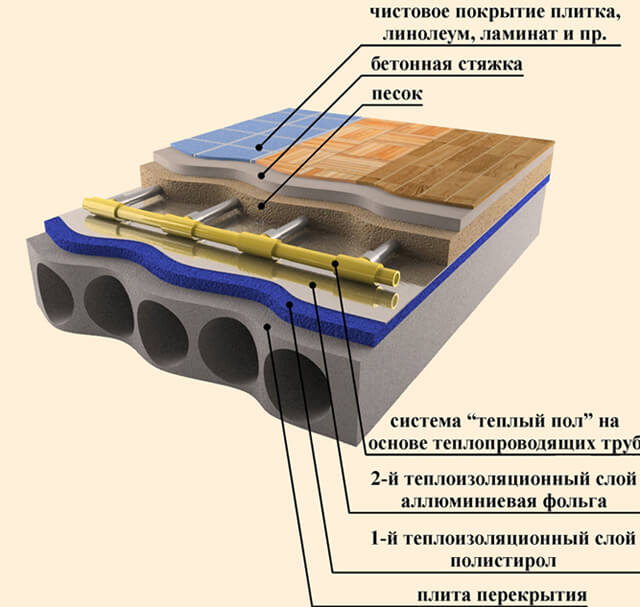
It is also important to remember that the installation of such a heating system must take place, provided that the quality of the floor is good. Do not forget about the indicator like power. So, this parameter for heating elements equipped under the laminate should not have a value greater than 110 W per 1 m².
Self-installation of a warm floor on an electrical basis
Instructions for laying a warm floor provides several options for this work.The main ones are the following:
- can be performed, and then the entire system from above should be covered with tiles;
- the second option involves the installation of a warm electric floor on the screed with the further placement of ceramic tiles on top of it (read also: "");
- another way involves laying the floor with heating directly under the floor covering. But for high-quality performance of this work, it is necessary to prepare the installation surface in advance by cleaning and leveling it, and then laying on it a layer waterproofing material.
Preparatory activities
Before laying a warm floor, it is extremely important to remove all dust and other debris from the surface of the site being prepared, thus preparing a clean and smooth surface. After that it is recommended to treat the entire perimeter of the concrete base with a primer. This is done, first of all, to improve the adhesion properties of the floor.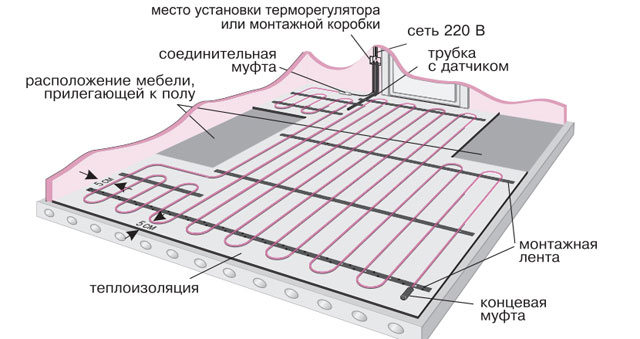
Installation of heating mats
First of all, make sure to insulate the base of the floor so that the heated air can rise unimpeded. The material in this case can be expanded polystyrene, foam foam or mineral wool. Next, a special reinforcing mesh is laid on the thermal insulation, but you can do without it, after adding a special plasticizer containing a microfiber into the solution.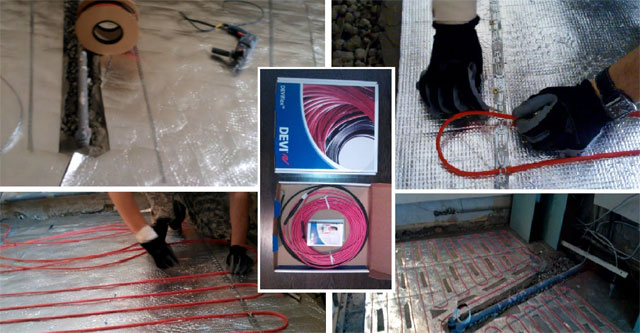
Before laying a warm floor, it is important to determine its parameters, that is, to fit the entire structure to the dimensions of the room. This can be achieved by cutting off the excess mesh in the required areas, but without affecting the electrical cables in any way. If the humidity level in the room is high, the reinforcing element must be earthed to the regulator.
It should also be mentioned that when installing a warm floor, it is absolutely necessary to observe a wall spacing of 5 cm, and if there are stationary heating devices (batteries, heating pipes), this parameter should be at least 10 cm.
Connection rules for underfloor heating
At the base of the concrete floor, it is necessary to make an oblong hole with parameters of 20x20 cm and draw along the ends of the heating elements to the main module.Do not forget also about checking the resistance of the heating mat wires and controlling the temperature sensor. Their indicators should completely coincide with those that are stated in the manufacturer's instructions. It would also be superfluous to draw up a special scheme, on which the sections of the wires on the floor should be displayed. This drawing can be of good service in the case of any repair work already after the installation of the warm floor (see also: "").
In order to control the temperature, it was easier to place a corrugated pipe equipped with a temperature sensor, which should be located on the end of this pipe, and the element itself should be closed by means of a plug. On the reverse side, the connection wire leading to the terminal box must come out.
All the ends of the wires must be carefully cleaned and then fixed on the thermostat. After completing all the procedures, it is recommended to turn on the entire system for a short time to make sure its device is correct and stable operation.
Laying a warm electric floor, detailed video:
How to properly make screed?
After completing all the above measures, the heating mats should be poured with a specially designed solution with a layer thickness of approximately 8 to 10 mm. When the material has dried, it is again necessary to make sure that the warm floor is functioning normally. Only after this, you can start laying the desired floor covering or tiles. Here it is important to remember that in carrying out this work, it is very important not to allow drafts into the interior of the equipped building, and it is allowed to switch on the mounted system only after the final drying of the screed.To start the device of such a system you need from the equipment of a special rack of collector type, which you need to install in the wall next to the floor surface. In this mechanism, the contour pipes must be connected to the central heating system to which the housing is connected.
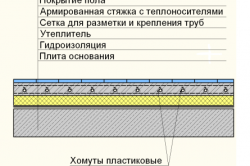
Further it is necessary to clean and if necessary level the surface on which a warm floor of this type is to be mounted. It is applied a layer of waterproofing, with the function of which polyethylene can do fine. The wall, as in the previously described method, is equipped with a damper tape, after which a heater is laid, which can be made such materials as mineral wool, foam concrete or polystyrene.
Then you need to start laying pipes that can be made of materials such as metal plastic or polypropylene. These elements are fastened to the reinforcing mesh by means of special clamps, and to the thermal insulator - by bands or staples.
After that, you need to create a special strain joint, where you should also apply the already known damper tape. The operation of the system must be tested by feeding liquid from the collector to all contour pipes. The installation process is completed by the implementation of the screed, and its height should not exceed the figure of 3 - 7 cm.
In the event of difficulties in the process of work, one can always turn to specialists who will always give the right advice and provide detailed photos and videos on installing a warm floor.
- The device of a water warm floor
- How to make packing?
- How to cover the base with a thermal insulation layer?
- Nuances that should be known before installing metal plastic pipes
- Polystyrene construction of a warm water floor
- System of water-heated floor for wooden buildings
In order to avoid cold in an apartment or a private house in winter, it will be necessary to install a warm water floor. The stacking technique is not as simple as it might seem at first glance. If there is no experience in installing such structures, it is recommended to contact professionals. If nevertheless it will be decided to make a stack by yourself, then you should know all the nuances.
First of all, we will have to draw up a project, after which we will perform all the necessary calculations that are connected with the load of the heating system. For each room you will need to make your own calculations.
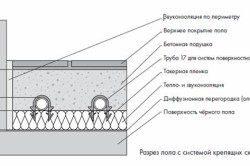
The scheme of the device under the tile.
Water warm floors are best suited in private country houses. In urban buildings, there may be some problems associated with the installation and connection to a centralized heating system.
With the use of water-heated floors, it is possible to significantly reduce electricity consumption, as a result, the cost of money will be reduced. AT warm floors other types may be electromagnetic radiation, but in the case of water structure this problem will not be.
If properly designed such water structures, the heat in the room will be distributed evenly, which can not be said about electric floors.
The device of a water warm floor
If hot water is used as the source, the principle of the system operation is quite simple. Instead of the heating registers used on the floor, a special flexible tube, on which the hot water will pass. This liquid will be supplied from a gas boiler or central heating.
For each room in a private house, you will need to select the optimal system. The construction device can be produced in 3 ways:
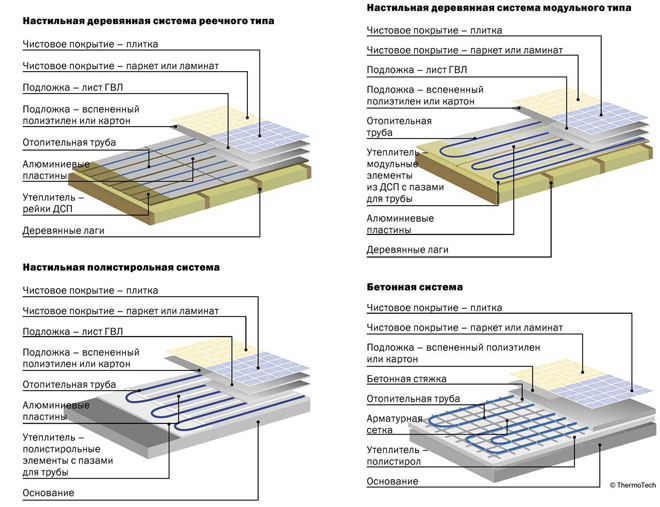
- Installation using concrete screed.
- Installation without the use of screed from concrete - flooring technology. This method is more laborious, since the floor covering must be laid through an additional layer of waterproofing on aluminum sheets. As a waterproofing material, polyethylene or cardboard can be used.
- Laying of the system on wooden blocks or slabs.
The configuration of the structure is as follows: flooring of material for thermal insulation, pipes made of metal-plastic, fastening fittings, couplings, lock nuts, pumps that create pressure and circulation and the final element - screed of concrete and floor.
The option of using a centralized heating system as a source of hot water is not the most optimal from the point of view of comfort.
Every fall will have to wait until the average daily temperature reaches a certain level and utilities will turn on heating. As mentioned earlier, these structures are recommended for use in private homes. However, you should be aware that some newly built houses involve the connection of a warm floor in the event that there are separate risers.
Back to contents
How to make packing?
Elements that will be needed for stacking the system:
- Cement.
- Water.
- Sand.
- Polyethylene, cardboard or other waterproofing material.
- Aluminum sheets.
- Wooden bars.
- Metal-plastic pipes.
- Reinforcing mesh.
- Couplings.
- Lock nuts.
- Pumps.
- Flooring.
- Clamps.
- Corrugated hose or pipe.
- Damper belt.
The first method is the use of a concrete screed. It is used most often. Using this technology, even a person who knows at least a little knowledge of plumbing and construction will be able to install a warm water floor.
The first thing is to mark up an apartment or a private house. The room should be divided into sectors of 40 m². In this case, the parameters that affect the temperature characteristics of the screed of concrete will be compensated.
Back to contents
How to cover the base with a thermal insulation layer?
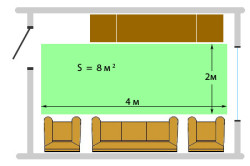
The principle of calculating the useful area (highlighted in green).
If a warm floor is planned to be installed in an apartment that is located on the 2nd floor, the structure will be a concrete slab. In this case, the structure will be the ceiling of the 1st floor. However, if there is a basement room under the apartment, the heat will be wasted in vain, so it makes sense to think about how to avoid heat loss. To solve this problem, you need to perform the thermal insulation of the surface.
To begin with, it will be necessary to clean the base of the floor, and then to lay the insulation material. This is necessary in order to avoid heat loss. If you choose the right material for thermal insulation and make it properly laid, then the floor heating will only go up, which is what you need to achieve. As a heat-insulating material, it is recommended to use foam plastic with a thickness of 3 to 15 cm and a density of more than 35 kg / m³. The thickness of the material should be selected based on the nature of the room. Everything will depend on the necessary intensity of heating. Over the insulating material it will be necessary to lay an ordinary polyethylene film to produce waterproofing of the surface.
Throughout the perimeter of the heated room and between the rooms, it is necessary to lay a damper belt, which will be used to compensate for the thermal expansion of the screed.
After this, it will be necessary to reinforce the insulation layer and lay it along the contour of the pipe. In most cases, a 150 x 150 mm grid is used for reinforcement. The cross-section of the rod should be up to 5 mm. If you need to strengthen the structure, you can lay an additional layer of the grid. This layer is laid after the installation of pipes.
After the pipe laying has been carried out, it is necessary to proceed to fixing them to the reinforcement mesh. In this case, you will need to use special clamps, which are installed in steps of 90-100 cm. To avoid deformation, the clamps need not be tightened too tightly. When heated, these elements will expand, as a result of which the pipes themselves may become unusable.
Connection scheme.
The technology of laying the water floor involves the installation of pipes at a distance of 10-30 cm from each other. From the wall of the pipe should be at a distance of about 8 cm.
Next, the assembly of the structure. In the feed manifold, the first end of the pipe must be inserted and secured. Then the pipes are laid along the contours and fixed. The length of the spiral should be approximately 50-60 m. When the first circuit is installed, the end of the pipe is inserted into the return manifold. The number of collector outputs is determined based on the number of stacked contours.
In order to avoid problems in the future, you need to lay the water-heated floor by using the instructions. If the pipes cross the deformation joint, which is located between the contours, then a corrugated hose or pipe must be used.
When the assembly and fixing of the structure is completed, it is necessary to check the system for leaks.
To do this, you need to fill the pipes with water and make the pressure above the norm 1.5 times. It is recommended to carry out the test together with specialists.
Next is the screed. In this case, it is possible to use a sufficiently large number of different mixtures. When making the screed in the pipes there must be a working pressure. As a result, the floor will rise by 6-7 cm.
In recent years, the system of warm floor has been widely used in creating a comfortable microclimate, both in private and in private multifamily houses. The assortment of heating materials allows you to choose the most effective copy for heating your own home. In addition, the popularity of the system is due to the fact that the installation of a warm electric floor is possible with your own hands without the involvement of builders or electricians.
Ways of installation
There are several variations of how to make an electric warm floor:
- place it deep into the screed;
- mount directly on the screed;
- set under the floor covering. Such warm floors are called film.
 In the screed
 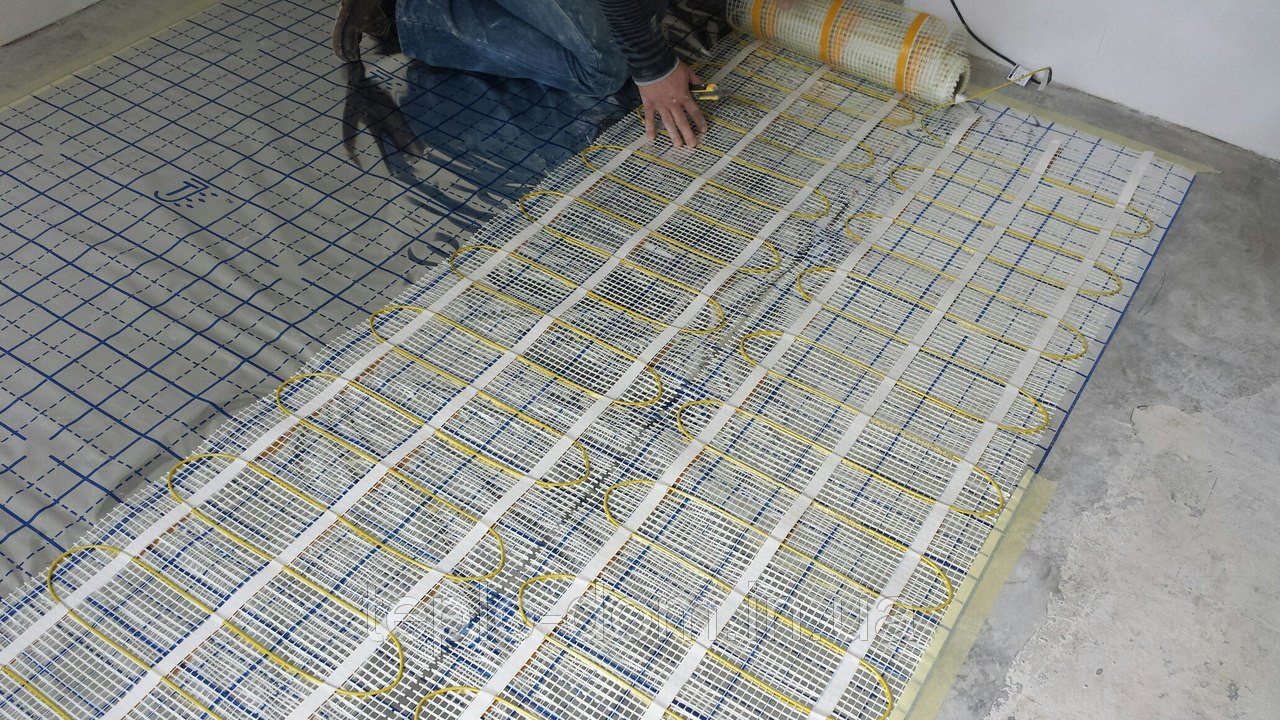 On the screed
 The first variant of laying, as a rule, finds its application in the arrangement of kitchens, loggias and balconies. The design is known as a cable floor, the creation of which includes the following steps:
- laying waterproofing layer;
- installation of insulation;
- fastening of heated elements;
- screed formation.
 Cable floor scheme
 If the installation of an electric heated floor is planned in the apartment, under which the heated room is located, installation of the system without additional thermal insulation is allowed. In this case, the tile and fixing glue act as a protection of the structure and all its individual elements. It is important to familiarize yourself with the recommendations of the manufacturer of the selected underfloor heating system to ensure that such a styling type is suitable for such a material.
Under the linoleum or laminate can be installed infrared heating type. The equipment of such a floor is characterized by considerable simplicity:
- the working surface is covered with foil-coated polyethylene;
- if necessary, additional waterproofing is installed;
- elements of the heating structure are installed;
- a system check is performed to connect to the mains;
- the finishing coat is laid.
 Scheme of infrared warm floor
 Such a heating system must not be installed in a screed, and as a final finishing material, you can not use ceramic tile.
Material selection
The construction market offers two options for warm electric floors:
- the basis of the system is represented by a heating electric cable (this category includes special heating mats);
- the base has the form of an infrared film.
The heated cable can meet:
- self-regulating The cable - heating element is represented by a polymer matrix. When the system overheats, the current in the problem zone decreases, while the remaining elements continue to perform their functions. As a result, the design is characterized by a long period of use, but its cost remains high;
- resistant cable - has one or two cores, where there is increased resistance. Passing through them, the electric current is converted into thermal energy. The heating core is supplemented with an insulating layer and a metal braid, which is responsible for grounding and is a barrier to the electromagnetic field. To drawbacks of the design is that if one of the elements overheats, the work of the entire system is disrupted.
 Self-Regulating
 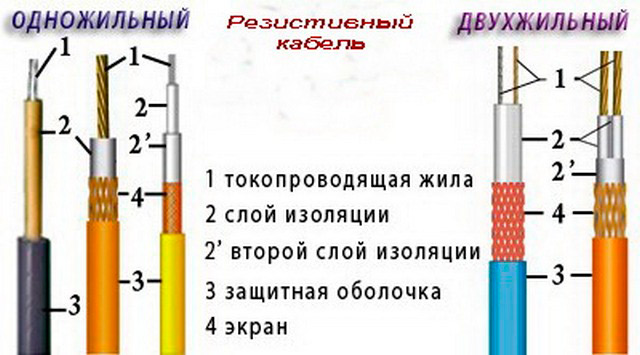 Resistive
 Significantly simplify the process of how to install a warm floor, the following materials can:
- heating mats - have the appearance of a mesh base made of fiberglass of different widths, to which the heating cables are fixed at a predetermined pitch. The specific power per square meter for such mats varies, but it is still inferior to the standard of a standard heating cable;
- film electric floor (also called infrared). It is a cloth based on dense polyethylene with sealed graphite. Its width can reach one meter. The name of the material is determined by the principle of its operation: during the operation, heat is generated within + 20-45 ° C. The film is divided into strips, and if the work of one of them stops, the system still continues to function properly.
 Heating mat
 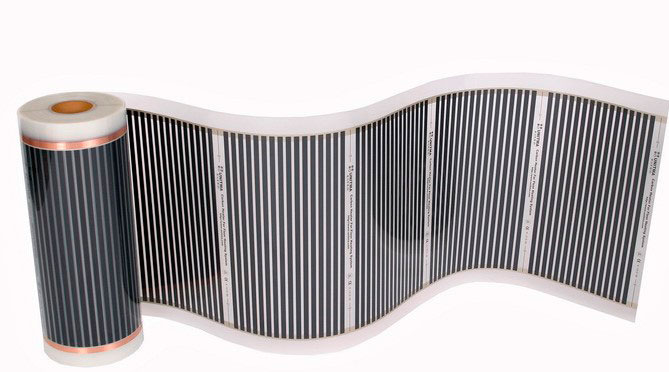 Film
Film The choice of material depends on the finish of the floor:
- the infrared material perfectly feels under the parquet board, laminate, carpet or linoleum. In this case, no additional concrete screed is carried out;
- the experts advise you to lay heating mats under ceramic tiles. Installation of tiles is carried out directly on mats, additional insulation is not required.
Heating cables are selected on condition that heating is required for a large room. Installation of the cable of the warm floor is carried out in the cement filling, which will give the room additional heat. It should be understood, the arrangement of the screed "eats" up to 10 cm of the height of the walls of the room.
Power calculation
Knowing the power factor of the cable is necessary in order to understand whether the entire room will be sufficiently heated. In addition, the indicator also plays a role in choosing the length of the material itself.
To calculate the power, use the following formula: P1 = P2 * S * 1.3 (... 1.6), while P1 means the power of the cable going to laying the warm floors; under P2 is meant the heating power per one square meter of the room; Variable figures from 1.3 to 1.6 represent the safety factor. Its role is to ensure that the equipment does not function at the limit of its own capabilities, but has a reserve of power reserve.
Typically, to heat one square meter requires a power of 120-180 watts, in the case of glazed loggias and balconies, the indicator increases to 180-250 watts per square meter. The power can vary depending on whether the system was installed for the main heat source or an additional one:
- if the installation of the structure is planned as the only heat source, then more than 70 percent of the floor surface is covered;
- if the design acts as additional heating, the cable is laid only on the surface, where no furniture or household appliances are provided.
Calculating the cable power for each individual room, its length is calculated by the formula: h (cable laying step) = S (area of the insulated surface) * 100 / L (total length of the cable). The cable, depending on the power, has a standard length. It is not recommended to trim it - if necessary, the stacking step is changed during installation. It is important to remember that this calculation should also take into account the wire for connecting the entire structure and controller from the meter to each element of the system, since the connection scheme for the warm floor does not allow direct access to the outlet.
In the case of laying the film warm floors, the calculation process is simplified as much as possible - the total number of heating elements must completely cover the entire area of the room.
Distribution of heating elements and control units
Before installing the electric heated floor with your own hands, it is recommended to take care of creating a plan for the forthcoming works. Here it is important to note that the installation of a cable or a film is not envisaged in places where in the future it is planned to arrange massive interior items or electrical appliances.
Being in the same plane, the heating devices work evenly. If there is a pressure or a barrier in the form of heavy furniture, then there is overheating of the heating elements, which provokes their failure. There is also a risk of damage to furniture due to overheating.
The heating wire is most often placed in the wrong shape. Any rearrangement of furniture after completion of work is undesirable - there may be a malfunction when the system is running. Therefore, for different rooms experts advise to take care of creating separate circuits of the warm floor, supplemented by independent regulators and power. Provided that the installation of a warm electric floor is carried out under the screed, between the elements is established damper belt.
To install a warm floor controller, prepare a hole for the mounting box on the wall surface at the selected location. From the groove in the wall to the floor make a groove or stroba, into which after the wires are placed. A place for the future thermostat for electric underfloor heating should be convenient and inconspicuous, but the height from the floor should be 30 -40 cm.
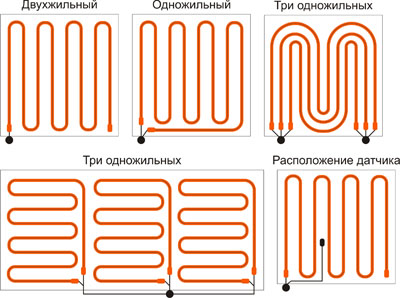 Cable laying options
 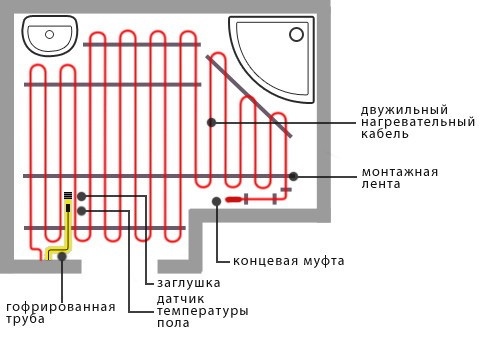 Laying a warm floor in the bathroom
 Surface preparation
Before the direct installation of the heating cable, a set of preparatory works is carried out: the installation of an electric warm floor is allowed exclusively on a flat surface. You will need to do the following:
- dismantling of the previous finishing material;
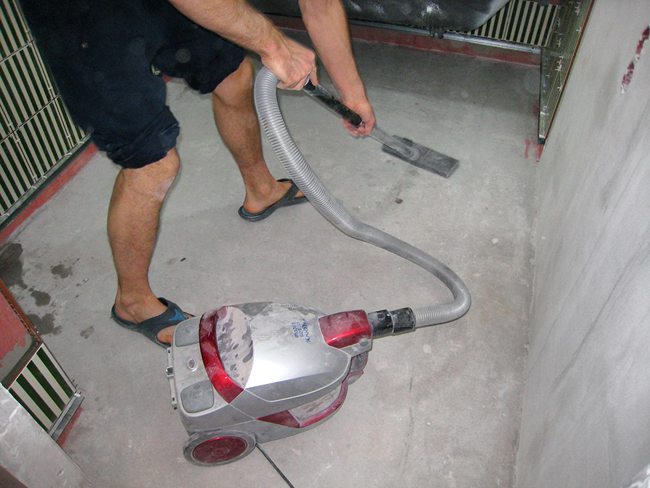
- the floor base is cleaned of various debris and dust. The ideal solution will be the use of a construction vacuum cleaner, but in the absence of such it is possible to resort for help to an ordinary old vacuum cleaner or broom;
- the cleaned base is inspected for irregularities and other defects. To begin with, you can try to smooth them mechanically (wipe it off). If such a method does not succeed, then the base is covered with a screed. The choice is recommended to do in favor of quick-drying mixtures, since drying of a classic cement-sand mortar can take up to two weeks, depending on the area of the treated surface and air temperature. The height of the screed can vary within 3-7 cm (with a layer thickness of less than 3 cm, the screed can crack);
- for better adhesion of the self-leveling mixture to the surface, it is recommended to coat the floor with a primer;
- after complete drying of the screed, it is possible to proceed with the thermal insulation of the substrate.
 Surface cleaning
 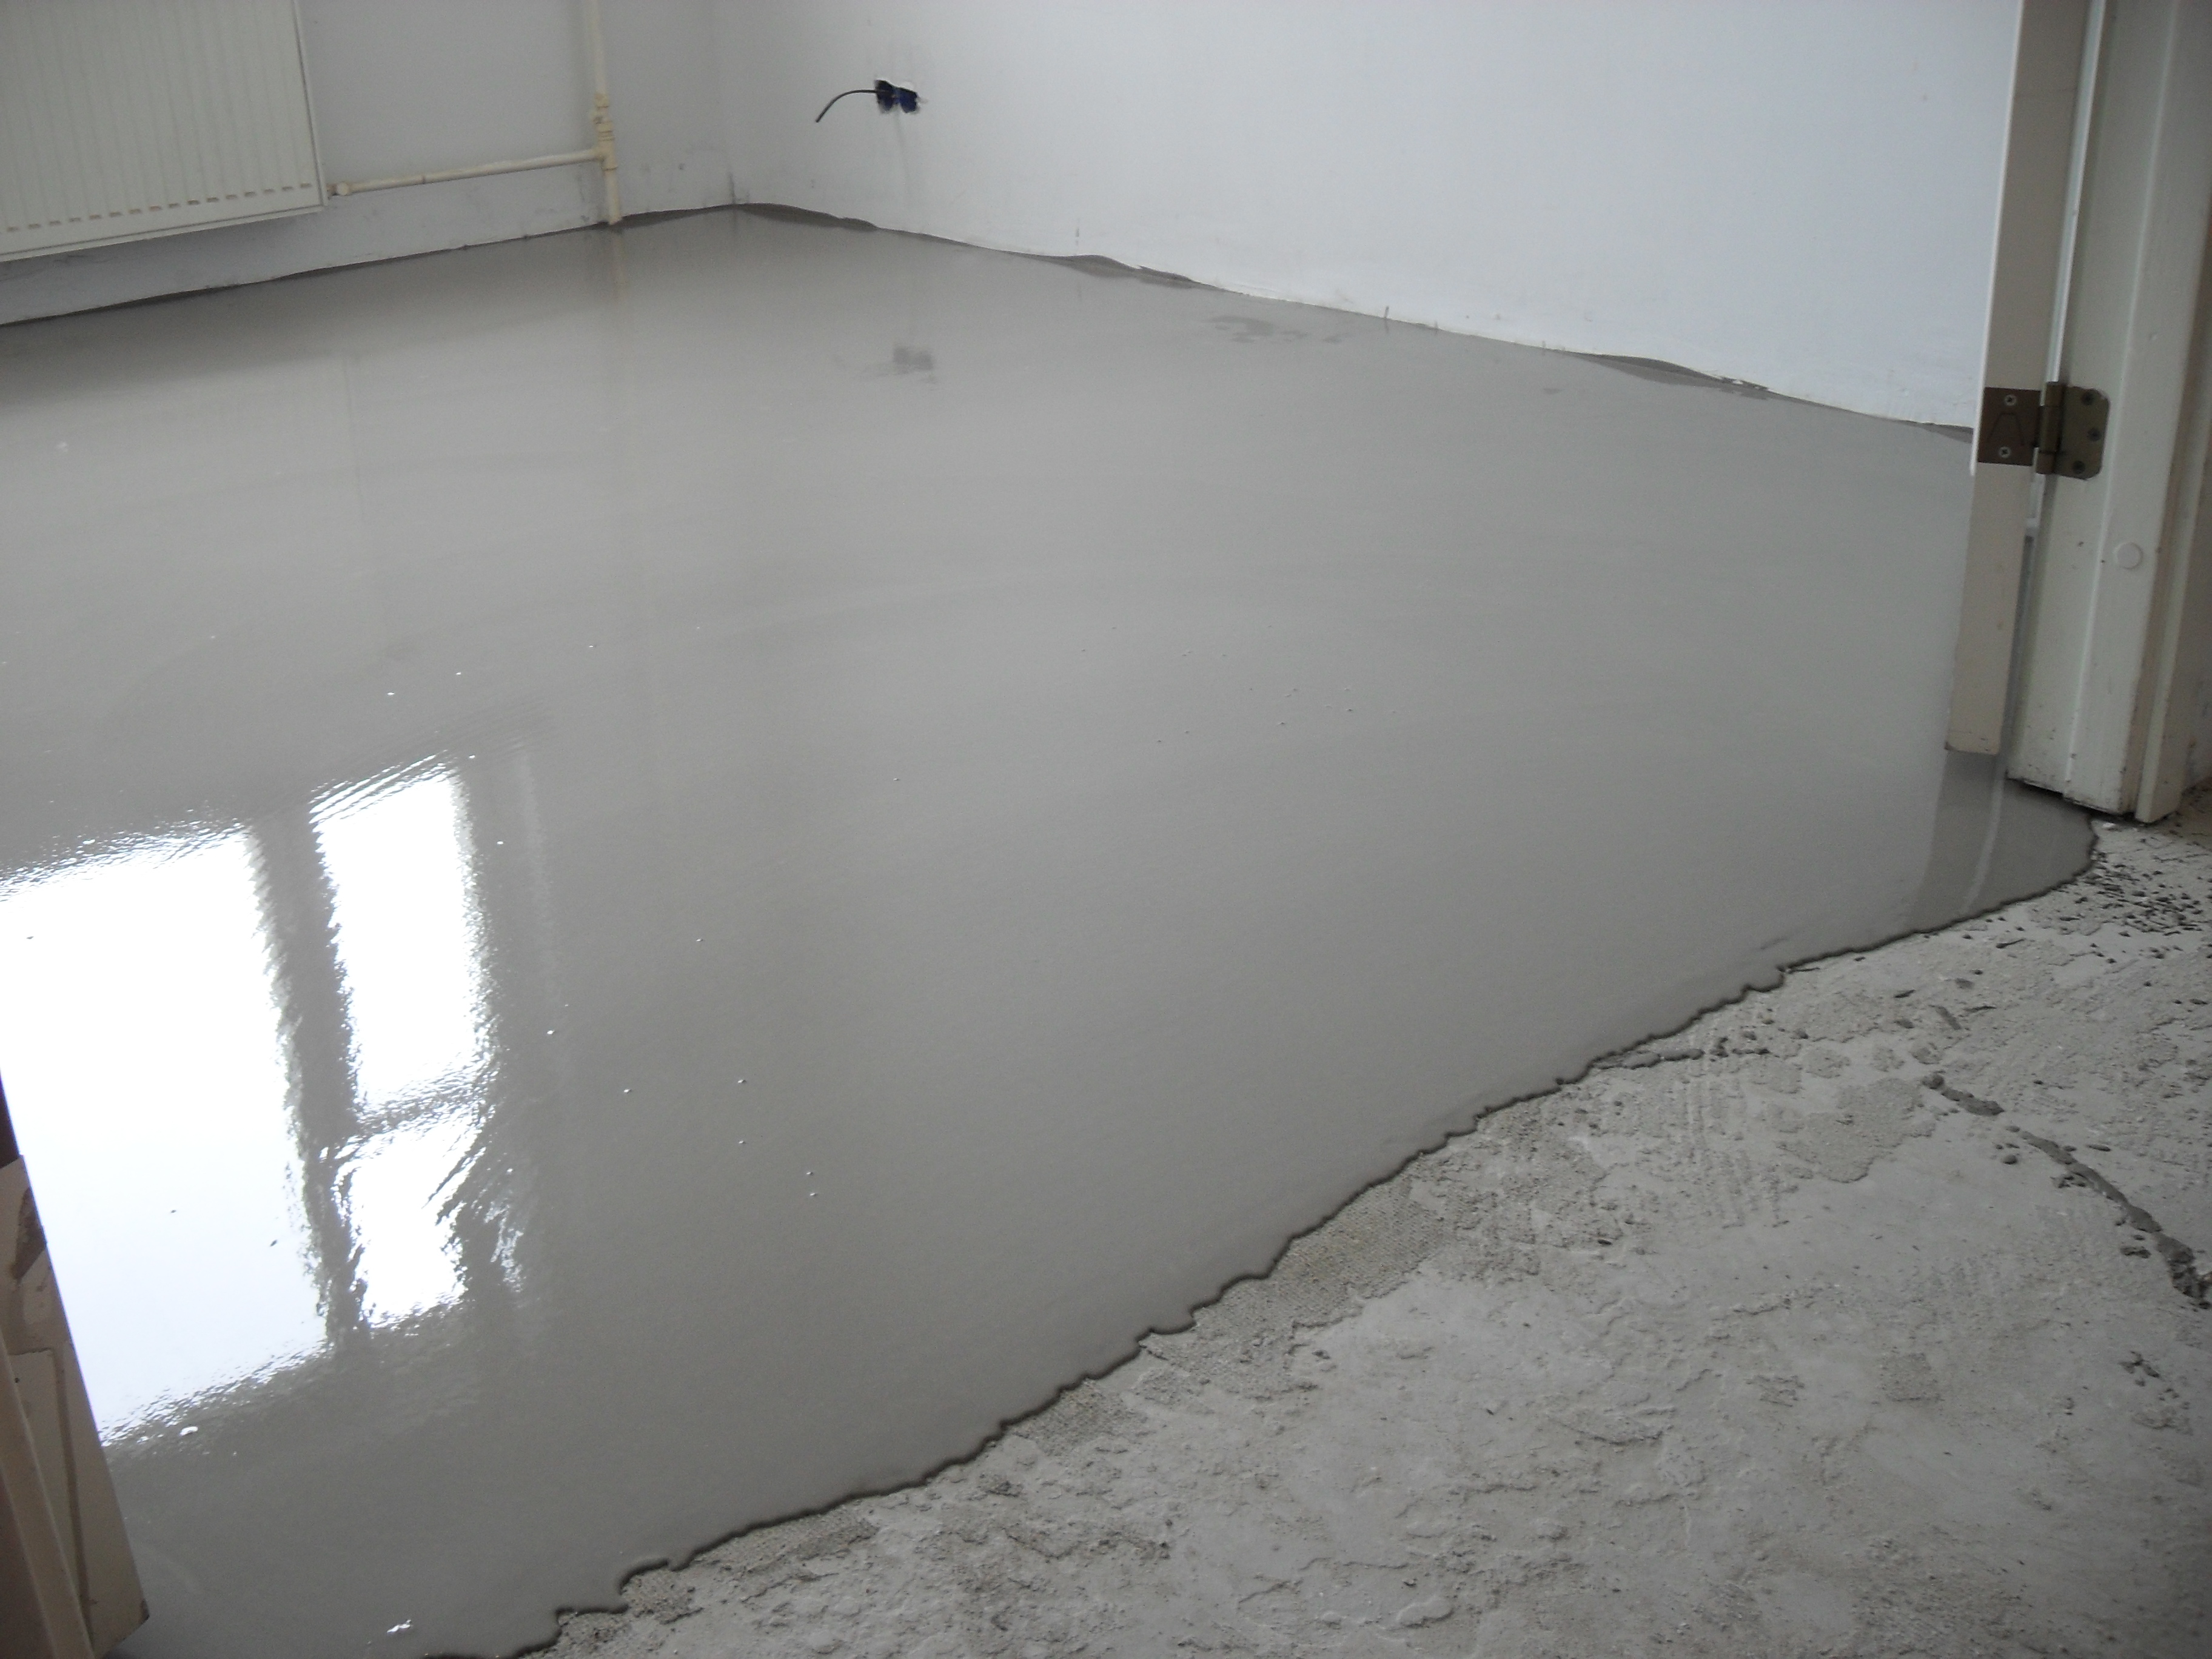 For leveling the surface, a screed
 Careful alignment of the base is necessary for the reason that any bend or unevenness in the path of the cable can provoke its breakdown. As a result, there will be a breakdown of the heating system, the repair of which will be financially expensive. In details, read how to make everything go smoothly.
Features of base insulation
To ensure that the electric floors fully heated the room, it is necessary to take care of the thermal insulation of the room. The fact is that during the operation of the system, the heat is spreading in all directions, which contributes to excessive consumption of electricity. To adjust it, the insulating material is placed before the heating elements (the heat will be sent exclusively to the heated room).
The choice of insulating material depends on the characteristics of the room where the warm floor will be laid:
- if there is a heated premise at the bottom (for apartment buildings), it is sufficient to use roll-up foil material with a thickness of no more than 4 mm. Roll is cut into lengths with a suitable length, they are laid out on the rough floor and fixed with a construction stapler. If desired, the joints are treated with mounting tape;
- if there is an unheated room (basement or garage) at the bottom, as an insulating material, extruded polystyrene foam, polystyrene or any other similar material, supplemented with a foil layer. In this case, the thickness of the insulation varies within 5-10 cm.
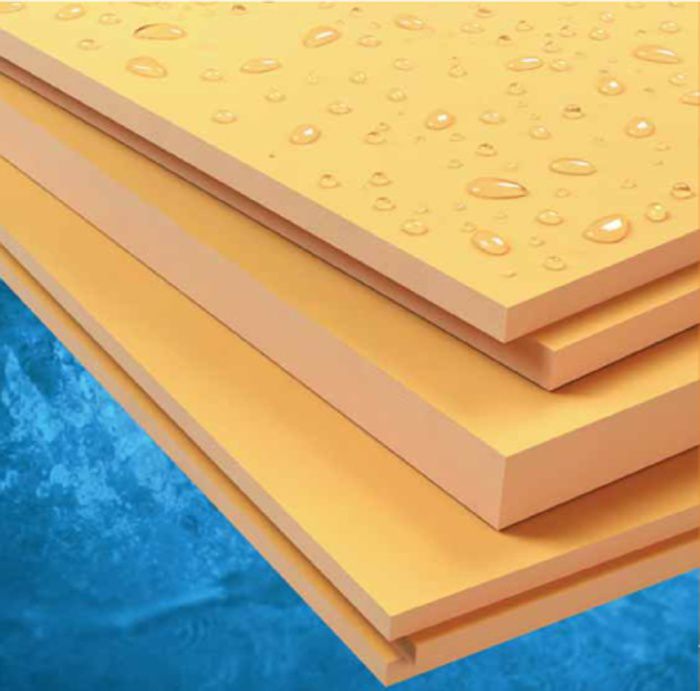 Extruded polystyrene foam
 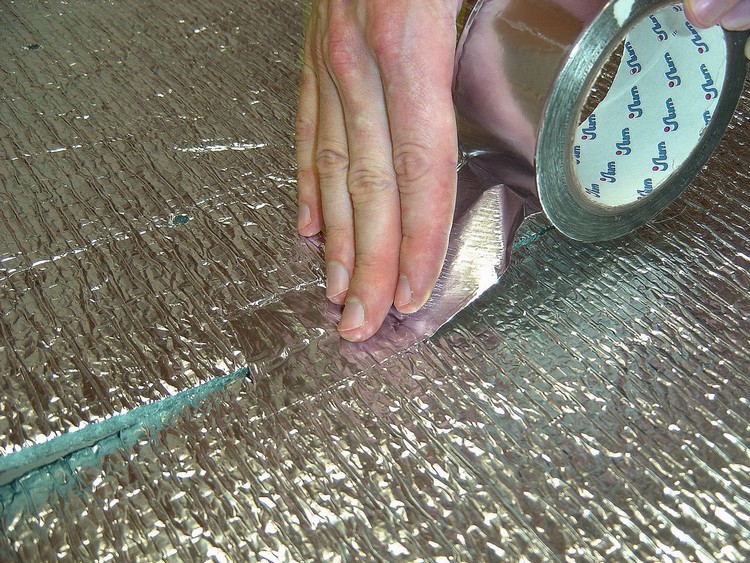 Foiled insulation
 If it is planned to warm the floor with rooms with an increased humidity level, heat-insulating material additionally treated with waterproofing.
Mounting process
At the preparation stage, a thermostat is installed for the electric warm floor. In the process of preparation of the base, a corresponding groove in the wall under the thermostat has already been created, and a sieve for its wire has been laid.
The temperature sensor is placed between the heating lines by cables at exactly the same distance. It is important that the heat regulator is in a confident heating zone: a common mistake is to install it behind the first line of heated elements and eventually the sensor is in an area with insufficient heating. Therefore, it is necessary to place a corrugated tube with a sensor, at the end of which there must necessarily be a plug, at a distance of at least 50 cm from the wall, so that correct temperature indices can be obtained.
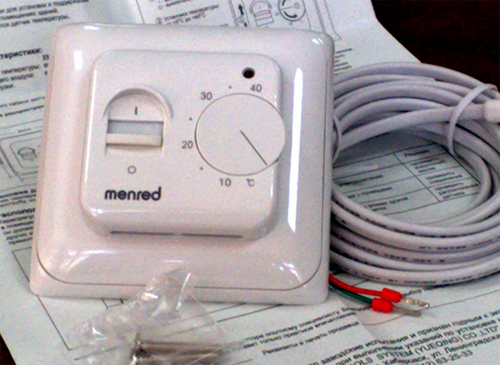 Thermoregulator
 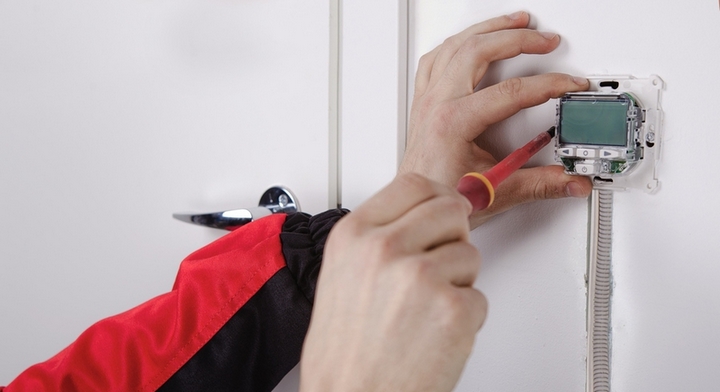 Installing the thermostat
 Heating cable
When stacking the material, start with the place of connection of the power wires to the thermostat. On the thermal insulation mount a steel mounting tape (for fixing using dowels or screws), and laying the cable is carried out on top of it with a pre-calculated step. A fixation tape is used for fixation.
After connecting all the elements of the construction, the floor is connected to the electricity, thereby checking for possible damage and facilitating the management of the warm floor.
In the absence of defects, a screed is poured. The use of such a solution, designed for warm floors, will allow us to proceed finishing finish already after 3 days, however, the connection of the electric warm floor at this stage is not yet permitted: a full fight and drying of the screed takes up to 30 days.
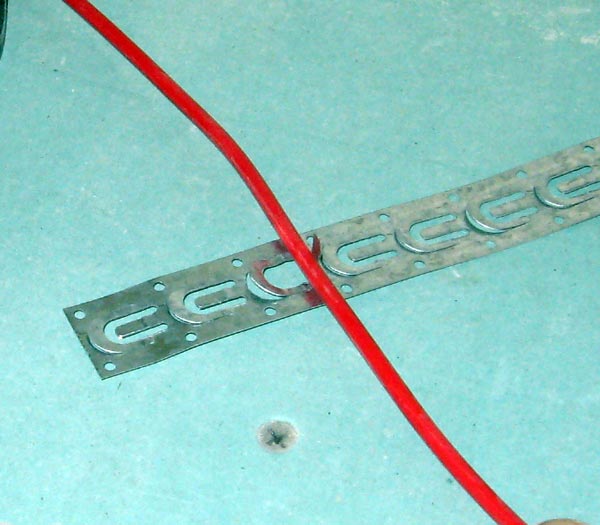 Cable fastening element
 In order to avoid overheating of the system, pre-insulation is not carried out. Since the material has the form of a roll, it should be rolled out on the floor, and the desired direction is set with scissors (it is important not to damage the cable).
This material is supplemented with adhesive tape, which greatly simplifies the installation process. No additional fixatives are required in this case. When the heating mat is snug against the base, it is covered with a tile adhesive. It is important that the cable does not protrude above the floor surface. The construction dries no more than 5 days, after which you can start working with the finishing materials.
 Installation heating mats
 Heating film
The heating film is mounted according to the type of electric mats, but there are some differences:
- the prepared working surface is covered with a heat-insulating substrate supplemented with a foil film;
- the heating elements are laid out on the floor, but the film can be cut completely in the designated places. The shear points are isolated, and the power wires are connected to the other side of the material. The joining of separate sheets is carried out in parallel;
- after fixing all the components, the system is connected to the network and its operability is checked. No additional screed is carried out.
 Heating film laying
 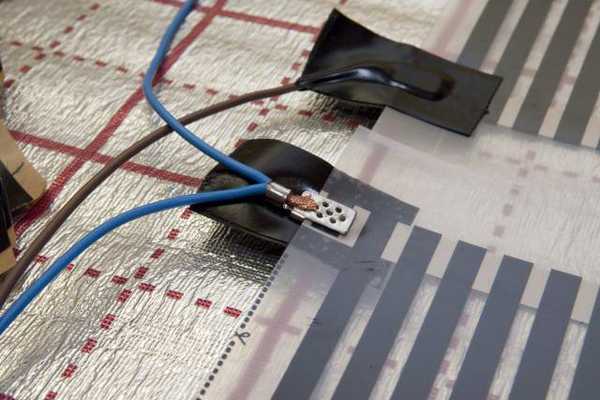 Connecting infrared bands is the most difficult part of an installation
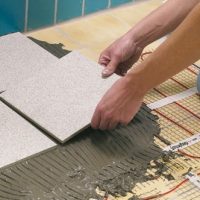
One of the most common heating systems are electric floors on a warm basis. They are placed in various rooms up to the structures of the industrial sector. Correctly executed laying of an electric warm floor can become a guarantee of reliable and harmless use for a long time. Layout of warm floors begins with preliminary work.
How to properly install a heat-floor
If you have chosen for yourself heating installation "Warm floor" with the type of cable heating elements, then first you need to calculate the step of laying the electric warm floor. The following formula is used for this:
H = S × 100 / L,
here: H is the step of packing in centimeters;
S is the surface area of the surfaces to be used for installation;
L is the length of the heating wire.
Installation of floor heating
The length of the power cable depends on the power that is required to heat the room.
Determined with how much such an electrical wire is required, and what area will be covered by the heating system, you can proceed with installation.
The stacking technology consists of several stages. To begin with, you need to make small depressions in the surface of the base to place the temperature sensor, as well as the location of the wires to connect the thermostat.
To improve the contact of the substrate with a concrete screed, the dry and cleaned surface must be covered with a deep penetration primer.
The prepared base should be laid with a ruberoid or a polyethylene film, and on top of it, lay some heat-insulating fiber of the desired thickness with a protective film. It is necessary to protect the thermal insulation material from the influence of alkaline components of the concrete mix.
In order to use the mounting tape, laying it, according to the calculated step size. To securely connect it to the base, choose dowels or other devices.
Errors during installation
Everyone knows that any work performed not qualitatively leads to additional waste of time and money. To avoid this, you need to know which mistakes are most often made when installing the electric thermo-field.
Perhaps the most common and most important is cutting too much cable. This is strictly forbidden, since the wire used to make the "warm floor" is shielded and has resistance, depending on its length.
Underfloor heating
An incorrectly calculated area under the device can also disable it later.
Some people, worrying about the integrity of the design, include it, without waiting for the drying of the screed, which can not be done!
Devices of a warm floor - rather fragile thing and to attack on them it is necessary very cautiously, avoiding cable crushing. Therefore, take care to remove heavy shoes when laying the heating elements.
The temperature sensor should be placed strictly in the tube from the corrugation, so that the mixture of concrete does not get there.
Do not save and leave voids between the elements of electric floors, it will only lead to their overheating and breakage.
Make an effort after mounting to make an approximate plan for the location of the device, since later forgetfulness can play a cruel joke with you and, by repairing something, you will put out the entire heating system.
Installation of a temperature sensor and a regulator
Before mounting the warm floor, it is necessary to connect the temperature sensor and position the temperature controller. The last one is mounted on the surface of the walls in a convenient place for you, but not more than 30 centimeters from the floors.
The meter for the heating temperature (temperature sensor) is located in the thickness of the electro-floor elements at a distance of about 70 centimeters from the wall. The heating process can be controlled by means of a temperature regulator.
Scheme of electrical floor heating connection
The scheme of laying electrical floors with a warm base involves the introduction of a thermal sensor in a corrugated tube, a cable from the central electrical network and electrical cables from heating elements to the temperature controller. Including the device "warm floor", on the front panel of the controller you can see a lighted pointer, and the floor heating elements will radiate heat.
Which known types of electric floors exist
The modern market of materials for construction presents its customers with three different electro-floors:
- Film.
- Heating cables.
- Heating mats.
Film electric floors are also called infrared. With their help you can spend a few hours in the layout of the heating and not reduce the volume of the room. This type of floor will ensure rapid growth of temperatures in any room.
Traditionally, the installation of the film floor begins with planning the layout of infrared plates in the room. Do not forget to remove from the total area, the area occupied by furniture. A heat-reflecting material should be located around the perimeter of the entire room.
If such a floor is used as the main heating system, then the coverage should be no less than 70%. In the form of additional - will be enough 45% of the total area.
It is necessary to remember that the size of stripes of film floors should be no more than 7 meters - if the width is 1 meter; 10 meters - 0,8 meters; 13 meters - a width of 0.5 meters.
The stripes of the film floor are cut strictly at the indicated place of the cut, and laid down with copper elements. It is necessary to avoid overlapping of neighboring areas, and at the end of the layout, fix the strips together with a special adhesive tape used in construction.
After completing the basic installation work, connect the structure to the power supply and check its operability. Infrared warm floor is ready for use.
Heating cables differ from other types with their large linear output. It is because of this that it must be located in a layer of cement screed about 5 centimeters thick. For laying such electrical floors, a certain degree of qualification is required, and the system itself is suitable for use not less than a month.
Mats for heating have a small capacity, so they can be placed in layers of tile adhesive directly under the ceramic tiles. Since the electrical cable is fixed to a plastic mesh, installing such a kind of warm floor will not be very difficult, and it can be done on its own. It is necessary for this simply to lay out the heating mats on the floor surface, giving them the necessary shape, cutting the mesh, but not the cable itself.
The mounted structure is ready for use within a couple of days after the glue has dried completely. The arrangement of mats directly under the slabs will make it possible to achieve the effect of "warm floors" in a very short period of time.
How to install a "warm floor" design at home
This instruction is suitable for self-placement of the floor in the home. There are several methods:

When starting to mount the heated floors with your own hands, it is necessary to thoroughly prepare the surface. It is very important, when installing the heating system, to make indentations from the walls by 5 centimeters, and from the heating elements of a different kind (pipes of the central heating system, batteries), such indentation should be at least 10 centimeters.
In the screed you need to make a groove measuring 20 x 20 centimeters, it will be located the final wires of the heating system, which will be displayed to the junction box.
Do not forget about checking the resistance of the wiring of heating mats and the temperature sensor. They should not exceed the dimensions of those specified by the manufacturer in the technical specifications.
Temperature control will be carried out by a special sensor located in the tube and closed by a plug. After stacking the temperature sensor in the ditch it is filled with a tile adhesive.
At the walls, the bending of the pipes should be no more than 5 centimeters in radius. The ends of the wiring must be cleaned and attached to the thermostat. Having done this, you can make a short-term test run of the installed heating.
Registration of the final stage of installation
At the end of the work, the floor with the electric base is poured with a thin layer of solution, not more than 1 centimeter. After it has completely dried, a second check is made to check that the mechanism works. If everything works, then you can proceed to gluing the tiles or facing the other floor covering.
Do not forget that when laying the thermo-floor the room should not be exposed to drafts, and the floor is switched on only after the concrete screed has completely dried.
Laying an electric warm floor has several advantages. Such a floor will create in the room a soft and evenly distributed heat, do not disturb the usual humidity, and will not dry the air. In addition, warm electric floors will harmoniously fit into any interior, as they will not occupy much space in the room and will make it possible to remove the radiators. It's no secret that the convective heating system is less comfortable and economical than electric heating floors.
So for those who love coziness and pleasant sensations, will become an excellent solution installation of this type of construction. The warm surface of the laminate or tiles will bring you a lot of positive emotions, and the hidden system will not spoil the appearance of the room, providing it with heat.