With all the undeniable advantages of a brick, he still has one significant drawback: high thermal conductivity. Therefore, houses built of this material, need high-quality insulation. For each structure of bricks, it is necessary to make a heat engineering calculation. That is, to find out what the required design resistance is for the building envelope. This will help to perform high-quality insulation brick house outside and inside.
What materials are used to insulate a brick house outside
The developer should focus on three basic rules of heat engineering:
- External insulation is more effective than internal insulation.
- The increase in the coefficient of vapor permeability of the materials constituting the wall pie should be directed from the inside outwards.
- For the full insulation of the enclosing structures, it is necessary to perform a set of corresponding works on both sides of the wall.
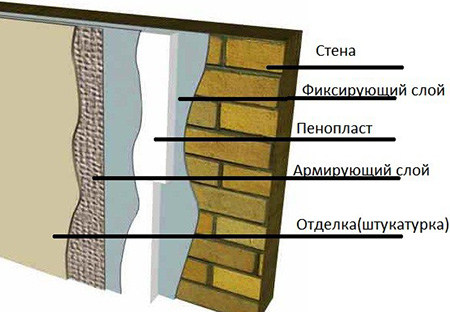
The scheme of warming the brick house outside
There are three types of heat insulators, which are optimal for the insulation of walls, built of bricks. This is extruded polystyrene foam, polystyrene, mineral wool (or other fibrous materials with similar properties).
Extruded polystyrene foam
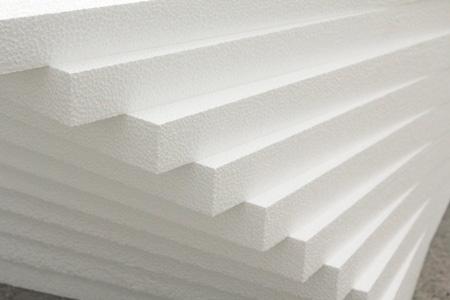
Extruded polystyrene foam (EPSP) has the lowest thermal conductivity among those materials that are suitable for making an interior and exterior brick house. EPSP is manufactured by pressing and has a significantly higher density than the foam.
Styrofoam and Penoplex
Polyfoam is the most popular heat insulator for brick walls. It can be used for both types of insulation: external and external. The optimum thickness of the plates is determined with the help of heat engineering calculation, which can be done with the help of the Teremok program or the "Thermal Technical Calculation Online" service.
According to GOST 15588-86 released 4 brand foam: PSB - 15 PSB - 25 DPM - DPM and 35 - 50. The developer should be aware that the standards do not provide letters "U" - an improved or "F" - front. The presence in the trade network of material with marking of this kind is caused by the desire of the producer to interest the buyer.
Important: In choosing a foam for warming the brick house from the outside and from the inside, you need to pay attention to the figure in the marking. The lower it is, the higher the thermal conductivity of the material.
There is an improved modification of polystyrene. This material has a lower thermal conductivity. It is more profitable to make the insulation of a brick house with foam by means of penoplexes in terms of cost savings, since it becomes possible to use slabs of lower thickness. So, reduce the cost of buying a thermal insulator for exterior walls.
Mineral wool
There are two main types of mineral wool: stone (basalt - basalt, limestone, dolomite) and slag (base - slag of non-ferrous and ferrous metallurgy). Any of these fibrous materials, on average, has the same thermal insulation properties as polystyrene foam. For example, the thermal conductivity of mineral wool with a layer thickness of 167 mm is 0.039 W / m ° C. A foam at a thickness of 159 mm - 0.037 W / m ° C.

But minvats have one significant drawback: high hygroscopicity. When wet, it is not capable of performing the function of a heat insulator. Therefore, in regions where the air humidity is increased, it is more profitable and more reasonable to make the insulation of the brick house from the outside or EPS. but good as a heat insulator for the internal walls of the building.
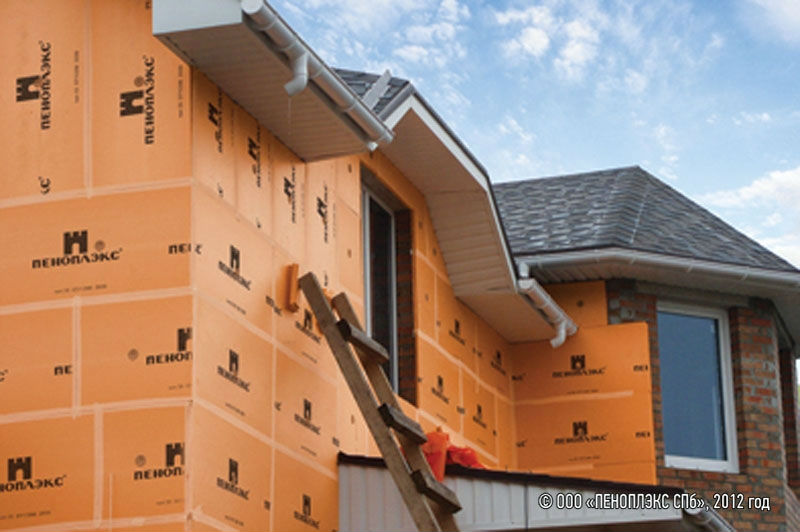
How to insulate a brick house, if the facade of a siding
If siding (not important, vinyl or metal) is chosen as the facing material for the exterior walls of the house, the best insulation in this case is foam or EPS. Since the second one has a higher price, the first one is the most popular.
Ways of facade insulation under siding:
- gluing foam plastic;
- fixation with special fasteners.
The technology of gluing foam to the outer walls
Warming of a brick house with foam plastic for siding with gluing is the best choice for brick buildings. The reason for this is the less laboriousness of the process and the higher speed of work.
Important: The developer should be aware that the fixation of the foam plastic by gluing is possible if the exterior walls of the brick house are flat.
Stages of work
- The surface of the wall is cleaned of dirt and, if necessary, leveled.
- Produce treatment with a primer of deep penetration.
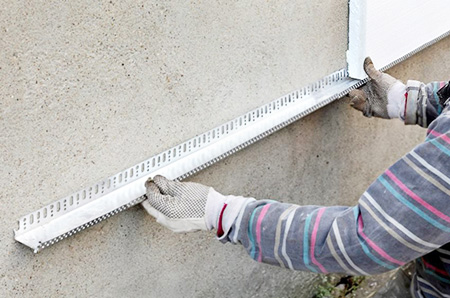
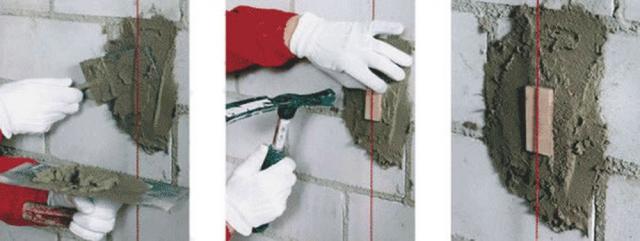
- In the lower part of the wall, a horizontally mounted strip is attached, which will serve as a support for foam or Penopolix cloths during the gluing process.
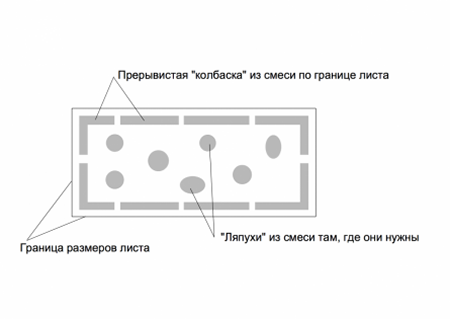
On the surface of foam plates (Penoplex) rolled needle roller.- On the perimeter and center of the expanded polystyrene sheets, a layer of glue is applied. You can use glue foam for work with foam PENOSIL, polyurethane adhesives in cylinders, dry mixes Ceresit CT-85, Weber Vetonit, Bergauf Isofix, Perfect Thermo or similar. Any of these compounds allows you to perform quality insulation of the brick house from the outside with foam under the siding.
- The first row of plates of heat-insulating material is fixed with support on a horizontal rail.
- The second row of plates is staggered in relation to the first.
- Post-conglutination glue mount siding.
Important: To fix the foam on the exterior walls of a brick house, it is not recommended to use a cement-sand mortar. It is not able to provide the proper level of adhesion of the binder and heat insulator.
Technology of fixing foam to external walls with fasteners
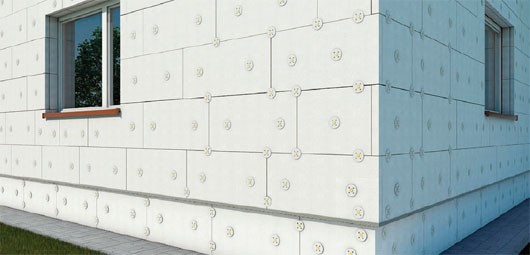
The facade of a brick house insulated with foam
Thermal insulation of a brick house under siding with its own hands can be done with the help of special fasteners: dowels with wide hats. This method is more reliable, but it takes a lot of labor.
Stages of work
- The surface of the wall is cleaned of dirt. Alignment, if there are no large differences in altitude, is not required.
- Install the starting guide (horizontal rail) in the lower part of the wall and beacons from the tensioned cords (serve as a guide during the laying of plates).
- Vertical racks from a metal profile or wooden bars are exposed, the step between which should correspond to the width of the thermal insulator sheets.
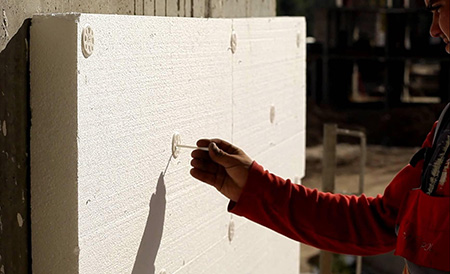
- Fasten the foam or Penoplex sheets each with 5 dowels: four in the corners and one in the center.
- Mount the siding.
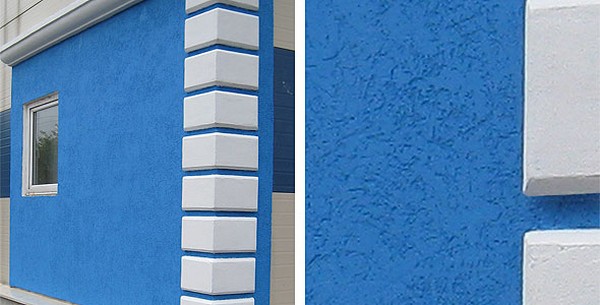
We warm brick walls with foam and plaster
Use for plastering the exterior walls of a brick house plastered foam - an economically profitable way to make a warm and aesthetically attractive facade. The work uses special prizes: Ceresit, Ecomix, Stolit and others with similar properties.
Important: The insulation of the brick house with polystyrene for plastering is done using a PVC mesh, as this material is resistant to alkali. Optimal choice - grid for facades with a density of 140-160 g / m2.
Stages of work
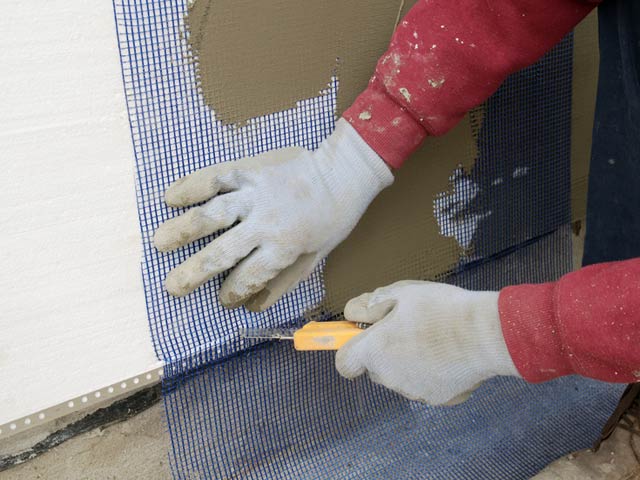
- Starting from the top of the wall, the mesh is fixed to the foam plastic so that its edges are dense to form an overlap of at least 10 cm.
- Work is begun in the finishing of window and doorways.
- Apply the first layer of plaster thickness 0.7-0.7 mm. This work will be more convenient if you hold the upper part of the grid with one hand and place the solution in a direction from the top down. In this process, it is more convenient to use a special plaster trowel, and mesh the "mash" with plaster.
- On solidification of the first layer, the second layer is applied: leveling. Its thickness is not less than 1 cm. A spatula with a width of 35-45 cm is used in the work.
- Apply a priming layer and proceed to finish the plaster: painting or hand-made.
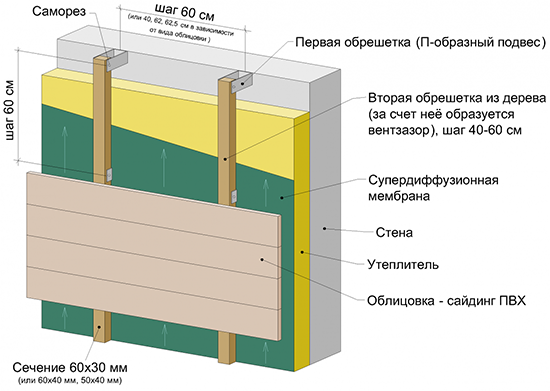
We warm brick walls with mineral wool
Mineral wool is the best heat insulator for internal works. Regardless of whether the roll is used material or slabs, internal walls buildings are fastened vertical racks at a distance equal to the width of the woolen cloths. For external work, it is recommended to use compressed plates.
Warming of a brick house outside under the siding requires a ventilated facade. Due to the high hygroscopicity of this heat insulator between it and finishing material It is necessary to leave a gap that will allow moisture to evaporate. In addition, the minivat should be covered with a vapor-tight membrane.
Stages of work
- The supporting wall is attached to the crate.
- They put a heater.
- Mount the membrane.
- Provide ventilation products with a width of 4-6 mm.
- Strengthen the finishing material.
If this way to perform the insulation of a brick house on the outside with a mineral wool under the siding, this heat insulator will serve irreproachably for many years.
Wall insulation with expanded polystyrene from the outside is most common. After all, the price of the material is quite democratic and you can do all the work yourself.
How to insulate the exterior wall of the house with expanded polystyrene, we will consider today in detail. Also on the video in this article and a photo you can clearly see the most important areas of work.
Warming the extruded polystyrene walls from the outside is not a difficult process, but this is if you are familiar with the technology of work. The whole work can be divided into several stages, the instruction for each of them is set out below.
Preliminary preparation of the wall
Extruded polystyrene begins with the preparation. This is not just a cleaning of the plane, it is also necessary to prepare the material itself for further installation.
Attention: Warming for walls from the outside with expanded polystyrene is made on a flat plane, there are tolerated differences, but not more than 5 mm.
After all, it rarely happens that the wall was originally completely level and the preparation is just the leveling of the wall:
- All kinds of irregularities, depressions and bulges may well lead to the appearance of voids under the insulation material, and as a consequence, such places can be broken by impact. And it does not matter whether it is a cavity or a wall slightly bulging, in alignment it needs both cases. Ideally prepared aligned wall is one on which the difference in heights is not more than one two centimeters.
- Well the wall is leveled and now it is necessary to take into account the texture of the facade, it will depend on this, how well the heater will be glued. So from the painted surface of a wall the paint quite can slazit and fall off, such wall necessarily requires careful cleaning. PF paint should be knocked off the wall surface in any case (see).
- When you touch a wall completely ready for gluing, there will be no trace left on the hand. In this case, you can do without priming it surface, but only if your budget is limited, and yet the primer is very, very desirable.
- When the trace from the hand is left, the primer is mandatory. And if even small sand grains start to fall from the wall from under the hands, it is necessary to carry out a sweep before the disappearance of this effect and only after starting the primer (see).
- Rarely, but it happens so that, regardless of how much we clean everything shedding will continue, then in any case it is not necessary to continue to the bitter end, and you can overdo it. Conduct a preliminary primer from the sprayer, and then a solid shpaklyuyut or plastered with the addition of glue PVA.
- Than to carry out a first coat, will be described below under the text. The primer itself is applied either with a special brush, a mackerel, or from a pulverizer, but the first option is preferable when the wall does not crumble. Applying a primer with a brush, as if you are additionally cleaning it.
The process of preparation of insulation with the use of extruded polystyrene
The sheets of extruded polystyrene foam are distinguished by the increased smoothness of the surface in connection with which, in contrast to the foam it is necessary to prepare for gluing.
Attention: Manufacturers, knowing about a similar problem, tried to take this into account and now on sale it is possible to meet such insulation material and with the corrugation, however it is not always available.
- The preparation of extruded polystyrene consists mainly of making the sheets rough, otherwise the adhesive will not adhere well to them. In order to make the sheets rough they should be rolled with a needle roller for gypsum board.
- The rolling process does not differ in any complexity, the sheet is simply enough to roll the entire sheet. It is not necessary to do everything at the last minute, the sheets are prepared in advance in the right amount for conducting insulation work.
Attention: An important point is that the rolling must be done on both sides of the insulation. If you do not have a roller, you can use for the same purpose an iron brush.
Thanks to its structure, the foam does not need any processing.
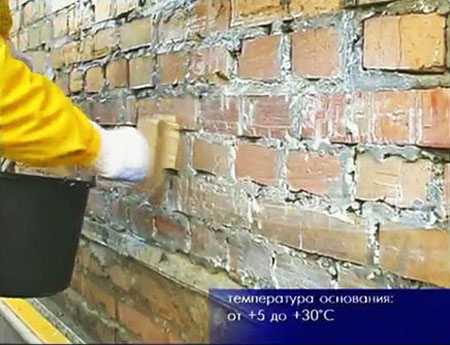
Wall priming
The choice of type of primer depends on the material of the walls, the main thing is that it should be deeply penetrated. When going to primer, swipe the wall with a hand with little resistance.
- If the hand is dusty or there is a bit of street dirt on it, the wall should be well washed and dried, and then the primer can then be applied only for the next day.
- White plaque indicates the presence of mineral deposits, typical for the weathering of the upper layer. If it is available, the wall must be treated with a hard metal cord by means of a drill or a bolgar. The remaining dust is removed, then you can start priming.
- Concrete or brick walls, from silicate or simple bricks, with erosion deep into the hand, leave a gray, red or brown plaque. Such walls are also treated with a metal cord, until the whole unscreened wall goes. You can even resort to using a perforator with a chisel to remove the top layer of the damaged surface.
- After that, the wall is rubbed with cement filler over the concrete until it is completely leveled.
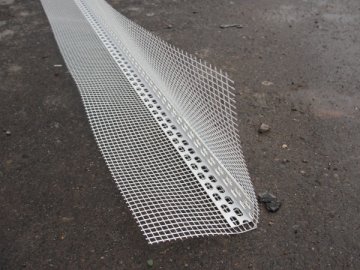
Pasting of cornice
Before you start to glue the heater to the walls, you need to paste the cornice:
- Gluing is done by the thinnest strips of material on one glue. Extruded polystyrene is cut by electric jigsaw with the blade on the foam, or with a hacksaw for metal. PPP can also be cut with a conventional mounting knife.
- Begin to glue the strips from the wall, since later they will be supported by wall sheets. FROM
- begin to stick vertical strips, protruding so that the vertical stripes could lie on them. There should be no protrusions for each other.
Work with slopes
Slopes in the original form do not fit and require some refinement:
- So the window sill on the outside should end up no more than 4-6 centimeters. For example, you chose sheets of insulation thickness of 8 centimeters, then the new window sill should be 15-17 centimeters more in width of the old one, because 2-3 centimeters just simply leave because of the mesh and plaster.
Attention: Do not make the window sill unnecessarily protruding, otherwise you risk with every rain to hear it well in the house.
- When installing a new window sill, you should avoid the voids below it. If they are, they are filled with fragments of foam and filled with foam, otherwise moisture will penetrate there and the wall will dampen. Immediately, the sill is installed and pressed down with materials for one day.
- We select the sheets for gluing the slope so that it does not interfere with the leaves. The gluing is made with removal, and after the glue is completely hardened, the foam is cut level with the wall, or with a minimum removal of 0.5-0.7 centimeters. Thus, after mounting the wall plates, they will press the strips to the slope even better.
Work on gluing plates to the wall
After leveling and cleaning the walls, carrying out work with the windowsill and slopes, the turn of the walls comes:
- Begin to glue only in rows from top to bottom, otherwise the coating will crawl. The mounting of the material slabs is done horizontally by the wider side. Vertical joints between the plates of the material are made in staggered order, for this angle plates are cut in half in length.
- Wide, from 40 centimeters to a meter, a spatula with corrugation, on the wall is applied glue, which can be applied to it with a smaller spatula. In the process of applying glue, if it slips in any place, such a place is necessarily lubricated with an average. On the end of the slab of the material, sour cream is applied, the tile is installed and leveled by a gentle rocking for adjustment.
- For quality insulation of one layer of material will be small. Therefore, it is better to calculate the quantities of material immediately taking this into account. Since it is necessary to glue in staggered order, the top row of plates is glued with a horizontal shift to the floor of the plate and completely to sour cream.
- Due to the fact that one layer will be small for normal insulation, some might think that it is possible to take plates of different thicknesses. But there is no choice of plates that costs only one thickness.
Warming of walls outside with expanded polystyrene should be of high quality. After all, the material must be firmly attached to the plane. Polyfoam to the wall is attached with dowels-fungi converter. At the same time in many instructions to the material there is a recommendation on the corners of the dowels to set, deviating from the edge of the plate.
- Correct fixing is made only in the corners of the plate, so it will be more reliable and the load is distributed at once several plates. Dowels-fungi are chosen only plastic, because the metal is too susceptible in this case by thermal expansion and destroys the foam. In this case, metal dowels can cut material, and are not resistant to moisture.
- They should be planted to a depth of at least 6-8 centimeters. With a thickness of insulation of 8 centimeters, dowels are chosen 15-16 centimeters. The drill is chosen 20 centimeters, or two at a time, as there will be many work and the strength of one may not be enough.
- Polystyrene is a rather delicate material, so the dowels-fungi are inserted manually into the resulting holes, with the finishing to the level of the wall with a rubber mallet. Then the same tool clogs the propylene nails into the fungus. The resulting unevenness is leveled by the solution.
- On the corners and slopes the distance between the fungi is 15 to 30 centimeters, receding from the very corner of 20-22 centimeters along the wall. But this depends on the thickness of the insulation, at the same 8 centimeters, the indent should be 30 centimeters, that is, the dowel must necessarily fall on the angle of the slope.
Installation of a grid on a heater
After 24 hours, the grinding surface is equal to the surface of the foam. Even if the grater has come into a bad condition after that, it should not be thrown away, it is quite useful for leveling the primer under the plaster. After that, you can make a mixture for the alignment, to which the grid will be glued.
- The process of gluing is similar to the patching of insulation sheets, from top to bottom. They start from the corners, and then again a corrugated spatula with teeth will come in handy, it will be blended onto the foam. After that, the net is stretched and rolled until it lies well on the material. You can do the opposite and first put the grid and already on it a mixture, but this method is not effective.
- Where the winters are severe, the corners are warmed additionally, with special plastic corners with perforations, or the grid is mounted on sour cream, a day after installation, it is filled with a mixture and after another day it is rubbed.
- To prevent the joint from sticking out, the edges are made free. The edges should go to each other by two thirds, the third remains free. When the mixture hardens, they are bent, smeared and again applied to each other, carefully punching to the surface.
Preparation before plastering the insulation
For subsequent plastering, the mesh should preferably be selected from PVC (see). Such a mesh will not break down and will not undergo a corrosion process from the cement mixture.
- The length of the grid strip is cut off depending on the height of the wall. The grid is mounted from the top down, its strip is held at the top, carefully applying a solution to the floor of a centimeter thick, trying, as it were, to firmly connect the foam plastic with the mesh.
- After the solution has solidified at the top, it is possible to continue applying it, over the whole surface, starting from the top and along the entire width, leaving only a small part of the edge free.
Attention: The free edge remains only on one side, to subsequently overlay it on the next strip and so on to the end of the wall.
It is necessary to clarify that it is necessary to begin the installation of the grid from corners, from slopes and openings, only then passing to the other parts of the walls.
Rubbing before finishing
In order for the put solution to eventually become even, strong and reliable, it must be subjected to rubbing:
- Grinding is done by a plaster half-rub, at work it is necessary to wet it from time to time and remember that polystyrene is a gentle material. Miter gently and carefully, without exerting strong pressure when leveling and smoothing the solution.
- Grid peeping out of the solution is not a problem and does not require the application of an additional amount of solution.
There are tips, from people engaged in this professionally, to proceed after this to the priming of the entire layer.
Plastering of insulation from foam
Having made the insulation of the walls with extruded polystyrene foam, the plane must be plastered from the outside (see), because the plane must be perfectly flat. After all the above procedures, you can make the second and even the third layer before the final alignment of the wall and to hide the protruding grid. Layers are not applied in a row, but only after the previous one has dried completely.
So:
- The application of all these layers should by no means be the final step in the finishing of the wall, but only the preparation for the final stage in the plastering of the wall. Plaster for these purposes is allowed to choose decorative. After all, many of the previous actions, as a thorough alignment, were designed precisely to ensure that the decorative plaster looked qualitative.
- For plastering, you must immediately prepare all the necessary material. Stucco composition is best to choose the universal, and have several types of spatulas. A small spatula, useful for imposing a solution on a large, which is much more convenient than other methods.
- To optimally distribute the plaster over the entire surface of the wall, a plaster half-cup will be useful, preferably from a foam. Reinforcing material will make a mesh of polyvinyl chloride. Well, of course, you will need some tanks with water to make the mixture, the usual bucket will do.
How to insulate the external walls with styrofoam you already know. By doing the work correctly, you will reduce the cost of heating. Do everything qualitatively and thoughtfully, only then you will not waste time on rework.
External insulation of the building can significantly reduce energy losses and save on heating. This method requires the use of a durable and moisture-resistant material. The cost of thermal insulation should not constitute a significant part of the budget foreseen for construction. Experts recommend that the walls be insulated with polystyrene foam, while it's easy to do the work yourself. Plates of expanded polystyrene are characterized by low thermal conductivity, strength and durability. To install the insulation has a tangible effect, it is necessary to strictly observe the installation technology.
Polyfoam - a universal insulation, it can be used on any part of the outer walls of the house from the foundation to the roof. It is a white plate with a pronounced granular structure. The closed gas-filled pores constituting the basis of the material provided him with optimum performance characteristics:
- thermal conductivity - 0,038-0,042 W / m * K;
- density - 15-40 kg / m3;
- water absorption - 2% of the volume;
- operating temperature - from -55º C to + 75º C;
- the coefficient of vapor permeability is 0.05.
The material is environmentally safe, it does not have toxic emissions. Its surface is not exposed to mold and fungi. The low weight of polymer products facilitates transportation, installation by one's own hands and load on the structure.
Polyfoam is produced with the following parameters of the plates: 100 × 100 cm, 100 × 50 cm, the thickness is 1-10 cm. To effectively insulate the walls from the outside, a material with a thickness of at least 4 cm is required.
The strength and durability of the foam depends on its density, the higher this value, the more reliable the heater. External insulation of the walls assumes an increased load in the form of a finishing layer of plaster, therefore plates with a density of 25-35 kg / m3 will be required. The democratic price of expanded polystyrene has made it the most popular heat insulator in private housing construction.
Disadvantages of using foam plastic
Choosing which insulation to install outside the walls, you need to learn all the pros and cons. Foamed polystyrene plates have several disadvantages:
- high flammability class - G3-G4, the material is easily ignited, it gives off toxic gas during combustion.
- damage to the structure by solvents and paint;
- an attraction for rodents.
High fire hazard is compensated by placing the insulation under a layer of non-combustible mineral finishes or decorative siding.
Extruded polystyrene foam - differences and similarities of materials
Extruded polystyrene foam (EPSP) is a fine-pored insulation with a homogeneous and dense structure. This kind of foam plates has the best resistance to moisture, fire, mechanical impact. The edges of sheets of individual grades of insulation are made with a sample. This design reduces the likelihood of cold bridges. The thickness of the plates is 20-50 mm, they are recommended for mounting under siding. The cost of EPS is 1.5-2 times higher than that of foam, so what kind of insulation is better - each customer decides individually.

Calculation of materials for thermal insulation
Plates of foam plastic have a convenient size of 1 × 1 m and 1 × 0.5 m, which means 1 square meter. m and 0.5 square meters. m, respectively. The number of products must correspond to the value of the area. To the estimated amount of materials it is better to add 10% to the fit. The size of the mesh for reinforcement is also equal to the area of the walls of the house.
Fastening of foam plastic is made with plastic dowels, on each sheet it is required 5 pieces. Quantity of glue and plaster mixture depends on the thickness of the applied layer and the manufacturer. On the packaging of the formulations, there is always an expenditure net.
The procedure for the insulation of walls with polystyrene foam
Preparation of the surface for thermal insulation
Universal insulation foam is suitable for installation on any surface of the house: brick, concrete, cinder block. The preparation of the surface of the walls is divided into several stages:
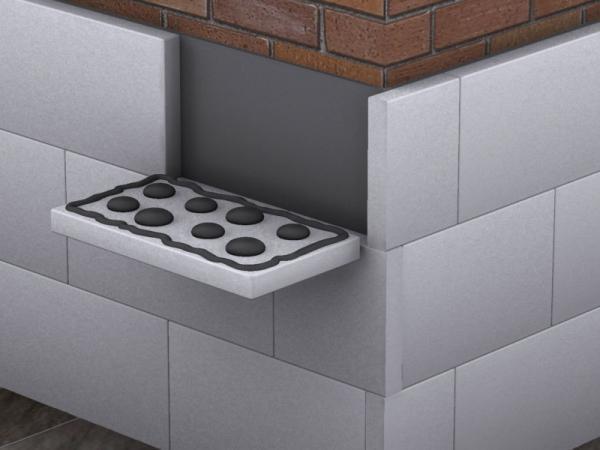
Installation of tin and slope insulation
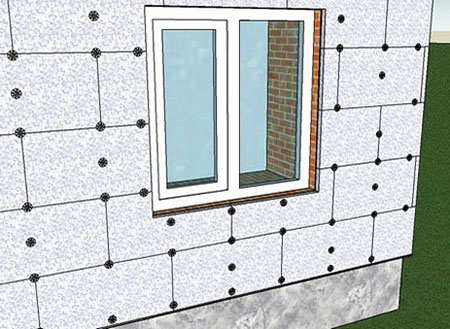
Secure the ebb on the plastic window before installing the heater. It is mounted so that the edge protrudes beyond the finished wall by 3-4 cm. This arrangement protects the finish of the house from the draining rain water. Simultaneously, the slopes of the windows are insulated. For this purpose, a distance of 2-3 cm is provided. The facade heat insulator will not work because of excessive thickness, it is necessary to use a thinner material. The docking with the general warming of the outer walls will be facilitated by the protuberance of the foam plastic by 1 cm.
Ways of installing foam plastic
Technology of insulation of walls with foam plastic from outside offers several ways of fixing the plates on the walls with your own hands:
- The adhesive - used general purpose or special composition for adhering polystyrene, e.g., Ceresit CM 83. The dry mixture is poured into a bucket of cold water and stirred with a mixer or a drill construction with nozzle.
- Nailing - apply plastic dowels with a wide bonnet, they are called "umbrellas", "fungi" or bowl dowels. The metal or polymer insert is clogged inside the fastening. One plate requires 5 pieces - 4 - at the edges and 1 - in the middle.
- Combined - the most reliable and common method, it combines the two previous methods.
Order of fixing dowels
Foaming plastic foam
To do the work yourself will need:
- spatula 80 mm;
- large spatula 200 mm;
- mortar bucket;
- mixer;
- level.
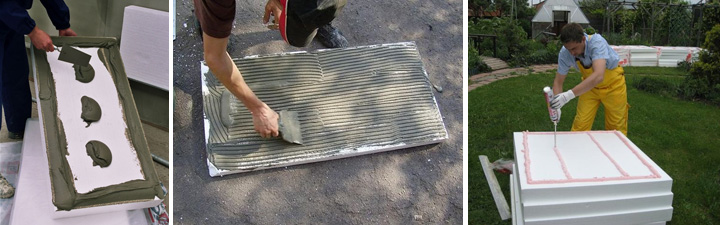
A special adhesive dry mix of Ceresit CM 83 is diluted in a bucket according to the manufacturer's instructions. The consistency of the solution should not be liquid, otherwise the foam sheets will go down, and excessive density will make installation difficult. A normal consistency can be selected after the first knead. Do not mix a lot of solution at once, it can harden to full capacity.
Apply the mixture using two spatulas - small it is recruited from a bucket and stacked on a large one. Apply glue to the EPS board or to the wall of the house. The first method is recommended in the presence of a flat surface without significant differences. The solution was applied by a dashed line perimeter of the plate, with a space from the edge of 2-3 cm. In the central part of the block in arbitrary blotch in an amount of 6-8 pieces. Minus method - weighting of foam, installation of the entire insulation requires significant work.
If the wall is a curve, then the thermal insulation will not fit well. Correction of unevenness allows the application of the adhesive mixture directly on the surface to be insulated. Using this method, the thickness of the solution is changed, decreasing or increasing it at different sites.
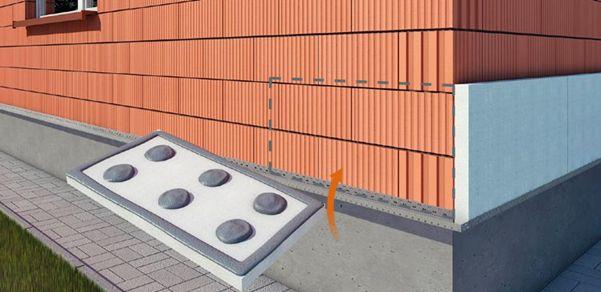
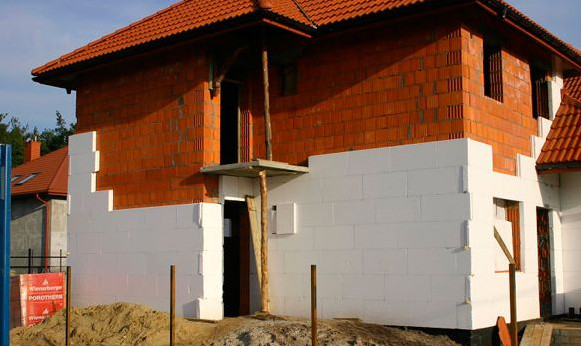
Mounting and docking of plates
The process of warming the outer walls of the house with foam begins with the installation of the starting plate. It is installed along the entire perimeter of the building with the help of anchors or dowels. The horizontal fixing is checked by level. The profile will allow to keep sheets of a heater from sliding down to drying of a glutinous mix.
Mounting the plates with your own hands starts from the bottom of the corner of the house. After applying the adhesive mixture, the heater is pressed against the wall and leveled. The plane is controlled by applying the level. Plates are stacked with dressing, using the method brickwork. The joints must remain dry, without glue. Filling the entire surface of the heater outer wall, it is left for 3 days to dry.
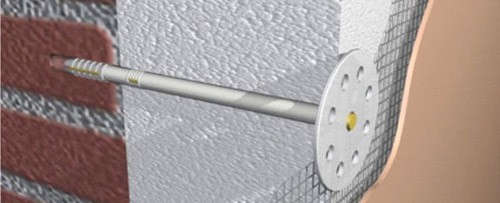
Fastening with plastic dowels
Belleville dowels - universal and convenient fasteners. With their help, the foam is reliably held on the outer walls, allowing the application of a layer of plaster or the installation of siding. The length of such a "fungus" should exceed by 4-5 cm the thickness of the insulation to ensure a strong attachment with a supporting structure. To install the foam plastic dowel and the wall of drilled hole puncher with a margin of 2 cm. Fasteners inserted without nail is hammered and flush with the surface of the insulation. With a heater it is better to use a plastic core, it will eliminate the appearance of a cold bridge. If the nail protrudes above the dowel head, it must be cut off. "Fungi" are placed in two ways:
- on the surface of one slab.
- one in the center, the rest at the joints of adjacent sheets of foam plastic.
Which of the schemes is better, each solves independently, but experts recommend the second method. In this case, the fastener clamps the joints, and the plates are closer to the wall.
Processing of seams and fastening points
After nailing all the foam, inspect the joints of the plates, if there is more than 5 mm gap between them, it is poured with mounting foam. When the foam solidifies, the protruding part is cut. The holes from 2 cm or more are filled with polystyrene cuttings. When protruding one of the polystyrene plates at the junction, the protrusion is removed with a float. When using EPPA, the joints are corrected with a construction knife.
Joints of plates and hats plate dowels shpaklyut glutinous mixture, trying to wipe all the irregularities.
Reinforcement of insulation
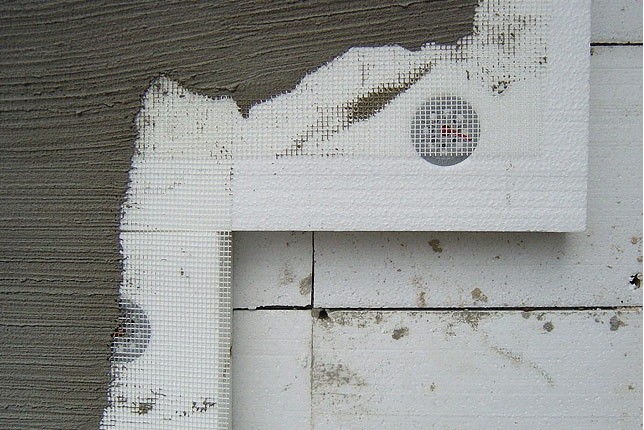
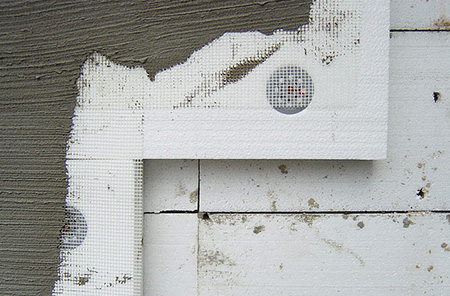
To reinforce the insulation of the outer walls of the house you will need a fiberglass mesh and a special mixture, for example, Ceresit CT 85. The entire surface of the thermal insulation is applied with an adhesive mass. The reinforcing mesh web is spread over the surface without folds and is put into solution. Neighboring strips are stacked with an overlap of 5-7 cm, at the corners grid is wound on the adjacent wall. To strengthen the corners, the use of a perforated metal corner is effective. The solution is imposed by a wide spatula in a layer of 2-3 mm. Applying the mesh parts, leave the dry area to 10 cm. It is smeared with the reinforcing mixture when applied to the next piece of the mesh. After the composition has dried (1-2 days), the surface is mashed by hand and a leveling coat is applied.
Finishing of external wall insulation
The aesthetic appearance of the house can be achieved by applying a decorative layer of plaster. Before finishing finish the surface is treated with a primer. Further putty putty for painting or decorative plaster. After the outer walls are insulated, the finishing material can be mounted on them.
Features of the insulation of a brick wall under siding
Thermal insulation of the house with foam is often performed under metal or vinyl siding. Installation of heat insulation boards in this case occurs after installation of a frame from a tree or a metal profile. The choice of material depends on the climatic conditions - in dry conditions the tree will last a long time, for wet - the galvanized profile is preferable. The size of the crate depends on the thickness of the insulation, it is usually 50 mm. Polyfoam is fixed between vertical guides using glue and dowels. The installation technique is similar to that described above. Places of joints are smeared with building mortar. In cold regions it is recommended to lay the insulation in two layers.
On top of the layer of thermal insulation, a membrane is tightened, protecting from wetting and wind effects. Between it and the foam plastic leave an air gap created by stuffing the crate. At the top of the protective sheet you need to mount your own crate under the siding. Its installation is carried out according to the manufacturer's instructions.
In contact with
How to insulate the walls with foam plastic from the outside
If the walls of the house can not hold the heat, then no state-of-the-art heating systems will not be able to heat it. At a lowered temperature, the humidity rises sharply in the room and the fungus and mold rapidly develop, affecting not only things and furniture, but also the building itself. Specialists claim that up to 30% of heat is lost through the walls, so you should take care of their warming in time.
Features of work with polystyrene foam
Polyfoam is one of the most popular and inexpensive materials. It is an excellent heat insulator, is not afraid of moisture, does not rot and is easily cut with the help of simple tools. However, this material very quickly loses its properties under the influence of ultraviolet, so the walls, covered with polystyrene, are never left open.
Another significant drawback of foam is flammability. That is why it is used most often in so-called systems of a "wet" facade, when the layer of foam is covered with a layer of plaster fixed on the reinforcing mesh. This technology has become very popular due to its simplicity and low cost.
Important! Any tree can absorb and evaporate moisture, i.e. "breathe". Polyfoam has a low water vapor permeability, so for sheathing wooden house not applicable. In this case, it is better to use glass or basalt cotton wool.
Finishing the house with polystyrene with further plaster coating ("wet" facade system)
The system of "wet" facade with a decorative layer of plaster
Consumables
For the plating of walls with foam plastic you will need:primer: saving here is inappropriate, it will not only reduce the consumption of glue and will prevent the development of the fungus, but also strengthen the surface and improve grip;
warmer: when laying the foam part of the plate goes to the undercut, so 1 square. m of the facade will need about 1.05 square meters. m of foam; its thickness depends on the climatic zone;
glue;
6 mm dowels for fixing the profile;
dowels-umbrellas ("fungi"): on 1 square. m need 5-8 pieces;
basement (for the bottom of the wall) and angular profiles;
reinforcing mesh: 1.35 square meters. m per 1 square. m of the facade; it is better to take a grid with a density of 140-160;
knife for cutting foam;
building level;
putty knife;
plaster: its consumption is indicated on the packaging, but it should be noted that 10% more will be used for the processing of the slopes;
paint for facade works;
forests, stairs, construction goats or platforms.
Wall Preparation
Even perfectly laid heat-insulating material It does not help to avoid heat losses in the presence of open air channels. Therefore, before starting work, all the cracks should be carefully plastered or poured with mounting foam. To allow the solution to penetrate inside, they are preliminarily expanded to the desired size.To detect delaminated areas of the wall, you should tap. Crumbling plaster, layers of soot and mold are removed using a metal brush. You can also use a special nozzle on the bulgarian. In order for the foam to lie flat, too protruding parts of the wall are knocked down. Greasy stains are treated with a solvent. On painted walls of oil paint to improve the adhesion, it is better to make small incisions with an ax.
Priming of walls
Concrete and brick walls are better treated with epoxy compounds for outdoor work, which can penetrate deeply into the surface of the walls. For their priming, it is possible to use mineral acrylic mixtures for facades of buildings, which provide good adhesion.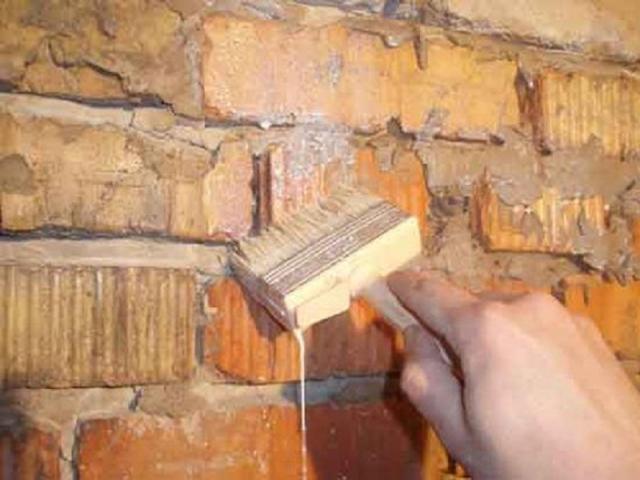
Wall priming
Selection of glue
You can glue the foam to any walls: concrete, brick, plywood, etc. Before starting work better check the quality of the glue. To do this, it should be smeared with a small sheet of paper, squeeze it for a few seconds against the wall and leave until completely dry. If after drying the foam is badly torn off the wall and there are small pieces on it, the glue is of high quality and is chosen correctly.Important! Carefully read the instructions for use: the adhesive must be frost and moisture resistant.
For work with polystyrene, you can take any facade adhesives, silicone sealants or liquid nails. For intertwining seams use a mounting foam. The composition for fixing the foam should not contain organic solvents (acetone, gasoline, ethers, etc.).
The most suitable adhesive is special composition for sticking foam. There are several of its varieties:
1. Universal for foam, which is suitable for both gluing and reinforcement.
2. Adhesive for gluing. It has a high plasticity and tackiness, when used, sheets of foam do not slip during drying.
3. Adhesive for reinforcing the foam: it has high strength, but less plasticity.
Foaming plastic foam
Layout of walls
Angulation in corners is not always possible, because they can have minor deviations. Marking is best done in the old grandfather way: with the help of plumb lines (lighthouses). To the string, hung on a dowel at a distance of 5-7 mm from the wall, the cargo is tied. After he stops swinging, the twine is fixed.If irregularities are found that do not allow the string to be laid flat, they must be knocked down. On the "failure" of the wall can be applied glue or construction foam. Transverse (horizontal) markings can be applied by means of a hydro level and twine.
Aligning the wall to lighthouses
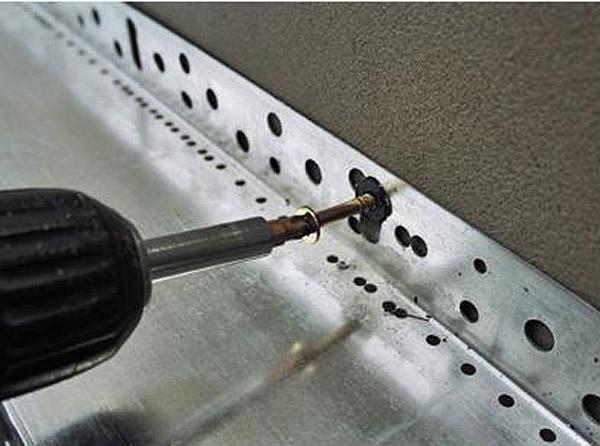
Setting the start profile
To support the plates in the lower part of the wall is fastened a metal profile. In addition, it is able to protect the styrofoam from mice that like to settle in a foam plastic.The size of the profile is chosen according to the thickness of the insulation. The fixing is made by 6 mm dowels with washers with an interval of 30-40 cm. The angles of the profile are joined by the method of oblique cuts or by means of a corner connector.
Fixing the starting profile
Methods of applying glue
You can paste a sheet in the following ways:when not smooth walls it is better to apply a sufficiently large layer of glue along the perimeter of the sheet, as well as in several places along its center;
with a spatula with teeth spread the glue a small layer evenly throughout the sheet, in this way the foam is applied on even walls;
Special glue for polystyrene, sold in cylinders, is applied around the perimeter and center of the sheet.
Warming of foam plastic
Before starting work walls must be dry. If glue foam on wet, not dried after the winter wall, the glue joint will be fragile. When working in summer heat, the differences in daytime and nighttime temperatures will not have the best effect on the strength of the glue composition that has not dried out yet.All work should be done in the spring, about a week after the heating is turned off in the houses. You can glue the foam in the fall, when the temperature of the surrounding air drops to + 17-18 ° C. Do not start work and in warm windy weather, because the glue will grasp too quickly.
It is not recommended to use too brittle foam in work: it is better to choose a material with a density of 20 kg / m3. Thermal insulation of denser sheets is less, so it is better not to use them for insulation of external walls.
Finishing order
You can start sticking foam after a day after applying the primer. Plates are stacked long side of the sheet down, starting at the bottom corner. The second row should go with an offset, as when laying a brick (see photo). To do this, the first sheets of odd rows adjacent to the corners are cut in half. The most convenient are slabs measuring 0.5 × 1 m and a thickness of 5 cm.
The gaps between the sheets are filled with foam. Too large gaps can be sealed with polystyrene chips.
The scheme for gluing foam plastic
Additional Fixation of Polyfoam
For this, umbrellas are used - special dowels for foam plastic, having a plastic head. Their length is selected taking into account the thickness of the plates. Metal fasteners that can damage brittle plastic are not used. In addition, the metal has a different coefficient of expansion.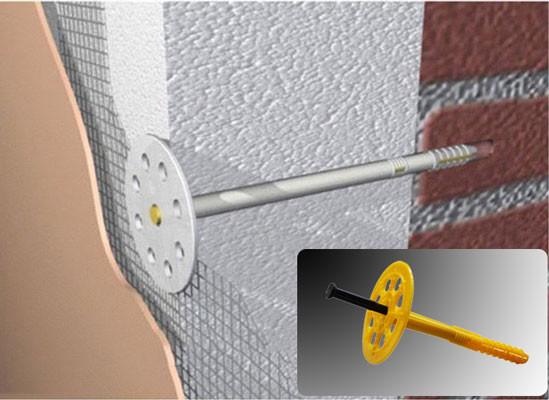
Dowels for foam plastic
To install dowels in the wall, pasted with foam, holes are made of the appropriate depth, into which dowels are inserted. They must enter into the foam plastic for 1.5-2 mm.
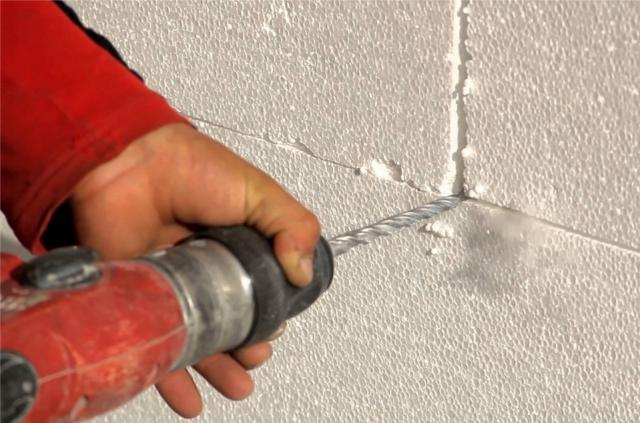
Dowel holes
The fastening of umbrellas is made by an envelope: at the corners of the leaf and in the center. Thus, to fix each sheet you need 5 dowels. Dubels must be included in the concrete base to a depth of 50 mm, into a brick wall of 90 mm. For example, with a width of 8 cm of polystyrene, "umbrellas" measuring 13-17 cm are used. After inserting them, they are additionally pinned with a rubber hammer so that each of them is drowned in a foam for a couple of millimeters.
Creating a decorative protective layer
After a day after laying the foam, it is leveled with a float. The corners of the house are additionally protected with reinforced mesh with a corner. It is attached to the glue and pressed tightly against the joint with an angled spatula.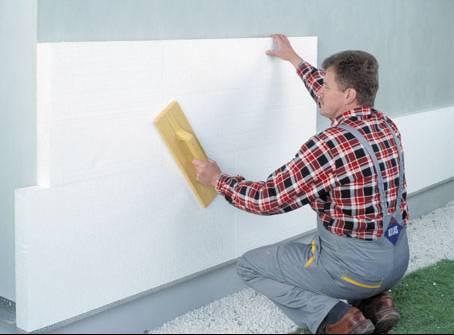
Grouting of foam plastic
Important! Do not leave the walls insulated with polystyrene, without finishing for a long time. Even after 2 weeks, ultraviolet rays are already capable of damaging its top layer. If this still happened, the damaged surface is removed using a float, and only then the wall is lined with a mesh.
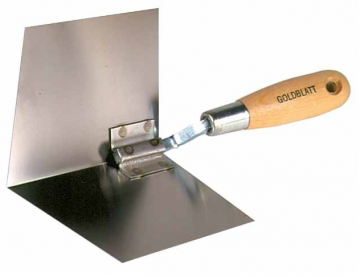
Armored corner and corner spatula
The reinforcement of the walls insulated with foam is made using a grid with cells of 3-5 mm. The grid is cut into strips of the desired width. On the wall is applied a special adhesive for reinforcement so that the mesh is buried in it. Its edges are fixed in the last turn. After fixing the mesh on the wall with a spatula, it is leveled and the excess glue is removed. Too much of its layer can lead to cracking.

Overlapping reinforced mesh
The second layer of glue is applied only after the first one dries. The reinforced layer after 3 days is primed, plastered, and then a layer of facade paint is applied to the wall.