In our time, builders know a lot of ways to erect various protective structures, each of which has a number of its undeniable advantages. One of the most successful variants of this type of structure is the installation of a fence from corrugated board.
Here's how it might look like:
or

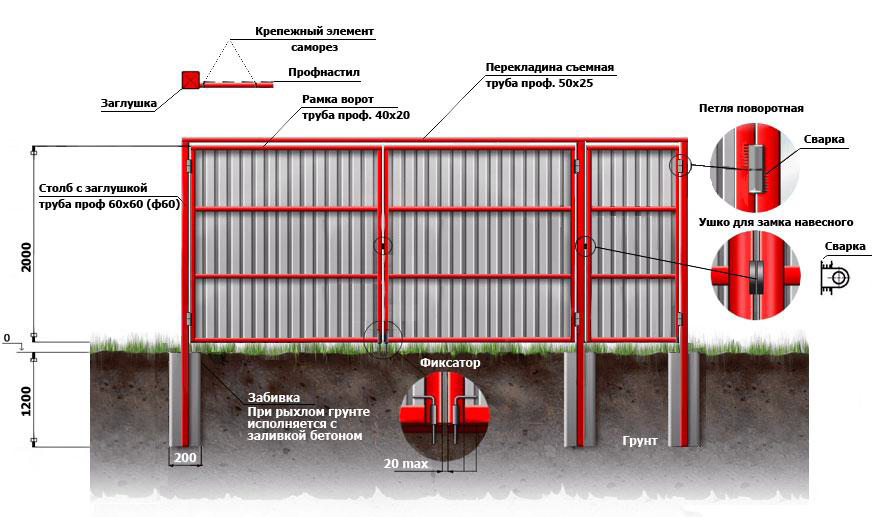
The scheme of the gate from the corrugated board can be as follows:

It is necessary to understand that the fence made of corrugated board can be made very qualitatively and for many years, reliable and durable and it will easily fit into any design.
Advantages of fencing from profiled sheet:
- The erection of the fence from the profiled sheet takes little time.
- To establish such a construction is quite possible for two workers who have a standard set of tools and possessing minimal building skills.
- Fence from the metal profile reliably protects the territory of the site from extraneous views.
- All the materials needed to build such a fence are easily accessible and relatively inexpensive.
- Fencing made from corrugated board is not demanding in maintenance, strong, durable, has an elegant appearance and high performance.
- In addition, you can make a gate from the corrugated board - it is economically profitable and looks good.
Operating procedure
The technological process of erecting a fence from a profiled sheet consists of two main stages:- preparatory
- building.

Preparatory work
The preliminary stage of building a fence includes:- design and layout;
- selection and calculation of the required quantity of consumables.

Stage 1. Design and layout
Step 1. First of all, decide on the parameters of the fenced area and the stakes on the ground indicate the angles of the future fence.Driven into the ground pegs alternately connect tightly stretched twine, which will show the boundaries of the installation of the fence.

Roulette measure each side of the resulting perimeter markings and record the results.
Step 2. Selection and calculation of consumables
Profiled sheeting
For the erection of the fence from the profiled sheet, it is possible to use a galvanized roofing sheet, but to achieve the best result, you should purchase a special profiled sheeting with a polymer coating, the thickness of the metal sheet is at least 0.5 mm, and the height of the ridges does not exceed 20 mm.
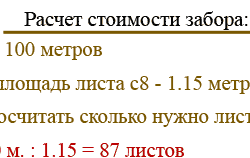
The standard length of such sheets is 12 m. By dividing this figure by a multiple (the value of which will be equal to the height of the fence) you will learn how many pieces of the fence can be cut from one sheet of metal. Further, knowing the width of the pieces and the length of the perimeter of the fence, you can easily calculate the desired number of profiled sheets.
Supporting posts
As reference columns, experts recommend using profile steel pipes square section 60x60 mm, in the absence of which it is possible to use logs or ordinary round pipes with a diameter of 55-70 mm (but also make brick supports).


The length of each support column depends on the desired height of the fence - ideally the support should be buried in the ground at 1/3 of its length, ie, with a fence height of 2 m, the length of each pillar will be 3 m.
Calculation of the number of columns is based on the length of each side of the fence. For the strength of the structure, the width of one span of the fence should be within 2-2.5 m. Based on this value, you can calculate the number of intermediate supports required for each individual side of the fence and add to them 4 posts that will stand in the corners of the fence.
Cross lags.
As transverse lags it is best to use shaped rectangular tubes section 25x60 mm or 40 * 20.
If the height of the fence does not exceed 2 m, two rows of transverse supports are sufficient. Multiply the perimeter of the fence by 2 and you will know the total length of the lag.

Other materials
In addition to the basic building materials, you will need self-tapping screws (6-9 pieces per 1 piece of corrugated board), paint in the tone of the coloring of the profiled sheet (for dyeing lags and supports), gravel and concrete mortar.
Stage 2. Construction of a fence of corrugated board
Excavation First of all, in accordance with the plan, drill in the pit area under the supporting pillars.
First make holes for the corner posts, then pits near the goal posts, then drill all the rest after the intervals calculated earlier. The depth of the foundation holes should be 1-1.5 m, and the diameter - 0.2 m.
Installation of supports
At the bottom of each pit, fill a 20-centimeter layer of gravel in the middle fraction. Tamp the gravel cushion, pour some mortar on it, center it in the pit, pour it into the concrete, check the verticality of the column with a plumb, fix it in the correct position with the reinforcement until the solution is completely solidified.
For the removal of air bubbles, fresh solution is smeared with a metal rod.
Fastening of transverse lags
After a few days, after the concrete has finally solidified, proceed to the installation of the transverse pipes.

Row lags should be fastened at a distance of more than 20 cm from the ground and from the top of the fence.
The transverse pipes can be attached to the support posts by electric welding or by bolts with a nut and a lock nut.
Mounting corrugated board in the skeleton of a fence
Pre-cut sheets of metal profiles begin to mount from the gate racks.Sheet profiled with a level set in a strictly vertical position and attach it with screws to transverse lags, using an electric screwdriver.
Fasten the metal profile to the pipes in six places - on each lag, make one fastener in the center and two at the edges.
Each subsequent piece of profiled sheet is laid on the previous one with an overlap in one "wave".
Finishing finish
Close the upper ends of the hollow fence posts with decorative caps.Paint bricks and transverse lags.
Cost and price
The cost and price of the fence from the corrugated board can be different, it all depends on the region and the competition, and each company can set quotations depending on the installation per meter and in general with the installation on a turn-key basis.We remind you that here you can buy profiled sheet for the fence (usually choose galvanized with a polymer coating and painted in rAL colors)
Additional pictures that will help you make a fence from the proflista by yourself:
1. What is the coating of the metal profile used for sampling:

Another couple of schemes to help


A few tips:


And here's how it all looks like in the end:

or so:

More recently, profiled sheets were quite simple and unpretentious material. Manufactured from galvanized sheet, they were used to cover the roof of production halls, small outbuildings, hangars and garages, as well as for erection around construction sites. But it's all in the past.
Fence made of corrugated board combines quality and cheapness.
Producers tried to bring the profiled flooring to a higher level, for which they approached the process of its fabrication with imagination and improved its quality characteristics.
And today profiled sheeting is a completely new material, based on the same galvanized sheet metal, but its external data has become much more attractive. For example, the last version, the upper side of which was covered with a layer of polymer.
Thus, the manufacturers decided at once two tasks:
- Enhanced protective properties.
- We created a material that has excellent external data in terms of color design.
Therefore, at present, many developers with great pleasure began to use corrugated board not only to cover their roofs country houses, villas and outbuildings, but also for.
And, as practice has shown, building a fence of corrugated board is so simple that even an amateur can handle it.
In addition, it should be noted that from - it's cheap. And today the financial indicator for many plays a more important role than all the others.
But, as in any construction process, everything must be accurately calculated, well prepared, not missing a single detail, and only then proceed to the process itself. And one more very important addition: it is necessary to strictly adhere to all the stages of erecting fences from the corrugated board with their own hands.
Calculation of necessary materials
In order to professionally from the corrugated board with your own hands, the following materials are needed:
- profiled sheets. It should immediately be noted that the corrugated board is divided into two categories: roofing and for fencing. Although both can be interchanged. So for fences it is best to use a material whose crest does not exceed 21 millimeters;
- racks. Here you can use different options. For example, brick or stone pillars, logs, pipes of various shapes, metal profiles and so on. Since the conversation is about self-profiled, you'll have to choose the simplest option. These are pillars of pipes. Their installation is simple, the price is low. It is best to choose round pipes with a diameter of 59 mm or square section with dimensions 60x60 mm;
- transverse lags. It also uses metal pipes rectangular section with dimensions of 60x25 mm. Obligatory condition: the wall thickness of such a pipe must not exceed two millimeters;
- self-tapping screws for metal;
- paint for painting poles and lag is selected in the color of the profiled;
- cement and gravel.
Now everything must be accurately calculated. Let's start with corrugated board. To do this, you will have to decide how high your fence will be. Please note that the profiled sheets are made in length of 12 meters. Therefore, they will have to cut them into a multiple number of pieces so that there is no waste. Ideally, this is 1.5 m, 2 m, 3 m, 4 m and so on.
For example, we choose a two-meter fence. Next, you will have to calculate the perimeter of the plot that will be enclosed. The width of the sheet is known, the height of the fence, too, it remains to make several mathematical calculations, and you will know exactly the necessary amount of corrugated board.
There is a small nuance. Of the total number will have to subtract the size of the gate and wicket, if it is located outside the gate.
Now we count the number of columns and their size. The height of the fence is 2 m, but this is only its outer part, and the installation of the columns will have to be made into the ground. So underground part pillars should be from the external 30%. In our case, 70 cm. Hence, the length of each metal stand is 2.7 m.

Now the number of pillars. Here we need a scheme of the site and the size of its perimeter. The best option, when the posts below will be located at a distance of 2-2.5 meters from each other.
The number of transverse lags is again determined on the basis of the scheme of the site and its perimeter. There is one subtlety here. If the height of the fence exceeds 2 m, then the lag is assembled in three rows, if less, then two. The number of screws is easy to determine.
One sheet will require six or nine pieces. Everything depends on the number of lags. The remaining materials are counted according to the SNiP.
How to make a fence of profiled sheeting: the stages of construction
Stage 1 - excavation. You have already decided on the distance between the racks. Countdown will go from the goal post. If they are already standing, then the first pit will have to dig around them. You can dig with shovels, but this is a laborious process. It is best to use a garden drill.
After each open pit, measure the distance and dig another. Drilling a well is a bit more in depth. It will have to fall asleep gravel and ram. It will perform the function of a pillow.

Stage number 2 - we prepare the concrete solution. There is no need to do it in large volume. It is possible to be limited to small mixes, which would suffice for concreting several wells. The solution is one part of M400 cement, four parts of gravel.
Phase 3 - installation of wells and concreting. Expose the columns must be strictly vertical. Filled concrete must be stitched using tools or materials. This is a prerequisite. During the bayonet, air is released, which remains in the body of the solution.
Attention! Before the installation of the rack it is necessary to paint.
Stage number 4 - installation of transverse lag. This phase is best to start a few days after the installation is done by yourself. The concrete mortar must dry out.
Now to the process itself. Here you can use two options for attaching the lugs to the racks. The first is by electric welding. This is the simplest process, besides secure fastening, but it will be beneficial to you only if you yourself have the skills to work with a welding machine.
If not, you will have to invite a professional who will have to pay. Yes, and the construction of a fence of corrugated board with their own hands goes into the category with the help of outside assistance.
The second way, where you can use a bolted connection. That is, through holes in lags and racks are drilled, these two elements are connected with a bolt and nut, and preferably two nuts.
Attention! Installation of transverse logs is performed at a distance of not less than 20 centimeters from the top of the column and from the ground. After installing the lag you need to paint.
Stage number 5 - installation of profiled sheets. This process starts from the gate. Each sheet is set vertically with a level. Mount them with self-tapping screws, using an electric screwdriver. Two fasteners at the edges, one in the middle for each lag. Each subsequent sheet is overlapped by one wave.
In principle, it would be possible to finish the construction of the fence from the corrugated board with our own hands. But there are a few more nuances.
How to make a fence: additions

First. The upper open edges of the vertical racks must be closed. Here you can use decorative elements in the form of balls, a peak and so on. Their manufacture is carried out by a large number of workshops. The choice is huge.
The second. Under the profiled sheets, it is possible to remove a part of the ground and carry out concreting in the form of a strip, creating a small blind to the side of the street from the outside and towards the site from the inside.
Third. The construction of the fence must strictly comply with all norms and requirements of the site design as a whole. That is, the matching of the gate and fence, the main house and fence, extensions and fence. Everything should be united by one concept of landscape design. By the way, even more often designers suggest to make a gate and a fence from one material.
Fourth. The scheme and device of the fence must strictly obey all the norms and requirements of the present.
Important! No initiative and economy of building materials. A temporary approach to this building is unacceptable, everything is solid, all for ages.
Conclusion
From all of the above, we can make a fairly simple conclusion. If you decide to build a fence of corrugated board yourself, without attracting qualified assistance from outside, then know that the device and the fence construction are quite simple.
You could see for yourself. But come to its construction with a large share of responsibility.
Note that a small mistake or neglect to one of the stages may lead to a fence after a while. You will lose not only money to repair or restore it, but also a lot of nerves.
If you decide to put a fence of corrugated board with your own hands, then this review is for you. It describes in great detail and clearly all the nuances of the workflow. You just need to repeat all the actions - and the result will be no worse than that of professional builders.
How to organize the work properly
To get a good result, it is not enough to understand only the peculiarities of mounting the fence from the corrugated board. It is necessary to choose high-quality materials, use the right tool and build a strong supporting structure. We will analyze the process from the beginning to the end, so that you do not have any questions left.
Preparatory activities
Going to buy materials at once is not the best solution. Since you do not know the exact number, and even the professional will not pay any attention to the eyes.
Therefore, do not be lazy and spend half an hour to conduct measurements and calculations:
- First of all, the location of the fence. A construction cord is stretched along the line, which will serve as the main reference point. At the corners, wooden pegs or metal elements are clogged, onto which a cord or line is fastened;
- Length measurements are made. First of all, it is necessary to specify the length of the fence. Here everything is simple, for work it is necessary to attract an assistant and to measure all the measurements using roulette;
- Determine the position of the columns. It can be anything, but most often a range of 2 to 3 meters is chosen, 2.5 meters is the most popular and convenient solution. It is best to immediately mark the position of the supports, so you can accurately calculate the required number of posts;
- The required volume of the profiled sheet is calculated.. Here everything is simple, if you know the size of sheets of corrugated board. The standard width is 1155 mm, the useful width is 1100 mm. The height can be any, you will cut the material to within a centimeter.
If you have an uneven terrain, you should design the fence so that you compensate for all the level changes. In this case, it is necessary to make a strip foundation, with the help of which all irregularities are closed. Below is an example of a project for an uneven plot.
Materials and tools
Even perfect compliance with the installation technology does not guarantee the reliability of the fence, if you used poor-quality materials. Therefore, you need to carefully choose everything you need. The table below will allow you to make the right decision.
| Material | Recommendations for selection |
| Profiled sheeting | It is best to use variants with a wave height of 8-10 mm, they are labeled as C8 and C10 respectively. The thickness of the material should be 0.5 and more mm, I do not recommend taking more thin sheets. When buying, pay attention to the quality of the dyeing: the surface must be perfect, without rejection and scratches |
| Columns | The most commonly used profile pipe is 50x50 mm and larger. The length of the supports depends on the height of the fence, if this figure is 2 meters, then the pole should be 3 meters for reliable anchoring in the ground. It's easier to buy ready-made posts, their price is higher, but you get a ready-made version that does not need to be painted and cut |
| Lintels | They are best made from a light and strong tube 40x20 mm. For the convenience of mounting the profiled sheet, choose products from the wall at 1.5 mm. With this thickness, you can screw the screws without drilling holes, which speeds up and simplifies the workflow |
| Fasteners | Profiled sheeting is best fixed using roofing screws. They are painted in the color of the main coating and have a drill bit for screwing into the metal without pre-drilling. Also in the product there is a washer with a rubberized base that closes the hole and protects it from moisture penetration |
| Concreting materials | To fix the pillars, you need either concrete from cement sand and gravel, or cement-sand mortar and filler made of stone, brick and broken concrete. The second option is easier and cheaper, as the stones and old brick can be found almost free of charge |
| Paint | It is necessary for the coloring of poles and bridges. Use either a primer and paint, or a composition that combines these components |
Mounting the fence from the corrugated board with your own hands assumes that you have a specific set of tools:
- Welding apparatus for fixing veins to poles. Suitable mobile home version, powered by 220 volts. If you do not know how to cook, it's easier to attract a welder for an hour or two. In this case, you need to pre-train and markup, so as not to waste time and work quickly;
- Bulgarian for cutting metal and its stripping before welding. This tool allows you to quickly and efficiently cut the pipe, clean the welds and prepare the surface for welding. Do not forget to stock up on cutting and grinding disks of the appropriate diameter;
- For cutting corrugated sheets, use metal scissors. In no case do you work as a Bulgarian, this makes the profiled sheet overheat and after a year the ends begin to rust;
- For digging pits under the pillars, a shovel or special drill with a diameter of at least 20 cm is used;
- The solution is prepared either manually (in this case you need a large capacity), or with a concrete mixer. The second option is preferable for large volumes of work. You do not need to buy equipment, you can rent it for 1 day;
- Measurements are made using roulette, marking is best done with a felt-tip pen. It is most convenient to control the position of poles and profiled sheets by building level;
- Fastening of sheets is made by means of a screwdriver with a special attachment M8. It is sold in construction shops and is designed specifically for roofing screws, the magnetic holder allows you to keep fasteners during operation.
Installation of poles and fastening of veins
The installation of the fence from the corrugated board begins with the installation of posts.
The process consists of the following:
- Dug or drilled pits under the pillars. The work is performed with a shovel or drill, the minimum penetration of the supports should be at least 1 meter. In addition, a pillow of sand or gravel with a layer of 10-20 cm is poured on the bottom, this nuance should also not be forgotten. The total depth is usually 120-140 cm;
- At the bottom poured pillow. It will ensure the stability of the installation and will not allow the column to leak when concreting;
- The post is set in place. First of all, the height of its above-ground part is checked, if necessary the position is regulated. If the support is low, then sand poured, if high, then the column gently deepens;
For reliability, you can weld to the underground part protrusions and lintels. Then when concreting the pillar will be much stronger.
- If the filler is made of stones and bricks, then the pit is filled to 2/3 of the depth. The rest should be put after the initial filling of the solution, when it is filled with all voids. The stones are gently tamped, while the position of the pillar is constantly checked with the help of a level, it should stand exactly;
- A solution is prepared. If you do not have a filler, then mix cement, sand and crushed stone in a proportion of 1: 3: 5, the consistency should be thick enough. If you use stones or bricks, then a semi-liquid solution of 1 part of cement and 3 parts of sand is prepared. The solution must penetrate into all the voids and fill them for the best attachment;
- Concreting of pillars is made. The solution is poured into pits and compacted with a stick or armature so that it fills the pit as best as possible, and there is no void left in it. The mortar with rubble is poured to the top, and if you used stones, then at the first stage they should be closed, then the filler is added to the very top and filled with a solution to the desired level;
- Checking the position of the elements. I know from my practice that even with a neat pouring the post may shift. Therefore, immediately after concreting, check its position with a level from all sides and, if necessary, make an alignment. Only after this work can be considered successfully completed.
For concrete to gain strength, it needs time. It is best to continue work not earlier than 5 days after concreting, during this time the material will well grasp and harden.
The technology of installation of the fence from the corrugated board with its own hands includes such a stage as fixing the veins. This part of the work can be done in two ways: by welding and using special brackets.
Let's consider each of them and start with welding:
- Prepared jumpers and poles. As for the veins, they are cut into pieces, which should be 5 mm less than the distance between the poles. The surface of the poles in the junction of the jumpers is cleaned, if they are painted, then it is removed;
- The provinces are exposed and welded. If you have clamps, then it's easiest to fix the jumpers with their help, if there are no fasteners, then two assistants must hold the element until it is picked up. Welding is performed around the perimeter of the abutment;
- After welding, the seams are peeled. Removed too protruding rushes and other flaws. When poorly digested areas are found, they must be welded again;
- The surface is cleaned and painted. If you have painted poles, then only the joints and veins are painted. If there is no coating, then the treatment is done entirely. The application of a protective coating is carried out in at least two layers, special attention is paid to welding points and other joints.
Now let's analyze the connection between the pillars and the log using special brackets. How they look, you can see in the photo, but, how to use them, we will discuss below:
- The first element is set at the level you want. Mounting to the pole is performed using self-tapping screws. Fastening can be made on the sides or on the front side, it all depends on the design of the fastening unit;
- The bracket is placed on the second pillar. In order to accurately determine its position, it is necessary to put a jumper and put a construction level on it. It determines the exact location of the fastening, and it is screwed to the support. In the same way, the work continues along the entire length of the fence;
- The jumpers are fixed with screws at the rear. It turns out a very strong and perfectly smooth knot. The only drawback of this solution is that fasteners can not be found in all cities, so if you decide to use such technology, then be sure that you can buy brackets.
To install a fence of corrugated board for this review will not be difficult. If you are interested in the question of assembling gates and wickets, then the process is analogous to the above, with the only difference, then you need to weld the frames and fasten them to the posts on the hinges. In detail, this type of work is described in a separate review on our website.
Conclusion
After reading the review, anyone can handle the job, especially since you are choosing the options for assembly. The video in this article will help to understand the topic even better and visually show many important moments of editing. If you still have questions, write them in the comments below.
Not each of us has the opportunity to pay workers for assembling the fence from the profiled floor, the more such a work in our time is worth a lot. Do not be afraid, in this article we will show you how to make installation of the fence from the corrugated board yourself not a problem. Profiled sheeting is the most successful choice for building a fence, many varieties of sheets and ease of installation are a good indicator for choosing this particular material.
2.
3.
4.
5.
6. ;
7.
How to choose profnastil
Profiled sheeting is divided into two types of material, sheets with a polymer coating and galvanized coating.
Polymer coating is a compound that processes the profile to protect against environmental factors. The service life of this coating is 50 years. Processing can be done on one or both sides of the sheet. These sheets can be used as roofing material, as well as for facing various structures.

Galvanized corrugated board is cheaper, it is made from inexpensive raw materials, it is not so well protected from the external environment. Galvanized sheets are more often used for temporary fences.
Calculation of material
Installation of the fence from the corrugated board should start with the calculation of the amount of material, taking into account this knowledge it will be possible to find out the approximate amount of costs for your futurefence. In addition to the corrugated sheet, support posts, cross bars, fasteners and cement-sand mortar will be required. You may also need to make a gate or gate.
More often sheets with a wave height of 10-20 mm are used. Posts are used from a square tubular profile, the cross-section of which depends on the desired height of the fence.
Profile sheets are a strong material, you can make high fences up to 8 meters from it. The number of transverse more often two to the standard height of the sheet, but you can use more, fasten the sheets to the transverse metal screws and seal the joints between the sheets.

To calculate the number of supports, divide the entire length of the perimeter by the distance between the supports, plus 3 posts per gate and gate.
The number of sheets (based on the selected sheet width) is also divided by the length of the perimeter. It is better to buy a few extra sheets for stock.
The number of transverse based on the selected number of them on the height of the sheet, if 2, then multiply the resulting length of sheets by 2. And plus the length for the gate and gate.
Dimensions of corrugated sheet in standard form are 100-130 cm, and height is 180-200 cm. It is possible to produce sheets according to individual order for any size.
Necessary materials
More often used pillars of 4x6 or 6x6 cm section and wall thickness of 2 mm. In order for the structure to be strong, the distance between the pipes should be 2-2.5 m. Such a design can easily withstand treacherous weather tricks. The depth of excavation of the pillars depends on the soil, if clay then 80-90 cm, if sandy 100-120 cm, plus the height of the profile sheets.
For transverse also use profile pipe, often with parameters of 4x2 cm with a wall thickness of 2.5 mm.Sheets of corrugated board are better with a height of the ridge of 2 cm and a thickness of 0.5 mm.For fastening - self-tapping screws for corrugated board, with special soft gaskets (EPDM).


Instruments
To make holes in the ground, you can use a sledgehammer, shovel, or drill, if the ground is heavy for work, you can use a gasoline rig.Just needroulette,level,cord,welding machine.

Installation of poles
First, dig up the pillars in the level at the corners of one row of the plot, between them from the pillar to the pole, pull the cord and dig over it, the rest of the pillars. Preliminary measure the distances from between the pillars of 2-2.5m. All pillars should be the same size. It is better to cement the posts with a cement-sand mortar in the proportion of 1 part of cement and 4 parts of sand, 4 rubble and 4 water.Transverse fasteners are fastened to posts using welding 20 cm from the edges of the sheet. Cross and poles polish and cover with paint.


Installation of corrugated board
The edge sheet is fixed strictly to the level of the horizontal and vertical, then the rest is lapped to the wave. The sheets are screwed around the edges and in the middle.If there are scratches during the installation of the sheets, they should be painted over with a balloon. Everything, installation of the fence from the corrugated board can be considered as finished.


Installation of the fence from the corrugated board with your own hands. Video
The installation of the fence from the corrugated board is an urgent need, because the corrugated board as a material is distinguished by its strength, reliability and durability, and the fence construction itself is the guarantee of home property safety. Due to the production of multi-colored versions of profiled sheet, the owners country cottages it is possible to build a fence in a harmonious combination with the overall design of the site and the style of the house.
So, you decided to install a fence of corrugated board. What you need to know about its installation, so that it becomes a practical and aesthetic part of the exterior suburban area?
Installation of the fence from the corrugated board: the main factors determining its cost
When planning the installation of fencing specialists advise to accurately calculate its size and determine the required material. If we talk about the price of corrugated board, it varies in a different range depending on its type. A sheet with a thickness of 0.5 mm and a galvanized coating is notable for its cheapness.
As a rule, such material is not used as an external fence. It will be an excellent option for a low fence inside the site. A little more expensive will cost a profiled sheet of aluminum and zinc. Its advantage - strength and durability, because it can withstand temperature fluctuations and is not so strongly affected by corrosion. The most expensive option is a material with a deposited polymer layer, a different color scheme and texture.
When purchasing corrugated board for building a fence, the following aspects should be taken into account:
- the thickness of the sheet should be from 0.5 mm. From its indicator depends the stability of raw materials to loads;
- depth profile (8-75 mm);
- cover sheet must contain at least one polymer layer, which will significantly increase the period of operation;
The zinc content under the polymer coating should be at least 140 g / sq. M. Since the main purpose of this chemical element is to protect against corrosion, this indicator guarantees 20 years of service of the finished product.
In addition to corrugated board for the fence, metal pipes of square or round cross section, guide lags, fasteners will be required.
Process of installation of support pillars

As support is implied the use of metal pipes, the height of which depends on the height of the fence itself. To place the supports should be clearly horizontal, leaving 2-3 meters of the distance between them.
When building a cumbersome structure of brick or stone, it is necessary to erect ribbon foundation, whereas when it is made of profiled sheeting piling foundation in places of support installation. In this case, the depth of the piles must be sufficient to withstand the load of the wind, preventing the bank of the fence.
For installation of pipes it is necessary to dig holes with a depth of about 0.8 m. It should be taken into account that the higher the fence, the greater the depression. The diameter of the wells should be approximately 25 cm. The next stage involves filling them with crushed stone, the layer of which varies from 10 to 20 cm. Afterwards, metal pipes are installed in them, which are leveled by means of a level and fixed with supports. In conclusion, the pit is poured with concrete from the outside, and when it is properly seized, then inside the pipe to the level of the ground.
Before installing the supports, they must be treated with bituminous mastic.
Experts advise that when installing poles to a depth of 1.5 meters, pour a well into a meter with a solution, and cover the remaining half a meter with roofing material and cover with sand. This construction must be at least 3 days old.
For the production of cement mortar you need:
- 3 buckets of rubble;
- 2 buckets of sand;
- 1 bucket of cement.
Installation of guide lugs
The number of transverse logs depends on the height of the fence. As a rule, they are attached at right angles to pillars using a welding machine. With a fence height of 2 meters, it will be sufficient to install two logs parallel to each other at a distance of 40 cm from the top and bottom edges of the fence. If the height of the summer enclosure exceeds 2 m, it is necessary to attach an additional third lag in the middle.
When the frame is completely ready, it is necessary to treat the welding seams with a primer, and after it dries with special enamel.
Ways of mounting corrugated board

There are two methods of fastening the profiled sheet: self-tapping screws and rivets. The advantage of installing with self-tapping screws is that over time, you can tighten loosened connections or make a dismantling of the structure.
- Self-tapping is performed in a fairly short time, using a manual or electric drill at low revs. As the raw material, it is best to use the grade C1022, which is made of carbon steel, has sufficient strength and an anticorrosive zinc coating thickness of 12.5 microns. Experts advise that when mounting self-tapping screws, use special rubber pads under their heads. This will prevent moisture from entering the installation site. In order to properly install the profiled material, the fasteners must be screwed strictly perpendicular, avoiding their misalignments.
The installation of the fence from the corrugated board can also be carried out using self-tapping screws with a press washer. They tightly press the profiled sheet to the frame, thanks to the special design of their heads.
- Mounting by means of special rivets takes place when it is impossible to fix on the outside of the screw. It is important to take into account that for such purposes in the construction shops for sale special rivets for the corrugated board are provided. The use of other types of them can shorten the life of the fence due to non-compliance with the material. Depending on the thickness of the sheet, the diameter of the rivets can fluctuate from 3.2 to 6.5 mm. In terms of quality and appearance, rivets come in a variety of colors from aluminum or galvanized steel. Therefore, in order to avoid fixing the fixing points, it is logical to purchase details, the color of the hats of which corresponds to the color of the fence. To fix them, you need to use a construction hand gun in your work. It should be taken into account: the fixing step should be at least 30 cm along the edge of the corrugation and 50 cm in the middle of the sheet.
To correctly calculate the number of fasteners, it is necessary to take into account that an average of 8 rivets are worn per meter of fixing the cover.
In order not to make extra holes and not miss metal frame, the kapron cord should be tightened between the extreme fasteners of the profiled sheet along its entire length. In this case, the screws and rivets will be aligned in a straight line along a beautiful horizontal line.
At present, fences made of corrugated board become more and more popular due to their strength, durability, aesthetics and relative cheapness building material. In addition, its installation is not difficult. The main thing is to have in your arsenal the necessary construction equipment. Here, perhaps, and all that you need to build a reliable and economical fencing with your own hands.