Mounting the shower tray is the first step for installing the shower enclosure. Read how to install a semi-circular acrylic pallet. It's easier than you think!
The installation of the shower tray with its own hands does not present any difficulties if you skillfully choose the model corresponding to the place where the installation will be performed. When buying a pallet, you must choose the one that is easiest to install. First of all, we are talking about the height of the pallet and the location of the hole for water flow. Look, in what place is the entrance to the sewer in the bathroom, and at what height. A low pallet can be connected if the entrance to the sewer is very low, directly above the floor or even in the floor. If the input is a little higher, choose a higher one, because only then it will be possible to reduce the pipe from the siphon to the sewer.
The second question is the location of the sink on the floor in the bathroom. Contrary to popular belief, a small distance between the drain of the pallet and the entrance to the sewer does not facilitate the connection, because it is difficult to fit the siphon and bend the pipe. It is better that the drain is a little further away, so that there is a place to make the connection to the sewer.
The third question is the choice of the siphon itself, which, as a rule, needs to be bought separately. Choose the lowest siphon, especially if you plan to install a low pallet.
Preparation of a place in a bathroom
Before installing the pan, the walls and the floor must be tiled. Be sure to make sure that under the tile made a waterproofing. This will prevent the flooding of neighbors or adjacent rooms. The entrance to the sewage system with a diameter of 50 mm should be located.
Assembly and installation
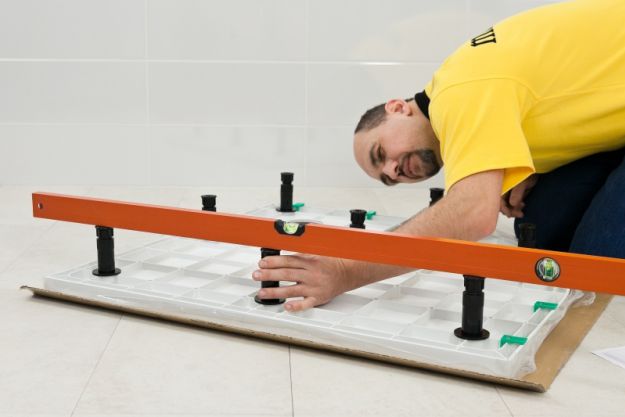
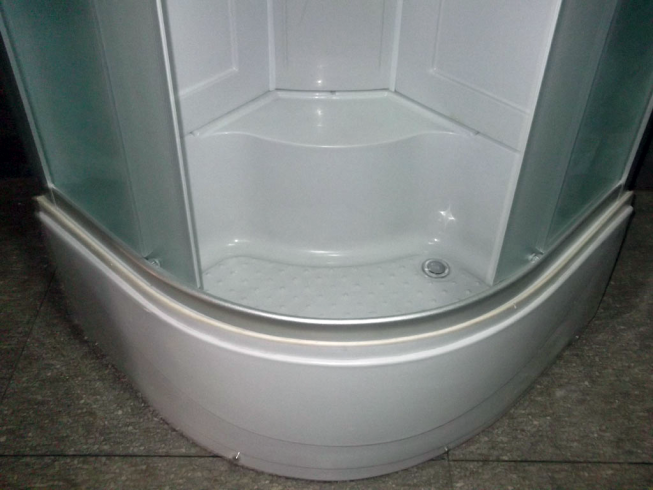
1. Attach the legs to the bottom of the pallet as shown in the photo. Beforehand, measure the height of the panel and set the desired length of the legs so that the panel fits under the pallet. Do not remove the protective layer from the pallet, so as not to scratch it.
2. After installing the legs, check the horizontal plane with the building level. Bubble level apply from different sides - along the sides of the pallet, and diagonally.
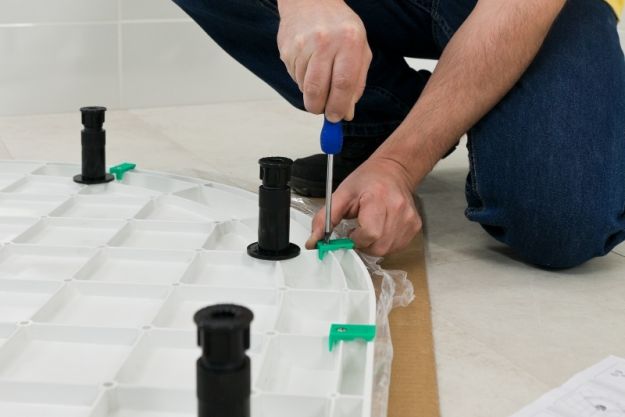
3. Screw the brackets for the side panel.
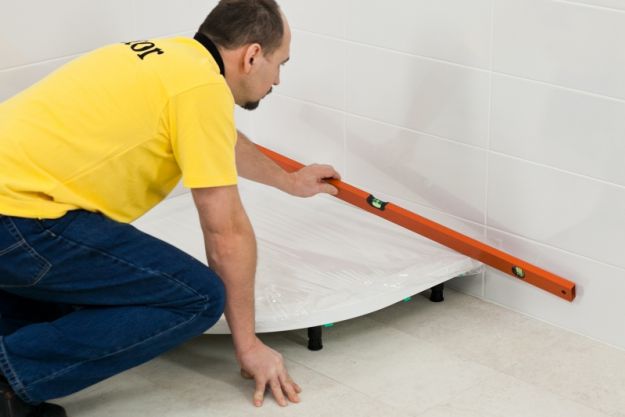
4. Place a tray in the corner of the bathroom, and check again for its level. If necessary, adjust the height of the legs again. Try on whether the side panel is suitable, make a trial installation of the panel, and then remove it.
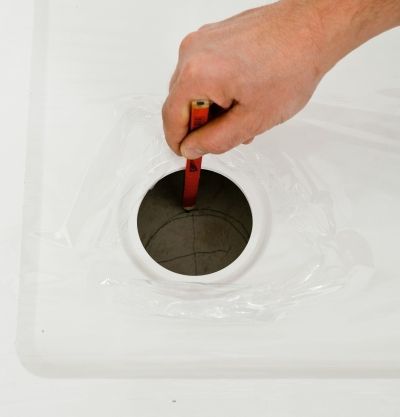
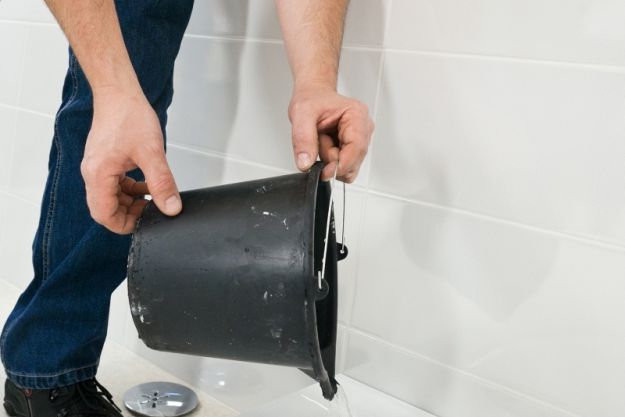
5. With a pencil, mark the spot of the sink on the floor. At this point you will install a siphon.
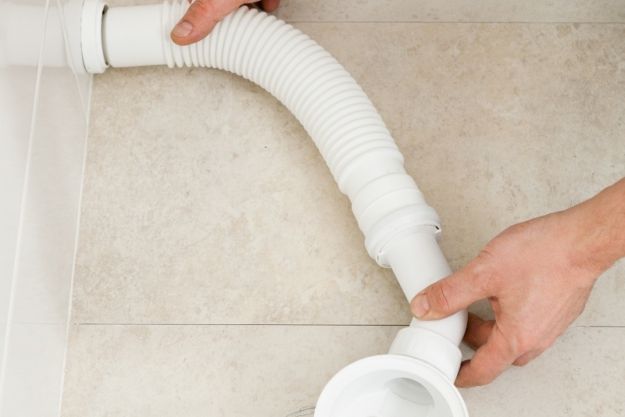
6. Lower the siphon, connect it with a flexible pipe to the sewage drain. Usually the drainage in the sewer pipe has a diameter of 50 mm, the same diameter has a pipe. Remember to respect the inclination towards the drain.
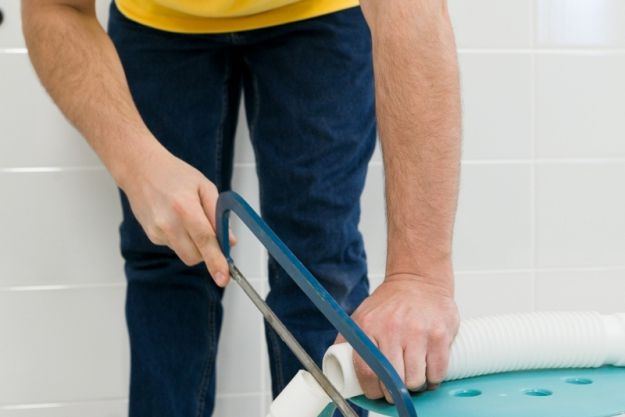
7. If the tube is too long, trim the end of the pipe with a metal saw. After cutting, cut edges with a knife or sandpaper. To facilitate the connection, the ends of sewer pipes and gaskets should be greased with a dishwashing liquid.
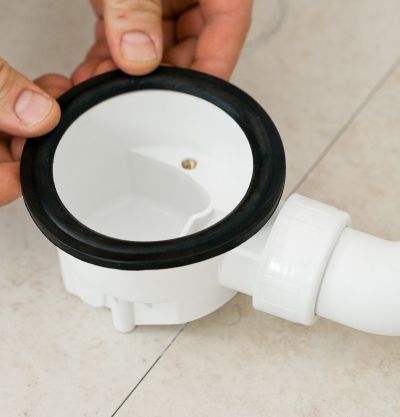
8. Gently lay the gasket on the bottom of the siphon.
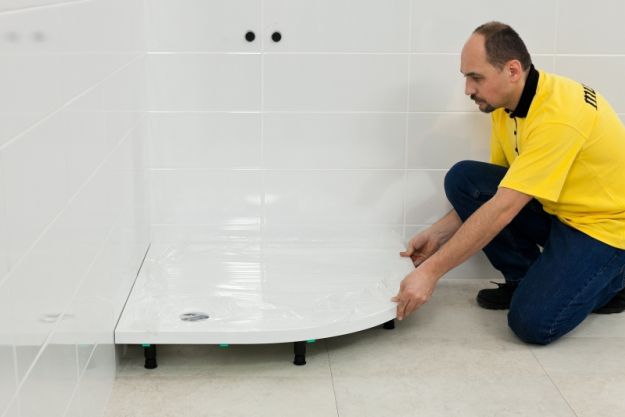

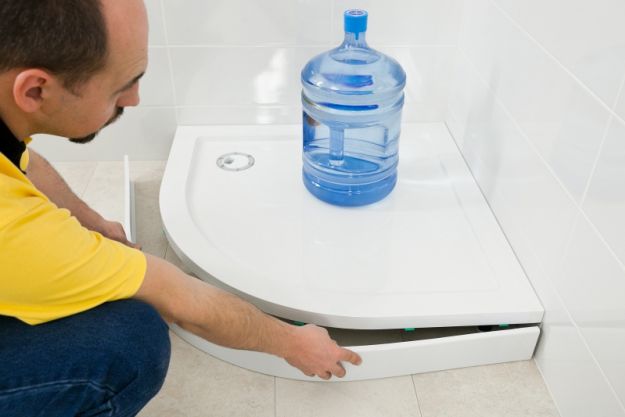
9. Place the pallet in the right place, as shown in the photo. You can apply silicone or mounting glue and thus glue the pallet to the wall. Some models may have mounting brackets, they should be screwed to the wall with dowels.
10. Insert the top of the siphon into the drain hole and connect it to the lower part of the siphon previously connected. Remember the correct order of installation of gaskets (this depends on the type of siphon). Be careful not to damage the gaskets. Insert the remaining part of the siphon and the top cover. Now you can remove the protective film from the pallet.

11. Fill the siphon with water and check that the water is sucked in well. If the floor remains dry, you can continue the installation.
12. Glue the legs to the floor so that the pan does not move during use. Apply silicone from the gun, around the legs and rub with your finger.
13. Press the tabs on the side panel.
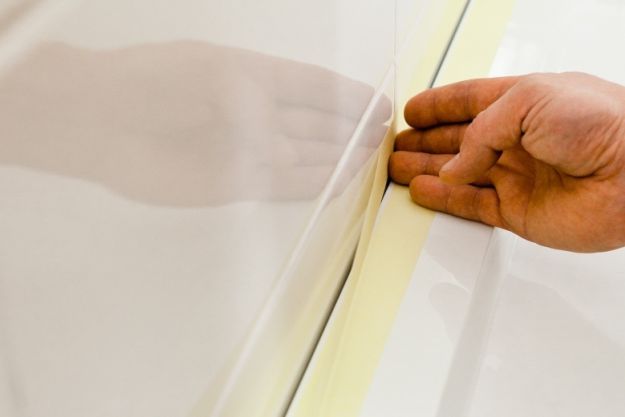
14. Wipe dry and securely seal the edge of the paint tape adjacent to the walls and edges of the side panel, adjacent to the walls and to the floor.
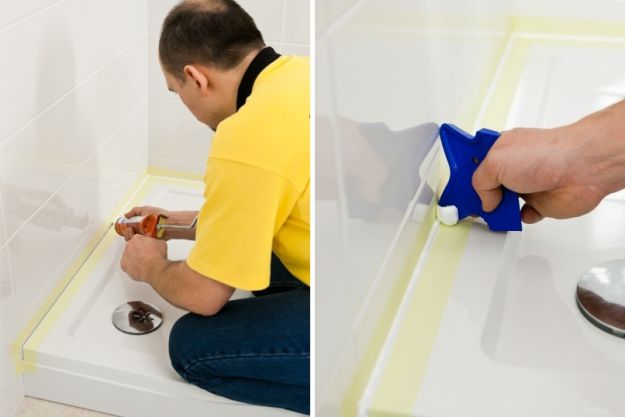
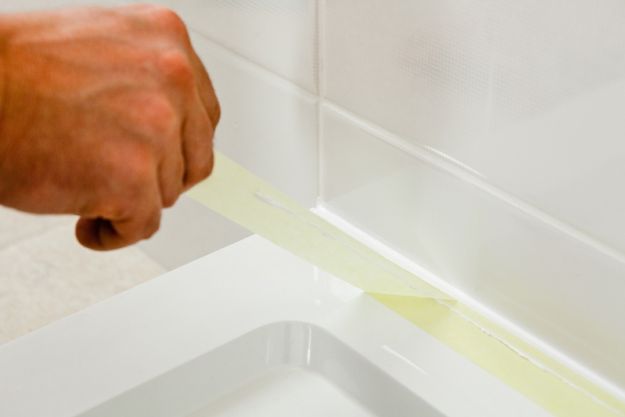
15. Fill the gap with silicone. Extrude the silicone from the gun along the entire length of the crack, and then smooth the seam with a rubber spatula or finger.
16. Immediately tear off the molar tape while the silicone is wet.

17. Do not use the shower tray for 24 hours until the silicone has dried. After that you can mount the cabin.
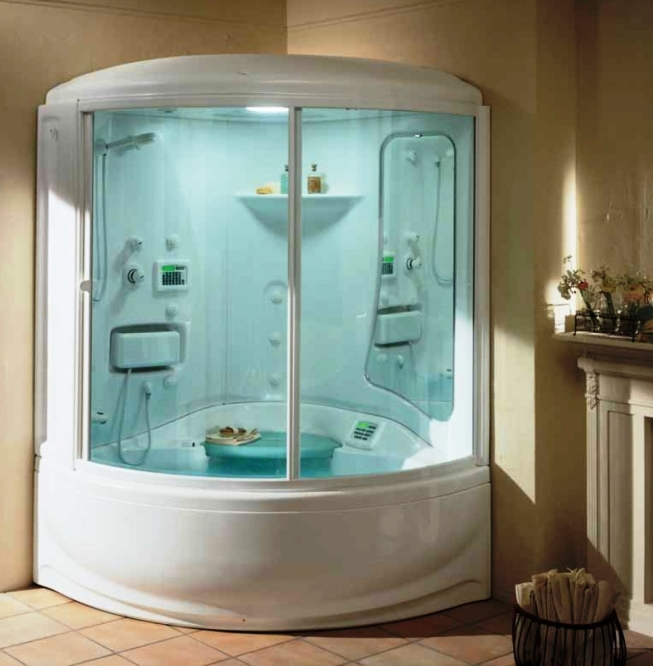
How to choose a pallet
It does not take up much space, which will make the functional interior even from the smallest room. In the shower stall one of the important elements is a pallet. Below we will advise what to look for when choosing.
The form
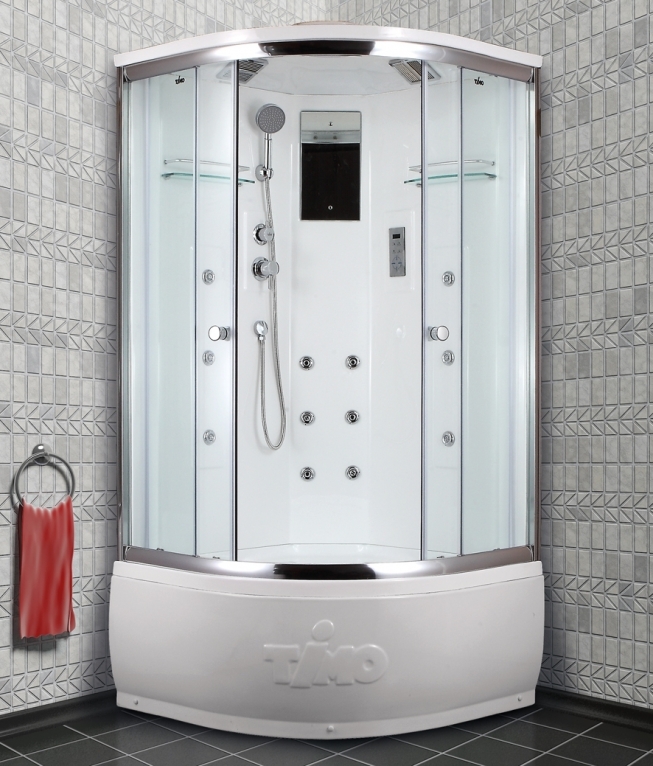
Available forms: square, rectangular or semicircular (based on the quadrant). For a small bathroom corner is better - semicircular or square models. For a spacious bathroom suitable rectangular tray, in which we gain freedom of movement. It is better that the appearance of the selected model refers to the nature of the remaining elements in the bathroom, this will create a single whole with them.
The size
The common sizes of square and quarter shower pans are 80x80 cm, 90x90 cm, 100x100 cm. It is worth noting that in the case of identical quarter shower trays their radius is essential. Most often they have a radius of 45 cm, 50 cm and 55 cm. When choosing a rectangular, models with a size of 100x80 or 120x80 are available.
The choice of size depends on the location that we can allocate in the bathroom.
Depth
Another aspect in this respect is the choice between a shallow pallet (low) and deep. Low, look more modern and elegant. Moreover, their application visually increases the space of the bathroom. They are suitable for use by the elderly, who have difficulty with overcoming high thresholds.
Deciding on the choice of a deep model, we acquire, in particular, the possibility of bathing a small child or soaking the laundry.
With or without seat
On the one hand, his presence takes a place, which can be unpleasant with daily use of the shower, on the other - on the seat, you can sit or put on it soap and shampoo.
Siphon
The last element is the choice of siphon. Depending on the diameter of the sink, we have a large siphon - a diameter of 90 mm or a small one - a diameter of 50 mm.
From which material to choose a pallet
The choice is not limited to the well-known cheap acrylic. A lot of materials are available on the market, each has its own strengths and weaknesses.
Acrylic - popular and affordable
Pros: light, smooth, warm to the touch and durable. Their installation is not difficult. On acrylic, you can easily hide small scratches or chips, using ready-made care kits (paste and sandpaper) or repair (liquid acrylic and hardener). Acrylic pallets also have decorative qualities - available in various shapes and colors.
Cons: Acrylic of poor quality can quickly become dull and yellow. To keep it's original appearance for a long time, it can not be cleaned with detergents containing abrasive substances - use only polishing agents for their care.
Of enamelled steel - strong, but prone to jags
Pros: fairly strong, scratch resistant and relatively inexpensive. It is easy to keep clean - the enamel surface can be cleaned without fear by any kind of chemical means.
Cons: Enamelled steel is prone to chips. Tin pallets are cool in contact with their feet and are pretty loud when a jet of water hits their surface. Fortunately, you can install a special rubber mat that will smooth out both drawbacks.
Ceramic - strong, heavy, expensive
Pros: more stable and durable than acrylic pallets. To install them you do not need a frame - they are attached directly to the base. They are resistant to damage, have a stylish, elegant look, easy to keep clean.
Cons: much heavier (pallet 90x90 cm weighs 33-46 kg) than acrylic or steel, several times more expensive than acrylic analogs.
From conglomerate (artificial stone) - style has its own price
Pros: they are made from 80% marble, 20% plastics, resins and dyes. This type of connection at first sight is indistinguishable from natural marble. The pallet is durable, resistant to chips, scratches, temperature changes and exposure to chemicals. They are warm and smooth, bacteria and fungi do not develop on the surface.
Cons: price - shower trays made from conglomerate are much more expensive than acrylic, steel or ceramic.
Of stone - luxurious granite and marble
Pros: luxurious, shower trays made of stone, elegant and pleasant to the touch, resistant to mechanical influences and dirt. They suppress water strikes and accumulate heat.
Cons: high price. In addition, during the cleaning of shower trays made of stone (especially marble) it is necessary to pay attention to the alkali content of the cleaning agent, since it can lead to discolouration. Shower trays of this type are slippery, so a rubber mat is needed to minimize the risk of falling. Absorbing stones require frequent polishing and constant impregnation.
How to make a shower tray with your own hands
If none of the listed types of material you are not satisfied - you can make a shower tray with your own hands made of ceramic tiles. On the market even ready-made kits are available, which contain the necessary elements.
Now you know the sequence in which the shower tray is installed with your own hands, and also what forms and materials they are made of.
If you decide to install the shower and the deep pallet yourself, you can do this if you take into account all the requirements and installation features. With the help of a modern shower cubicle, your bathroom will be very comfortable, which means that you can save a considerable amount of money. Installation instructions will help you to follow all the recommendations carefully.
Features of the choice of hydraulic box
The height of the room can be determined by adding the height of the cabin and the stock in 30-40 cm. Such a margin will be needed for easy maintenance and installation of the shower cubicle. In this case, it is important to pay attention to the height of the podium, if you, of course, are going to produce it.
One of the important criteria is the choice of pressure. It is worth giving preference to the device that will be suitable for the pressure of your water supply. Before you carry out the installation of the cabin, you should familiarize yourself with the circuit of its device.
Start the installation of the product only after you make sure that you have all the components and components of the shower enclosure and pallet and see the drawings, according to which you can understand the sequence of work.
Assemblage of a cabin and the deep pallet the hands
If you want to assemble the device quickly and efficiently, you should take care to prepare the necessary tools. Among them we can distinguish such:
- electric drill;
- building gun;
- silicone-based sealant;
- FSM tape;
- a wrench type;
- level and flexible hoses.
When you open the box in which the pallet is located, you should make sure that there are all the necessary elements: siphon, bracket, pins, pallet and screws, apron apron, frame and nuts.
You can proceed with the installation of the structure:
- Carefully remove the protective film from the pallet.
- After that, you should turn it over and put it on a tight cardboard. It will protect the product from possible scratches. If the frame of the cabin is already welded, you can put the pallet in order for the fasteners to match the holes that are in the frame.
- We take the hairpins and wind the nuts on them. After all the pucks have been placed in their places, you can screw them into bets and remove the scotch and acrylic from the holes.
In this case, it is important to exercise special care. After the shower cabin assembly it is important to do so, so as not to cause damage to the product, so it is necessary to do everything very carefully.
- Then it is necessary to put the frame on the studs. This can be done so that the frames are in exact contact with the pallet. After the frames are installed, you should tighten the nuts as tightly as possible so that there is no gap between them and the shower tray.
- After that, you need to use a wrench to tighten the nuts. First, tighten the upper, and then lower. At this stage of work it is important not to exert much effort, since the frame is a thin and sensitive construction. If you misuse it, it can lead to a break in the fastenings and to a loss of stiffness, resulting in instability in the cab.
- Choose the screws that come with the kit and fit the number of holes and length. Position the cab frame on the bump of the fastener, and then screw it with screws.
- Next, use the brackets to help you mount the pallet. Remove the film beforehand, and then carefully place the apron on the pallet.
- After that you need to use 2 screws. Their length can be suitable for fastening brackets to mortgages.
- It is necessary to screw the nuts on the legs that are located on the facade, and then put on the washers. From above, the brackets are threaded and the washers are laid, after which it is necessary to screw the nuts.
Installation of a deep pallet
If you have firmly decided to conduct an independent assembly of the structure, the first thing you need to start with is the installation of a side wall. By connecting the side panels and rear walls, you can install all the necessary elements for mounting the pallet.
The differences are not so great, especially if you have never installed such devices.
When you perform the installation of panels, you should pay special attention to the docking of the elements.It is worthwhile to ensure that all borders coincide. Do not deprive attention and places in which the panels with facade sides are joined. It is important to lay them correctly to create a straight line. Next, you can use the profile frame, which is used to mount the doors, and then you should install it in front and tighten all the screws.
- After the installation of all the walls of the pallet is completed, you can proceed to the next stage - to install the roof. Here, you may need the help of a friend, since the roof needs to be held in order for it to be mounted in the correct position.
- Then you should install the construction on the mounted pallet. When the installation is done, you should make sure that everything is done correctly. Before making the final fixing, try to gently move the structure until it takes the desired position. It is quite easy to do this.
- The final stage of the work is sealing the seams in order to avoid water leakage. Often, silicone can be applied from the rear, however, in some cases, it must be laid in front. The top of the roof must be sealed in the last place, namely after the hydraulic box has been installed and the doors will be mounted.
If you install the rollers yourself, you should pay attention to how the doors will be located. They should have the same position as on the frame. At the end, it is worth fixing the screws and completing the installation of the shower enclosure with a deep pallet.
As you can see, you should not have any special difficulties in installing such constructions. And, if you still have any questions, then any information posted on the Internet will help you cope with the installation of the cab and pallet.
We decided to install a shower in the bathroom. But the first problem is connected with the installation of an acrylic shower tray. And at once there are so many questions: how to correctly install it, what materials to apply for the pallet. The pallet itself is quite deep and its size is 120 X 80.
You decided to buy a shower, you realized that this is the necessary sanitary equipment that you need. However, if you need such a cabin to please the eye and body, then it is not worth hurrying, because any creative work involves a large amount of routine, in which you need to understand. To begin with, we recommend picking up 1-2 sheets of paper, tape measure and a pencil. Measure all the parameters of the available space that you want to occupy. Knowledge of height, width and length will be more than enough. Now you need to get the building level and make the following measurements:
1. Vertical and horizontal floors and walls. If the floor is horizontal and the walls are vertical, you will get an angle of their location, which should be equal to 90 degrees. This will mean that any shower will become "like a native";
2. Determine the degree of deviation from the mean value or, in Russian, how much the curved walls and how far they go from the vertical line.
If the results of the study show that the walls are curved, then this threatens with such consequences:
- not very aesthetic cosmetic effect. The cockpit will not fit snugly against the wall and, as a consequence, all cracks will be visible to the naked eye;
- installation of some types of this sanitary fixture does not allow the presence of uneven surfaces;
If you still can not find the level, then you can buy it in any market. Prices for such a device length of 1.2 m are in the range from $ 10 to $ 30.
After you remove the geometric parameters, carefully calculate the possibility of approaching and moving away from the cabin. It may be that leaving the booth is not very convenient, but it happens most often not through your fault, but by designers. Look at all the plumbing installations that are nearby. In some systems, doors open in the same way as interior doors. From this it turns out that the glass doors when opening can damage anything. Take this moment and try to avoid it. It will be especially offensive if this "something" will be the door.
Now pay attention to the location of the water pipes. If you pipe installed on the Soviet scheme along the walls, it is unlikely that you will be lucky. Most likely, here you have to saw, drill and cut out the shower booth or hide the water supply in the wall. It is better to depict all this on paper and once again get expert advice - suddenly give good advice.
Also, do not forget about the electricity supply and water pressure. Pressure can be useful for any water special effects, and electricity connects all control systems. But we'll talk about this later. A ventilation grille should be located nearby - be sure to put it on the picture. The distance to the sewer pipe will be no less useful. for each of the running meters of the drain pipe will have a bias in a couple of centimeters.
And a few tips:
Tip 1. The pallet is installed on a flat floor. It is necessary for him to make a small stand from the cement slurry or from the mounting foam. After drying, mount the pallet and then under it put the stand. The edges of the pallet that come in contact with the wall are filled with sealant and allow the sealant to dry for 24 hours.
Tip 2. For leveling the pallet, a level and a flat floor are used. If the pallet itself and the stand under it are sufficiently rigid, install it without additional tools. However, very often Chinese shower cabins, perhaps because the Chinese are small and light, do not have enough rigidity and then you have to perform improvised props using brick and other materials.
Council 3. I think without a brick you can not do. Often I encounter the installation of pallets and in most cases a brick is used to stabilize the pallet, level the pallet on a stand, there are legs on the thread and are regulated in height, and then at three points under the pallet install bricks on the solution and the pallet sits on them , if the gap between the bottom of the pallet and the floor is not large then fix it with a mounting foam, but you must first collect a full pallet of water before the foam lifts it.
Tip 4. The best option is to make a pedestal under a pallet of expanded clay fill with concrete, or use Knauf ubo. Thus, you will get the necessary support, you do not have to suffer from bricks and good thermal insulation under the pallet! But you need to provide access to the siphon.
Tip 5. The correct installation of a shower tray begins with the installation of a sewage drain. The suction funnel should be exactly under the sump drain. Expose the level you need not only the pallet itself, but also screens that should be located strictly vertically. Before fixing the walls, the doors are hung and adjusted. Be sure to fill the sealant with all the seams between the walls and the shower.
Tip 6. It should also be noted that for a shower cubicle, a water trap is usually not installed. A shower tray can be installed on a non-ideal floor, there is some possibility of adjusting the height of the legs. When deepening the deep pallets, you can simply fill them with water, but if the tray is low, it is advisable that someone should stand on it until the foam seizes.
Add your advice, pleeeee.