When constructing the roof ridge, we will pay special attention to the following questions:
- Calculation of the height of the ridge.
- Ventilation.
First, let's define what is called the roof ridge. This is an edge that is located horizontally, which is formed when crossing the roof slopes and various elements adjacent to it.
Let's try to figure out: how to equip the roof rope yourself, how to calculate the height of the ridge, and how to organize the ventilation of the roof.
 Previously, the skate was covered with sheets of asbestos cement. Sometimes roofing iron was used for this purpose, but it happened so rarely.
For the design of the ridge of the most common four-sloped hipped roof, at the moment, galvanized iron is used. In modern execution this is the most popular option.
For the device of such a covering of the ridge, ready-made profiles of galvanized iron can be used. Their standard length is about two meters. Such corners are bought in stores selling construction materials. Corner can be made by hand from the formed remnants of galvanized iron. 
How to equip the skate
The corner can be made by yourself, having pruned galvanized iron and kiyanku. Cuttings of the appropriate size must be laid along the marked line. Further, with the help of a kayak, tapping a sheet to the desired profile, you get the corner you need. Do not use the hammer, as it can damage the zinc coating of the sheet.
For a corner, the dimensions of galvanized iron scraps can be 240-300 millimeters in width, 2000 millimeters in length.
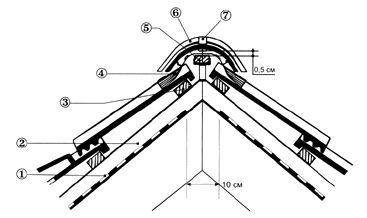
The above picture shows how to fix the ridge's angle to the gable roof skylight. An obligatory condition is considered that the overlapping of the elements of the ridge during laying should be not less than 10 centimeters, and the side of the corner, which is used, respectively, 12-15 centimeters.
When nailing, make sure that they pierce the wave slate and affect the crate. To achieve this condition, sometimes prikolachivayut an additional beam on the lath where the horse is. If there is a need for work, then the ridge beam can not be equipped. Then the corner of the ridge is nailed to the crate.
In recent times, when installing the skate, the spaces between the roof covering and the corner were covered with a mortar. Now such work is done with the help of mounting foam.
Attention! Arranging a skate on the roof yourself is not a difficult job, but requires compliance with safety rules, since it is produced at a sufficient height.
Before you begin the arrangement of the ridge, it makes sense to determine the height of the ridge and ridge run.
The height of the ridge will depend directly on some significant factors. First, the height is determined by the shape of the roof and the sharpness of the slope of its rays. Secondly, the effect on the height is the coating that you have chosen for your roof.
Having chosen the roof covering you liked, the work begins on arranging the ridge, having first calculated its height.
Calculate the height of the ridge
In order to determine the height, it is first necessary to put two, three pieces of tile, designed specifically for the roof. It should lie on the roof slopes with two edges. After laying the shingles, measure the distance between the upper edge of the roof tile and the inner one from the narrowest end of the tile.
The edge of the top is called the "control bar" and consists of blocks that connect to each other. Between the neighboring bars, the distance is tried to be as small as possible.
Measure the distance between the upper part of the ridge holder that is already inserted into the bracket to the point where the fastening is bent. Further, the upper beam of the ridge is strengthened by nails. It should be located on the central part of the crate.
At both ends of the ridge, fasteners are fastened and a building cord is called, which is called a mounting cord. If this is not available, then instead of it you can pull the line thicker. The purpose of the mounting cord or line is that it allows you to mount a ridge run precisely along the line.
The next step is to install the ridge beam into the holders of the ridge beam and strengthen it with nails, which choose high-quality stainless steel.
It is important to provide for the construction of the ridge the use of side tiles with lightweight construction. Such shingles, has significant advantages in the arrangement of ridge run. It is installed after all those works that were considered earlier.
In order to protect the attic space from the penetration of moisture or steam, provide for the laying of waterproofing. Also, to maintain a sufficiently comfortable temperature, heat and sound insulation are arranged.
If you made the entire assembly of the skate qualitatively, the seams and the joints of the roofing material will be tightly closed by the designs of the ridge run.
Helpful advice! To avoid the accumulation of condensation under the ridge, provide a compartment for ventilation. This compartment should be equipped even if you have waterproofing works.
When ventilating the ventilation compartment, ventilation boxes can be used, which are either purchased in the store already ready for installation, or they can be made independently. Installation of ventilating boxes is carried out with the help of a special mixture for gluing or, if it is provided for in the design, special fasteners.
The ventilation box must be glued on the technology to a dry and clean roof surface. Try to have a comfortable temperature in the street.
After you have decided on the height of the ridge of the gable roof and completed all the necessary work, you can proceed with the installation of the roofing run. For a roofing run, a special roof shingle is usually used. At the same time, it will serve as the final element and decoration of the roof
Arrangement of the roofing run is properly started from the leeward side. This will avoid the rain from working in the joints of the roofing material, or that wind gusts do not interfere.
How to provide for ventilation of the roof ridge
The horse protects the attic from entering the water in the event of precipitation. But there is one more of its purpose. The horse is an important element for ventilating the attic space. The ventilation becomes especially important when the roof is insulated.
Ventilation is arranged according to the following scheme:
After finishing the installation of the rafters, they can be filled with a waterproofing film. The film is attached to the legs of the rafters in the transverse direction. Fastening it is carried out by strips, and it is necessary to make sure that the upper strips go to the lower ones with an overlap of not less than 15 centimeters. The film is joined at the seam with a special tape.
The figure below shows the scheme of roof ventilation:
- Steam insulation.
- Heater.
- Waterproofing.
- Ventilation in two layers.
- Single-layer ventilation.
Be sure to take care of the waterproofing, which protects the roof trusses from accumulating condensate. Also, the film will prevent the water from flowing into the attic space through the cracks in the roof covering.
In addition to this, the waterproofing film will protect the rafters from rotting, and the existing metal joints from the appearance of rust.
If the ventilation is not properly arranged, the condensate accumulating between the waterproofing and the roofing material will settle on the film. This will only accelerate the process of decay of the crate and the spread of rust on metal fasteners.
If you make a warm roof, then it is understood that below the waterproofing, the insulation layer is being arranged. The heater is usually a mineral or basalt wool. The heater itself is hygroscopic, that is, it absorbs moisture well. In addition, if the ventilation system on your roof is not properly equipped, moisture, accumulating in the layer of thermal insulation, worsens its properties. The same problem leads to intensive rotting of the rafters, since the warming layer lies between them.
To prevent moisture ingress, arrange holes for ventilation. At the bottom of the filing of the cornices, ventilating gaps are made through which air enters and necessary ventilation takes place.
In addition to these gaps, some gaps are provided between the waterproofing and the roofing material. In addition, it is necessary to make holes between the ramps, through them will come out moist air. After these events, they begin the installation of the skate.
Airing of the roof can also be carried out in alternative ways that depend on the roof cover. If necessary, other options for roof ventilation are provided in addition to those available.

- 1 Principal differences and ways of implementation
- 2 Design Features
- 3 The diversity of ridge elements
- 4 Tips
- 5 Preparation and collection of consumables
- 6 Calculation of height
- 7 Fastening technology
- 8 Installation
- 9 Videos
- 10 Schemes
Dacha and suburban construction from time immemorial attracted not only the possibility of a full-fledged holiday away from the city bustle, but also an independent arrangement of their homes. Certainly, in a number of moments when erecting a cottage and a private plot there are certain difficulties that need to be solved with the help of masters, however, if desired and with due patience, you can erect some elements of the house's construction with your own hands. Having finished with the foundation and walls, each owner is faced with questions about how to properly equip the roofing system.
In this article, we'll tell you how to make a skate on your roof with your own hands, consider the roof options from slate, corrugated board, metal.
Principal differences and ways of realization

When starting to study the procedure of erecting these elements, it is necessary to understand what is the difference between such concepts as "the roof ridge" and "the roof ridge". The first is formed at the intersection of two roof slopes, and the second is formed by a separate element, which is selected depending on the type of roofing material.
The main purpose of the roof ridge is to provide ventilation and remove the moisture formed on the inner sides of the skates. The functioning of this element is achieved by laying roofing materials, so that there is a small gap between them at the upper closing point.
 Slate roof slate
To date, the skate device can be implemented both through ready-made sets, and with their own hands, having prepared the necessary materials. In the first case, the owner relieves himself of taking measurements and preparing the metal for installation. If you have everything selected, it remains only to choose a form that is represented by figured, relief, conical, semicircular and other types. Self-made skate provides for cutting metal on its own and performing an even bend, which in most cases is difficult to do at home.
 Ridge of reeds
There are many ready-made solutions for both roofs made of metal, and for other roofing materials. As a rule, manufacturers of a particular product offer the use of their material, prepared specifically for their coverage. It should be said that the purchase of ready-made skate elements is the optimal solution, ensuring precise fitting of each part and that will help create an excellent aesthetic appearance. At the same time, the owner only needs to lift the cut pieces to the roof and, in accordance with the instructions, perform their installation.
To erect the roof ridge should be started only after the completion of all roofing works. Its fixation is carried out on the prepared coating, which requires the insulation of the insulation before the placement of the ridge in the variant of the insulated roof.
Design Features

When planning to equip a horse, first of all it is necessary to understand what this element is and how to install it correctly. Roofing horse includes the following parts:
- bar - ensures the retention of the outer coating, which protects from the harmful effects of environmental factors;
- wooden or metal racks.
As already mentioned, the skate provides ventilation of the roof. However, one should not forget the fact that small gaps between this element and the roof slopes may cause the appearance of birds, rodents and insects in the attic of the house, therefore, one should provide protection from them.
 Roof on the roof of metal
To solve this problem, it is most rational to use special grids with small cells. As a basis for it should choose a fairly strong material, for example, aluminum, because it has sufficient strength and flexibility.
Having finished with the arrangement of the ridge, one should not forget about the blinds, which are installed in the end part of the structure. Their fastening is carried out through self-tapping open apertures between skates.
The variety of ridge elements

The modern assortment of goods in stores in this area is large. In some cases, the skate is laid on the pillars of the beam, located on ceiling slabs or screeds. In another case, it is formed by plating the boards under a certain slope, which are placed close to each other. To date, there are the following types of ridge:
 The defining nuances during installation
In the course of the work, it is necessary to take into account that the ventilation of the space under the roofing is achieved by leaving the gap. Having finished with facing of skates, it is necessary to proceed to laying of the ventilation material, providing reliable protection of the support bar of the future skate against penetration of atmospheric precipitation.
At the same time, the intermediate layer also solves another important task: it excludes insects and birds from entering the attic space. As a basis for this element, it is more appropriate to use special seals, mineral glass wool, etc.
When installing the ridge, it is prohibited to use mounting foam and sealants, as they interfere with the circulation of air under the roof.
Preparation and collection of consumables

Having weighed all the features of the material and determined on its choice, you should purchase the required amount of ridge, as well as its components and fasteners. As a rule, the composition of the ridge element includes a ventilating partition and a tape, fasteners under a lightning rod and a seal.
To avoid discrepancies in size when docking, as well as to ensure quality connections, it is necessary to purchase all roofing materials from one supplier.
To successfully accomplish the task and reduce the time for preparation, it will be necessary to collect in advance the required tools and devices, namely:
- sliding staircase;
- building level and roulette;
- screwdriver or drill with a set of drills and bits for working with roofing screws;
- a capron cord;
- scissors for metal or Bulgarian.
The use of an electric tool greatly simplifies any installation, however, in the absence of appropriate equipment, it is easy to find an alternative to the tool available in everyday use.
Calculation of height
 Calculation of the height of the ridge
Getting to the arrangement of the roof, the necessary measure is the calculation of the height of the ridge. This will allow you to make all subsequent calculations of consumables that will be required when building rafters and roofing. This indicator is determined by means of geometric parameters and is calculated on the basis of the angle of inclination of the facing roofing material and its type. Thus, in the case of a cane or other type of soft roof, such materials are laid with a slope ranging from 12 to 85 °. However, slate and other materials are fixed with a slope of 15-60 °.
At the same time, one should also take into account the general aesthetics of the building - the height of the roof should be optimally coordinated with the proportions of the house. A too high or too much flat roof can ruin the whole appearance. For our strip it is most rational to use the slope of the roofing material at 30-45 °, otherwise the cladding will be subjected to increased wind or snow loads.
To carry out the necessary calculations, you will need to refer to the geometry and calculate the values using a simple formula. So, it is necessary to take a rectangular triangle and calculate the length indicator of the leg, which is equal to the length of its second colleague multiplied by the tangent of the angle at the foot. Having a house with a width of 6 m and an inclination angle of 40 °, we find on the school tables the values of the tangent - it will in this case be 0.83. As a result, we get the formula: 6/2 × 0.83 = 2.49 m - the optimum height of the ridge element.
Fastening Technology

To build the skate proceed after the completion of the procedure of fixing the roof on the ramps. Decorative components to the location are delivered through a winch mechanism or rope. To fix the ridge element, it is necessary to install a beam with a section not less than 80 × 100 mm from the outside between the slopes. Further, to each of its sides the fixing of the bridle bars is carried out and the ridge beam is installed.
To simplify the subsequent process of laying parts, it is not superfluous to attach special brackets to the central support bar and place navigation bridges on them. In addition, for the most dense fit of roofing material, it is most rational to use a ridge beam with a rounded edge.
 Skirting board
Protection from decay, development of mold and fungal formations is an integral process during installation, which provides for the upholstery of the ridge beam along its entire length with a roofing felt or a special sealant. This practice can significantly extend the life of not only the skate, but also the entire roofing system.
In the production of a roof made of slate, it is more rational to choose a shoe from a similar material - asbestos-cement, or use galvanizing.
Fastening is carried out directly to the ridge beam by means of slate nails or self-tapping screws, so that the imposition of the parts goes from the gable of the house.

For example, take the placement of the ridge element on the roof of metal. For high-quality performance of work to ensure reliable operation is performed in the following sequence:
- be convinced of the smoothness of the ridge axis - the place where the edges of the skates close (allowable discrepancies - up to 2-3 cm);
- installing additional roofing details, it is worth remembering the need to install a small layer of heat-insulating material in the ridge grooves;
- lay the first and last skate element on the prepared beam level with the outer edges of the roofing (it is more rational to conduct all roofing work with a partner, which will greatly accelerate the entire installation process);
- pull a nylon cord between them;
- to fix the composite skating elements by means of self-tapping screws (the step of screwing in should be moderate about 40-50 cm).
 Fastened skate
Ridge elements should be chosen with a shelf width of 15 cm, since parts with smaller faces can not reliably protect your attic space in the winter season from snow.
In conclusion, I would like to note that the process of installing a skate on a roof is not as complex as it seems at first glance. Taking into account the fact that all work is carried out at a significant height, then, having no experience of installation in such conditions, it is more expedient to turn to specialists for help.
- filing roof overhangs with your own hands;
- how to install solar panels.
In the provided video material, you can learn about the intricacies of mounting the roof ridge:
It's winter at full speed, it's time to do winter sports. And one of the most popular entertainment for both children and adults is skating. And you did not have such a desire to become more visible on the ice, among the mass of people? I decided to make a bright highlight for this, it's quite easy to do.
So, to make the highlight on the skates we will need:
6-20 bright LEDs (preferably with a wide glow angle, 3mm in diameter), the color is our taste. For red LEDs you will need to buy resistors of 51 Ohm, for blue you can do without them, below I'll tell you why.
2 holders for a pair of AA batteries with switches (optional, but easier to attach and looks more aesthetically pleasing)
The meter of wires can be used as a thin stranded insulated wire, or a conventional copper wire from a "twisted pair"
Hot melt glue with a "gun"
Soldering iron
4 AA batteries, preferably alkaline
Double-sided adhesive tape (foamed, for mirrors), 2 screws with nuts and washer.
Pliers, knife, side cutters (optional)

So. We will first deal with the electrical circuit.

Here I have power from two AA batteries - new alkaline ones give a voltage of 1.6 * 2 = 3.2 volts. On the outside are only 5 blue LEDs, on the inside - 5 blue and 5 red. This number of LEDs is even redundant, since the perception of the brightness of light by the human eye is described by an exponential law, and an increase in the number of LEDs even in 2 times will not cause a visually similar effect.

So most of you can do 6-10 LEDs per shoe. Remember, the more LEDs you install, the faster the battery life will be. As for the installation of resistors - they should not be soldered to the blue LEDs. The operating voltage at them is usually within 3.2-3.4 V, all within the limits of the norm. In the red, this range is 2.2-2.8 V, and when connecting our batteries, the current will go beyond the permissible 20mA, and the LED will burn out. Therefore, I recommend soldering resistors rated at 51 ohms, they are soldered to the long (positive) terminal of the LED.

Everything can be seen in the diagram above. Why did I make two different colors? First of all, in order to maximize the use of batteries. On new batteries with such a scheme, a blue glow will prevail, and even when the batteries are almost completely discharged (in the frost this process accelerates), the blue LEDs will go out, and the red ones will glow brightly for a while.
Let's get down to business. Solder one by one wires / resistors to the LEDs, for convenience of further arrangement, I did this by trying on skates right away.

When the LED is soldered, you can immediately fix it on the boot with a hot-melt adhesive. What is the use of hot glue - even if something turns out inaccurately, or do you want to remake it, you can always warm it up with the same soldering iron and fix the necessary places. We bend the leads of the LED and wires:

Apply and glue:

Next, I took an empty rod from the gel pen, on which I fixed 3 LEDs so that they lay on one straight line and their light was directed in one direction. And the leads themselves LEDs used to connect them as conductors.

The rod by the way can still be highlighted differently, filling it with non-freezing liquid, inserting LEDs into its ends, but I do not like this option very much, it gives little light, and LEDs are needed with a directional glow (20-30 degrees).

Places where the resistors are soldered are not very nice, but you can think of a more reasonable arrangement. Or to use SMD-resistors, they are quite small in size.

I decided to take out the batteries on the top of the boot from the rear. Space under the boot allowed to install and there, but there is a very damp and cold place, for batteries this is the most unfavorable conditions. And so they are at least a little covered with a pant leg and there does not fly snow and ice.
As for the switch and the battery compartment in general, there are ready-made products in the radiotherapy stores, already with wires and a switch, so as not to break your head. Otherwise, the batteries will have to be connected, for example, with electrical tape, instead of a switch, think of some kind of NO contact. This is not very reliable, especially with such "harsh" operating conditions.
Winter, frost, vacation - it's time to take advantage of the opportunity to relax actively! And how can I forget about the winter sporting equipment - about skis and skates! Consider what needs to be done to prepare them for walking and skating.
Let's start with the lubrication of skis with our own hands
Strange as it may sound, but when preparing skis, we need to ensure that the skis do not slip. More precisely, they did not slip back when pushing away. To achieve such a result is easy. To do this, there are many ski waxes. When choosing them, it is necessary to take into account some parameters: temperature and humidity, as well as temperature and graininess of the snow. The last two factors, as a rule, take into account professional skiers.
When preparing for an ordinary walk, it is sufficient to know the values of the first two parameters. As a rule, the temperature of use of the ski ointment is indicated on its packaging, and it will not be difficult to find the necessary lubricant.
And what if the old skis from last season have the remains of the old ointment? How to remove old ointment? To remove the old ski grease, there are two ways: "hot" and "cold".
"Hot" method involves the use of absorbent paper, iron, scraper and washing. First you need to cover the surface of skis with the rest of the ointment with napkins or toilet paper. Then iron the iron several times to iron them until completely absorbed. If necessary, the operation can be repeated. Then, the paper soaked in ski grease is removed from the surface with a scraper. Scraper is better to take plastic.
In the "cold" way, the old ointment is removed only by scraping and washing. Difficulty can cause an old ointment applied to skis several years ago. In this case, it becomes necessary to combine the above methods.
Paraffin can also be used as a cleansing agent. Apply paraffin to the contaminated area, allow it to stand for a while, then remove the remains of the old grease with a scraper.
A ski ointment is sold in briquettes, as in a photo, or in cans. Their cost starts from 300 rubles. for packing.
So, we cleared the skis and prepared for the new season. But to skate on a classic style ski, you have to spread the skis under the shoe holding ointment, so that the skis do not slip when jerking. For amateur skating you are quite suitable set of inexpensive domestic ski wax. It, as a rule, consists of four briquettes, sometimes jars, made of thick metal foil or soft plastic. Also you need a synthetic cork-rubbing.
After rubbing the ointment should get a smooth, slightly shiny layer. If the even layer does not turn out, just smoothen the ointment with your hands.
If you go to the forest to ski, it is advisable to bring ski ointments designed for higher and lower temperatures, as well as a cork and scraper. If the skis do not allow you to confidently push off, and when you jerk back, then in this case it is enough to put a warmer ointment over the previously applied and rub it with a stopper. The correction of the lubrication will take you only a couple of minutes.
Sometimes skis do not go at all, besides they are covered with ice or snow under the shoe. To get rid of this scourge, ice or snow should be removed with a scraper, and then wipe the ski with a glove. Then put a new layer of colder ointment on the skis. As a rule, this method corrects the situation and allows you to continue skiing.
How to spread skis with your hands - video
How to sharpen skates
In order to get the maximum pleasure from skating, it is not enough that they ideally "sit" on the leg. First of all, their quality sharpening is necessary! On most skates that have just been bought in the store, there is no sharpening. How to check if your skates are sharpened? It's pretty simple. Look at the blade, holding the horse with the toe to itself, and the heel from itself. You will see that it has a U-shaped blade, and not a knife blade, as many imagine!
Honed skates will have on the blade grooves of various shapes, which depend on the type of sharpening.
If you do not have new skates, you will immediately understand when they need sharpening. The first bell that needs sharpening will be the following symptoms: loss of speed, skating skates during acceleration, problems with braking, leaving the blades out of the way when turning.
For everyday non-professional skating, a standard sharpening with a rounded channel is necessary. This sharpening creates two distinct edges - inside and outside. These ribs are needed for the blade to cling to the ice better. If you are riding outdoors (on the street or a frozen pond), where the ice is colder and harder, the groove on the blade should be deeper. This will ensure better grip of the blade with the surface. If you go to a covered skating rink, the groove should be much smaller. In the room the temperature is higher and the ice is softer, so skates with a deep gutter will "bite" too much into the coating.
To sharpen skates at home is not an easy task. But, if you still decide to do it yourself, prepare some tools. You will need: a round file, emery, a sharp fine-grained bar, a vice. In order to avoid any difficulties with sharpening, pay attention to the fact that the metal tools are harder than the blades. To deepen or form a groove, first treat the blade with emery. Then, using a file with a thickness of not more than 10 millimeters, infer the shape of the groove while simultaneously processing the edges of the blade.