As soon as autumn comes, and with it the first cold snap, many of our compatriots begin to wonder how to trim the loggia with their own hands. And this approach is quite understandable, because the thermal insulation of this room will help us to keep the precious degrees inside the apartment. In addition, after finishing we will get not just a warehouse for conservation and unnecessary things, but a full-fledged room.
These arguments are enough to work on the interior decoration. And if you do not know which side to approach this problem, we recommend to study the tips given below.
We prepare the site of work
Glazing - in the first place
First, we need to determine the main goal. If we just want to repair the walls and the floor of the loggia - this is one thing, but for a full-fledged finish with insulation we will have to work much more.
Before you can trim the loggia with your own hands, you need to take care of its protection from wind and rain.
If the glazing is already installed - excellent, if not - you need to solve this issue in advance:
- At the first stage, we perform measurements of the opening in which the glazing will be installed.

- Next, go to the carpentry shop or the company for the manufacture of plastic windows. We order products in accordance with our dimensions.
Note!
Wooden windows are more environmentally friendly, but plastic, especially supplemented by energy-saving double-glazed windows, where they keep heat better.
With regard to such a parameter as the price, then against the background of a stable cheapening of metal plastic, today we can talk about almost equal costs in both cases.
- The ordered designs are installed in the opening and fixed by anchors. If you do not want to remove the glazing, then the anchor can be replaced with mounting plates, which will then be hidden under the lining.

- When installing the structures, make sure that they are perfectly aligned. Deviations from the vertical or horizontal will lead to the fact that in a few months the shutters will not open due to skew.
- After installing the windows themselves from the inside, we mount a narrow (up to 150 mm sill). Outside, instead of the window sill, we install water drainage from galvanized steel.

- All the gaps are filled with polyurethane self-expanding foam. After drying, the foam is cut and colored, protecting from UV rays.
Base waterproofing
However, the windows protect our loggia from only a part of the moisture. Next, we need to ensure a good waterproofing of the bottom plate.
For this:

- We dismantle the floor covering over the whole area of the loggia (it will have to be removed in any case).
- Thoroughly clean the concrete base of dust and debris.
- Cracks and cracks in the places of abutment of horizontal and vertical surfaces are cleaned and filled with a sealing compound. You can use cement mortar, or you can simply blow inside polyurethane foam.
- The floor and the lower part of the walls (approximately 150 mm) are covered with a waterproofing compound. In addition to the lubricating waterproofing, it is possible to spread a roll of waterproof film on the floor.

This completes the preparation. Now you can proceed to the inner lining of the loggia.
Finishing technology
Choose the materials
For decoration of the balcony from the inside use a variety of materials.
In this case, there are also the most popular solutions:
- The floor is usually laid on the system lag with a heater. On top of the rough floor of the plywood or OSB-plate is laid linoleum or ceramic tiles. Use the laminate here is not worth it, because the high humidity in the summer (windows are almost always open!) Can lead to swelling of the coating.
- For wall sheathing, gypsum, MDF panels, plastic or. The last option is the most advantageous, but the cost of finishing with the use of natural wood will be much higher.
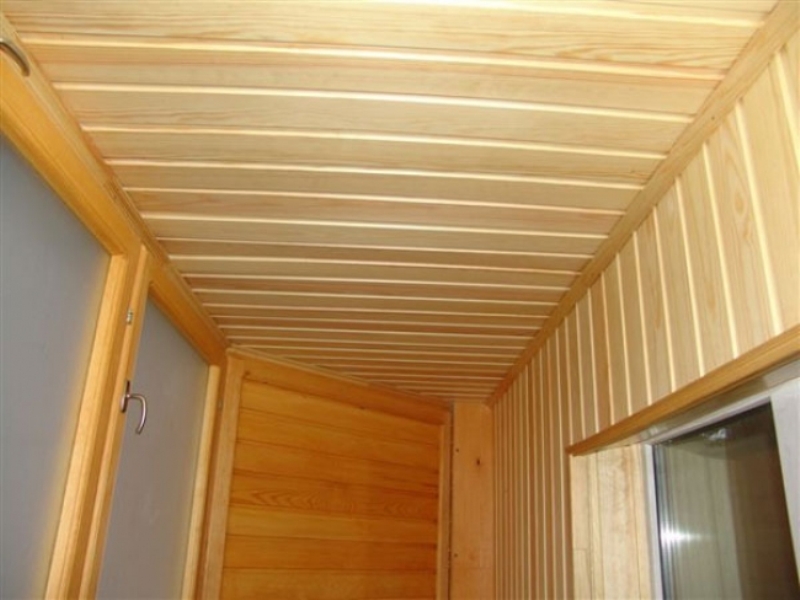
- As for the ceiling, it is either simply painted or covered with plastic panels. The plastic lining allows you to install the built-in lighting, so it's better to use this option.

Of course, there are other options for finishing the loggia with your own hands, but if you have not previously encountered such works, then it's worth using proven schemes. Moreover, we describe below the sequence of basic operations.
Laying floors
Finishing works usually begin with the installation of floors:

- On the prepared and waterproofed base we establish support bars.
- On the uneven bars we lay the logs with a section not less than 50x50 mm. To ensure the rigidity of the lag, located along the walls, we fix to the bearing structures with the help of steel plates.
- Using plastic or wooden wedges, we level all the logs along the plane.
- Between the supporting elements we lay the heat-insulating material. The best choice is basalt cotton wool - it does not rot, does not get wet and keeps heat well.
Advice!
On top of the heater it is necessary to lay a vapor barrier membrane.
- Further on the logs fix plywood sheets with a thickness of 15 mm. For fixing we use self-cutters with a length of 40 mm.

After that, go to, and then return to laying the floor covering. This is done in order to not damage and dirty linoleum or tile in the process of work.
Finishing of the floor is as follows:
- We roll the linoleum on the floor and leave it for at least two days. During this time the material should be leveled.
- At the end of the required time, we trim the canvas to the size and either simply lay it on the rough floor, or glue it to the plywood with a special glue.
- If tiles are used for finishing, then tile glue is applied to the base, then we put tiles on the floor.
- The laid tiles are left for a day, after which we rub the seams with a waterproofing compound.
- The final stage is the installation of thresholds and skirting boards.
Walls and ceiling

Walls and ceilings are usually finished with additional insulation. At this stage, the following instruction is optimal:
- At the first stage, we treat all surfaces with an antiseptic.
- Further on the walls and ceiling we fill the beams of the crate. The distance from the wall to the timber should be slightly larger than the thickness of the insulation used.
Advice!
For high-quality thermal insulation it is sufficient to use a mineral wool of about 75 mm thickness or polystyrene plates of 50-100 mm.
The thickest layer should be laid on the outer fence.
- For fixation, it is best to use the dowels "express-mounting". The plastic sleeve of such a dowel is inserted into the hole made by the perforator, after which the design is fixed with a locking screw with a conical head.

- On the walls between the beams of the crate we glue the insulation. For gluing it is convenient to use foam in cylinders - it can then be filled with all the cracks.
- On top of the heater lay polyethylene or foil film. These materials fulfill the vapor barrier function.
- On the ceiling to the crate, we also attach casing with padded wiring for built-in light. The ends of the wires are fixed with clamps where the lamps will be installed.

Then we do the cladding:
- Plastic panels are attached using a construction stapler, pushing the staples into the grooves.
- To install panels from MDF, it is best to use special clips. They are attached to the crate with either a stapler or small nails.
- Cladding can also be done using clips. However, thick and heavy boards should be mounted either on nails or on self-tapping screws.
- Plastic and MDF after installation do not require additional processing. But the lining of natural wood must be impregnated with stain and opened with lacquer.
Finishing of the loggia with plasterboard by one's own hands is also possible. However, due to the variable humidity in this room, it is worth using moisture resistant gypsum. After the carcass plating has been completed, they must be plastered with sheets of plasterboard, after which it is possible to paint the walls or glue them with wallpaper.

Conclusion
Finishing the loggias with your own hands is not an easy task, although it is quite labor intensive. However, to spend time and effort is worth it, after all, after qualitative warming we will get a completely new room. In addition, it will play the role of a buffer zone, so that in the cold season the temperature in the living rooms will also rise by several degrees.
A detailed description of the above operations you will find by reviewing the video in this article.
Balconies and loggias are an integral part of many apartments and houses. Often the owners of residential real estate do not perform any repair work in these premises, saving money, however, this is considered a wrong decision. If the finishing of the balcony with their own hands the step-by-step instruction of which is presented below will be performed correctly and qualitatively, a full-scale living room will be obtained, which can be used for any purpose. Various materials can be used to finish this structure, but the optimal solution is the use of special panels that can be plastic, wooden or some other. Finishing the lining is an ideal choice, as the material has a beautiful view and is environmentally friendly. Quality repair works, performed for loggias or balconies, provide a beautiful and warm room.
For finishing works, a variety of materials can be used to ensure an excellent work result. The most popular are the following options.
| Material | Specificity of its application |
| Wooden lining | Finishing the lining of balconies and loggias is considered the best solution. This material is made from natural wood, and also has a beautiful view. Photos of this design are very beautiful. Working with the material is simple, but it is considered not cheap. |
| Siding | Its installation involves not only improving the appearance of the balcony, but also additional work related to the insulation of this room. Siding is produced in numerous colors, and also in the production process is equipped with special fasteners, which guarantee a simplified procedure for its installation. |
| Moisture resistant plasterboard | It is mounted on the crate, after which all the joints are sealed. This coating can be covered with wallpaper, paint or other materials for finishing. This option does not require investing a large number of funds in repair work for loggias. |
| They are a good choice for a balcony, however, they do not have the necessary vapor permeability, so a sealed finish is obtained. Are issued in numerous colors, therefore with their help the interesting and bright design turns out. |
 Drywall
The above materials are considered the most relevant and often used in the process of finishing the balconies. Of these, durable and beautiful coatings are obtained. Everyone who does not have experience in this direction can perform all the work on their creation.
Most often, logs are chosen for loggias, which form a beautiful coating. It is easy to work with, and also under production conditions, treated with special protective compounds, which prevent possible rotting or development of microorganisms. The photo of this decoration is widely represented in the selection, so you can be sure of the correct choice of cladding for the balcony surfaces.
Step-by-step instruction for finishing the balcony with your own hands
If you plan to perform repair work on the balcony yourself, it is important to understand how all the details of the coating are installed. A step-by-step instruction describes the sequential actions with which the independent creation of a correct and qualitative design is carried out.
Initially, it is important to calculate the necessary materials for the forthcoming work. This takes into account the size of the balcony itself, as well as the dimensions of the panels of the lining or other selected material. It is recommended to initially purchase panels with a small margin, as a beginner can make mistakes that lead to the destruction of materials, which will significantly increase the flow.
Necessary materials and tools
Not only the panels are purchased, but also additional materials that will be used in the process of work. If the walls of the balcony are uneven, then it is desirable to form the crate, for which quality and properly dried wooden slats are used. Especially a lot of attention is paid to the purchase of fasteners, which should not violate the integrity of the lining, but must ensure its optimal and reliable fastening.
It is important to prepare the following elements for work:
- since it is planned to clap the balcony with a lining, high-quality material is purchased in the right amount;
- polyethylene film or other waterproofing material;
- wood rails, which must be of good quality and properly dried;
- a heater, which in size should correspond to the cells created in the frame, the heat-insulating material being represented by plates or rolls;
- self-tapping screws, by which the fixation of the main structural elements will be performed, and it is desirable that they be galvanized, since in this case they have high resistance to numerous negative factors;
- dowel nails;
- foam, providing filling of joints formed during work;
- a drill and a screwdriver are prepared from the tools, as well as the level by which a perfectly flat structure is obtained;
- since the walls of the balcony are covered with a lining, it is important to prepare a jig saw for cutting it, and also it is allowed to use a hacksaw.
In the process of cutting the lining, use only protective goggles to avoid possible small and dangerous objects falling into the eyes.
 Tool for finishing the balcony with lining
  Materials for thermal insulation
 Preparation of the surfaces of the balcony
Finishing the balcony with your own hands begins with the preparatory stages, which involve bringing all surfaces to the desired view:
- removing the previous coating, if it is on the walls of the balcony;
- surfaces are examined for the presence of areas on which there is mold or crumbling areas, since they must necessarily be eliminated;
- all surfaces are treated with special antiseptics;
- after the antiseptic has dried, a primer is applied, for which it is possible to use rollers, brushes or sprayers.
After preparation, the frame assembly is started.
 Preparing the balcony for finishing
 Creating a roofing
Instructions for the formation of high-quality finishing of the balcony by lining suggests the formation of a reliable frame. It is to it that the selected materials for finishing will be fixed.
To create a frame, a wooden beam is usually used, and properly dried and quality elements are selected. Their thickness depends entirely on what parameters the panels selected for finishing have. It is taken into account, whether the heater will be used in the process of finishing the loggias, since it can affect the parameters of the crate.
 Bars for wooden battens
 Before using any wooden materials, which includes a wooden beam, it is important to cover them with quality antiseptic agents that increase their resistance to moisture.
The skeleton is installed in the following sequential steps:
- a marking is applied, with the help of which it will be clear in which places it is necessary to fix the main elements of the crate;
- profiles or slats are cut off in such a way that the elements are exactly the same;
- the slats or profiles to the walls are bolted or screwed, the distance between them being equal to the width of the panels used to finish the loggias or balconies;
- the most commonly used bar, for fixing which dowels are used.
The photos of the finished crates are presented below, so it is very easy to understand their structure and design. At the same time, their parameters can be different, because they are completely dependent on the panels used, since not always the balcony is finished with the lining. Often, for this, other materials are used, which are also fixed to the frame.
 Horizontal lathing
  Lathing on the floor of the balcony
 Thermal insulation of the structure
Finishing loggias often involves additional insulation. Since a crate is created that has empty cells, it is in these cells that the selected heater is laid.
Thanks to the creation of a heat-insulating layer, a warm room is formed. Optimum choice for loggias and balconies is penoplex, produced in slabs. Also mineral wool is often used, but its use is allowed only in conjunction with waterproofing films, since it is important not to allow water to get onto the heater, negatively affecting its basic parameters.
 As a heater can be used penoplex
 Also, interior decoration often involves the use of foam during thermal insulation. However, it is considered that it has poor vapor barrier parameters. The plates of the heater must fit into the cells very tightly.
The heat-insulating material is fixed with glue or mounting foam, but it is allowed to use various mechanical fasteners for these purposes. You can see the photo of the finished result below.
 Fastening of a heater
 Waterproofing
A step-by-step instruction assumes that the next stage of finishing the balcony with a lining is the covering of the framed skeleton with waterproofing materials. The polyethylene film is most often chosen for these purposes, which is considered to be affordable and easy to use. However, there are many types of modern membranes on the market, which provide excellent protection of the structure against moisture. Their photos are presented in the collection, and usually one side is foil.
If the roofing material is chosen as the material for the waterproofing, the material must be heated from the fixing side before installation. If the foam is planned to be used as a heat insulation material, plastic dowels or a toluene-free adhesive will be required to fix it. This adhesive must be treated with a notched trowel mounting area. For more reliable fastening on the edges of the plates there are dowels.
The reliability of hermetic sealing will allow additional use of the sealant tape. Also, do not forget about such works as the surface treatment of frames with special hydrophobic compounds, as well as the installation of an ebb that blocks the access of water under the frames.
Waterproofing of walls with polyethylene film
Steam insulation of the balcony with foil insulating glass
Wall covering
The whole process is divided into the following stages:
- the work starts from a certain corner of the room, for which the starting element of the plastic is fixed;
- the installation is performed using self-tapping screws, but it is allowed to use staples and stapler;
- the remaining sheets are joined to each other by existing grooves and spines;
- if there is a need to cut the panels, then a special hacksaw is used for this, designed to work with a specific material.
Thus, the decoration of the walls of the balcony with the help of a lining is considered a simple and understandable process, which everyone can handle.
 Mounting of the guide profile
  Fastening of panels
Floor
For a complete decoration of the loggias, it is important to pay attention and sex. For this, the following structures are most often formed:
- the base can be created from cement, for which the screed is poured or self-leveling mixtures are applied, and also it is possible to make a construction on logs or a wooden floor;
- on top quality flooring, and for balconies, an excellent choice is a terrace board, ceramic tiles, a quality laminate or linoleum.
It is important to focus on those materials that will be resistant to temperature changes or high humidity.

Ceiling
The interior decoration of the balconies also affects the ceiling. For this, the following types of finishes can be used:
- the formation of the same coating as on the walls, for which sheets of lining, plastic panels or other elements are used, and they can be fixed directly to the base or the frame can be used;
- use whitewash for the ceiling;
- the creation of a tension or suspended ceiling.
Each species has its own characteristics, so the choice depends on the destination of the balcony and the desires of its owners.
 Stretched ceiling
  Drywall
Lighting
Finishing finishing is to create high-quality and bright lighting. Photos of the finished result are presented below in large numbers. For loggias you can use not only standard chandeliers located in the center of the ceiling, but also spotlights, as well as LED ribbons.
Thus, finishing any balcony or loggia is a complex process, consisting in the realization of a large number of actions. All of them are understandable and uncomplicated, so they can be performed on their own.


Video
Step-by-step instruction for finishing the balcony.
Photos of examples of finishing balconies
Selection of photographs with options for finishing balconies with different materials.


Comfortable and beautifully trimmed from the inside balcony not only pleases the eye, but also causes a sense of pride in front of others, especially if everything is done by yourself. The correct approach to the balcony arrangement should be present at every stage of the work, from glazing to finishing, so special attention should be paid to this. This will make it possible to create from a nondescript premise a full-fledged residential area.
Than to finish a balcony from within
Among a large number of finishing materials for the premises, the most common is the lining (usual) and the lining. It is a specially made oak, ash, linden, alder, cedar, pine boards (other types of wood can be used). It is worth noting that the pine material is not used for facing the sunny side, because when heated, the pine emits resin and spoils the external aesthetic appearance of the room.

There are also car-bearing facing materials of artificial origin, the most popular of which include PVC, MDF, seamless and seam panels.

What is the difference between the lining and the usual wood lining?
The lining or the lining is a planed board with grooves, a dowel for docking or a profile. These cladding options can last about 20 years, but with proper care and lack of direct sunlight, exposure to moisture, pests (mice, rats), insects and other factors.
GOST 8242-88. Details made of wood and wood materials for construction. File to download.

Below are the main differences between the lining and the lining.
- These profiles have different thickness, width, quality.
- Evrovagonka is more demanding in maintenance, than usual wood lining.
- Materials have different manufacturing techniques. Evrovagonka - it is almost completely dried material, and the lining has its own natural moisture (no additional drying treatment was used).
- The lining has specially designed grooves to drain condensate, so these panels are less exposed to rot. Also, these internal grooves allow you to remove tension from the board and the finished lining.
- The cost of materials is also different (the Euro-lining will cost more).

As arranged lining: 1 - thorn; 2 - the shelf; 3 - face layer; 4 - compensating grooves; 5 - the lower edge of the groove; a - working width; b is the total width.
Advantages of wooden lining
The main advantages of the vagonki can be attributed to the fact that it:
- is made of environmentally friendly material;
- characterized by resistance to temperature changes, mechanical damage;
- has good thermal insulation;
- has a long service life.
According to the quality of the material, the wooden lining is divided into 4 classes. These boards are made during one time period, and are classified when they are ready for molding and sale.

Table. Classes of wooden lining.
| Class | Features |
|---|---|
| This is the most expensive version of lining. It has no knots and irregularities. It is absolutely smooth and attractive in appearance. |
| There is a small number of knots (no more than 1-2 per 1.5 square meters of surface). |
| There may be microcracks and resin pockets. |
| It is used only for external cladding. It has numerous cracks and knots. |


More information about the existing forms of the finished cladding board
Separate several forms of boards ready for cladding. Before selling the boards are processed, resulting in the following types of lining:
- block house (imitation logs);
- imitation of timber;
- soft-line;
- calm;
- eurolock;
- the Landhaus.

What is required for the balcony paneling with own hand
Balcony cladding can be carried out by both a professional team and the apartment owner. To carry out such work, it is not necessary to have special skills, knowledge, but it is worth carefully preparing and responsibly approaching the task.
In order for internal work to succeed, you need to know the basic rules.

Tools and materials
The paneling of the balcony can be performed qualitatively only if all the tools and materials listed below are present.
For work you will need:
- a high-power perforator or a drill;
- screwdriver;
- drills (1 mm, suitable for the size of the screws);
- quality borax, 4 and 6 mm in diameter;
- a hacksaw or a jigsaw for wood;
- level;
- simple pencil, tape measure, square;
- hammer and ax;
- self-tapping screws 90, 75 and 50 mm;
- 30 mm nails with a large bonnet, dowels; for perfectly flat surfaces dowels 6 * 60 are suitable, but with minor irregularities - 6 * 100.

Preparation of walls for plating
Before the start of work, surface preparation is absolutely necessary. It is required that the lining is well fastened, the walls do not pour, they do not appear fungus and mold. To do this, it is necessary to repair the cracks in the plaster, remove irregularities and treat the surfaces with an antifungal solution.

Insulation work
An important point after the preparation is the insulation of the balcony. Balcony insulation is sold in stores in the form of rolls and slabs.
Materials "Penofol" or "Izolon" have a foil base, so they are attached to the surface of the walls after the preparatory work and drying. Further on the heater is installed skeleton for sheathing.

Thermal insulation of the balcony "Penofol" (a sheathing frame is mounted on top of the thermal insulator)
If a mineral wool or foam plates are used, the sheathing should be prepared immediately, and the heater must be laid between its slats.


Correct installation of the frame

Step 1. First, the smoothness of the surface is checked with a level. If the upper section needs to be withdrawn more than the lower one, then work should begin from the bottom.
Step 2. The first thing is to install vertical slats, and then put horizontal ones between them.

Step 3. The guide rail is cut to the required length.
Step 4. There are places for future fastenings of the lining. The tags are placed every 60-80 cm.
Step 5. A 6 mm drill is used to prepare holes 5-6 cm deep.
Step 6. Installation of the battens starts from the corner posts.
Step 7. Reiki are laid as follows: one - at the level of the knee, the second - the hips, the third - the shoulder. It is necessary to observe the interval between the beams about 50 cm.

Step 8. Do not immediately tighten the screws. First, the guides are healed with plastic choppers.
Step 9. Before you install the rail, you need to make sure that it is suitable for the level.
Step 10. The rack is clogged with a dowel, which can then be screwed with a screwdriver.
For the dowel, you need to use a plastic nozzle that tightly enters the hole no less than 30 mm.
Step 11.It is required to create vertical lines along the working perimeter to see the smoothness of the car-laying during installation. To do this, pull the cords.
Step 12. Based on these indicators, the other bars are fixed.
Step 13. After installing vertical racks, you need to move to a horizontal installation.

Step 14. If mineral wool is used for warming, it will be necessary to lay it in the formed cells and stick it with a specially designed adhesive foam.

Step 15. After that, a vapor barrier film is attached.

Mounting the frame to a deformed surface
If there are visible irregularities on the working surfaces, which require a lot of effort and financial costs to eliminate, you can mount the frame in a different way.
- Install the rail on the flatest part of the wall and attach a plumb line to it.
- Follow the lower bars to strengthen, starting from the plumb line.
- Where it is necessary to reduce the distance between the surface and the rail, make a substrate, and with visible convexity - remove the top layer of plaster.
So you can hide the flaws of the walls in the most economical way, accessible to everyone. After the installation works, the deformation marks will be invisible.
Installation of lining
Step 1. It is necessary to prepare all the necessary tools and materials: a drill, screws, small nails, kleimers or dowels, level and wood materials for the cladding.

Step 2. Attach 1 board to the corner of the already installed skeleton. Check the smoothness of the angle using the level.
Step 3. After making sure that the board is positioned correctly (vertically), you can use the clamper. To do this, the latter is inserted into the groove of the wood and fixed with a small nail.

The wood structure is very gentle, so when hammering a nail it is important not to damage it. To do this, it is recommended to put the pliers on top of the nail and carry out light punches with a hammer.

To securely fasten the lining to the battens by a screwdriver, it will be necessary to screw it into the groove (tilt inwards).
If this method is used, the wood may crack. To avoid this, you need to drill a hole in the attachment point, and then screw in the screw.

Step 4. To fix the second board, you must carefully insert it into the groove of the previous one (from the bottom to the top) and also accurately fix it with a knife or self-tapping screw.

Step 5. When installing the third board you need to repeat all the manipulations. When the wood is in its place, you need to take a hammer and tap it well against the previous boards along the entire length. To leave no traces on the edges of the board, you need to put a bar and knock on it.

Step 6. The entire working perimeter is set in the same way.


Step 7. The final stage of the plating is the installation of plinths, which makes it possible to hide the seams in the corner places of the joining of the boards.
To do this, you need to put the finished skirting board in a corner, drill the thinnest drill for the drill hole and drive in there small, unnoticeable nails. Such actions are performed along the entire perimeter of the balcony.
Video - The paneling of the balcony with a lining from the inside with your own hands
Also at the lining the longer spikes (8-9 mm), when compared with the usual lining (4-5 mm), so it fastens more easily and reliably.
Protective coating for finished casing
Protective coating - a special solution that protects wood material (lining) from exposure to sunlight, mold or fungus, as well as to give a smooth and more attractive appearance.
The following tools are used for this:
- antiseptic preparations: cover or glaze;
- varnishes: alkyd and acrylic;
- paint: oil or.

Also, to give the boards a shade and strength, you can apply acrylic paint, which must be applied to the lining in several layers.
Use of PVC lining
This option of internal balcony covering is the most economical and accessible to everyone.

Table. Pros and cons of plastic lining.
| Advantages of PVC lining | disadvantages | How to improve the quality |
|---|---|---|
| Panel panels are easy to use, well-mounted at any angle. | Are made by artificial way, therefore are not eco-friendly. | Make flexoprinting. |
| They are cheap and accessible to everyone. | Able to turn yellow due to solar influence on the structure of PVC. | Apply a product for lamination. |
| They have a huge color spectrum. | Do not interfere with the accumulation of condensate. | Use the thermal transfer. |
Flexo printing. After coating the plastic material with flexographic printing, it becomes more resistant to slight mechanical damage and ultraviolet rays. This is due to the surface lacquer fastening pattern.

Plastic panel with flexographic printing "Marble beige"
Lamination.When it is used, a special film is applied to the material. After carrying out these manipulations, you can notice that the artificial material has become stronger and more elastic, so it will last much longer. The second function of lamination is decorative decoration. After carrying out this procedure, the surface of the lining becomes a kind of wood or stone, which designers will appreciate.

Thermal transfer. The most difficult process of drawing a drawing, because it is carried out by the influence of high temperature on the image and the surface. Consequently, the image is reprinted and soldered into the basis of an artificial lining. Using this technology, you can get vivid pictures, and golden or silver shades are obtained only in this way.

PVC panels - the most simple and convenient material for facing internal works. This lining is well fixed in any position - horizontal, angular and vertical.
There are many colors and textures of plastic lining (there are even mirror panels). However, the "mirror" version is used exclusively on darkened balconies, where direct sunlight does not penetrate. This is due to the negative impact of the sun on the shine of the PVC mirror coating.

Mounting of PVC panels (lining)
In order to properly install PVC carriages, it will be necessary to evaluate the evenness of the wall surface. If they are ideal, then the panels are attached to the glue.

If there are distortions or irregularities on the surface, it will be necessary to make a frame (the same as for facing boards). Then the process proceeds as follows.

- Plates are attached to the beams with a stapler or self-tapping screws.
- The beginning of the work comes from the corner.
- To secure the panels together, you need to insert the plate into the groove of the previous panel (until it clicks).

Before installing the frame and panels, a preliminary antiseptic treatment of the wall surfaces should be done. This helps reduce the likelihood of fungus.


Features of seamless PVC lining
This kind of material for decoration is artificial. In its structure it is not very different from PVC tile, but it has large dimensions, which are the only difference and cause inconvenience when transporting to the house.

Advantages of seamless PVC
- Panels are easy to install, so they can be finished without hiring a professional team.
- Large dimensions of the material allow you to quickly finish the installation.
- Panels do not have cadmium or asbestos in their composition, therefore they are safe for health.
- They are well soundproofed and have high moisture resistance.
- Do not lose their properties and retain their appearance even after 30 years of operation.
- They have an increased thermal stability (they can withstand -50 to + 50 ℃).
- More PVC panels are easy to clean with water and sponge.
- Special care is not required, as is regular antiseptic treatment.
Suture board
Suture lining - small plastic 10-centimeter. plate. They are equipped with connecting grooves for easy mounting. Most often used to give the wall a relief appearance.

Pluses:
- this board is simple and unpretentious in maintenance;
- visually expands the room thanks to the seams;
- easy to transport and install.
Disadvantages:
- it is unstable to mechanical damage;
- can turn yellow from heating by sunlight (used for balconies located on the shaded side).
MDF lining - a material that allows you to combine wood and artificial versions of the skin. A special feature is the manufacturing method: the process takes place under high temperature and pressure. The structure of MDF is based on the use of wooden fibers coated with PVC film, which imparts a color to the material of wood species.

Advantages of this material:
- it is cheap;
- does not require regular treatment with antiseptics and antifungal agents, but looks like a real tree;
- is characterized by increased noise insulation, thermal insulation and light fastness;
- easy to operate and maintain;
- can last more than 25 years;
If desired, you can change the color, enough to cover the MDF lacquer lacquer.

Finishing of balcony MDF lining
Disadvantages:
- there may be problems in the installation work - this profile has inconvenient connecting grooves;
- MDF can not be used for external cladding, because the material can be deformed from moisture (as a result, the cladding will be spoiled).
The process of installing MDF boards (suture and seamless)
In fact, the installation technology does not differ from the laying of wood or PVC materials. At installation the internal warming and a skeleton is required. The only thing that distinguishes these panels from environmentally friendly ones is the lack of the need for regular care and low resistance to damage.

Video - Wall decoration with MDF panels
Video - We warm the balcony with MDF panels (part 1)
Video - We warm the balcony with MDF panels (part 2)
Video - We warm the balcony with MDF panels (part 3)
Video - We warm the balcony with MDF panels (part 4)
Video - How to install internal corners for MDF panels
Video - How to set external corners (slopes) for MDF panels
When do we think about finishing the balcony? Many only a few years after settling in the apartment, as they say, "hands do not reach", others decide how to trim the balcony itself first. In fact, it only matters in one case, if you want to connect it to a room, so that you do not do it twice in it.
Below we will try to talk about how to beautifully trim the balcony with the help of the most popular finishing materials, as well as rare, highlight their pros and cons. In addition, we will try to include in the format of the article the main points and features of the installation of each of them.
To meet simply whitewashed balconies today is a rarity, as the construction market offers materials that even the most lazy landlord can easily use. It remains only to understand all this variety and choose the appropriate option.
Where to begin
Preliminary stage of internal and room warming.
A general instruction will be proposed below, which is suitable for mounting the majority .

In the photo - the installation of double-glazed windows
Tip: If you decide to install aluminum double-glazed windows on the balcony, its insulation should not be carried out, since the metal has a high thermal conductivity and all efforts will be useless.
- Do the crate of wooden bars or metal profiles for gypsum board.
- Install the window system - wooden (the most expensive), aluminum (cold) or plastic (warm and most inexpensive). Their service life is almost the same.
- Make the lining of the inner and outer walls of the balcony. From the outside, it is easiest to use siding panels, since they are durable, durable and water resistant. Inside - a wooden lining, plasterboard, plastic lining or panels, metal lath ceiling will look beautiful with any trim. The appeared slots blow out the mounting foam and protect it with paint, putty outer and inner lining.
Before finally fixing the facing material inside, the balcony should be insulated:
- Attach the waterproofing film to the walls of the room and glue on it or simply put any insulation (mineral wool, polystyrene foam) in the crate, the thickness of which should correspond to your climate zone. On average, this is 100 mm, otherwise a frost of 30 degrees will "knock" all your works through.

- Install the wooden crate on the floor of the balcony and fill it with a heater, the best option - polystyrene plates. Make sure that the logs lie horizontally, for which you can put wooden pads when installing them. Cover the floor with plywood 12 mm thick, and put a laminate on top - an inexpensive but resistant material.
Tip: with the help of a floor covering you can visually expand the area of the balcony, if you put it diagonally.
- Do not know how and how to trim the threshold on the balcony, use a conventional ceramic floor tile, which, most likely, you have left after the flooring in the kitchen.
Main Stage
Construction companies are ready to offer a wide range of different finishing materials.
In our case, they should be:
- moisture resistant;
- easy to use and operate;
- eco-friendly;
- have a high level of noise and heat insulation;
- aesthetically attractive.
Panels made of plastic or PVC lining
Distributed in our country, as this is the most economical way to make it beautiful.
Their advantages:
- do not be afraid of moisture;
- convenient installation;
- it is easy to use, easy to clean and clean;
- a wide choice of colors and textures.
You can make the interior of the balcony a certain style, combining the colors of plastic panels. You can buy today a texture similar to wood, ceramic tile, even wallpaper.

Most often, a monochrome plastic lining is installed on the balcony. Attach it to a wooden crate prepared by self-tapping screws, studs or staples of a construction stapler with your own hands will not be difficult, even if you do this for the first time in your life.
Tip: you can use plastic on insulated and not insulated balconies, even at -30 ° C with panels nothing happens.
The lack of plastic is not "breathing".
Wooden lining
Classic version of the balcony. These are slats from different types of wood, which are processed in a predetermined way.
Of the advantages of the material should be noted:
- support of the microclimate in the room - absorbing excess moisture, giving it back when the air becomes dry;
- after treatment with antiseptic compounds - does not rot;
- does not cause operational difficulties;
- long service life;
- can fill the room with a woody fragrance, especially on a sunny day.
The billets are produced in sizes of 1.5 m, 3 m and 6 m in length. It is offered for sale in a package of 10 boards wrapped in thermal packaging.

When drying, the width of the bars can vary. If you fasten the lining to the lath with the euro profile, then this parameter will not affect the quality of the finish.
The standard lining has special grooves on the back side of the strip, through which the condensate is removed, so it is best suited for interior decoration. Thus, the material does not react to humidity and temperature changes.
The lining is not characterized by manufacturing technology, but only by the type of wood.
Most often you can find it from:
- pine trees;
- aspen;
- linden trees;
- alders.
Less often from oak, but larch only inside.
There are several conditions for installation:
- the carcass planks must be perpendicular to the board;
- between them the distance should be 500-600 mm;
- the frame is set strictly according to the level, then the lining will be perfectly even;
- for fixing it is better to use Kleimers, then the bar will not split;
- after the installation, the wood should be covered with antiseptic compounds, and after drying, paint or varnish. Update the protective layer every 2 years.

GKLV plates
Another economically feasible way of facing the balcony. Drywall allows you to change the interior as often as it will be needed.
Its advantages:
- ease of installation;
- not toxic;
- has a high level of sound insulation;
- does not burn;
- low price;
- flexible.
You can fasten the previously cut sheets to a wooden or metal crate with screws 25 mm long in wood or metal, respectively. Surface must be primed, putty, after which it can be painted or glued wallpaper on top.
Note! On the balcony you should use only a moisture-resistant gypsum board.

Cork cover
A comparatively new way for our country to finish the balcony space.
Let's look at the positive qualities of the plug:
- does not collapse from time;
- do not burn in the sun;
- high insulation properties as evidenced by an increase in the temperature in the room by 6 ° C;
- aesthetic, visually similar to ceramic tile, wood surface or decorative plaster;
- does not rot;
- it does not reproduce the fungus;
- do not be afraid of moisture.
Cork is provided with panels or rolls. Apply it to a previously prepared flat surface with a contact (recommended) or acrylic adhesive. After applying it on the wall and on the back of the material, wait until it starts to set, and then press the cover tightly against the wall.

Conclusion
It is possible to turn an ordinary balcony into an original room today thanks to modern finishing materials. Mounting them does not cause any difficulties and you can do it yourself, except for installing windows, thus saving your family budget. In the video in this article you will find additional information on this topic.