First of all, it is necessary to review the integrity and availability of all components of the shower enclosure. Pay special attention to the integrity of the windows, check the cabin for lack of chips, review the instructions. If there are any shortcomings, do not sign the documents, you have every right to request replacement.
For shower enclosure installation we need:
Required Tools
- Adjustable wrench (swedish)
- Screwdriver
- Drill of small diameter
- Pistol for extruding silicone
- Flat screwdriver
Necessary materials
- Silicone antibacterial transparent
- Two hoses 1, 5 meters
- Transition to sewerage diameter 32/50
So, the cabin is brought, the integrity is checked. We proceed to installation.
How to install a shower cabin with your own hands
Understand in numerous boxes (all signed). Find the shower tray. Carefully unpack the box with the shower tray, there you should find the following items: the pallet itself, the pallet apron, the pallet frame, the studs on which the legs will rest, the brackets for the apron, the numerous nuts, screws and siphon. If there are no elements, then there must be a box in which all this is.
- Remove the protective film from the pallet.Then turn it over and put it on a previously prepared large piece of cardboard, which will prevent the appearance of scratches on the pallet, left without a protective film.
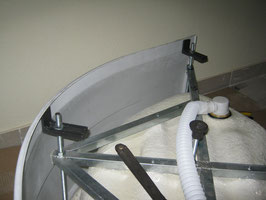
- We take out the frame, if the pallet frame is already welded and it does not need to be assembled from many elements, then we put it on the pallet in such a way that the holes on the frame coincide in the fastening inserts on the pallet.
We take 4 large pins, the diameter of which is usually 10-12 mm (which is rare, you were lucky =).) We screw the nuts, we put the washers as you see in the next photo.
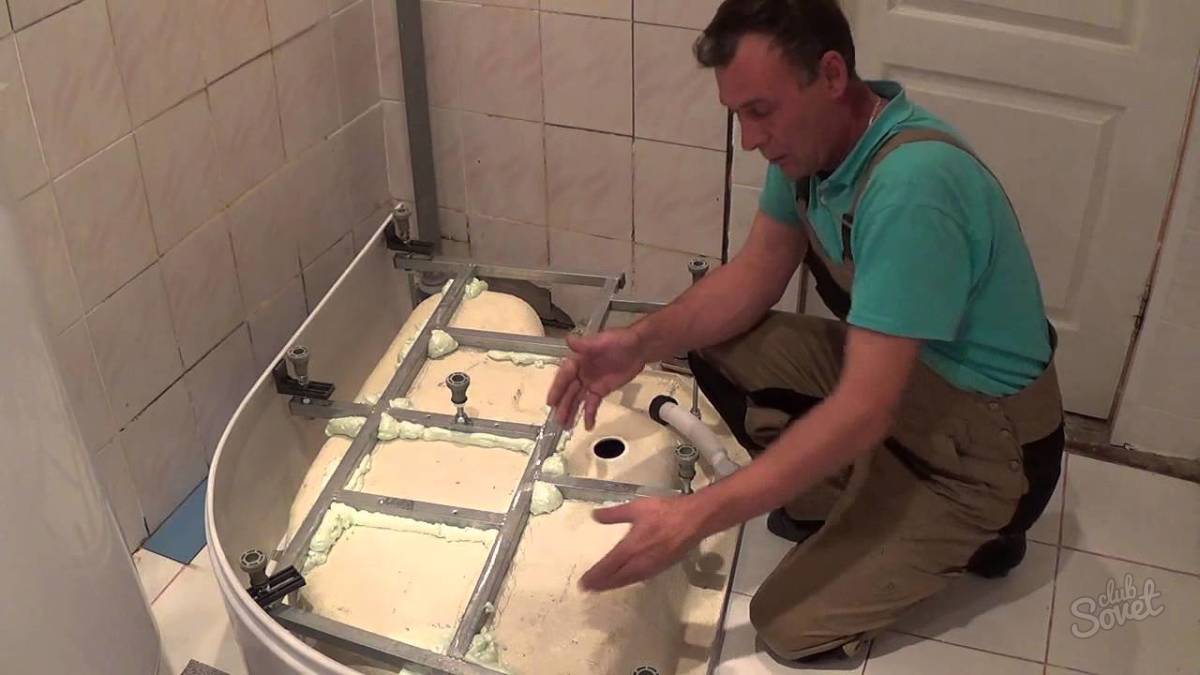
4. When screwing 2 nuts on all the studs, as shown in the photo, screw them into the fastening inserts, having previously cleaned the holes from excess acrylic and scotch tape. Be careful when touching the bottom of the pan - you can get injured on a sharp, unpolished surface.

5. Then put the frame on the studs, the frame should touch the bottom of the pallet. Then tighten the nuts from the top, there should be no gap between the pallet and the frame.

6. Slightly tighten the nuts with the wrench. First, the upper nuts, to press the frame to the pallet, and then the lower ones. Do not overdo it - the frame is thin, it can bend and then the rigidity of the structure will be broken and the cabin will be unstable.

7. Choose from a number of screws suitable for the number of holes and length (profile height + 5mm.) For fixing the frame to the pallet.
We put the frame exactly on the fixing protuberances with mortgages and screw screws.

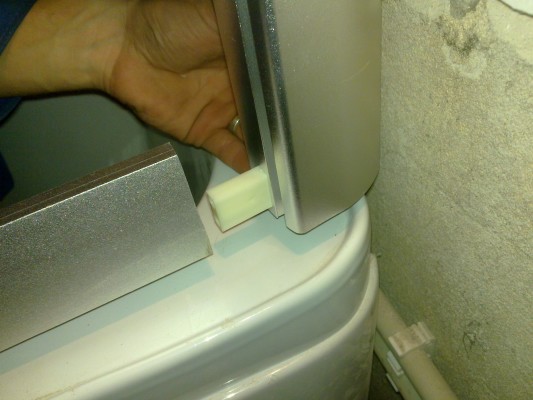
8. After that, take the brackets for attaching the apron to the top of the pallet (small white or black, bent in the form of a question). First remove the protective film from the apron and set the apron along the facade perimeter of the pallet. Take the brackets and screw them on the mortises, they are fastened with two screws of suitable length.

Then on 3 legs located on the facade, you need to screw on the nuts and put on washers. Top with black brackets in the shape of the letter "G" with a perforated short side, then put the washers (if any) and screw the nuts on top. Adjust the fit of the bottom of the apron to the brackets (the main thing is the perpendicularity and the normal curvature of the circle).

Installing the siphon shower cubicle
We find the bottom plastic part and the upper one - steel. One rubber gasket with a greater concavity is put upward. Substantially silicone it.
We put the steel part together with the sealed liner in the hole for the siphon. Take the second flat gasket and nut. From the bottom of the pallet there is a gap through which water can flow during the operation of the cabin. Treat this slit with silicone. We put a flat gasket and wind the brass nut.


We process the fatty layer of the silicone thread, remaining after winding the nut, and also we dilate the internal thread in the lower inner part of the plastic siphon.

Carefully, by thread, twist the bottom plastic part of the siphon to the steel one. Make sure that there is no distortion in the thread (the thread may break, and a new siphon is not cheap).

Spread out excess silicone over the nut. You can not spoil the porridge with oil
Adjust the shower tray to the level
When you do all of the above operations with the pallet, you can finally install the pallet to the installation site and adjust it by level. This is very important. Here, special attention should be given to this, on other sites when viewing the instructions, pods are placed on the level only after mounting the upward construction - this is a huge mistake that makes the installation of the shower cabin unnecessary by hand.

Yes, by the way, it is not worthwhile to connect the siphon to the sewage system, by the way the cabin will move again in the process of further installation.
Installation of the upper part of the shower enclosure
We unpack all the remaining boxes in which are: the side walls of the cabin, the ceiling, the roof, the doors, the central rack with the installed mixer, radio, etc.
First of all, it is convenient to collect a roof after the pallet. For this we find a lamp, a rain shower, a cooler, a speaker and decorative covers (there are different kinds of kits, all this may not be). Remove the protective film from the ceiling, install these elements on the roof and eventually get about this:
Then we begin to assemble the frame, which is represented by the following elements: two semicircular profiles and two vertical ones. We begin to assemble the frame for the cab doors, it consists of two semi-circular profiles and two straight ones. To do this, we find the screws in an amount of 8 pieces of suitable length and collect it.

Here it is time to think and carefully inspect these elements, because if the door frame is not assembled correctly, further assembly is impossible. On the semicircular profiles are usually pasted on the stickers, where it is indicated where the profile should be located. "Up" is the top, "Down" is the bottom one. With straight profiles, the situation is simpler - in the lower part there is a cutout of a square shape for a more dense installation of the profile to the edge of the pallet.

Then, after understanding the location of the elements, we begin to twist them. The screwdriver is placed approximately on the "two", we take the screws and begin to twist the given elements. If you have difficulty with hitting a screw on the bit in the frame hole (the screw slides and falls), take the silicone and process all the screw heads - this usually helps.

We take rubber stops, as shown in the photo

Preliminary we put in them short screws, so that they protrude from the limiter for a length of not more than 3 mm. We screw them into the hole, which is on the semicircular profiles in the recess, where the rollers of the doors will slide. The holes are located synchronously on both profiles. A screwdriver can be put on a "one".
Begin to complement the side panels. Usually there are a watering can, a holder, a mirror, a shelf, etc.

We collect the central panel, if it is in disassembled state


Handles of the lever mixer are installed with the help of a fixing bolt, which is inside. A flat screwdriver.
Mounting the elements of the shower enclosure on the pallet
1. Install any side wall and the central panel with a mixer and radio. The side panel and the rear wall are interconnected vertically, there is no need to screw it to the pallet yet. Then, in a similar manner, the second side panel of the central panel is screwed.

When installing these panels, special attention should be given to the horizontal docking of these three elements, the boundaries must be clearly aligned. Due to the "quality features" of Chinese shower cabins, pallets are usually curved, during the installation of the ceiling there are undesirable gaps that affect not only the hydrophobic design, but also the aesthetics. Another special attention should be given to the place of docking from the front side of these panels, so that there is an even line and the panels lie in their place.
Then we take the profile frame, on which the doors hang and install it from the front, twisting the eight screws, the main thing - pay special attention to the place of docking.
The walls are standing and a turn of the roof has come. The roof is carefully set up, we look at the ratio of the roof edges vertically with the pallet (here you need an assistant who will keep the roof in the given place). And you at that time screw the ceiling on four screws.

In front of the roof, so that it does not hang, the Chinese manufacturers do not provide for fixing the roof in front of the semicircular profile of the frame of the door frame. If the thickness of the profile allows (they are hollow), then you can drill the hole carefully and screw the screws along the perimeter of the semicircular profile with a 2mm drill.
Now you can place the upper structure on the pallet in the correct position, by gently moving on the surface of the pallet. This is easy to do if the gaps are visually determined. Having installed the roof in the right place, it is possible to fix the structure by screwing the screws behind.

Particular attention: in this photo the screw is not twisted into a channel, according to the water, accidentally got behind the walls of the cabin, should go into the pallet, because the screw forms a hole through which water can run to the floor.
Shower cabins today have become very popular. They not only provide an opportunity to save the useful area of the room, but also because of its appearance become an effective element of the decor of the room. As practice shows, the installation of the shower cabin with their own hands is quite possible for the home master, you only need to carefully read the instructions.
Few people know that the installation of shower equipment may need permission. It is necessary in the event that the cabin will be installed in a room where the bath is already standing. As a result, an additional "water point" is obtained, which requires mandatory coordination with the relevant organizations and the introduction of changes to the technical plan of the premises. If the cabin is mounted to the place of the bath, no additional permits will be required.
When purchasing equipment, it is very important to ensure the integrity of all elements of the device. Usually they are all well packaged, however it is necessary to inspect the items in the warehouse. Quite often you can face damage or inadequate equipment of the cabin. The latter is especially true for devices manufactured in China. When checking, you can immediately identify all the problems and, if necessary, exchange equipment. In the last resort, the missing items will have to be bought. It is also important that in the kit with the cabin was an instruction for its installation.
When installing the shower in a room where the bath is already located, you will need a special permit
You can try to find a video guide for installing a shower enclosure. There are a lot of similar recommendations on the Internet. However, you need to understand that most often they are intended for a certain model, so you will either have to spend time and find the option you need, or try to adapt what you see to your equipment. Therefore, it is the easiest to understand for yourself the general rules for installing shower cabins, which will be relevant for a variety of types of devices.
Features of installation of shower equipment
When conducting assembly work, follow the manufacturer's instructions for this model. This will greatly simplify the task and will allow to assemble the equipment correctly, without shortcomings, which can affect its performance characteristics. Installation is carried out in several stages.
We install the pallet
Most often, special mounts are used to mount this element, which come with the device. The pallet is placed on the supports and carefully leveled along the horizon and height by adjusting the locking screws. Models without legs are installed directly on the floor, which is previously leveled with a cement screed. For acrylic pallets it is necessary to install a skeleton, which is a crossed support bar with additional support in the center of the structure. In the absence of such a frame, an additional reinforcement of the pallet in the form of a concrete cushion is performed.

The pallet must be leveled. Even a small bias can lead to operational problems
Fix the drain hose and supply water
- We fix the drain hose. One end of the part is fixed to the pallet, and the other is discharged into the sewer drain. It is important to provide in advance the possibility of installing a tee, since drainage from the sink, washing machine, bathtub, etc. should be connected to the drain. It is especially important to check the reliability of the gasket. In the event that it seems to be insufficient, moisture resistant sealant is additionally used.
- We supply water. We install a tee for hot and cold water, to which we subsequently connect the cabin. All joints are carefully sealed. For these purposes, we use FUM tape, special sealants or simply a patch.

Sample wiring diagram for the corner model
We will equip the outlet
Modern devices are often equipped with various options that require power supply. Therefore, the installation of a shower enclosure is accompanied by the installation of an outlet. In this case, only special models are used, designed to work in conditions of high humidity. The part is positioned in such a way that when the device is turned on, there is no tension in the wire. The optimum place for the socket is on the side or behind the cab.

The shower is assembled in strict accordance with the manufacturer's instructions
We collect the cabin
We begin the installation of the walls. It should be noted that the assembly of each model differs in some nuances, which is due to the peculiarities of its design and the manufacturer. That's why you should follow the manufacturer's instructions. However, there are common points. First, the ceiling and walls of the cabin are assembled and only after them the doors. Walls are fixed using standard connecting bolts, and for roller installation, roller mechanisms are most often used. However, fasteners of other types can be used. If the fasteners seem not reliable enough, it is better to buy new ones and replace them already at this stage.

Instructions for assembling the shower cabin River DESNA: Part 1

Finishing the installation
- We connect the drainage to the cabin. Pay special attention to the hoses. The best option is the parts with threaded connections. If the set contains elements with clamps, they should be replaced. Practice shows that most often they provide a connection of poor quality. Thus, in order to avoid problems, it is best to purchase a more reliable system.
- Mounting the converter. This additional element is necessary for models equipped with all kinds of electronics. The device is usually included in the complete set of the cabin.
Installation as a whole is over. It remains only to carefully check the tightness of all joints and seams. To do this, we leave the equipment for a time, which will require sealants for complete solidification. Then turn on the water supply. First we try a weak pressure, if everything is good - turn it on to full power. Carefully inspect the cabin for possible streaks. When they appear, proceed to re-seal the seams, then again conduct a test.

Correctly installed shower cabin - practical and effective bathroom equipment
Video: installation of a shower cabin with their own hands
Mounting the shower can seem like a simple enough exercise. This, indeed, is not so difficult, but only for those masters who have the skill of working with plumbing equipment. For everyone else, the procedure can be too complicated. Then it's worth asking for help from professionals. They quickly and qualitatively mount any, even the most complex, model of the shower cabin.
They are very popular and are increasingly in demand among domestic consumers, so there is a growing interest in information about the installation of the shower cabin with their own hands.
Using the materials on this page, you can easily install the shower yourself.
Many people ask the question "how much does the installation cost" and are afraid of high prices. Indeed, the installation of a shower cubicle by a specialist in this area will not be cheap, from 4000 r for work. And then in case the country-manufacturer of the cabin is China.

Installation of European plumbing is much more expensive. And looking at her, there are thoughts that it is better not to deal with this matter yourself and save on the price of works. But do not just think about it, because the assembly of the shower is not such a complicated process, and almost every skilled master can install the cabin with his own hands. Photo and video instructions on this page will help you to do the work on the European standard.
Also you will be interested: - Save half the cost.
What does the shower cubicle of the simplest type consist of:
- a pallet (has a special frame);
- wall and side panels;
- doors (have rollers and fasteners);
- cab cover, i.e. ceiling panel (depends on configuration).
Before installing the shower enclosure, it must be pre-installed in another room if the bathroom is not large enough. And make sure whether all the details are present, whether enough fasteners, make the necessary holes in the right places, familiarize yourself with the order of assembly, and if necessary, replace substandard parts. After doing the dismantling of the corner booth and already assemble it directly in the bathroom itself. When purchasing, make sure that there is an assembly instruction and a schematic of the device and wiring diagram for the cabs with electronics: some nuances in each of the booths, especially if they are Chinese, may differ. Try to follow the instructions completely.
Step-by-step installation instructions for shower cabins

Ready-made shower tray
Installing the pallet
Installation of a corner shower with your own hands of course starts with a pallet. But before installing the pallet, it is necessary to connect the water drainage system with flexible hoses. Under the drain hole of the shower tray, the outlet to the main sewer should be located.
After that, we assemble the shower cabin. The pallet must be placed on the legs. We take long hairpins, which we slowly roll into the seats until they stop completely.
Then tighten the nuts on them and throw the washers, and after that we put on special metal foundation supports (watch the video). The installation should be carried out according to the assembly scheme and on an even, cleaned floor.
![]()
We choose a support that is shorter than the others and we look for a special welded nut on it. It should be fixed to the central leg. Tightly screw it and clamp it to the stop with the help of nuts and washers. After using the screws, we fix the pallet to the wooden blocks, which are in the GRP of the pallet and tighten all the fasteners.
It will be interesting: - convenience and practicality.
Once this work is done, we check the drain at the pallet and its tightness. We overlap the outlet from the drain hose and pour the water into the pan. After verifying that there is no leak, we check how long the drainage hose is, and whether it reaches the sewer outlet. If everything is in order, go to the direct assembly of the shower.
The installation of shower cabins with a low pallet is not fundamentally different. An exception is only one: in some cases it will be necessary to erect a special podium, which provides the possibility of laying the sewerage to the drain of the pallet.

Installation of fences and panels
Before installation in the bathroom, you should carefully inspect all the glasses and determine their location. As a rule, there are more holes in the upper part of the glass, which means that this part will be at the top. We pass to the guides. The upper guide will be wide, and the lower one will have a thin figured cut, therefore, so we have them when mounting. After, according to the assembly instructions, it is necessary to carefully insert the glass into the specially allocated places for the guides, before this, greasing the joints with a sealant.

The shower can be assembled by one's own
Next, connect the guides using self-tapping screws with a special rack and put the seal on the glass. Sealant must be applied to the pallet under the lower guide and after installing the glass. Silicone bonding is important, without it you can only install expensive cabs equipped with reliable seals. Self-assembly of the shower is a difficult task, but it is quite feasible. If there is an opportunity to ask someone for help (hold, file, etc.) and the matter will go much easier.
When applying bonding material with your own hands, you should leave untouched grooves designed for water drainage. Using self-tapping screws, we perform the connection of the side panels to the pallet, for this purpose there are special holes in it. Be sure to treat the junctions with silicone. After fixing the back panel and also processing the joints. Proper sealing is a very important stage in the assembly of the shower cubicle.
Do not strongly tighten the screws, it is necessary to leave a certain gap for additional adjustment. Install the shower enclosure without hurrying up, neatly, according to the assembly scheme. The metal corner shower is fragile enough.
Next, we check the operation of all necessary electrical devices, for example, radio, fan, and backlight. After all, to collect a shower cabin is not only to connect the pallet with curtains, it is first of all the correct connection of all communications. If everything works, then most of the work is done, and you can leave the booth for a while to fully harden the fastener.
Installation of glass leaflets
On the doors we fix special rollers and put on the seals. After installing the sash and adjusting them with the help of upper rollers in order that they close with the best density. For special screws holding the rollers, we put on plastic caps. These manipulations can be seen on the video below.

Doors for a shower cabin are better to choose with "patterns"
By the way, if you have not had time to get acquainted with it, we recommend that you pay attention to reviews about glass transparent doors. It turns out they get pretty dirty, so we recommend choosing doors with some kind of pattern.
An example of such a pattern you can see on the right in the picture. This pattern will hide the divorce from water and save a lot of your time.
In the classical sense, the assembly of the shower enclosure will consist in the correct installation of the flaps to the pallet fixed to the floor. After all, the basic convenience of such a cabin is blowing just practical glass doors that allow you not to be afraid of splashes and humidity.

It is necessary to give maximum attention to the valves, since from the correctness of their assembly will depend on the integrity and durability of the shower.
Installing the cab roof
We fix on the corner shower in the bathroom a shower head with a certain long hose, a speaker, a fan, and a lamp for lighting. The edges of the speaker should be greased with a sealant. These work must be carried out carefully following the instructions for collection. Next, you need to mount all the missing accessories: handles, mirror and shelves.
After installing the shower, you should check the tray for crackling and subsidence. If there is a squeak or other sounds, then it is necessary to adjust the legs: the cost of repairing the burst pallet is high. Then it should be connected to the water supply, sewerage and electricity.
Video instruction for installation and installation
When the self-assembly of the shower enclosure is completed, all connections and its tightness, including the tightness of the connection to the water supply, should be checked once more. If a leak is detected, fix the problem, and after installing the screen on the pallet and the shower is ready for use. By the same principle, the cabin is installed in a wooden house. If you did everything according to the instruction manual and instructions, following the assembly order, everything should turn out.
Calculate the price of your repair! Is free!
After completing the form and clicking the "Continue" button, our specialists will calculate the approximate cost of the work and if you need it you will be prompted by good specialists.
Calculate the price of your repair! Is free!
Filling out the form and clicking the "Compare Prices" button, our specialists will calculate the approximate cost of the work and if you need it you will be prompted by good specialists.
- Installing the pallet
- Mounting of corner and side panels
- Door Recommendations
- Sliding constructions
- Summarizing
The shower cabin is a fashionable, comfortable and beautiful achievement of technological progress. If taking a shower is usually considered a daily hygienic procedure, then in the shower it is a whole ritual. Manufacturers build in their models and radio, and LED lighting, some models can perform the function of a sauna or a bath.
The shower cabin, unlike a bath, takes up much less space, which is extremely important in bathrooms with a small area.
Built-in shower heads have several modes of operation. The shower cubicle perfectly fits into the interior of any bathroom, and the sizes of the samples offered on the market are so diverse that they are suitable even for the smallest room. Well, finally, it's beautiful. A competent with their own hands or with the help of a specialist will provide daily relaxation for many years.
How, that all the efforts of the manufacturer not to bring to naught? Before answering this question, it is worth paying attention to some secrets of choosing this fashionable device, so that during the installation and operation there are no additional difficulties.
Installing the pallet
Begins with the installation of a pallet. It can be of two types: low and high steel frame.
Before installation, it is necessary to remove the pan and all openings from the protective film before installing and connecting to the sewer. After that, the siphon and the drain hole must be rinsed in the connection points for additional protection against leaks.

The siphon drain casing is attached to the bottom of the pallet using a nut with gaskets. On the corrugated hose is put a cuff in accordance with the diameter of the sewer pipe. Next, make a connection to the sewer and check the system for leaks by pouring water into the drip tray.
When installing a pallet, you need to take into account two features:
- the pallet must be level;
- the slope of the drain hose must be at least 150 mm and not more than 200 mm per meter.
The shower tray of the low type is "glued" to the floor by means of a mounting foam, the collected siphon is pre-connected. Having installed the pallet, it is necessary to put the load on top so that the foam does not lift it, and wait six to eight hours until it is completely solidified. Only after this can continue the assembly of the cabin.
The pallet on the high steel frame must first be assembled.
Long pins are screwed into the holes until they stop. They are screwed on nuts and washers, and then the frame of the shower tray is criss-crossed. To the protruding parts of the studs, the legs are screwed, four at the edges, one in the middle. The level of the pallet on a high steel frame is set by adjusting the legs.
Some models of shower cabins require additional fastening of the pallet to the wall. To do this, place it on the installation site and on the upper edge, outline the boundaries for fasteners. Drill the required number of holes and, using the bolts supplied with the shower enclosure, as it were, "fasten" to the wall.
As a rule, the metal frame is not strong enough. It can be strengthened by placing under a steel frame, for example, several bricks, creating an additional support.
Back to contents
Mounting of corner and side panels

Before installation, you must install all the connections and accessories included in the package. This is a watering can, hydromassage installations, shower mounts, radio panels, lights, dispensers for liquids. In more complex designs - foot massagers, a device for steam and bath. There is no one instruction on this issue. Each model has its own. But what necessarily applies to all shower cabins, joints and fastenings to the walls must be sealed with silicone.
Conclusions for electricity and water should be provided during the repair of the premises, so it should only be noted that the assembly of electrical connections must exclude water ingress, and the places of water connections are sealed. To do this, you need to check the factory assembly, if necessary, tighten the clamps using a screwdriver and, where possible, additionally treat with silicone.
The walls of the side panels are mounted on an aluminum frame, which is assembled from vertical slats and rails. The straps are attached to the guides using self-tapping screws. In the frictionless grooves of the guides, one of which is fixed to the pallet, glass side walls are installed. The joints are treated with silicone, after which the base of the booth is checked for correctness of all connections and tightness.
Shower cabin in a private house, the apartment looks not only presentable and beautiful, but also promotes comfortable living. Many are interested in the question "how much does the installation cost?" And are horrified by the high cost. And indeed, the service of installing a shower cabin by a master in this direction will cost at least 4000 rubles. And this is only if you bought a Chinese shower.
How to install a shower cabin - how much are the services of a master
The cost of installation of high-quality European plumbing will cost several times more. Looking at the set of spare parts, there is a desire to call the master. Do not rush to do this, because you can save - the assembly of the shower can be done by any skilled craftsman with their own hands. A step-by-step instruction with photos and videos provided below will help you to perform work at the highest quality.
How to install a shower cabin - check the completeness
First, check the integrity of each fittings and glasses. They are usually carefully packed, so it should be done immediately in the supplier's warehouse. The doors are always made of tempered glass, which, when struck, breaks into small pieces. Therefore, if you do not hear any noise in the box, you can not worry - the doors are unharmed.
If you are going to install the cab in the home, be sure to check the presence of all small parts. If the booth was made in China, then there is a chance that something to put is forgotten. This is the sad truth of life. Check each item according to the instructions.

How to install a shower - installation of a pallet
From the pallet the installation of any shower cabin begins. However, you must first connect the water drain system (use flexible hoses). Provide an exit from the shower tray to the main sewer. We collect the pallet. All pallets are equipped with legs, which will have to be properly leveled and fixed with nuts. We fix the drain hose. Provide for the installation of tee, because in the drainage system tap-offs are connected from the washing machine, washbasin, bath. Check the connection gasket. If it is not reliable, use a waterproof sealant together with it.
How to install a shower cabin - we supply water
Install a tee for hot and cold water, where the cab will connect. To fully seal the joints, use the usual patch, FUM tape or special sealants. All listed materials at an affordable price can be bought in construction stores.

How to install a shower - supply power
In all cases, the installation of a shower enclosure implies the presence of a separate outlet next to it. Install it in advance. Pay attention, it is best to use a special outlet, designed for installation in rooms with high humidity. The best option for installation is behind the cab or on the side.

How to install a shower - installation of walls
In each case, when assembling and assembling the walls, there are special features that depend on the manufacturer and the model. Fixation is usually performed using conventional connecting bolts. And for the installation of doors using roller mechanisms. You can not exclude the possibility of using other types of fastening. In some cases, factory fasteners are not trustworthy. In such cases, you have to buy auxiliary fasteners. Consider the important rule - first the walls and the ceiling are mounted, and the doors at the very end.

How to install a shower enclosure - drain connection
Take care of the water hoses. Threaded connections must be mounted on them. If there are none, then buy new ones. The clamps supplied in the kit are of low quality. Therefore, we do not recommend them to use, but to buy new, more reliable ones.

How to install a shower enclosure - additional items
Most modern shower cabins are equipped with various electronics (radio, hydromassage). It works on the voltage in 12V. Therefore, if the converter is not included in the kit, you will have to assemble it yourself.

How to install a shower enclosure - check for leaks
After all the sealants have dried, check their quality by turning on the weak water pressure. If you notice a leak, re-seal the seams.

The process of installation and assembly of shower cabins may differ slightly from the plan provided by us. It all depends on the configuration of the product and many factors. We talked about the main and most common stages of the assembly.