For motorists it is important to properly organize the storage of the vehicle. With this task will cope with a garage from the profile pipe, which is constructed quickly and economically for money. The design is so easy to install that it is not difficult to create a building with your own hands.
Why is profiled material beneficial for building a garage?

- the profiled sheet is much cheaper than brick or reinforced concrete;
- you can save on the foundation, because the design will be easy;
- the skeleton turns out strong, therefore the further covering of planes will not damage the skeleton of the building;
- you can make a quick dismantling of the "motor home" for installation in another place;
- if you do not take into account the construction of the foundation, wireframe technology excludes "wet" processes. Mounting manipulations are carried out in any temperature mode;
- the finished building during construction and during operation does not shrink.
If the garage of the profile pipe will be operated in a harsh climate, additional insulation will be required. The metal must be treated qualitatively to avoid rust damage. Processing with special means, painting or plant spraying on the surface will be enough.
Designing a garage
Detailed drawings and sketches will help to avoid costly rework. This approach helps to calculate the required amount of building material with a small margin. It should be determined in advance whether the structure is welded or demountable. To create the last frame provides for the additional purchase of fasteners, galvanized corners and nuts of the required length.
Base for a garage from a profile pipe
The foundation is easily done by oneself. It is important to consider the type of soil under the future structure. So, a garage from a profile pipe can have:
- Monolithic foundation
- Ribbon foundation
- Pile foundation
- Paving slabs
The base is made of a solid reinforced concrete slab. The project is expensive, therefore it is recommended to equip the observation pit in the center for car repair.
If the soil density allows, you can make a shallow foundation on the perimeter of the building.
The most economical option. Concreting, laying of bricks or fixing of pipes is carried out only in places of the greatest load. A metal plate is welded to the top of the formed platforms, which becomes the support for the frame.
This type of foundation is more expensive than a concrete screed, however, it is very in demand when creating garages.
Required condition!
Regardless of which type of foundation is chosen, the concrete base should be at least twenty centimeters higher than the ground level. Otherwise, rain and melt water will wash away the structure, the metal will regularly contact with water. Any platform should be slightly larger than the garage.
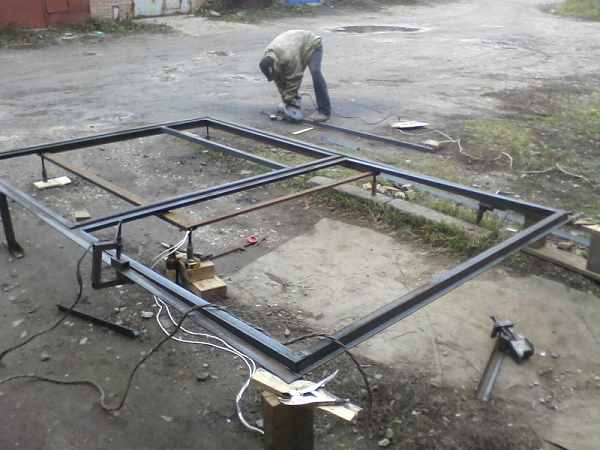
Frame construction
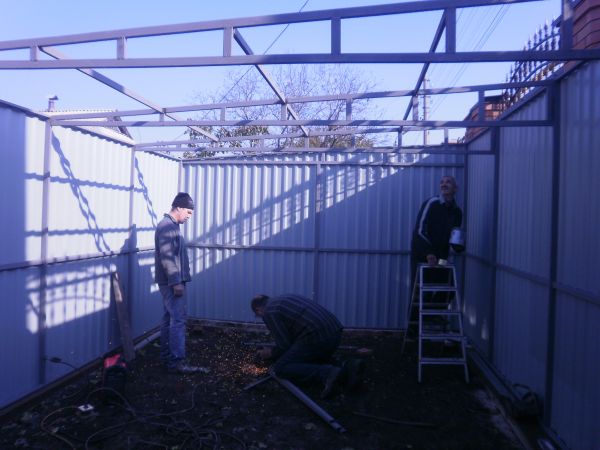
After the installation of the foundation, the profile profile is built with your own hands. Throughout the perimeter of the garage, the profile pipes of the maximum length are laid on piles and welded. Then attention is paid to fixing the vertical riser. After fixing the vertical supports, the pipes are fixed along the upper edge of the entire welded frame.
If a single-skinned roofing is planned, then one half of the garage should be higher than the other. Additionally, iron beams, which carry practical functions, are attached to the horizontal forms. Types of installation:
- assembly on site (provided in the case when construction is planned without helpers);
- modular assembly.
A simpler version: each side is assembled separately taking into account fixation of the stiffeners, then individual modules are fastened together on the foundation.

Much warmer will be the garage of the profile pipe, when attention is paid to the roof. First, a metal mesh of pipes is welded, as in the case of a frame. The finished crate is attached to the upper areas of the wall slabs. Anyone with the power to additionally insulate the roof surface, impart a roof waterproofing properties and create ventilation ducts.
On the finished layer of the crate is applied profiled sheeting. As a fixer perfectly fit screws with plastic washers or special rivets. It is important not to squeeze, otherwise you will get the effect of "squeezing" (leading to deformation of the roofing flooring). A roof with overhangs is mandatory.
It should be observed!
If in the "motor home" foreign-made cars are stored, low temperature regimes in the internal space will adversely affect the technology. On the perimeter of the hangar it is necessary to equip with insulating materials with high indicators of heat resistance. Insulating film (with a small margin in the distance) between the corrugated board and iron sheets will provide additional ventilation.
To the garage from the profile pipe looked presentable, the doors are inserted qualitatively. The most common option is a hinged or hinged gate. Get the necessary shape easily with profile pipes and sheet corrugated board.
If the sheets prove to be heavy, the construction will quickly settle and will cease to fit tightly into the garage opening. In this situation, the lifting gear will help.
The adjacent pipe connects two supports. The leaf profile of a wide parameter is fixed to the supports. The prefabricated structure is connected to the assembly mechanism.
If they decided to build their own hoisting gear by their own hands, the two pipes are fastened together in the form of a knee. In the resulting apparatus, a spring is built in to receive a support. The finished product is installed on the future gate or door.
Garment cover
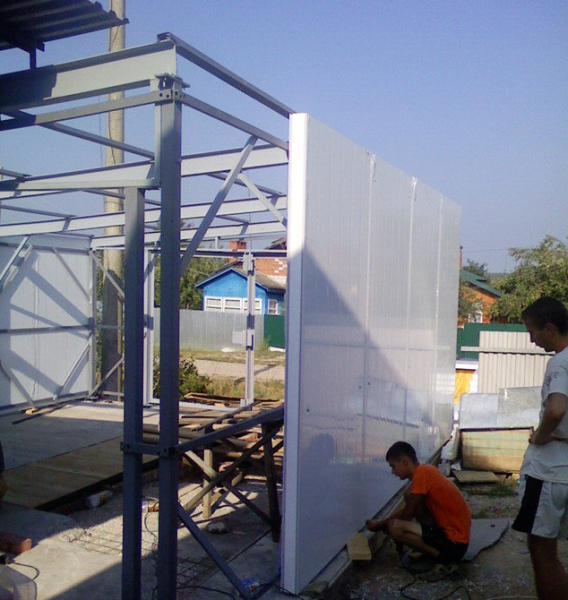
- To the garage from the profile pipe eventually pleased the owner, the skin of the received room is carefully thought out. In the first case, the corrugated board is used. The panel is screwed to the metal frame with the help of the necessary screws. The building is built on three sides;
- for the outer lining the siding panel is suitable. First, the frame is covered with an OSB plate (acts not only as a platform for cladding, but also as thermal and sound insulation), then a plastic or siding panel is laid.
Warming with a separate line
If the garage of the profile pipe is operated in harsh climatic conditions, the room must be made warm. In the interior space, you can attach a layer of foam to the vertical surface. The building material perfectly resists penetration of moisture inside the building and has thermal protection properties. Together with the corrugated board, you get a kind of sandwich panel made by yourself.
Metal construction always involves complex design work. As a rule, only professionals will be able to correctly calculate the load on profiled pipes in each of the nodes. A qualified employee will accurately determine how much weight each pipe can withstand. The planned garage of the profile pipe, as well as the residential building, also requires careful calculations.
A wonderful "motor home" to build under everyone's power.
- Creating a Drawing
To build a garage from a profile pipe by one's own hands can be much faster and much cheaper than from brick or besser-blocks. And, not at all lost in strength and durability. At the same time, it is possible to trim the frame garage from a profile pipe in various ways. For the garage of the proftruby suitable as a popular siding, and modern sandwich panels.
What is the Proftrub and its advantages?

Among the specialists of the trade union pipe is called a "box". It can be made from a variety of materials ranging from ordinary metal st.3 and ending with gold. There are several methods for making it:
- hot rolling at high temperature of deformation;
- cold rolling on HTP mills (cold rolling of pipes);
- by welding from sheet material (strips);
- in a complex way through pressing, piercing, cold or hot rolling and drawing;
- all pipes, in order to improve their strength characteristics, can be subjected to a certain heat treatment.
To assemble a garage frame from a profile pipe it will be perfectly possible to use a welded "box" with dimensions from 40 × 40 mm to 100 × 100 mm. It is possible and their combination, with the use of different options for the use of the angle 50 × 50 mm, in accordance with the drawing of the garage of the profile pipe. From such a corner it will be convenient to weld various profiles of the type of the brand or I-beam according to the drawings of the roof structure.
Having fixed a wooden block on the shelf of such a profile, it will be possible to easily attach any roofing material to it. The drawing executed in an autocade, will allow to approach very scrupulously to calculation of parameters and quantity of the preparations necessary for assemblage of a skeleton of garage from the welded, profiled pipes. If in the field conditions there is no such possibility, then a simple, spatial scheme of the future design will be sufficient.
Important: if centralized delivery of metal is impossible, then its transportation will have to be performed on its own machine. Unfortunately, we will have to confine ourselves to the multiple dimensions of the blanks, in contrast to the dimensions recommended by the garage drawing from the profile pipe.
Creating a Drawing
When developing a drawing for the frame of a future garage using an auto cassette or drawing its axes manually, several important points should be considered:
Maximum width of the garage;
- the width of the machine should be increased by 1.5 m, adding to them the technological size of the working area. This is how the width of the internal space will be understood;
- if it is supposed to periodically conduct some preventive or plumbing work, you should additionally add 800 mm to the workbench with the vice;
- in addition, in order to create an acceptable temperature regime, it is also necessary to take into account also 100 mm for insulation and wall finishing;
Length of the internal space;
- when designing, this size should be increased by adding another 2.5 m to the length of the vehicle.
- before the machine should provide a place for installation of shelves for storage of inventory and a passage near them;
- and the passage must also be behind - in front of the gate;
The height of the ceilings of the future building;
- it should allow the hood of the machine to be raised smoothly with enough clearance to place the hands;
- in addition, the welded frame must have a margin for height to perform all work related to the insulation of the ceiling and the placement of fixtures.
Important: when preparing a general layout drawing, it is necessary to draw in advance the placement of all heating devices and ventilation wiring. Especially, if you plan to use forced, forced-air and exhaust ventilation.
Site planning and foundation works
To start earthworks it will be possible only after checking the diagonals of the entire foundation. If the roughness of the ground and the near groundwater do not allow you to use the ribbon variant of the basement, the pile variant will be simply necessary. The process of making it will look simple enough:
- after stripping at a design depth of not more than 500 mm, it will be necessary to drill a number of holes with a hand drill to the depth of soil freezing in the local conditions.
- to the depth of the resulting pits to insert asbestos cement pipes, smeared with waterproof mastic;
- to collect a timbering from edging boards with its two-layer reinforcement both on perimeter, and inside piles. If the inspection pit is supposed to be made, it must be manufactured simultaneously with the main foundation;
Fill the formwork with concrete of the brand from M-200 to M-300 with its vibroprocessing by any mechanized method;
- pour simultaneously with the main foundation and the floor of the inspection pit by 150 mm, laying under the concrete waterproofing membrane;
- Under favorable weather conditions it will be possible to disassemble the formwork in a week after pouring. In this case, the boards should be cleaned of the remnants of the solution and folded under the canopy through the pads for drying;
- Cover the sides of the foundation with a cold method, let dry and perform a backfilling;
- To the assembly work on assembling the frame of the future garage, you can start after 20 days after pouring, when concrete will gain maximum strength.
Important: when recruiting the foundation strength, it will be useful to perform marking work and cutting the proftrub on the workpiece. Painting blanks can be done with enamel on rust both before welding and after it.
Assembly work of frame construction

The assembly of the construction can begin after that when it became clear how to make a garage out of the factory pipe. The assembly process itself can be carried out in several ways. Everything will depend on the skills of the performer and the availability of the necessary tools:
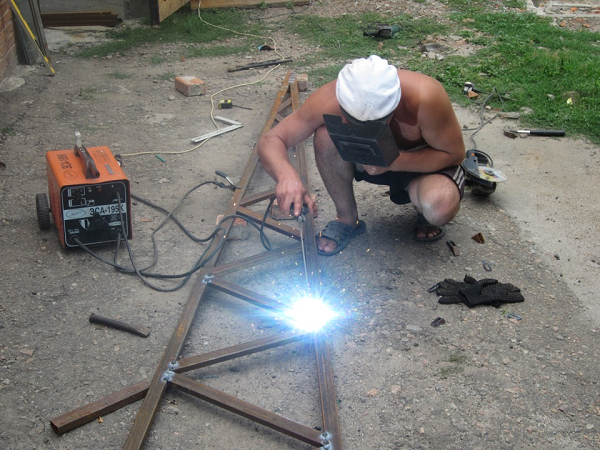
To weld the assembly, a welding machine is required.
- it is better if it is an inverter that does not impose high demands on the qualification of the welder;
- a few locksmiths are required and for cleaning the welds from the flux - a medium sized hammer;
Collapsible version with threaded connections - screws and bolts, the set of tools will be slightly different;
- locksmith clamps complete with a set of wrenches. Very useful will be the end head with a ratchet;
- electric drill with a set of drills for metal;
- shaped, stamped overlays for joining proftrub;
- a grinding machine for refilling dull drills;
The application of the rivet will simplify the process of creating a garage construction out of profiled pipes. This will require:
- rivet of any design with a set of rivets of certain sizes. The use of thread rivets is possible;
- electric drill with a set of drills - strictly under the size of rivets;
- a set of clamps of various sizes.
In 80% of cases, assembling of similar structures from profiled pipes and shaped rolled products is carried out with the help of welding equipment. It is only when creating temporary structures that the use of collapsible, threaded connections is assumed.
The process of assembly is similar in all three variants:
Connection variant
- on the waterproofing layer of the foundation the lower frame is assembled with its fixation to the embedded elements. Control of diagonals and horizontality is a mandatory operation;
- the assembly of the walls can be done separately and installed on the frame in a fully assembled state. Vertical racks should be installed at a distance of multiple the size of the skin sheet (corrugated board). Pre-fixing of walls is carried out using a set of stubtsin;
- all the details must be carefully painted with enamel on the rust, if this was not done beforehand.
Important: it should be remembered that if we weld the workpiece in butt, then the ceiling seam can not be cooked, but limited to lower and vertical seams. The stock of strength will be quite enough.
Mounting of the roof and garage lining
![]()
Assemblage of details of a roof is carried out similarly to assemblage of the basic design. At the same time, it is necessary to take into account the possibility of organizing a weir during the design. If this is not required, the joists must be somewhat longer than the width of the structure. This is necessary for removing sediment from the walls of the garage. Between the beam of the ceiling and the rafters there must be installed strut details, increasing their rigidity. Installation of the roof can be performed in the following sequence:
- from the peeled boards of formwork to produce embedded rails of rafters. Be sure to perform their preliminary antiseptics;
- to establish trusses on walls and to fix in any, chosen way;
- fix the embedded beams and trim the roof with a hedge or any moisture-resistant sheet material;
- cover the roof with a waterproof and cover with a profiled sheet. The hydroisol will avoid damage to the lath due to the condensate from the profiled sheet.
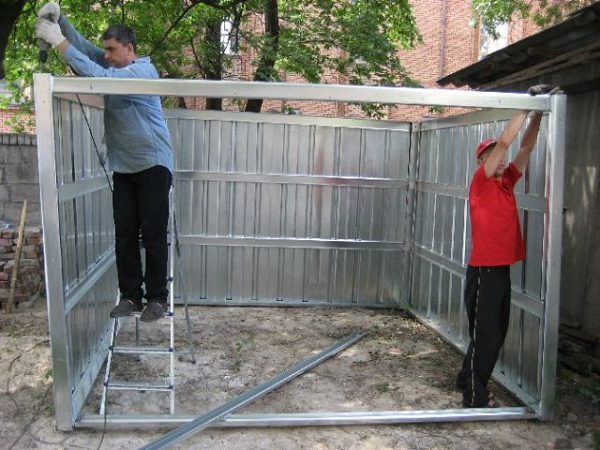
Particular attention should be paid to the insulation and the covering of the garage walls. And if the pre-ordered gates do not require it, then you can avoid avoiding the procedure of insulation and skinning yourself. The general wall pie with insulation will look as follows: corrugated board (or siding) + vapor barrier (wind protection) + billet + factory pipe + insulation + billet + vapor barrier + vinyl siding for internal works (moisture resistant gypsum board).
The thickness of the insulation in this case can reach 150 mm, which is quite enough for the garage infrastructure.
Important: when carrying out all work on insulation and finishing, do not forget about the ceiling and inspection pit. Folding wooden beams allow you to do this without any problems.
Work related to the power supply of a welded and finished house will be the final stage of construction. External wiring with a meter connection will be performed by the owners of the local power grid. If the garage is fed from your own home, then this work will have to be done on your own. To ensure reliable maintenance of the garage, an electric cable of 3 cm2 will suffice.
The first arrival for housewarming should be planned only after the entry of the entrance itself, due to the fact that the floor of the garage is raised in relation to the ground by 100 mm. The house for the car should turn out quite good.
The problem with the storage place of the vehicle has always existed. To not say different kinds of experts in automotive matters, the garage needs a motorist like air. Otherwise, the machine will slowly, but surely turn into a rusty piece of iron. You can buy a garage in a cooperative or rent, the value of the garage has always been determined by its remoteness from your house, so it's best to build a garage from a steel profile pipe yourself.
What is a garage of sheet metal and profile pipe
The most accessible and easy-to-implement construction with its own hands is the frame scheme of the garage. As a matter of fact, it is a steel skeleton or a skeleton from a metal profile, trimmed with a thin sheet iron. Make a frame garage from a profile pipe with your own hands is relatively easy if you have the skills of locksmithing and at least the initial ability to work with welding. Perhaps this is not the best option for a car storage room, but there are plenty of advantages to such a garage from a profile pipe:
- Such a design, if properly made, will be considered a temporary foundationless building, so it is easier to install or "fit" on the adjacent territory of a multi-storey building, it is only necessary to negotiate with the owner and arrange the lease;
- The garage frame from the profile pipe can be dismounted if desired, which will allow it to be transported or reinstalled
a new location without significant costs within one working day; - Despite a certain level of distrust in the strength and reliability of such a garage, we can say that this is not a notorious "shell". The most important thing is that the car in such a room from the profile pipe is fully protected from the sun, precipitation and possible attack of intruders, the space is perfectly ventilated and dried.
- In addition, the frame garage from the profile pipe and with their own hands will cost you much cheaper than the purchased product, and, most importantly, - the quality of construction will be much higher.
Important! Manufacturing and assembling a garage from a profile pipe will require at least three full working days, a large site and the ability to perform work on a garage drawing from a profile pipe without haste and distraction to other matters.
Building a garage from a profile pipe
The construction of the garage in any case occurs in several stages, so before starting work, you need to plan and think through the sequence of operations so that at the most crucial moment of final assembly you do not have to "freeze" the construction site due to unforeseen circumstances.
Which garage project from the pipe to choose
It is best to limit yourself to the simplest garage scheme. More complex options do not give special advantages, except that they allow placing more car accessories and auxiliary equipment in the room. But the cost of manufacturing and the laboriousness of building a garage increases very significantly. If you do not plan to spend day and night in the garage, choose the simplest and rugged version of the skeleton with a gable roof.
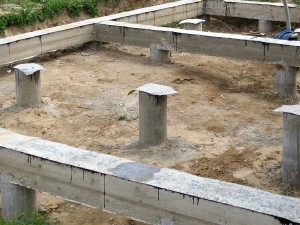
In addition, for the garage of the profile pipe, a foundation is needed. It is best to use a combined finely-grounded strip foundation with screw piles, a depth of one and a half meters, installed in the corners of the foundation box. The easiest way to make such a foundation is to pour concrete and lay rubble stone.
Advice! The foundation must be done according to all the rules with waterproofing and drainage, after the frame of the garage from the metal profile pipe will be made and it will be clear in which places it is necessary to seal the anchorages of the entire construction of the garage to the foundation.
Preparation for basic works
Most of the work on the construction of a garage from a profile pipe is performed in the following order:
It remains to correctly disassemble the design, pack and transport to the final assembly site.
We collect the skeleton from the profile pipe
To begin with, we will try to observe two simple rules:
- First, do not immediately cut the entire stock of profiled pipe into blanks, cut off each time a piece from a new thread of metal profile should only be if it is impossible to select a suitable sample from the available cuttings.
- Secondly, when drilling cut workpieces for connection with a bolt and a nut, the pipe pieces must be carefully leveled so that they are in the same plane. This ensures that the sidewall frame you build is a flat, not curved, propeller.
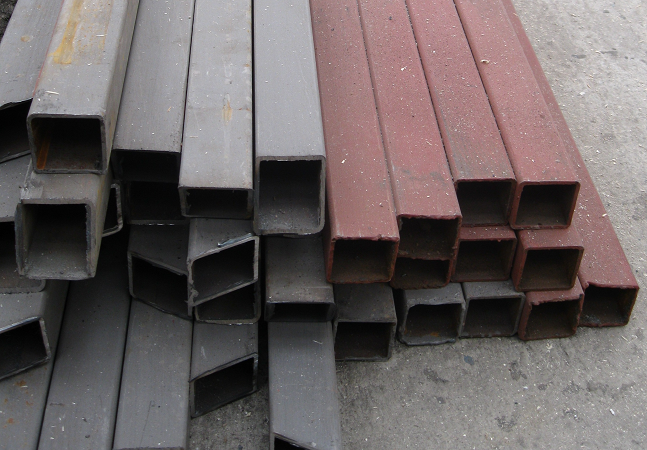
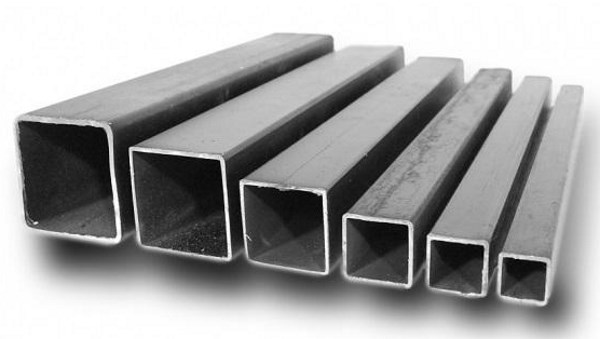
To produce the main parts of horizontal elements and auxiliary spacers of the frame we use a profile pipe: a hollow square with a face of 60 mm or a rectangular profile measuring 70x20 mm. For corner vertical racks and garage door frames, we use a square with an edge of 100 mm.
At the first stage, we cut out and collect the side walls on the bolts. To increase the stiffness of the opening of the frame of the side wall, after every 70-80 cm, fix the vertical posts. At their fastening it is necessary to take into account that later on the profile sheet will be fastened to these elements, therefore the outer plane of the frame and the inner spacers should be in the same plane. The best for these purposes is not a square, but a tubular profile, with cut-off support columns at the ends.

Due to the length and height of the side walls, it is difficult to lift and transport. Therefore, in addition to vertical spacing pipes, it is necessary to add pads in the corners and in the center of the frame of the wall. Similarly, we collect on the bolts the back and front walls of the garage. The front wall is reinforced with vertical posts, which are installed along the connecting dimensions of the garage doors.
Due to the bolted connection used, the rigidity of the side and rear walls is still insufficient, only after welding the rigidity of the structure will increase by several times. In the process of preliminary assembling and "sweeping" of the frame, the side walls are raised to the vertical position in the most accurate manner, in several steps, in order to avoid deformation of the pipe under its own weight in the central part of the frame. Sometimes, to increase the lateral stiffness of the frame of the side wall inside the assembly, boards or slabs are temporarily fastened.
Advice! Do not try to immediately sew the plane of any of the walls with a profiled sheet. This measure partly increases the stiffness of the frame, but even with a weak breeze, the entire structure of the profile pipe turns into a sail and becomes uncontrollable.
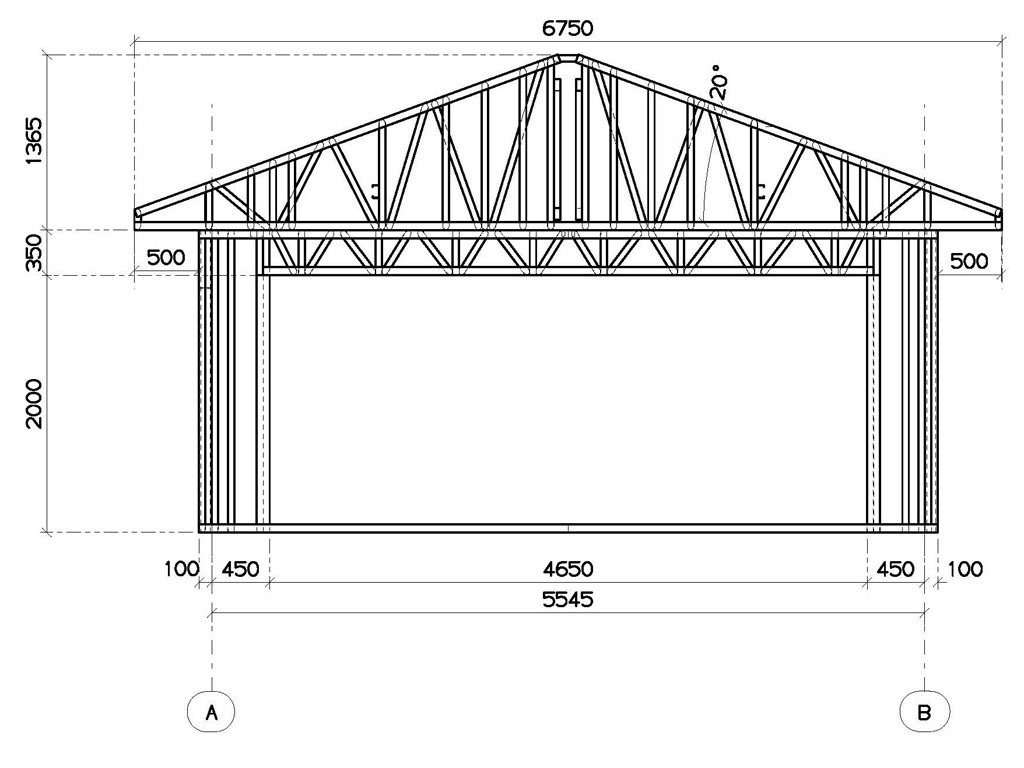
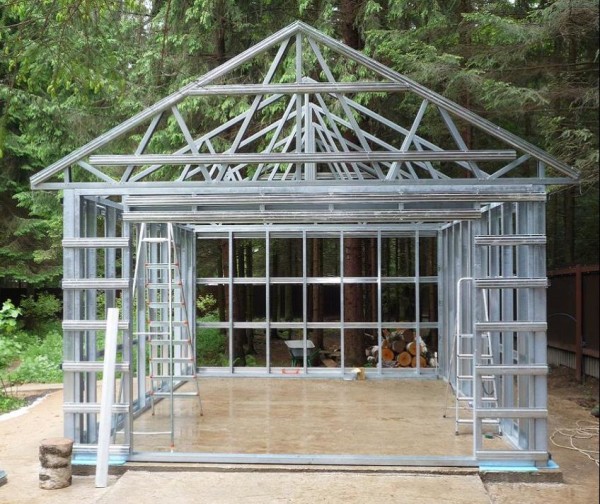
In a similar way, the triangular pediments of the garage roof are assembled. To increase the stiffness inside the pediment frame, it is necessary to install a V-shaped power element. The fronts are mounted on the assembled box from the side, back and front walls and are then connected together by a longitudinal ridge beam from the profile pipe. From a light pipe of rectangular cross-section 50x15 mm, a ceiling overlap of the garage is built up, and rafter load-bearing elements are installed.
Garage assembly and final operations
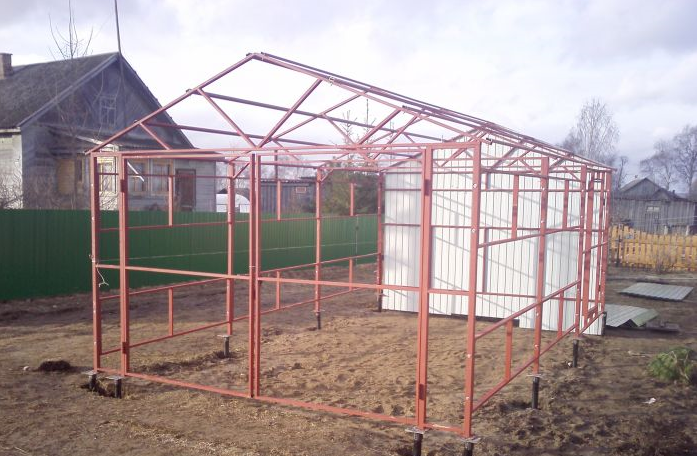
Before installing the carcass of the garage on the finished foundation, it is necessary to make sure that the anchor bolts are fixed to the concrete base, if there are no problems, then the carcass assembly begins with the installation of side walls and ceiling elements. To increase the rigidity of the assembly in the places of each bolted connection of individual fragments of the profile pipe, the joints are strengthened by applying several welding points.
After installing the rear and front walls of the garage frame, gables and roof truss elements begin to adjust the gaps in the connections. Sometimes you have to knock down spot welding and hammer the connections to achieve the necessary dimensions and gaps, which ensure the normal operation of the entrance gate. After that, they begin welding operations. Passing from the front wall and the gate to the corner posts, the back wall, the roof are welded by electric welding all the seams in the bolted joints. At the final stage, the frame from the profile pipe is uniformly fixed on the anchorages of the foundation.
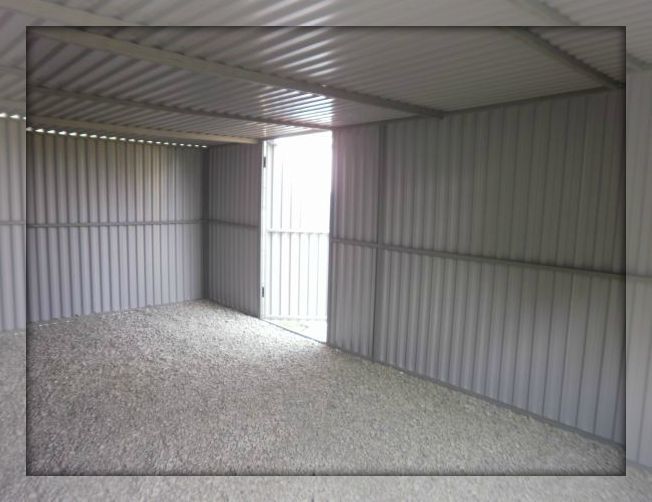
It remains to treat the profile pipe with a phosphate corrosion inhibitor, primer and paint, after which it is possible to proceed to laying on the garage frame of the metal profile. The inner surface of the ceiling and the walls of the garage are faced with foam and stitched with a plastic profile. Very rarely for insulation of garage walls, fiber materials based on mineral or basalt wool are used, the degree of insulation for such a structure is not so important, and the moisture is very good, which can create problems for the bearing profile pipe due to high humidity in the room.
Conclusion
Estimates for the construction of such a garage on average ranges from 400 to 800 dollars. But with financial calculations, remember that this is a good investment of money, as the life of the garage from the profile pipe will be at least 10-15 years. Despite the use of welding for the assembly of the garage, such a structure from the profile pipe can be really disassembled and packed into a long cargo "Gazelle" for 5-6 hours.
The modern choice of materials for construction opens wide opportunities to those who want to provide their car with a reliable and durable shelter, that is, a garage. They can be made of bricks and other block materials, based on a wooden or metal frame and other materials, can be used for one or more cars.
In other words, there are a lot of garage options. One of the economical and practical options is the garage of the profile pipe with your own hands. The profile is used to build a frame, which is then sheathed with corrugated board, sandwich panels and other materials. We offer you a detailed instruction on the construction of a garage from a profile pipe with your own hands.
The choice of the profile pipe for the construction of the carcass of the garage is determined by its definite positive qualities:
- Low cost. Garage from the profile pipe with your own hands will cost you significantly cheaper than a similar construction of brick, reinforced concrete, etc .;
- Savings on the foundation. The weight of the profile pipes is small, so they do not need a solid foundation to build them. In this case, less costly grounds are enough;
- Ease of installation. Virtually anyone who is familiar with the technology of performing construction works will be able to build a garage frame from a profile pipe with their own hands. The profile can be welded or jointed with fasteners.
- Minimum of construction debris. Working with the profile differs, among other advantages, cleanliness;
- Strength. The garage of the profile pipe, built by own hands, will turn out quite strong and reliable. In it, you can safely leave the car, as well as perform the necessary repairs.
Important! The garage of the profile pipe, assembled without welding, can easily be dismantled and installed on another site!
In comparison with other building materials suitable for erecting a garage, the profile pipe wins its low price, the ability to perform almost any finish, with different options for connecting the frame. Therefore, this is a good solution for those who want to acquire a reliable, durable and cheap place for a car.

For the erection of a garage from a profile pipe by oneself, the best option is a square profile. It's easier and easier to work with. When using a rectangular profile assembly will require more effort. The wall of the profile pipe should be 100 mm. This size will provide the necessary strength and stability. More narrow tubes of 60 mm size are also suitable. for elements that will impart rigidity to the structure. To implement such a project, the following tool kit will be needed:
- Drill with a set of drills for metal;
- Roulette;
- Bulgarian with a set of disks for metal;
- Keys;
- Marker.
If you plan to connect parts of the frame by welding, then take care of the presence of a welding machine. It is also necessary to ensure the safety of the work process. To do this, you need gloves, a mask, goggles.
Stages of construction
The work plan for the construction of a garage from a profile pipe with his own hands is as follows:
- Project preparation;
- Layout of the site;
- Foundation or preparation of a construction site;
- Assembly and installation of the frame;
- Performing the installation of the gate;
- The device of a roof;
- Warming;
- Sheathing of the building.
Let's take a closer look at each of the steps of erecting a garage from a profile pipe with your own hands.
The plan is the basis for successful construction. Although the garage of the profile pipe and does not seem difficult construction, the plan is required to properly determine the right amount of building materials, as well as for accurate and error-free implementation of all phases.
First, you need to create a preliminary garage plan, which, according to the scaling rules, you need to place the entire building. Determine the parameters that are optimal for your car. Further, drawing on the drawing data, calculate the required number of building materials.
Important! When creating a drawing, try to execute it in such a way that the supporting pipes are integral and as long as possible, especially on the base.
At this stage, it is important to decide how the parts of the framework will be joined. If the construction is planned, it makes sense to use welding. If the structure is intended to be dismountable, then you can use the fasteners.
If the independent development of the garage project from the profile pipe is uninteresting for you, you can always find ready-made design solutions on specialized websites on the Internet.
Foundation

The most important thing that you should pay attention to when building a garage from a profile pipe yourself is drawings. So, the foundation is executed just after the drawing is prepared. The profile is relatively light, so it is not necessary to build a solid foundation. For the base suitable:
- Reinforced concrete slab. This is the most reliable, but also the most costly option. For the foundation, several slabs are required, the area of which should exceed the area of the foundation of the building. Before installation, the playground must be leveled, and a pit should be prepared and a sand and gravel pillow laid. The plates are laid on the prepared base.
- Monolithic reinforced screed. This is a more affordable option, which is well suited for frame structures.
- Pile foundation. The best option for a frame garage.
- Sidewalk tiles. Budgetary basis. The concrete screed of the site is carried out, and paving slabs are laid out on it.
Important! When preparing the foundation for the construction of a garage from a profile pipe with your own hands, remember that it should rise about 20 cm above the ground level so that the room is protected from moisture.
Walls
After the foundation, you can proceed to the assembly of the frame walls. It is implemented as follows:
- The profile is laid on the prepared base and fixed along the perimeter;
- Vertical supports are fixed and fixed. They are joined together by horizontal elements;
- The top strapping is in progress. It is important to consider the type of the future roof. For a single-pitched roof, one side of the frame must be lower than the other.
- On the horizontal elements, a load-bearing profile is fixed from above.
This completes the frame assembly.
Sheathing
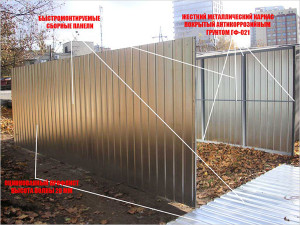
For the plating of the garage from the profile pipe with their own hands choose corrugated board. And this choice is completely justified. With profiled sheeting is easy to work with, it is durable, affordable, practical. For such a building as a garage, this option is excellent. In addition, modern corrugated board is made in a variety of colors, and this allows you to choose the best option for your site, depending on the color design of other buildings. When performing sheathing with corrugated board, fasteners are fastened to self-tapping screws with rubber gaskets.
Also when plating can be used or plastic. If you have chosen any of these options, then do not forget to pre-trim the frame with OSB-slabs, which, in fact, will form the basis of future walls.
In addition to siding, plastic, corrugated board, you can also use metal roofing, falshrus, lining and other materials. Each owner can customize the skin and make a unique frame garage from the profile pipe with his own hands. The profile assumes a wide range of suitable materials, as well as the use of various decorative techniques.
Roof

The roof can be a gable or a saddle. One-run option is more simple in execution. For its execution, one wall of the frame is made lower than the other. Then, both sides are connected by a transverse profile and covered with the selected material for the roof.
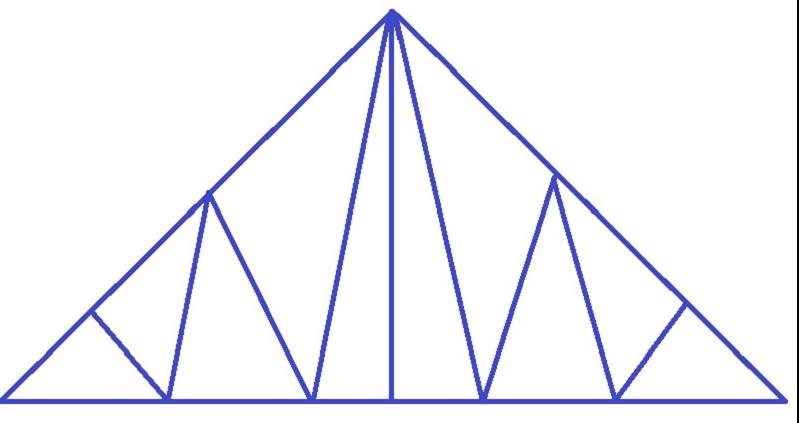
If a gable roof is planned, then it is necessary to execute the farms separately. A standard garage requires about 3-4 farms. They are mounted to the frame after its assembly, and then also covered with the selected material.
Important! The choice of material for the roof is very important. For example, when choosing a corrugated board, note that when the panel is joined, the joints of the sheets must coincide with the stiffener rib so that the structure is reliable and durable.
If you plan to build a simple and cheap garage from a profile pipe with your own hands, then it's best to stop on a single-deck roof lined with corrugated board, like other elements of the frame.
Goal
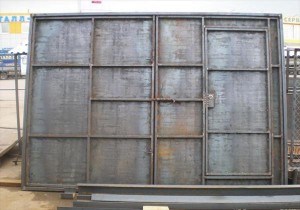
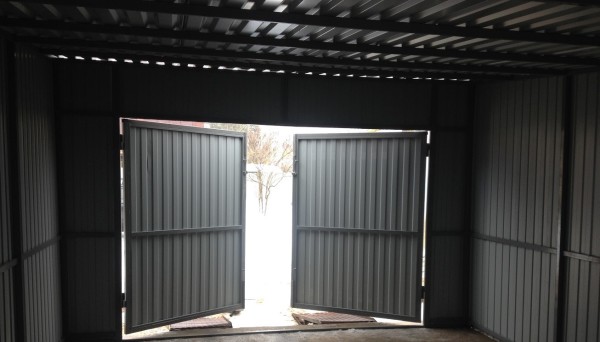
The gates are installed on the finished frame, but before the start of the plating. On the garage of the profile is usually installed ready-made sectional, roller gates. But you can make a gate with the same strength from the same materials as the whole building, that is, from the profiled sheet and the profile pipe. Manufacturing technology is as follows:
- From the profile, size 60 mm, you need to make two rectangles - the foundation of the future flaps;
- Attach additional stiffeners and stitches;
- Place the hinges on the frame. Desirable, more than 2 pieces on each side;
- Hang the shutters on the hinges;
- Sew with other elements of the frame.
Important! In one of the valves it is recommended to make a small wicket in human growth. It can be used when people need to leave or enter only. At the same time, you do not need to open the gate completely. This is not only convenient, but also useful, because in this way much less condensate will form in the room.
It is also possible to install sectional doors with automatic control. This is more expensive, but more convenient solution.
Warming

The values of the thermal insulation of thin metal walls are rather low. Therefore, if you build a garage from a profile pipe yourself, take care of its insulation. For insulation use mineral wool, expanded polystyrene, foam and other materials. Affordable, safe and effective option is the insulation with mineral wool. It is implemented as follows:
- The frame is covered with waterproofing material. It can be ordinary polyethylene or special polymers. Mounted waterproofing with glue or self-tapping screws with plastic hats;
- The lining is vertically fastened to the waterproofing;
- Between the parts of the crate are laid mineral wool;
- Then the top is covered by another layer of waterproofing;
- The internal covering of the garage is performed with the help of plywood, plastic, plasterboard.
Thus, you get an aesthetic, practical and very convenient garage at no extra cost! If you want to learn more about how to build a garage from a profile pipe yourself, the videos will help you.
In comparison with capital construction, the erection of a garage from a profile pipe will cost very cheaply. Of course, it is possible to perform precise calculations only after the completion of a specific project. But the approximate estimate for the self-transportation of materials and the execution of work with their own hands will look like this:
- Profiled sheeting - about 300 rubles per sheet. For a standard garage for one car will require about 12 sheets, that is 3600 rubles.
- The profile pipe for the frame is about 2000 rubles;
- Heater - about 2000 rubles;
- Sand, cement - 1000 rubles.
Total, for a garage for one car you need 8600 rubles. This is one of the most economical and fastest ways to build a garage with your own hands. In addition, such a building will serve for about 30 years. If the carcass connections were made using fasteners, then it can be easily dismantled and transported to a new site.

Garage from the profile pipe with your own hands is an economical and effective solution to the problem of arranging a place for a car. Implement such a project can be quickly, simply and at minimal cost. We hope that our recommendations and tips will help you to solve the problem of arranging the garage in the best way.
Leaving the car at night on the street is dangerous - hijacking cases are very frequent. Constant precipitation is harmful for paintwork. It is inconvenient and expensive to transport to a paid parking lot. To build a capital structure of brick is not cheap and requires permits. A constructive solution is to assemble the garage from the profile pipe with your own hands. What are the types of such constructions? Where to begin? What is the sequence of work?
Drawings of frame garages
Do not be afraid to personally take up the construction of the garage. Everything begins with the preparation of the drawing. In its calculations, it is necessary to take into account two factors:
- Availability of free space under the building.
On the proposed site you need to determine how many meters you can take to the garage so that it does not interfere with the passage or passage. It takes into account the free arrival of the car in the garage. The existing communications in the ground (the passing pipe of water supply or sewerage) should not be under the structure.
- Dimensions of the car and its needs for the garage.
There should be enough room around the machine for passage or repair. Often the garage becomes a "storeroom", where old furniture, a bicycle and other rarely used things take out. If the building is not large enough, it will soon become uncomfortable and cramped. It is better to take full account of further use.
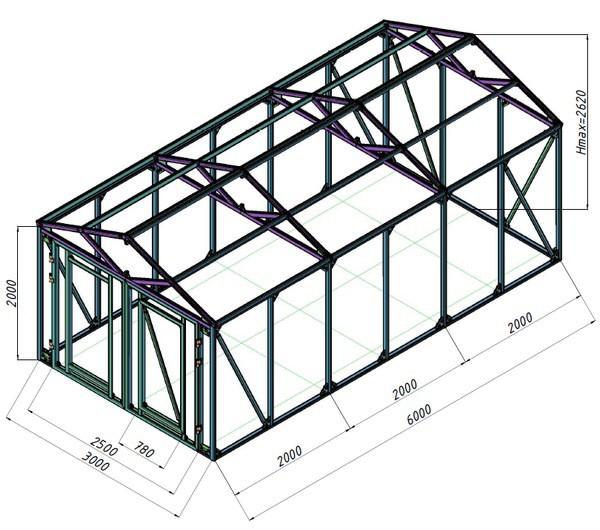
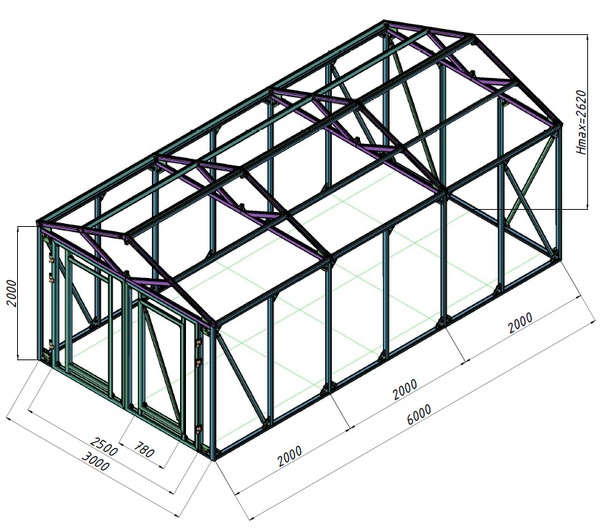
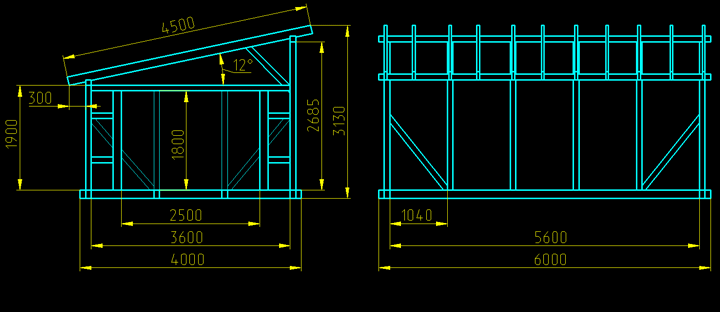
Based on the available space and personal needs, the dimensions of the structure are displayed. They should be indicated in the drawing. There are two popular models of frame garages. It is rectangular with a one-pitched roof (without an attic), and a rectangular with a gable roof (with an attic if desired).
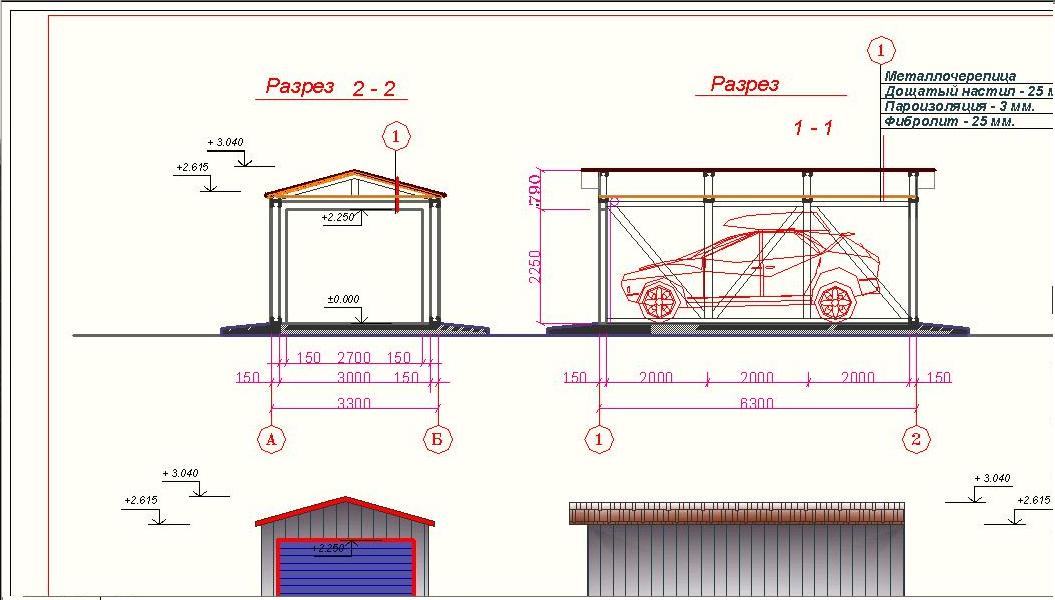
They have standard sizes, but can be increased or reduced if necessary. Garage from the profile pipe odnoskatny often produce:
- in length - 6000 mm;
- in width - 3500 mm;
- height of the upper edge - 2900 mm;
- the lower edge is 2450 mm.
The variant with a gable roof is built according to the same parameters, only the height to the ceiling is 2500 mm, and further 1000 mm to the top point of the ridge.

Basic material of construction
Whichever skeleton drawing is selected, standard or extended, it is important to evenly distribute the load. The profile pipe has a different cross-section. For supporting frame supports it is worth using a size of 100 × 100 mm. This should be the corners of the building, the lower and upper perimeter. You can add one basic support for every 3000 mm of span of the wall.
Additional jumpers are used with a cross-section of 60 × 60 mm, or 60 × 40 mm. They are fastened every 500-1000 mm. Perpendicular elements are fixed to the frame with the same frequency.
The number of additional pipes with a smaller cross-section affects the rigidity of the structure, making it more resistant to vandal burglary, but this also raises the cost of the project.
When the drawing is ready, the footage of the material and other elements is counted. It is worth to buy a few meters more profile pipe, for unforeseen cases (errors during the cutting, etc.). Usually, there is no big overrun, so spend a lot of extra meters is not worth it.
Foundation for construction
The frame garage refers to light types of buildings and does not require a solid foundation. If the structure is erected on private land and will not move, it is advisable to prepare a foundation of reinforced screed. It is 300 mm deep and 150 mm wide. This is necessary to prevent the structure from sinking to the ground. Out of 300 mm, a minimum of 100 mm should protrude above the surface. Such an elevation on the foundation will protect against ingress of thawed or rainwater inside the room. The floor in the garage can be paved from paving slabs or a concrete screed.If the place does not belong personally to the owner (the courtyard of the block, etc.), it makes sense to make a groundless foundation, in case of moving the garage. This is achieved by gravel padding and paving slabs.
The frame of the structure is fixed to the concrete foundation with anchor bolts, threaded through welded loops to the lower perimeter.
In the case of a garage on the tile, it is necessary to bang into the ground, at a minimum of four places, a reinforcement of 1000 mm long and weld the frame to it. Between the lower part of the structure and the base, it is necessary to place a layer of waterproofing material (bituminous mastic, etc.). This will protect the room from dampness.
Assembling the frame
When the foundation is ready, you can proceed with erecting the structure. It is important to follow the drawing precisely. Even at the planning stage it is necessary to determine the way in which the profile pipe is fixed to each other. There are two:
- Bolted connection.
It will be necessary to purchase corners with holes for corner joints. Some joints can be overlapped without corners, drilling two layers of pipe through and through. This method of connection is more expensive. Need to buy: bolts, washers, nuts and drills. The assembly takes more time. But in case of disassembly, moving or expanding the garage, there is a lot of freedom of action.
- Welding.
Requires small skills in handling the welding machine. Very high quality seams are not needed (tightness is not important here), but metal smelting should be good. Of consumables - only electrodes. The product is characterized by increased strength and anti-vandal properties. The disadvantage can be considered painstaking work on cutting, in case of expansion of the structure. Advantages of the method are quickness and cheapness. Most prefer the second type of connection.
Assembly according to the drawing starts with:
- The lower perimeter. Having spread everything on the ground, the welds are tack welded. It is necessary to verify the uniformity of the diagonals. The joints are welded according to the cross-to-cross pattern.
- Angled and span bearing supports are pre-welded to the lower perimeter, previously exposed in terms of level.
- The upper perimeter is assembled on the ground, similar to the lower one, and rises to its original position. There is a fixation.
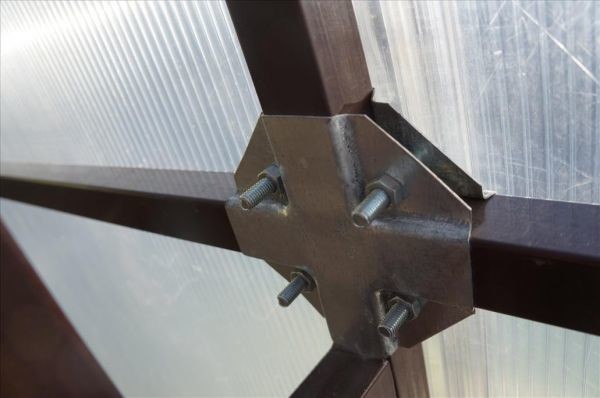
- In the resulting box, pipes of a smaller cross section are added, according to the drawing. The seams leaving the outside of the structure (on the street side) must be stripped with a bulgarian so that the subsequent sheathing densely adjoins the frame.
The gable roof is assembled on the ground from trusses. The triangular structure has a central stand and several skewers. Farms, alternately climb to the top and are fixed to the perimeter. Between each other they are connected by a pipe 50 × 20 mm every 1000 mm. Attic space can be used to store skis, sledges, and other items without cluttering the main room.
Garages are sewed with metal sheets 2.5 mm thick. Mount it can be bolted or welded. Short joints of 20 mm must pass evenly through every 250 mm of the joint. This will create a reliable attachment. Often use corrugated board, which does not require subsequent processing (except for welding places), and has a wide color range.
Additional Garage Elements
In the design, even at the planning stage of the drawing, doorways and additional doors are laid. In the latter, there is no need if the garage is standard in size. But in the case of an extended design, when the room is used not only to store the machine, the additional doors are convenient for quick entry into the interior.
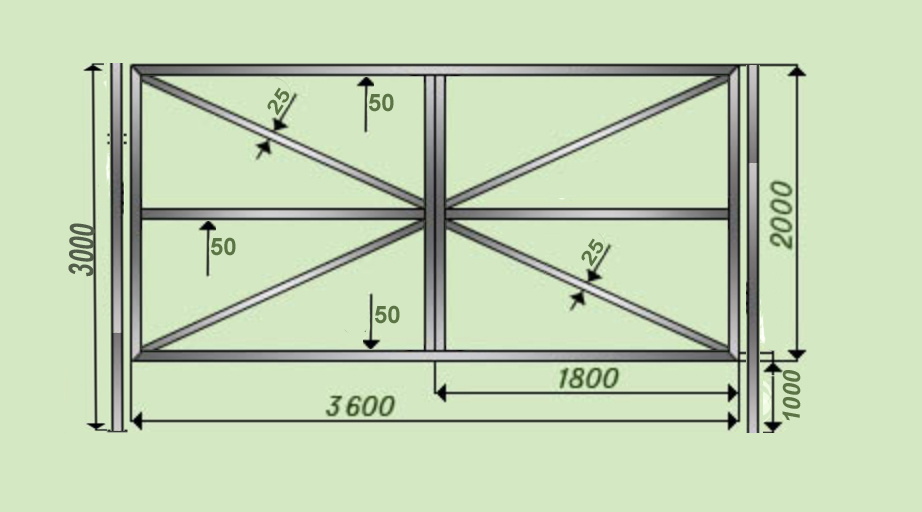
The gate can be of two types:
- Sweeps.
The bicuspid design, which is relatively inexpensive, is ordered according to the size of the opening. It is enough to leave 2500 mm in width and 2000 mm in height. The side posts, to which the gates will be attached, must be made of a supporting profile (100 × 100 mm). They will have a load when opening the doors. The disadvantage of swing gates can be considered the need for a certain space to open outside. But this is not important in the case of open courtyards.
- Rolling shutters.
More modern and compact gates. They can be opened by arriving at the ceiling or winding themselves on a roll above the gateway. In the first case, it is necessary to raise the height of the ceiling to 2300 mm, so that the mechanism does not interfere with the actions inside. In the second case, it is important that the load-bearing profile is at the edges and above the opening, since a housing with a winding mechanism will be attached to it. The gates are compact in the folded form, and do not require free space in front of the garage for opening.
In the end, making an easy and reliable garage for your car is not so difficult. You need a thoughtful drawing, materials, and the procedure described in the article.
The following video clearly shows the process of building a garage with a frame from a profile pipe.