Preparation of quality shish kebab is impossible without special adaptations, made in the form of a brazier and called in the people braziers. Especially popular among fans of meat are mangalas of prefabricated type, as they are easily dismantled and can be transported in disassembled form in the trunk of the car. In this article, we'll look at how to properly make a folding brazier with your own hands.
When making a collapsible brazier, you will need to consider the following requirements for products of this kind:
- compactness, so that it can be moved from place to place;
- simplicity in manufacture, that is an opportunity to manage at assemblage without expensive shaping and rifled equipment;
- versatility, allowing to use the brazier in the field;
- reliability in relation to fire safety.
Instruments
For the production of a brazier, a standard set of working tools, always available to any business man, is required. This set should include the following items:
- electric jig saw with metal canvases;
- "Bulgarian" with a set of disks (cutting circles);
- powerful metal scissors;
- electric drill with a set of drills;
- welding machine of any type;
- measuring and marking tools;
- set of threaded dies.
When choosing the dimensions of the future device, it is usually taken into account such characteristics as the maximum number of skewers that are planned to be placed simultaneously, as well as the dimensions of the trunk of your car.
Its width is chosen, as a rule, taking into account the size of skewers at your disposal. With regard to the height of the frypot, it should be selected based on the possibility of obtaining a temperature sufficient for roasting meat (usually this value is selected in the range of 150-160 mm).
As an example, consider a typical brazier with the following parameters:
- width - 350 mm (for a 400 mm long skewer);
- length - 650 mm from the calculation of the use of 6 skewers;
- the height of the barbecue walls is 150 mm (including the grate 20 mm);
- the length of each of the 4 legs is 600 mm.
The composition of the brazier should include the following elements:
- Frame from the corners with fixing tubes.
- Legs - 4 pieces.
- The bottom of the steel sheet.
- Two longitudinal sides.
- Side walls.
- The fire-bar.
In addition, to assemble the structure you will need standard fasteners, such as bolts, nuts and washers (simple and engraving).
Preparatory operations

First of all, a stand is prepared in the form of a frame, on which the frame of the barbecue and its legs will be attached. It is made of steel corner pieces of a certain size, which (after they are cut to the size of a brazier) are welded into a rectangular construction - the frame that is the base of the future brazier.
Then on the inner edge of the corner (along the edges of the frame) are welded sections of a pipe with a diameter of about 17 mm, used as supports for the legs of the brazier. For the manufacture of the legs themselves, tubular billets with a diameter of about 20 mm can be used. The bottom of the frypot is made of a rectangular steel plate 3 mm thick, in which holes are drilled using an electric drill to circulate the air in the heating zone.

For the production of rails, sheet metal with a wall thickness of 1.5 to 2 mm should be used. After the marking of the side blanks according to the size of the base and their cutting by the Bulgarian, it will be possible to proceed to the preparation of the seats. To do this, holes are prepared at the points of their attachment to the base, and also in those places where the side walls are connected to each other.
The work on making the grate is most easily organized with the help of a welding machine. To do this, you will need to prepare not very thick reinforcing bars and cut them with a bulgarian to the size of the bottom of the grate. To obtain the bottom of the grate chamber, these rods are simply welded in the form of a grate.
Stages of assembly

Consider the general order of assembly of the collapsible brazier:
- First of all, the previously prepared skeleton is connected by bolts of the appropriate size to the base. To obtain a reliable connection when installing bolts, it is advisable to use the engraver washers.
- After that, on the basis of the brazier you can mount the legs. For their arrangement on pre-prepared pipe supports with a diameter of 17 mm, "pieces" of a pipe of larger diameter are "worn".
- Then attach the beads and fix them on the base and with each other using the same bolted connections.
- To increase the strength of the resulting structure, it is recommended to further expand the walls with the help of longitudinal spokes, which are then tightened with nuts like "lamb".
- In the end, you will only have to put the finished grate on the bottom of the structure.
Now you can safely gather with friends on nature, taking with them the exploded design of the brazier, a couple of kilograms of pickled meat and charcoal. If you did the brazier in another way, share your experience with our readers, leaving comments on the article.
Video
We offer to see the video about the method of manufacturing the simplest design of the assembled brazier.
Preparation of shish kebab is one of the most favorite culinary entertainments of the inhabitants of our country, both in summer and in winter. A winter version of a juicy, fragrant meat dish made of pork or lamb is more suitable for cooking on an indivisible or stationary barbecue. It is installed on a site cleared of snow near a country house. Another thing summer - the time of holidays and travel. There is nothing better than on a halt in an automobile journey or after a swim in the river to organize a shish kebab smelling of smoke. For outdoor enthusiasts, it is best to have your own portable, comfortable grill. And below, we'll look at how to make it right with your own hands, give drawings and photos.
Content of the material:
| Features demountable brazier. | |
| Tools that will be needed for work. | |
| Dimensions, drawings, a complete collapsible brazier. | |
| Assembling mangal with their own hands. |
We begin to make a collapsible mangala with our own hands. Everything that is done for oneself and with the soul is a matter of pride. On the other hand, if you plan to travel out of town rarely, then you should not bother. For one or two onslides on the nature of an ample disposable, store brazier. As an option, you can buy a quality collapsible brazier, factory-made. Today, the stores offer a large selection of them. However, if you need an original and inexpensive brazier, then we proceed to work.
Features of collapsible barbecue
Demountable brazier, made by own hands, should fully meet the requirements below. It should be:
- simple in manufacturing, without the use of expensive sheet-bending equipment and guillotine;
- compact, well suited to the dimensions of the trunk of the car;
- durable, made of materials resistant to high temperatures;
- easy to assemble / understand the field conditions without using many tools;
- in terms of operation and fire safety.
Collapsible BBQ with their own hands: photos, drawings, video, tools
To make a brazier you need a standard set of tools, available in the garage or home workshop of each owner. Do not be afraid, if any of the tools are not, they can always be rented. For work you will need:
- bulgarian and cutting discs for metal;
- jigsaw with canvases for metal;
- reinforced scissors for metal;
- roulette and other measuring tools;
- drilling machine with a large set of drills for metal;
- a metal square and a ruler;
- stylet for marking on metal sheet;
- welding machine;
- set of dies for threading.
Dimensions of collapsible mangal made by own hands
Immediately it is necessary to say that the dimensions are always calculated individually. The calculation is based on:
- dimensions of the trunk of the car, which should completely match the dimensions of the brazier in disassembled form;
- the number of servings of shish kebab supposed for one-time cooking.
The brazier offered by our portal "Remontik" differs in the following sizes:
- 600 mm in length (calculated for six skewers) the distance between them is 100 mm;
- 300 mm in width (usually the length of the skewer is 400 mm);
- 150 mm - the height of the brazier (the optimum height is 130 mm + 20 mm - the grate), which if less, then the meat can burn, and at higher levels, more coal is needed;
- 600 mm - the height of the legs of the brazier (do not forget about the size of your trunk).
Collapsible BBQ with his own hands: blueprints, photos
We offer you to familiarize yourself with the simplest design of the barbecue, looking at the picture:
Let's imagine several variants of the drawings of the collapsible brazier with different sizes. Among them, you can choose one of the most suitable options.
Completion of demountable barbecue
The collapsible mangal model consists of 6 basic elements:
- frame (stand) from corners with four fixing tubes having a diameter of 17 mm;
- bottom (base) of the barbecue from steel sheet;
- legs with a diameter of 20 mm;
- board longitudinal with 3 ledges (2 pieces);
- side board with 2 ledges (2 pieces);
- grate;
- fastening elements: engraver washers and simple, wing nuts;
- bolts with simple washers and nuts (10 pieces).
Such a brazier can be folded very compact: its dimensions in the folded state are not more than 600 mm in length, 300 mm in width, and not more than 60 mm in height.
Manufacture of elements of a design of a brazier
- We make a frame (stand) for a brazier.
The support for the barbecue is made in the form of a frame. It is required to give high stability to the structure and fasten the legs. Moreover, the stand on the legs can be used separately, for other needs, for example, for drying clothes and shoes, etc.
The frame is an ordinary rectangle, which was welded from the corners. To make the frame, you need steel corners. Also, it is possible to use substandard products that can be found on metal warehouses. They will cost much cheaper, compared with grade rolled metal products.
Note that the frame size should always be slightly less than the size of the base. It is necessary that when welding its width does not exceed the dimensions of the main brazier. Sawed and measured corners must be welded into a rectangle with the following dimensions:
- length - 570 mm;
- width 230 mm.
At the edges of the frame, four segments of a water pipe having a length of 50 mm should be welded from the inside of the corner, with an outer diameter of 17 mm and an inner diameter of 10 mm. These four pipes should act as a support for the legs of the brazier.
- We make the legs of the barbecue.
As the legs for the barbecue, water pipes with an internal diameter of 20 mm are used. You can use any water pipes: second-hand or non-air-conditioned. Such legs will fit well into the support tubes, which are fixed to the frame of the brazier. In this project, the length of the legs is not more than 600 mm. To the end, which will rest against the ground, you need to weld a plug, as well as a platform for stability. In order for the leg not to fall out make a through hole and secure the leg in the assembled state to the support using a hairpin. In this case, you can make the legs higher.
- Make the bottom (bottom) of the barbecue.
The bottom of the brazier in its final form is a rectangular sheet with holes for air circulation, holes for fixing to the frame and grooves for fixing the bolts.
To strengthen the base of the collapsible brazier, a steel sheet having a thickness of no more than 3.0 mm is suitable. To increase the durability, which is subjected to strong temperature stress, use a sheet of heat-resistant or stainless steel.
If you do not have the opportunity to use this material, the optimal solution will be:
- make grates of metal rods, which are welded together in a lattice to the size of the base;
- to choose the size of the base cast iron bars, which are used in home furnaces (but be prepared, that in this case, the design is heavily weighted).
The base is divided into four stages:
- An electric jigsaw, a Bulgarian or another tool can cut out a rectangle having a size of 300x600 mm.
- For normal air circulation at the same distance from each other, it is necessary to drill through holes, with a diameter of 20 mm. They will be required to access air during the combustion of coals. Adjust the number of drilled holes, if there are a lot of them, then the strength of the structure will decrease, if there are not enough of them, then you will not be able to achieve a normal burning of the coal. It is important that the holes are not blocked by the grates.
- Run through the grooves in the bottom of the structure. Grooves are required to fix the lower edges of the sides of the product. For this purpose, a distance of 7 mm from the outer edge should be measured along the perimeter of the base. Then draw a line along the perimeter. At the same distances from the edges in the center, we plan grooves. Drill holes with a diameter of 2 mm, located close to each other. Connect them with a jigsaw, and round the files, smooth the inner edges. We get three grooves, two on the side and one with a longitudinal groove. The dimensions of the grooves are 2 mm wide and 20 mm long.
- Then make holes for fixing the bottom sheet to the frame. We lay the frame on the bottom of the brazier. Drill three holes with a longitudinal and two holes on the side. We fasten the frame and the bottom with bolts. The nut should be from below, right under the bottom of the brazier. Thus, you will save the thread from sintering during high temperatures.
- We make the sides of the collapsible brazier.
For the manufacture of rails you will need sheet metal (from 1.5 to 2 mm). It will take two lateral and two longitudinal bolts. The length of the longitudinal - 568 mm, the side - 286 mm, two pieces go to each side. The size relative to the base will be reduced by 14 mm. The height of the sides is 170 mm (20 mm of which extends to the fixing protrusions).
Now we make the marking of the sides along the bottom edge. It is necessary to attach the bead to the corresponding edge of the base. Then the labels are opposite the grooves. So, we get two protrusions from the side and three with a longitudinal.
With an electric jigsaw for metal cut out the contours of the sides. Need to use HSS saws, which are designed to cut metal. From the bottom do not forget to make fixing protrusions.
At equal distances from one another, we make through holes in the bumps intended for air access.
How to properly fix the edges
The safety and stability of the brazier design directly depends on the strength of the connection between the rails. Among all the possible options for fixing it is worth choosing among them the most reliable. The essence of fastening consists in fixing the beads on the longitudinal spokes, and also tightening them together with the help of wing nuts.
- The spokes (rods) of the round section should be made of heat-resistant metal. Total need four spokes, having a length of 300 mm. The choice of their diameter is arbitrary. At both ends of the knitting need to make a thread. Now we select the wing nuts for the diameter of the knitting needle.
- Need to fasten the spokes firmly on the side. Thus, it will be easier to assemble the brazier. To do this, measure the required distances for attaching the spokes. In the event that the thickness of the metal allows welding, then weld the spokes to the sidewall. If you can not weld, then make two holes on both sides of the rod. In total there will be four holes for the knitting needle. In paired holes, you need to insert a podkokobrazny bolt, which has a thread at both ends. The horseshoe ends should be firmly tightened with nuts.
- Make two holes in the longitudinal board, which will coincide with the protruding parts of the spokes. They may be needed to fix and join the sides. That's all - the design is ready.
- We make the fire bars.
You can easily make a grate if you have a welding machine at your disposal. For manufacturing, you will need reinforcing bars or other material. Using the grinder, cut the cross-pieces 284 mm and the length of the bars 584 mm. The number of bars can be selected only individually. Then we weld everything in the form of a lattice. Provide legs - 15 mm in length.
Assembling mangal with your own hands: video, photo
Now we proceed to the final stage of the work. It is important to perform it carefully in order to fit different parts of the brazier.
- We connect the brazier frame to the base. Thread the bolts through the holes in the corner of the frame and the base. For high-quality fixing of bolts use usual washers and engraver. The final fixation can be made by a lock nut and a nut. In principle, such a connection should be made inseparable.
- Fix the legs. On legs legs with an outer diameter of 17 mm, you need to put on the legs with an internal diameter of 20 mm. If the play of 3 mm between the foot and the support will interfere with the stability of the brazier, the legs must be deepened into the ground. Alternatively, a threaded attachment can be made to fix the legs.
- Attach the sides to the base. The protrusions of the lower part of the sides are inserted into the grooves of the base of the brazier. The lower part of the sides must be pre-fixed. In the holes that are drilled into the niche of the ledges, insert metal studs that will prevent the edges from falling out. It is possible that such a method of fastening will be very cumbersome. Try your own mounting option, for example, the hinged connection of the sides and the base.
- We pull the longitudinal and lateral sides with the help of spokes. Then we insert the knitting needles on the side boards into the holes on the longitudinal sides. Well, if the ends of the side edges are tightly pressed against the longitudinal board. We put the washers on and tighten the flanks to the side board to the side. Perhaps fastening with knitting needles in the brazier is not rational, because they can deform under high temperatures. It means that they should be made from the outside of the rim, as a result of which you will receive additional pens.
- Lay the grate on the bottom of the grill.
So we realized what was planned and made a folding BBQ with our own hands. If you suddenly find design flaws in the drawings and schemes of the brazier, we recommend that you voice your suggestions in the comments to the article.
It should be added that after the manufacture of all parts of such a brazier, it is necessary to perform their treatment with special means that would protect the metal from corrosion and give the material moisture-proof properties. The simplest way to handle the surface of parts is to paint a special paint with a balon, which you can find in any car store.
Portable brazier - a necessary thing for fans to combine outdoor activities and cooking food in the fresh air. Such structures are easy to assemble, and due to the compact dimensions, the brazier is easy to carry and transport, so it is popular among tourists, fishermen, summer residents and other lovers of shish kebab and grill.
Available for sale are options portable braziers, but not always they can be tailored to the buyer's requirements for the price or materials of manufacture. therefore portable braziers very often they make their own hand from improvised means. There are many options for video, photos and drawings of mangal for self-assembly, which are different from each other by the complexity of the assembly scheme, require a different level of ownership of the tools bulgarian, welding machine) and the skill of working with metal.
Manufacture of portable brazier
With your hands, you can make a variety of options for portable brazier, it all depends on marching requirements for the weight of the product, its size, and on the model (folding or prefabricated).
Foldable option
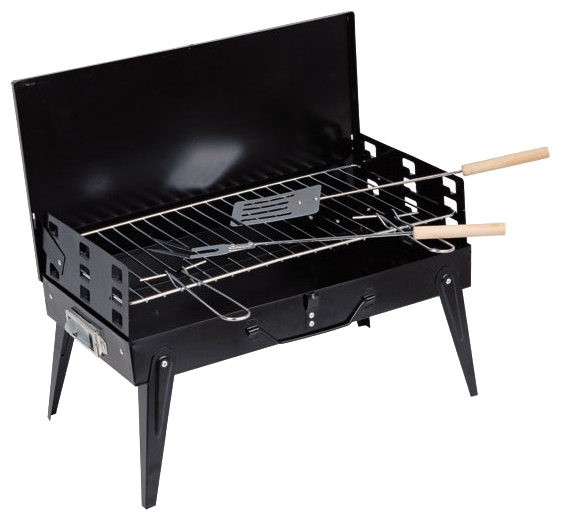
This model is a portable design, consisting of the parts already fastened together, which can be collected in the brazier at the right time. The photo below shows that in assembled form tourist brazier similar to a steel suitcase about the size of 60 by 40 cm. Skewers can be stored inside. The drawing of this design is simple enough to collect by yourself.
The lower surface of the barbecue - the bottom, should have the largest thickness of metal sheet (more than 2 mm), due to high temperature loads. The size of the rectangular bottom, as indicated in the photo, must have a margin of 5 centimeters with each side, which later, it is necessary to bend at an angle of 90 degrees. On the long side of the bent corner, round holes are made to allow air to get to the coals. Pair of side walls should be the size 65 by 20.5 centimeters, they are attached from below to the bottom of the brazier by means of hinges or steel hinges.
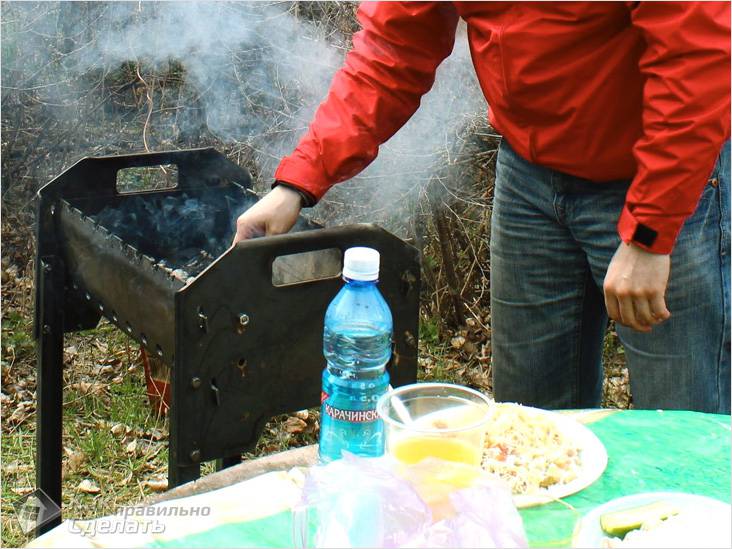
 The second pair of walls the size of 42 by 21 cm will be removable, they are installed using clamps. To do this at the edges, you need to make slits (as in the photo) and bend the edges. At the bottom of the barbecue weld nuts, in which the legs will be screwed. Four stable legs should be made of a round steel tube up to 8 mm, length 50-60 cm. Their edges are sharpened, and on the opposite end they make a thread for the diameter of the nut. In addition to one of the walls attach a handle and hook so that the brazier is not laid out. You can color the product heat-resistant paint to resist high temperatures and corrosion of its elements. The photo shows how the portable brazier looks as it is. Also you can see a video about the assembly of the folding portable tourist brazier with your own hands.
Prefabricated brazier models that do not require welding
 The first version of the barbecue is suitable for distant hiking, where a very important parameter is the weight and size of each object in the backpack. To make a portable brazier you will need a steel strip (about 2 meters) and a Bulgarian. This construction does not have a bottom (a fire is kindled on the ground). Represents carcass of metal strips, on which skewers are laid out. First, cut a steel strip 3 cm wide into 4 pieces 40 cm long (legs), then a steel strip 3.5 cm into 2 pieces of 40 cm (frame).
Tourist brazier is going through slots on legs and steel strips of the same width (0.5 cm), which, when assembled, fix each other. How to properly and safely work with a Bulgarian metal look in the video instructions. At the ends of the legs, a sharp wedge is cut with a Bulgarian for better fixation in the soil. On the frame it is necessary to make oval slits for skewers (as in the photo), so that it would be convenient to turn them around. To assemble the structure, the legs are recessed into the ground, and a steel strip is inserted on them from above in the grooves, two n-shaped parts with a width of 40 cm, the distance between which is adjusted depending on the length of the skewers. See the process of creating your own hands of this model of tourist brazier you can in the video, or in the photo of the design process itself.
For many people, outdoor recreation is directly associated with the preparation of a shish kebab. However, in order to make all the favorite product really delicious and juicy it is very important not only to observe the rules of meat preparation, but also to use a snap (grill), which facilitates the process of making a meat masterpiece.
Given the many requests of our users, today we wanted to talk about how to make a folding BBQ with our own hands. And also present several drawings for the self-assembly of this device.
The main criteria for making a brazier
Given the fact that the folding brazier is supposed to be used for trips to nature, its design must meet certain criteria:
- The overall dimensions of the product (in the folded form) should ensure its unimpeded transportation in the trunk of the existing car;
- The materials used in making the brazier must be resistant to high temperature effects and have sufficient mechanical strength (it is better to use metal);
- The best option is a brazier, for the assembly and disassembly of which does not require the use of additional tools.
If we talk in more detail about the overall dimensions of the collapsible brazier, it is best to start from the length of skewers and the number of portions of meat dishes that are supposed to be cooked simultaneously.
The standard dimensions of the collapsible brazier have the following parameters:
- The height of the board is 130..150mm;
- The width of the barbecue 300..350mm;
- The length of the barbecue 600..700 mm;
- The height of the location from the ground level is 0.5-0.6 meters.
With regard to metal, it is allowed to use material with a thickness of 2 to 4mm.
Preparation for work
Of course, before you make a folding barbecue with your own hands, you need to make a series of preparatory work, namely, prepare all the necessary materials and devices, as well as determine the type of construction that you would like to receive.
Therefore, in addition to the sheet metal itself, it is required to prepare a measuring equipment, a drill with metal drills, bulgarian , in some cases, a welding inverter and a threading set (taps) may be useful.
Option number 1. Drawing collapsible brazier without fasteners

An additional advantage is that for the construction of the presented structure it is enough to stock up the sheet material and the Bulgarian with the cutting circle.
Technology of work
In order to make it easier for the consumer to understand the nuances of self-made collapsible brazier, we suggest you familiarize yourself with the drawings of this product.
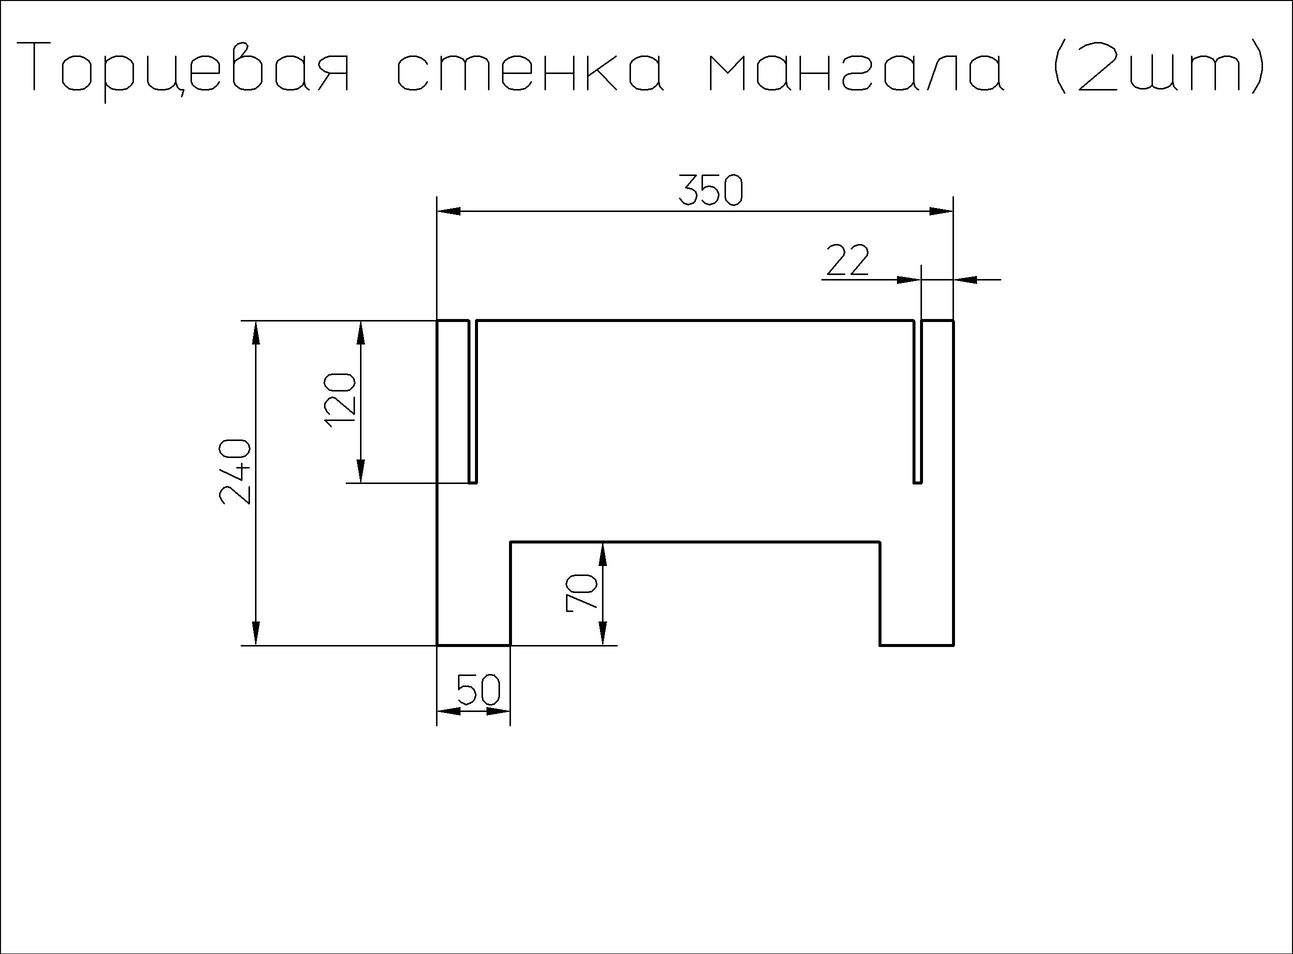
So, the first step is to prepare all the components of the future brazier, namely: 2 side panels, 2 end panels and bottom.

For these purposes, preliminarily on the metal sheets, it is necessary to apply the appropriate marking and to cut the material according to the proposed drawing.
It should be noted that all suggested sizes are indicative and, if desired, the performer can be selected individually. However, it is still better to follow the dimensional recommendations described above.
After the products are cut, you should take care of the safety of the user and use a file to grind off all sharp edges and corners.
The grooves in the side walls are made in order to vary the height of the skewers above the level of the coals. That is, as they cool down, the skewer can simply be rearranged to the lower tier.
As for the cuts on the side and end plates intended for input of the response parts, their width should be selected based on the thickness of the sheets + 0.5 ... 1 mm (for free entry and output of the elements from the mutual engagement).
After preparing all the components, you can proceed to the test assembly of the collapsible brazier. For these purposes, the bottom and side walls must first be joined together (the ears of the bottom are inserted into the slots on the side panels). And after - make a mutual connection (insert into the grooves) side and end panels. At this the assembly of the barbecue is considered complete, and all that remains for the performer is to check the mechanical strength of the product in assembled form (certain rigidity must be provided).
Option number 2. Drawing of collapsible brazier with removable fixture
A slightly different is the folding brazier, the drawing of which is presented in the image below.
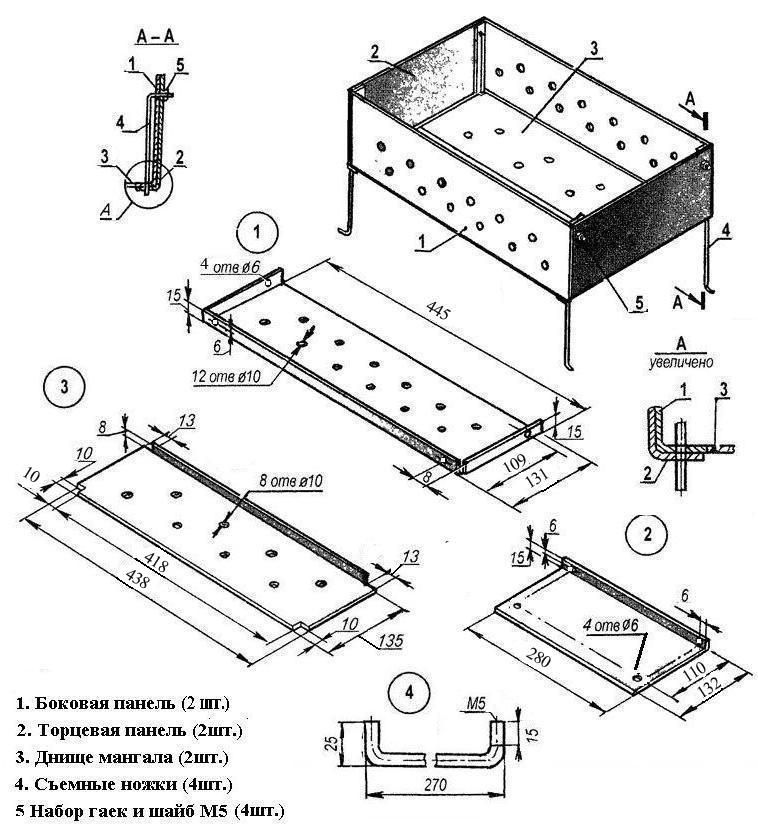
Here, all the structural elements, namely: the side and end walls, the bottom are fastened together by means of standard studs that act as legs, which are inserted into the holes in the walls and are finally fixed in the side panels with nuts on the M5.
Of course, assembling or disassembling such a brazier will require the owner to have an additional tool (carob keys), however, the presented design is very popular among users, thanks to the similarity with the fixed-type barbecue.
Technology of manufacturing collapsible barbecue
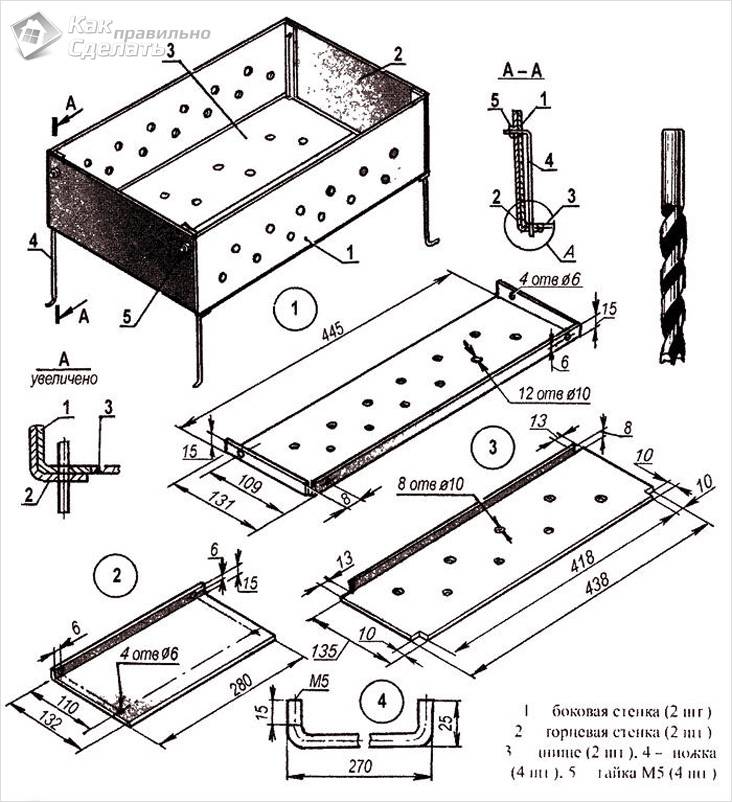
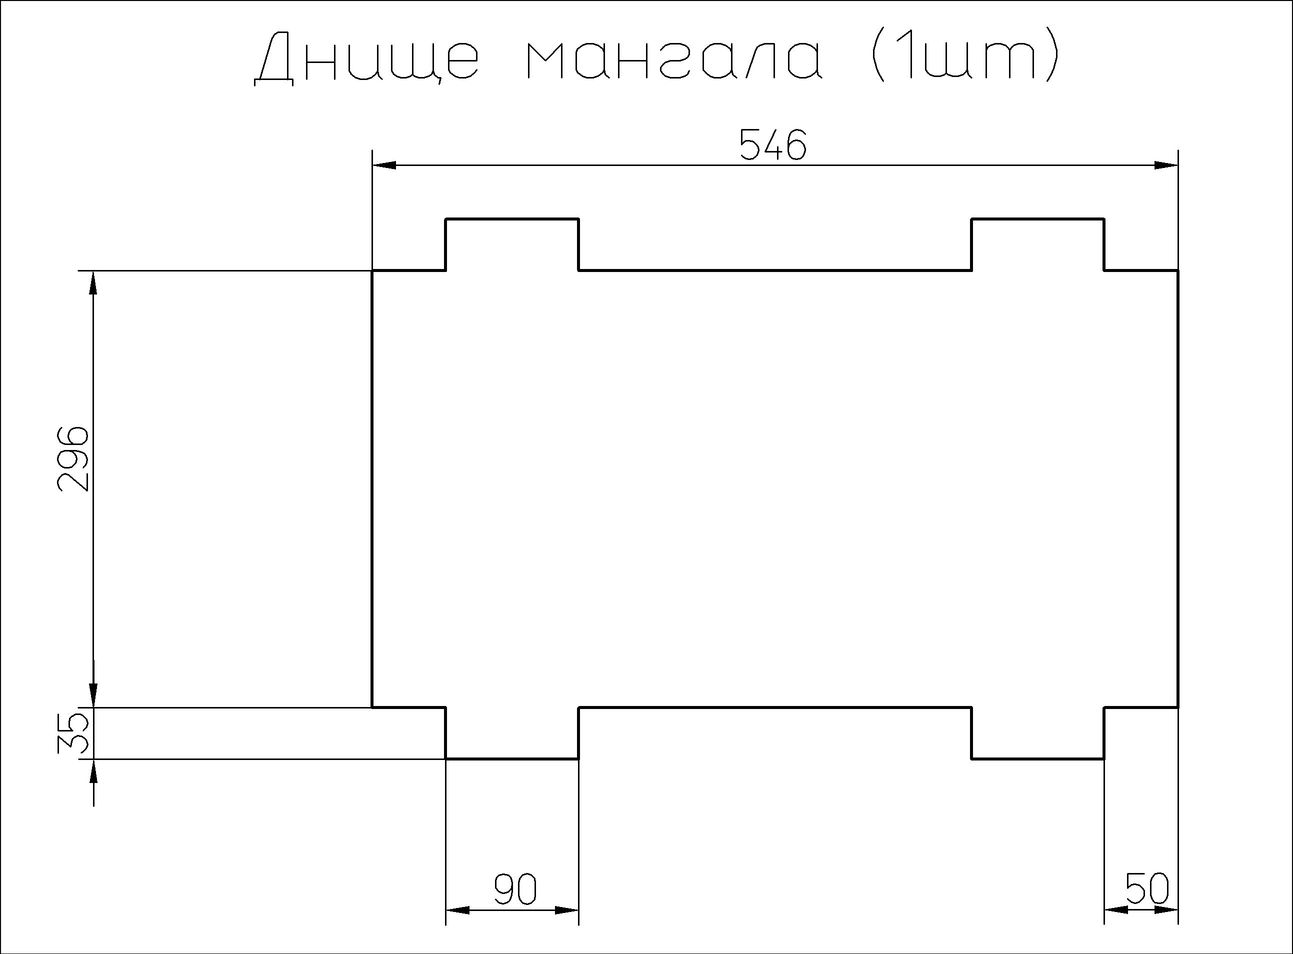
As can be seen from the above drawing, the brazier is completed with the following elements:
- Side panel (2 pcs.);
- End panel (2 pieces);
- Bottom (2 pcs.);
- Feet (4pcs.).
Therefore, first of all, it is necessary to cut out the panels and bottom from sheet metal. In this case, it is necessary to take into account the stock of material 15mm, which is necessary for bending (considering the need for bending of metal, the thickness of the material should not exceed 2 ... 3 mm).
After cutting the sheets, according to the proposed drawing, it is necessary to perform bending of the sides. For these purposes, you can use a workbench and a hammer. And in the final work - to carry out all the necessary drilling for the possibility of installing fasteners.
Legs for such a brazier can be made from a metal rod or pins, at the end of which it is necessary to cut a metric thread using a die of the appropriate size.
Assemblage of collapsible brazier
After the final manufacture of all the elements, you can start assembling:
- Using the end and side panels, it is necessary to assemble a box of the future brazier by matching the corresponding holes and fixing the elements together using the legs (shown in A). That is, each bar is wound through the lower openings of the side and end panels and is inserted by the folded edge into the upper hole of the side panel (where it is clamped with a nut and washer).
- To the received box it is necessary to attach 2 elements of the bottom (the bottoms are stacked inside the box and abut on the folded edges).
- After assembly, you should test the brazier for strength.
In the final works, both in the first and in the second case, it is advisable to treat the metallic elements of the brazier with special protective (anticorrosive) agents that are resistant to high temperatures.