A comfortable house can not be cold. Today, increasingly, developers are using the heating system "warm floor" (can be water, infrared film , electric). The last in popularity belongs to the palm tree, although the floors heated by the water carrier are also quite in demand.
Sometimes consumers provide for combined heating, which includes a system of warm floors in conjunction with a standard centralized heat supply.
Technology of laying a warm electric floor
The correct assembly of individual elements of the electric warm floor allows to get a reliable system, working without complaints for a long time.
So, the basic stages of installation of an electric warm floor by own hands under a tile.
Definition of the laying scheme
It is advisable to determine the location of the heating elements during the filling of the rough floor or during the overhaul of the apartment. For this purpose, a laying plan is drawn on the floor plan, marking the place of the cable connection, the location of the temperature sensor and the thermostat.

In the event that sanitary ware or stationary furniture is installed in a room, such areas can be excluded from the heating zone. This will lead to a decrease in the further consumption of electricity, a decrease in the used components of the system.
On the need for a heat-insulating layer
It is known that the heating elements laid without a heat-insulating layer can waste up to 30% of the generated thermal energy (it can "go" down to a cold cellar, etc.).
About the specifics of fixing heating cables
As a rule, these elements are laid out using a steel mesh or a special mounting tape. In the first case, the cable is secured by means of plastic clamps.

This method is good in that the mesh makes the cement screed stronger, while preventing the heat cable from rolling into the pre-laid insulation layer. Mounting tape is a special flexible material, which already has fasteners for fixing the laid cable.
Marking
On the surface of the floor indicate the location of furniture and sanitary equipment. The remaining surface of the floor is marked for further cable laying. At this stage it is important to remember:
- about the places of fixing the thermostat and sensors,
- the observance of the optimum distance between the rows of cable,
- the inadmissibility of its cross-laying.
Cable installation
When installing a heating cable, the nominal capacity of the system, calculated per 1 sq.m. Proceeding from this value, the stacking of the set with the prescribed step between the strips is carried out. The coupling "SPLICE" fixes the boundary of the connection of electrical and thermal cables. This place should be located as close to the thermostat and be in the area of the cement screed.
The distance from the wall should be from 20-30 cm, and the knot itself must remain rectilinear without kinks and kinks.
Installing the thermostat
This element is used to adjust the temperature regime of the "warm floor" system. Install it in accordance with the manufacturer's instructions. As a rule, fix it at a distance of 0.8-1 m from the floor level.
If the thermostat is equipped with a temperature sensor (floor temperature sensor), the latter should be placed inside the corrugated tube (facilitates the replacement of the element, if necessary), and its location must be equally removed from the adjacent turns of the heating cable.
Pour the screed
- First of all, the laid cable must be tested for compliance with the value of resistance to the calculated value. In addition, the position of the SPLICE coupler is always monitored, always in the screed area.
- The prepared solution is distributed evenly over the floor surface. Usually the height of the screed, performed on a standard concrete base, varies within 3-7 cm.
- It is necessary to avoid the formation of voids during the pouring of the floor, as this can cause a decrease in the heat transfer of the system, local (local) overheating of individual elements and disruption of their normal functioning.
- After completing the filling, the integrity of the cable should be checked with an electric tester.
- The frozen screed is covered with a suitable floor covering (laminate, linoleum, carpet, or tile). At the same time, it is necessary to be cautious about natural wood materials (parquet, parquet board, etc.), checking the nominal temperatures of the "warm floor" system with the permissible temperatures of heating of such bases.
P.S. And for dessert I propose to watch a video: Self-assembly of electric underfloor heating

Cable floor heating is one of the most common heating options. In this article, we will consider in detail where this type of system can be used, how to prepare for its installation and describe in detail the entire process of laying the cable and installing all the necessary equipment. At the end of the article, for your convenience, there is an instruction for self-laying tiles.
What is a warm floor? This is a layered cake consisting of a roughing and finishing screed, a heater and the heating elements themselves. According to technological requirements, the floor can be used in residential premises.
One of the most common types of underfloor heating is the use of water heating or infrared radiation. But its not less effective analogue is electric heating elements. Their role is played by a cable that is sold in coils or mounted in special mats. Which option is better - it all depends on the installation site. Cable floors are ideal for laying "under the tile".
Many experts complain that the cable warm floors significantly raise the level of the floor, including layers of screeds and insulation. But there is a special, thin cable that will reduce the overall thickness of the layer, but slightly. The same goes for the heating element built into the mats. The effectiveness of the two species is absolutely the same.
Additionally, together with the heating cable, it is necessary to install:
- Thermal sensor;
- Thermoregulator.
Advantages of underfloor heating
The bathroom is a special room. Every morning in this part of the house we are charged with positive energy for the whole day, and in the evening we remove the burden of a hard day's work. In this room you can soak in the bathroom or relax under the jets of a warm shower. It is not very pleasant after warm procedures to stand on the cold floor, covered with ceramic tiles. Heating means in the bathroom is either an ordinary battery or a heated towel, but the heat from them is not enough.

In modern life, the heating system "warm floor" in the bathroom is very popular. Now it's hard to surprise anyone with this. The bathroom is considered to be the most damp and cold in the apartment, it is known that dampness has the property to accumulate from below, because of which the whole apartment immediately feels a characteristic feeling of moisture. Installation of a warm floor is made not only to keep the heat in the room, insulating the floor can avoid the spread of damp throughout the apartment.
Moisture will dry faster after taking a bath, as well as after washing. The floor heating has other advantages, with our low rooms there will be a minimum loss of height - the thickness of such a floor (including the tile) is 12-15 cm. Installing a warm floor in the bathroom with your own hands is not a complicated process and it can be done quite quickly.
Surface preparation
First of all, you need to dismantle the old floor covering. In the apartments it will be necessary to remove the floor to the concrete floor slabs. In a private house comes from the characteristics of the structure: if the floors are laid on a concrete foundation (in most modern buildings), and the height of the ceiling allows you to fill an additional screed, then simply remove the floor covering (except for tile, cable mats can be laid directly on it).

Do I need a concrete screed?
This question worries people whose apartment or house has low ceilings. In fact, the device ties "Steals" from 15 to 20 cm of the height of the room. The electric warm floor will work perfectly and without screed, for example, if the tile on the glue is placed on top. However, with this method of installing a floor, the surface will quickly cool down. If it is possible to fill the screed, it is better not to be lazy. The concrete layer will accumulate heat, and give it to the floor surface even after a power outage.
If the floors are wooden and under them there is a void for ventilation, then you can immediately put a heater. In this case, a rational solution will be a double floor (old coating, lag, new coating). The wood has an excellent thermal conductivity, because direct contact between the cable and the wooden boards is not required.
After completion of the dismantling of the old coating, if necessary, pour concrete screed thickness of 10 mm. It will hide the unevenness and ensure easy installation of the electrical cable.

Laying of thermal insulation and mesh
At this stage, everything is simple. The material is laid on the frozen screed as tightly as possible to each other. The main condition is to hide the joints. If this is not done, the heat will go to the bottom. For these purposes, you can use ordinary paint tape, but it is better to use metallized tape. If it is a question of a premise with the raised humidity, from above a heater it is necessary to lay a waterproofing material. For example, if the underfloor heating system is installed in a bathroom, experts recommend a good waterproofing.
Do not forget about the walls!To avoid the loss of heat near the walls, they must be isolated from the screed. To do this, you can use penofol or polysterol up to 1 mm thick. The height of insulation from the surface must be not less than 15 cm (it is better to be guided by the assumed thickness of the concrete screed).

Next, you need a mesh with a width of cells up to 1.5 cm. The sections are stacked closely and are additionally fixed. Such a device will allow filling concrete with a space under the cable, which will protect the thermal insulation from overheating.
To the note: if the heating selected by you has a section system, then the installation grid can not be stacked, but immediately proceed with the installation of the heating.
Cabling
It is carried out on the heater cover. The most common option is dense foil based on PVC. After it is laid, it is necessary to mark the floor area, indicate the places where the mounting tape will be fastened. It serves as a fixer for the heating cable and must be fixed in such a way that it does not disrupt the integrity of the substrate layer - at the joints of the heat insulator sheets. Step fixing the mounting tape from 0.5 to 1 meter.

To save energy, you can not put heating elements in places where furniture is. But this must be done, provided that its permutations are not carried out. Otherwise, it will not make any sense.
Cable laying rules
It must be located from the walls at a distance of at least 50 mm. The same requirement is made for the removal of the cable from stationary heating devices and communications: water pipes and heating systems.
The installation of the cable begins with the determination of the location where the thermostat will be installed. First, the heating cable is connected to the regulating device. From here, the heating cable is laid on the surface.

This is done by transverse winding. The distance between them must be at least 80 mm, the cable must not overlap. The bends of the loop loops should be smooth. Their tension and kinks are not allowed.
Installation of thermostat and temperature sensor
A thermostat, or, more precisely, a place for its installation, must be prepared before starting the laying of the cable. This can be any convenient space on the wall, the height from the floor should be at least 300 mm. To install the thermostat, it is necessary to make a recess in the wall under the device itself and 3 grooves for suitable wires. One of them will be a thermal sensor. It is installed after the cable is laid. It's quite easy to mount it, the main task is

It should be borne in mind that the section of the conductor of the power line should correspond to the current consumed by the warm floor. Simply put, you need to choose a thermostat adequate for the power of the cable warm floors.
Attention! When laying a two-wire cable, both ends of the cable section to be connected to the thermostat are connected.
The thermo sensor is placed in a corrugated, plastic tube before installation. It should be at one of its edges, which is closed with a dense plug. On the other hand, there must be wires for connection to the thermostat. After the tube is placed in the prepared groove in the wall. The end of the tube with the temperature sensor should be fixed at a distance 500-600 mm from the wall, at an equal distance between the cable turns. Such a system will allow without special effort to replace a failed thermal sensor.

Now you can connect all the elements of the system to the thermostat.
Check of working capacity of a warm floor
After everything is connected, it is necessary to test the warm floor. To do this, the thermostat switches on the power supply. After a few minutes, the cable sections begin to heat up. Now you need to turn off the power. Such an operation must be repeated several times to ensure the working capacity of the underfloor heating system. If there are failures in work - it is checked its integrity and correctness of connection of elements.
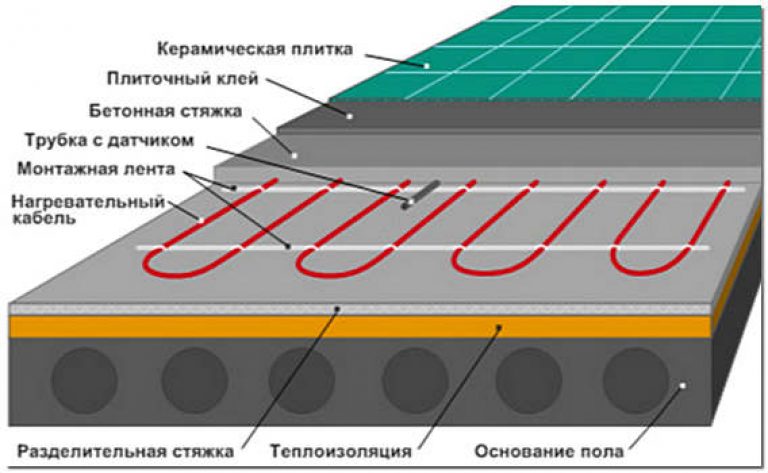
Laying tiles on the warm floor
The technology of laying tiles on a warm floor is similar to the usual lining of the surface of the floor or walls. To do this, it is necessary to perform a series of actions in a certain sequence, but first prepare the room, the temperature in which should be about twenty degrees Celsius.
In addition, the room should be cleaned of debris and dirt, and the floor surface should be leveled if necessary. To do this, use a special solution, the thickness of which is from three to seven centimeters.
![]()
It is important to keep in mind that before laying the tiles on a warm floor surface should be moistened with a spray. Tile laying operations are performed in the following sequence:
- Preparation of the desired glue, diluting it to the desired consistency and applying to the floor surface (70 × 70 cm);
- Tile processing by glue composition with a notched trowel (the size of the spatula teeth is dependent on the dimensions of the floor space - the larger they are, the greater this index);
- Laying tiles gently on the floor, and then lightly pressing it (you should pay attention to the evenness of the masonry.) Press directly on the middle part of each tile);
- To align the seams between the tiles, you need to install crosses from plastic (one cross must fall on four tiles, joining each other);
- After checking the smoothness of the installation, the plastic crosses should be removed;
- Tiles should be left for at least one day, without exposing it to even the slightest mechanical stress;
- After the adhesive base has dried and the tiles on the floor surface are firmly fixed, grouting can be carried out. Interlace stitches must be filled with a trowel.

Experts advise take the time to trowel the seams, so that the tile adhesive solidifies solidly, otherwise the tiles can move. When choosing a grout, you need to pay attention to the index of its elasticity, making a choice in favor of the option that has a higher value of this indicator.
The process of laying tiles on a warm floor can not be called quite difficult, so with small skills it can be carried out even by people who are not specialists in this field. This allows to reduce to a certain extent the costs of construction and repair work, which is especially important for situations when such work is performed in accordance with budget estimates.
Kind time of the day for everyone who opened this article! In it, I will tell you about the electric warm floor, which, unlike, does not require a connection to the water heating system. This, in many cases, greatly simplifies the installation of such a heating system. Let's start by considering the types of electric underfloor heating.
Types of electric underfloor heating.
There are three main types of electric underfloor heating:
- Cable systems - are special heating cables.
- Systems in the form of mats - the same heating cables, but they are fixed on the grid.
- Film infrared warm floors - films with heating elements applied on them.
Cable systems.
They are a piece of heating cable of fixed length, equipped with an installation wire for connection to the network through a thermostat. Do not cut such cables unless the manufacturer instructs you to do so. Cable systems are laid in a layer of screed or in a layer of tile adhesive. The thickness of the cable floor heating is selected from the area to be heated. To do this, use the following relations:
- Not less than 110-120 W / m² if the cable system is used as an additional one together with another heating system (for example, together with radiators).
- Not less than 150-160 W / m², if the cable will be used as the main heating system. In conditions of our climate, using warm floors as the main heating is risky because they give less heat than, for example, radiators. You can just start to freeze in winter. In addition, if you use the cable as the main heating, then the cable laying area should be at least 70% of the heated.
- For heating a loggia or a winter garden, it is also worth taking at least 160 W / m². This is due to the large heat loss through the windows.
warm floor connection scheme
Installation of the cable system.
As already mentioned before, the cable can be laid either in a layer of tile adhesive, or in a layer of screed. Installation begins the preparation of the surface, which must be cleaned, leveled and primed. Laying the floor is possible only on a dry surface, that is, the screed and the ground must be left on the "drying" for a minimum of 21 days. The installation in the screed and in the glue layer is different, so consider these methods separately.
Installation of cable in the screed.
Installation of the warm floor in the screed is carried out in several stages:
- Laying of thermal insulation on the base.
- Filling the insulation with the first layer of screed 1-2 cm thick.
- Installation of heating cables with loops and installation of a thermostat with a sensor for controlling the warm floor.
- Check for damage and system performance.
- Fill the top layer of screed thickness of 3-5 cm.
Scheme laying the cable of the warm floor in the screed.
To fix the cable to the screed, a metal mounting tape is used. The cable is attached to the tape in the places of the loop bends, that is, along the edges of the heated area, without sharp bends and tensions. Between the edges of the piece of mounting tape are stacked in steps of 0.5 meters. Laying is done in such a way that the installation cable is not far from the junction box. After laying the cable on the floor, the resistance is checked, the results of which are recorded in the warranty card. The resistance is determined by the integrity of the cable insulation. The resistance parameters for which the cable is considered to be operable are specified in the operating instructions.
It is also necessary to install a temperature controller with a temperature sensor. This is done using the following algorithm:
The procedure for installing the thermostat and connecting the cable.
- In the wall are made niches for the installation of a junction box and thermostat plus strobes for laying the temperature sensor and the installation cable.
- To install the temperature sensor in the rod, a special corrugated tube is laid, one end of which is muffled, and the other is fed to the thermostat. The tube should move away from the wall for at least 60 cm, in addition, it must be laid between the loops of the cable. This is necessary for the correct operation of the temperature sensor. The bending radius of the corrugated tube should be such that it can be easily removed from the sensor if it breaks down.
- After all these manipulations, the shtroba, together with the tube, is filled with a screed.
- The installation cable is connected to the network via the thermostat. The connection is shown in the passport. Strobu also need to be covered.
Installation of cable in the layer of tile adhesive.
It is possible to install a cable floor heating system in a layer of tile adhesive. The sequence of actions here is as follows:
- The installation of the thermostat and the junction box is prepared. That is, niches and stitches under the cable are made.
- A junction box and a corrugated hose for the temperature sensor are installed. The end of the corrugated hose damps tightly to prevent the tile adhesive from entering it. After that, it is necessary to check whether the sensor is removed from the hose, after which the shroud is filled with a screed, and the place where the end of the hose is marked with a marker. It is necessary to do this so that the sensor does not happen to be "covered" with a cable.
- Re-clean the floor surface from debris. Then attach the pieces of mounting tape to the floor, to which the cable will be attached. The pieces of the mounting tape are also placed as when laying in the screed.
- Next, carefully attach the cable to the mounting tape. We do this so that it is possible to connect the installation wire in the junction box. Do not forget that the temperature sensor must be placed between the loops of the cable.
- We check the cable for damage due to resistance. Resistance parameters are described in the user manual.
- We connect the cable and the thermostat. After that, for a short time we serve food and check the efficiency.
- We lay a layer of tile adhesive with a thickness of 5-8 mm. and we repair the shrouds for the cables. We are waiting for the glue to dry.
- We lay the tile on a new layer of glue. We are waiting for the glue to dry out and you can use a warm floor.
Laying in a layer of glue
Warm floors in the form of heating mats.
They represent a heating cable, which is fixed to the grid. They are sold in the form of rolls. To fix the mat to the floor, no mounting tape is required, which simplifies and accelerates the installation of the floor. In addition, you can make a warm floor over the old tile. Mats are installed directly in the layer of tile adhesive, the thickness of which should not exceed 5 mm.
Mounting the heating mat.
Installation of the heating mat is also carried out as the installation of the cable in the layer of tile adhesive (see above). Installation of the thermostat is similar.
Inclusion and operation of electric underfloor heating.
Include warm floors are allowed after the drying of the screed or tile glue is completely dry. The drying period should be indicated on the packaging of these building mixtures. At the first start-up, you can set the thermostat to maximum and wait until the cable warms up the coating. Then you can lower the temperature on the regulator until you need it.
Infrared film warm floors.
This kind of warm floors can be laid in a layer of tile glue, under a laminate or under linoleum. These floors are produced in the form of rolls, which can be cut into sections of the required length. Heating is carried out with the help of. This kind of electric underfloor heating is the easiest to install, which distinguishes it from the cables and mats described above.
Installation of a film warm floor.
As mentioned above, the infrared film warm floor can be installed under tile, decorative stone, parquet or laminate. For the installation of such a warm floor, the following requirements exist:
The inclusion and operation of such sexes is no different from those described above.
Safety requirements for electric underfloor heating.
- It is forbidden to shorten the length of the heating part by itself.
- It is forbidden to use one section of warm floors for rooms with different types of coating. In this case, each room should have a separate section with its own thermoregulator.
- As a screed and tile adhesive, only mixtures that are recommended for use with warm floors can be used.
- It is forbidden to open shrink sleeves at the place of connection of the heating and installation part of warm floors
- It is forbidden to cover the places of installation of heating sections with carpets and put furniture on them without legs. This will worsen the heat dissipation from the cable and may cause a malfunction.
These requirements are most universal for different manufacturers of heating cables and mats. For safe operation, be sure to read the instructions that come with the kit.
Electric floor heating is a technical solution that allows to provide the desired comfort in the house and at the same time to avoid the problems associated with water systems: the need for laying pipes, interfering in the heating system and connecting to the boiler, obtaining special permits for the work, developing the project.
In addition, a rather important feature of the water system is that the installation of an electric warm floor in comparison with it will cost 3-4 times cheaper. In addition, electricity consumption by using such a heating system is minimal and can be connected to a standard execution network and does not require additional registration of permits.
Laying a warm electric floor: available options
In order to correctly determine the type of system used, the basic data that will allow you to make a weighted decision will be:
- the area of the room (complete and useful),
- the presence of a central heating system, its appearance,
- possibility of installing an electric underfloor heating system with a screed,
- state of the bearing surface.
In most cases, the device electrical. warm floor cable type or laying heating mats - the best option, since the leveling screed in any case will be flooded. If there is no desire or possibility to dismantle the old coating, the infrared film materials will allow the coating to be applied quickly and with minimal effort to the base surface. In terms of costs, both systems as a whole will require roughly the same investment.
All you need to select and install an electric floor heating, video
Cable systems
When using a cable heating element, the installation of warm electric floors is performed only in a cement screed. Only after this, the flooring can be laid. The principle of operation of such a system is the passage through a current conductor of a given value.
Due to the use of a cable of a resistant or self-regulating type, it heats, at which heat will be transferred to the screed. And the first option is the most popular, because it differs significantly in its cost. In addition, they perform the same function.
Calculation of power - an indispensable stage in the technology of the device of electric underfloor heating. Most often, special tables are used for this, in which the averaged values are given according to the data of equipment from different manufacturers. The final difference between the calculated and actual data is about 4%, which is not important for such an installation.
When a warm electrical floor of a cable type is installed, the average consumption is
- for the corridor and kitchen - 150 W,
- of bathrooms - 180 W,
- balconies - 200 W,
- living rooms, bedrooms - 150 watts.
Installation of electrical warm floors always begins with the determination of the location in which the system's thermostat will be installed. If necessary, a shroud is made in this place to install the box, the sensor itself, and also the cable laying.
In order for the sensor to be able to give a sufficiently high accuracy, it must be installed at a distance of 1 m from the wall under the heating cable in the plastic pipe. With this solution, it is possible to easily access the element for replacement or maintenance
Infrared film floors
The film material is a heating element, which is a thin film. Its thickness is 0.4 mm. Inside, carbon bands are sealed, when heated, contact buses made of copper serve as a source of infrared waves with a range of 5-20 microns.
It is important to consider! Infrared radiation is absolutely safe for the human body as opposed to electromagnetic
When laying a warm electric floor of the film type, there is no heating of the floor covering itself. Heat around the source of heat structures and objects (it can be furniture, ceiling, walls). This allows you to keep the humidity level unchanged.
When performing power calculations, it is important to take into account that if a laminate, parquet or parquet board is planned to be laid, the heating power should not exceed 150 W per 1 m2. The use of ceramic tiles as a floor covering allows to increase the capacity of the system in a room up to 200 W
When performing calculations and installing an electric warm floor, it is also recommended that the distance between walls and furniture before the film should be at least 10 cm, and the room should be covered with a canvas more than 70% of its area.
Installation instructions for a warm electric floor
What is the scheme of a warm electric floor


Warm electrical floors, stowage technology
In most cases, regardless of whether the cable will be laid or film, preliminary preparation of the room will be required.

- Freeing the room from furniture.
- Dismantling of the old floor covering.
- Aligning concrete with a grinder, removing all deposits, protrusions.
- Elimination of all existing cracks, crevices with the use of a repair composition based on epoxy resin and cement.
The presence of uneven floors more than 20 mm - an occasion to fill the leveling screed. To do this you need:
- primrutovat surface,
- prepare a self-leveling mixture,
- pour it, evenly spreading over the surface in accordance with the instructions,
- rolling of the needle roller removes all air from the poured mass.
It will be possible to start further work not earlier than in a few days.
Manufacture of an electric warm floor, technology of leveling a concrete foundation.
It is important to know! In order to prevent the formation of cracks and the destruction of the floor or the deformation of the screed when it is heated, it is recommended to glue the damper tape around the perimeter of the room on the walls.
How to lay the insulation under the electric floor
After complete drying the screeds begin to lay the substrate under the electric warm floor - roll foil insulated (it can be Tepofol, Penofol or their analogues). With their use, heat radiation is reflected inside the room.
When installing a warm electric floor, the insulation is laid as follows:
- the material is laid out on the floor,
- it is laid throughout the entire area of the room so that the stripes lie without gaps against the walls,
- on the joints the material is connected with foil tape.
How to lay the electric floor heating cable type
Electrical installation of film floors due to the high availability of the material itself for laying usually does not cause any problems, but with cable there are many questions. One of the first questions is the amount of cable needed. In order to determine the length, it is most convenient to use special tables that are available on the websites of cable manufacturers.
Electric underfloor heating, thermostat installation
The thermostat is installed at a height of 50-100 cm from the floor level. It is possible to install a mounting box with its surface or internal fastening. In the first case, if there is no desire to break the wall finish, it is recommended to use a special cable-channel to connect the line.
Then the thermostat itself is fixed in the prepared cavity, a cable is laid along the wall, which connects the device to the heating elements. Temperature sensors for the installation of electric underfloor heating are fixed to the floor and are connected by wires laid in the strobi with a thermostat. Sensors are recommended to be laid in plastic tubes.
In the above scheme of laying an electric warm floor, one of the ways of connecting the cable with a thermoregulator is proposed. When using this method of connection, the single-core heating cable must be connected to the thermostat with two ends. Using such a scheme is optimal for compact rooms, with a large area of the room, the need to connect the cold and hot end of the cable to the thermostat can be problematic.

When using a two-wire cable, the electrical scheme of the warm floor varies significantly. In this case, two wires will be connected at the end terminals. In order to get power from the thermostat, you will need to connect at once 2 cores. The design is more complicated in comparison with single-core models, but at the same time, using a two-core heating cable, it becomes possible to heat a room of a large area by increasing the energy intensity of the conductor.
When laying cable systems using a floor mat it will be enough to simply roll it out on a prepared base and connect it to a thermoregulator. If it is necessary to bypass the place of installation of sanitary equipment or large furniture, it will be sufficient to cut the mesh web, without permitting any damage to the conductor.
In most cases, manufacturers offer mats equipped with special fasteners. In their absence, the rules for laying a warm electric floor allow the use of dowels for fixation. If a heating cable is selected in the bay, special guides are needed that will allow the conductor to be placed in zigzags with the same pitch of the electric warm floor.
Also it is necessary to check with the help of the tester the resistance of the cable (must correspond to the passport values), the quality of insulation at the connection points. It should be taken into account that the optimal operation of the thermostat will only be if it is located between the cable turns.
In the areas of the passage of the wire above the dividing line it must be hidden in a 12 to 15 cm corrugated tube. In this way, it is possible to significantly reduce the risk of cable breakage during thermal expansion of the plates. The place of connection of the supply wires with the heating cable should be located 10-15 cm from the shtroba. As a result, the connecting clips are recessed into the screed.
It is worth noting the location of the junction on the floor plan to easily find it in case of repair of the warm floor
It is necessary to check the resistance of the wire, its value should be within the limits prescribed in the passport data for the heating elements. Only after this test is possible with the inclusion of a warm floor.
In order to regulate the temperature of the warm floor, the temperature sensor must be connected between the nearest bands in the corrugated pipe. Due to this, not only its effective operation is provided, but also the possibility of easy replacement. If all components during testing work normally, the controller is removed in order to perform all the necessary finishing work.
Video, how to lay the electric warm floor (cable)
When installing the electrical cable floor in rooms with high humidity (in baths, bathrooms), the reinforcing mesh and regulator must be grounded. Optimum option for this will be tinned copper wire
Warm electrical floors, technology of laying infrared systems
The technology of mounting the electric warm floor of the film material is to spread it over the thermal insulation layer. It is desirable to pre-mark the layout area. The film is cut, laid out along the lines. It is not allowed to overlap the canvas on each other.
For fastening strips, it is most convenient to use double-sided adhesive tape. After that, the connection is made: the wires are fixed to the film with special clamps, all connections are isolated. Wires should be led to the wall and stretched under the baseboard. Electrical installation is carried out in a parallel circuit. The test run is performed after all the strips are connected.

Since in the case of installing electrical warm floors from film materials, the screed is not required, so you can immediately begin laying the floor covering (linoleum or laminate).
Video mounting of a warm electrical floor of a film type
- Do not cut two-wire cables. In this case, they completely fail. Therefore, when choosing the length of the material, it is necessary to take into account that it will be impossible to reduce it subsequently.
- When choosing a cable, it is necessary to focus not on the total area of the room, but on the surface on which the warm floor will be laid, excluding the areas in which plumbing is installed, stationary household appliances, furniture.
- Do not turn on the cable before the adhesive and screed dry completely, this can damage it.
- Do not lay the cable on a dust-free surface. For cleaning, an industrial vacuum cleaner is best suited.
- It is not recommended to walk in shoes with a hard sole on the heating elements, this can lead to damage to the insulation layer.
- Do not block the thermal sensor in the solution. Its breakdown sometimes happens, so when mounting in a corrugated pipe, it will be possible to easily remove the device and without any difficulties.
- Before laying the screed over the cables and floor covering it will be useful to sketch the layout of the electrical warm floor with the indication of distances to walls, furniture, other landmarks. If in the future, for example, you need to drill a floor for installing plumbing, such a scheme is always useful.
- Do not neglect the procedure for measuring resistance, its compliance with the passport data will allow to judge the health of the heating element.
- Air pockets located around the heating cable can lead to local overheating of the conductor and a significant reduction in its service life.
- Immediately after the end of the installation process, you can not turn on the warm floor even to check its operation (and especially for the quick drying of the screed). Almost always, there is a damage to the heating cable.
Systems of warm floors allow to receive additional heating of a premise and in regular intervals to distribute it. They are installed most often under different floor coverings. Recently, electric warm floors have become more in demand, compared to water. This is explained by the numerous advantages of electric floors. There are two main types of such systems: cable floor heating and film. The first option is more durable and has its own design features. Before installing such a system, it is advisable to familiarize yourself with all the characteristics of the cable floor.
 Types of cables used in heating mats
The largest part of the construction of the cable floor is occupied by the heating cable. There are several varieties of this system, depending on the type of cable. There are the following types of cable floor heating:
- Self-regulating;
- Resistive single-core;
- Resistive two-wire.
The latter variant has in its system two veins - heating and feeding. This design feature creates advantages over a single-core floor variant:
- There is no need to return one vein to the thermoregulator;
- Lower level of electromagnetic radiation.
Since, in a single-core cable system rather high radiation, such warm floors are recommended to be used in low-access or non-residential premises. The two-core system is more expensive, but completely safe.
The main drawback of any resistive system is the overheating of the areas where the contact of the screed and the cable occurs. This lack is absent in self-regulating cable systems. The structure of the cable in such a system is more complicated. It allows you to increase the resistance of the cable in areas where the temperature rises. The current flowing through the section decreases, which eliminates the failure of the entire system.
Construction of cable floor heating
Cable floors go on sale in two types of construction:
- Section;
- Heating mats.
The sections are thick and require more time for installation. They fit under the cement screed. This significantly increases the rise in the floor level.
 Two types of cable systems: heating mats and cable in the bay
 If there is no need to build a screed, the best option is heating mats. They have a smaller thickness and can be mounted in a layer of tile adhesive. Laying them goes much faster.
Calculation of the required power of the electric underfloor heating
Calculations of the required capacity of the cable floor for a particular room are made taking into account the availability of the heating system. While warm floors are only an auxiliary heating system, for heating 1 m2 it will take 100-140 W. If the cable floor is the only way to heat the room, then its capacity should be at least 150 W / m2.
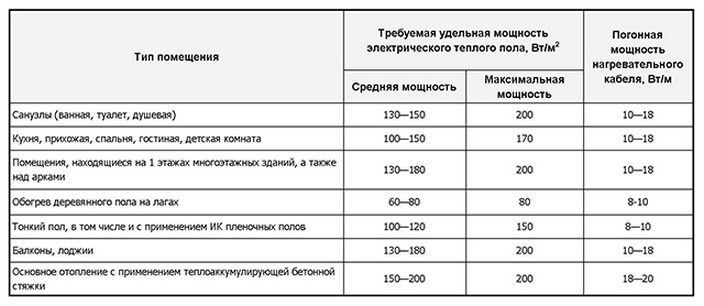 Table of recommended capacities of electric underfloor heating, laid on 1 m2 of area, with additional heating
 To make the final calculation, it is necessary to multiply the area necessary for heating by a given power. At the same time, it is not necessary to include the places occupied by furniture items in the heating area.
 Laying area - the area of the room, minus the area occupied by furniture or other household items
 In order to reduce the required power consumption, it is necessary to conduct high-quality thermal insulation of the floor.
Installation of cable system
Installation of the electrical system of the warm floor of the cable view takes place in several stages. Each of them must be carried out in accordance with the recommendations of specialists and not violate the order of work.
Stages of installation:
- Planning;
- Substrate preparation;
- Installing the heating circuit;
- Installation of thermostat and temperature sensors;
- System health check;
- Finish pouring.
Planning
Before starting the installation, you must carefully consider the location of the cable floor heating, and prepare a plan. It is necessary to indicate on paper where furniture or household appliances will be located. In those places where they are located to establish an electrical circuit it is impossible, since it does not tolerate large loads. Places that are free of heavy objects can be filled with the system.
 The figure shows the layout of the cable for the bathroom. The diagram is drawn in accordance with the scale, pitch and bending radii of the cable
 It should be borne in mind that after installing a warm floor there is no possibility to do furniture rearrangement and change the layout of the room.
Substrate preparation
Installation of any kind of floor heating implies first of all the preparation of the base. For a cable floor heating, the floor must be prepared as follows:
- Dismantle the old floor covering and release access to the slab;
- In the presence of cracks, the size of more than a millimeter, they must be expanded, using a perforator to a centimeter;
- All loose and protruding parts of concrete must be knocked down and leveled;
- Clean the surface of debris, moisten the substrate with water;
- Expanded cracks, chips and other openings with concrete;
- If the surface of the plate has strong unevenness, it is leveled, using;
- After the leveling screed has dried, it must be impregnated with a liquid waterproofing.

After carrying out the preparatory work, it is necessary to lay the heater. These can be plates of expanded polystyrene. On top of it, aluminum foil is laid, as a heat reflector. You can use only a shielding thermal insulation, for example, "Penofol".
Installing the heating circuit
After installation of thermal insulation, the heating circuit is assembled and installed. It is performed in the following sequence:
- On the foil part of the thermal insulation it is necessary to install the slats - this can be polymer strips with snaps to fix the cable. The installation should be perpendicular to the wall on which the system control unit will be located. Laying starts at a distance of 20 cm from the wall, and the ends of the slats should not reach other walls by 5 cm;
- The installation of the cable starts from the point where the block will be located. The installation should be in the form of a "snake", the bending step of the cable corresponds to 10-15 cm.
Installation of thermostat and temperature sensor
The scheme of the cable system of the warm floor includes, in addition to the cable itself, such elements:
- (thermostat);
- Temperature sensor.
After the work on laying the cable is completed, it is necessary to proceed to the installation of these elements.
The sensors are installed between the cable turns. Wires should be output to the skirting boards, and then to the block. How many sensors are required, and what step of their location - determines the manufacturer, which will be indicated in the instructions.
 One of the variants of the electrical connection scheme for all elements of the warm floor: cable, thermostat, temperature sensor (located at a distance of 50 cm from the wall)
 The thermostat should be located at a distance of at least 30 cm from the floor. For convenience, you can mount it at eye level. To install it in the wall, you need to cut out a hole, the standard one for the jar. In the hole to install the box, and in it to bring power and wires from the temperature sensors, as well as the cable itself.
It is important to take into account that the power supply must be supplied from the central fuse of the apartment. Connecting from an ordinary outlet can lead to overloading of the wiring and the occurrence of a fire hazard situation.
Connection is carried out in series. The sensor wires are connected to their connectors, and the cable to the separate one. It is best that the given work involved a specialist. In the absence of knowledge and experience working with electrical connections, you can not only damage the entire system, but also harm your health.
System health check
After installing all the elements, you need to check the system health. The tester can check the resistance. The indicator should not deviate more than 10% from the declared data in the passport to the device.
If the resistance is normal, you can begin the final step.
Finishing Fill
After installing and fixing the cable and all sensors, it is necessary to perform. Its thickness should be about 5-6 cm. Filling is carried out from the wall opposite the entrance to the room. It should be remembered that when aligning the screed, you can not use needle rollers, which can damage the system.

The time for drying the screed should be taken about 3-4 weeks. After that, you can connect all the cables, electrical wires of the system. Then you can install the selected floor covering.
Heating mats have a great advantage, because their installation takes less time. Mats are enough to spread on the selected parts of the floor. The cable is located on the grid already with the specified pitch. Very often the lower surface of the mats is self-adhesive.
 Step-by-step technology of mounting heating mats
 To install heating mats, there is no need to install a large cementitious screed. They can be installed under the tile - in a layer. Or use self-leveling mixtures for pouring. Connection of the system is possible after the drying of the fill or glue.
The only difficulty in laying can arise in rooms with a complex configuration. In such cases, the installation of a separate cable is much more convenient.
Combining the cable floor with the coverings
Most often, electric cable floor heating is used for laying under ceramic tiles, but it can also be installed under the following types of floor coverings:
- Wooden floor.
Any can be selected and installed. And when combined with other coatings, it is necessary to provide special layers of insulation or choose a coating with a marking indicating the possibility of combining with systems of warm floors.
 Cable floor heating can be laid almost under any floor covering
 Resistive cable flooring should not be covered with carpets. The self-regulating version of the electrical floor does not have this disadvantage.
Conclusion
If all the rules for installing the cable floor are met, you can achieve the desired result. The warm floor can easily replace the main heating system. In this case, the air in the room will be warmed evenly, and the level of its humidity will remain normal.
Dear reader, leave your opinion about today's article in the comments or tell us about your experience of operating cable floors.