There is nothing better than weekends or holidays spent at your own dacha. Especially this kind of recreation is appreciated by residents of large megacities, and therefore often visit their suburban properties even in the cold season. But the construction of summer cottages is not designed for comfortable living at low air temperatures, so in this case it is necessary to have high-quality insulation, the organization of which has its own characteristics.
Thermal insulation of these two types of residential buildings should occur in different ways. This difference is dictated by the fact that the private house is heated year-round, while the internal temperature in the country cottage falls heavily in the cold season.
The main task of home heat insulation is to keep heat inside the room. The most effective way to achieve this is through the creation of internal and external insulation. The dacha, in turn, is heated only in the case of its use, while it requires a comfortable temperature in a short period of time. Such a sharp drop in conditions is very harmful for the very construction of buildings and finishing materials.
Therefore, when deciding how to insulate a holiday home, it will be preferable to choose only thermal insulation from the inside, which will reduce the negative effect of a sudden increase in temperature. At the same time, the warm-up time of the room will be reduced, as energy costs for wall, floor and roof insulation will be reduced. An important advantage of this method of thermal insulation of the dacha is its low cost.
But only internal insulation can lead to the development of fungi, which is due to the displacement of the dew point (the boundary of the formation of condensate inside the wall, which can be displaced under certain conditions). Therefore, in order to avoid such consequences, the following recommendations should be adhered to:
- Between the heater and the wall you need a layer of vapor barrier film. On this aspect of repair work is extremely undesirable to save.
- Regardless of whether you use a heat insulator in the form of slabs or coils, the joints between the pieces of material should fit closely together.
- Also, there should be no empty space between the wall and the layer of insulation. Therefore, before starting work, it is desirable to treat the surface of the wall with an adhesive compound.
- Virtually the only way to significantly reduce the humidity in the country is a system of forced ventilation. If you have the opportunity, be sure to equip it with your seasonal suburban housing.
- The thickness of the layer of insulation must be clearly correlated with a number of parameters, the most important of which is the climatic conditions in the region. Information on specific calculation formulas can be found on the Internet.
- Before starting work, it is necessary to treat the walls from the inside with an antifungal compound.
If you adhere to all the above tips, then this internal thermal insulation will be quite effective and you will have to avoid problems with the fungus.

Internal thermal insulation of walls
There are many ways to organize the insulation of walls from the inside, so consider only the most popular. For this type of work most often used minvate, glass wool and expanded polystyrene (in the Russian market is presented under the name "penoplex"). The latter option is most preferable, since it has high vapor barrier parameters. Let's consider the algorithm of the simplest thermal insulation using the example of the penoplex panels:
- The quality of the thermal insulation from this material depends to a large extent on the base surface to which it will be attached. Therefore, before starting work, the wall must be thoroughly cleaned or even aligned with the rough one.
- After waiting for the drying of the putty, a layer of waterproofing can be applied. But the good vapor tightness of the penoplex makes it possible to get rid of this protection measure.
- Next, you can proceed to gluing the panels of penokleksa. For better contact, the surface of the insulation must be perforated using sandpaper or a knife. Glue is applied to one side of the panel with a spatula, after which it is pressed against the wall, starting from the bottom corner. Mounting slits are treated with a sealant.
- In addition, it is necessary to fix the thermal insulation material using dowel-type anchors.
After the completion of this stage of operation, a vapor barrier layer must be installed. It is best to use foil materials that are attached to the sheathing. At installation it is necessary to leave a little space between a layer of a heater and a vapor barrier.

The installation of mineral wool or glass wool differs little from the process described above. The difference is that because of the flexibility of these materials, they can only be fastened to the crate, and you can not do without basic waterproofing.
Warming of a wooden floor in the cottage
A significant part of the room's internal heat can escape through the floor, especially if there is a basement. Therefore, effective thermal insulation of the dacha will also require an internal thermal insulation of this structural element.
- The most effective is the insulation with a floor analysis, which is carried out according to the following scheme:
- To the floor ladders, a wooden plank is nailed, which will form an even base surface. The best alternative to conventional wood will be OSB-boards.
- Then a layer of waterproofing material is laid, which can be a conventional polyethylene film.
- The next layer is formed from a heater. The best choice in this case will be porous materials that provide good natural ventilation.
- The final stage is the installation of a second board, which will perform the functions of the rough floor. At the same time, there should be a distance of 5-10 mm between the roll edge and the wall, which is necessary for natural ventilation. Later it can be covered with a plinth.
Choosing heat-insulating materials for internal insulation of the floor, it is necessary to choose ones that are capable of withstanding great physical exertion. In particular, it can be polyurethane foam, expanded polystyrene and expanded clay.

Unlike walls, the floor is best insulated from the outside and from the inside, so it is highly recommended to conduct the insulation of the outer socle of the villa.
Internal thermal insulation of the roof
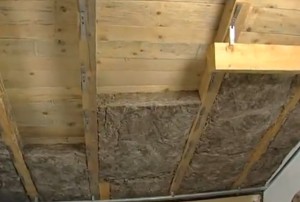
A warmhouse is impossible without a roofed roof, since it is through this part of any structure that the overwhelming part of the internal energy leaves. The technology is also a classic heat insulation cake, which is mounted by this method:
- The initial stage is the laying of waterproofing materials. Slightly sagging stripes of waterproofing are placed perpendicular to the rafters. Formed slits are sealed with adhesive tape.
- Rolls or slabs of heat insulator are placed close to the rafters. From the inside they are additionally strengthened by means of ropes or thin wooden bars. If the required thickness of thermal insulation requires the laying of insulation in two layers, then the outer layer must overlap the knocking of the inner.
- After this, a vapor barrier layer is created. Smooth surface it should be located towards the street. To fix the vapor barrier it is enough to use an adhesive tape or a stepper.
- At the final stage, the guide rail is mounted, on which the final decorative finish is mounted.

Increasingly popular is the foam insulation, the technology of which is radically different from the one described above. For it, polyurethane foam is used, which is sprayed under high pressure from a high device. But it should be taken into account that this approach will require the installation of a forced ventilation system, since the foamed polyurethane absolutely does not let steam pass.
Greetings. This time you will learn how to properly perform the warming of the holiday home. As an example, consider the popular methods of thermal insulation of wooden cottages and building objects from concrete blocks. Types of buildings for review are not chosen by chance, since it is from these materials that most of the dachas are built.
I am sure that the methods proposed in the article will be of interest to owners of old country houses. However, if your dacha is new, but not warm enough, you will also find a lot of useful information for yourself.
Basic information about the insulation of country houses

The correct heat insulation of the cottage starts with the analysis of heat losses with the use of special equipment - a thermal imager
Warming of a country house has the following objectives:
- Providing comfort of living;
- Reduced costs associated with heating;
- Providing a long service life of the facility without the need for regular repair repairs.
From the points listed above, the following conclusion can be drawn: the dacha should be energy efficient.
What is an energy efficient house? This is a building object, in which, due to high-quality thermal insulation, the optimal microclimate is combined with low energy consumption.
In accordance with SanPin 2.1.2.100200, the following requirements are imposed on the microclimate of living quarters, in the cold season:
- the average air temperature should be from 18 ° C to 24 ° C;
- relative humidity of air - within 35-40%;
- the speed of air flows is not more than 0.15 m / s.
- the surface temperature of the walls is lower than the air temperature in the room by no more than 4 ° C;
- the temperature of the floor surface is lower than the room temperature by no more than 2 ° C.
Do you think the microclimate within the walls of your dacha meets the requirements listed above? If it does not match, then it's time to insulate the country house.

The instructions for the insulation of the dacha depend on the following factors:
- The nature of the operation of the facility (seasonal or all-season);
- Materials used in construction;
- Type of glazing object;
- The presence of technological errors in the design and / or construction;
- Type and efficiency of the heating system used;
- Budget funds allocated for the implementation of the project.
The thermal insulation of a building object can affect individual structural elements, for example, a ceiling wall or a foundation, or it can be implemented in a complex manner. Despite the fact that the price of complex insulation is significantly higher than the cost of separately performed work, it is the integrated approach that provides the best result.
Warming of a wooden house
Wooden houses are insulated in such a way that the sawn timber retains the optimum degree of humidity, does not rot and does not collapse. Conditionally, the thermal insulation of the wooden dacha can be external and internal. Which of these varieties is more preferable?
External (external) insulation of the walls prevents their freezing. In addition, the dew point shifts towards the outer edge of the wall. In order to reduce condensation, a ventilated facade is installed. As a result, the wood remains dry and does not rot, which favorably affects the resource of the house.
Thermal insulation of load-bearing walls from inside the house reduces the useful area of the room, which is especially noticeable if the dacha is small. In addition, warming the internal surface of the walls, you will provoke the freezing of wood in winter and wet with the onset of the warm season. As a result, the wood will rot and decay intensively.
The conclusion can be made the following - the internal thermal insulation of the wooden building is made only in combination with external insulation. In extreme cases, we limit ourselves to external insulation.
Thermal insulation of wooden walls
One of the most correct instructions for warming walls from wood involves the installation of a ventilated facade with a bookmark of thermal insulation material. The advantage of this solution is the absence of condensation and the possibility of using insulating materials with a large thickness.
The following materials will be required for installation:
- Guide metal profiles 100 × 40 mm;
- Steam insulation film;
- Plates of dense mineral wool (thickness, similar to the width of the metal profile or will have to be stacked in two layers);
- Double-sided tape;
- Windproof cover;
- Wooden bars 50 × 20 mm;
- Vinyl siding.
The instruction of the device of the ventilated facade with a bookmark of a heater is as follows:

- With the help of the plumb and the spirit level, the curvature of the walls was determined;
In our case, the attic slightly protrudes forward relative to the first floor.

- With an interval of 60 cm from each other, on the surface of the walls fixed alignment pads of pieces of plywood, in order to compensate for the differences in levels;

- On the surface of the wall, stapler fixed the strip of vapor barrier;
The vapor barrier has 2 sides - one smooth, the other rough. We direct the smooth side outwards, and the rough side - inside. We fix the vapor barrier horizontally, so that the upper strip is on the lower one and, thus, the condensate drain is provided.

- Over the vapor barrier, the guide profiles were fixed vertically;
The installation of the profiles is carried out on the leveling plywood liners, which are easy to feel under the layer of vapor barrier. As a result, the guides must be spaced from each other by a distance of 60 cm.
- Plates of mineral wool are inserted into the spaces between the guides;

- On the outer side of the guides we glue pieces of double-sided tape;
- We lining the windproof cover, temporarily fixing it on a double-sided adhesive tape;

- Over the windproof cover, we fill the lath from the wooden slats;
The lath is secured so that the laths are fixed to the metal rails that were used in the construction of the supporting frame.

- On top of the wooden crate, vinyl siding was fixed.
Are there other ways of thermal insulation of wooden walls?

Due to the simplicity of implementation, foam polyurethane foam is becoming increasingly popular. The two-component mixture under pressure is sprayed onto the wall, after which it polymerizes and forms a layer of foam. Despite the obvious advantages, the method has a significant drawback - the equipment for spraying is expensive, but because of their own hands, such insulation can not be performed.
Foamed polyurethane is an airtight composition that will prevent the wood from breathing. Therefore, there is a possibility that the walls from the outside will rot and decay.
Thermal insulation of floors and floors in a wooden house
Warming of the floor in a wooden house can be done using different materials. For example, I recommend to lay between the lag keramzitovuyu zasypku, mineral wool or crushed polystyrene.
But the method of floor insulation chosen by you must meet the following requirements:
- The structural elements of the floor, including logs and planking, should not rot;
- Filling the space between the lag should be unattractive for rodents;
- The layer of thermal insulation must be fireproof and non-toxic.
As an example, I suggest the instruction of the correct device for a heat-insulated floor pie.
The easiest way is to carry out the insulation of the floor on the logs during the construction of the dacha. If the insulation is carried out in an already operated house, the flooring will have to be completely removed.
After access to the lags is open, it is necessary in several layers, with a break for drying each previous layer, to cover the wooden parts with antiseptic and fire protection.

After complete drying of the impregnation, the space between the lag is lined with a windproof covering. Such a measure will eliminate the possibility of formation of cold bridges. Wind protection is necessarily attached to the logs with staples from the construction stapler.
In the prepared space between the lags, the insulating material is laid or poured.

Traditionally, mineral wool is used as insulation. But such material, in due course, can become a refuge for rodents. Therefore, I recommend the use of a dense claydite filling with a core diameter of 3-5 mm. This backfill is produced by Knauf for the installation of dry screeds.

After the insulation material between the lag is laid, the top layer of the vapor barrier is lined. Strips of vapor barrier, as well as wind protection, must be lined with overlap, so that there are no gaps. Over the finished cake is mounted boardwalk.

The insulation of the floors is similar to the insulation of the floor. But for these purposes, materials with low weight, mainly mineral wool or plates of expanded polystyrene, are used.

When installing ceiling ceilings, the vapor barrier is placed in the bottom of the cake, in order to prevent the penetration of moist warm air from the room.
Wind protection is lined over the heat insulation pie in order to serve as a barrier to cold air from the attic space.
Warming of a country house from gas-concrete or silicate blocks
Unlike wooden cottages, objects made of brick or lightweight concrete can be insulated both from the outside and from the inside. And in this case, the external insulation is an order of magnitude more efficient than the internal one.
But the best results guarantee comprehensive insulation, in the course of which the thermal conductivity of walls, blinds, floors, ceilings and roofing systems is reduced.
Thermal insulation of walls
For the thermal insulation of walls made of bricks, concrete blocks and similar building materials, cellular polystyrene plates can be used; mineral wool, application of foamed polyurethane.

Affordable price - a good reason for buying expanded polystyrene boards
Of the listed materials, I particularly recommend the plates of expanded polystyrene. Using this type of insulation materials, you can not only reduce the thermal conductivity of the bearing walls, but also subsequently plaster the building, giving the facade an attractive appearance.
Installation of expanded polystyrene boards with subsequent plastering is performed in accordance with the following scheme.

For the device of thermal insulation the following materials will be required:
- Plates of cellular polystyrene with a thickness of 150-200 mm (the thickness is selected depending on the climatic conditions of the region);

- Tarpaulic dowels (umbrellas) in the number of 4-5 pieces per each plate;
- The initial bar is the profile for holding the plates of the first row in the required position;
- Alkali-resistant reinforcing glass mesh;
- Tile glue or special adhesive for expanded polystyrene;
- Stucco mixture or tile adhesive for making reinforcing layer;
- Stucco mixture for finishing.
The instruction of warming the walls of a modern dacha from aerated concrete blocks or silicate bricks is as follows:
- Collecting forests, from which it is easier and safer to work, than with a ladder;
- The chisel from the surface of the walls knocked down the inflow of masonry mortar;

- The surface is primed in one layer with a penetrating primer to strengthen the porous substrate, and in one layer with a film-forming primer for better adhesion;
Apply a primer with a roller or even a brush. But, given the large surface area and application in two layers, I recommend using a spray gun to work with a primer.

- On the level, along the edges of the wall are fixed indicative cords, along which the insulation plate will be laid;

- With the help of a laser level or a level with a plumb, the position of the upper part of the plates in the first row is determined and a corresponding mark is placed along the perimeter of the walls;

- We knead the glue solution in accordance with the manufacturer's instructions and, after cooking, stand for 5 minutes;
- Apply glue to the slab;

- The first plate is installed from the corner, so that its edge protrudes around the corner for a distance equal to the thickness of the plate;

- The second plate is placed from the corner close to the aligning edge of the first plate, as shown in the figure;
- Similarly, the entire first row along the perimeter of the walls is laid out;
- When laying each row, level check the horizontal and vertical position of the plates;

- The second row begins to stack also from the corner. Plates should lie with respect to each other with displacement, as shown in the figure;
- The third row is stacked offset from the second row, but so that it coincides with the plates in the first row;

- The next rows are set in a similar way, so that as a result a dentate bunch is formed at the corner;

- We combine plates with window apertures, cutting foam, as it is shown in the figure;
![]()
- If there are gaps between the plates in the course of installation, immediately fill them with mounting foam to prevent the appearance of cold bridges;
- After the foam has dried, remove the excess with a sharp knife;

- On the edges and in the center of the plate are mounted disk dowels, so that their caps are drowned in the surface of the foam;

- Reinforcing glass and stucco mixture strengthened slopes;
- Dowel notches are filled with a mixture;

- The wall covering is reinforced with a glass net and a plaster mix;

- Over the dried base layer can be applied decorative plaster.
Thermal insulation of the floor

In previous instructions he told how the floor is warmed on wooden logs. This technique can be used in brick houses, where the floors are laid out on logs. But what if there is already a ready-made concrete screed in the house?
I offer the following options:
- Installation of microlags with subsequent laying of thermal insulation and plywood flooring;
- The device of dry screed from gypsum plaster with claydite filling;
- Laying an additional layer of expanded clay;
- Laying an additional layer of polystyrene concrete;
- The device is a system of floor heating for subsequent use as an auxiliary heating system.

If the level of the rough floor allows you to raise the surface by 5-10 cm, I recommend laying a layer of expanded clay concrete along the lighthouses. The advantage of this solution is in low thermal conductivity and high material strength. Again, laying claydite concrete is much easier and faster than working with conventional concrete, if only because the finished solution is much easier.
For dachas, the problem of rodents is urgent, which gnaw through the layers in the layer of insulation and feel comfortable in the subfield. Keramzit concrete, after a set of brand strength, in terms of hardness is almost inferior to heavy concretes, and rodents in such a subfield will not settle.
Another option that personally tested in his home - a device system "warm floor" based on infrared film emitters. This option is preferred for summer cottages, which are used seasonally. If you decide to live in a country house, in the winter it will be possible to warm up the floor quickly, which means that comfortable conditions for temporary accommodation will be provided.

Film infrared flooring is a universal solution that can be laid under a tile, under a carpet or under a laminate. The only important condition for the smooth operation of the film heater is a perfectly flat base without pronounced microrelief.
Why do not I advise a warm floor on the basis of water-heating equipment and? Most dachas and country houses in the province do not have a stable connection to the water supply. Again, the wiring in the old house may not withstand the load of the water heater.
Conclusion
Now you know how the external insulation of low-rise buildings is performed. I am sure that the proposed instructions and recommendations will be useful when arranging your dacha.
If you have any questions, ask them in the comments to the read - I will definitely answer all. By the way, maybe you'll find the answers to the interesting questions by watching the video in this article.
Warming the country house is an important process that will allow you to save considerably money when heating the premises in the winter season. However, it is necessary to know how to properly carry out insulation work so as not to make mistakes.
1
Recently, warming is a very urgent issue due to the constantly rising prices for energy.
But this issue is especially acute for owners of country houses and dachas, which spend a lot of money during the heating season. Practical insulation consists in choosing a quality and reliable material. In addition, it is advisable to make all necessary calculations in advance, so as not to be mistaken when buying the material. Take into account the thickness of the material.
Among the most inexpensive are the plates of expanded polystyrene and mineral wool. But whatever heater you choose, it is worth bearing in mind that:
- some of the heat loss passes through the door and window structures - about 15%;
- approximately 7% of the heat flows through the ceiling and floor;
- the ventilation system is capable of taking more than 20% of the heat.
2
In many ways, the choice of insulation will depend on the climatic features of your region. Naturally, when choosing you should take into account your financial capabilities and the result that you wish to receive.
What to use:

3
As we have already said, in order to protect your home by 90% from heat loss, you will have to work on the insulation of the floor, ceiling, walls and windows. The work, of course, is not the easiest, but the result will pleasantly surprise you. Firstly, the house will become much warmer, and secondly - you can not spend incredible sums on heating.
Features of choice:

In the modern world, in which natural resources have to pay a lot of money, the issue of warming the house even in the country is a priority - it is the correct and competent insulation of the structure that allows you to reduce the cost of heating the house, not at the expense of a cozy comfortable temperature in it. Yes, it will require some investment. Yes, you have to work a little with your own hands to reduce these investments. But as a result, you will get a warm and, most importantly, inexpensive in operation country house in which you can safely live in the winter and, as they say, do not know how to grieve.

How to insulate the walls from the inside: the fabrication of the frame and the features of the process
Almost every literate builder or repairman knows that if it is a question of warming walls from the inside, then anything better than wireframe technology in this respect is difficult to come up with. It is she who will make the thermal insulation of the walls, without depriving them of the ability to "breathe". This is very important, since without proper steam conductivity of the walls inside the house, improper climatic conditions are created - humidity rises and as a result fungus and mold develop. This technology provides for the creation of a false wall, for which mineral wool is laid - this false wall is made on a frame, which will have to be dealt with first. The frame can be manufactured in two different ways and from two different types of materials.
Frame made of metal profile. In most cases, such a foundation of the false wall is used for subsequent plastering of walls or any panels. Structurally, this skeleton is arranged simply, and it is assembled from profiles of two types - UD and CD. The first option is the guiding profile, which sets the plane of the future wall - it is installed on the floor, ceiling and adjacent walls. The second option is the load-bearing profiles designed to withstand the load from the plasterboard and the finish that will be on top of it. Mount them vertically with a step of 600mm in the center of the profile - in addition they are attached to the wall by special U-shaped brackets, which are installed every half a meter, starting from the ceiling or floor (no difference). When the height of the ceilings in the house is more than 2.5 m, additional reinforcement of the frame is made by horizontal bridges, which are mounted at a height of 2.5 m. There is a nuance here - the odd sheet drops to the floor, and the even one is pressed to the ceiling (or vice versa). Therefore, the jumpers should be installed in the same way - for an odd sheet, 2.5 m is measured from the floor, and for an even sheet from the ceiling. This is a breakdown of the seams, which is necessary to prevent their cracking.

This is about the question of how to insulate the walls with plasterboard. Not all people like him. Those who do not tolerate it prefer to use wooden panels instead of it - for dachas it is generally an ideal option. With their help you can solve the problems: how to insulate a brick wall from the inside, and how to insulate walls in a wooden house from the inside. The frame for the wooden sheathing in most cases is also made of wood - from the timber. Ask why? The fact that the wood and the profile is not very combined in terms of reliable fastening - the tree leads from changes in temperature and humidity and it pulls the fasteners, weakening it. With a wooden frame this does not happen - it evenly leads both the skin and the base to which it is attached. This skeleton is manufactured almost exactly as it is from the metal profile for gypsum board - the principle is the same, only here the fixing of the bar to the wall is somewhat different. In places where the U-shaped brackets are installed, it is necessary to lay brusochki.
In principle, if we talk about a wooden cottage, walls in which are even, then this bar can be sewed straight on the existing walls. By the way, this bar should have a section of at least 50 mm, and even 100 mm (it all depends on the temperature in your region in winter), and it can be installed both vertically and horizontally. If you want to install the lining vertically, then you need to sew the bar horizontally - and, conversely, vice versa.
As you can see, everything is quite simple, and for the production of this work there is no need to hire specialists, the main thing is to understand the principle. The frame is only flowers, it is very important to fill the cavity behind it effectively to insure it.
Insulation of walls from the inside with their own hands: how to heat-insulate
This, it can be said, is the most crucial moment - in spite of the fact that it is simple, it is necessary to act with observance of certain rules. Otherwise, there will be no sense from warming. If we talk briefly about this stage of work, then the skeleton is first laid insulation, then the whole wall is tightened with a vapor barrier and only after that the gypsum or panels are finished. It's simple, if not for the subtleties that play a key role.
1. Insulation - not any will do. Only mineral wool is needed here and nothing else.
2. Heat insulation in no case can not be pressed, squeezed or condensed in any other way - it keeps the heat in the house not with mineral wool, but with the air between its fibers.

3. Mineral cotton wool should be attached to the existing wall - otherwise it will eventually settle all the way down, and there can be no thermal insulation. With the same success it can be glued or fixed mechanically - for example, umbrellas used to install foam.
4. Steam insulation - it protects the heater from excessive wetting. Wet mineral wool does not work - the vapor barrier allows moisture to penetrate inside the insulation, as they say, dosed, so that it managed to naturally from there itself to go out first to the walls of the house, and then out.
5. Steam insulation must be properly installed - it is a one-way membrane that passes moisture vapor to one side, and the other does not. If you confuse the installation direction, you get the thermos effect inside the house - the moisture will condense in a huge amount on all cold surfaces.

Fastens the vapor barrier to the wooden frame with a stapler, and to the metal small self-tapping screws. Connect individual parts of this material overlapping each other, with the entry of centimeters to twenty - this must be taken into account when buying a vapor barrier.
And the final stage of the work, related to the solution of the problem of how to properly insulate the walls of the house from the inside, is the skin of the frame. This is an uncomplicated stage and can be produced using various materials. As mentioned above, you can close the insulation with both plasterboard, and wooden lining, and in general with any type of panels. Even the sheet material such as plywood or OSB is not an exception. There is nothing complicated here, and you can solve this problem yourself - the only thing I can say about this is that if you decide to sew drywall, then please study the technology of working with it. The fact is that it also has many nuances that will certainly affect both the appearance of the walls in the future and their performance characteristics.
In concluding the topic of how to insulate the walls from inside the dacha, I will add only one thing - this is not the only solution to the issue of thermal insulation. There are other technologies, but this is the best for domestic work. In general, it is more effective to produce heat insulation from the outside - this approach to business will not allow the walls to freeze in winter. At a minimum, this is a lower rate of their destruction and the like. In general, it is better to be warmed from the outside and to resort to internal heat insulation is necessary only in case of a desperate situation. In addition, external insulation does not reduce the internal space of the cottage.
When using a summer cottage not only in the summer season, but also in the cold season, there is a need for its warming.
To solve this problem, it is necessary to answer two main questions: where is the heat leakage and how effective?
Causes of heat loss
It is not difficult to establish the cause of heat loss. It usually leaves through badly insulated walls, roof, floor, windows and various cracks.
The experts propose to warm the dacha not only from the outside, but also from the inside.
Material selection
For thermal insulation materials there are a number of requirements.
Heat insulation must have a low thermal conductivity, good hygroscopicity, fire safety and environmental cleanliness.
It is necessary that the material reliably prevents heat exchange between the outer and inner parts of the walls, and protects the structure from the inside well. 
Today, mineral wool based on basalt or fiberglass is widely used as a heater. If the ventilation of the house is properly equipped, moisture will not be a problem for this material.
On the market of construction products, new products are constantly appearing for high-quality warming of the dacha with their own hands. For example:
- linen fiber insulation - the material is produced by slabs, easily cut, does not change shape, environmentally friendly, has good antiseptic properties;
- ecowool - sprayed loose heat insulator, consisting of recycled cellulose with the addition of antiseptics and flame retardants;
- soft wood-fiber board (DVP) - environmentally friendly material, they can immediately strengthen the walls.
How and what to insulate, the question of taste and good choice. The main thing is that the country house is reliably protected from winter cold.
Roof
A roof with improper installation can "steal" from you more than 10% of the heat spent on heating the house.
When choosing insulation for the roof, pay attention to the service life, which depends on many external factors: temperature fluctuations, rainfall (especially snow), wind strength and direction. Pay special attention to the water resistance of the material. Also, isolation must be safe for health. The first sign of safe isolation is the absence of a sharp, pungent odor.
Thermal insulation of the roof with polymeric materials is not the best solution. They are very easily and quickly ignited, so you have to take increased fire safety measures. 
for the roof can be considered stone wool, which is designed for thermal protection of structures that do not carry serious loads.
Walls
It is the main stage of the work, since they occupy the main area of any structure and have the highest heat transfer.

Surface preparation
Before warming the wooden walls, always clean the entire surface of the dirt. Thoroughly treat the walls from the inside with special solutions and aerosols, which will protect the wood from insects. Then zapopatte all gaps with a dry pakli and a thin chisel.
Heater
As a heat insulator for walls, the jute fabric is very suitable. It quickly and easily fits with a construction stapler, does not rot, is not blown by the wind and does not represent interest for moths. The tow and jute fiber have a low thermal conductivity due to the capillary structure, they easily give off moisture. In addition, as bactericidal materials, successfully resist the spread of fungus.

It is not recommended to use for the warming of the walls of the cottage house materials: felt, batting, wool. They abundantly accumulate moisture. As a result, the process of decay begins quickly, and in the wool a moth is necessarily started.
Window
After the walls are warmed, we go to the windows. They also lead to significant heat losses, so the windows should pay close attention, especially if the design is obsolete.

Cleaning and waterproofing
It is necessary to thoroughly clean the frame of the house of dust, replace the cracked glass, repair - the gap between the walls and frames.
For high-quality insulation, you will need a silicone sealant in a special gun. It reliably protects the joints from inside from fungi and mold. 
Foam is also suitable. However, it quickly collapses from the sun and is not entirely aesthetic. If you stop the selection on foam, then you have to take measures to protect it from ultraviolet rays.
D-profile tape
Then you need to glue the sealing tape. The ribbon of the D-profile is best suited. It effectively closes the slots up to 7 mm. For more reliable fixing, you can fix the tape with studs or staples. 
Film on glass and slope insulation
To maximize, cover them with a heat-saving film. This material is applied directly to the glass. When laying the film there should be no folds, blisters, bubbles. Carefully executed work will help to save more than 30% of the heat.
Do not forget about the insulation of slopes. For this, various materials can be used, for example, foam polyethylene or mineral wool. Heat insulation is fixed on the slopes with the help of glue.
Floor
There are many modern materials for floor insulation. The main thing is that the cottage from the inside should be as dry as possible.
Styrofoam
Styrofoam does not absorb moisture, is durable, durable, good antiseptic. With such material it is convenient to work, since it does not change the initial volume.

Minvata
Mineral wool is sold in different versions: rolls, plates, mats. Low density, ecological cleanliness, durability, relatively low price are its main advantages.

PenoFol
The new foam foam material has already proved to be the best and has gained popularity. It is sold in rolls, consisting of a layer of foil and insulation. Most often the basis is foamed polyethylene.

Requirements for insulation
When choosing the material for the floor insulation of the cottage by yourself, do not look for the cheapest options and remember that the insulation must be:
- environmentally friendly, safe for health;
- excellent heat insulator;
- durable.
Methods of floor insulation
There are several ways to insulate the floor of the villa.
Double floor
The lower layer of unshaved boards is carefully fixed directly to the beams. The "rough" construction is laid "clean" coating. 
Wooden logs are installed on the foundation in steps of 0.5-1 m or cut into a frame. Then the "rough" floor is spread. Free space is filled with thermal insulation. A simple and effective method is enough. 
You can insulate the floor on the lags installed on the brick posts. Insulation material: mineral wool, fiberglass, foam or other suitable material. The distance between the finishing floor and the ground is increased. The work does not require the experience of a builder and is easily carried out by one's own hands. With this option, the insulation material does not experience any load, which makes the method of warming the wooden floor perfectly lagged.