The self-made earthing loop in a private house is one of the most important elements of the power supply system. First of all, it is necessary from the point of view of the safety of residents who use electrical appliances. The grounding loop provides fire safety and efficient operation of household electrical equipment.
Bury the ground loop
Main Contour Elements
- three vertical earths are driven into the ground; this can be a steel corner 50x50x5 mm;
- three horizontal earthing switches connect vertical; this is a steel strip 40x4 mm;
- the conductor between the switchboard and the circuit is a steel core section of 8-10 mm.
The armature for assembling the ground loop is forbidden for use, since the salted surface does not evenly distribute the current and is quickly oxidized.
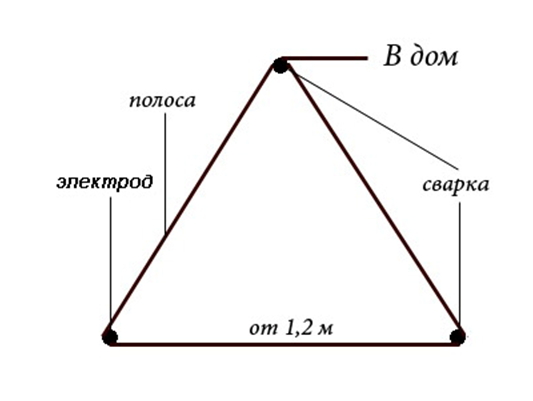
The classical shape of the contour - the isosceles triangle is placed at a distance of 1-3 meters from the foundation of the private house.

Classical shape of the ground loop
The trench digs in depth of 90 cm for laying horizontal elements, vertical pins are driven into corners to a depth of 2-3 m, leaving on the surface 25-30 cm. Welding around the perimeter is welded a steel strip, connecting vertical pins, then wire rods Ø 8-10 mm from the contour to the body of the switchboard.
To the body of the switchboard, the steel core is bolted, for this, at its end, it must be flattened and a hole drilled under the bolt. The joint is carefully cleaned for reliable electrical contact. It is possible to lay a steel strip from the contour to the shield, the cross-sectional area of this conductor must be at least 16 kV / mm.
It is believed that a flat steel tire is more effective, it has a large area of contact with the ground, better current conductivity. The complexity of using such a strip - when cornering during laying in the ground and laying along the foundation and walls of the house. You have to cut the tire into pieces and weld it at the right angle.
Connections of contour structures, horizontal and vertical elements are performed only by welding. Bolts are forbidden, contacts quickly oxidize, the contour ceases to perform its functions. It is strictly forbidden to paint details of the underground part of the circuit, the paint is an insulator and prevents the passage of currents into the ground.
If there are problems with welding work at the cottage or in a country private house, bolted connections of the contour elements can be tolerated. Then they always remain above the surface of the ground, the contacts are carefully peeled off, the bolts are tightened securely. Sometimes the joints should be greased with conductive grease.

Welding constructions
Industrial grounding
Some companies manufacture sets of ground loops for 220V and 380V networks from elements of galvanized and copper-plated steel. The design of this grounding goes to a depth of 6 m, a vertical pin of four components is connected by threaded couplings. At the end, a pointed tip is screwed.
For easier penetration of the galvanized probe into the ground, it is recommended to pre-drill holes with drill. On the surface is left 20-25 cm of the pin, a brass clamp is attached to this area.
From the housing of the switchboard in the house, before the earthing electrode is clamped, an insulated copper or galvanized stranded wire is insulated. The threaded connection on bolts is lubricated with conductive paint.
Such sets serve not less than 25 years, have good conductivity, are simply mounted. As a disadvantage you can note the cost. Approximately 3-5 thousand rubles, not everyone can afford such costs, having the opportunity to use cheaper materials, but no less effective.

Earthing device
How to properly ground the old wiring
The most correct solution will be in replacing the old wiring with a new one, where there are four wires in the cables. One of the yellow-green wires is for grounding. All this can be done by one's own hands; The difficulty is that it will take time, you will have to spend financial resources.
Practically the electrical wiring diagram at the cottage or in the house will be substantially changed. Before doing this, it is worthwhile to be ready for a major overhaul. Sockets, switches, junction boxes can be left on the old places in the house or at the cottage, if necessary, the layout can be changed.
When installing correctly new sockets, be sure to make sure that all the ground wires are connected in junction boxes, and in the distribution board go out to the ground bus. Grounding bars are attached to the shield body. Having a reliable electrical contact, the wire or the plate goes to the circuit from the housing. Following the instructions above, you can make grounding by all rules.
A cheaper way to make the correct grounding at the cottage or in the house is to disconnect the old wiring from the switchboard and leave it immured in the walls. The new scheme is laid from the outside in plastic cable channels, while it is possible to use new outlets and switches, installing them in old podrozetniki.
Junction boxes can be used already installed, cleaning them from old wires. If funds are available, you can immediately buy all the elements for outdoor wiring: junction boxes, sockets, switches, cable channels, wires and assemble a new circuit.

Junction box installation
Installing in the old house modern electrical equipment with grounding elements, it is enough to make a ground loop, to mount a new switchboard. Leaving the old wiring for low-power devices, for a split-system, a boiler, a washing machine, an air conditioner, it is worthwhile making separate wiring through the cable channels taking into account the grounding. In this case, you have to spend only on the shield, protection automatons, several outlets and a cable-channel.
Not everyone can afford to spend at the cottage or a country house overhaul with the replacement of electrical wiring. Even if someone decides to do everything themselves, money will still be needed. The simplest and cheapest way, when the wiring diagram is completed with one grounding wire, and the remaining wires remain in the old places.
In order not to shrottit the walls, the grounding wire can be neatly laid in plastic cable ducts. They fit well in any interior of the house and villa, simply attached to the walls of any material.
This is a simple task: fix the cable channels from the switchboard between the boxes, from the boxes to the outlets. In the junction boxes, all the ground wires are connected to each other and exit to the grounding bus of the switchboard.
Grounding. Video
How to properly make a grounding in a private house will sketch out this video. Only knowledge of the process itself can prevent errors directly in the course of work.
We have considered several options on how to properly make grounding for 220 and 380V networks in a private house or at a dacha. Each owner, taking into account the given conditions, taking into account his financial capabilities, makes the decision himself. Of course, there is always a choice of which reconstruction option to use for the correct assembly of the grounding scheme.
For security reasons, owners prefer to make grounding in a private house at the design stage of the building. This method of protection will avoid negative consequences as a result of a sharp voltage jump in the electrical network at 220 volts. The article will talk about how to make grounding in a private house, its types, the sequence of installation and recommendations for work.
In order to make grounding in a private house with your own hands, you need to decide what type of protective circuit you need to install in a particular case. The ground loop has two types: working and protective.
The working type of grounding allows reliable and correct operation of powerful industrial equipment. At home, it is not advisable to use it, as usually there is no such equipment in living quarters. More often grounding conductors are made for an electrical network with a voltage of 380 volts.
When sudden surges of voltage prevent the breakdown of most electrical appliances and equipment. Typically, such jumps occur when there is considerable damage to the insulation in the transformer winding. Also, when a lightning strikes the house, the entire charge that will hit the lightning receiver will go to the ground, and all domestic electrical equipment will continue to work stably.
The protective type of grounding is based on the fact that electrical equipment, which is under the influence of alternating current, is purposefully connected to the "ground". This method is recognized as the most effective and most common. If a three-core cable is laid in the house, then there will be no problems with it.
Earthing scheme
The last, protective ground loop has many different installation schemes. Often it is applied to an electrical network with a voltage of 220V. If the installation and installation is done correctly, but effective protection of the house against excessive voltage for a long period will be ensured. To do this, it is enough to make a connection of the "ground" in the socket, and a reliable construction with low resistance, which is located underground.
There is a separate list of household appliances and appliances, which are strongly recommended to ground by any of these methods: boiler, computer system unit, microwave oven, washing machine and electric oven.
Earthing loop and lightning rod
A grounding loop is a three-wire cable that connects electrical appliances to the ground. With this connection, most of the negative processes in the technology (open phases or short circuits) that create a stray current will be directed to the grounding structure and then to the ground. The circuit of the grounding loop is simple enough, and it can be made by hand, if you follow certain rules.

The circuit of the protective ground loop provides for the connection to each outlet of the earth wire, which will be pulled to the grounding structure. When connecting household appliances or electrical appliances to the network, they will also be connected to the ground terminal. All wires must approach the switchboard, and a separate cable will be taken from it. On the one hand, grounding wires from a residential house or premises will be connected to it, and on the other - an earthing structure that will go to a certain depth in the ground.
A lightning rod can also be connected to the ground loop. The lightning rod will allow you to take a powerful charge of lightning and transfer it through a current collector to the ground. If the house has already made grounding elements, then an additional installation of a security device against lightning will be easier. An effective device for receiving a lightning charge must necessarily consist of such a kit: lightning collector, current lead and grounding structure.

If previously there was no protective circuit installed in the house, then all these elements must be installed. But when a current collector is already ready and an element connecting the entire home network to the ground, it is sufficient to install only a lightning rod. This device is located much higher than the highest point of the house to take a hit. Such a protective system can be done by one's own hands. It does not matter how the lightning rod looks like, but its core must be hollow. This is necessary in order to place a conductor in it to connect to the ground loop.
Also, the lightning rod can be made on the site in the form of a separate tower. Its spire will rise 2-3 meters above the maximum point of the apartment house, providing reliable protection against lightning strikes. In this case, the grounding protective circuit can be either a joint or a separate (more expensive way).
Video "Earthing Installation"
Stages of grounding
If you want to make a home grounding yourself, first of all you need to acquire some knowledge in the field of electrical engineering. Also, experts strongly recommend the use of ready-made schemes for installing grounding. It is advisable to familiarize yourself with the rules of electrical installation (PUE) before starting work.
Then for work it is necessary to have an earthing structure, which will be placed underground. You can buy already ready reliable and certified kit. For example, there is a set of EZ 15, EZ 38 or EZ 48 (marking determines which kit is needed for the appropriate type of soil). If desired, you can make a similar design yourself, using a similar scheme.
Then you need to determine which system the earthing loop will be located in the house. The most common system is TT. Marking of the TT system means that the neutral is grounded, and its open conductors are grounded, regardless of the attitude to the "ground" of the neutral power sources or other points of the supply network. The TT system is characterized by the presence of grounding at the descent into the premises of the house.

Make a grounding on the TT system by yourself, if you follow its scheme correctly. The TT system is common in the townships, small houses and buildings, cabins and sheds are connected through it. Typically, the TT system is used when powering the electrical installation to 1000 volts, and if it is not possible to comply with the conditions of the TN system. For TT, it is necessary to connect a residual current device. One of the most important drawbacks of the TT system is the simultaneous failure of the RCD and the breakdown of the phase onto the body of a grounded electrical device.
Next, you need a suitable tool for your work. A set of spanners, a portable welding machine, a grinding machine, a heavy sledge hammer, a bayonet shovel, a set of screwdrivers are needed. Using the tool you need to make a grounding structure. You can stay on the version with the shape of a triangle.
At a sufficient distance from the house you can draw an equilateral triangle with a distance between the tops of 1.5 meters. At this point, dig a hole up to 1 meter deep. In the places of the tops, a steel reinforcement with a circular cross section of 2-3 m in length and at least 35 mm in thickness is clogged. Then the upper parts of the reinforcement must be connected with a metal bar 4 cm wide and 4 mm thick.

To do this, you need to cut a set of blanks with a length of 1.6-1.7 meters (with a margin). With the correct installation of electrodes, the length of the tires is enough to connect them together. Welding is used for fastening. The connecting wire, which will be connected to the earth wires near the switchboard, is preferably selected with a copper section. Then the trench buries.
Then you can begin to connect all the sockets in the house to the "ground", which is in a three-core power cable. Work is necessary with dead wire. When you are sure that you have made the connection correctly, you can proceed to the control check.
What is prohibited according to the norms
![]()
It is very important that when installing the grounding, the connection technology and the rules for placing electrical installations are observed. If necessary, with their own hands in a house that has an electrical system with a voltage of 220 volts, it's quite simple. For this, it is necessary to follow the existing standards of the EMP. The rules for the installation of electrical installations stipulate that during the installation of the circuit, it is impossible to make a connection or twisting of the stripped wire contacts from the outside. If there is direct access to such contacts, then there can be negative consequences. At high voltages in the network, this zone can pose a serious threat to human life.
It is forbidden to use in the grounding structure of the main elements, which are covered with paint or other coatings (except for the layer of oxidized metal), including oxide film. Do not ground electrical household appliances to gas and heating pipes, or to a water pipe. It is forbidden to make a serial connection during installation. The norms of the PUE also stipulate that ferroconcrete structures with metal parts that are under stress can not be used as grounding loops. It is also forbidden to use pipes of various purposes with combustible and highly flammable substances.
Checklist
To verify that the ground loop is made correctly, you need to measure the resistance value at a distance of 12-15 meters. It is necessary to correctly distribute the polarity between the connected contacts to the earth electrode ("-") and the set of measuring electrodes ("+"). Between the electrodes the distance is 1.5 m. If the resistance value is less than 4 Ohm, then everything is done correctly. If the resistance is higher, then you need to find and fix the problem.
Video "We make grounding in the house ourselves"
This video material contains a visual aid that will allow you to perform such an operation yourself, as grounding organization. The kit also includes a guide for constructing the contour.
1539 views
To provide your own private house with a secure electricity supply system, you need to take into account the earthing system in the process of its reconstruction or when conducting a new electrical wiring diagram. At the same time it should be noted that the installation of grounding in a private house with their hands 220V - the process is not very complicated. Especially when compared with the installation in an apartment building. And although everyone understands why a protective grounding is needed, not everything is done. Therefore, we will consider the design completely, but at the same time we will answer the question of how to make the earthing loop of a country house.
The device of grounding in the street at the house
The device of the earthing loop in a private house is a pintle driven vertically into the ground, which are tied together by conductors. And this whole structure is connected to the distribution board in the house. Before making a grounding in a private house, you need to prepare the necessary tools and materials.
From the tools you need shovels, scrap, sledge hammer, hammer, welding machine with electrodes, Bulgarian, wrenches. From materials:
- a metal corner in the sizes 50х50х5 mm;
- steel tape with a width of 40 mm and a thickness of 4 mm;
- metal wire rod diameter 8-10 mm.
Purely in the design, the home ground loop is an equilateral triangle, into the corners of which the metal earths are driven. For this, a metal corner is used. The depth of driving is 2.5-3.0 m. You can do it yourself with a conventional sledgehammer. If the soil on the site is solid, then you can first hold the groove with a drill to a depth of 1.5 m, then finish off the corners with a sledgehammer.

The installation process must begin with applying the dimensions and shape of the ground loop to the ground. Then a trench of up to 60 cm in width is excavated along the entire perimeter so that it is convenient to carry out welding, and a depth of 80-100 cm. To the process of entering the ground corners was without problems, it is recommended that their ends are sharpened under the cone. To the end it is not necessary to hammer, it is necessary that the edges of the pins stay about 20-30 cm above the bottom of the trenches.
Now it is necessary to join the corners between the horizontal elements of the ground loop. For this, a metal tape is used. The connection is made only by electric welding. No bolts that are buried under the ground by corrosion, and this partial or complete absence of contact, which will lead to inefficient grounding in the country house.
The next stage is the connection of the made contour with the switchboard in the house. To do this, you can use either a wire rod or the same metal strip. In the courtyard, the connecting loop is held in a trench, inside the house by a wall or skirting board. At the end of the conductor, which entered the house, a bolt M6 or M8 is welded. He will wear a ring of wire, which is responsible for the internal grounding of the private house. The fixing is done with a similar nut. It may be necessary to isolate the joints.
Attention! As the elements of the grounding circuit, metal fittings can not be used. Its outer layer is hot, which disrupts the uniform current distribution throughout the section of the profile. In addition, the reinforcement in the earth rusts faster.
Welding places must necessarily be treated with anti-corrosive compounds. But the whole contour can not be painted or covered with any protective compounds. Because the system needs full contact with the earth, where the wandering currents will go.
At this installation of the ground loop for a private house can be considered complete. Therefore, make sure that the welding joints are strong, after which it is necessary to dig trenches with shovels. By the way, this technology can also be used to build a lightning rod system (lightning rod). Here you can make a grounding device in a private house with your own hands.
It should be noted that the correct form of grounding a private house is not necessarily a triangle. You can use a square, a circle, a line, and other shapes. It is important that the contour itself does not create resistance, therefore, the maximum number of earth-plugs driven into the ground and their horizontal counterparts was as much as possible. Although the triangle is a time-tested option. And one more important point - the distance from the home loop of the grounding system to the foundation of the house should not be less than one meter.
Connection in the electrical panel
Usually, private homes are supplied with electric current by overhead power lines. Therefore, the input into the house is made with two wires: phase and zero. Their grounding system is based on the TN-C scheme, in which the established zero loop, which is also grounding, is connected to a common neutral in the transformer substation.
Since your house is equipped with a grounding system, the connection can be made in two different schemes:
- TN-C on TN-C-S;
- TN-C to TT.
Connecting the circuit in accordance with the scheme TN-C-S

The system of grounding a private house with their own hands according to the TN-C scheme is, as a rule, two-wire wiring in which one wire is a phase, the second zero performs two functions at once: the working conductor N and the protective PE. To transfer to the TN-C-S circuit, an additional bus must be installed inside the switchboard. It must have a metal contact with the body of the electrical board. It will be connected to the neutral wire of the supply network and the conductor from a new ground loop, assembled with their own hands.
The new bus should be connected to the bus to which the zero wire N, which exits the house, was connected. In this case, the contact of the N bus with the guard should not be. In fact, it will be, because in the shield on the bus is installed a dielectric terminal block, through which the connection is made. By the way, the phase wire is also isolated from the elements of the switchboard and its housing.
The last step, how correctly to make grounding in a private house through the TN-C-S system, is to connect a new bus and a ground loop between each other. Usually, a copper multi-core cable with a cross-section of at least 4 mm² is used for this, one end of which is attached to the shield, the second to a bolt welded to the end of the grounding conductor at the entrance to the house.
Connection according to TT scheme

The scheme is similar to the grounding of the house via the TN-C-S system, but it also has striking differences. In the TT connection system, the incoming PEN conductor carrying a double load (zero and ground) is connected to a bus that is isolated from contact with the switchboard. As, in principle, and the phase conductor. It will be connected to a neutral wire that leaves the house.
To an uninsulated bus, which is not connected to any other bus, a ground wire is connected to the house. The earthing switch, which goes from the street ground loop, is also connected here. The connection is made with a copper cable with a minimum cross-section of 10 mm². That is, it turns out that all the wires go through different contours and are connected to each other only in household appliances.
A distinctive feature of the TT grounding system, its positive side is the separation of two contours: zero and ground. In the TN-C-S system, there is one negative point - if the PEN wire goes off, electricity will go at the lowest resistance, that is, by the most protective ground. And this is fraught with big troubles. Minimally, what can happen, there will be a short circuit in the wiring, can burn household appliances. Maximum - here and before the fire is not so far away.
Grounding in a private house using the TT system guarantees complete safety in all non-standard situations. And even if the PEN conductor is burned out, there simply will not be electricity in the house, because the grounding network goes through a separate circuit. And nothing with zero, it is not connected. Therefore, when choosing a grounding system for a TT house (with your own hands mounted), you can be sure of its complete safety.
Grounding check
Grounding in a wooden house or brick is ready, it is necessary to check it. What do I need to do?
- We disassemble any outlet in the house.
- Take the multimeter and put it in the voltage mode.
- We connect the wires of the phase and zero wires with the probe. The voltage value in the network should appear.
- The phase and ground are then connected. The device should show a slightly different (lower) voltage value than in the previous paragraph.
All this can be done with a control lamp. All the same manipulations, in which the bulb should be bright when the phase is connected to zero, and dimmer when the phase is connected to ground. That's how you can answer the question, how to check the grounding in a private house.

In connection with the device of grounding the house with their own hands, private house owners and newly-built developers often face some problems that they can not solve themselves. For example, grounding in a private house with their own hands (380V voltage). Are there any special features in mounting? There are no special features, because the three-phase connection inside the house is broken down into single-phase circuits, which are evenly scattered throughout the building. For example, one phase goes to lighting, the second to the sockets, the third closes, for example, to a boiler. To ground the house it is necessary on one contour. That is, the ground wire leaving the house is connected to the bus where the earth electrode was connected from the street. At the same time, inside the premises, the ground loop connects all the sockets and powerful household appliances among them, as stand-alone consumers.
Is it possible to ground in the house using a cellar or a cellar? There are no problems here. The main thing is that the grounding in the basement (cellar) is completely in the ground, so that the resistance of the structure is minimal. In this case, the cellar will be an ideal place (wet floor and ground, well conducting current), the only requirement to it is to close the installation site of the circuit with protective devices, for example, lay wooden lattices on the floor.
Conclusion on the topic
When installing the grounding scheme in a private house with your own hands on 220V, you need to realize that this is a security measure. And whatever costs you had to do, do not worry that the family budget is suffering losses. It will pay off a hundredfold, because health and life are more expensive. So do not hesitate to make a grounding in a private house or not. The answer is positive - you need to ground the ground without delay. For earthing, you should not skimp, and how it's done is described in detail.
If you find a bug, please select the text fragment and click Ctrl + Enter.
The construction of a ground loop for a residential building is a strict requirement of the rules for the operation of any electrical installations related to the safety of people. Yes, and modern household appliances, such as gas boilers or water heaters, may not work properly in the absence of a ground wire. And if in country cottages this tire is laid still at the stage of construction, then in most country houses it simply does not exist, which is a drawback of the owners.
Perhaps you also made a similar mistake. Then there is no other way than to make a grounding in the dacha itself or hire staff of an energy company that will come out significantly more expensive. Therefore, it is better to take the decision of this issue into our own hands, having studied the installation technology for our publication.
Why a ground loop is needed
The vast majority of suburban areas are supplied with single-phase networks with a voltage of 220 V. This means that the current is supplied to the electrical installations by two wires - phase and neutral (neutral). At the same time, there is always the possibility of damage or wear to the insulation of electric heaters, motors or the conductors themselves. Then on the metal case of the device there is a high potential from direct contact with the phase.
Note. To connect a three-phase network with a voltage of 380 V to a holiday home, it is necessary to develop a project, coordinate it with an energy company and involve a specialized organization in the installation. So in this case it will not be possible to solve the grounding problem independently.
Than it is fraught? Touching such a surface under normal conditions will result in a noticeable electric shock. If, at this point, you stand barefoot on a damp concrete floor or keep your hand on a steel central heating pipe or water pipe, the discharge can be fatal. The reason is that the electric current searches for the path of least resistance to the ground, and you close the circuit to yourself and become a conductor, as is clearly seen above in the diagram.
The conclusion is simple: in order to protect yourself and your loved ones from damage due to insulation failure, you need to lay a grounding conductor through which the electrical circuit will automatically go to the ground. An important condition: its resistance should be several times lower than that of a person (about 1000 Ohm) and is 30 ohms for private houses. Then, with an accidental touch, the phase voltage will not choose you as a conductor, since it has an easier way to get into the ground.
Reference. Now almost all home appliances are equipped with three-core network wires with a special plug. The third core in the cable is just designed for contact with the ground loop.

In addition to providing basic safety, grounding in the country performs such functions:
- allows to function correctly to differential automatons and residual current devices (RCDs);
- equalizes the potential between all the steel elements in contact with the ground - heating batteries, pipelines and so on;
- allows you to correctly operate complex electronics, which are equipped with heating boilers, water heaters and computers;
- the underground circuit can be connected to a lightning rod;
- the static charge does not accumulate on grounded electrical appliances.

Note. The lightning protection system can be connected to a common ground with a house through a special device (SPD), preventing the flow of high potential into the building.
Ground loop design
This system, designed for a private home, includes such elements:
- a contour of steel or copper rods buried in the ground;
- the tire leading from the contour into the building and connected to the body of the shield or distribution plate;
- house wiring with a grounding conductor.

We do not touch the electrical wiring in the rooms, because we believe that it has already been made. Now we need to mount the earthing device contour ourselves and bring the conductor to the shield from it, as shown in the diagram. Recall that the system's resistance should not exceed 30 ohms, and the underground part - 4 ohms. To achieve these values is not so easy, because the characteristics of the grounding device is influenced by many factors - the composition of the soil and its humidity, as well as the cross-section and length of conductors.

If your site has ordinary clay soils, then you can take as a basis any of the 3 designs:
- Metal rods of 2.5-3 m in length, 3 pcs. vertically immersed in the ground in steps equal to their height. Between each other, the earth conductors are connected by a horizontal conductor.
- The same 3 pins are arranged in the form of a triangle. The optimal size of its sides is equal to the length of the vertical rod, the minimum - 1.5 m.
- Deep into the ground, the only electrode is clogged, consisting of several sections that are joined during the immersion process.

Diagram of the grounding device in the form of a triangle
Council. In a situation where the soil at the dacha is rocky, sandy or overmoistened (abrasive), it is better to calculate the grounding device individually by contacting specialists. Option two: find out how the system was assembled by the neighbors and repeat their construction.
Contour details can be made from the following materials:
- usual "black" metal;
- cink Steel;
- copper.

The most lasting are earthing switches made of copper, they are the most expensive. Sold in sets, which includes not only the rods, but also connecting couplings made of bronze with bolts. For convenience of driving, the pins are provided with sharp and flat tips.
As an inexpensive option for vertical electrodes a 50 x 5 mm corner or a circle of 16 mm in diameter made of ferrous metal is used, less often round and profile pipes. The horizontal earthing switch is a steel strip 40 x 4 mm or a circle (rod) with a diameter of 10 mm. The minimum cross-sections of grounding conductors from various metal rolling are indicated in the table:

Council. In order to achieve a resistance value of 4 ohms, it is better to take a metal roll with a margin on the cross-section. Make vertical pins from a circle with a diameter of 20 mm, and a connector - from a strip of 50 x 5 mm.
To enter the house is usually used a steel tire with a width of 40 or 50 mm with a wall thickness of 5 mm. In order to avoid mistakes in the selection of materials and the subsequent installation of grounding in the country, we suggest viewing the video:
The order of installation works
First of all, it is necessary to choose a place for electrodes stuffing and mark this area. Do not place the contour too far from the building and the electrical board itself, because every meter of steel conductor is additional resistance. The optimal distance is 3 m from the house. If the fence or other structures adjoin the dacha on the right side, place the pins in one line (you can - a polyline), otherwise make a triangle.

After cutting the blanks, proceed to work, observing the following order:
- Between the points of installation of vertical earthing conductors dig a trench depth of at least 500 mm, and better - 70 cm, as shown in the photo. At this level, the connecting strip will pass.
- With the Bulgarian, sharpen the ends of the steel corners or rods, set them in the planned points and push them vertically into the ground with the help of a sledgehammer. Electrodes should protrude above the bottom of the trench no more than 10 cm.
- Tie rods with a metal stripe, carefully grinding the joints on both sides. The total length of the weld at each joint is not less than 10 cm.
- Lay the strip to the cottage and take it to the base. Take the bitumen mastic and process the welded seams, as well as the part of the conductor rising above the ground.
- Weld the bolt to the end of the strip and screw to it a copper tire, laid from the electrical panel.

Note. It is not necessary to cover with bitumen all rolled metal, laid under the ground, otherwise the resistance of the circuit will become unacceptably high. Spread only welds that are more susceptible to corrosion.
At the end of the work, the trench can be buried and deal with internal wiring. If you purchased a mounting kit from copper rods, the order of work is preserved, the difference is in the way of connecting the elements (bolts with couplers instead of welding). The immersion of a single electrode is also quite simple - after driving the first section, screw it to the second one and slaughter it, and so on. How to properly make a grounding device at the dacha from metal corners, is told on the video:
Conclusion
The design of the ground loop is certainly a serious matter. And the stage of installing the electrodes and laying the conductor in the house is the simplest part of the work that everyone can do with his own hands. But that as a result of a malfunction of the electric appliance the current quickly and well spread in the ground, it is desirable to calculate all parameters - distance, depth and cross-section of earthing switches. In order not to waste time and materials for nothing, we recommend that you consult with an electrician who knows the local conditions and the quality of the ground.