No construction is complete without a roof, and, depending on the type of construction of the structure, a complex separate roofing project is being done.
Make saddle roof with their own hands is easy, if you know all the subtleties and stages of construction. For this, it is necessary to familiarize yourself with the features of this design, necessary materialsto make the roof warm and protect the house from weather phenomena.
The roof with one slope is considered to be the simplest in construction technology. For its construction it is necessary small area with a slope of not more than 25 degrees.
True, such a roof has some drawbacks, it can not be made a loft and attic, and the view is very simple. But you can make it attractive with the help of corrugated board.
If you need to make an inexpensive roof, then you can use slate, it is resistant to frost and moisture, durable and almost not exposed to damage by ultraviolet. In this article, we will consider a step-by-step instruction for mounting one pitched roof.
In order to make a saddle roof you need to purchase:
- Beams
- Rafters
- Curb
- Overlapping
As of the finish material use tile or slate, ondulin or metal.
Kinds of single-pitched roofs
 Depending on the design, the angle of inclination, the width of the span and the type of roofing, the single-pitched roofs are divided into several types:
- When rafters have a support on the walls at different angles;
- When rafters are made as a one-sided triangular truss, with a support at one level;
- Mansard shed roof.
To make the roof of the first option Need less wood, but at the same time one of the bearing walls should be higher than the other. But for the second option, the walls should be the same level, but more wood will be needed, and the work will be more difficult. When choosing a roof option for construction, it is necessary to consider the width of the span, the number of materials and the conditions of construction.
Single-pitched roofs differ in the number of supports for rafters, they can be made without intermediate or with several intermediate ones. Depending on the length of the rafters and their slope, the need for additional support is determined. Rafters can be laid on the Mauerlat or on the joists.
How to prepare for the construction of the roof?
First, you need to make the drawings, the scheme and calculate the dimensions and angles of inclination, after which you can calculate the desired material. From the slope of the roof will depend on the amount of material, because for a small slope it will take less than for a large one.
But if you make a slight slope, the water will not flow so well and at the joints of the sheets increases the likelihood of leakage, and the load on the rafters will increase.
- If you use corrugated board, the angle of inclination should not be less than 20 degrees. Otherwise, snow can bend the roof. It will also be necessary to make a waterproofing, especially if the ramp has a length of more than 5 meters.
- If the roof is made of metal or slate, it is better to make an angle of inclination from 25 to 40 degrees. If this is not possible, then it will be necessary to make a good waterproofing.
What are the options for a single-pitched roof project?
There are several variants of projects for saddle roofs:
- At home with a small attic, who have a direct ceiling on the top floor. With such construction will be improved thermal insulation. Due to the increase in the height of the attic it will be easier to maintain the structure.
- If the house does not have an attic, the roof will serve as an additional and ceiling cover. But then the ceiling on the top floor will be uneven. The ceiling will have the same angle as the slope of the ramp.
Often small single-storey houses make a rectangular shape, in this situation, to calculate the roof, it is necessary to calculate the height difference on opposite walls. Such a design is the simplest, and is suitable for country houses and summer cottages. It is desirable that the windows were small, and the design of the house is made restrained and inexpensive.
If the house is large and has several floors, then the roof is broken, you can make an attic, as well as a garage. If the house with an attic, then the ceiling will be flat, and when without it, the ceiling is made with a slope. Very good look at home where different decoration Materials, with different colors and textures.
What will it take to mount a saddle roof?
- Wood for rafters, supports and beams measuring 7 - 15/20 cm;
- Board 4 cm, or a beam of 5 cm;
- Cutting board 2,5 - 3 cm - will be needed for sewing the ends and side parts;
- Different in length nails;
- Special screws for roofing;
- A hammer;
- Ax;
- Hacksaw;
- Chainsaw;
- Screwdriver;
- Stapler;
- Material for the roof.
Calculate how many bars you need to build on the rafters, as well as the weight of the roof and the distance between the rafters. It is recommended to make a gap between the rafters about 60 - 100 centimeters. The material for the crate is calculated depending on the area of the roof itself, as well as on what type of roofing material you have chosen.
The main stages of work
Trussing system installation
- For the construction of a single-pitched roof it is necessary to make a rafter system. It is best to use coniferous wood. Logs must be well dried and treated with antiseptic, do not put the composition to protect from moisture and from fire.
- Mauerlat is laid along the bearing wall. This stage is very important, it will ensure the reliability of the design. Also, you can tie a wall-welded wire, or attach it with anchor bolts.
- Further into the Mauerlat at the ends of the beams You need to cut the nests with a double tooth, and they are fastened with special staples.
- The place where the beam is to be closed ruberoid in two layers, this is done for waterproofing.
Rims
- Skeleton lathing is made from planks, beams and poles. The wood is also treated with special compounds for protection.
- That the lath was durable It is necessary to sew boards at a distance of up to 1 meter perpendicular to the rafters.
- Bars and boards with a distance of up to 15 centimeters They fix on the received skeleton taking into account the slope.
- Short parts for the flooring of the lathing it is necessary to alternate in staggered order.
- When making a crate, it is necessary to take into account in which way the roofing material will be fastened.
Waterproofing and vapor barrier
- To the crate, it is necessary to attach a vapor barrier material, use a construction stapler or small nails, but with a wide cap. Depending on what structure the roof is made on, it is possible to produce a roofing roof.
- Further with the help of waterproofing all the joints are covered.
Installation of roofing
 Mount sheets are required from the leeward side. It is imperative that the upper layers lie in an overlap on the lower ones.
- Lay the first sheet next to the pediment overhang;
- In the first row, two more sheets must be mounted;
- Next, you can lay two leaves of the second row and another one of the first.
It is necessary to make sure that the vertical overlap is about 15 to 20 centimeters, and the horizontal overlap is made on one wave. That there were no skews in a place where four sheets coincide, edges should be cut off. An exception is the installation of ridge and cornice sheets.
In no case should you break off the corners of the slate, otherwise cracks will appear on it.
How to establish ebb and protect the house from the wind?
The last stage of installation of a single-pitched roof is the installation of tin.
To do this you need:
- To begin with, it is necessary to nail the wind board onto the logs that protrude from above and below.
- To set ebb tides you need to choose a place for them and nail them with nails. This work is very simple and does not take much time.
How to make a roof for a bath?
There is a wide variety of materials for creating a single-deck roof for a bath:
- The material should be durable, moisture resistant, and also be combined with the appearance of the building.
- Often for baths use metal roofing, seam roof, corrugated board, roofing felt or slate.
- If the sauna is wooden, then it is worth taking care of good steam and waterproofing, and the roof must necessarily be insulated.
Saddle roof for garage
Roof for construction or verandah, barn
If a verandah, a gazebo or a barn, a summer cottage should be used in the warm season, then it is enough to make a saddle roof. But for a loft it's better to make a roof of a corner kind.
To make a roof for a verandah is absolutely not difficult:
- It is necessary to determine the angle of inclination.
- Further it will be necessary to make wooden frame.
- Install the rafters.
- Cover the structure of the roof.
Since such buildings are not intended for living, the material for the roof can be purchased is not very expensive, the slate used to be very popular, but today the market offers a wide variety of alternative types of coatings.
It can be easy and affordable materials, such as metal, and it can be put in one layer without joints.
- If the structure will be used in the winter, it is recommended that the roof be insulated. For this, the insulation is laid between the beams on the auxiliary crate, after which the rafters must be gypsum plasterboard or plywood.
Advantages and disadvantages of a saddle roof
In a single-pitched roof, as other species have their pros and cons, it is necessary to consider them before determining the type of roof.
Benefits:
- The roof is affordable
- With its help, the structure is reliably protected from strong gusts of wind, which is suitable for windy regions
- To build it is quite simple
- With a slight slope, the roof can be used as a resting place or as a greenhouse
Disadvantages:
- Due to the small angle of the roof, a large amount of snow accumulates on the roof, this can cause the roof to be pinched
- To make an attic or loft insufficient space
- It is impossible without complete difficulty to make a complete thermal insulation
How to insulate a house with a gable roof?
Previously, cement-chip slags or clay-concrete were used to insulate the house, but such materials do not provide good thermal insulation, and they deteriorate from snow and rain.
To date, construction companies have begun to use more popular materials, such as URSA. It includes a heat insulation plate, fiberglass blocks or glass wool, basalt mats.
If you make insulation using URSA, then the cost of money will be minimal, and installation is very easy.
Operating procedure:
- Under the steam and waterproofing the first coat. This will ensure good ventilation and dryness.
- Under the slope is a vapor barrier, especially if the ceiling is made of plasterboard or it will be tension.
- To the roof was a dwelling,it is worth using foam insulation for insulation, it will protect the room from moisture from the outside and from the middle.
- Where the overlap is horizontal, thermal insulation should be with a minimum density.
How to do preventive maintenance for a saddle roof?
Since in the winter season a lot of precipitation falls on such a roof, it is necessary to look after the roof. For the roof, the most dangerous is thaw snowfalls, since snow with heavy weight simply sticks to it.
Every year the roof needs to be inspected, especially in the case of the rafter. Rodents can damage it, and wood can also rot. Annually remove from the roof debris, which accumulates on the waves of slate.
The construction of a single-pitched roof makes it possible to build roofs on various buildings in a short time and with minimal financial investments. To ensure that the roof successfully copes with the loads, it is important to carefully approach the design rafter systems and the choice of roofing material.
Advantages and disadvantages of saddle roofs
Roof construction with one slope is one of the simplest options for building a roof. In some cases, a single-pitched roof can be made using reinforced concrete slabs (roofs with a small slope, including exploited ones). But most often the construction of a single-pit roofing construction with the use of a rafter system.
The advantages of single-pitched roofs include:
- economic feasibility of erection (materials are saved);
- simple installation, which can be done with your own hands;
- relatively small weight of the roof (can be erected on buildings with a light foundation);
- the possibility of installation on buildings of various purposes and sizes, including on houses with a large area;
- possibility of attic equipment;
- low susceptibility to wind loads (roofs with a small angle of slope can be used in certain regions);
- wood economy in 2-3 times in comparison with gable roofs (it is important when building in non-forested areas with a high cost of sawn timber).
Among the disadvantages of this type of roof is:
- high susceptibility to snow loads;
- the need for additional waterproofing to avoid roof leaks with a small angle of the slope;
- not the most attractive appearance.
The construction of a single-pitched roof with a relatively small slope is excellent for building houses in southern regions with high wind loads and low rainfall. In the areas to the north, the roof with a slope of less than 45 ° will have to be cleaned regularly from accumulated snow. In this case, the cross-section of the elements of the rafter system should be increased so that the roof can withstand high snow loads.

Single-pitched roofs are widely used in the construction of buildings for economic purposes, garages, terraces, baths, etc. At the same time, the roof of this type can become one of the elements of the original architectural solution of an apartment house.
Project preparation
The design of a single-pitched roof is developed based on the following parameters:
- length of span of the building;
- width of the building;
- desired angle of inclination of the roof;
- type of roofing material;
- desired length of the ramp;
- height of load-bearing walls.
Such parameters as the length of the span of the building and the angle of inclination of the roof affect the need for additional supports for rafter legs. From the difference in the height of the bearing walls depends the need for the construction of the gable. The height of the pediment is determined by the angle of inclination sill roof.

The length of rafter legs is determined not only by the dimensions of the span and the angle of the roof. Depending on the architectural features of the structure, the roof slope may extend for a certain length beyond the pediment, including the roof for the veranda or the adjacent terrace. If the project provides for the construction of a single-slope roof operated with a small angle of inclination, the rafter legs on either side usually rest against the Mauerlat and the outwardly projecting outer part of the wall.
The number of rafter legs depends on the width of the building. In addition, the length of the rafters is affected by their length and the cross-section of the material from which they are made - the longer the rafter, the more powerful it should be, and the smaller the distance between these elements. To avoid sagging rafters are used racks, struts, crossbars. The minimum allowable cross-section of these elements of the rafter system is 50 × 100 mm. Lezhni and gaskets are made from a bar section of 100 × 150 mm.

If the length of the rafters is up to 3 meters, the pitch of the arrangement can vary from 110 cm to 215 cm, depending on the material section (from 80 × 100 mm to 90 × 160 mm). If the length of the rafters reaches 6.5 meters, the cross section must be at least 120 × 220 mm, and the pitch of the rafters should be 110 - 140 cm.
Ready-made drawings for the construction of a single-pitched roof should contain complete information on the location, length and cross-section of all elements. In addition, it is desirable at the design stage to determine the principles of fastening the nodes and to reflect this in the documentation. This will allow to perform the installation in a short time.
Calculation of the inclination angle of the ramp
This parameter depends on a number of factors, among which is the atmospheric load and the type of roofing material. If a single-pitched roof is to be constructed by one's own hands, it is necessary to approach the calculations independently.
When choosing a roofing material, it is important to know the features of its installation. Recommended slope angle:
- for metal - 30 °;
- for roofing felt and others roll materials - 5;
- for corrugated board - from 8 °;
- for slate - from 20 to 30 °.
For a humid climate with a high amount of precipitation in winter, it is recommended to use a single-pitched roof with an angle of 45 °.
If the roof has a large enough area and a small angle of the ramp, it will often have to be cleaned of snow. It is important to choose a roofing covering that will not deform under the weight of a person.
The incision of a saddle roof is a rectangular triangle in which the rafter's leg is a hypotenuse. Conditionally denote:
Lc - length of rafters;
Lbc - the length of the wall from the rafters to the ridge;
Ld is the length of the wall of the house;
A is the chosen angle of inclination of the slope.

The length of the wall from the rafters to the ridge will be: Lbc = Ldd * tgA;
The length of the rafter's leg is: Lc = Lbc / sinA;
Trigonometric values are easily found in the Bradys tables.
Roofing system
The saddle roof scheme depends on the slope angle of the pitched roof and the span length of the building. A rafter system without supports is used for the installation of a single-pit roof with a slope angle of less than 30 ° on a structure with a span length not exceeding 4.5 meters. The rafter legs in this case rely only on the mauerlat of the bearing walls. This is the simplest construction, which is actively used in the construction of free-standing terraces and outbuildings.
Intermediate supports are used for span lengths from 4.5 to 16 meters. If the span does not exceed 6 meters, then at the base of the higher wall lies a log - a wooden beam measuring 100 × 150 mm. At an angle of 45 ° between the bottom and the rafters is fastened a hinge (a leg under the trunk).
The length of the span from 6 to 12 meters requires the installation of a ladder in the center of the projection of the rafters, parallel to the bearing walls. A vertical support is mounted on the left (the legs are connected by a run). On each side of the support are installed struts, resting against the rafters.

Long buildings require the installation of two leg support systems. At the same time from the racks to the rafters there is one strut (towards the nearest bearing walls), and a pair of racks supporting one rafter is connected by a bridge. This provides the necessary rigidity of the structure. The scheme should take into account that the distance between the wall and the foot should not exceed 6 meters, and between the two legs there is a third of the length of the run.
The lumber for the manufacture of the truss system must be well dried and not have cracks in the bonding areas of the elements. Outside these zones, cracks of not more than 0.25 of the thickness of the timber and more than 0.25 of the length of the element are allowed.
The construction of a single-pit roof can provide for the use of rafters from a bar or boards. Long rafter legs are recommended to be made of glued timber to avoid joints. The one-piece bar can be joined if necessary, while the joints should be placed above the support posts. Rafters from boards are used in the construction of relatively light roofing systems. They are divided into rafters composite (of three boards with liners, the central board is extended to the required length) and paired (two boards without a lumen).

When designing a saddle roof, special attention should be paid to the roofing cake, which consists of the standard elements inherent in roofing systems of any type.
Author Pavlov Yuri
Nikolayevich
Shed roof is one of the simplest versions of roofing structures, with the device of which you can easily handle by yourself. It is necessary only to study the main features of the technology and do everything in strict accordance with the instructions.
The design in question is attractive, primarily because it does not require a large number building materials. Some serious skills and great experience for doing such work are also not needed. One-pitched roof has an extremely simple device and is excellent for residential and outbuildings.

When choosing the appropriate angle of inclination of the roof slope, it is necessary to take into account what material will be used in the future as a finishing roofing. So, if the owner gives the choice in favor of the slate, it is best to build a ramp with a slope of 35 degrees. In the case of the arrangement of the rebated roof, the slope may be in the range of 18-35 degrees.

Better, if the development of the project of a single-pitched roof will be handled by a specialist. This will greatly simplify the work of the home master. He will only have to do everything in accordance with the instructions and rejoice at the result.
The main material for the production of a saddle roof is natural wood. It is used to create a crate, beams, rafters and other elements. As a finishing coat, slate and its more modern analogue called ondulin are most often used, tiles and other materials are often used.

Before proceeding to the construction of a single-deck house roof with your own hands, you need to calculate optimal gradient roof slope.

As already noted, the main point to be guided at this stage is what finish roofing material the owner decides to use. For example, metal tile or the same slate delays the precipitation not as a metal profile. And all these moments must be taken into account at the stage of designing and calculating the roofing system.
It is recommended to choose a material that can be cleared from snow and rain for as short a time as possible. Strongly it is not recommended to neglect such a moment as the rate of precipitation removal. At one point, the roof can simply break through or strongly deform under the weight of the snow, so be as careful as possible.
In the case of the application of ruberoid and other rolls roofing materials you can do minimum gradient at a level of 5-10 degrees. When using slate, it is recommended to increase the grade to 20 degrees. If the roof is covered with tiles, the minimum allowable angle of inclination is 20-30 degrees, but it is better to orient at least 35 degrees.

In addition to the type of finishing roofing, it is necessary to take into account the main features of the terrain in which the house is built. For example, if a building is located so that its roof can blow wind from all sides, the angle of slope of the ramp can be reduced. If the house is located among the dense plantations of tall trees, it is strongly recommended to equip steeper slopes, because only the force of the wind to remove all the snow is definitely not enough.
Preparation of materials and equipment for the roofing
The list of materials for the construction of a saddle roof includes the following items.
1. Wooden beams. Used for the arrangement of load-bearing structures. Most often used bars size 150h150 mm, in some cases allowed the use of bars section of 120x120 mm.
2. Boards. Of them laid out floor attic space. They are also used for rough finishing of attic walls. Fit to the horizontal bar.
3. Slate and special nails for its fastening. If you use another finish coat, select the appropriate fasteners.

4. Waterproofing material. Usually this is a polyethylene film or roofing material.
5. Insulation. A variety of materials can be used. The most commonly used foam and mineral wool.
7. Nails for fixing the elements of the structure.
As for the tools, you will need a simple home-made carpenter's set, which uniquely includes an ax and a hammer. Additionally, you will need a hacksaw and a construction stapler. Set necessary tools can vary depending on the chosen roofing. In this moment, you will have to orient yourself directly while doing the work.
The construction of a single-pit roof requires the following elements: crate and controllable. It is best to collect them from bars measuring 50x50 mm.
Guide to laying the beams
Beams are fixed on the top of the wall at a distance of about 75-80 cm from each other. The role of the base for the uneven bars is traditionally performed by the Mauerlat. In some situations, the seismic belt is used.

Reinforced concrete is used for manufacturing seismic tape. From it is done monolithic construction On the upper edges of all the walls of the house. The seismic belt repeats the contour of the outer walls. The construction is necessarily closed. It is used to increase the resistance to incoming wind loads.

To arrange the element in question it is necessary to fix the formwork first. Its height should slightly exceed the height of the future seismic zone. After the formwork is installed, the reinforcement is mandatory and the concrete is poured directly.

Mauerlatt is made from a bar. Also fixed around the perimeter outer wall at home. Performs the function of support under the rafters. Promotes a uniform distribution of the main loads created by the roof.

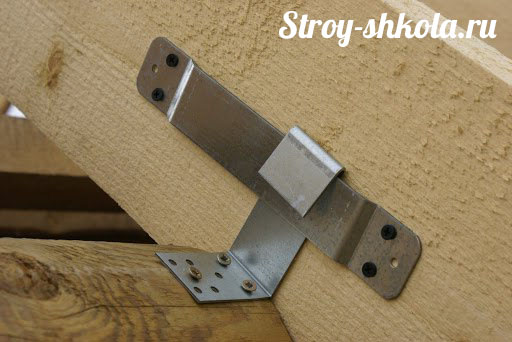
After the fastening of all the beams, the rafters must be fastened on top of them. They will serve as the base for the upper point of the saddle roof. The rafters must be exactly as much as the beams of the overlap are used. The result should be a kind of triangle with a right angle. After this, the inclined beams are fixed. To fix them to the seismic band, anchors are used, to the Mauerlatu, the beams are fastened with nails.
The construction of the roof begins with the creation of a rafter base with a slope to the rear wall of the building. In the end, the roofing material is laid. For maximum ease of movement, you can put strong boards on the rafters, and then remove them immediately before you start laying the roofing material.
Thermal insulation works
The procedure for the independent installation of a single-deck roof depends largely on what kind of concrete roofing will be used as the final roof. However, regardless of this moment we need to pay great attention to the issue of thermal insulation, as well as moisture and vapor protection. Moisture insulation will provide protection from the harmful effects of water, which will contribute to an overall increase in the life of the system.
In the past, such materials as cement-shaving slag, as well as clay-concrete and other similar materials were used to insulate the roof. However, at the present time they are practically not heard. They have many weak qualities, including low resistance to moisture, poor heat-insulating properties, etc.
Today, more complex materials are used to insulate single-pitched roofs. They are characterized by relatively affordable cost, high efficiency and ease of installation.
Before proceeding with the installation of the thermal insulation material, it is necessary to mount a waterproofing. If the thickness of the heat-insulating layer is less than the thickness of one rafter, the moisture insulation must be spread over the rafters. If the thickness of the thermal insulation layer corresponds to the same parameter for rafters, the film should be placed along the upper edges of the bars, which are set for the required elongation of the rafter legs.
![]()
![]()
The waterproofing is fixed across the ramps with an overlap of about 10 cm. Between the roof and the waterproofing, leave at least 5 cm of clearance, for the preparation of which, prepare bars in section 5х5 cm in advance.
Unpack the heater, wait 15-20 minutes, and then proceed to further work. Wait for the insulation to adapt to the surrounding conditions. Cut the heater into pieces of the required size and lay it between the rafter legs.
The material fits in with the enemy. When cutting, take into account the fact that the width of one slab should be approximately 2.5-3 cm above the distance between adjacent rafter legs. Be sure to maintain a small gap between the waterproofing material and thermal insulation. To do this, use the previously mentioned brusochki.
Proceed to fasten the vapor barrier to the material. It is placed at the bottom of the rafters and fixed with the help of galvanized nails with a flat head. Also suitable for fastening is a construction stapler and the corresponding brackets. The vapor barrier material is covered with a 10 cm overlap. The joints must be fixed with a metalized adhesive tape.

Installation instructions for the battens
Due to the crate, the finishing roofing will be retained. This element of construction rests on the control of the lattice. The latter is attached to the rafters. Usually for the assembly of the battens are used bars measuring 5x5 cm. The grating is collected from the same bars.
Experts do not recommend collecting laths from gnarled low-quality boards. This is not the most reliable material. It can simply break down under the pressure of snow. From the use of raw boards, too, should refrain, because as the amount of moisture in the composition decreases, their size will change, because of which the design will begin to rapidly loosen and noticeably weaken, and in the end it may completely collapse.
Most often, a slate is used to cover a saddle roof, so further steps of the technology will be considered just by its example. In case of working with other materials, do not forget to make the required changes in the order of their installation.
The corrugated sheets are laid on the transverse lath, assembled so that each sheet lies on 4 brusks. The first bar should be under the lower overlap, the next 2 bars are responsible for maintaining the central part of the roofing sheet, And the last bar supports the upper part of the roofing element. The bars should be installed at approximately the same distance. For example, if the slate sheet has a length equal to 175, place the bars in a step of about 44 cm.

In the case of using another finish coat, the design of the crate will also have to be changed. For example, ondulin is recommended to be laid on a continuous crate, and roll materials and soft shingles best combined with a base of plywood sheets. Be sure to adhere to the installation technology of the crate, designed specifically for your roofing material. Otherwise, the service life and, in general, the reliability of the roof can be significantly reduced.
Laying of the final roofing
The process of constructing the roofing will be considered using the example of the already mentioned slate. You can choose any material suitable for a single-skin roofing structure and lay it according to the appropriate technology. Sheets start to mount on the leeward side. The upper elements of the flooring must go to the lower ones. Most often, the fastening starts with the fact that the starting slate sheet fits near the pediment overhang, then 2 more sheets of the first row are placed, after which 2 sheets of the 2nd row and 1 sheet of the 1st row are laid, and so on.

Ensure that the vertical overlap does not exceed 120-200 mm. The standard horizontal overlap is equal to one wave. The sheets should be laid in such a way that the lateral parts of the slate of the upper layer coincide as closely as possible with the sidewalls of the bottom plates. The corners of the slate sheet need to be cut, otherwise there will be distortions at the convergence points of the four sheets.
However, breaking these angles is strongly discouraged. This can lead to a significant reduction in the strength of the material and the growth of cracks. As a result, the service life of the roof will decrease noticeably. Angles can be cut with a circular saw or a hacksaw. The same tools are also used for cutting sheets. All sections must be painted over.
Thus, there is nothing super complicated in the device of a single-pitched roof. Follow the instructions, do not forget the main rules and everything will happen. Successful work!
Video - Self-propelled roofing device
One-pitched roof is one of the simplest types of roofs, which can be built with your own hands in the construction of a dwelling house or outbuildings. If you do not have the experience of independently constructing such roofs, you can use the information outlined in this article.
Waterproofing
Currently, very often in the construction of saddle roofs use a waterproofing film (hydro-barrier). Such material is attached directly to the rafters, rolling across the roof slope. The panels of the hydrobarrier are lapped, starting from the lower part of the roof and preliminarily fastened with a stapler.
 After the hydrobarrier is laid it is fixed with longitudinal slats (controllable), along the rafters. The lining in this case is arranged from above along the longitudinal rails, thus ensuring the ventilation of the space under the roof.
The device for waterproofing the roof is especially important for small slopes of a single-pitched roof. And although it complicates the work and increases the cost of building the roof - these costs are fully justified.
Fig. 3 Waterproofing of single-pitched roofing:1- rafters; 2 - hydro-barrier; 3 - control bar (longitudinal); 4 - crate.
Finishing of sidewalls, edges and overhangs
After installation of the roofing material along the edge of the roof, along the sides and from the ends, depending on its type, the windboards are cut (edging and planed) or special metal side strips, as for roofing from profiled sheeting or metal roofing.
Overhangs of a saddle roof can be sewn with a planed board, plastic lining, corrugated board or other material. It depends, both on the availability of this or that material, and on the type of roofing material, which should be harmoniously combined with underlaid eaves.
One-pitched roof on load-bearing walls that are on the same level
Work begins with the laying of horizontal beams , which can perform simultaneously and function attic floor. The beams must be laid on the Mauerlats if the walls do not have a flooded reinforcement belt or its surface is not sufficiently level. Mauerlats are installed strictly horizontally, for waterproofing and fastened to the wall with the help of wire and anchors or pins, pre-embedded in the reinforcement belt.
If the surface of the reinforcement belt is flat and horizontal beams can be laid and fastened directly to the wall along the layer of waterproofing.
The cross-section of the beams and the distance between them depends, as for the rafters, on the length of the span and the weight of the roof. Usually the beams are laid at a distance of 70-100 cm. On top of the beams, it is necessary to lay a temporary flooring from the boards, in order to be able to move along it during operation.
To the laid and fixed beams are fastened vertical pillars-supports from the high side of the future roof. The supports are leveled and attached to each beam, after which they are fixed in a vertical position with temporary braces.
When all the vertical supports are installed and secured with bracing, the upper trim bar (upper run) is installed on top of them, on which the rafters will rest with the upper part and which must be strictly in the horizontal plane.
Installation of rafters
Rafters are stacked in steps equal to the pitch of the laid beams. In the upper part they are laid on the harness and fastened to it with the help of nails of 200 mm and staples. Steel staples are clogged in the rafters and the bar of the top harness at an angle of 45 o, in the form a truss between the rafter and the harness. In the lower part of the rafters are attached to the previously laid beams, also with the help of nails and staples. The result is a series of trusses in the form of rectangular triangles.
You can do without a bar top bandage, and the rafters lay directly on the vertical support and attach to them. In this case, you need to ensure that all rafters are on the same level. This can be controlled with a cord stretched between the outer rafters, and strengthen the racks with reliable braces. But still, with the upper strapping the construction will be more reliable.

Fig. 4The construction of a saddle roof on walls that are on the same level: 1 - walls; 2 - rafterleg; 3 - beam; 4 - vertical support; 5 - Mauerlat; 6 - additional support; 7 - the stop (brace); 8 - run; 9 - facing of the front part.
When the length of the rafters (more than 6 m) is large, it is necessary to install intermediate supports - one or several, depending on the span, securing them with braces. Intermediate supports are installed on the inner bearing walls. If even during the installation of the intermediate support the length of the span is more than 4.5 m, then in addition to the vertical supports it is necessary to install supporting braces (stops).
The size of the eaves with this method of mounting a single-pit roof is regulated in the upper part by the release of the rafters in relation to the wall, and in the lower part by the release of the beams outside the wall or rafters.
Bundle and roof installation
After installing and securing all the rafters, you can proceed to the device of the crate. The lining with this method of construction of a single-pitched roof is also arranged as in the first variant.
After the crate is installed, the wooden frame of the roof is ready and you can start assembling the selected one roofing material.
Single-deck roof with your own hands video
Below you can watch a video about one of the ways of fastening the rafters.
The advantages of a saddle roof include:
- Simplicity of construction and light weight;
- Economical, a small amount of building materials for the roof;
- The possibility of erecting a roof with a slope angle of 3 to 45 degrees;
- High ability to withstand snow and wind load depending on the angle of inclination;
- For a single-pitched roof, most roofing materials are suitable, which allows the implementation of any design solutions;
- On a single-deck roof, you can arrange a place for rest or sunbathing.
The saddle roof also has disadvantages:
- Under a single-pitched roof it is not possible to build a full attic or attic;
- In regions with strong winds, a complete insulation of the saddle roof and downwind walls is required;
With a large snow load on a single-pitched roof with a slight slope, it is necessary to remove snow in a timely manner, however, this defect is easily solved the right choice roofing.
Single-pitched roof construction
A single-pitched roof usually consists of a rafter system, a roofing, a heater, a roofing covering and an outer sheathing of gables and walls. Depending on the type of building, the gable roof system can be of three types:

In addition, single-pitched roofs can be divided into vented and unventilated. Unventilated roofs usually have an angle of not more than 5 degrees and require high-quality insulation, hydro and vapor insulation. Ventilated roofs can have any tilt angle, their feature is the availability of free space between the roof and the ceiling and ventilation holes on both sides of the roof or on the gables. Air gap can improve the conditions of water vapor removal from the insulation, extend the life of the structure.
The slope angle of the saddle roof is directly related to the roofing. For soft roofing or roll materials use a slope angle of up to 10 degrees, with an angle of inclination of 10 to 20 degrees, usually use profiled sheeting with a longitudinal profile and a wave height of 30 mm, slate and ondulin can be placed with the roof tilted from 20 degrees, and metal tiles from 25 degrees. When calculating the roof, it is necessary to take into account this dependence and make a choice in accordance with the purpose of the roof and the chosen coating.
Technology of making a single-pitched roof
The erection of a saddle roof, with all its advantages, is not always possible. If there is a lot of precipitation accompanied by wind, as well as a large snow load, it is better to choose another type of roof, gable or hip.