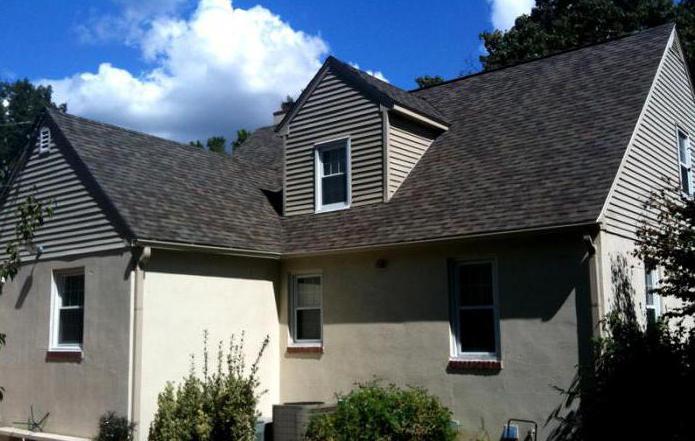
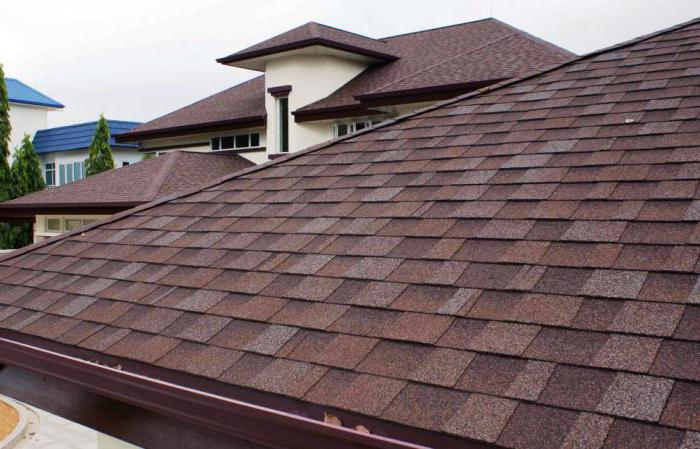
Stacking technology soft shingles is simple enough and does not cause any special difficulties and, if you follow the instructions, and also have some skills in construction, it is quite possible to install the bituminous shingles with your own hands. Correctly produced laying of such a coating is not only an excellent protection of the home from adverse weather conditions, but also an excellent appearance of the roof itself.
Weather
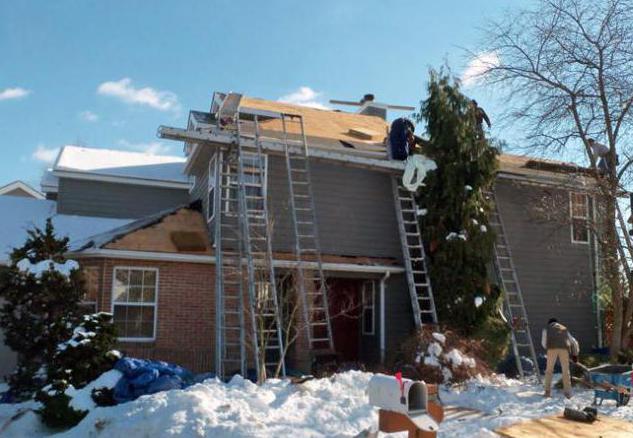
According to the instructions flexible shingles are recommended to be placed in a warm, dry season, at a temperature of not less than + 5 ° C, but it is better still + 10 ° C. This is necessary in order that, under the influence of heat, the bitumen shingle sheets should be better bonded between themselves and the base, forming a practically monolithic coating layer. At low temperatures, the sheets become brittle, they do not bend well, so winter is not the best time to work with this type of coating, but if you plan to install bitumen shingles in winter and the air temperature is less than + 5ºС, you must always hold the material at room temperature for 24 hours and use a building material a hairdryer for warming up the shingles and bituminous mastic for better sealing of the layers. In winter, it is better to make partial roof repairs, rather than a full installation on the entire surface of the roof, especially if laying flexible shingles it's made for the first time.Roof pitch
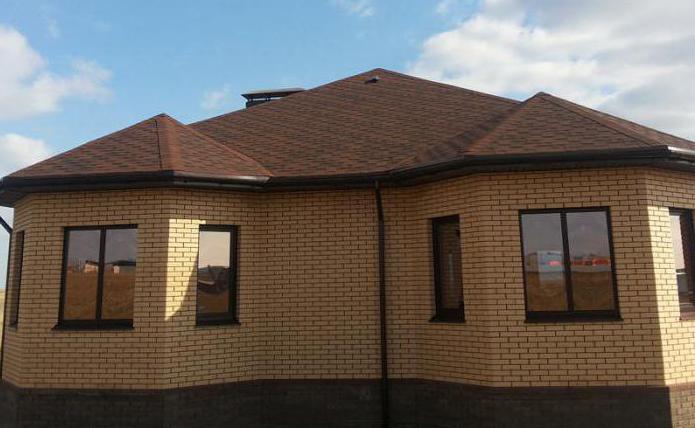
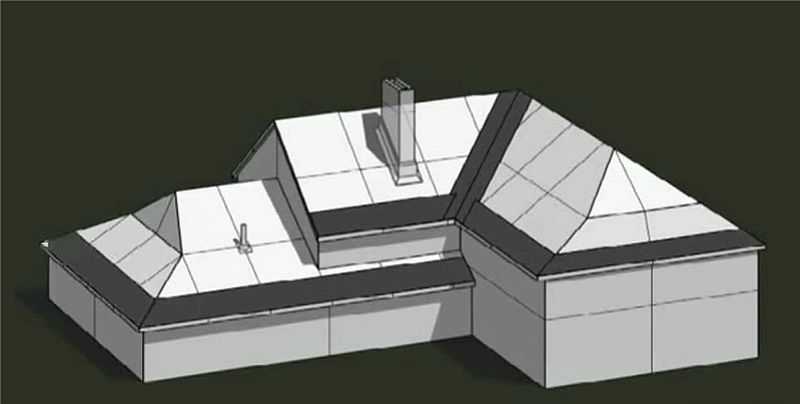
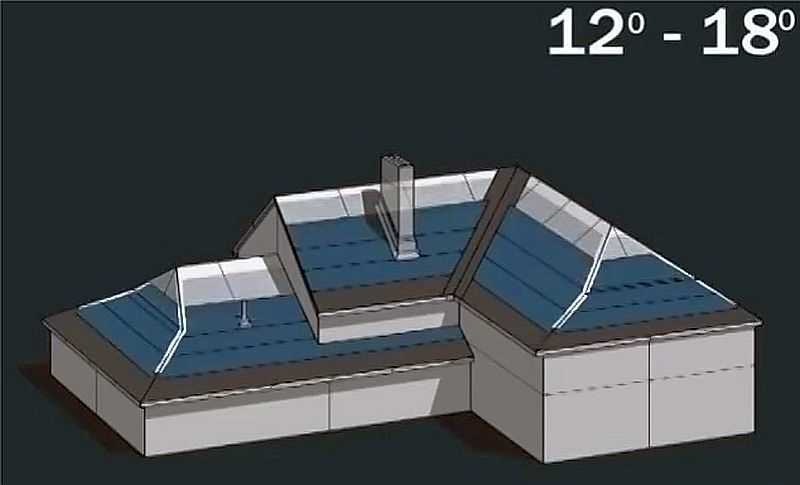
Installation of flexible tiles is advisable to conduct on roofs with minimal bias 12º-18º. If the slope is smaller or the roof is flat, it is better to choose another type of cover, since the inevitable stagnation of water will lead to rapid damage to the roof.The basic stages of laying soft shingles
Base, ventilation
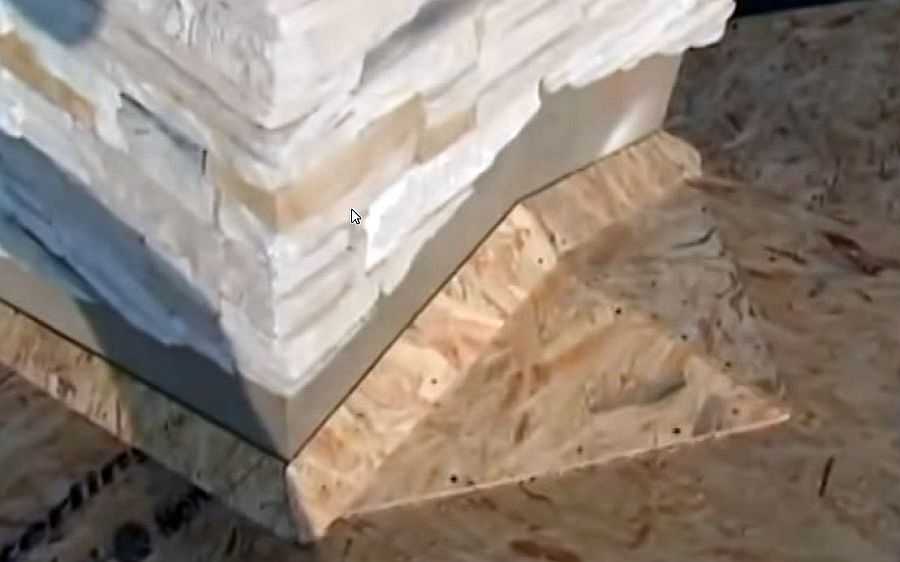
Any type of roof installation begins with the preparation of the foundation. As a basis for laying "bitumen" is used a solid solid foundation. It should be smooth and firm, because the slightest irregularities will inevitably affect the appearance of the roof. The ideal version of the coating is the OSB-3 plate. An obligatory condition for the long service of a soft roof is proper ventilation on a "bottom-up" principle. At the bottom of the ramp, ventilation holes are made through which air enters, and it is pulled through, so-called, ridge ventilations or aerators.
 Features of laying the lining layer
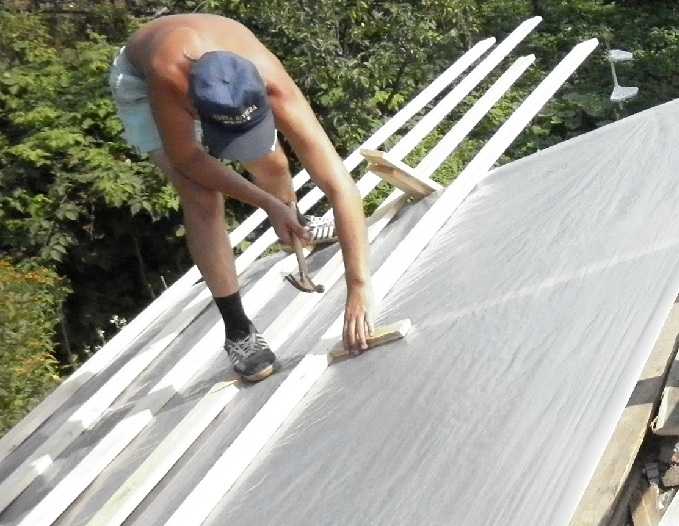
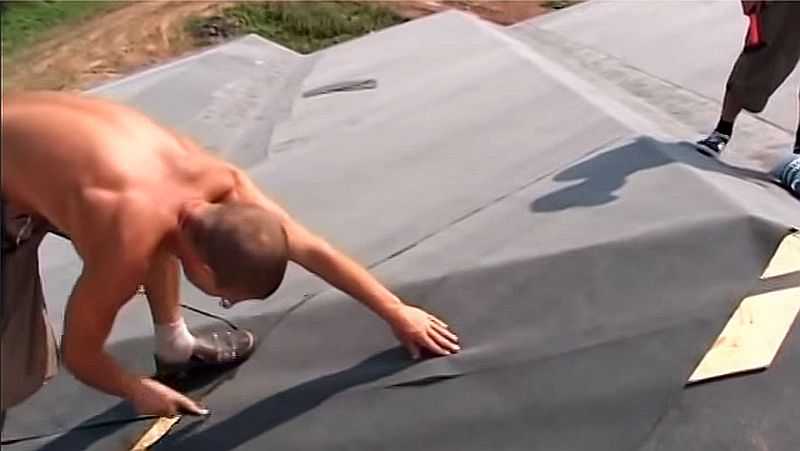
Installation of soft tiles is carried out on a special lining carpet, preferably the same manufacturer as the tile. If the angle of inclination of the roof is minimal, ie 12 ° -18 °, then the lining carpet must be laid on the entire surface of the roof. Fasten the backing layer from the lowest point of the roof, parallel to the cornice line. Layers are superimposed on each other: the top layer should be found on the bottom by 20 cm, the edges are greased with glue and nailed with wide hats. Pay attention to the good tension of the carpet! In the case of a roof slope of more than 20º, it is possible to lay the lining, only on the cornice overhangs, skates, at the junction of the rajids (ravines), around the pipes, i.e. on "problem areas" where leakage is likely. In this case, the carpet can be fastened and upright. Also, vertical carpet fastening can be used for roofs with steep ramps. In any case, before installing the backing layer, the base should be smeared with bituminous mastic. Then, when the carpet is heated with a hair dryer, the lining perfectly fuses with the base and a continuous coating is obtained. The correct base and a high-quality lining layer affect both the appearance of the roof and its protective functions. Use as a lining material hydrobarrier, ruberoid is not recommended.
Protection of the "edges" of the roof
For the outflow of water and the protection of wooden roof elements, over the overhang of the roof over the lining is installed metal curtain rod. They should be fastened with nails in a staggered order and connect the overlap by 5 cm. The end strips are fastened in the same way. These elements strengthen the overhangs, protect the wooden cover from rain, increase wind resistance and give a complete appearance.
Marking for flexible shingles
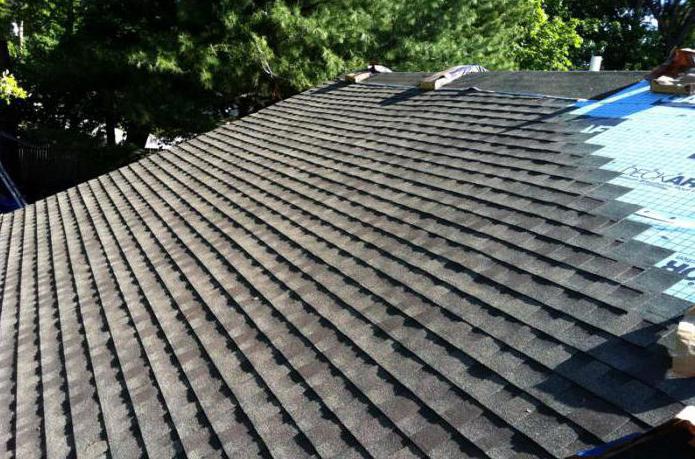
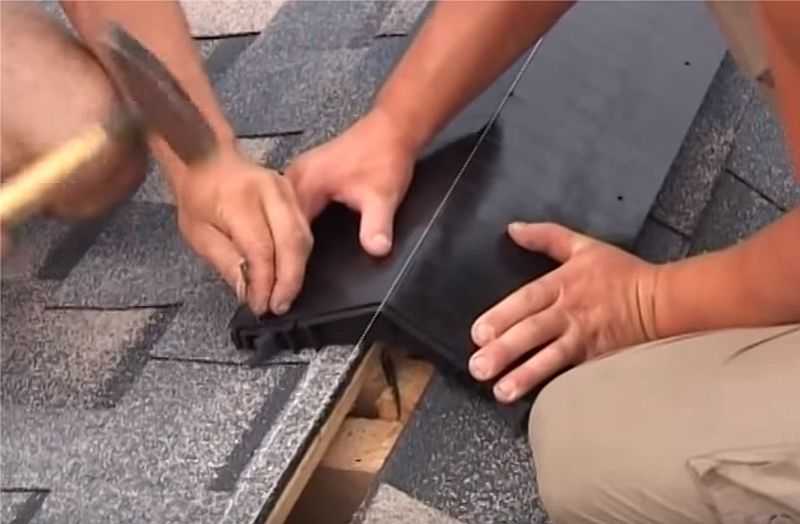
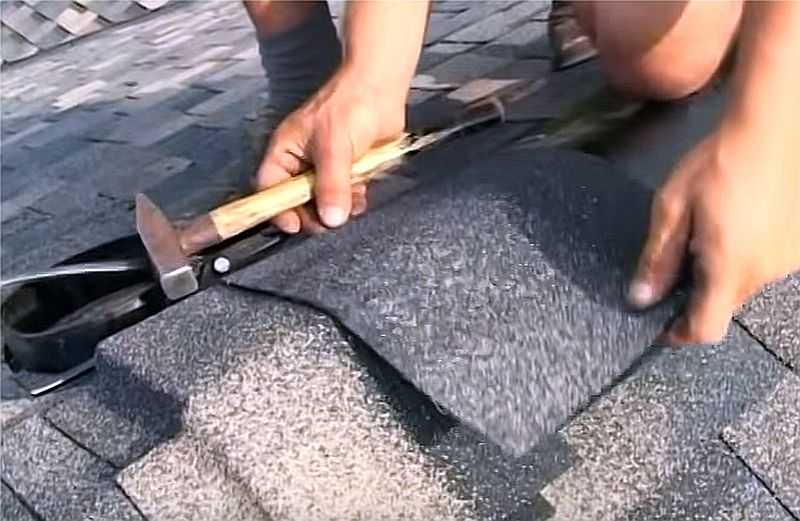
If the laying of soft tiles is done for the first time, it is better to make a preliminary marking to avoid curving the rows. The cord is stripped to horizontal and vertical lines in steps of 0.8 and 1 m, respectively. This markup will help to align the rows horizontally and vertically, and also to correct the curvatures in the event that an object is embedded in the roof: a pipe, a window. To strengthen the tile strictly on these lines is impossible! Just follow the direction! It is necessary to mix a few packages with tiles, so that the roofing looks homogeneous, because in different batches there can be different shades that can not be noticed at once. First, at 1.5-2 cm from the edge of the cornice, the self-adhesive cornice tile is fixed to the joint, in addition it is nailed with wide hats. You can take ordinary ordinary shingles, and cut off the protruding parts, the so-called petals. The first row begins to attach from the center of the ramp towards the ends of the roof in both directions. If the installation of flexible shingles is done by hand for the first time, then you should follow the sequence of actions:- Remove the film from the bottom of the sheet (after that you can not stack the tiles on each other).
- Apply shingles to the surface and secure with four nails on the "notches" at least 2 cm from the edge. If the slope of the roof is large, then you need to fix it with six nails - two to drive along the edges of the sheet for additional fixation.
- The next row is superimposed on the previous one so that the "petals" of the top sheet are found on the recesses of the previous row and form a continuous straight line with them.

Registration of "problem" places
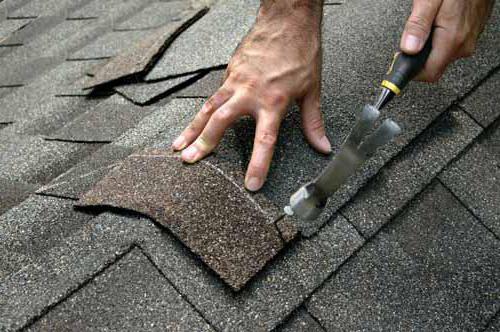
- Having reached the end plate, soft tiles should be trimmed level with the bar and glued with bituminous sealant or glue to a width of about 10 cm.
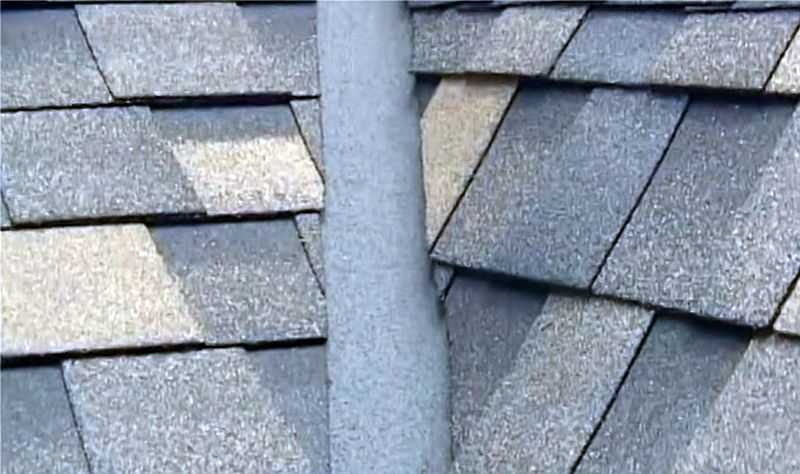
- When stacking in the valleys, the tile is overlapped on the adjacent ramp and cut off under one line, heated additionally with a hair dryer and pasted with bituminous glue.
- A metal apron should be used around the pipes, outlets of the antennas and in the places where the soft shingles are adhered to the vertical surfaces and must additionally spread the seams with bituminous sealant.
The horse
On the shingle of the roof is fastened the curtain tile, divided into three parts. Each part is bent at the right angle. You can start laying on either side of the ridge. The sheet is glued to the shoe with a self-adhesive side and is nailed with four nails. The next (top) shingles should be overlapped on the bottom (5 cm) to cover the nails. The marginal sheets are glued. Everything, the roof is ready!
  But the majority of questions arise precisely in the process of work, so it is worth familiarizing with the video materials on the installation of flexible tiles.
 You can lay soft shingles on any kind of roof, but it is especially suitable for use on roofs of complex configuration with joints and transitions. To install a soft shingle with your own hands is not a difficult task, but for quality work you need to know some features. We have tried to explain this in detail in this article.
What is soft shingles?
This elastic material is manufactured using a special technology made of fiberglass or polyester, impregnated with bitumen. Externally, soft tiles are small plates of the most varied shape (rectangular or five-, hexagonal), executed in the form of rhombuses or ovals, bee honeycombs,The use of special additives from styrene-butadiene styrene and polypropylene can significantly increase the strength, increase frost resistance and reduce the thermal conductivity of the shingles. Colored stone crumb, applied to its front side, serves not only as a decorative decoration, but also as an additional protection against mechanical damage and burnout.
The device of a roof from bitumen shingles
Installation of soft tiles
1. This type of roof is mounted only on continuous flooring (crate). Its thickness depends on the step of the rafters: the greater the distance between the rafter legs, the thicker the material from which the flooring is to be made. As it can be used moisture-proof plywood, sheet piling boards, chipboards, etc.2. To make the roofing look aesthetically pleasing, it needs to be laid perfectly: at the slightest unevenness, the tile will look sloppy.

Installation of wooden flooring for flexible tiles
Important! Since when changing the temperature of the wooden sheets or boards may vary in size, it is necessary to leave the deformation gaps of 3-5 mm between the boards or slabs of the flooring.
3. To prolong the service life of the roof, it is necessary to provide in it the presence of steam and wind insulation and ventilation clearances.
4. The vapor barrier film is attached from the inside of the crate and fixed with nails or staples, and then pressed with a wooden strip in 60 cm increments. The overlapping places of the film are glued with a double-sided adhesive tape.

Laying the vapor barrier layer
5. Residential attics should be pre-insulated. Plates insulation are laid in unison (in staggered order) on top of the vapor barrier layer between the wooden blocks.
6. For additional waterproofing the most problematic places of the roof on the cornice, valley, skate ramp in the places of its fracture is decomposed backing carpet. If there is insufficient inclination of the roof (up to 12-18 °), it should be rolled over the entire surface of the roof. All joints should be further processed with bituminous mastic.

Installation of lining carpet
7. The lining carpet is mounted with overlapping 10-15 cm and fixed with roofing nails in 15-20 cm increments. This material should not be bent. To create overlaps on the slopes of the roof, it can be cut into 10-15 cm.

Mounting of the cornice
9. Installation of a soft roof begins from cornices. For this, it is better to use a special cornice, on which a self-adhesive layer is applied to enhance waterproofing. If it is not available, the tile installed on the cornices should be carefully smeared with mastic. In addition, it is fastened with roofing nails with wide hats.

The order of laying the first row
Council. For laying, use tiles from one lot. Otherwise, significant deviations in color are possible. To obtain an even pattern, it is better to use shingles (tiles) from different packages alternately.
10. When installing decorative tiles of complex shape "petals" should be laid out in accordance with the manufacturer's recommended drawing scheme.
11. Cutting material it is more convenient to carry out a special knife with a hook-like blade. To do this, you can use an ordinary wood hacksaw. In order not to damage the soft tile, it is better to cut it on a special board.
12. In order for the roof to look neat, it is better to place the roofs lighthouses of strong filaments, which when laid will serve as landmarks.

Mounting of the next series
13. The subsequent rows of tiles are also fastened to the base with the help of roofing nails. Their hats are completely hidden behind the petals of the next series. The first row is laid starting from the center of the slope, gradually moving in the sides. On its edges, the shingles are cut if necessary.
14. When installing in a warm season for several days, the bitumen, which is part of the flexible shingles, will melt, and self-shattering of the shingles will occur. If the weather leaves much to be desired, to fuse the shingles among themselves, it should be treated with a construction hair dryer.
Important! Flexible roofing it is not recommended to mount at low temperatures (not below + 5 ° C) - in the cold, the tile becomes too fragile and may break in places of bends.
15. To ensure ventilation on skates or anywhere else in the roof, aerators are equipped. The places of their junction should be protected with a lining carpet and smeared with a layer of mastic.

Roof fans
16. To protect the most vulnerable places of the roof, additional components are used: skates and valleys (flexible strip or curved shingles laid at the junction of the roof planes). They fit simply: a fragment of shingles is bent, and then fixed by roofing nails with a step of 10 cm. With the help of ridge shingles, it is possible to strengthen and bypass the air ducts, the output of communications and the attachment point of the antennas.
17. Since the most frequent formation of leaks in the valley areas, it is advisable to lay two layers of shingles in such places.
Council. When working in conditions of low temperatures, ridge shingles and grass for better flexibility, it is better to warm a little on a warm metal pipe.

Stacking of the valley
The construction of any house always includes erection of a roof and installation of a roofing covering providing reliable and long-term protection at any time of year. Constant technological progress provides consumers with a wide range of roofing materials.
Many of them successfully combine practical and aesthetically beautiful solutions created centuries ago, with the latest scientific developments. This is most clearly demonstrated by soft shingles, the technology of installation and its wide possibilities is a consequence of the achievements of modern developers, and the unique appearance is the merit of the builders of medieval Europe.
Soft roofing or is a modern material that is used to cover the roof and consists of glass-fiber, bitumen and stone granules.
History, species and composition
Despite the fact that the first bitumen shingles appeared at the beginning of the last century, the mass distribution was received only in the middle of the century in America. First of all, due to the shape with three petals, as a result almost every second house was covered with such a roof.
An interesting fact is related to the name. The technology of installation in all countries is almost the same, but in America the word "shingles" is used more, by analogy with wooden boards for roofing, and in Europe, as before, "shingles."
Modern production technology, which includes the use of a tear resistant fiberglass fabric, modified with bitumen and bitumen polymer additives, has led to the creation of a universal roofing material.
Advantages, disadvantages and scale of production
The use of any roof covering has its pros and cons. The soft shingles are no exception. The installation technology, high performance and a wide range of colors distinguish it in a number of other coatings.
Among the main advantages are:
absence of moisture absorption, which automatically excludes destructive processes and provides reliable waterproofing;
resistance to any temperatures;
not exposure to ultraviolet radiation, in particular the absence of melting at high temperatures;
good tolerability of almost all mechanical effects;
lightness and flexibility.
One, but a significant drawback is the total cost of work. When soft tiles are used for the coating, the installation technology includes an obligatory solid foundation, which is usually made from plywood or OSB boards. Even if a board is used, very strict requirements are imposed on it for thickness and location on the surface. Annual rings must be directed downwards.
Today production is carried out in many countries of the world, mainly in America and Russia. From domestic manufacturers are allocated "Shinglas" ("Technonikol"), "Rufleks", "Doke" and "Tegola" (together with Italy), occupying more than 80% of the market.
Terminology and materials
Technology from each manufacturer has its own nuances. But the basic stages of all the same. To better understand the technical information contained in all instructions, it is necessary to understand both the terms used and the main materials used.
Any element of the tile consists of several conventional parts:
adhesive strip;
the petal.
visible surface;
places of overlap;
Roofing usually includes:
pediment and cornice eaves;
valley or inner corners at the junction of two rays;
ribs and fractures, which are places of joints of two different surfaces.
Laying of the coating is done after preparation roofing construction, including hydro and steam insulation, insulation, if necessary, as well as mandatory space for ventilation.
The technology of installing soft tiles involves the use of several mandatory materials:
roof tiles and universal starting, used for cornices and skates;
lining base (carpet), which can be of several types;
lining base for valleys;
metal bars for eaves and ends, as well as for abutting, for example, a pipe;
ventilation elements;
mastic based on bitumen and polymer additives, allowing to work without preheating;
roofing nails.

Preparation of the base of the roof and ventilation
When soft roof tiles are used for roofing, the self-assembly technique requires strict execution of all steps contained in the instructions for use.
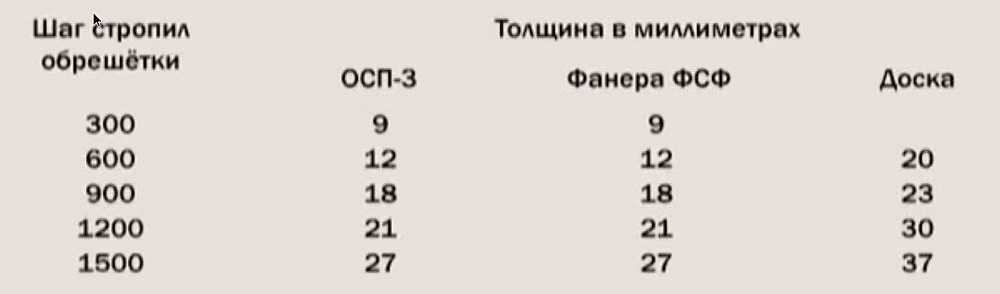
The first step is always the preparation of the roof surface for laying the roof tiles. For this, you can use plywood, OSB slabs or edging boards, which are better fixed with screws. The thickness of the base is determined by the distance between the rafters of the roof structure and is calculated according to the table below.
| Distance between rafters, mm | OSB, mm | Plywood, mm | Board, mm |
| 300 | 9 | 9 | - |
| 600 | 12 | 12 | 20 |
| 900 | 18 | 18 | 23 |
| 1200 | 21 | 21 | 30 |
| 1500 | 27 | 27 | 37 |
A clearance of up to 5 mm is left for the board. In cold weather, it is necessary to have a gap of at least 3 mm for a possible expansion under the effect of temperature in the summer. The resulting surface must be flat, rigid and solid.
Properly made ventilation has airflow, space above the heater and exhaust ducts. At the same time, the area of the outlets should exceed the incoming ones by 15%. Often, the eaves are sewed with finishing material, without holes for the inflow, which is a gross violation.
Installation and lining base
To demonstrate the basic stages of installation, for example, the technology of installation of soft shingles "Shinglas", which occupies more than 40% of the Russian market, is used.
On the prepared basis around the perimeter fixed special metal cornices, often called droppers. They are installed with an overlap of up to 50 mm and are fixed in steps of up to 150 mm in a zigzag pattern. At the joints, the pitch is reduced to 30 mm.
After that, the installation of the lining base begins, having small differences for ramps with different angles.
For rolls and cornice overhangs, a roll material is used, which is coated on one side with an adhesive compound that is attached to the roof surface and must be installed along the entire perimeter of the cornices, not reaching the 30 mm bar.
In valleys, it fits 500 mm on each side, along the cornices along the entire width of the overhang and additionally by 600 mm inside the roof. The overlap horizontal is made 100 mm, vertical - 150 mm. To increase the reliability, the base is fixed around the perimeter with nails in steps of no more than 250 mm.
For the rest of the roof surface, a conventional underlay base is used, which is laid upwards parallel to the cornice and fixed with nails. The places of lapping are additionally treated with mastic not less than 100 mm.
On the ribs, skates and skate fractures the base is laid 500 mm on each side, that is, the entire width. For the pediments and along the joints with the walls, only half the roll is used, equal to 500 mm.
At the end of this stage, the front strips are installed, which protect them from wind and moisture. They are fixed with nails in steps of no more than 150 mm.
Mounting protection of the valley
Endova is the most vulnerable place in the whole construction. In addition, during the repair you have to disassemble two roof slopes at the same time. Therefore, when installing the shingles, special attention is paid to it.
After installing the entire backing layer, it is necessary to separately make protection of the valley. To do this, a special lining with a width of 1000 mm is applied, which is laid 500 mm on each side over an already fixed base with an offset of up to 30 mm.
The edges along the entire perimeter are smeared with a mastic with a width of at least 100 mm. After gluing the entire perimeter is additionally fixed by nails no further than 30 mm from the edge in increments of 250 mm.
If it is not possible to make the base solid, the overlap width must be at least 300 mm, with obligatory blurring of the entire area with mastic. It must be placed as close as possible to the top.
Preparation for laying and installation of the starting strip
Soft roof has its own subtleties, caused by the structure and features of production. To work simultaneously, several packs are used to avoid concentration of one shade. For the same reason, when soft tiles are used, the installation technique in winter requires working with only a few packs that are taken from a warm place.
It is recommended to apply a net on the lining base, which will facilitate the installation process. The horizontal distance corresponds to the size of 5 rows of tiles, the vertical is 1000 mm or the dimensions of one shingle. This will quickly make alignment or simplify the task if an additional element is present in the roof.
Installation begins from the bottom of the center of the ramp. For the starting strip, a special universal element or ordinary ordinary tile without petals is used. They are installed on the adhesive backing and fixed by 4 nails along the perimeter at a distance of no more than 30 mm. If a trimmed tile without a glue base is used for the start, it should be smeared with mastic.

Installation of shingles
The installation is made by cutting downwards with an indentation of 10 mm from the starting element. The tile is fixed with nails along the allocated place. For stingrays with an angle of up to 45 °, 4 nails are used, which are fixed at 25 mm from the edge and the visible area, which allows two elements to be fixed simultaneously. For 90 °, the number of nails is doubled. Depending on the shape of the petal, different styling options are possible, allowing both chaotic patterning and orthogonal drawing.
In the valleys, the location of the trough, from which it recedes 300 mm in each direction, is pre-marked, determine the zone where nails do not break through. The tile is cut to the required size and must be fixed with nails and mastic. Near to the valley the upper corner is cut off for water retreat.
On the pediments, the tile is fixed not reaching 10 mm to the edge with the obligatory cutting of the upper corner, as in the valley. Fixation on the edge is carried out using a mastic, which is applied by a layer of not less than 100 mm, and nails.
Pipes, ventilation and skates
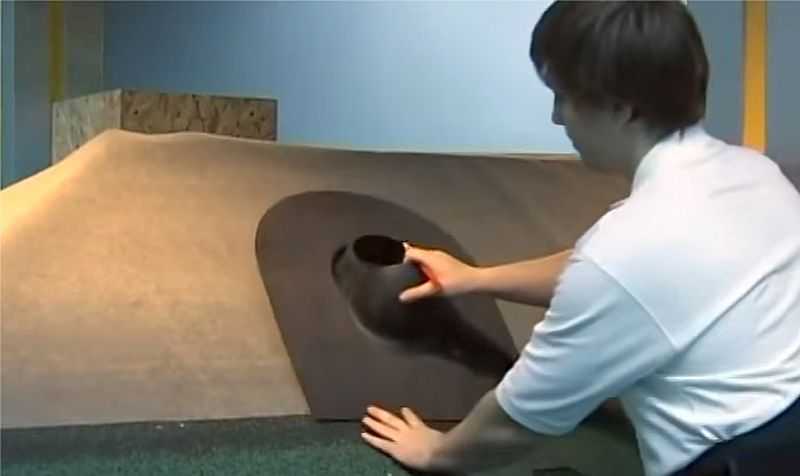
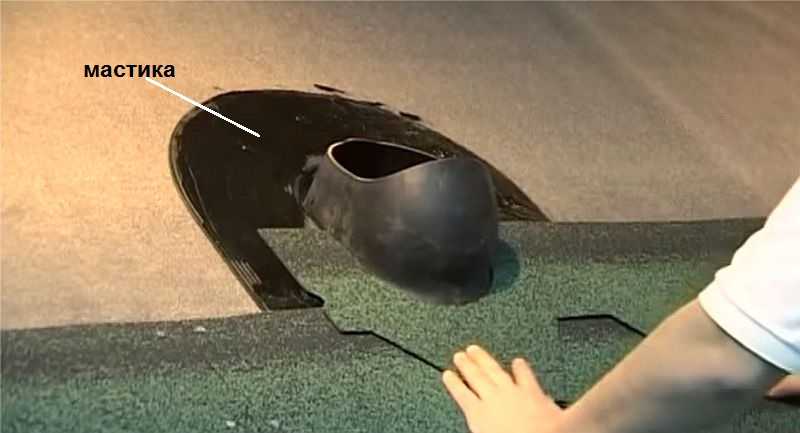
For fastening to the pipe, a lining base for the valley or metal with anti-corrosion treatment is used. The material is put on the pipe by 300 mm and on ordinary tiles by 200 mm with obligatory blurring of the entire area with mastic. After that, the shingles are fixed on it, forming a trough 80 mm wide. The top is closed with metal bars, after which it is treated with a sealant.
Ventilation or other technological elements are mounted using special elements fixed on the roof surface using mastic and nails. After that, the shingles are fastened around them.
The horse is closed by a special profile, which is fixed with nails, then, together with the ribs, it is covered with ridge tiles of the same color. To obtain it you can cut it into three parts of the ordinary ordinary. Installation is made from the bottom up with an overlap of up to 50 mm and is fixed by 4 nails.
As you can see, soft shingles, the technology of mounting on the photo above and below confirms this, is a practical and convenient material that deservedly is popular.
Features of tiles from different manufacturers
The technology of installation of soft tiles "Tegol" practically does not differ from "Shinglas". The main difference in the form and name of the elements used during installation.
Another producer, "Doke", is distinguished by an integrated approach to all materials for roofing, which, in addition to the coating, includes a heater, vapor barrier and ventilation ducts. The technology of installation of soft tiles "Doke" has all the main stages inherent in the first two manufacturers, differing in the absence of a special coating for problem areas and individual color solutions.
Whichever tiles are chosen, all of them are distinguished by high quality, affordable cost, warranty and detailed instructions that answer all the questions during the installation and operation.
Until recently, as a roofing material, only galvanized steel, tiles and slate were used. For installation work involved several people who spent a lot of time and effort. But today the range of materials has expanded, there is a lot of new - for example, soft roof.
Due to its technical and operational characteristics, the soft roof is much superior to other materials. Its advantages include:
- simplicity of installation (it is possible to consult alone);
- strength;
- durability;
- flexibility;
- resistance to moisture and corrosion;
- tightness;
- attractive appearance.
Often the following types of roofing are used as roofing:

Attention! If the top layer of the roof is not removed, then when buying a soft roof, you should clarify whether it is compatible with the material of which the construction is made.
Preliminary work
Installation begins with preparation.
Stage 1. Preparation of all necessary
As already noted, a laying of a soft roof can be done by one person. To work it will require a completely standard list of materials:

Stage 2. Preparatory work
The base must be as strong as possible, its deflection is unacceptable. Materials that can be used to strengthen, there are several:
- plywood;
- OSB-plates;
- sheet pile boards with a width of 10 cm.
It is characteristic that in the winter between the sutures of the skin should be left small gaps (of the order of 3 mm). If the structure is covered with boards, then 5 mm.
Attention! Roofing system it is desirable to treat with antiseptic means for protection from decay and insects, as well as flame retardants - to improve the fireproof properties.
Stage 3. Ventilation gap
The ventilation system allows to solve the problem of high humidity and reduces the amount of ice that forms in the winter. Moreover, in summer, thanks to ventilation, the temperature inside the roofing sandwich is reduced.
Ventilation consists of three main elements:
- ventilation outlet;
- valves for fresh air (installed from below);
- air gap width of 50 mm between the base and the layer of waterproofing.
Attention! If the slope of the ramp exceeds 25ᵒ, the area of the vent should be 8 cm². If the slope is less than 25ᵒ, then 16 cm².
Stage 4. Interlining layer
Under the lining in this case is meant a special bitumen material, laid along the entire perimeter of the roof. Installation is made from the bottom up, starting from the eaves. Observed overlap of 10 cm. The material is fixed with nails every 20 cm.
When the roof is sloped less than 18ᵒ, the lining can be laid not over the entire area, but only in certain areas, such as:
- horse;
- overhangs of cornices;
- the place of the junction with the vertical wall;
- the location of the chimney.
Attention! If the slope is less than 12ᵒ, then use soft roofing Not recommended.
Stage 5. Mounting of laths
Step 1. To protect the material from atmospheric precipitation, eaves are installed on the eaves, it is possible to directly over the cushioning material. Planks (another name - droppers) are located with an overlap of 2 cm and are fastened by roofing nails (zigzag, along the entire length of the bar).
Step 2. On the ends of the structure are installed gable plates. This should be done with the same 2-cm overlap. The nails are clogged in 10 cm steps.
Step 3. There is a place for the outlet of the chimney (if there is a heating furnace in the house).
Step 4. After installation of the laths, the bedding of the valley carpet is completed, which will significantly increase the water resistance. The color of the carpet should match the color of the roof, the edges are fixed with nails in steps of 10 cm.
After that, you can start laying the roofing material.
Below is the technology of laying bituminous shingles, since this is the most common type of soft roofing.
Stage 1. Cornice tiles
On the slats, fixed at the overhangs, the roof tiles are laid. For fixing, galvanized nails are used - they are clogged in two rows 2.5 cm from the top and bottom edges of the material.
Instead of cornice shingles, you can use the ordinary, which will save a little. For this, the shingles are cut off - shingles are taken and the petals are cut off from it. In this case, the installation is performed "butt" at a distance of 2 cm from the cornice overhang.
Stage 2. Ordinary tiles
Attention! Do not forget about the color deviations. Even if all the shingles from one batch, the tone in different packages may differ. For this reason it is recommended to mix six to seven packages in advance.
Step 1. Laying starts from the center of the roof overhang and runs in both directions.
Attention! Protective film from the shingles is removed immediately before installation, since without it, the material can not be stacked.
Nails are used for fixing. Usually, there are four pieces per shingle, but if the roof slope exceeds 45ᵒ, then it is better to use six.
Step 2. The first row is laid in such a way that its edges retreat from the edges of the cornice overhang by 1-1.5 cm. At the same time, the petals cover the joints between the cornice tiles.
Step 3. The second row is similar, but the petals must overlap the notches of the previous one.
Step 4. At the edges, the material is cut off at the edge and pasted. There should be an interlayer 10 cm wide.
The same is done in endovyh - the shingles are cut to obtain a 15-centimeter strip, after which the edges are spread with glue about 7-8 cm.
Attention! When pruning shingles, it is desirable to put a piece of plywood, so as not to damage the underlying layer.
Stage 3. Ridge tiles
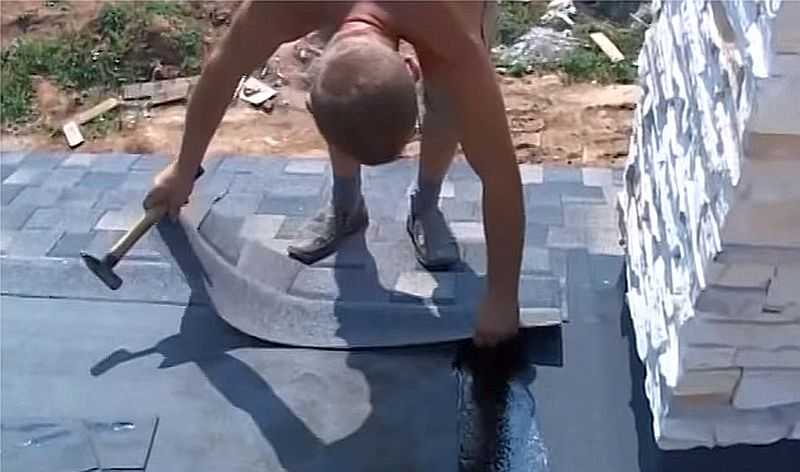
Step 1. At first the scaffolds are prepared. They will greatly simplify the work with the roof ridge, but at the end of the work, do not forget to paste the shingles of the shingles in the places of fastening.
Step 2. The tile is lapped (approximately 5 cm), each shingle is fixed with four nails.
Attention! Ridge shingles fit only after the completion of the laying of a private.
Step 3. To obtain a ridge shingles, the cornice is cut into perforations. Next, each element is bent and placed in a short part along the ridge of the roof.
Stage 4. Passages and abutments in the roof
There are several ways to organize passes through the roof. So, if the diameter of the passage is small, then it is better to apply special seals of rubber. This concerns the inputs for antennas and other communications, but the pipes are sorted somewhat differently - here it is necessary to take into account the possible heating and, consequently, the expansion, so the technology is used differently.
Step 1. At first, along the perimeter of the joint of the pipe and the roof, a triangular-shaped rack is punched (in most cases - 5x5 cm).
Step 3. The pipe is pasted with insulating material in such a way that 25 cm of slope and 35 cm of the pipe itself are closed.
On this installation work almost finished, it remains only to fix the adjacent bar along the entire perimeter of the pipe. Further, an iron apron is fixed, and the seams are carefully sealed with a silicone-based sealant.
Adherence to vertical walls is carried out in the same way. The only difference is that the triangular rack does not form a perimeter, but is fixed along the wall.
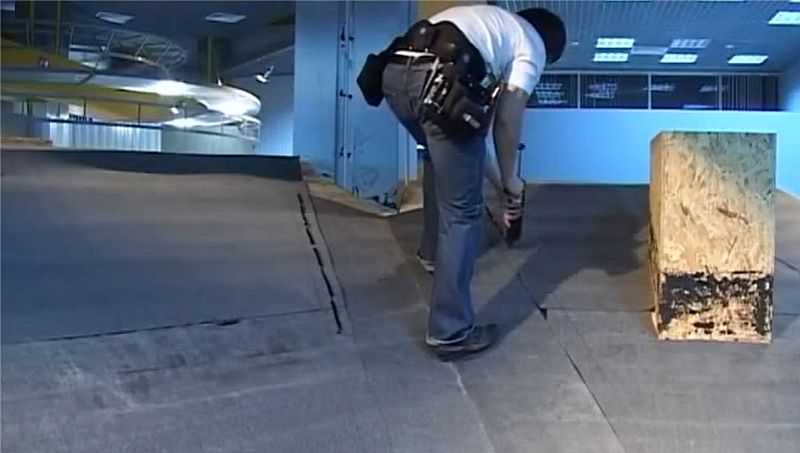
Video - Installation of soft roofing
Laying of the roll roofing
The roll material, which is also called euroruberodiom, is stacked mainly on flat roofs, although it can sometimes be found on the pit slopes under a slight slope.
Step 2. One side of the roofing material is heated by a special burner until the special indicator is melted.
Step 3. After that, the side is glued to the base. When the material cools down, the roll rolls back to the fixation point.
Step 4. The melting and gradual rolling of the roofing material are carried out. In doing so, you must adhere to certain rules.
- The ruberoid is welded with an overlap of 5 cm. To do this, a special guide strip is applied over the entire length.
- Do not overheat the material, otherwise it will deteriorate, lose the ability to stick.
- The quality welded material should be uniform - without voids, dark spots, etc.
Video - Euoruberoid mounting
As a conclusion
The main points of installation, considered above, will help to get to the heart of the matter even to the layman. The main thing to remember is that compliance with the installation technology and strict adherence to all instructions will extend the operational life of the soft roof.
Roof from bitumen soft tiles is easy to use, durable and aesthetic. A big plus of it is that self-assembly is possible. The technology is not the most difficult, the weight of the fragment is small, fixed to the adhesive base, and additionally fixed by roofing nails. So the installation of soft tiles with their own hands can be done even alone.
Roof pie for soft shingles
The attic under the roof can be warm or cold, depending on this, the composition of the roofing pie changes. But its part from the rafters and above always remains unchanged:
- on the rafters is stuffed waterproofing;
- on it - bars not less than 30 mm thick;
- solid flooring.
Here are the materials and consider in more detail - what to do and what features each of them has.
Waterproofing
Waterproofing membranes are one, two and three-layer. Single-layer membranes - the simplest and cheapest, perform only a dual task - do not let the moisture in the direction of the room and let the steam out. Thus, simple way not only protects the attic or from the penetration of condensate or leaked, suddenly, precipitation, but also the excess moisture that accompanies the life activity of a person is removed from the air. Single-layer membranes are poorly represented on the market. Almost one company produces them - Tyvek.
Two and three-layer membranes are more durable: besides their waterproofing layer, they also have an interlayer that imparts greater tensile strength. The third layer, if it exists, is an adsorbing layer. That is, even if a drop of condensate formed on the surface of the membrane, this layer absorbs it into itself, not allowing it to spill onto other materials. With sufficient ventilation, moisture is gradually carried away.
Three-layer membranes (for example, EUROTOP N35, RANKKA, UTACON) are desirable if the attic is insulated and used as a heater mineral wool. It is afraid of getting wet and with increasing humidity by 10% loses half its thermal insulation properties.
If there is a cold attic under the soft tile, it is desirable to use a two-layer waterproofing membrane. On strength it is much better, but at a price more expensive slightly.
Rims
Over the waterproofing film, parallel to the overhang, the laths of the crate are packed. They are necessary to create an air gap. It will allow to maintain normal humidity of roofing materials.

Oblashku make of boards of coniferous species (mostly pine). Thickness of boards - not less than 30 mm. This is the minimum clearance that will ensure normal air movement in the under-roof space. Before laying the wood must be treated with impregnation, protecting from pests, fungi, after - fire retardants.
The minimum length of the board for the crate - at least two spans of rafters. They are fastened and connected over rafter legs.
Flooring
The flooring under the soft tile is made solid. Materials are selected on the basis that nails must be driven into it, therefore they are usually used:
- OSB 3;
- moisture resistant plywood;
- grooved or edged board of the same thickness (25 mm) with a moisture content of not more than 20%.
When laying the flooring under soft tiles, it is necessary to leave gaps between the elements - to compensate for temperature expansion. When using plywood or OSB, the gap is 3 mm, between edging boards 1-5 mm. The sheet material is attached to the seam deflection, that is, so that the joints are not continuous. Strengthen the OSB with self-tapping screws or nails.

Using as a flooring board, you need to ensure that the annual rings of wood were directed down. In the opposite location, they are arched by an arc, soft tiles will raise, the integrity of the coating may be impaired. There is another trick that will keep the wooden flooring even, even if the moisture of the boards is above 20%. The ends of the boards during installation are additionally fastened with two nails or self-tapping screws, which are clogged close to the edge. This additional fasteners will not allow the boards to bend under shrinkage.
The choice of the thickness of the material for the flooring depends on the step of the crate. The larger the step, the thicker the flooring is needed. The best option - frequent step and thin plates. In this case, a light but firm foundation is obtained.
Another point concerns the construction of a deck for soft tiles around the chimney pipe. With a brick pipe, the width of which is more than 50 cm, a muzzle is made behind it. This design resembles a mini-roof.
After installing the flooring, its geometry is checked. The length, the width of the ramp at the top and bottom, the height of the ramp from both sides are measured, the diagonals are measured. And the last check - tracking the plane - the entire ramp should lie entirely in one plane.
Technology of roofing of soft roofing tiles
When buying, you will most likely be provided with an instruction to which the installation of soft shingles will be painted step by step and in detail, indicating all the exact dimensions that this particular manufacturer requires. These recommendations and should be adhered to. However, in advance with the order of work and their volumes to get to know in advance - to understand the intricacies of installation and the necessary amount of materials.
At once we will tell that to address with soft tile at packing it is given cautiously - she does not like, if it or her kink. Therefore, try not to bend or crush the shingles unnecessarily (this is one piece, consisting of a visible and an assembly part).
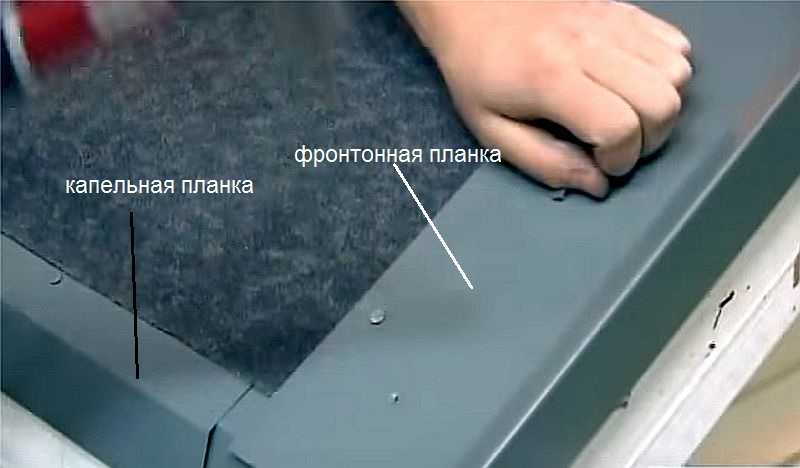
Strengthening overhang
The first is the drip strip. This L-shaped sheet of metal, covered with paint or polymer composition. Polymer coating is more expensive, but also more reliable. The color is selected close to the color of the shingles.

A drip strip is installed along the overhangs of the roof
The task of the drip strip is to protect the lathing, the slices of the rafters and the flooring from the ingress of moisture. One edge of the capelnik is laid on the deck, the second is covered by the overhang. It is fixed by nails from galvanizing (stainless steel), which are clogged in checkerboard order (one is closer to the fold, the second is near the edge). Step of mounting fasteners - 20-25 cm.
![]()
A drop lath is sold in two-meter pieces. After laying the first element, the second one is fastened with an overlap of at least 3 cm. If desired, the gap can be closed: smear the joint with bitumen mastic, fill with sealant.
At the same stage, hooks are mounted, in any case, hooks, which will hold the gutters.
Installation of waterproofing carpet
Regardless of the angle of the roof, in and along the slope, a waterproof underlay carpet must always be laid. It is sold in rolls of meter width. On the underside there is an adhesive compound covered with a protective film or paper.
Installation of a waterproofing carpet begins with stacking it in the valley. Roll out the material of a meter width, spreading 50 cm from both sides of the inflection point. It is desirable to do without joints, but, if necessary, the overlap of the two canvases should be at least 15 cm. The laying goes from bottom to top, the joint is additionally smeared with bituminous mastic, the material is well pressed.

Then the waterproof carpet under the flexible tile is laid along the cornice overhang. The minimum width of the carpet on the cornice overhang is the size of the overhang, plus 60 cm. The lower edge is located on top of the drip, and can bend down a few centimeters. First, the carpet is rolled out, if necessary - pruned, then the protective film is removed from the wrong side and glued to the substrate. In addition, fix the edges of nails from stainless steel or galvanized with a large flat hat (20-25 cm pitch).

In places of horizontal joint overlap of two canvases not less than 10 cm, in the vertical direction - not less than 15 cm. All joints are additionally smeared with bituminous mastic, the material is crimped.
Lining carpet
Lining carpet, as well as waterproofing, is sold in rolls of meter width, the back side is covered with an adhesive compound. The method of laying depends on the slope of the roof and on the profile of the selected bituminous shingles.
When using bituminous shingles with cuts (such as Jazz, Trio, Beaver Tail), regardless of the slope, the underlay rug spreads over the entire surface of the roof.
The installation of a lining carpet often requires undercutting. Do this with a sharp knife. To prevent damage to the underlying material when cutting, plywood or OSB piling is placed.
Front (front) bar
On the side sections of the overhangs are mounted pediments. These are metal bands bent in the form of the letter "G", along the fold line of which there is a small ledge. They cover the laid roofing materials from wind loads, from moisture penetration. The gable plank is laid on the deck over a lining or waterproofing carpet, fixed with nails (stainless steel or galvanized) in staggered order with a step of 15 cm.
These bars also go in pieces of 2 m, stacked with an overlap of at least 3 cm.
Scatter marking
To install a soft tile was simple, a lining in the form of a grid is applied to the underlay carpet or flooring. Do this with a paint string. Lines along the cornice overhang are applied at a distance equal to 5 rows of tiles, in the vertical - through a meter (the length of one shingle of flexible tiles). This layout makes the laying easier - on it the edges are straightened, it is easier to track distances.
![]()
Ends carpet
On top of the already laid waterproofing carpet there is still a packing material. It is a bit wider, it serves as an additional guarantee of absence of leaks. Without removing the protective film from the underside, it is laid, cut down in the area of the overhang, mark the boundaries. Having deviated from the mark of 4-5 cm, a special mastic of increased fixation Fixer is applied. It is applied from a syringe, roller, then rubbed into a strip about 10 cm wide with a spatula.
On the mastic, the carpet is unfolded, folds are smoothed, the edges are pressed. Having deviated from the edge by 3 cm, it is fixed with nails in steps of 20 cm.
Adjunction to the brick pipe
To bypass pipes and ventilation outlets make patterns from the carpet or galvanized metal, painted in the appropriate color. The surface of the pipe is plastered, processed with a primer.
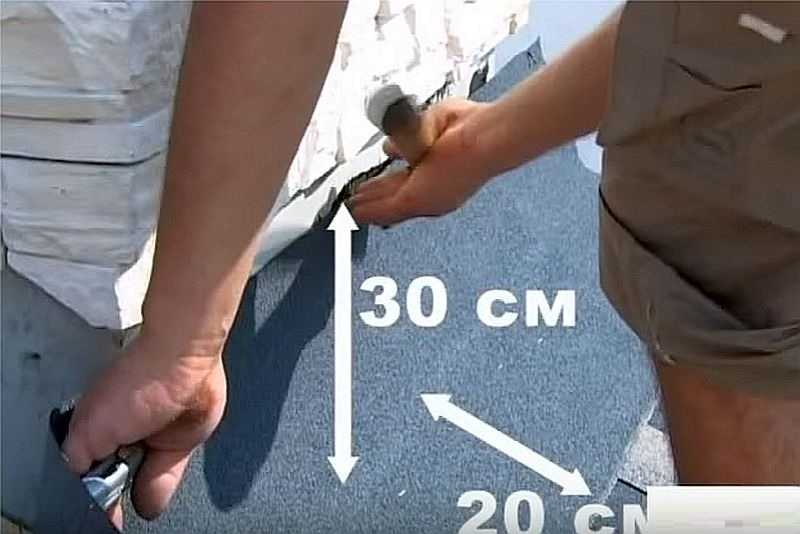
When using the bottom carpet, a pattern is made so that the material goes into the pipe no less than 30 cm, at least 20 cm should remain on the roof.
Pattern promazyvaetsya bitumen mastic, fit into place. the front part is installed first, then the right one and the left one.

Some side elements are wrapped on the front. The rear wall is installed last. Its parts go to the side.
With proper installation on the flooring around the pipe, a platform is obtained, solidly laid with a bottom carpet. Before laying the shingles in this place, the surface is smeared with bituminous mastic.
A tile on three sides comes to the laid carpet, not reaching the walls of the pipe 8 cm.

The upper part of the abutment is sealed with a metal strip, which is attached to the dowels.

All gaps are filled with heat-resistant sealant.

Output of round tubes
For passage of ventilation pipes there are special passage devices. They are arranged so that the lower edge of the element goes to the tile no less than 2 cm.
By attaching the passage to the roof, they traverse its inner hole. On the applied contour in the substrate, a hole is cut out, into which a round tube is drawn.
The rear part of the skirt of the passage element is smeared with bituminous mastic, put in the desired position, additionally fastened along the perimeter by nails. When installing a soft tile, the penetration skirt is greased with mastic.
The gaunt is cut as close as possible to the protrusion of the penetration, the gap is then filled with mastic, which is covered with a special powder, which protects against ultraviolet radiation.
Starting line
Installation of soft tiles begins with the laying of the starting strip. Usually it is a skate-cornice tile or a private tile with cut off petals. The first element is laid on one of the edges of the ramp, with the edge going to the pediment. The lower edge of the starting strip is laid on the drip, having deviated from its bend by 1.5 cm.

Before installation, a protective film is removed from the rear part, the shingles are leveled and laid. Each section of bitumen shingles is fastened with four nails - at the corners of each fragment, having deviated from the edge or perforation line 2-3 cm.

If the starting strip is used for cutting from ordinary tiles, in some of its parts there will be no sticky composition. In these places, the substrate is smeared with bituminous mastic.
Installation of soft ordinary tiles
There is a flexible tile with applied glue mass, protected by a film, and there is a composition that does not require a protective film, although on the roof it also fixes the elements well. When using the first type of material, the film is removed immediately before installation.
Before laying the shingles on the roof, open several packs - 5-6 pieces. Laying is carried out from all the bundles at the same time, taking one shingle from each one in turn. Otherwise, the roof will have pronounced spots, differing in color.
The first shingle is stacked so that its edge does not reach the edge of the starting strip by 1 cm. In addition to the adhesive composition, the tile is also fixed with roofing nails. The number of fasteners depends on the angle of the ramp:
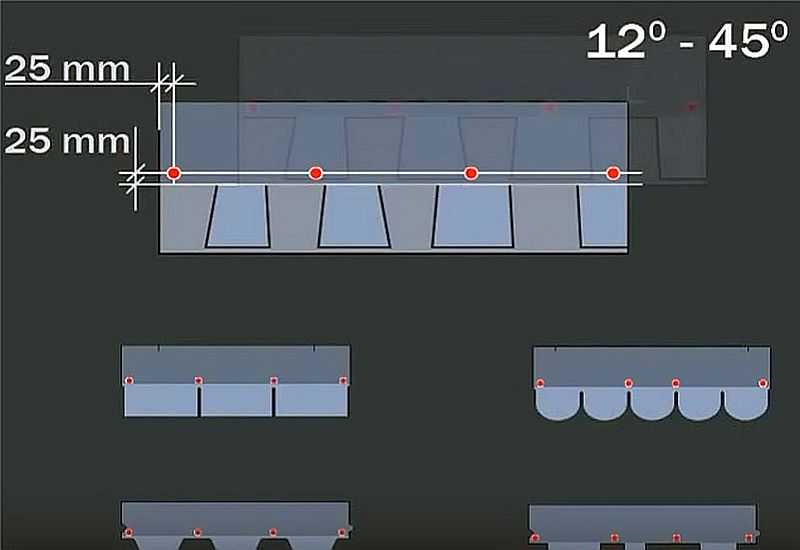
When installing soft tiles, it is important to drive nails correctly. Hats should be pressed against the shingle, but not break through its surface.
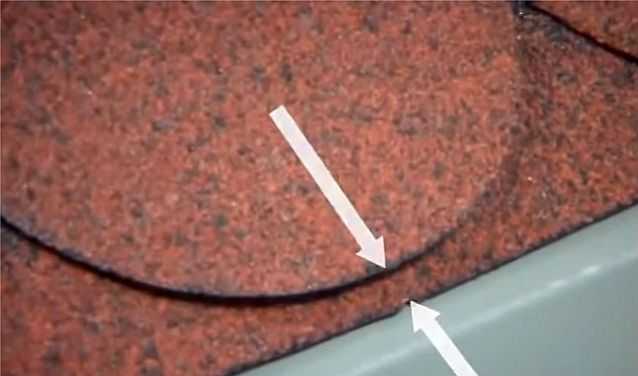
Decoration of the valley
With the help of a paint cord in the valley, an area in which nails can not be driven is 30 cm from the middle of the valley. Then mark the boundaries of the trough. They can be from 5 to 15 cm in both directions.

The upper corner, which is turned towards the valley, is cut
When laying ordinary tiles, the nails are hammered as close as possible to the line beyond which the nails can not be beaten, and the shingles of the floor of the line of the guttering are cut. To prevent the water from leaking under the material, the upper corner of the tile is cut diagonally, cutting about 4-5 cm. Unfixed tile edge is greased with bitumen mastic and fixed with nails.
Fronton decoration
On the sides of the ramp, the shingles are cut so that the edge of the end plate remains 1 cm. The upper corner of the shingle is cut as well as in the valley - an obliquely slice of 4-5 cm. The edge of the tile is impregnated with mastic. The strip of mastic is not less than 10 cm. Then it is fixed with nails, as well as other elements.

If the flooring in the area of the ridge is made solid, a hole is cut along the ridge, which should not extend to the end of the rib 30 cm. Bituminous shingles is laid before the opening of the hole, after which a special ridge profile with ventilation holes is installed.
It is fixed by long roofing nails. On the long skate can be used several elements, they are joined together butt. The mounted metal skate is covered with ridge tiles. It removes the protective film, then the fragment is fixed with four nails (two on each side). Installation of soft tiles on the ridge goes towards the prevailing winds, one fragment enters the other by 3-5 cm.
Ridge shingles are a skate-cornice divided into three parts. It has a perforation, a fragment is torn along it (first bend, press the fold, then tear off).
The same elements can be cut from ordinary roof tiles. It is divided into three parts, not paying attention to the picture. The resulting tiles are cut off the corner - about 2-3 cm on each side. The middle of the fragment is heated with a construction hair dryer on both sides, laid in the middle on a bar and, gently squeezed, folded.
Ribs and bends
Ribs are closed with ridge tiles. Along the inflection at the required distance, a line is beaten off with a paint string. On it the edge of the shingles is leveled. Laying the flexible tile on the rib goes from bottom to top, each piece is glued, then backing off from the top edge of 2 cm, fixed by nails - two on each side. The next fragment comes on laid on 3-5 cm.
