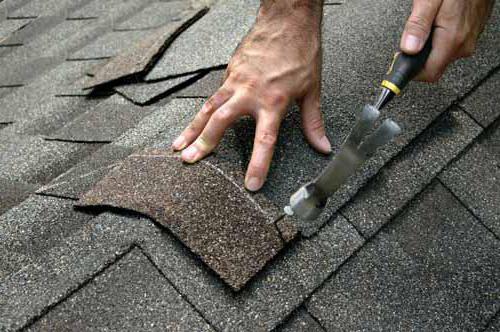
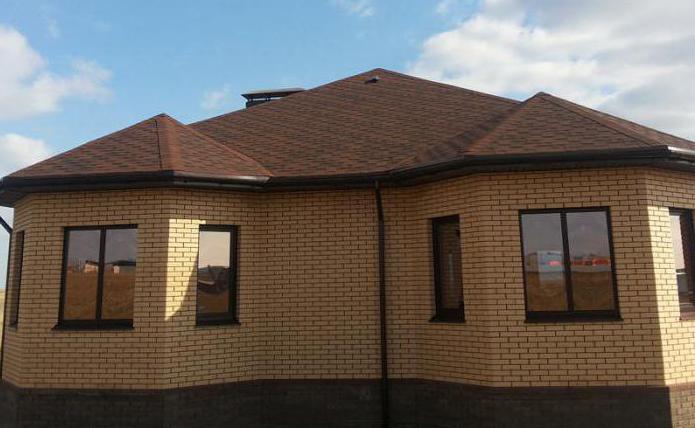
The construction of any house always includes roof erection and erection roofing, providing a reliable and long-term protection at any time of the year. Constant technological progress provides consumers with a wide range of roofing materials.
Many of them successfully combine practical and aesthetically beautiful solutions created centuries ago, with the latest scientific developments. This is most clearly demonstrated by soft shingles, the technology of installation and its wide possibilities is a consequence of the achievements of modern developers, and the unique appearance is the merit of the builders of medieval Europe.
Soft roofing or is a modern material that is used to cover the roof and consists of glass-fiber, bitumen and stone granules.
History, species and composition
Despite the fact that the first bitumen shingles appeared at the beginning of the last century, the mass distribution was received only in the middle of the century in America. First of all, due to the shape with three petals, as a result almost every second house was covered with such a roof.
An interesting fact is related to the name. The technology of installation in all countries is almost the same, but in America the word "shingles" is used more, by analogy with wooden boards for roofing, and in Europe, as before, "shingles."
Modern production technology, which includes the use of a tear resistant fiberglass fabric, modified with bitumen and bitumen polymer additives, has led to the creation of a universal roofing material.
Advantages, disadvantages and scale of production
The use of any roof covering has its pros and cons. The soft shingles are no exception. The installation technology, high performance and a wide range of colors distinguish it in a number of other coatings.
Among the main advantages are:
absence of moisture absorption, which automatically excludes destructive processes and provides reliable waterproofing;
resistance to any temperatures;
not exposure to ultraviolet radiation, in particular the absence of melting at high temperatures;
good tolerability of almost all mechanical effects;
lightness and flexibility.
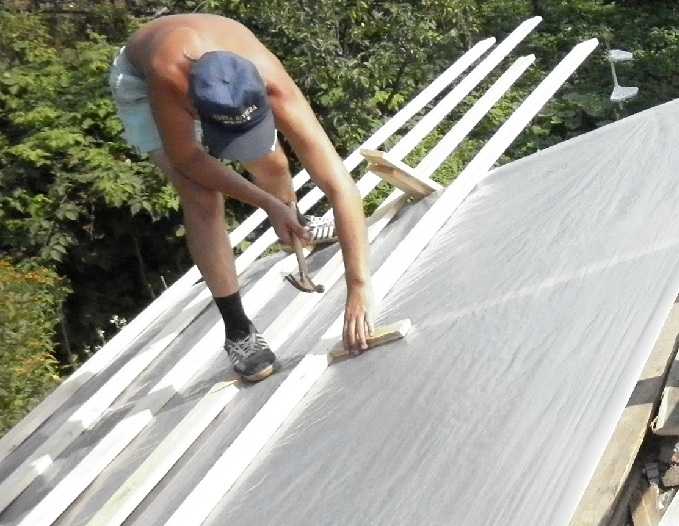
One, but a significant drawback is the total cost of work. When soft tiles are used for the coating, the installation technology includes an obligatory solid foundation, which is usually made from plywood or OSB boards. Even if a board is used, very strict requirements are imposed on it for thickness and location on the surface. Annual rings must be directed downwards.
Today production is carried out in many countries of the world, mainly in America and Russia. From domestic manufacturers are allocated "Shinglas" ("Technonikol"), "Rufleks", "Doke" and "Tegola" (together with Italy), occupying more than 80% of the market.
Terminology and materials
Technology from each manufacturer has its own nuances. But the basic stages of all the same. To better understand the technical information contained in all instructions, it is necessary to understand both the terms used and the main materials used.
Any element of the tile consists of several conventional parts:
adhesive strip;
the petal.
visible surface;
places of overlap;
Roofing usually includes:
pediment and cornice eaves;
valley or inner corners at the junction of two rays;
ribs and fractures, which are places of joints of two different surfaces.
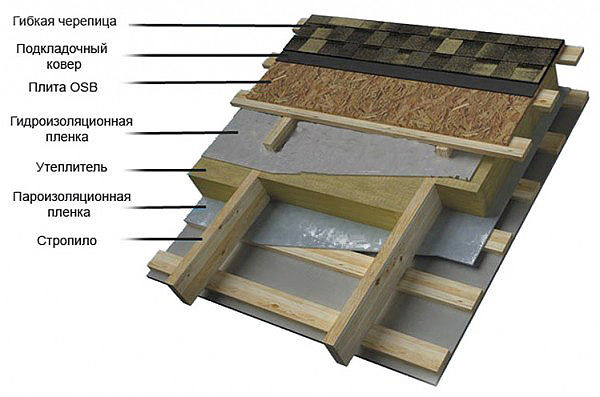
Laying of the coating is done after the preparation of the roofing structure, including hydro and steam insulation, insulation, if necessary, as well as mandatory space for ventilation.
The technology of installing soft tiles involves the use of several mandatory materials:
roof tiles and universal starting, used for cornices and skates;
lining base (carpet), which can be of several types;
lining base for valleys;
metal bars for eaves and ends, as well as for abutting, for example, a pipe;
ventilation elements;
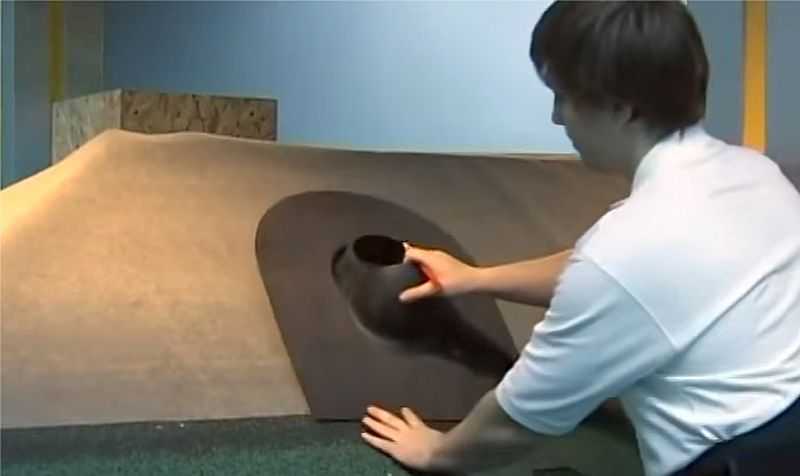
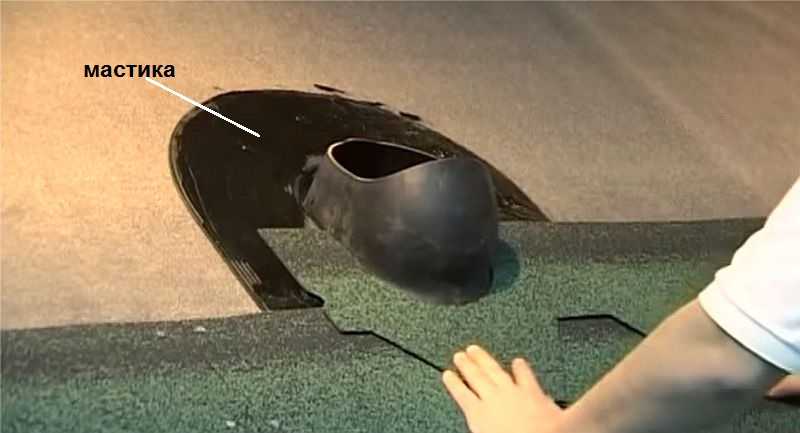
mastic based on bitumen and polymer additives, allowing to work without preheating;
roofing nails.

Preparation of the base of the roof and ventilation
When soft roof tiles are used for roofing, the self-assembly technique requires strict execution of all steps contained in the instructions for use.
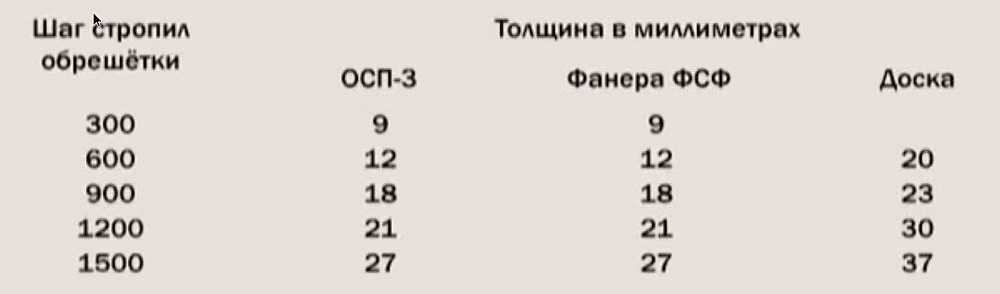
The first step is always the preparation of the roof surface for laying the roof tiles. For this, you can use plywood, OSB slabs or edging boards, which are better fixed with screws. The thickness of the base is determined by the distance between the rafters of the roof structure and is calculated according to the table below.
| Distance between rafters, mm | OSB, mm | Plywood, mm | Board, mm |
| 300 | 9 | 9 | - |
| 600 | 12 | 12 | 20 |
| 900 | 18 | 18 | 23 |
| 1200 | 21 | 21 | 30 |
| 1500 | 27 | 27 | 37 |
A clearance of up to 5 mm is left for the board. In cold weather, it is necessary to have a gap of at least 3 mm for a possible expansion under the effect of temperature in the summer. The resulting surface must be flat, rigid and solid.
Properly made ventilation has airflow, space above the heater and exhaust ducts. At the same time, the area of the outlets should exceed the incoming ones by 15%. Often, the eaves are sewed with finishing material, without holes for the inflow, which is a gross violation.
Installation and lining base
To demonstrate the basic stages of installation, for example, the technology of installation of soft shingles "Shinglas", which occupies more than 40% of the Russian market, is used.
On the prepared basis around the perimeter fixed special metal cornices, often called droppers. They are installed with an overlap of up to 50 mm and are fixed in steps of up to 150 mm in a zigzag pattern. At the joints, the pitch is reduced to 30 mm.
After that, the installation of the lining base begins, having small differences for ramps with different angles.
For rolls and cornice overhangs, a roll material is used, which is coated on one side with an adhesive compound that is attached to the roof surface and must be installed along the entire perimeter of the cornices, not reaching the 30 mm bar.
In valleys, it fits 500 mm on each side, along the cornices along the entire width of the overhang and additionally by 600 mm inside the roof. The overlap horizontal is made 100 mm, vertical - 150 mm. To increase the reliability, the base is fixed around the perimeter with nails in steps of no more than 250 mm.
For the rest of the roof surface, a conventional underlay base is used, which is laid upwards parallel to the cornice and fixed with nails. The places of lapping are additionally treated with mastic not less than 100 mm.
On the ribs, skates and skate fractures the base is laid 500 mm on each side, that is, the entire width. For the pediments and along the joints with the walls, only half the roll is used, equal to 500 mm.
At the end of this stage, the front strips are installed, which protect them from wind and moisture. They are fixed with nails in steps of no more than 150 mm.
Mounting protection of the valley
Endova is the most vulnerable place in the whole construction. In addition, during the repair you have to disassemble two roof slopes at the same time. Therefore, when installing the shingles, special attention is paid to it.
After installing the entire backing layer, it is necessary to separately make protection of the valley. To do this, a special lining with a width of 1000 mm is applied, which is laid 500 mm on each side over an already fixed base with an offset of up to 30 mm.
The edges along the entire perimeter are smeared with a mastic with a width of at least 100 mm. After gluing the entire perimeter is additionally fixed by nails no further than 30 mm from the edge in increments of 250 mm.
If it is not possible to make the base solid, the overlap width must be at least 300 mm, with obligatory blurring of the entire area with mastic. It must be placed as close as possible to the top.
Preparation for laying and installation of the starting strip
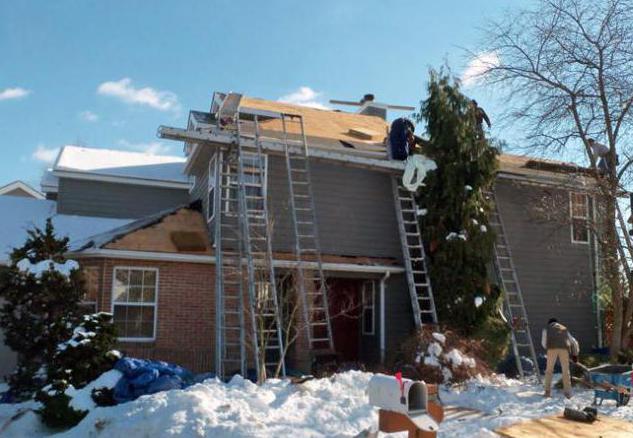
Soft roof has its own subtleties, caused by the structure and features of production. To work simultaneously, several packs are used to avoid concentration of one shade. For the same reason, when soft tiles are used, the installation technique in winter requires working with only a few packs that are taken from a warm place.
It is recommended to apply a net on the lining base, which will facilitate the installation process. The horizontal distance corresponds to the size of 5 rows of tiles, the vertical is 1000 mm or the dimensions of one shingle. This will quickly make alignment or simplify the task if an additional element is present in the roof.
Installation begins from the bottom of the center of the ramp. For the starting strip, a special universal element or ordinary ordinary tile without petals is used. They are installed on the adhesive backing and fixed by 4 nails along the perimeter at a distance of no more than 30 mm. If a trimmed tile without a glue base is used for the start, it should be smeared with mastic.

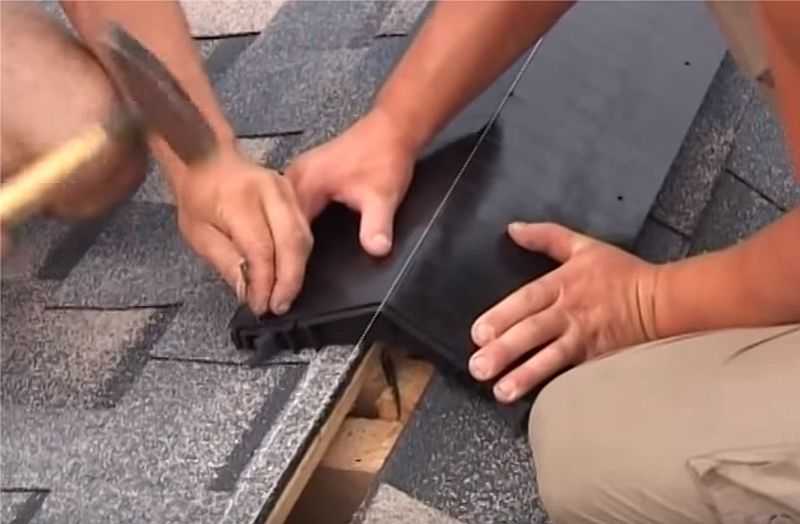
Installation of shingles
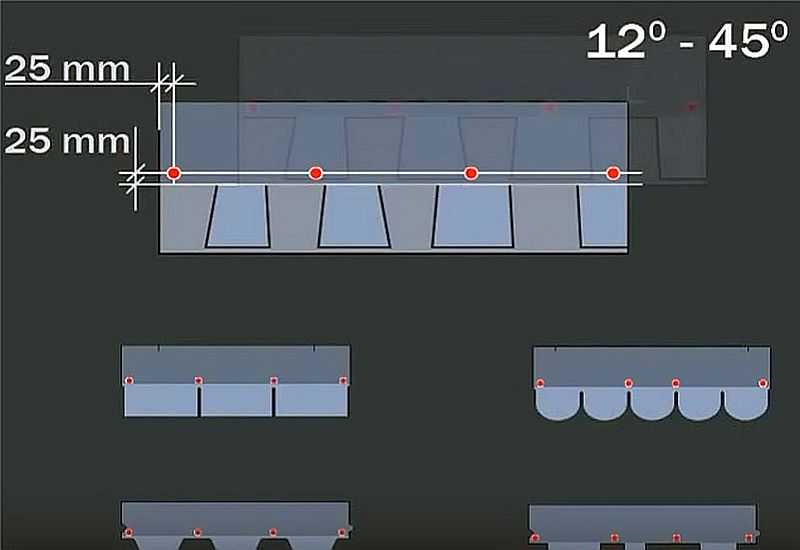
The installation is made by cutting downwards with an indentation of 10 mm from the starting element. The tile is fixed with nails along the allocated place. For stingrays with an angle of up to 45 °, 4 nails are used, which are fixed at 25 mm from the edge and the visible area, which allows two elements to be fixed simultaneously. For 90 °, the number of nails is doubled. Depending on the shape of the petal, different styling options are possible, allowing both chaotic patterning and orthogonal drawing.
In the valleys, the location of the trough, from which it recedes 300 mm in each direction, is pre-marked, determine the zone where nails do not break through. The tile is cut to the required size and must be fixed with nails and mastic. Near to the valley the upper corner is cut off for water retreat.
On the pediments, the tile is fixed not reaching 10 mm to the edge with the obligatory cutting of the upper corner, as in the valley. Fixation on the edge is carried out using a mastic, which is applied by a layer of not less than 100 mm, and nails.
Pipes, ventilation and skates
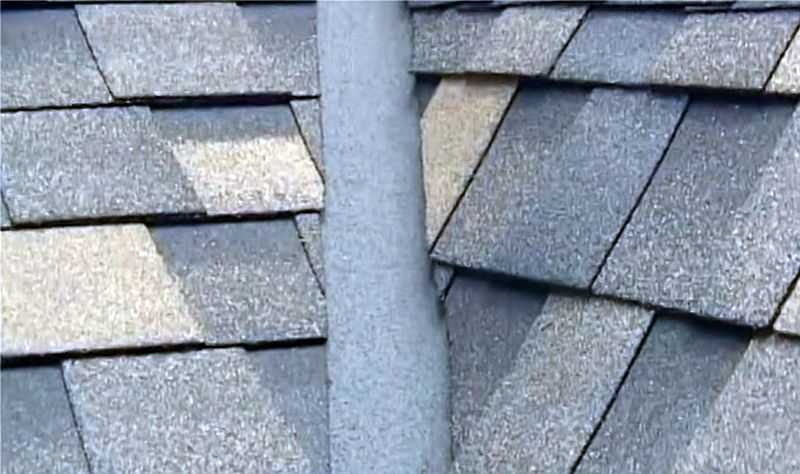
For fastening to the pipe, a lining base for the valley or metal with anti-corrosion treatment is used. The material is put on the pipe by 300 mm and on ordinary tiles by 200 mm with obligatory blurring of the entire area with mastic. After that, the shingles are fixed on it, forming a trough 80 mm wide. The top is closed with metal bars, after which it is treated with a sealant.
Ventilation or other technological elements are mounted using special elements fixed on the roof surface using mastic and nails. After that, the shingles are fastened around them.
The horse is closed by a special profile, which is fixed with nails, then, together with the ribs, it is covered with ridge tiles of the same color. To obtain it you can cut it into three parts of the ordinary ordinary. Installation is made from the bottom up with an overlap of up to 50 mm and is fixed by 4 nails.
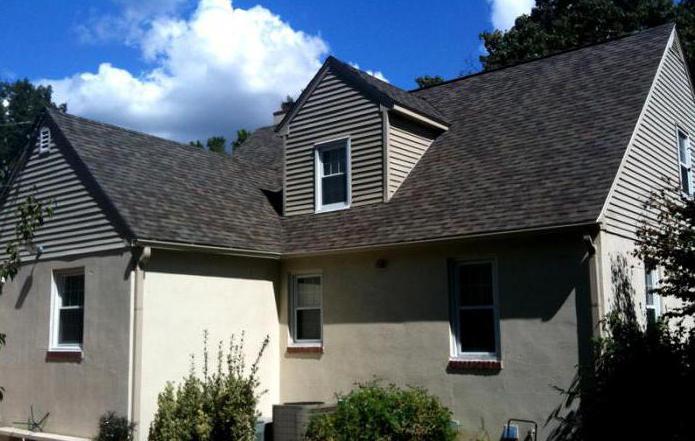
As you can see, soft shingles, the technology of mounting on the photo above and below confirms this, is a practical and convenient material that deservedly is popular.
Features of tiles from different manufacturers
The technology of installation of soft tiles "Tegol" practically does not differ from "Shinglas". The main difference in the form and name of the elements used during installation.
Another producer, "Doke", is distinguished by an integrated approach to all materials for roofing, which, in addition to the coating, includes a heater, vapor barrier and ventilation ducts. The technology of installation of soft tiles "Doke" has all the main stages inherent in the first two manufacturers, differing in the absence of a special coating for problem areas and individual color solutions.
Whichever tiles are chosen, all of them are distinguished by high quality, affordable cost, warranty and detailed instructions that answer all the questions during the installation and operation.
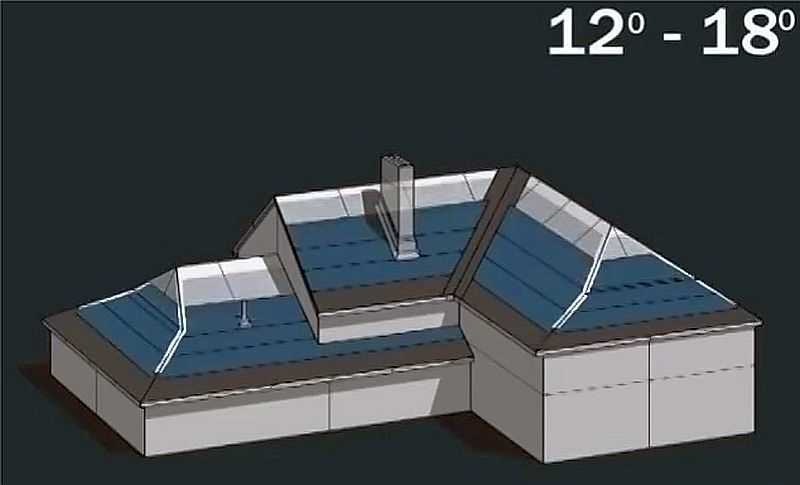
Soft roof tiles are used to arrange such roofs, the slope of which is not more than 12 °, which can be determined as a ratio of 1: 5 (height to length). Soft tiles It is used both for the equipment of new roofs and for repairing old ones.
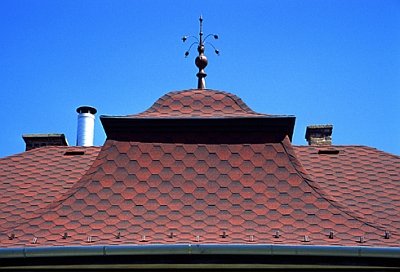
Such a roofing on the roofs of private houses and cottages, as well as industrial, public and other buildings has proved to be very good in design, especially when these buildings have a rather complex geometric shape.
The main advantage of soft tiles is the fact that it can be used to cover the roofs of almost any configuration, shape and complexity, including domes and roofs of bulbous forms.
It allows to provide the maximum tightness and perfectly fits into any landscape. If the tile is laid on top of the old coatings on the bituminous substrate, they serve as the lower additional lining layer for it.
Layers
To ensure that the longevity and reliability of the roof does not cause any doubts and criticisms, for its further operation it is absolutely necessary to create a continuous layer of vapor barrier and a layer of insulation, chosen taking into account the peculiarities of the temperature regime of this region. In addition, it is equally important to ensure proper ventilation of the under-roof space.
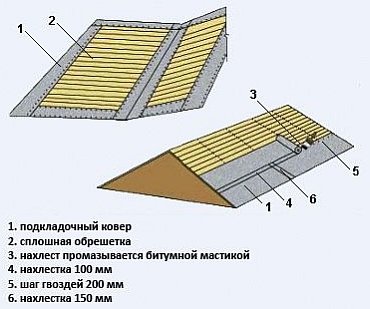
- The underlay carpet serves as an additional waterproofing of less protected roofing areas and is a roll material on a bitumen base;
Fig. 1. The construction of the roof of soft tiles
- An endless carpet is used to increase the waterproofing of the internal fractures of the roof (grades), which are most prone to rain and snow loads, and also to seal the junctions to vertical surfaces. In addition, it is a bitumen-polymer material, and its installation is carried out with the help of sealant and roofing mastic.
The construction itself bituminous shingles includes several layers at once:
- The basis;
- Improved bitumen;
- Basalt powder;
- Self-adhesive frost-resistant bitumen-polymer base;
- Siliconized removable protective film.
Installation of the roof with soft tiles
Installation of soft tiles begins with the preliminary preparation of the base. For soft tiles, a smooth and clean solid foundation, called a crate, is mandatory. The cladding can be made of moisture-proof plywood or oriented chipboard, however, if necessary, a conventional edging board, preferably coniferous, can also be used.
This solid flooring is laid on top of the rafters and attached using self-tapping screws.
Advice of a specialist: it is necessary to treat the rafters with an antiseptic, thus increasing the life of the entire structure as a whole.
The step of the rafters and the crate itself is largely dictated by the architectural features of the roof. In addition, it can also be affected by permanent and supposed temporary loads, and therefore it can vary from 60 cm to 1.5 m. In turn, the step of the rafters affects the thickness of the wooden flooring used:
Advice of a specialist: in order to compensate for the linear expansion that inevitably occurs during the warm season, it is recommended to leave gaps between 3 mm boards (if using OSB or plywood) or 1-5 mm when the crate is made from a pile or edging board.
Installation of the roof of soft tiles is desirable to spend in the warm season. When the temperature drops below + 5 ° С, it is worth keeping the package in a warm room and bringing them from there as needed in small batches, 5-6 packs each. In such weather conditions, for better consolidation of soft tiles, the self-adhesive side of the tiles should be heated with thermofan.
By doing installation works for the construction of the roof of soft tiles, all the necessary requirements of safety regulations must be observed, and when using the thermo-foam, use protective gloves. If the installation takes place in warm weather, do not step on the laid soft shingles, as this can lead to stains and marks on it. Moving along the slopes of the roof is recommended with the help of special erection ladders.
During the acquisition of soft tiles, attention should be paid to the release date and color codes of batches. This will allow you to sort the roofing material immediately before laying and help to achieve the same color and aesthetic appearance of the roof as a whole. If there is such a need, various shades of soft tiles can be used for the arrangement, which will make it possible to create an attractive design conceived by the designer. An important condition is the preservation of the material to cover the roof from direct sunlight, which can prematurely destroy the adhesive layer with a protective film. Also, do not put pallets with sheets of soft tiles on top of each other.
The order of laying soft shingles
In addition to the above-mentioned auxiliary materials, the following are used for the installation of soft tiles:
- Planks of contiguity, which are designed to fix the carpet on the vertical surfaces. Their installation is carried out with the help of roofing bituminous mastic, sealant and galvanized nails;
- Planks are pediments. They serve to reduce wind loads on the overhang of the overhang and protect the edges of the base from moisture. Mounted with sealant and galvanized roofing nails;
- Planks korniznye. Used to protect the substrate from moisture and strengthen the eaves of the cornice, fastened with sealant and nails;
- Roofing bituminous mastic. Serves as a sealant for gluing joints of soft tiles, as well as lining and endow carpet on the base;
- Roofing zinc-coated nails. A little shorter and thicker than the usual building nails (length - 30 mm, thickness - at least 3 mm). They also have a slightly larger cap (from 10 mm);
- Knife with a hook-like blade for cutting tile roof tiles;
- Building hair dryer. It is used for heating and fusing sheets, so that they adhere to the roof surface more tightly.
To lay a soft tile along the vertical and horizontal lines, it looks evenly straight, marking on the roof slope, the vertical lines of which correspond to the width of the tiles used in the step, and the horizontal lines are carried out in steps of approximately 80 cm (that is, about five rows of tiles).
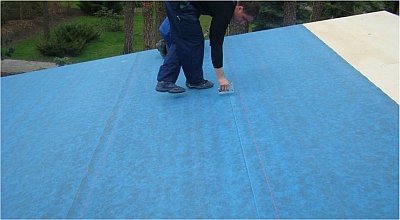
Installation of lining carpet
On the entire surface of the roof, a lining carpet is laid, parallel to the overhang overhang from the bottom upwards and with an overlap of at least 10 cm. The fastening is carried out by roofing nails with an interval of 20 cm.
At an inclination exceeding 18 °, the underlay carpet is spread on the cornice or end parts, valley, in places passing through the roof of the dormer windows and pipes, and also in places adjacent to vertical surfaces.
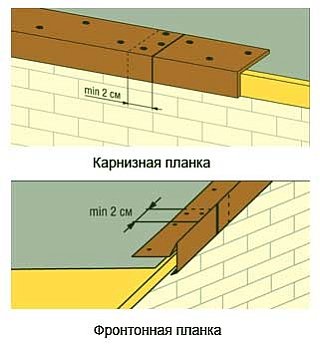
Mounting of eaves
In order to protect the edges of the eaves from possible humidification, the backing layer is fixed with the help of cornice metal strips. They are fixed with an overlap of a couple of centimeters of roofing nails. They must be clogged with a zigzag, with an interval of 10 cm.
Mounting of pediments
The edges of the laths along the front parts of the roof are protected with the help of pediments that are assembled with an overlap of at least a couple of centimeters, and the fixing with zigzag roofing nails with an interval of 10 cm.
Fig. 2. The construction of the roof of soft tiles
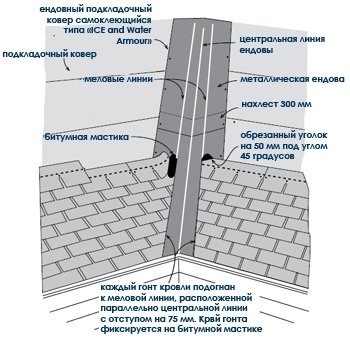
Carpet installation
To ensure the waterproofing of the ends, an endow carpet is spread over the backing layer, fixing its edges with the help of roofing nails and bituminous mastic. The choice of the color of the carpet is carried out in accordance with the color of the softest shingles.
Fig. 3. The construction of the roof of soft tiles
Sometimes the valley is equipped with the method of undercutting, and then the flooring begins to be laid from a smaller slope. Those tiles that go to the valley from this slope are glued to the valley axis, taking into account the overlap to the second ramp of about 30 cm. The fastening is carried out by bituminous mastic or by fusing with a construction hair dryer.
In turn, on the adjacent ramp parallel to the axis of the valley with an indentation of 10 cm, the tile, which goes to the valley from the slope, is cut off. At the same time, the upper corner of the edge cut off on the tile should be cut at an angle of 60 °.
Paving of cornice soft shingles
Flexible tiles start to be mounted just from the laying of the cornice roof tiles on the eaves. The cornice tile itself is a strip of width of 19.5 cm, obtained from ordinary tiles with cut off petals. It is recommended to remove the self-adhesive layer on the sheets of soft tile immediately before fixing the next sheet. The gluing of the cornice tile is carried out with an indent from the cornice strip upwards for a couple of cm. It is pasted by the joint-to-joint method and is nailed closer to the perforation metas. The fastening points are later covered with ordinary flexible tiles.
Fig. 4. The construction of the roof of soft tiles
Stacking of ordinary soft shingles
In order that thereafter there are no obvious differences in the color of the tiles laid with soft tiles, the installation should be carried out after the tiles from several packages are mixed. It is necessary to start from the center of the cornice overhang, gradually moving to the ends of the roof.
After the protective film is removed, the tiles should not be laid on other tiles!
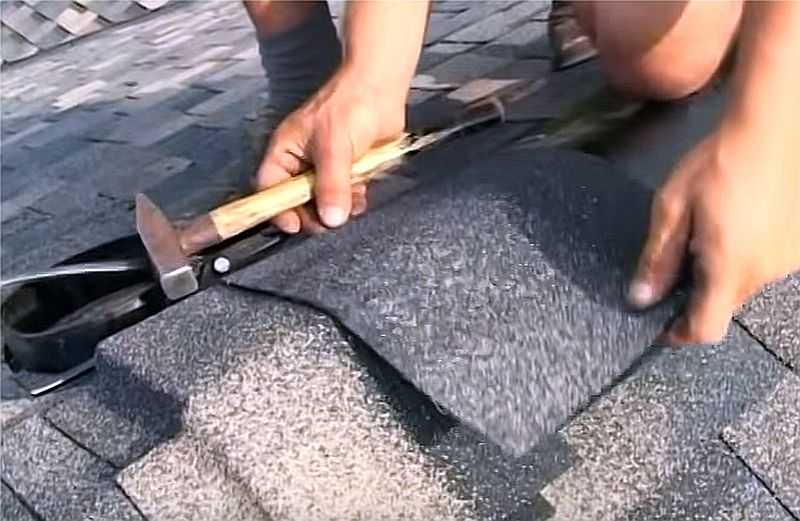
Fastening of each of the tiles of ordinary soft tiles is carried out with the help of 4 roofing nails, hammered by 2-3 cm above the groove line. If the flexible tile is mounted on the roof with a slope of more than 45 °, fixing is carried out using 6 nails for each tile.
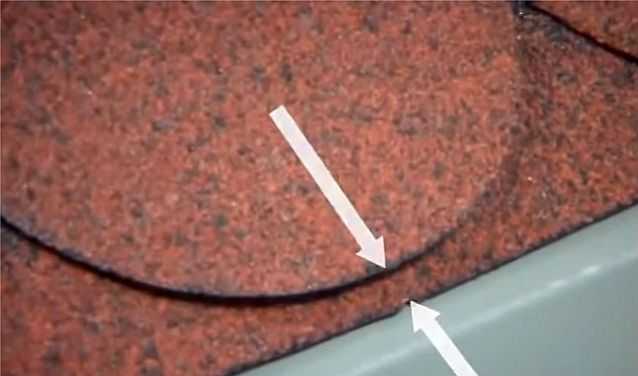
The first row should be placed in such a way that its lower edge retreats about a centimeter in relation to the previously laid cornice tile, and the joints of the latter should completely overlap with the petals of the ordinary roof tiles.
The laying of each subsequent layer of soft tiles is carried out, observing the following condition: the ends of the petals of this layer must lie either at the level of the tile cuts of the row laid earlier, or be located slightly higher. At the ends of the roof surpluses are cut off flush with the edge, after which the end parts are glued with flexible mastic for a minimum width of 10 cm.
In order to avoid damage to the roofing, trim must be performed on a padded board or plywood.
Laying ridge soft roof tiles
For the ridge part of the roof requires a soft tile with dimensions of 0.25x0.33 m, for which the cornice tiles along the perforation line are divided into three parts. Laying ridge soft shingles after removing the protective film on the hobby should be done in parallel with the short side of the tiles, fixing them on each side of the ridge with a pair of nails. Each subsequent sheet is stacked with an overlap of 5 cm on the previous sheet, thereby closing the nail heads.
Installation of the connecting bars
In those places where the roof will be connected to the chimney and other vertically arranged planes, installation of soft tiles is carried out as follows.
- Initially, in all areas of the joints, triangular slats 50x50 mm are nailed, on top of which a lining carpet is laid, fixed with mastic.
- Following the tiles of ordinary tiles should be placed so that their edges go to the vertical surface at least 30 cm, after which they are fixed with a mastic.
- This abutment is then covered with a metal strip of abutment in the form of an apron, and for its fastening a silicone sealant is used, due to which a greater stability in relation to various natural phenomena is achieved.
Fig. 5. The construction of the roof of soft tiles
Roof from bitumen soft tiles is easy to use, durable and aesthetic. A big plus of it is that self-assembly is possible. The technology is not the most difficult, the weight of the fragment is small, fixed to the adhesive base, and additionally fixed by roofing nails. So the installation of soft tiles with their own hands can be done even alone.
Roof pie for soft shingles
The attic under the roof can be warm or cold, depending on this, the composition of the roofing pie changes. But its part from the rafters and above always remains unchanged:
- on the rafters is stuffed waterproofing;
- on it - bars not less than 30 mm thick;
- solid flooring.
Here are the materials and consider in more detail - what to do and what features each of them has.
Waterproofing
Waterproofing membranes are one, two and three-layer. Single-layer membranes - the simplest and cheapest, perform only a dual task - do not let the moisture in the direction of the room and let the steam out. Thus, simple way not only protects the attic or from the penetration of condensate or leaked, suddenly, precipitation, but also the excess moisture that accompanies the life activity of a person is removed from the air. Single-layer membranes are poorly represented on the market. Almost one company produces them - Tyvek.
Two and three-layer membranes are more durable: besides their waterproofing layer, they also have an interlayer that imparts greater tensile strength. The third layer, if it exists, is an adsorbing layer. That is, even if a drop of condensate formed on the surface of the membrane, this layer absorbs it into itself, not allowing it to spill onto other materials. With sufficient ventilation, moisture is gradually carried away.
Three-layer membranes (for example, EUROTOP N35, RANKKA, UTACON) are desirable if the attic is insulated and used as a heater mineral wool. It is afraid of getting wet and with increasing humidity by 10% loses half its thermal insulation properties.
If there is a cold attic under the soft tile, it is desirable to use a two-layer waterproofing membrane. On strength it is much better, but at a price more expensive slightly.
Rims
Over the waterproofing film, parallel to the overhang, the laths of the crate are packed. They are necessary to create an air gap. It will allow to maintain normal humidity of roofing materials.

Oblashku make of boards of coniferous species (mostly pine). Thickness of boards - not less than 30 mm. This is the minimum clearance that will ensure normal air movement in the under-roof space. Before laying the wood must be treated with impregnation, protecting from pests, fungi, after - fire retardants.
The minimum length of the board for the crate - at least two spans of rafters. They are fastened and connected over rafter legs.
Flooring
The flooring under the soft tile is made solid. Materials are selected on the basis that nails must be driven into it, therefore they are usually used:
- OSB 3;
- moisture resistant plywood;
- grooved or edged board of the same thickness (25 mm) with a moisture content of not more than 20%.
When laying the flooring under soft tiles, it is necessary to leave gaps between the elements - to compensate for temperature expansion. When using plywood or OSB, the gap is 3 mm, between edging boards 1-5 mm. The sheet material is attached to the seam deflection, that is, so that the joints are not continuous. Strengthen the OSB with self-tapping screws or nails.

Using as a flooring board, you need to ensure that the annual rings of wood were directed down. In the opposite location, they are arched by an arc, soft tiles will raise, the integrity of the coating may be impaired. There is another trick that will keep the wooden flooring even, even if the moisture of the boards is above 20%. The ends of the boards during installation are additionally fastened with two nails or self-tapping screws, which are clogged close to the edge. This additional fasteners will not allow the boards to bend under shrinkage.
The choice of the thickness of the material for the flooring depends on the step of the crate. The larger the step, the thicker the flooring is needed. The best option - frequent step and thin plates. In this case, a light but firm foundation is obtained.
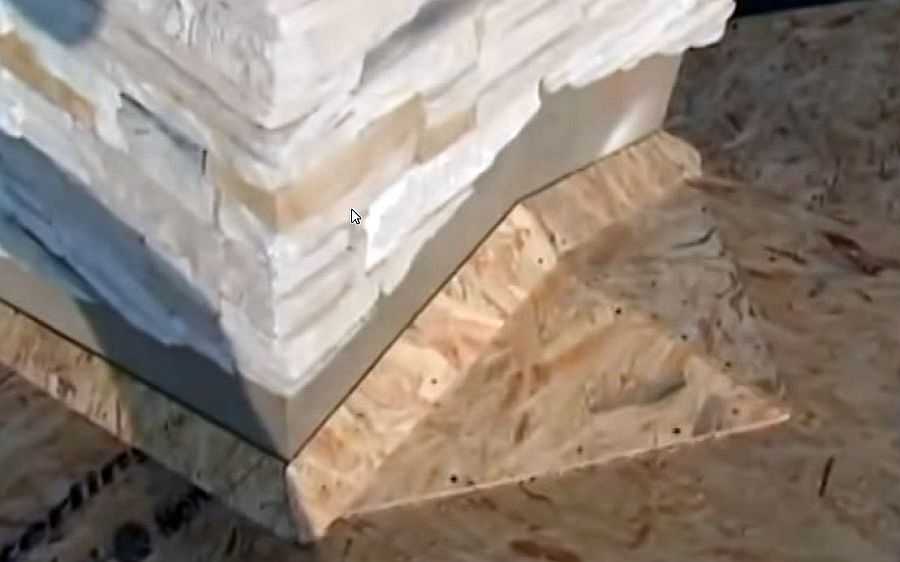
Another point concerns the construction of a deck for soft tiles around the chimney pipe. With a brick pipe, the width of which is more than 50 cm, a muzzle is made behind it. This design resembles a mini-roof.
After installing the flooring, its geometry is checked. The length, the width of the ramp at the top and bottom, the height of the ramp from both sides are measured, the diagonals are measured. And the last check - tracking the plane - the entire ramp should lie entirely in one plane.
Technology of roofing of soft roofing tiles
When buying, you will most likely be provided with an instruction to which the installation of soft shingles will be painted step by step and in detail, indicating all the exact dimensions that this particular manufacturer requires. These recommendations and should be adhered to. However, in advance with the order of work and their volumes to get to know in advance - to understand the intricacies of installation and the necessary amount of materials.
At once we will tell that to address with soft tile at packing it is given cautiously - she does not like, if it or her kink. Therefore, try not to bend or crush the shingles unnecessarily (this is one piece, consisting of a visible and an assembly part).
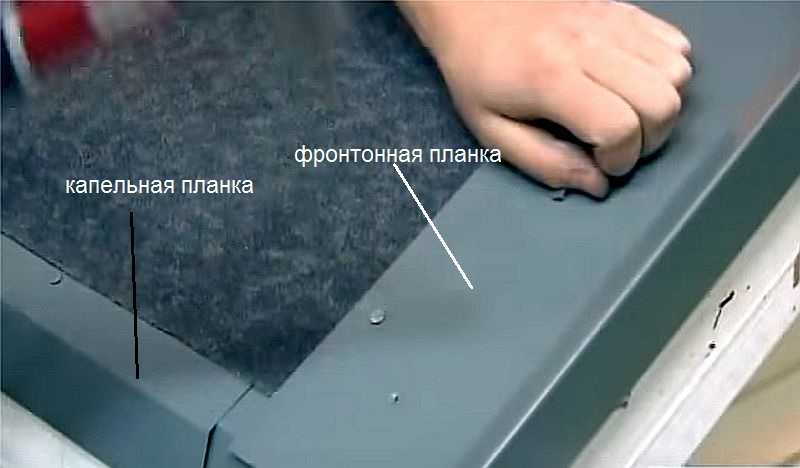
Strengthening overhang
The first is the drip strip. This L-shaped sheet of metal, covered with paint or polymer composition. Polymer coating is more expensive, but also more reliable. The color is selected close to the color of the shingles.

A drip strip is installed along the overhangs of the roof
The task of the drip strip is to protect the lathing, the slices of the rafters and the flooring from the ingress of moisture. One edge of the capelnik is laid on the deck, the second is covered by the overhang. It is fixed by nails from galvanizing (stainless steel), which are clogged in checkerboard order (one is closer to the fold, the second is near the edge). Step of mounting fasteners - 20-25 cm.
![]()
A drop lath is sold in two-meter pieces. After laying the first element, the second one is fastened with an overlap of at least 3 cm. If desired, the gap can be closed: smear the joint with bitumen mastic, fill with sealant.
At the same stage, hooks are mounted, in any case, hooks, which will hold the gutters.
Installation of waterproofing carpet
Regardless of the angle of the roof, in and along the slope, a waterproof underlay carpet must always be laid. It is sold in rolls of meter width. On the underside there is an adhesive compound covered with a protective film or paper.
Installation of a waterproofing carpet begins with stacking it in the valley. Roll out the material of a meter width, spreading 50 cm from both sides of the inflection point. It is desirable to do without joints, but, if necessary, the overlap of the two canvases should be at least 15 cm. The laying goes from bottom to top, the joint is additionally smeared with bituminous mastic, the material is well pressed.

Then the waterproof carpet under the flexible tile is laid along the cornice overhang. The minimum width of the carpet on the cornice overhang is the size of the overhang, plus 60 cm. The lower edge is located on top of the drip, and can bend down a few centimeters. First, the carpet is rolled out, if necessary - pruned, then the protective film is removed from the wrong side and glued to the substrate. In addition, fix the edges of nails from stainless steel or galvanized with a large flat hat (20-25 cm pitch).

In places of horizontal joint overlap of two canvases not less than 10 cm, in the vertical direction - not less than 15 cm. All joints are additionally smeared with bituminous mastic, the material is crimped.
Lining carpet
Lining carpet, as well as waterproofing, is sold in rolls of meter width, the back side is covered with an adhesive compound. The method of laying depends on the slope of the roof and on the profile of the selected bituminous shingles.
When using bituminous shingles with cuts (such as Jazz, Trio, Beaver Tail), regardless of the slope, the underlay rug spreads over the entire surface of the roof.
The installation of a lining carpet often requires undercutting. Do this with a sharp knife. To prevent damage to the underlying material when cutting, plywood or OSB piling is placed.
Front (front) bar
On the side sections of the eaves are mounted pediments. These are metal bands bent in the form of the letter "G", along the fold line of which there is a small ledge. They cover the laid roofing materials from wind loads, from moisture penetration. The gable plank is laid on the deck over a lining or waterproofing carpet, fixed with nails (stainless steel or galvanized) in staggered order with a step of 15 cm.
These bars also go in pieces of 2 m, stacked with an overlap of at least 3 cm.
Scatter marking
To install a soft tile was simple, a lining in the form of a grid is applied to the underlay carpet or flooring. Do this with a paint string. Lines along the cornice overhang are applied at a distance equal to 5 rows of tiles, in the vertical - through a meter (the length of one shingle of flexible tiles). This layout makes the laying easier - on it the edges are straightened, it is easier to track distances.
![]()
Ends carpet
On top of the already laid waterproofing carpet there is still a packing material. It is a bit wider, it serves as an additional guarantee of absence of leaks. Without removing the protective film from the underside, it is laid, cut down in the area of the overhang, mark the boundaries. Having deviated from the mark of 4-5 cm, a special mastic of increased fixation Fixer is applied. It is applied from a syringe, roller, then rubbed into a strip about 10 cm wide with a spatula.
On the mastic, the carpet is unfolded, folds are smoothed, the edges are pressed. Having deviated from the edge by 3 cm, it is fixed with nails in steps of 20 cm.
Adjunction to the brick pipe
To bypass pipes and ventilation outlets make patterns from the carpet or galvanized metal, painted in the appropriate color. The surface of the pipe is plastered, processed with a primer.
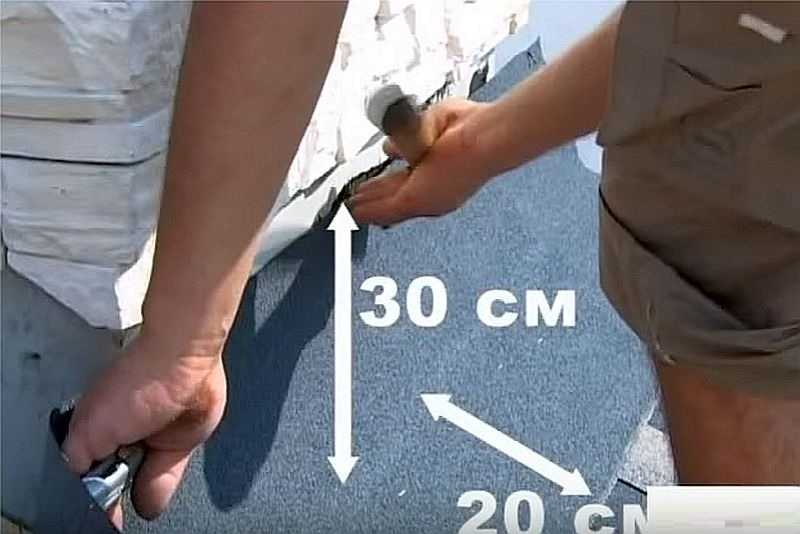
When using the bottom carpet, a pattern is made so that the material goes into the pipe no less than 30 cm, at least 20 cm should remain on the roof.
Pattern promazyvaetsya bitumen mastic, fit into place. the front part is installed first, then the right one and the left one.

Some side elements are wrapped on the front. The rear wall is installed last. Its parts go to the side.
With proper installation on the flooring around the pipe, a platform is obtained, solidly laid with a bottom carpet. Before laying the shingles in this place, the surface is smeared with bituminous mastic.
A tile on three sides comes to the laid carpet, not reaching the walls of the pipe 8 cm.

The upper part of the abutment is sealed with a metal strip, which is attached to the dowels.

All gaps are filled with heat-resistant sealant.

Output of round tubes
For passage of ventilation pipes there are special passage devices. They are arranged so that the lower edge of the element goes to the tile no less than 2 cm.
By attaching the passage to the roof, they traverse its inner hole. On the applied contour in the substrate, a hole is cut out, into which a round tube is drawn.
The rear part of the skirt of the passage element is smeared with bituminous mastic, put in the desired position, additionally fastened along the perimeter by nails. When installing a soft tile, the penetration skirt is greased with mastic.
The gaunt is cut as close as possible to the protrusion of the penetration, the gap is then filled with mastic, which is covered with a special powder, which protects against ultraviolet radiation.
Starting line
Installation of soft tiles begins with the laying of the starting strip. Usually it is a skate-cornice tile or a private tile with cut off petals. The first element is laid on one of the edges of the ramp, with the edge going to the pediment. The lower edge of the starting strip is laid on the drip, having deviated from its bend by 1.5 cm.

Before installation, a protective film is removed from the rear part, the shingles are leveled and laid. Each section of bitumen shingles is fastened with four nails - at the corners of each fragment, having deviated from the edge or perforation line 2-3 cm.

If the starting strip is used for cutting from ordinary tiles, in some of its parts there will be no sticky composition. In these places, the substrate is smeared with bituminous mastic.
Installation of soft ordinary tiles
There is a flexible tile with applied glue mass, protected by a film, and there is a composition that does not require a protective film, although on the roof it also fixes the elements well. When using the first type of material, the film is removed immediately before installation.
Before laying the shingles on the roof, open several packs - 5-6 pieces. Laying is carried out from all the bundles at the same time, taking one shingle from each one in turn. Otherwise, the roof will have pronounced spots, differing in color.
The first shingle is stacked so that its edge does not reach the edge of the starting strip by 1 cm. In addition to the adhesive composition, the tile is also fixed with roofing nails. The number of fasteners depends on the angle of the ramp:
When installing soft tiles, it is important to drive nails correctly. Hats should be pressed against the shingle, but not break through its surface.
Decoration of the valley
With the help of a paint cord in the valley, an area in which nails can not be driven is 30 cm from the middle of the valley. Then mark the boundaries of the trough. They can be from 5 to 15 cm in both directions.

The upper corner, which is turned towards the valley, is cut
When laying ordinary tiles, the nails are hammered as close as possible to the line beyond which the nails can not be beaten, and the shingles of the floor of the line of the guttering are cut. To prevent the water from leaking under the material, the upper corner of the tile is cut diagonally, cutting about 4-5 cm. Unfixed tile edge is greased with bitumen mastic and fixed with nails.
Fronton decoration
On the sides of the ramp, the shingles are cut so that the edge of the end plate remains 1 cm. The upper corner of the shingle is cut as well as in the valley - an obliquely slice of 4-5 cm. The edge of the shingles is smeared with mastic. The strip of mastic is not less than 10 cm. Then it is fixed with nails, as well as other elements.

If the flooring in the area of the ridge is made solid, a hole is cut along the ridge, which should not extend to the end of the rib 30 cm. The bitumen shingles are laid before the opening, after which a special ridge profile with ventilation holes is installed.
It is fixed by long roofing nails. On the long skate can be used several elements, they are joined together butt. The mounted metal skate is covered with ridge tiles. It removes the protective film, then the fragment is fixed with four nails (two on each side). Installation of soft tiles on the ridge goes towards the prevailing winds, one fragment enters the other by 3-5 cm.
Ridge shingles are a skate-cornice divided into three parts. It is perforated, a fragment is pulled along it (first bend, press the fold, then tear off).
The same elements can be cut from ordinary roof tiles. It is divided into three parts, not paying attention to the picture. The resulting tiles are cut off the corner - about 2-3 cm on each side. The middle of the fragment is heated with a construction hair dryer on both sides, laid in the middle on a bar and, gently squeezed, folded.
Ribs and bends
Ribs are closed with ridge tiles. Along the inflection at the required distance, a line is beaten off with a paint string. On it the edge of the shingles is leveled. Laying the flexible roof tiles on the rib goes from bottom to top, each piece is glued, then retreats from the top edge of 2 cm, is fixed by nails - two on each side. The next fragment comes on laid on 3-5 cm.

Make the roof of the house reliable and beautiful allows the device of the roof of flexible roof tiles. The popularity of this material is due to the high performance characteristics of the coating and aesthetic appearance.
Structure of the shingles
Bitumen roofing materials of the new generation are widely used for the arrangement of roofs due to the following qualities:
- high waterproofing parameters;
- thermal insulation characteristics;
- convenience of installation;
- soundproof and noise-absorbing qualities;
- fire safety;
- resistance to temperature changes;
- non-adherence to biological destruction.
Until recently, coatings made on the basis of bitumen had a relatively short operational life, as bitumen has low elasticity and cracking under the influence of atmospheric influences and temperature changes. The cardboard basis of the first generation roofing is prone to decay under the influence of moisture. Modern materials on a bitumen basis do not have these drawbacks.
Today, fiberglass and polymer materials are used as the basis. The creation of bitumen-polymer compositions made it possible to significantly improve the physico-technical characteristics of roofing materials and several times to extend their service life.

It is a piece material for installation soft roofing. As a basis providing mechanical strength of elements, non-woven glass fiber can be used - due to the chaotic arrangement of fibers, the material is better impregnated bituminous composition and does not allow it to flow under the thermal effect of the sun.
Polymer-bitumen composition for piece tiles has the necessary elasticity in order not to harden to a brittle state at negative air temperatures.
Protective-decorative powder is made of colored mineral granules. The outer layer allows to protect polymer-bitumen filler from mechanical damage, ultraviolet exposure. In addition, the powder reflects a significant part of the sun's rays, protecting roofing structure from overheating.
Bitumen shingles are produced in the form of shingles - individual sheets of a certain shape. The aesthetic appearance of the finished roofing, in particular its relief, depends entirely on the shape of the "petals" of shingles.
Application of flexible tiles
Piece bituminous materials have been used for many years in construction in European countries. In addition to high technical and operational characteristics, the flexible tile attracts the possibility of arranging roofs with complex architectural forms. Bituminous tiles are in demand not only in private, but also in commercial construction.
The roof of flexible roof tiles can be mounted independently, without the involvement of professionals. The technology of laying shingles provides for installation practically without the use of adhesives and heating devices. They are used only for the arrangement of complex places of the roof. Ordinary elements form a strong waterproof flooring, adhering firmly to the base due to a special adhesive layer on the lower part of the shingle. Adhesive composition protects the polymer film, which is removed immediately before the installation of the element. Bituminous tiles should be additionally fixed with the help of roofing nails.
Preparation of the foundation for roofing
According to SNIP, the roofing of flexible roof tiles requires the installation of a continuous crate. For this, a pile or edging board, OSB boards or plywood sheets may be used. It is recommended to use waterproof or punctured plywood. Elements of the battens should be laid, joining the rafters. The deformation gap between boards or sheet material should be 3 mm.
If the step of the rafters does not allow the installation of the crate with the use of one-piece sheets, calibrated boards are packed on the rafters along the rafters, and plywood or OSB plates are attached to them using self-tapping screws or spiked nails.
Wood materials, from which the bitumen shingles are made, must be pretreated with flame retardant compounds.
If the angle of the skate slope is less than 30 °, then a whole lining carpet is installed on the whole surface of the crate. In other cases, only the flooring of the lining is provided in places where snow accumulates to the maximum. This allows reliable waterproofing of the roof. It is advisable to use substrates recommended by the manufacturer of bituminous shingles. In this case, a qualitative grasp of the gluing layer of shingles with the base of the roof is guaranteed.
It is undesirable to use roofing material and similar materials as a lining carpet, since their operating time is noticeably less than that of the finish coat.
The laying of polymer-bitumen shingles over the material from unmodified bitumen leads to deformation of the finish coat, since the backing layer is not sufficiently elastic.
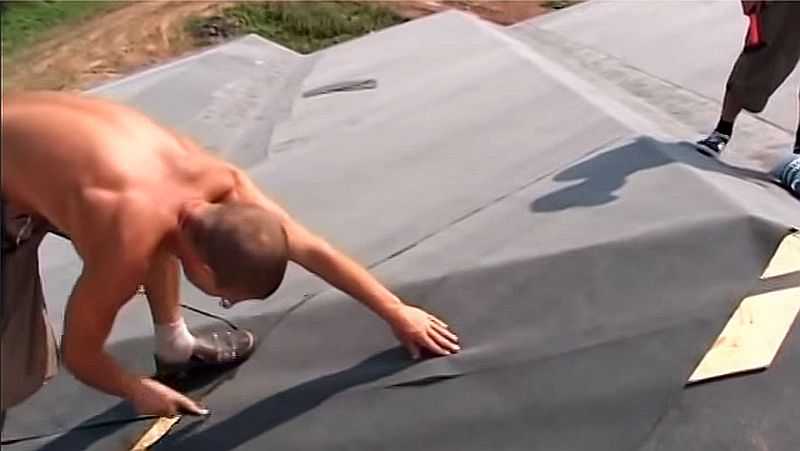
Waterproofing carpet on the skates is made of roll materials. The mounting of the strips starts from the eaves. Laying is done on bitumen mastic or thanks to a self-adhesive layer. The recommended overlap in the longitudinal direction is 150 mm, in the transverse direction - 100 mm. It is important to add each strip to the upper edge and to the sides with galvanized roofing nails with wide hats. Step fastening - 220-250 mm.
For additional waterproofing of difficult places it is recommended to use a self-adhesive bitumen-polymer membrane. Along the cornice overhang and the gable ends there is a strip of width corresponding to the width of the overhang plus 600 mm. In valleys, the width of the roof carpet should be 1 meter: 500 mm from the axis of the valley in each direction. It is desirable to mount the membrane with a solid strip, without joints. If necessary, the overlap should be at least 300 mm.
Mounting the drip and shingles
Kapelnik allows you to protect the roof cornice from the negative effects of moisture. For the use of a drip with a bend of 100-130 °, depending on the angle of inclination of the roof slope. The element should be fixed at the very edge of the eaves and be located vertically - this helps to efficiently drain water from the roofing. The roof of flexible tiles is supplied with drippers throughout the length of the cornices of the building.
Droppers or cornices are made of galvanized steel with a special color anti-corrosion coating. Cornice bars and other elements should be selected in tone to the roofing.
Stages of preparation for the installation of ordinary roofing:
- the curtain rod is fixed by the base to the crate;
- its lower edge should be directed towards the gutter;
- the capillary strips join together overlapping;
- the ends of the crate are closed by the front slats;
- the roofing carpet is installed in the valleys (the edges of the coating are treated with bituminous mastic);
- a series of cornice tiles are mounted on the drip;
- the ordinary shingles are laid (in staggered order, so that the petals of the upper shingles are located above the notches of the lower shingles).
The step of fixing the strips is 100-120 mm, in staggered order. In the places of overlap fastening elements are located in steps of 20-30 mm. Installation of bitumen roofing from individual elements is performed at an air temperature above +5 ° C. If necessary, the adhesive layer can be heated with a thermofan. In cold weather, installation on bituminous mastic is possible.
When laying flexible tiles, it is forbidden to use a burner designed for melting the roll membrane.
Endowa
The construction of a roof made of soft tiles requires the use of certain technologies. The construction of the valley can be carried out in two ways, each of which requires a certain preparation of the foundation. This method is "undercut" and open.
Open method. Above the backing layer with a displacement of 2-3 cm horizontally arranged carpet valleys. On the back, it is smeared around the perimeter with polymer-bitumen mastic, the width of the strip is 10 cm. After laying, the carpet is nailed with roofing nails in 20-25 cm increments and 2 to 3 cm from the edge.
If there is no way to do without the overlap of the Rendovo carpet, it should be located at the top of the ramp and be at least 30 cm. The overlap is carefully pasted.
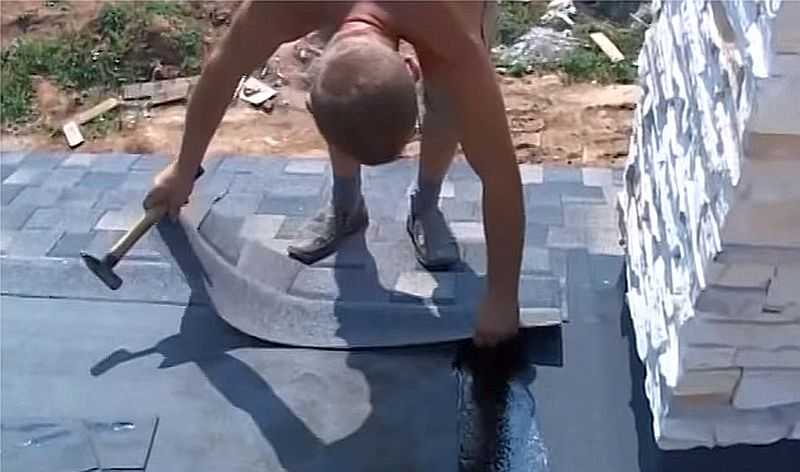
Ordinary shingles are mounted on top of the valley carpet up to its axis. Each shingle covering the valleys shall be fixed in the upper corner to the nail, but the fastener shall be located not less than 30 cm from the axis of the valley. After the shingles are assembled from both surfaces of the ramp, chopping lines are marked with a chopping cord. On these lines the ordinary tile is cut - in order not to damage the waterproofing, it is necessary to place a plate under each shingle during the trimming. Cutted edges of shingles are smeared with bituminous mastic and carefully glued. The width of the chute can be from 5 to 15 cm.
If in the immediate vicinity of the building grow deciduous trees, the trough is recommended to be made wide, so that the foliage is easily washed off.
The "undercut" method. A roof made of soft tiles can have a closed valley type. In this case, on a more sloping ramp, ordinary tiles are mounted, and the shingles should go over a steep ramp more than 30 cm. Each shingle in the upper corner is fastened to a nail. Then, the ordinary tile is mounted on a steep slope, after which the line of the undercut is beaten at a distance of 7-8 cm from the central axis of the valley. After cutting the upper shingles along the line, the edges of the material are fixed using bitumen mastic. This type of mounting of the valley allows it to be shifted towards a smaller slope in order to avoid the raining of the slope by rain or melt water.
Author Pavlov Yuri
Nikolayevich
Alexey Shamborskiy, 11/04/2016
Using a flexible tile allows you to give any structure a stylish and modern look. You can do the work yourself: difficulties in laying insulation layers, roofing material will not arise. The complexity and duration of work depends only on the shape of the roof, its size and design.
The scheme of the device of a roof from a soft roof

How does the installation of flexible shingles begin?
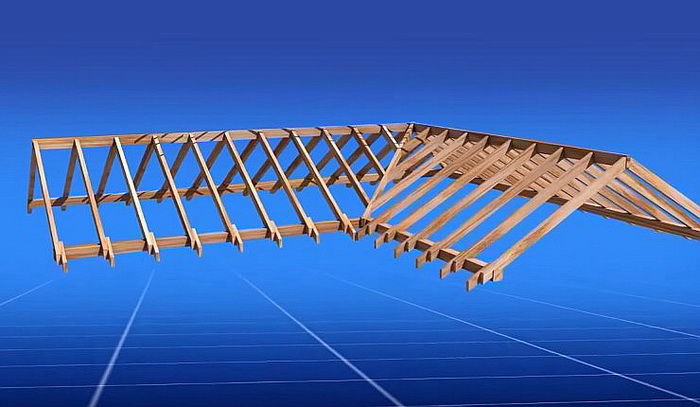
To lay the shingles with their own hands, you will need to create a solid foundation - a rafter structure. It is made of a bar with dimensions of 150x50 mm. The distance between the neighboring rafters is about 60 cm. The arrangement of the elements determines the future construction of the roof. But regardless of the size or angle of the ramp, the installation of a soft roof will be carried out without any problems. After construction rafter systems or before assembling the structure it is recommended that the sawn timber be treated with an antiseptic.

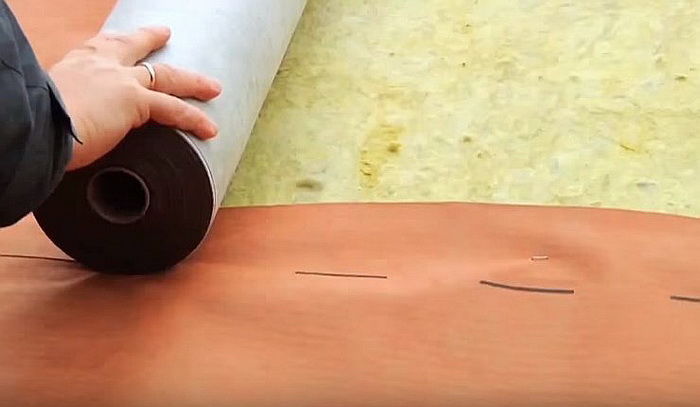
The next stage is the vapor barrier of the roof. Installation of the layer is made from the attic (mansard) room. Fastening of the roll material starts from the ridge, parallel to the cornice.
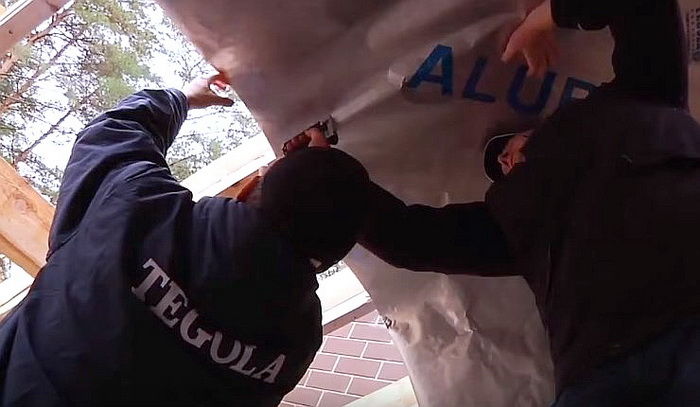

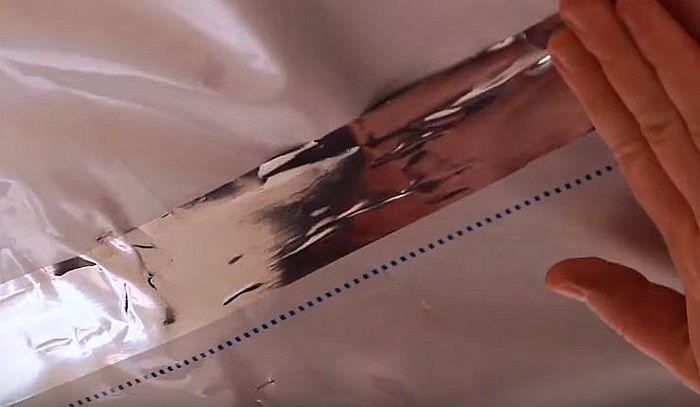
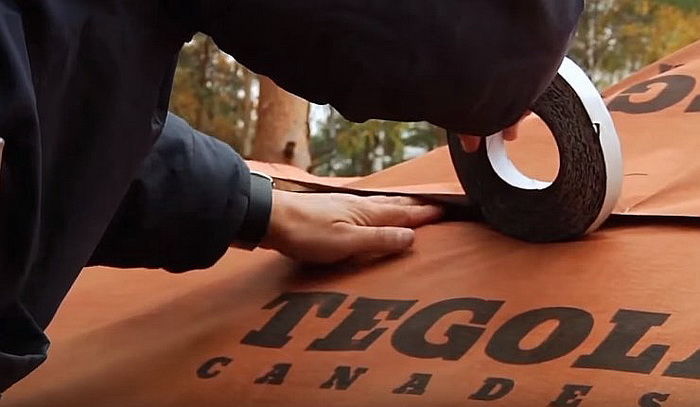
To the rafters the layer is attached with a construction stapler. Each new layer is superimposed on the previous by overlapping of the order of 10-15 cm. The joints are fixed with a foil tape.
Warming of soft roofing
The laying of the mineral wool insulation is carried out from the outside. The first layer of insulation sheets will be between the rafters (perpendicular to the cornice). Before their laying it is required to execute the black plating from the attic space. The optimum thickness of the layer of insulation for the central region of Russia is about 15-20 cm (2 sheets of insulation).

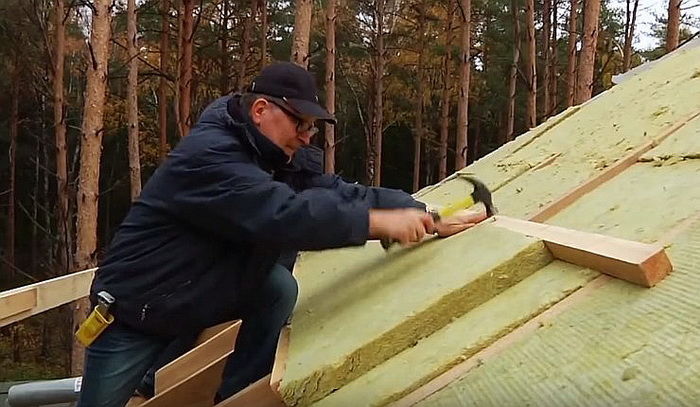
Such a two-level laying of the insulation practically completely eliminates cold bridges.
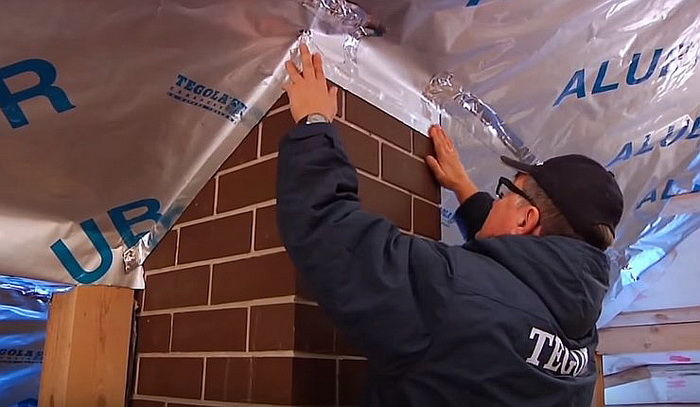
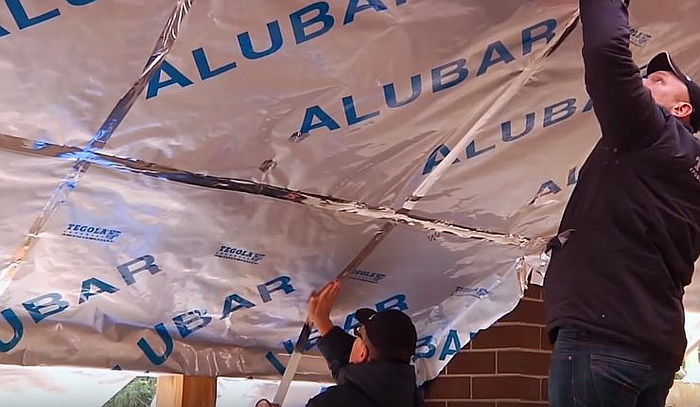
The layer of the parodiffusion membrane is fixed on top of the heater. Such a "multilayered" installation of a soft roof with its own hands will exclude the ingress of dust onto the minnow, will prevent the accumulation of deposits on the insulation.
The material is laid parallel to the cornice with an overlap of the layers of 10-15 cm. In addition, about 15-20 cm of the membrane should extend beyond the heating circuit. The material is fastened with a construction stapler, the joints are connected by a self-adhesive tape.


Preparation of the ventilation chamber and installation of flexible tiles
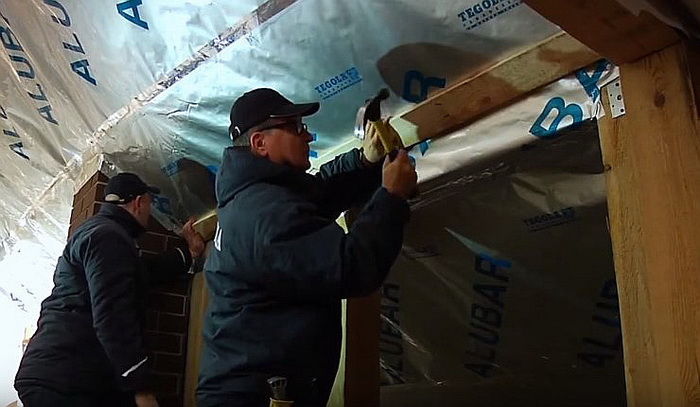
The ventilation layer between the base of the roof and the heater must be at least 5 cm. This is sufficient for normalizing the temperature and removing wet steam. The second layer of the counter-brus is mounted parallel to the rafters.
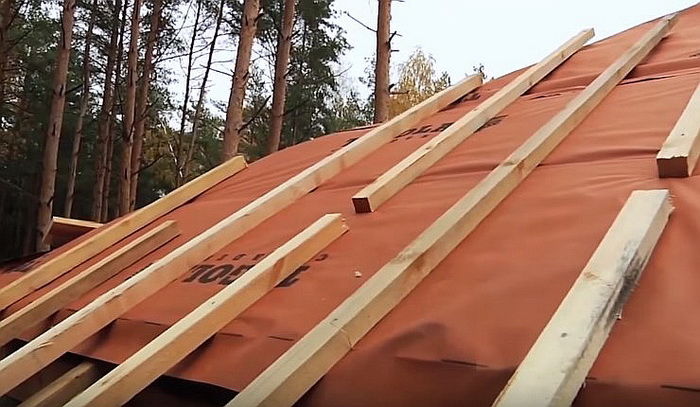
For work, lumber with parameters of 5x5 cm is used, the distance between neighboring supports is 30 cm. The fastening is made with breaks of 5-10 cm, as shown in the attached photos. Further work on the arrangement and installation of the roof of soft tiles is carried out according to the following step-by-step instructions:
1. A moisture-resistant