Metal, wooden or even plastic narrow bars, from which you can collect a fence, it is common to call a fence. However, despite such a "generalized" name, the fences made of them can eventually turn out to be very diverse. And, of course, even a beginner can easily cope with such work, since it is quite easy to make a fence from a fence. Especially if you know a couple of nuances.
Supports

Any fence is usually divided into sections, which are kept on buried supports in the ground. If the fence is heavy (for example, it is made of bricks), then it does not just have to be buried and concreted into the ground supports, but a real band foundation. Likewise, you should do the same in situations where strong winds are blowing in your area (capable of overturning a poorly fixed fence), or there are dogs on the site (yours or the next one) who adore making "trenches".
Master the fence from the fence with your own hands, as a support you can choose as a metal pipe (including a profile one - square or rectangular section), and a wooden beam (not less than 5х5 centimeters) or a concreted asbestos cement pipe. Usually, the supports are made of the same material as the fence itself (except for asbestos-cement pipes, which are better to combine with a wooden fence).

Metal supports in the ground can be hammered, having drilled in it an opening to a depth of not less than 50 centimeters (its diameter should exceed the cross-section of the support). After plugging a metal pillar, the space around it should be covered with gravel and compacted.
The wooden bar, when used as a support, should be treated with bituminous mastic in the lower part, then wrapped with a ruberoid and then concreteized, after immersing not less than 50-70 centimeters in a pit dug in the ground.
Supports from asbestos-cement pipes should also be concreted to the same depth. Remember that the empty pipe is quite fragile, so when the installation of the fence is completed, it should be filled with concrete.
Frame

The bars of the fence will not stick to the fence on their own - they need a frame that will join the next standing support. If the supports are metal, then the frame is made of the same material (mainly from profile pipe small cross section). The frame itself consists of two or three horizontally laid elements, to which later the fender strips will be attached.
With wooden supports, the frame is made of a beam with a section of 4x4 or 5x5 centimeters or of boards not wider than 10 centimeters and a thickness of at least 2 centimeters.

To supports from asbestos cement pipes it is accepted to mount metal carcass. For these purposes, holes are made in them, through which small pieces of metal reinforcement pass. Then to them from two sides weld the carcass planks.
Securing the fence

The fence is fixed to the horizontal slats of the frame approximately the same for all varieties of material of the slats:
- Measure the width of your fence bar and the distance between the supports. Calculate how should be the distance between the individual elements of the fence, so that the fence looked solid, and not like a leaky sieve.
- Determine the shape of the top edge of your fence. Since making a fence from a fence curved shape after you fasten all the straight elements will be difficult, take care of giving the necessary bending to the picket in advance. Most often use the shape of a convex semicircle (within one section of the fence), but experts in feng shui (if you suddenly decide to listen to their advice), recommend giving the sections of the fence a kind of concave semicircle ("bowl"), whose "duty" is to attract everything you need: from money and ending with family well-being.
- Install the fence of the future fence. If you have concreted them, then wait for the concrete to harden completely, and the whole structure will not bend under the weight of the fence from the fence.
- Fix to the supports the frame for the fence in the form of horizontal bars. The metal elements between each other are better to be welded together, and the wooden ones - by self-tapping screws.
- Paint the supports and the frame (after fixing the fence, it will be difficult enough).
- Paint the fence if necessary.
- Attach the bars with the same pitch in all sections of the fence to the horizontal elements of its frame. The fence should not touch the ground, especially if it is made of wood. Mount the wooden strips with self-tapping screws.
- If you want to make the fence the most inconspicuous, place the pins on both sides of the horizontal bars of the frame in staggered order. In this case, the step between the individual pins should be 2 centimeters shorter than their width.
Video
Instructions for the manufacture of a fence from a euro fence:
Solid or through fence made of wooden slats is widely used for fencing houses and suburban areas. A fence made of a wooden fence has many advantages: it requires a minimum of costs, and if necessary, repairs can be made as quickly as possible.
Required materials and tools:
• Roulette, construction level, strong twine;• shovel or drill;
• metal pipes or wooden logs for the manufacture of supports;
• transverse lags (veins) made of metal or a solid coniferous timber 50x100 mm (10 supports and 20 three-meter hollows will be needed for every 30 meters of the fence);
• picket;
• sand, cement, crushed stone for pouring metal pillars;
• hacksaw with medium teeth;
• ax, hammer;
• chisel with a wide blade;
• plane;
• Screwdriver;
• Mounting brackets and bolts for fixing the crossbars to the posts;
• self-tapping screws or galvanized nails;
Sandpaper for sanding wood;
• linseed oil, paint and paintbrush for coloring.
Installation of support poles
To make the fence smooth, the ground should be carefully leveled. Before leveling, the site where the fence is to be built is cleared, and trees and shrubs are uprooted. The roots of many plants (poplar, willow, dog rose, etc.) are quite tenacious, so even small cuttings should be removed. Otherwise, after a couple of years, the remaining roots can give an abundant gain and damage the fence.1. On the perimeter of the site at the site of future supports, gates and wickets are slaughtered by small pegs, between which the string is stretched. In order for the fence to be perfectly even, before starting the installation of the pillars, it is necessary to measure their location several times with the help of a building level.

On the perimeter of the fence there is a whip
Council.When wet, the tree becomes heavier, which significantly increases the load on the supports and logs, so they must be made of a solid wood or metal.
2. The standard interval between the supports is 2.5-3 m. This distance will be sufficient to hold the whole span. The distance between the supports should be equal to the length of the transverse logs, taking into account the spacing on the mount.
3. At the location of the supports with a shovel or borer, pits 70-100 cm deep (this figure depends on the type of soil). At the bottom of the pit a layer of 20 cm is covered with broken brick, stones or gravel, then sand. This "pillow" is carefully spilled and tamped.
4. Wooden logs cleaned of bark and knots. To protect against dampness and insects, the part that will be underground will be burned at the stake or treated with a blowtorch. Wood can also be impregnated with bitumen.
5. Fill with a wooden support does not follow - in concrete very quickly rot. They are installed in pre-prepared pits, covered with rubble and sand. At the same time, each layer of such a backfill is spilled with water and compacted.
Council. Since the main load will lie on poles and veins, they should be made of metal. They should be thoroughly cleaned of rust and covered with any anti-corrosion solution. Especially carefully should be treated places that will be in the ground.

Installation of metal supports
6. Pillars should be installed strictly vertically. To do this, use the building level.

Alignment of supports
7. After leveling the supports, they are fixed using spacers. Then the concrete mortar with the addition of crushed stone. Its proportions depend on the brand of cement.
Important!All subsequent work is carried out only after setting the solution (at least 1-2 days).
8. To ensure that the height of the fence is the same throughout the perimeter, after installing the first and last pillar, a nail is hammered on top of them, and a twine stretches between them, which will serve as a guide for the other supports.

Between the pillars a string is stretched
Fastening fence
1. In the wooden poles grooves (two for each pillar) with a depth of 30 cm are prepared. Their location is measured by the building level.2. In each groove is inserted a stamina and fixed to the post on the screws (more durable version) or nails. Thus, the binding of all the pillars is made.

Mounting the lag
Council. When using metal supports in the places of welding of veins (lag) to the posts, rust can quickly appear, so it is better to fasten them with the help of mounting brackets and bolts. With the help of staples purchased in the store or made independently of metal strips, it is possible to attach wooden logs.
Fixing the support to the wooden veneer using a clamp
3. Standard length picket fence 1.25 m. When using boards of non-standard sizes, they are cut to the desired length.
4. The first fittings are first attached, and they should be located relatively to the vein exactly under 90 °. To protect the planks from decay, you should place their lower end at a distance 5 cm from the ground. Then the remaining boards are attached.

Fastening fence
Council. To avoid splitting of the pins, self-tapping screws or nails should not be placed along one line. To the ends do not stick out, do not fasten them and too close to the edge.
5. The distance between the pins can be arbitrary. They can be attached as a continuous cloth, and with a small indent from each other. However, to make the fence look aesthetically pleasing, these indents should be the same along the entire length of the fence.
Council. When installing a solid fence to prevent deformation during moisture drops, the boards should be fastened with a small gap.

The boards are fastened with a small gap
Painting fencing and decoration
In order that the tree does not absorb too much paint, before painting it is covered with linseed oil and allowed to dry. For painting use any frost-resistant paint, stain or decorative varnishes.Decorate the fence of the fence is not difficult. For example, you can cut its upper part at a certain angle, make it semi-circular or, combining the length of the fence, arrange the top of the fence with a zigzag or a ladder. Cropped ends are sanded or embossed. Slicked at a certain angle, the snap-nets not only look more original, but absorb moisture less: it slides off its surface.
Any decorative elements of the fence are sawed out by template from plywood with jigsaw. They can be made separately, and then attached to certain sections of the fence.

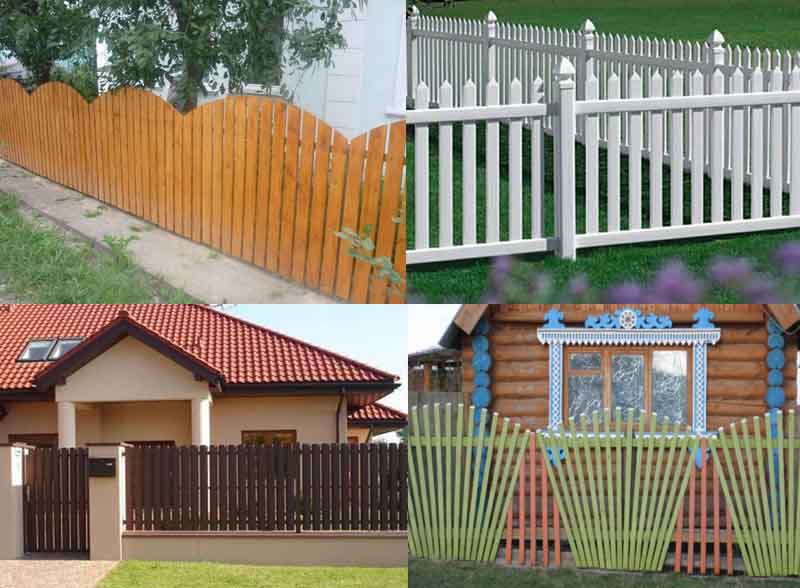
Types of fences from the fence


Options for decoration fences from the fence
Video: Installing the fence from the fence itself
One of the most beautiful variants of registration of sites are fences from a wooden fence. The tree has always been one of the most attractive materials for construction - its noble colors and picturesque textures create a special warm atmosphere. Now in Moscow is very common design such as eco-design: the predominance of natural materials in the interior and exterior of buildings. Organically, this design fits and a wooden hedge from the peg.
Modern technology allows you to make the installation of a wooden fence simple and fast, as well as significantly increase the level of performance. The fence is beautiful and eco-friendly, its installation is done in a matter of hours, and today's technologies allow extending the life of the product without being puzzled by its additional processing.
Now the fencing from natural wood can buy to itself everyone - the price for meter is quite comprehensible, besides, for higher cost you can order very interesting models with a different direction of boards: horizontal, vertical, diagonal, combined.
Prices for fences from a wooden fence
Prices for a fence from a wooden fence range from about five hundred rubles for the material itself, but also include additional costs. If you order a turnkey fence, note that the price per meter will take into account both the installation and the frame: poles, logs, the erection of brick or stone pillars, the ribbon foundation. Together with painting or impregnation, prices can be raised up to 1000 rubles per m and more. You can vary the amount at the expense of an individual calculation, saving on materials, solid foundation, etc.
| Product name / height | h-1 m | h-1.5 m | h-1.8 m | h-2.0 m |
|---|---|---|---|---|
| Metal fence frame: poles 60x60, 2 lugs 40x20 or board 100x40 |
350 r | |||
| Wooden fence (planed board 90x20mm) step 1cm | 600 r | 900 r | 1 080 r | 1 200 r |
| Wooden fence (planed board 90x20) step 2cm | 540 r | 810 r | 972 r | 1 080 r |
| Fence wooden (block house 95x20), step 1cm | 571 r | 857 r | 1 028 r | 1 143 r |
| Wooden fence (board planed 90x20 or block house 95x20), chessboard with a pitch of 5-6 cm |
890p | 1 335 r | 1 602 r | 1 780 r |
| Cover fence with antiseptic, pinotex, etc. | Consumption: 1 liter per 6-8 m2 | |||
| Fence installation (metal frame, lag and fence) | 400 - 450 r | |||
| Ribbon foundation | 3 500 r / 3 900 r (for brick poles) | |||
How to buy a fence from a wooden fence
On our site you can buy wooden fences for different modifications. These are fences with different steps (distance between boards), as well as different types of board processing. We offer hedges from ordinary planed boards, as well as from block house - this is a popular way of processing, when the inner side remains flat, and the outside is made convex. Perhaps single or double execution, with the arrangement of chessboard in checkerboard, as well as decorative options for the design of the fence with complex patterns. Also, we can calculate the cost of special impregnations for you, which will additionally protect the wood from color changes with time, sunlight, moisture, decay, microorganisms and insects.
Wooden fence - a simple design for the fence. And the decorative elements will make it very attractive. If you use certain types of wood as a material for the fence, for example, boards made of larch, you can get a virtually eternal fence.
Advantages Overview
Each design is characterized by explicit and hidden advantages / disadvantages. If we consider a fence from a fence, then first of all it is necessary to distinguish its universality, since the scope of such fencing is quite wide: private sector, temporary fence, delimitation of the territory (flowerbed, garden, kitchen garden, etc.), any objects, functional fencing with protective functions.
In addition, there are other advantages:
- absence of harmful substances, since the material is natural, this means complete safety of its operation;
- acceptable price;
- simple process of erecting a fence, which allows you to do all the work yourself;
- short installation time;
- strength, especially if a larch picket is used;
- aesthetic appeal;
- a variety of constructive solutions;
- do not obscure the site;
- is combined with other types of materials: brick, stone, metal;
- ventilation of the site due to gaps in the fence.
Among other things, fences made of larch or other materials can easily be repaired and restored. Therefore, the fence is obtained in the literal sense of the eternal.
How to choose the material?
At the initial stage, you should determine the instrument. To build a fence from a wooden fence, you will need a hammer, saw, screwdriver, pliers, tape measure, construction level, just in case the nail. Still need to prepare a screwdriver, shovel, sandpaper, hard brush.
The number of required materials is also determined:
- a small width stripe - made to order or prepared by hand from the edging board;
- lags or cross-bars on which the fence will be fixed;
- support posts: made of metal or wood.
In addition, paint and varnish preparations, sand, gravel, cement, wooden stakes and a rope for marking, a primer are prepared for work. It is important to choose the right tree for the fence. For the fence the best options Are considered: boards from a larch, an oak, an alder, a beech. With an error-free wood processing and fence installation, you can get an eternal fence.
To give strength to the structure, it is necessary to use logs with a section of 40x20 mm or 40x25 mm. As posts, metal poles or beams can be used. Recommended dimensions of the section: 60х60 mm, 80х80 mm. If the support has a circular cross-section, the diameter should be more than 60 mm. For a wooden fence, the distance between poles is between 2 and 2.5 m. Another one important nuance - a board made of larch or other material must be well dried.
Sequence of works during installation
It should begin with the cleaning of the territory, as well as with its marking. It is necessary to prepare the surface: remove large debris, dried weed grass, if necessary, level the soil, if there are pits, mounds. Marking is carried out using stakes and cord. First, the perimeter of the future fence is determined, the cord is pulled by itself. Then points are set for the installation of supports.

Wooden fence scheme
For a wooden fence there are two main ways of fastening pillars: the pit is filled with soil; poured concrete. The second option is more reliable. Holes in the ground can be drilled with the help of a garden drill or scooped up with a shovel, which is not always convenient, since the recommended pit depth is up to 1.5 m.
You can work with a drill without the professional's invitation, with your own hands. When installing supports in the holes it is recommended to check their position by the building level. For the reliability and for the purpose of fixing the poles, spacers are used.
If you plan to use wooden poles, the lower part, which will be immersed in the ground, is covered with bituminous mastic to avoid rotting wood. It is also necessary to treat the posts with an antiseptic solution.
At the base of the pits should be a gravel cushion, a sufficient thickness of the layer - 20 cm. After pouring with concrete, it is necessary to wait some time until the solution dries completely, as a rule, 3 days are enough. And you can proceed with the installation of crossbars.
Assembly is carried out in two ways: sequentially or sections. In the first case, lags are first mounted, then a board of larch or other wood is stuffed. The second option involves a separate assembly of the section from the logs and stunts, after which the finished block is mounted on its supports with its own hands.
To attach the wooden structure to the metal posts, use a special piece - in the form of a cross from a corner or channels. It is welded to the post if it is not possible to secure it with bolts. And in places of contact with wooden crossbars, a standard set of fasteners is used.
Finishing the fence
To make, in the literal sense of the eternal fencing of the fence, it is recommended to take care of the covering of the tree. Only two types are involved: primer and paint / varnish. If the task is to change the natural shade of the tree, the paint is used. But the transparent finishing material allows you to preserve the natural color and structure of the tree.
First of all you need to prepare the surface of the boards for staining. Improved adhesion will provide roughness. To do this, you need to grind the surface of wooden sticks with sandpaper by hand.
The end part of the support posts should be covered with special plugs or a metal plate. The upper edge of the rack is sanded and covered with moisture-resistant compounds.
Of course, this requires regular maintenance: remove the peeling paint, restore the protective coating. When preparing the material with your own hands and building a fence without involving professionals, the cost of fencing will be small.
Each owner wants his site a country house or the cottage was fenced beautiful fence. Now there are many options for fencing, it is only necessary to choose which one is most suitable for you both in appearance and in your pocket.
The golden mean in the selection can be a wooden picket fence, which can easily be made by hand, without using the expensive help of a specialist. With the help of a fence, you can beautifully outline the territory of a country house or cottage and at the same time save a lot. To make a fence wooden fence is quite simple, it is only necessary to know a few basic rules and features that we will consider on points.
A country house or a cottage is the place that you want to make in a special way beautiful and cozy. This is the territory for rest, solitude and relaxation. You can achieve the necessary harmony with the help of small details: plant beautiful flowers, make an arbor, swing, build a good decorative fence. And if all this is done by oneself, then at times it will be more pleasant then to admire all this beauty.
Why the fence?
Wooden fence fence, made by own hands, has so many pluses that all of them, probably, it is simply impossible to count, but to make a wooden fence fence with your own hands and install it is quite simple.
Here are the main advantages of this fence:
- Such a fence is universal. Wooden fence just perfectly fits almost any design and can become the color of the terrain landscape.
- The fence is pretty reliable. All, of course, depends on the dervine, which you choose, the height of the fence and the width of the stalk.
- Cheap materials and their availability.
- It is very easy to take care of such a fence. It is only necessary to periodically cover the surface with paint or varnish to prevent the possibility of defects.
It is also important that the wooden fence does not obscure the area near the fence, which means that you can plant beautiful flowers or other plants near the fence. And still such a fence will perfectly emphasize country style Territory or no less popular now country style.
With the fence it's very easy to work, and different original designs are possible - in the form of waves, semicircles, triangles and other patterns.
Types of fence constructions
Wooden fence picket fence can be of two kinds - with or without base. In order to make a fence wooden fence with its own hands with the base, it is necessary to make a foundation under the supporting poles and ribbon foundation under the fence itself. The foundation for wooden fence The fence is made in the form of a trench with the help of a conventional shovel by one's own hands, and it is better to deepen the pillars with the help of a hand drill.
The depth of the basement should be about one meter. At the bottom it is necessary to fall asleep and pound a pillow of sand or gravel. In the recesses the vertical pillars are fixed strictly upright, and the formwork should be installed on the base of the foundation under the fence. After pouring the foundation, you should wait about 7 days for the solution to dry and cling. After the concurrence of this line, you can proceed to the following works.
Such a fence is more durable than a fence without a foundation, since the base of the sling is additionally protected from moisture from the ground. The foundation of such a fence can be imposed with a ragged stone or other material.
The fence without a base is simpler in its construction. For its construction, it is only necessary to make holes for support poles and, after their installation, densely to soil. The post should enter the ground more than a meter.
If the fence is high and heavy, then a metal plate must be attached to the poles, which will additionally ensure the stability of the column. Plates firmly rest on the ground.
Necessary materials and tools
For the construction of a wooden picket fence with their own hands, such materials and tools are needed:
- Wooden fences. They can be from different types of trees - pine, cedar, larch and others. Stacking is made of narrow edging boards.
- Supporting posts. Usually these are metal or asbestos pipes, as well as thick bars.
- Cross stitches. As cross-bars under the fence, the wooden fence uses metal or wooden bars.
- A hammer.
- Nails or screws.
- Screwdriver or screwdriver.
- Level.
- Means for processing dereviny (paint, varnish, stain).
The bottom of the pillars (if they are wooden) must be treated with a special protective agent against decay. This will extend the lines of the fence service.
Schetakes can be purchased already prepared in special stores, or done by yourself. This process does not require special knowledge and skills. The surface of wooden slats should be well cleaned, sawed and sanded the tops. Beautifully look decorative tops on the fence. It can be semicircles, rectangles, triangles, you can also make decorative figures with a pattern.
Wood must be a certain moisture. If you use a raw tree to build a wooden fence, then the fence will not last long, defects and curvatures will appear soon after installation.
In order to begin the installation of a wooden fence fence, you need to prepare and clean the territory, by which it will pass, to cut the grass with your own hands. Next, you need to mark the perimeter. To do this, along the line of the future fence, it is worthwhile hammering wooden stakes and pulling the cord. Install fence fence wooden with their own hands will be precisely on this markup.
The next stage will be excavation. With the help of a hand drill or shovel, the necessary kind of foundation is made, as described above. The foundation for the pillars must be done after an accurate measurement of the distance between future pillars. After the completion of the foundation, you can install support poles. The pillar is installed on a prepared cushion of sand or gravel and concreted (a ball of concrete can be alternated with a ball of soil). Metal posts must be painted before installation to protect them from corrosion.
During the installation of support poles, you must adhere to strict verticality, as violation of this rule can lead to the filling of the fence. The construction level will help you in this.
Further to pillars fastening crossbars. If the posts or cross-beams are wooden, then you can fasten with bolts, screws or ordinary nails, and if metal, then you can use electric welding. Typically, design two cross-bars, at a distance of about 20cm from the bottom and top of the fence. Good fastening of the cross bars is very important for the stability and durability of the fence, because they perceive the load from the fence. During the selection of the crossbars, it is necessary to take into account the weight of one span of a wooden fence.
After all cross-pieces are attached, you can proceed directly to mounting the fence fence. Screws are fastened to the cross-members using self-tapping screws and screwdrivers or simple nails and a hammer. To ensure that the fittings are attached at the same level, you can pull the cord on top of them after mounting the outer fittings. The distance between the pins is usually equal to the width of one flap. For the distance to be equal, it is possible to install another striker, which will be used as a distance pattern, between the used and damaged snap-nets.
One shtaketinu better to nail 4 nails (screws), 2 per crossbeam at the top and bottom. This will ensure a tight fit.
The wooden fence is ready! It remains only to cover it with a protective agent. As such a means, you can use paint, lacquer, stain, lime. Very beautiful looks derevina, covered with stains and varnish. With the help of this method of processing, it is possible to simulate different breeds of derevy. Periodically to process a wooden fence it is necessary. This will ensure its durability and strength.