The presence of the original Russian stove in the interior of the private house fills it with a unique comfort, and a wide choice of facing materials allows creating a stylish element, combined with the room. Due to the fact that the furnace surface is subjected to sharp temperature changes, the work on its finishing by oneself is a painstaking process, which requires strict observance of the technologies.
The Russian oven is an ornament of the interior and the mascot of the house
Design of the furnace design
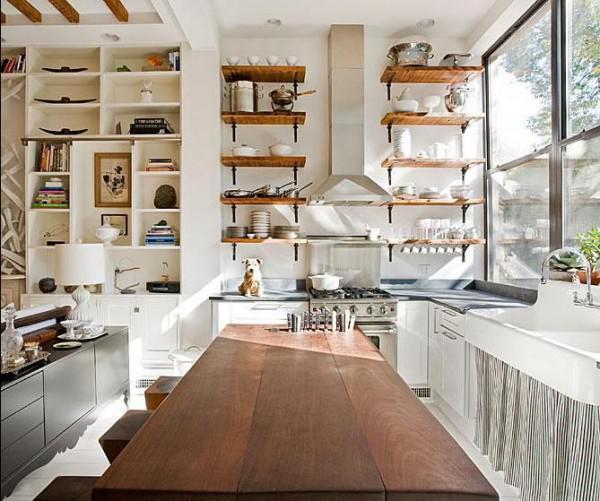
Before selecting the material from which the finishing will be performed, it is worth paying special attention to the design of the room. More often than not, the presence of a Russian oven presupposes a rustic style of cuisine, embodied in the rough finish of walls and floor, whitewashed ceiling, cotton curtains and wooden floorboards. However, imagination and a little effort will allow creating other unique design options that perfectly fit into the surrounding environment.
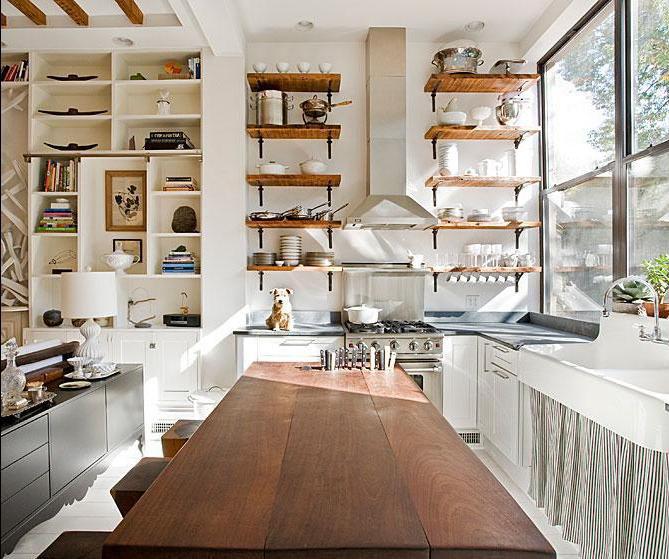
Russian oven in the interior of modern kitchen
Most often, a firebrick is used for laying the furnace with their own hands. As a rule, it does not need additional lining and can be used as an independent decor element. But, in the case of obvious dissonance with the design of the kitchen or the violation of the integrity of the surface during the operation, the material needs additional finishing.
There are plenty of options: the oven can be tiled or with a stone, tiles can be used in the decor or simply plastered and painted in any of the colors presented in the palette. The choice will depend only on the complexity and cost of work.
Finishing the surface of the stove with plaster
Design with plaster - is the most simple way finishing. Previously used compounds from clay have lost their relevance, in connection with the emergence of dry heat-resistant mixtures.
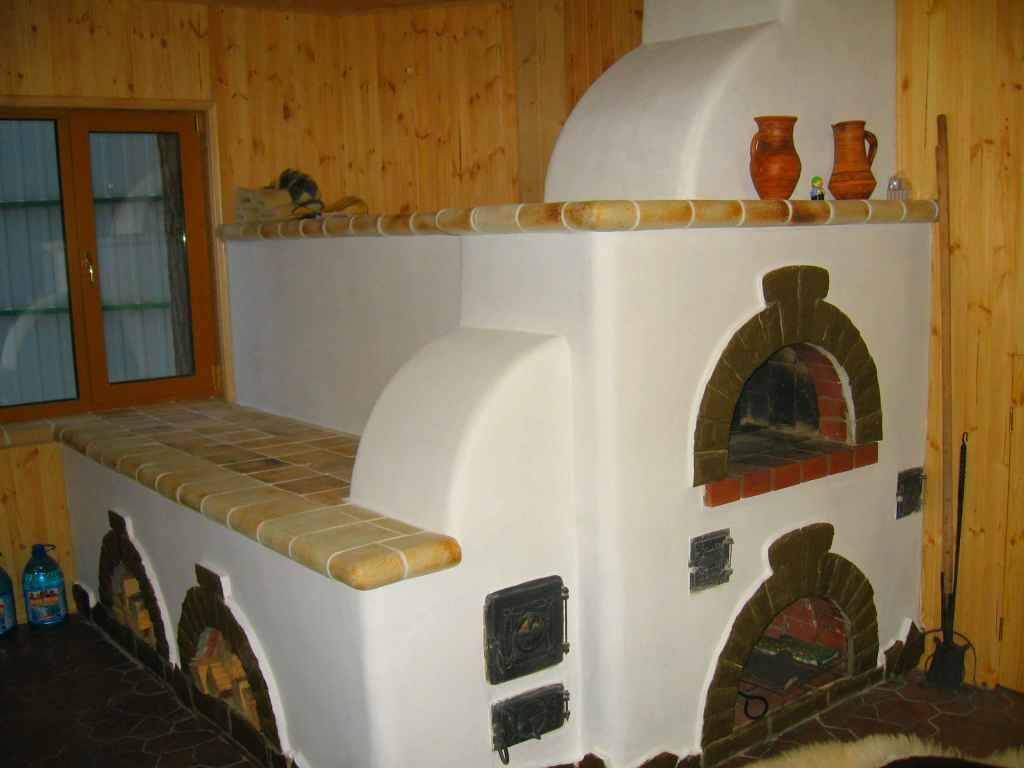
Russian stove is finished with plaster and decorative tiles
It is important to remember that before the beginning of the facing work, it is necessary to withstand a month from the date of the end of the masonry of the furnace. This interval is necessary for complete shrinkage of the structure.
Before starting plastering brickwork some training is needed:
- remove residual mortar and dust;
- deepen all the seams by 10 mm;
- evenly primer the surface;
- tighten the structure with a fine-grained net;
- protect the oven and moisten the walls with water.

The plaster is applied in several layers until a smooth layer is obtained
The immediate process of plastering is the layer-by-layer application of the solution with intervals of 4 hours - to completely dry each layer. The first kneading solution must be sufficiently liquid. Its task is to level the surface and form corners.
On average, to obtain a smooth surface, three to four layers are applied. The result of this work will be a durable finish.
The process of staining the furnace
The basis for painting the furnace in a private house can be both plastered surface and brickwork in kind, provided that its integrity is not violated. Variants of paints and whitewash set. To choose a suitable option than to paint the stove surface, you can take into account the level of complexity of work, financial base and overall design of the kitchen.

Lime staining of the oven
The easiest way to paint the oven with your own hands is chalk or lime whitewash. To strengthen the composition, salt is added to it, which during the operation of the structure will prevent the painting composition from falling off. Painting with chalk or lime is necessary in several layers, from this will depend not only the quality of the coating, but also the aesthetic appearance of the furnace.
There is also a series of heat-resistant paints, characterized by ease of application and a wide range of colors. The most common types among them are:
- alkyd;
- organo-silicate;
- silicic-organic.
Staining of the furnace after preliminary preparation
With their help, the surface of the oven can be painted in any color, and also perform a unique painting by yourself. The process of painting itself is not complicated, it is important only to carry out preliminary preparation of the surface. For this you need:
- remove the remnants of the previous finish (if any);
- wash the surface thoroughly;
- if there are greasy stains, remove them with soda.
Note: The oven can be painted without prior priming.
Staining of the oven surface (brickwork or plaster) is done with a medium pile roller. The brush is used only to paint joints and hard-to-reach places.
To paint the oven with your own hands is best in several layers, through time intervals for complete drying.
Advice: Before you start painting, it is advisable to stove a little bit. Any paint is better placed on a warm surface. But after the completion of the work, it is possible to heat the oven not earlier than 2-3 days later.
Facing the stove with tiles
Tiles - a unique and ancient look. The material is presented in the form of ceramic tiles on one side, and on the other hand - with a ruler, with which the installation process is carried out.
The color range of the tiles is diverse, in addition, they can have a different relief and pattern. The oven, lined in this way, will have a unique look. However, the cost of the material can significantly exceed the other types of cladding. This is due to the fact that the painting of the finished tile is done manually.
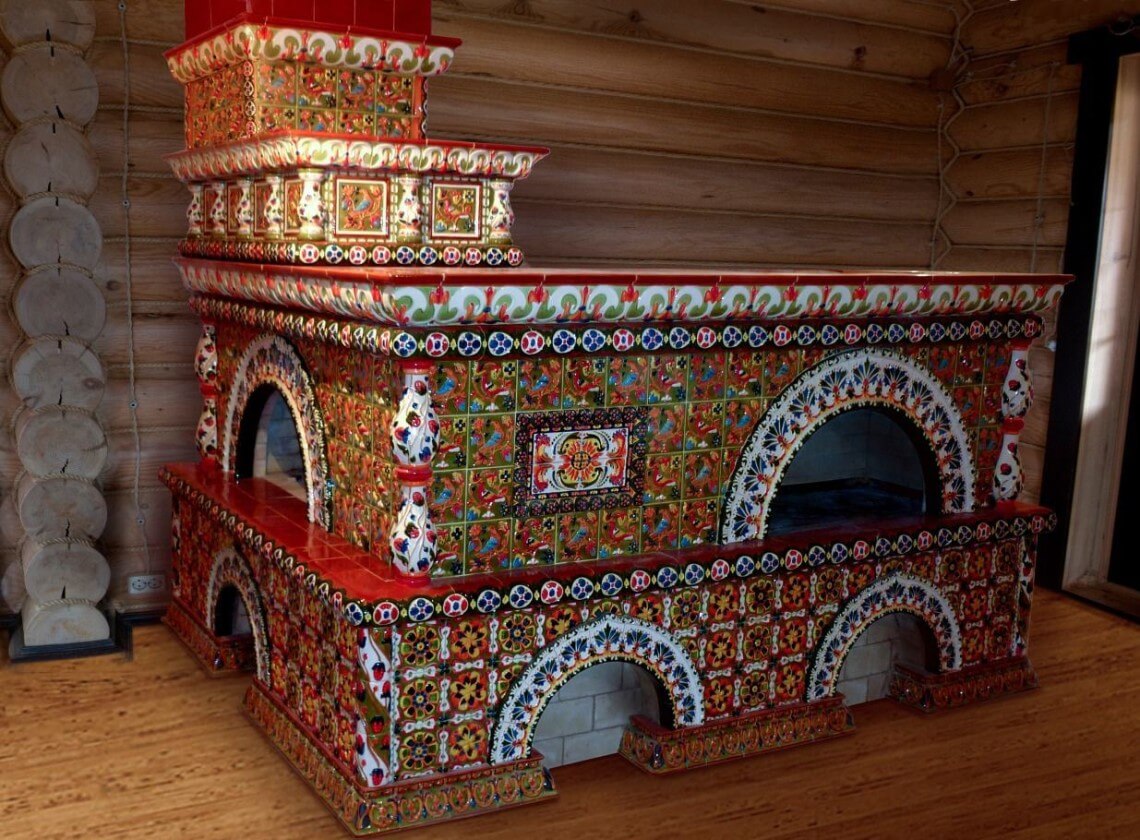
Russian stove is decorated with tiles
To impose a stove tiles, you must adhere to certain technical recommendations and perform it in the following order:
- Pre-tiles must be soaked in water. After that, they should overlay the oven without using a solution - to evenly distribute the parts. Next, remove all rows except the bottom row.
- Stacking rows, starting with the bottom, on a solution of clay. In this case, the steel pins inserted into the holes of the handle should be connected together by wire, pressing the tiles to each other.
- Adjacent tiles are additionally fastened together by brackets of elastic steel.
- The final stage is the grouting of seams with clay mortar.

The scheme of fixing tiles to the surface of the furnace
Important advice: The horizontal seams are rubbed with a gap of several millimeters, taking into account the shrinkage of the tiles.
The tiled stove in a private house is a reinforced, monolithic construction with an almost unlimited lifespan.
Furnishing of the oven with tiles
Alternative tile decoration can be the decoration of the stove in a private house with ceramic tiles. Majolica - glazed tiles, manufactured by pressing and double firing, has special decorative data. The facing material is made from colored clay, and the front part is decorated with a bright painting. It is much easier to impose a furnace with its help than tiles, and the final design will organically fit into the space of the village kitchen.
Terracotta not glazed tiles can be a budget option for finishing. In strength it is not inferior to majolica, besides it has more variants of drawing: imitation under a brick or a natural stone.

The process of facing the oven with ceramic tiles
As the most durable material for finishing, it is worth paying attention to the clinker - a kind of ceramic tile made of highly plastic clay varieties. This material can be imposed not only on the kitchen stove, but also on any other surface subject to sharp temperature changes.
In order to impose a surface by any type of tile with your own hands, it is necessary to use a special heat-resistant composition on a water basis.
Note: Before tiling the oven with tiles, it is necessary to carefully plaster and reinforce the surface.
Facing with stone
The surface of the furnace can be exposed using natural or artificial stone. Every year, this method is becoming more popular. This is due both to the refractory qualities of the material and to the aesthetic qualities. In addition, after a certain period of operation of the furnace, it is possible to make a variety in its design, simply by painting the surface in the desired color.

The stove is finished with stone
The nature of the work on laying the stone has a certain similarity with the design of tiles. But there is also a certain difference, which consists in fitting the material. Especially if the question concerns a natural stone, which has a variety of shapes and sizes.
The cladding process consists of the following stages:
- Priming the surface of the furnace to ensure a high level of adhesion of materials.
- Laying the lower row of stone, using the level. The work uses a special heat-resistant mortar consisting of cement, sand and synthetic additives.
- For the jointing of seams, small fragments of plasterboard can be used.
- The pruning of the stone is done with the help of a grinder and a disc for concrete.
Advice: Pruning of the stone must be done at low rpm of the Bulgarian, in order to avoid chipping.

The furnace is a special element of the design of a modern country house
Create a unique design of the kitchen in a private house with a stove is possible not only with the help of one of the finishes, but also combining several. Alternatively, the surface can be plastered, and the corners should be covered with natural stone. Alternatively, use a combination of brickwork in the lower part of the furnace, and the top paint in a tone or patterned pattern.
The stove in wooden house It is executed in classical "Russian" style and modern execution. They are designed for heating and cooking. There are different types of furnaces: converter heat generators, products with a water circuit and kilns.
Kitchen in a wooden house with a stove in the photo of the owners of private houses and cottages is equipped with devices of small and medium capacity. There are also high-power and low-power generators placed in rooms with appropriate dimensions.
Note!The kitchen with a stove in a wooden house differs from a simple stove with the possibility of warming up not only by convection, but also by heating the water. This allows you to build a wiring for all rooms of the building, forming a complete heating system.
Equipped with fireplace stoves, corner, square and round appliances with panoramic glass on the doors and different lining. The production of structures is provided with the use of steel or cast iron.

The foundation for the stove in a wooden house is installed in cases with the installation of a structure with a weight of 500 kg. This criterion is influenced by the mass of the finish, the fluid contained in the system and the unit itself. If the heater is placed, the calculation is carried out taking into account its full load, filling the steam generating capacity and the water jacket.
Types of cladding
The stove is in harmony with the ceramic finish. The main difference is a high level of strength and heat accumulation. Color solutions vary from dark to light colors, made in green, red, blue, etc. shades. There are rough and glossy coatings. The application of a tile can display a certain pattern or imitation of a stone.
The stone is the right decision in the matter, than to lay the stove in a wooden house. The choice is between natural and artificial material. Onyx, granite and marble are among them. You can also choose a brick facing.

Russian stove
The wooden house and the Russian stove are incompatible concepts, regarding people who appreciate centuries-old traditions. For the arrangement of such a structure, it is important to orientate well in the varieties:
- Dimensions: small (150 × 175 cm) and large (150 × 230 cm). Non-standard parameters can be used.
- Constructive differences: the traditional version (hollow sub-furnace, without heating the lower part of the furnace) and a modern type with a channel heated bottom part made of bricks. Some models are equipped with a cast iron hob and sun lounger.
- Installation: freestanding or attached to the building.
- External characteristics: corner and other building options with plaster or brick finish.

Product extensions
Subfoot and stove. The cooking surface acts as a pole, which was deaf in classical variations. It is made of cast iron rings, which allow the installation of dishes of different diameters. Through a removable cover it is easy to lay a firewood or coal.
Fireplace. The back wall of the stove with a fireplace is often removed to another room through a partition. The parameters of the structure do not make any special changes. The practical design eliminates the creation of a separate foundation for the fireplace and an additional chimney.
Topchan and independent rude. The traditional version was equipped with a large stove for three. The dimensions of such a structure were 2.5 × 2.5 m. Modern modifications fill this gap with an additional trestle. It is equipped with a full stove.
Design features
Placing a plate on a Russian stove contributes to the heating of the side heating shield or the bottom of the furnace (without heating the chamber). Among the typical variants, there are side-heating designs used for heating adjacent rooms and for lower heating. From the subsoil, gases are sent to heat all the walls of the sub-surface area. The use of the device is important for installing a large area in one room.

The foundation for the Russian oven
Determination of the type of construction is due to the study of the soil, taking into account the level of its freezing, the location of groundwater and the level of seasonal deformations. Based on the obtained indicators, the base under the furnace is selected:
- Plate (monolithic)
- The pile
- Columnar
- Ribbon
The installation of the base is carried out apart from the general construction of the floor, it is possible to combine the columnar with the ribbon variant. The joint laying of tape or plate bases is not permissible due to different levels shrinkage, which will lead to deformation.

Description of structures
Plate base is made with reinforcement elements. It is characterized by resistance to soil displacement, but can not cope with the washed groundwater. Its design looks like a monolithic structure made of concrete and a metal mesh. Reliability of placement provides a drain cushion.
The belt version is constructed of reinforced concrete, butane or cement fill with reinforcement. The base is placed at a depth of 40-50 cm. Outwardly, the product forms a single structure, erected along the perimeter of the furnace. This is a universal option for all types of soil.
The columned structure is erected from pipes filled with concrete or concrete blocks. The construction is often supplemented with a slab for strength. Waterproofing is provided with a roofing material. This installation is more often used for dry soils than for soils. However, in the second variant, it is possible to use a pile device made of metal with screw blades. The internal cavity is poured with concrete.
In some cases, the absence of the foundation is compensated by a sand cushion, located at a depth of 20 cm with the upper concreting of the surface.

Kitchen design with oven
The main elements of the interior are made in the following version:
- Ceiling. Pendant coatings made of fireproof plasterboard or natural varnished structures are well used.
- Walls. The optimal solutions for creating interior and exterior decoration will be block house or lining. The working area of the kitchen is finished with a protective apron from a natural massif or MDF.
- Floor. To divide the area into zones, you can use ceramic tiles, laminate or parquet.
The rustic design of the kitchen is comfortable and simple. The materials used are wood, natural stone, metal and ceramics
Country style is performed in different variations:
- Old Russian version;
- Provence;
- Country.

Differences consist in national accessories. The country style is characterized by warm, pastel colors with the arrangement of bright accents, made in small quantities. The predominant tones are brown and milky shades (tablecloths, napkins), furniture provides a comfortable placement. Modern designers widely use patination technology (aging).
Create an original kitchen design in a conventional apartment is problematic because of the small area of the room. And in a private house, the size of the kitchen allows you to make it not only multifunctional, but also interesting from the designer's point of view.
The larger the area of the kitchen, the easier it is to realize unique design solutions and turn the room for cooking and eating in a stylish room where you can not only cook but also receive guests.
Kitchen in a private house differs from kitchens in apartment buildings not just the size of the room. There are several points that significantly distinguish the kitchen in a private house from the usual:
With stove
An important element of most kitchens in a private home is the oven, with which not only this room is heated, but the whole house is heated. The presence of a stove in the kitchen dictates its own conditions, namely, when building a room, certain building materials should be used.

The stove in the house does not necessarily dictate the rural style, you can turn this place into a medieval castle.
For example, the ceiling in a room with a stove should be left wooden, making a protective coating on the saber with varnish. Plastic ceilings or wallpaper are not suitable for finishing, because due to the operating furnace in the room there will be a high temperature, and hot air has the property to rise and adversely affect the artificial materials. 
Walls should also be left wooden or used to cover a special tile that is resistant to high temperatures. Than to finish the walls in the kitchen about the advantages and disadvantages of different materials. The floor in the kitchen with a stove in the work area is best made of ceramic tiles. A large area of the kitchen will allow using flooring or laminate flooring in the dining area, away from the operating stove.
The style of the room with a stove does not have to be made rustic, with a competent design the stove can be inscribed in both modern design and high-tech. The oven, lined with brick, will look stylish in any interior.
With fireplace
You can make the kitchen cozy in a private house with the help of a fireplace. He can perform not only the function of the heater, but also serve as an ornament of the interior. The fireplace portal can be finished with either stone or polymer.
If the design of the kitchen provides for the natural finishing of individual elements, you can decorate the fireplace with masonry, brick or river stone. Classic interior can be supplemented with a fireplace, finished with tiles.
For decoration of fireplaces in a private house, quality refractory materials are always used, which make this decor element safe. Since the fireplace in the kitchen is most likely to be used for gatherings in front of him, it is advisable to equip opposite him with comfortable seats.

The fireplace in the kitchen will become the embodiment of a home that every housewife carefully supports
Installing a fireplace in the kitchen of a private house is necessary by all the rules of safety, ensuring that it is supplied with air and observing all standards of fire safety when laying a fireplace.
With gas boiler

When designing a kitchen in which a gas boiler is equipped, it is important to organically fit the column into the design of the room. A gas boiler can either be hidden, or try to make it as much as possible combined with a kitchen set and not catch the eye.
For example, a boiler can be hidden in a conventional kitchen cabinet, then it will be visible only if the cabinet doors are opened. To do this, when ordering a kitchen set, you need to consider that you need a separate place to mask the gas boiler.

There are certain requirements for the installation of furniture, which will be in contact with heating devices. For most wall cabinets, there should be a gap of at least 3 cm on both sides of the boiler, and there must also be no rear wall or bottom. These details must be discussed with the furniture installers, so that the use of furniture masking for the gas boiler is as safe as possible.
If you do not want to hide the boiler in the furniture, then choose such an aggregate to make it as harmonious as possible with the color finish of the kitchen.
Correctly chosen color of the gas boiler will make it almost invisible in the kitchen space.
With windows, bay window or exit
Windows - this is a great source of lighting and decor elements
Daytime lighting in the kitchen of a private house makes the room light and airy. Window decoration plays an important role in the interior. It depends on the size of the room, the location of the window and personal preferences. Instead of the window sill, you can make the countertop, continuing the work area. Often in the kitchen of a private house a sink is placed under the window. On today's fashionable car washes from artificial stone read.

Doing household chores in the kitchen is not so boring if you see a wonderful view from your window
If you want to use the window in the kitchen for decoration, you can place live plants on the windowsill, which will get enough sunlight in this place. Modern architecture often uses a bay window in the kitchen - these are large windows that protrude beyond the walls of the building.

The anchor can also be equipped as a rest area.
Eckers look impressive, especially if they are properly beaten. For example, equip there with a sofa and cushions or decorate the bay window with stylish curtains or curtains. If the kitchen in the house has access to the street, then you need to think carefully about the arrangement of furniture.

The glass door in the form of a French window will fill your kitchen with sunlight and warmth.
The glazed door will expand the space, but it is better that it is away from the working area. The door should be well insulated, so that in the cold season the temperature in the kitchen was not below normal.
Canteen
The main advantage of a large house is the opportunity to combine the kitchen with the dining room. A separate room for food is a luxury for owners of small apartments, but the commonness for the owners of a private house.

The working area and the zone of food intake should be separated from each other. Zoning space can be both using partitions, and with the help of separate lighting of each zone or due to the correct arrangement of furniture.
Over the dining table, surrounded by chairs, you can hang a floor lamp, which will create coziness during the evening dinner. You can also raise the working area by making the floors in it a few centimeters higher than in the rest of the room. The design of the kitchen should be done in one style.
Combined with living room


Pay attention to lighting - in a large kitchen there should be plenty of light - create several point highlights.

The kitchen with the living room should be kept in the same style.

In the big kitchen windows play a big role. Especially carefully you need to calculate the size of the lockers
Interior in the kitchen should satisfy the needs of the owners. Despite the large space, the room does not necessarily fully furnish furniture, quite the most necessary items. And if you're not too fond of cooking, it's better to focus on the elements of the dining room and living room, and make the working area small.
Country houses often use stove heating, and the owners wonder how beautiful it is to decorate the stove so that it will decorate the house and the whole interior. Often the furnace is designed in a rustic style. By including your imagination, putting your hands or hands on professionals, it can be made the main virtue of your home. Private houses have for a flight of fantasy, which can not be said about urban apartments, there is nothing to reconcile, you can make an oven of any configuration and any purse. So, what kind of oven can it be?
Choose the location for the oven
The location depends on many factors, the main is the area of the room. Having enough free space, you can locate in the frontal plane, in the absence of the necessary space make an angular arrangement. There are times when the furnace is immediately available in two rooms, one part - in one room, and the second - in another. Heating occurs two rooms simultaneously. Such a construction can be found in old houses near Moscow. Structurally, these options were made to combine the processes of cooking and heating the room. One part was brought to the kitchen, where it was installed, and the other part heated the living quarters.
Classification by location
- Any location: there are many fireplaces that will look beautiful anywhere in the room.
- Facing location: the fireplace is located in the middle of the room, creating a feeling of comfort.
- Angular arrangement: such fireplaces, as a rule, do not require much space. The name speaks for itself.
- Central location: the fireplace is placed in the center of the room, most often surrounded by paintings and plants. For such fireplaces a lot of space is required.
Styles
- Metal - fireplaces with metal elements, bringing to the interior notes of modernity and business style. The facing of the fireplace is characterized by clear, straight shapes. The play of light on the contrast of mirror stainless and deep black on steel elements.
- Vanguard - fireplaces that differ in originality. Strange shapes, sizes, lines, angles, all this gives the space where there is a fireplace, mystery, extravagance.
- Country - country style. Medium-sized fireplaces, embodying a home cosiness, a natural style of the interior.
- Modern - more like a metal, present in the finish of chrome, steel or matte black. Forms are more like geometric shapes.
- Classical - a very popular style of fireplaces. Dimensions, shapes and appearance appear before us in a wide variety.
The variety of designs is very large. It is necessary to choose the one that will suit your private house and become its decoration.
Stove-fireplace
 Furnace-fireplace - the design appears as a full fireplace with an open firebox, laid out from. Possible execution with cooking and without cooking panel. Design the most popular in country houses and is diverse in its design. The presence of a fireplace creates a comfortable atmosphere, coziness, gives the house a spirit of aristocracy. Creating a fireplace design from brick or stone, we can fit it into any style of a private house from minimalism, to the Scandinavian style. The oven-fireplace can be located both along the wall and placed in a corner.
Now there are many ready-fire stoves that make them from cast iron. Advantages are obvious: ease of installation, there is no need to do masonry, saving time. For installation it is necessary to determine the location in the room, to make a concrete base, to remove the chimney. We should not forget about fire safety, about finding near heating devices and flammable objects. Perfectly fit in the interior. There are options combined fireplace stoves, where the furnace is made of cast iron, and the furnace is brick.
If there are large spaces, installation is possible. brick oven. They warm the rooms well, they retain heat for a long time after the firewood is burnt. Design is limited only by your imagination.
Country style in the interior
The embodiment of the village style is. She came to us from the XIII century, however, in those days there was no pipe, so all the soot settled inside the hut, hence the expression "to drown in black." After the thirteenth century, Russian furnaces began making windows in the wall to remove smoke from the hut. Only by the 18th century in the cottages began to make pipes for removing smoke, after a few centuries they acquired a look that can be seen now.
Russian stove - cumbersome construction, its dimensions are quite large (width about 1.5 meters, height up to 2 meters, length - a little more than 2 meters. The main function - keeping heat for a longer time, for this the cooking chamber was located in the depth and was divided by a shutter between the chamber and the mouth, additional flaps from the smoke. Woodburning stoves for cooking can be installed. There are niches for dishes and. The size of the room for it should be large.
In many houses, the Russian oven is no longer used for its intended purpose, but is more an element of the interior. Mansions, dachas, where there are Russian stoves, which are in working order, are now little used for cooking and heating the room, their main purpose is entourage. Particular attention is paid to the design, many want to give it a fabulous look. It is very pleasant that after so much time, changing its appearance and functional capabilities, the Russian oven acquires a new life and remains relevant to this day.
Heating and cooking ovens
Constructive features are a capacious cast iron furnace, a chimney and a cooking surface, an oven can be installed. It is also possible to equip with a water circuit, then the unit can be connected to the heating system and get a full heating of the room. They are durable, made of cast iron and covered with heat-resistant paint. Simple installation, not requiring a foundation, but with the mandatory conclusion of the chimney. Attractive design that fits any design style.
The basic wish when choosing a design of the oven - it should harmoniously fit into the general concept of a private house.
At the moment there is a huge number of ready-made design solutions that you can safely use when building a stove. You can also create your own unique design with the help of professionals, or, armed with pencil and paper, create it yourself.
The options for furnishing stoves-fireplaces today are very diverse: painting, stone finishing, tiles, bricks and much more.
More and more families are thinking about moving to a permanent place of residence in their a private house from a household plot. And what can warm up and return vivacity, after working in the garden, as not such a heater as an oven.
Long ago, the Russian hut was heated by these sources of warmth and comfort, whether it is a huge Russian oven with a couch (or rough) or a small "Dutch".
Of course, they are being improved, new technologies and materials are being applied. An ancient stove-mazanka went to the distant past, but now the stove is a symbol of the home.
At present, depending on the preference of the owners, they install stoves and fireplaces various kinds of and try to trim them according to their taste.
This gives the whole appearance of the premises a special flavor, unique color and coziness. Long since the stove tried to decorate. Or paint it with patterns on plaster or, in rich houses, trim with tiles.
This tradition has not faded away in our days. Even in a small country house, try to give the stove a presentable appearance.
 For registration use mostly different types of tiles, but you can paint with bright colors on the plaster, treating it as the most budget option.
Advice of a specialist: If you decide to give your stove elegance and uniqueness, then the best choice become use of tiles.
It is necessary to understand - what kind of finishing materials are there for this:
- natural stone (sandstone, shell rock, serpentine);
- bright painted majolica;
- ancient unglazed terracotta
- heat-resistant clinker tiles;
- the latest novelty is porcelain stoneware;
- exquisite tiles.
All these facing materials for furnaces correspond to the necessary characteristics:
- sufficient thickness (6-9 mm);
- high temperature resistance;
- increased strength under mechanical influences;
- the structure is sufficiently low-porosity.
If at the facing of a sauna or stoves in a bath it is important only to contain heat, then when designing a home oven it is necessary to think about the design of the whole room.
Sandstone and shell rock
 The natural stone does not give refinement to the room, most likely it will look somewhat primitive or return to the scenery of the Middle Ages. But the originality of the room will add.
Note: sandstone and shell rock have excellent heat resistance and well accumulate heat.
Beauty majolica
 The tile, painted with bright fire colors, covered with a strong layer of glaze, came from the Mediterranean. Ancient Roman merchants brought her from Mallorca.
The area was famous for tin-lead painting on ceramic tiles and pottery.
Glazing is another layer that retains heat inside the finishing material, so majolica was in demand, as an excellent kind of cladding.
To decorate with such beauty the furnaces could only the well-off people.
The most ancient kind of ceramics
 Terracotta is a special type of clay with a porous structure. In fact, the same majolica, but not glazed. It is considered to be the oldest kind of cladding. Has high strength and bright color.
Pressed clay of a certain grade is first compressed, and then fired in special furnaces. It turns out an excellent decor for the cladding.
Terracotta was used in construction for roofing, different types of cladding, in order to improve the furnaces and fires.
Clinker tiles
 European material, created for facing fireplaces and stoves in contrast to decorative bricks, in the houses of Holland, Norway and a number of other Northern European countries.
Usually, several types of clay are pressed, with the addition of certain parts of chamotte, various dyes, and are burned. The result is a tile with a pleasant shade of beige, from milky to bright orange.
It is a material, 9-12 mm thick, with a microporous structure capable of keeping heat well.
Porcelain tiles
 Its creation falls on the 80s of the last century. Ceramic granite is not only used for furnishing furnaces, but is also widely used in construction.
For its release, several varieties of special clay are required, with the addition of quartz sand, various kinds of natural dyes and fine fractions of marble or granite.
The whole mass is well kneaded and pressed at rather high temperatures under pressure. As a result, a strong product is obtained, not afraid of strong impacts and high temperatures, excellent heat retention.
This is a monolithic material, which can be attached, in the manufacture, any color.
Thanks modern technologies, porcelain stoneware can be made in the form of majolica, terracotta or tiles. Not too great is the cost of such material, in comparison with the original.
Note: Ceramic granite for decorating stoves and fireplaces fits as well as possible. Due to its versatility and various design solutions it is able to decorate any building both outside and inside.
Izrazets - man-made beauty
 This is beauty, created from different types of clay. Manufacturing technology came from ancient Babylon and has survived to this day.
Izrazets is a form of a box, thanks to which the preservation of heat increases at times.
Take note: transferred from the stove heat is considered the most environmentally friendly.
This is a piece and expensive finishing material. In past centuries, only very well-to-do people could tie the stove with tiles.
Beautiful boxes, with individual drawings each, were unthinkably expensive, but enjoyed great demand.
Nowadays tiles are also popular.
Make your own hands
 In order to impose a brick stove with a tile with your own hands, it is necessary to carry out preparatory work and prepare the necessary tool:
- lumbar level and plumb bob;
- building trowel and spatula;
- paint brush (it is better to take a broad);
- special cutter for tiles;
- hammer or kiyanku with a rubber top;
- brush with metal bristles;
- convenient solution tank;
The decoration of the stove with tiles is not an easy process, so professionals are invited for such works, but laying the tiles is available to the owner with good hands.
- To begin with, the stove is peeled from the remaining mortar after the masonry. It is best to do this with a metal brush, wiping with a damp rag or sponge.
- Tighten and fix on the entire surface of the special metal mesh (the size of the cells is not more than 20mm). As fasteners take self-tapping screws or nails.
- The construction with the grid is plastered with mortar, leveled and allowed to dry. At the end of drying, when the solution is no longer cracking, the stove is well heated.
- Start to glue the tile. Masters are advised to start from the corners and lower rows. To make the series work smoothly use the level and "crosses".
- The simplest and most pleasant stage is grouting joints and applying a heat-resistant compound. Before rubbing the joints, allow the entire structure to dry for about three days. After that, you can remove all building debris and rinse the tiles.
Experienced masters advise: Before the firebox on the wooden floor, nail a sheet of galvanized iron for fire safety, in old houses it was always like that.
What else can I trim the stove
 Masters of stove makers are often asked: can the sheets of plasterboard be taken as furnishings?