Certainly, no master will refuse to have reliable and at the same time quite affordable roofing. A competently planned hand-mounted installation will not only protect all buildings from bad weather and possible damage, but also save a significant amount of financial resources. So, all of these qualities have an innovative soft roof, made of flexible shingles, which is based on bitumen. Therefore, it is important to understand how to properly install the roof of flexible roof tiles.
It is necessary to study in detail how the flexible shingles fit the mounting technology of which has its own peculiarities. Only strict adherence to each of the stages of its installation will create a reliable and durable roof. It is about technical characteristics soft shingles, as well as the method of its installation, and will be discussed later.
What does flexible shingles consist of?
The roof made of this material also has some other names, such as, for example, shingles, shingles or roofing tiles. The main advantages of such a roof are its light weight (the weight of one sheet is an average of 8 kilograms) and not too high cost in comparison with metal roofing. Thanks to the first indicator, the house's design does not turn out to be so massive that it saves on materials for construction and pay, and the second characteristic allows the roof to seriously compete with other, heavier roofing types.

The basis of this shingles is usually a fiberglass or fiberglass (less often - organic cellulose), impregnated with bitumen. These materials perform the functions of so-called reinforcement, which binds two layers of SBS-modifier, directly affecting the flexibility and elasticity of the coating. Outside, the material is sprinkled with slate, mineral crumb and granulate from basalt. They are able not only to protect the material from damage, but also to give it a variety of shades of color.
Work on the preparation of laying soft shingles
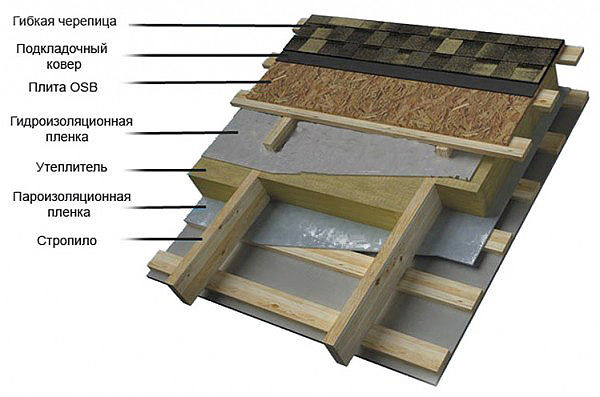
The basis for soft tiles is a chip-oriented slab, plywood, resistant to moisture or boards. When choosing boards, you need to carefully choose a quality material. The best option will be the use of a planed sheet piling board. If its thickness is equal to 2 centimeters, the rafter's step should be 6 meters. At a thickness of 2.5 - 3 cm, the pitch can be equal to 1.2 meters. The minimum thickness of plywood is a distance of 1.2 centimeters (rafter pitch - 6 meters), with a thickness of 2 centimeters, the rafter step is 1.2 meters. In any case, the material's butt joints must correspond to the rafter legs. Working with material such as flexible tile installation of the base for it is recommended to treat with antiseptic. It is important that the boards used during laying are necessarily dry. The coating of the substrate must be rigid and even.
![]()
In addition to the coating itself and the base material during the installation, the following elements can not be avoided:
- lining carpet that can be represented by any bituminous roll material provided that the roof of the flexible roof shingles is new. For the old roof, you can also use a formerly used roofing material;
- endovy carpet, whose role is performed by bituminous material with the use of polymers, necessary to protect against moisture abutments to walls and ventilation pipes.
When stacking a carpet, the following materials should be used:
- roofing sealant or mastic;
- building thermofane;
- a knife for cutting material;
- three types of nails: conventional, roofing and galvanized;
- construction laths required for processing contiguities, cornice and front.

When all the details have already been collected and the installation of the flexible shingles is carried out directly, the instruction requires that the following set of rules be observed when working:
- Initially, from the inside of the roof, it is necessary to fix the vapor barrier film. The material is attached to the rafters with nails, and to the ends - wooden slats. Film strips are connected by means of an adhesive tape.
- After that, already from the outside, you need to lay a heater, for fixing which it is customary to use wooden bars.
- On the heater is laid a film that protects the roof from the wind. For its fastening, a counter-bar is used, to which it will be necessary to nail the crate.
- After this, boards, a chip-oriented plate or plywood are laid. Secure the material with nails, equipped with a wide hat, or self-tapping screws.
Laying flexible shingles
When installing the roof with soft tiles, it is first of all necessary to repulse the temperature conditions, since the structure of the material requires a special approach. The highest strength of the connection between the elements of the shingles will be provided only by high temperature, sun and no precipitation, and the installation of flexible roof tiles in the winter is not recommended, since this can lead to the dropping of a little earlier glued tiles (read: "Installation of soft tiles - ").
What is important to remember when working with materials such as flexible tiles: installation by one's own hands should be carried out very carefully, and with the slightest doubt in own strength it will be better to seek help from specialists.
Anyway, detailed descriptions of the whole process of installing flexible shingles with video and photos can be easily found on our website.
soft roofing from bituminous shingles "data-essbishovercontainer =" "\u003eA soft roof is a type of cover that has long been familiar to most people. Not so long ago, one of the most widely used materials for covering roofs of various designs was a common roofing material, which also belongs to this category of roofing. In fairness, it should be noted that the old roofing felt was not particularly strong and high performance characteristics, so it required periodic repairs.
Today, thanks to emerging new technologies, the soft roofing material has undergone significant modernization. It is produced in various versions, including in the form of bituminous shingles. Such coatings already have long service lives, combine high quality, excellent waterproofing characteristics and a very elegant appearance. Therefore, many do not realize that the modern soft roof is the same ruberoid, only produced in improved variations.
The technology of laying soft roofing from bituminous shingles is quite complex, and requires a large number different materials, since the construction of such a coating consists of several layers, and therefore deserved the name of "roofing pie". Therefore, if it is decided to make an independent installation of a coating of this material, it is necessary to carefully study all the recommendations that should be followed when carrying out the work.
Before deciding on the choice of a soft roof, it is necessary to have an idea about this material, to evaluate its merits and demerits.
Advantages of soft roofs
There are different types of soft roofs, but they all have very high physical and technical and operational characteristics:
There are several points that can be called flaws in this roofing material, but they are, to be honest, very conditional. So, to such "minuses" it is possible to carry:
- Quite complex installation of the "roofing pie", which requires strict compliance with all technological recommendations.
- Any soft roof is laid only on a solid solid foundation. And this, in turn, will entail additional work and, accordingly, expenses.
However, as you can see, there are fewer negative aspects in the arrangement of a soft roof, and therefore the masters of private residences are increasingly choosing it.
Different types of soft roofs
To the soft roofs are several types of materials that can be easily found on the Russian market - flexible bituminous shingles, roll-type soft roof of various types, and Euroshield (ondulin).
Rolled soft roofing
Rolled roofing materials are divided into several criteria. So, the following varieties of coatings are produced:
- Baseless and having a basis under cover.
- The basis for roofing roll materials can serve as fiberglass, asbestos fiber, cardboard, polymers, or for it can be used several materials in the complex.
- Roofing material can be equipped with various protective layers - fine-grained or coarse-grained mineral crumbs, pulverized or scaly powder.
In addition, roll coatings can be divided according to the type of foundation and method of installation:
- Self-adhesive coatings. Such material has a layer of adhesive composition applied to the back of the web and protected by a special membrane, which is removed immediately before the installation of the coating.
- Adhesive cloths. These coatings are glued on the mastic in various ways, which are called hot and cold. But in any case, the material is heated to a certain temperature during installation.
- Welding coatings. This type of coating is fixed on the roof surface using gas burners. The flame of the burner melts the composition applied to the back of the soft roof material, after which the coating rolls. This kind of coating, properly laid on the prepared surface of the roof, makes it virtually tight and resistant to leaks. In addition, this type of material is considered the most durable of all roll options.
Membrane roll roofing
Membrane coating is a high-tech material that can be made on various bases: polyvinyl chloride (PVC), synthetic rubber (EPDM), thermoplastic polyolefin (TPO).
- The PVC membrane, reinforced with ether fiber and having plasticizers in its composition, has a high elasticity and resistance to temperature changes. In addition, the material does not burn out in the sun, fire resistant, is available in a variety of colors, and also easily and quickly mounted on the surface. However, this coating has its drawbacks - it does not differ in resistance to organic solvents, bitumen and oils. In addition, when heated, the PVC coating can release toxic substances to humans, since it is not environmentally friendly.
- EPDM membranes, manufactured on the basis of rubber and reinforced with polyester mesh, have high elasticity and resistance to various solvents.
Negative qualities of this material can be called the fact that its installation is done with glue, and joints with time, under the influence of external factors, can diverge, so the roof will leak, as the coating will lose its tightness.
- The TPO membranes produced on the basis of a thermoplastic polyolefin may have reinforcement or be manufactured without it. To reinforce this material, polyester or fiberglass is used. The material webs are welded together by means of hot air, and a sufficiently strong and reliable weld is formed at the welding site. Therefore, the coating has a long service life, high strength and resistance to negative temperatures, reaching -60 degrees.
The disadvantages of such a coating include its low elasticity and a relatively high cost, compared to other membrane materials.
In short - on the principles of flooring membrane roofing material
There are four main ways of installing a membrane roof - ballast fixation, mechanical fastening, gluing and welding with hot air.
- Ballast fastening Used in the event that the roof has a small slope, not exceeding 15˚.
In this case, the canvas is laid on concrete base flat roof or on a layer of laid thermal insulation. Then the material is stretched, fixed around the perimeter, the joints of the sheets are connected by welding or special glue.
Then, on top of the membrane, ballast is laid from pebbles, gravel or crushed stone.
- Mechanical fasteningif the supporting structure is not designed for the weight of the ballast.
The basis for installing the membrane in this way can be wood, concrete, profiled sheets, and also any other material.
The basis is laid and fixed layer insulation material. Most often, mineral basalt wool of high density is used for this purpose, specially designed for such applications, on top of which the membrane is stretched and fixed. To fix the materials to the substrate, disc or telescopic fasteners are used, which are installed on the joints of sheets overlapped by 80 ÷ 100 mm.
- Adhesion of the membraneis produced on high-quality glue mixtures, characterized by good strength. The material is glued only around the perimeter of the canvas, at joints and in problem areas, for example around chimneys, on ribs, valleys, etc.
- Welding the membrane with hot air- this method more often it is used for fastening membrane sheets.
The work is carried out with the help of a special device that squeezes two canvases overlapped with a roller and hot air, the temperature of which reaches 600 ° C. The welded joint can be from 20 to 100 mm in width, which ensures the reliability of the connection and ensures its sealing.
Euroshift or Ondulin
Another version of the roofing material, which can also be classified as a soft roof - it's ondulin or Euroshow. It is a light and reliable wavy material made of a bitumen-fiber mixture with the addition of mineral and polymer additives. Roofing sheets are easy to install and usually have a very long life. The material is produced in various shades of calm tones, from which it is always possible to choose a suitable facade for a specific design.
The installation of this material can be carried out not only on a solid substrate, but also on a lath made of boards with a width of 150 ÷ 170 mm fixed with a pitch of 200 ÷ 250 mm.
Ondulin - the only material from the category of soft roofing, which has a fairly rigid relief structure, and therefore can be fixed to the crate.
The installation of the onduline, as well as any undulating roofing material, is carried out from the eaves. The top rows are stacked with overlapping on the bottom by 250 ÷ 300 mm, and the adjacent sheets arranged in one row are overlapped, one wave. The ondulin is fixed by special screws with waterproofing gaskets and special lids. They are screwed into each crest of the wave along the cornice and the ridge, and in the middle part of the ramp - in steps of two to three waves.
Flexible shingles
Bitumen shingles can be safely attributed to the most popular types of soft roof, as it has an aesthetic appearance, a variety of shades and shapes, strength and durability.
Tiles are made on a fiberglass basis, which is impregnated with high-quality bitumen, on top of which mineral crumb of various colors is applied. Top mineral spraying performs not only decorative function, but also protective, as it prevents mechanical damage to the softer lower layers. Tiles are used to cover houses with pitched roofs of any size and configuration of any complexity.
Since the most popular material from the soft roof category is bitumen shingles, its installation will be considered in more detail.
Installation of roofing with shingles
To begin with it is necessary to understand the roofing "pie", which must be mounted under the flooring of soft tiles. It is very important to perform this work correctly, otherwise the roof will be devoid of reliability and will not last a long time, and in the rooms under it it will be impossible to maintain a comfortable microclimate.
Exemplary workflow
In order to comply with the sequence of installation of all elements, it is best to make a list of all the works in order:
- The first step is the installation rafter systems.
- Further, from the attic side a vapor barrier membrane is fixed to the rafters.
- Over the vapor barrier, also from the attic, the rafters are fastened to the rafters. It is necessary for the subsequent installation inner lining attic room, fixing the membrane and creating a rigid base for laying the heater.
- Further, there is a piling between the rafters' feet of insulation mats. Usually mineral basalt wool is used for this.
- The insulation is closed with a waterproofing roofing membrane. It is fixed to the rafters.
- The membrane is pressed against the rafter feet by the counterbrushes.
- Next, the installation of a sparse crate - the foundation for the flooring of a solid foundation - should be installed.
- On the crate are fixed sheets of moisture-proof plywood or OSB.
- The continuous plywood crate is covered with a lining carpet.
- Further, the laying of soft bituminous shingles is conducted.
- Fixing the gutter system, plating the cornice overhang with mosquito net, and then lining or PVC soffit can be carried out at various stages of installation work - as will be more convenient for masters.
Calculations of the roofing system under the soft roof
Now, knowing the approximate sequence of mounting the "roofing pie", there is a need to consider them in more detail, since there are nuances that are important to take into account when performing these rather complex technological operations.
The first thing you need to determine is what parameters should have elements of the rafters and crates, and with what step they are installed.
Let's start with the rafters. The cross-section of the beam from which they are made depends on the steepness of the ramp, the possible external loads on the roof and the step of installing the rafter legs. The dependence is expressed in the following.
External loads include the weight of the structure itself, with insulation, lathing and roofing material, the mass of possible snow drifts in the winter and the impact of winds. Both snow and wind loads depend heavily on the steepness of the slope, with the increase in the angle of inclination, the significance of the snow gradually decreases, but the wind increases.
The total load, expressed in kilograms per square meter, should be evenly distributed on the rafter feet. And this, in turn, depends on the step of their installation - the more often they are located, the less workload is necessary for each running meter a rafter beam, and the smaller its cross section can be. If the value of the distributed load is known, then according to the table it is not difficult to determine the parameters of the required material.
There is a rather complex physico-mathematical algorithm for calculating the distributed load on rafter legs. But we will not bother the reader with an abundance of formulas and tables, but we will suggest using a convenient calculator. The initial data for the calculation will be:
- Region of construction;
- Steepness of the roof slope, degrees;
- Material of roofing;
- Features of the location of the house on the ground and its height.
In the last point of the calculator it will be necessary to put the supposed step of installing the rafters. Changing this value to a greater or lesser side, you can determine the optimal load distribution. And then, according to the table, knowing the length of the rafters, pick up the necessary section of the beam (logs).
The calculator is accompanied by two map-schemes, which make it possible to determine the zones of the construction region according to the level of snow and wind load.
Calculator for calculating the distributed load on rafter feet
So, to start with maps, we define the zones:
Now substitute the known values in the calculator - and get the result
Soft tiles are also known as bitumen shingles - modern roofing material, which quickly gained its popularity thanks to beautiful appearance, relatively low cost and easy installation. The installation technique is quite simple and having studied the soft roofing device and the sequence of work execution, it is possible to perform all the laying processes by one's own hands.

The construction of the roof of soft tiles is carried out by laying bituminous shingles, covered with stone crumbs, on the prepared base. The technology of the work, its features and safety instructions are embedded in the packaging. Before you begin the installation of soft tiles, you need calculate material requirements, purchase all necessary for installation and check the availability of the required tool.
Materials and Tools

Material for flexible roofing:
The necessary tool for the work:


Step-by-Step Layout of Flexible Roofing

1. Base device

Arrangement of the roof from soft tiles starts with mounting the base. A base is being erected for the installation of a soft roof in the form of a continuous flooring.
Requirements to the basis:
- it must be continuous;
- smooth;
- strong;
- hard;
- it must be capable of fastening with nails.

For the base device are used:
- laminated plywood, made with the use of phenol-formaldehyde glue (PSF), which has increased properties of moisture resistance;
- oriented - particle board (OSB);
- edging or grooving boards of the same thickness and with relative humidity not more than 20%;
- other sheet moisture-resistant material, suitable for the device base.
1.1. Technology of the device of the board basis

If the base is installed from the boards, then for this purpose used softwood. The flooring is carried out on the rafters, if the boards are high humidity, then their edges are fixed with screws. The length of the board should be no less than two rafters. It is desirable that the annual circles on the ends of the boards are close to the center, i.e., the core of the tree approached the rafters. Thus, the board works better for bending. The gap between the boards should be between 1 and 5 mm. It is important to take these features into account, so that the substrate is qualitative, durable and durable.
1.2. Technology of mounting a large-base foundation

Shield flooring is laid on a boarded lath made with a certain step. The sheets are stacked and fixed to the crate with the help of self-tapping screws. When performing work in winter, the boards are laid with a gap of 3 mm from each other to allow the material to expand under the influence of temperature.
Large-scale flooring, unlike the boardwalk, is much more profitable and reliable due to its qualities:

The thickness of the deck depends on the material and the step of the crate. You can determine it from the following table.

It is important to pay attention to chimney plinth. If the width of the chimney exceeds 500 mm, it is advisable to arrange a razor-check, which will prevent accumulation of atmospheric precipitation.
After installation of the foundation for the installation of soft tiles, the geometry is checked and the quality of the work performed. The length, height, diagonal and evenness of the surface of the rays are checked.
2. Penknife device

Edge of the roof protected by metal profiles - droppers, they are laid on the cornice overhang and fixed with nails in 150 mm steps, in staggered order. Lap joint overlaps not less than 30 mm.
3. Lining of the lining carpet

Lining carpet, still known as oS barrier, is spread in the valleys (the inner corner of the skates) and on all the eaves of the cornice. Begin laying the barrier from the valley. A strip of 1 m width is spread out, so that each slope can be set at 50 cm. The cornice spreads over the width of the cornice and another 60 cm along the eaves. The overlap of vertical joints is 15 cm, and horizontal - 10 cm. For fixing the carpet is nailed with a wide cap around the perimeter in 20 - 25 cm steps.
The rest of the surface of the base is covered with a lining carpet. If the slope of the roof is from 120 to 180, 100% of the area is covered with a lining carpet. If the angle of the ramp is more than 180, then the textiles spread only on the ridge and skate fractures of 50 cm on each side. Walls and along the pediment stretch stripes of 50 cm.
When performing a soft roofing device "trio", "jazz" or "beaver tail", the covering with a backing carpet of the entire surface is mandatory. Material flooring is made horizontally from the bottom up. The overlap is smeared with bituminous mastic. Each strip along the perimeter is nailed.
4. Mounting the pediment

A pedestal bar is used to protect the ends of the roof base from atmospheric precipitation and carpet material from wind impact. Plank is installed on the edges of the roof and fixed with nails, staggered in steps of 150 mm. At the junction, an overlap of at least 30 mm is arranged.
5. The marking of the surface

Before you perform a soft roofing device, you need make skates markup. To do this, you use a metric tape measure, a pencil and a paint string. The surface marking is performed in the form of a grid and performs an auxiliary function. The pitch of the horizontal lines corresponds to five rows of flexible shingles, and the vertical step is 1 meter, this is the size of one shingle.
Such a centering grid helps to smooth the flooring of the finishing coat along the vertical and horizontal lines. Special it is convenient to use markup if the skate is made with the wrong geometry or a structure such as a dormer or a chimney is arranged on a plane.
6. Device of the grounds

There are a number of ways to organize the ends. One of the most popular and simple is bedding. It is mounted on the lining material. On the perimeter on the product is applied bitumen mastic, the width from the edge is not less than 100 mm. In addition, a shallow carpet is fastened with nails in increments of 200 - 250 mm. Nails are nailed around the perimeter, retreating from the edge about 3 cm. Surplus material is cut with a roofing knife.
7. Laying the starting strip
Installation of a soft roof begins with the laying of the starting strip. In its quality, a special skate-roof tile, provided that it will fit flexible roofing kinds of "sonata" or "chord". If the "jazz" tile is mounted, then the starting strip is used clerical uncut. When stacking material with the form of cutting "chord", "sonata", "beaver tail" and "trio", you can take as a starting strip pruning.
Stacks the strip, retreating from the edge of the drip 15 mm. At the place of laying bituminous mastic is applied, then the starting strip is mounted and additionally fixed to the base with nails with a wide bonnet.
8. Private tile flooring

Before the beginning of laying, several packs are unpacked, and the tile elements mixed in random order. If this is not done, the roof will have pronounced spots of other shades. Roof tiles "accord", "beaver tail" and "sonata" have a protective release film, which is easily removed during installation. In the cutting of the material "trio" and "jazz" there is no protective film, they are equipped with special strips, which protect the sheets in the pack from gluing.
The first sheet of ordinary shingles is placed on the starting strip with a vertical offset from the edge of the strip by 10 mm. Then the shingles are fixed with nails. If the slope of the ramp is less than 450, then 4 nails are hammered at a distance of 25 mm from the visible part of the shingle; if the slope exceeds 450, then 2 more nails are beaten along the axis (for the cuts of "sonata" and "chord", additional nails are located in the upper corners). It turns out that each nail captures two sheets at once. Drill nails carefully so that they do not crash into flexible material.

Next series fits with different horizontal shifts depending on the type of cutting. When installing "jazz" shingles, the displacement can be arbitrary, in the range of 15 to 85 cm. As a result, the finished roof pattern becomes chaotic. If you arrange the tile "chord" in such a way that the rightmost lobe overlaps the junction of the previous row, you will get a strictly orthogonal picture of the roof. The offset of the material with a trio, beaver tail and sonata cut is half the lobe of the previous row.
Alexey Shamborskiy, 11/04/2016
Using a flexible tile allows you to give any structure a stylish and modern look. You can do the work yourself: difficulties in laying insulation layers, roofing material will not arise. The complexity and duration of work depends only on the shape of the roof, its size and design.
The scheme of the device of a roof from a soft roof

How does the installation of flexible shingles begin?
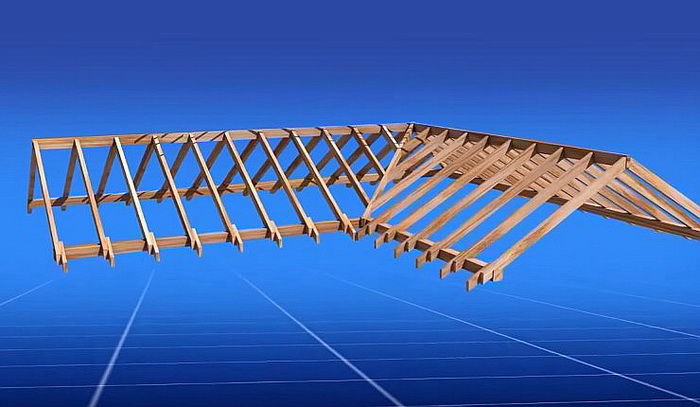
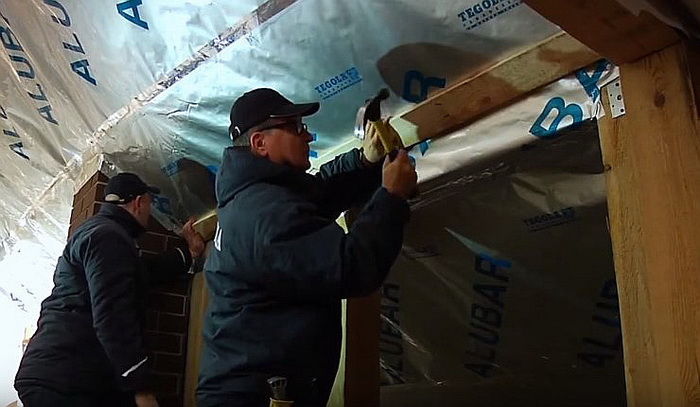
To lay the shingles with their own hands, you will need to create a solid foundation - a rafter structure. It is made of a bar with dimensions of 150x50 mm. The distance between the neighboring rafters is about 60 cm. The arrangement of the elements determines the future construction of the roof. But regardless of the size or angle of the ramp, the installation of a soft roof will be carried out without any problems. After the construction of the truss system or before assembling the structure, it is recommended that the sawn timber be treated with an antiseptic.

The next stage is the vapor barrier of the roof. Installation of the layer is made from the attic (mansard) room. Mounting of roll material begins from the ridge, parallel to the cornice.
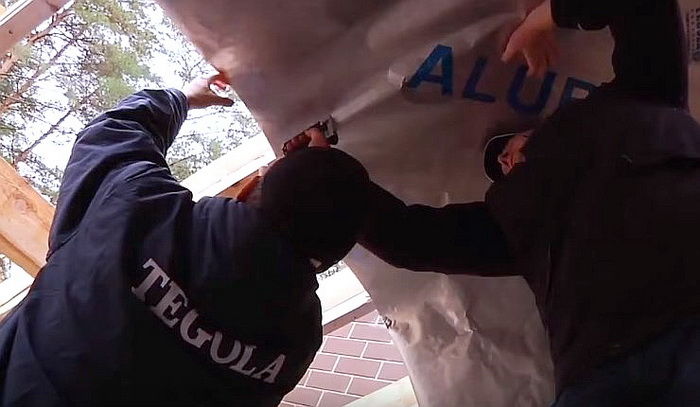

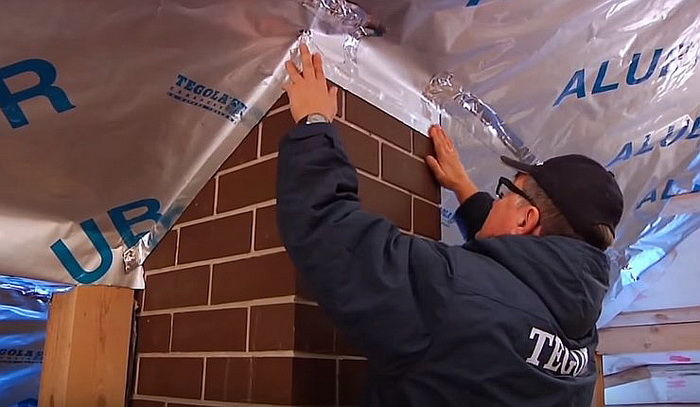
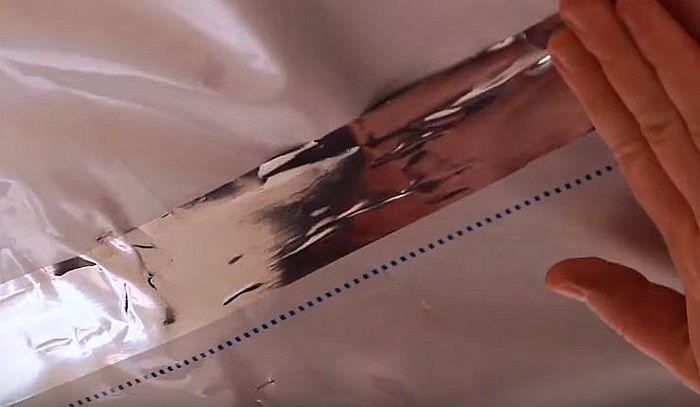
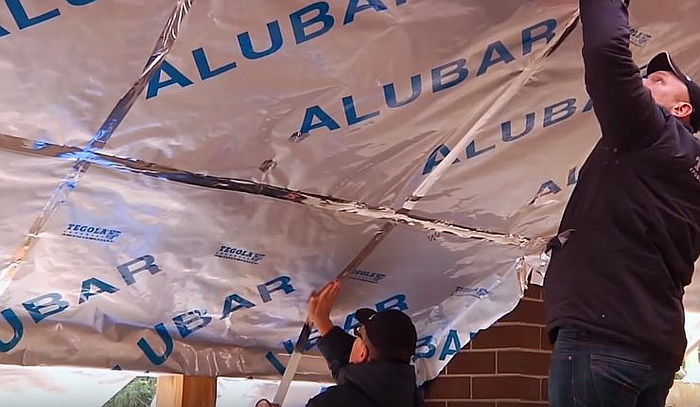
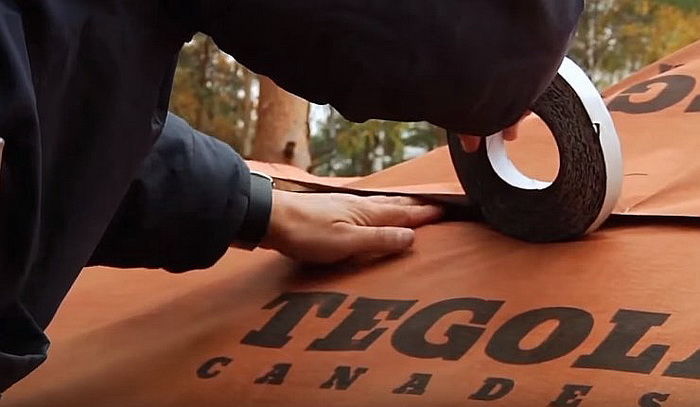
To the rafters the layer is attached with a construction stapler. Each new layer is superimposed on the previous overlapping of the order of 10-15 cm. The joints are fixed with a foil tape.
Warming of soft roofing
The laying of the mineral wool insulation is carried out from the outside. The first layer of insulation sheets will be between the rafters (perpendicular to the cornice). Before their laying it is required to execute the black plating from the attic space. The optimum thickness of the layer of insulation for the central region of Russia is about 15-20 cm (2 sheets of insulation).

Such a two-level laying of the insulation practically completely eliminates cold bridges.
The layer of the parodiffusion membrane is fixed on top of the heater. Such a "multilayered" installation of a soft roof with its own hands will exclude the ingress of dust onto the minnow, will prevent the accumulation of deposits on the insulation.
The material is laid parallel to the cornice with an overlap of the layers of 10-15 cm. In addition, about 15-20 cm of the membrane should extend beyond the heating circuit. The material is fastened with a construction stapler, the joints are connected by a self-adhesive tape.


Preparation of the ventilation chamber and installation of flexible tiles
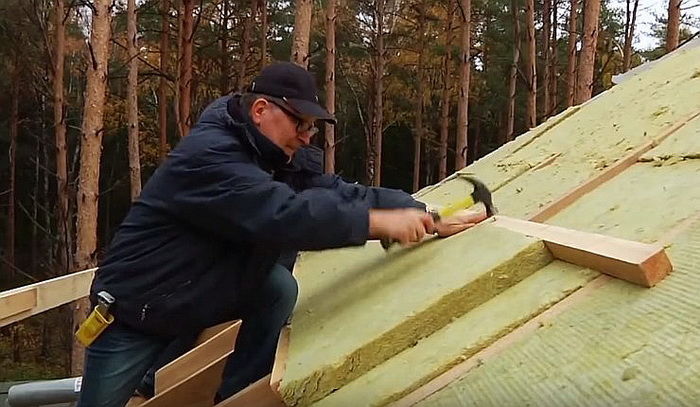
The ventilation layer between the base of the roof and the heater must be at least 5 cm. This is sufficient for normalizing the temperature and removing wet steam. The second layer of the counter-brus is mounted parallel to the rafters.
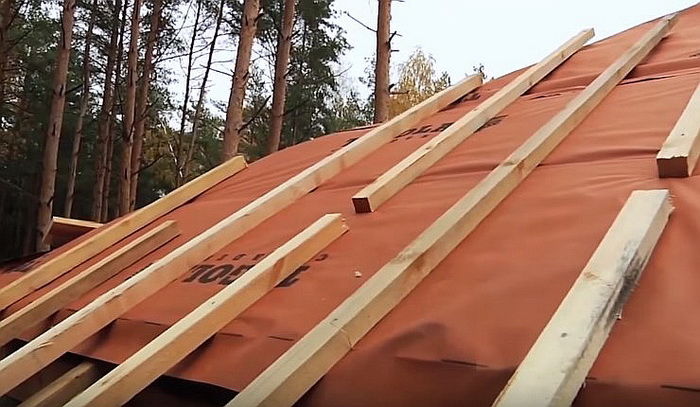
For work, lumber with parameters of 5x5 cm is used, the distance between neighboring supports is 30 cm. The fastening is made with breaks of 5-10 cm, as shown in the attached photos. Further work on the arrangement and installation of the roof of soft tiles is carried out according to the following step-by-step instructions:
1. A moisture-resistant
Recently, the popularity of soft roofs is gaining momentum. There is a very simple explanation for this. First of all, it should be noted excellent performance of this coating. Let's single out only some of them: absolute water resistance, high strength characteristics, attractive appearance, durability.
The undoubted advantage of a soft tiled roof is a fairly simple installation of flexible tiles. The installation instruction assumes fulfillment of several obligatory stages. The order of installation of flexible shingles – following:
- foundation device;
- flooring carpet flooring;
- installation of eaves and additional elements;
- the laying of shingles;
- formation of junctions.
How does flexible shingles fit in practice? The installation instructions offered to your attention will answer this question. The complete material includes all accompanying elements, for example, a lining carpet. Given the special adhesive layer applied from the back of the flexible shingles, the installation instructions can be used for roofs with a slope of 12-90 °.
Installation of flexible tiles with your own hands
If you intend to perform installation work alone, it is all the more important to know how to properly fit the flexible tile. The installation instructions, which detail all stages necessary work, will be particularly useful in this matter.
Substrate preparation


This is a plastic and soft roofing material, therefore installation of flexible roof tiles is mandatory performed on a hard base. Under the influence of sunlight, these characteristics of shingles only increase. If you mount the material on a thin crate, then either the shingles simply do not lie on it, or after laying will take the form of a crate, which, to put it mildly, will look ugly.
According to the installation technology, the substrate should be smooth and smooth, so that sheets of moisture-proof plywood or OSBs are filled over the usual crate.
Generally speaking, shingles can be laid on a foundation of separate boards, but under certain restrictions on the step between them and the difference in heights: the maximum step should be 5 mm, the maximum difference - 2 mm. However, even under such harsh conditions, literally a year later, on the roofing cover, the "figure" of the base is already being read.
Whichever material you choose, you should take into account that the moisture level of the substrate should not exceed 20% of its weight in the dry state.

Another important point concerning this stage is the need for under-roof ventilation. It must ensure the removal of excess moisture, which in time will become, in particular, the cause, decay of the coating. In addition, the air layer between the rafters and the crate can be used for the device of thermal insulation. Air supply, as a rule, is provided through the hole at the bottom of the roof, and the outflow - through the hole on the ridge.
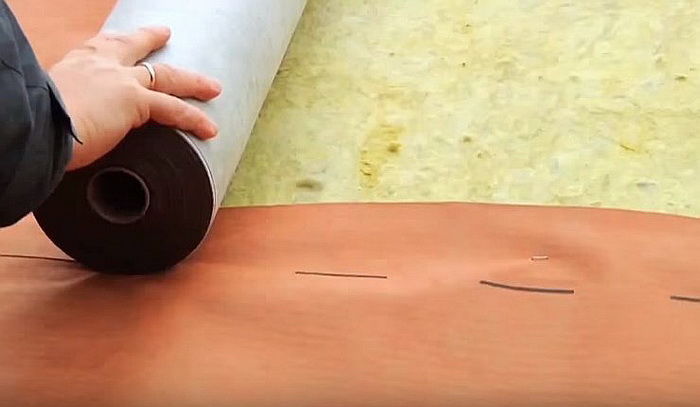
Lining layer device


The underlay carpet for bituminous shingles serves as an additional protection of the roof from leaks. For roofs with a small slope, on the order of 1: 3 or less, it is spread over the entire surface of the base. At large tilt angles of the ramp, the lining carpet is used only in dangerous areas: cornices, horse, endow, end parts.
Lay the carpet from the bottom up, starting from the lowest part of the ramp, with overlapping. Overlapping the lower strip, the upper one does not allow the water to drain under it. To fix the lining material use a special glue and nails.
Next, perform all the necessary operations associated with the device selected drainage system. For example, if necessary, to the cornice fix the brackets under the gutters.
Before laying the backing layer, the base is smeared with bituminous mastic, so after heating the substrate with a gas burner, a solid layer is obtained.


Roof overhangs need to be strengthened. To do this, use metal slats for cornices and ends, which are installed over the lining layer.
Further stages of installation are already associated with the roofing material itself.
Laying of shingles
Markup


Installation of bituminous shingles, especially for non-professionals, is recommended for marking, indicating the exact direction of installation, which is previously performed on the roof. In fact, because of the relatively small size, quite often the rows in the process of laying are bent, and if for small areas such a flaw is not significant and almost no eye rushing, then at large - they are fraught with unpleasant consequences.
From top to bottom (or vice versa), preferably with the edge, from where the shingles will be laid, draw two parallel lines parallel, keeping a distance of 50 cm between them. Then lines of rows with a pitch of 25 cm are perpendicular to them.
The laying process


Begin mounting from the lower edge of the ramp.
Row 1. There are two options.
- put the shingles upside down;
- use a special self-adhesive strip, however, it costs much more - almost twice. This series should be oriented relative to the slope.
Row 2. Starting from this row, the stowage is continued, following the marking. The gonts on the underside are provided with a protective film. It is removed immediately before gluing and pressed down to the base. Fix the tiles with special tin-plated or coppered nails, equipped with a wide bonnet.
They slaughter them along the edges and in the middle of each of the shingles so that it is possible to fix two rows at once. And the protruding forms of each of the following rows should cover the hats of the fastening elements of the previous ones. For every meter of shingles shingle need four nails.
The subsequent rows are stacked with a shift of half a meter. If necessary, make sure that the petals of each successive row are located between the same elements of the previous one.
The principle of fixing the shingles remains the same regardless of the series.

This was the basic part of the installation instructions for flexible shingles shingles, decks and soft shingles from other manufacturers. For example, the installation of a flexible tilercat priming shingles is carried out on the same principle.
Nuances of the installation technology of flexible shingles shingles
Particular attention during installation requires the so-called dangerous areas. In more detail, we will dwell on these stages of installation work.

- The least problematic is the placement of material on the skate. To design this site, use several options:
- additional skate element made of metal. They buy it already ready, either in the form of a special metal bar, or - from the same shingles (ridge tiles) or
- make themselves, carving out individual shingles. These fragments are bent through the ridge and fixed with the same fastening elements.


- From the endowment everything is different - according to statistical data this is a section that is sufficiently prone to leakage. Therefore, as a preventive protective measure, a substrate is used, which is glued qualitatively. This measure is mandatory regardless of the slope of the roof - it is used even at sufficiently large angles of inclination, when no lining layer is used. In glued valleys soft shingles do not bend, but cut in the direction of this element.
To increase the reliability of this joint, the valley must be glued with an additional layer of individual fragments of the tile. They are overlapped by adjacent slopes forming ravines, and glued using bitumen mastic.
- Usually, roof covering is not completely homogeneous, on its way there are some or other obstacles, for example, ventilation or chimney pipes. These areas are sealed using a ravine carpet and metal sheets treated with an anticorrosive compound.
- From the material, cut out webs of the appropriate size and cuts on the folds. Similarly come and in places where the roofing elements protrude. Thus, you can ensure proper fitting.

