Structure of the laminate
On the upper side of the floor is covered with a particularly stable protective film, which together with an attractive, melamine-impregnated resin, decorative film is pressed to create a wear-resistant surface.
Thin (7 mm), strongly compacted, fibrous plate E1 forms a layer-substrate.
From the underside of the support plate, a stabilizing film, which prevents penetration of moisture, ensures a high stability of the laminate form.
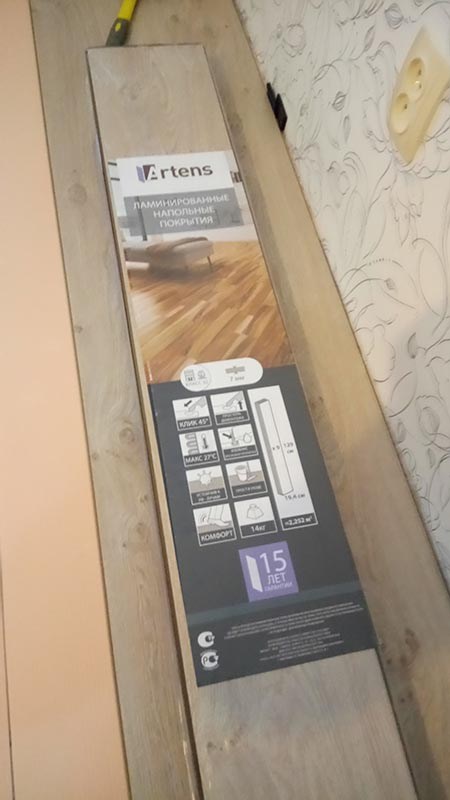
The thickness of the laminate 6 - 14 mm, depending on the class of use.
Substantial arguments in favor of laminate!
It is characterized by easy maintenance and resistance to loads. They do not accumulate dirt and harmful bacteria.
It is not sensitive to light and retains its fresh color even after several years.
It is made from renewable kinds of natural raw materials and does not contain any chemical substances.
It is difficult to ignite.
Resistant against wear and pressure.
Excellent sound insulation.
Resistant to fuming cigarettes.
Resistant to abrasion and can withstand the load from the chairs with rollers.
Ideal for laying on floors with water.
Since January 1, 1999, the area of use of laminate flooring is determined by the new classification. Household use (low, medium and high degree of load) - respectively class 21, 22, 23. Commercial use (commercial and public premises) - class 31, 32, 33 (depending on the degree of load).
All surfaces must meet the general technical requirements and, subject to current standards, be suitable for laying. When preparing the surface for laying, special attention should be paid to the following requirements:
Dryness
Flatness (deviation on one meter of max. 3 mm!)
strength / bearing capacity
cleanliness of the surface for styling
In addition to seamless floors, PVC floors, linoleum coatings, rubber or wood can also serve as a surface for laying, if they meet the conditions listed above, laminated parquet can also be laid on the floor with water heating. For laying the artificial parquet on the heated floor, use the special installation instructions that the supplier can provide at your disposal.
Laying on the floor with electric heating is unacceptable. Available floor textile coverings before laying laminated parquet should be removed.
Fundamental rules
The surface of a seamless floor or a floor on the basis of minerals should be completely covered with waterproof polyethylene film of 02 mm. In this case, at the joints, the strips of the film must be laid with an overlap of at least 20 cm.
A suitable substrate is recommended for all surfaces. The substrate is laid back, that is, without overlapping. When laying an artificial parquet, which has a sound-absorbing lining on the back, an additional substrate is not needed (the laminated lining does not replace polyethylene film on surfaces based on minerals!)
Elements of a parquet are always stacked as floating.
Fixed fastening of floorboards to the surface for laying (glue, screws, nails) is not allowed.
The minimum shift of the head joints of the floorboards of adjacent rows is 200 mm.
Compensation gap for all solid building surfaces - 8 - 10 mm.
In all doorways, junctions, rooms with complex configurations, as well as rooms with more than 10 m in length or width, insert adapters / sills.
Laminate laying
1. Check the elements of the parquet for damage / defects. Lay the sections longitudinally, in the direction of daylight, taking into account the location of the room. Begin laying the first row in the left corner, with both sides of the tongue pointing to the wall. The protruding parts of the floorboards adjacent to the wall are sawn off. Lay out the first row of elements by placing remote wedges at the wall.
2. Connect the panels of the first row by tapping lightly with a bar and a hammer (transverse side). The last element of the first row is marked by the required length (the crest is applied to the ridge) and cut off. Laying the second row starts with the rest of the floorboard of the first row, if its length is not less than 200 mm. When laying all subsequent rows, the laying of a new row also begins with the remainder of the floorboards. Attention: the minimum shift of the head joints should be 200 mm!
Z. "CLICK" is laid in such a way that the crest of the already laid floorboard is firmly fixed in the groove of the new floorboard, for this purpose the groove of the horizontally lying floorboard is connected to the crest of the already laid element. The connection is achieved by tapping lightly on the bar with a hammer. The floorboards of the artificial parquet are always joined first by transverse sides. Then the longitudinal sides are connected from right to left. Always use the appropriate lap bar when laying. Now you can stack the element behind the element and row after row. The last element of each row is strengthened by means of a clamp.
4. To mark the last row, put the stacked element exactly on the penultimate row. On top, put the remainder of the floorboard and press it against the wall, taking into account the compensation gap. Apply a contour of the wall to the panel at the desired distance. When laying floors in industrial premises, it is necessary to take into account the increased humidity in the premises. In this case, gluing elements with special glue is provided. The glue is applied to the upper comb in such a way that when the elements are laid, it protrudes outward along the entire joint of the transverse and longitudinal sides of the element. Surplus glue can be removed from the top of the floorboard immediately or by giving the glue a little dry. Attention! Make sure that after applying glue between the floorboards there are no gaps left.
Laminate fitting for pipes:
Measure the position of the pipes and mark it on the parquet floor.
Drill holes at least 16 mm larger than the diameter of the pipes.
Saw part of the floorboard at an angle of 45 degrees to the holes.
Cut out the piece to the rest and glue it.
After stacking
Leave the floor uncovered for 24 hours until the glue dries completely. Do not go over it. Then gently remove the gaskets. Lay the plinth and curbs. Cover all gaps at the doors with appropriate joints.
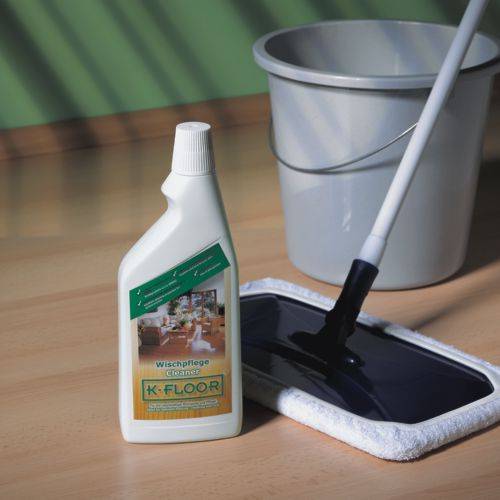
Laminate care
Spend the first cleaning.
Laminated parquet is protected from dust by its nature.
As a daily care floor enough to wipe.
Remove light dirt with a damp cloth.
To remove heavier soiling, use special detergents designed for this floor covering, and then wipe with a damp cloth.
To avoid disturbance of the decorative layer, never use abrasive cleaners, or with products not recommended by the coating manufacturer.
Do not move heavy furniture on the floor, lift it when moving it.
Glue felt pads to the legs of tables, chairs and small pieces of furniture.
Never conduct a wet cleaning of the floor.
If any liquid has been spilled onto the floor, wipe it immediately.
Often the reason to postpone the renewal of the flooring is the "anticipation" of the attendant upheavals and difficulties associated with dismantling the old and laying a new decor. Laminated floors are installed directly on the existing surface, and working with them is simple and does not require much time. Many dreams of a new beautiful, wear-resistant and practical coating are embodied in this material.
What is a laminate?
how to put a laminate on the floor
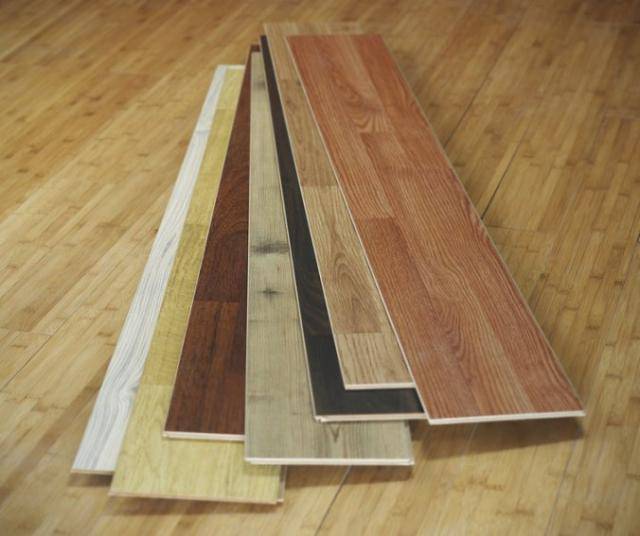
Laminate flooring in the market of finishing materials appeared relatively recently, but during the short time of its existence it had already proved itself to be a relatively inexpensive, reliable and rather effective material. Possessing the best properties of floor coverings of previous generations - environmental friendliness, unpretentiousness in application and aesthetics - laminate is equally successfully used in both public and residential areas. They produce it with different designs, but the panels that simulate products made of natural wood are in greatest demand. At the same time, for complete similarity, they are made with relief and with roughness, as in natural material.
The combination of different qualities of this coating is achieved in the manufacturing process, when individual components are pressed together into a single unit under high pressure. As a result, a new and extraordinary material is formed. There are several technologies for obtaining a laminate. In this case, the materials used may differ from each manufacturer.
But the technology remains unchanged - the presence of the main four layers that make up the laminated panel:
- First of all, the slab is the bearing base.
- On top is a decorative layer with a patterned image.
- Protective layer, protecting decorative from external influences.
- The bottom is covered with a stabilizing layer.
- Between the stove and the decor can be additional layers.
As a carrier base for the laminate, a fiberboard, HDF or MDF board is generally used. The decorative layer is a paper with a pattern, which is impregnated with synthetic resins. In the conditions of high-temperature processing, they form a high-strength and ultraviolet-resistant surface. As a layer of additional reinforcement, kraft paper or polymers are used. They are introduced between the base and the decorative layer to increase the hardness and impact resistance of the laminated panels, and also to impart greater rigidity to their edges.
The protective layer is functionally very important, as it provides wear resistance, thermal and lightfastness of the laminated floor. It is made from melamine resins in combination with various additives, for example, with corundum, stronger than which only a diamond. The protective properties of the coating can be improved by a transparent layer of symmetrically oriented alumina particles.
The stabilizing layer protects the panel from the bottom of moisture, helps maintain shape, compensates for deformations caused by fluctuations in humidity and temperature, and also prevents warpage and swelling. It is a paper impregnated with paraffin or melamine resin. The laminate panels can include a soundproof layer that is attached to the back of the plate.
Since the main material of the laminate floor is a tree, it is not used in rooms with high humidity - in saunas, toilet, bathroom. It is possible to swell the base from the chipboard with subsequent deformation. The top layer, having a high resistance to abrasion, allows you to maintain the appearance of the laminate for many years. At the same time, the wear resistance of the coating can be significantly increased with the help of parquet varnish.
Advantages of the material
- After installation, the laminate is similar to the parquet or other material depicted on the front side. But its installation is simpler, and the cost is much lower.
- Lay the laminated panels on any surface.
- The material is lighter and stronger than a regular board.
- It is characterized by wear resistance - the protective film can withstand loads for 15-20 years.
- Laminate heat-resistant, ecological and does not require special care.
Laying of laminate flooring
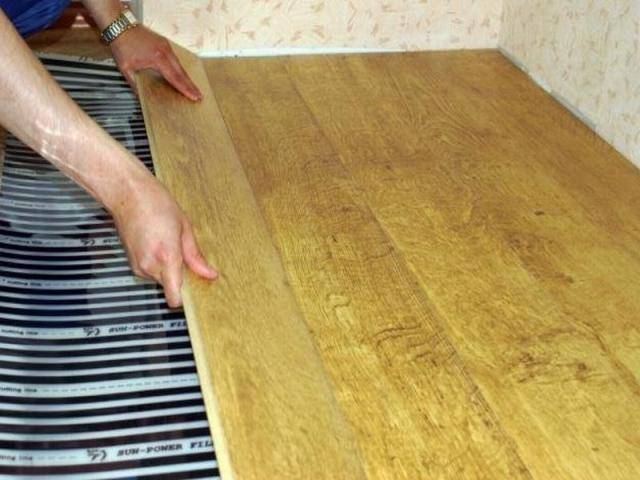
Panels of laminate are not intended for outdoor installation or use in damp areas. However, in an appropriate design, they can be used in rooms with a warm floor system characterized by a uniform temperature distribution over the surface.
The ease of laying laminated panels is due to the lack of the need to dismantle the existing floor covering. Virtually any base is suitable for mounting such a floor - wooden boards, fiberboard or chipboard slabs, linoleum, ceramic tiles, concrete floor and more. Installation does not require much time, and this work is easily mastered by anyone who knows how to use a hacksaw and a hammer. The only condition is compliance with the main rules of laying.
The panels must be prepared - unpacked, verified the integrity and quality of the material purchased, and then left for 48 hours in the room planned for installation. This is necessary for the laminate to adapt to the microclimate and to obtain dimensions in accordance with the temperature and humidity. The recommended values are 18 ° C and a maximum of 75%, respectively. To ensure that later joints between the slabs were inconspicuous, all edges at an angle of 45 ° and with slight pressure are treated with N320 grinding paper.
Preparation

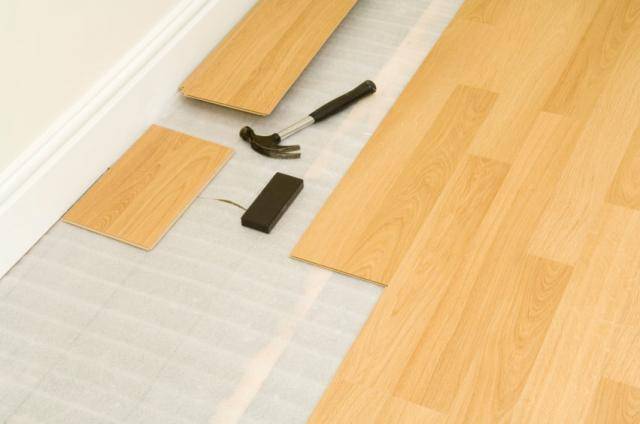
The base for the laminate must necessarily be firm, even, clean and dry. Floor coverings from linoleum, polyvinylchloride, other solid materials are allowed to be left, but carpet is to be removed. The short-haired flooring and soft linoleum are left as a lining under the floor of the laminate. And when installing on a tile, a solid linoleum or a wooden floor, a layer of intermediate soft material with a minimum thickness of 2 mm is required. For this purpose, a special gasket made of foamed polyethylene or foam rubber is ideally suited. They are neatly stacked and glued with any adhesive tape 4-5 cm wide or in another way.
To prevent penetration under the floor of moisture, self-adhesive tape also glue walls and corners to a height of 2-3 cm, which will subsequently be closed by a skirting board.
On the cement or ceramic tiles, the surface must be laid with a polyethylene film, which will serve as a layer of vapor-proof insulation and should go to the wall. Seamless uneven solid base level with putty for floors.
Primary requirements
Laminate laying on large areas requires the deformation joints to be left between each 100 sq. M of finished surface. At the entrance of the premises provide a carefully prepared place for the retention of moisture and dirt. Before installing the panels, you need to make sure that the door is free to close and open after mounting the laminate cover, and also remove the casing of the door jambs and the plinth.
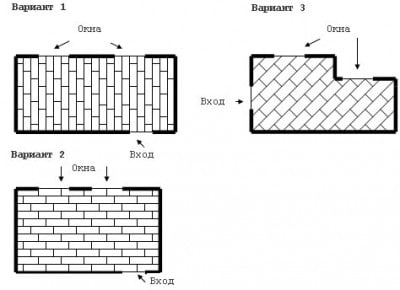
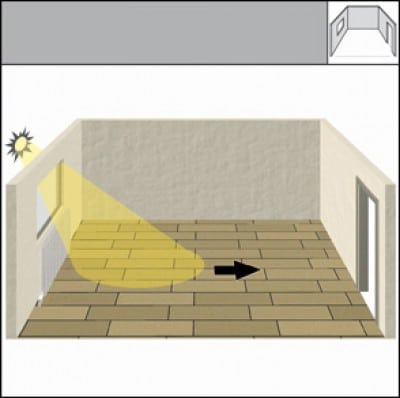
They make laying in the direction of the falling sun rays (the joints are less noticeable), and in the long rooms (corridor) - perpendicular to the long wall, not taking into account the direction of the light. Do not ventilate the room during operation.
Laminate flooring is always mounted in a "floating way", that is, not fastening to the base - the panels do not need to be glued, fixed with nails or otherwise. The glue is used only for assembling the elements among themselves at the junction of the groove, and this joint is attached to the floor due to the excessive adhesive mass. The width of the seam should be 0.1-0.2 mm. In the case of reduced humidity in the room, it should be taken into account that over time the material will shrink with the inevitable increase in clearances. Manually tightly dock the panels together is difficult. Therefore it is advisable to use special screeds to facilitate the work, fixing many rows of plates during installation.
Important! It is necessary to pay special attention to the joints, since this is the most vulnerable place of the laminate flooring.
It should be remembered that the panels are made of wood that "breathes", and at different times of the year, the humidity and temperature in the room can vary. Therefore, for the laminated floor, it is necessary to provide for the possibility of compression or expansion. For this, when laying, leave gaps of 8-10 mm along the perimeter, near the threshold and around the heating pipes. After installation of the panels, all the gaps are hidden under the baseboard or slats, which do not need to be attached to the floor.
Stacking
Note! Installation starts from the corner of the room furthest from the entrance, and from left to right. Do not use glue.
The first row is laid with the side with the crest to the wall, using spacers of the desired width. They are made from the calculation of the gap for the temperature and humidity expansion of the floor - 3 mm per 1 m of the width of the installation, but not more than 15 mm. Observe this rule and when passing rigidly fixed points - elements of the heating system, thresholds and others. Between the pipes passing through the floor and the panel, the required clearance should be at least 3-5 mm. When laying in length exceeds 10 m, in addition increase the gap by 3 mm. In the case of an uneven wall, the contour is applied to the first row of mounted panels and saw them along the drawn lines.
The last piece of material for the row, if necessary, is shortened taking into account the distance to the wall left. If at the same time a segment of at least 40 cm long remains, it is used later. Seams carefully tighten the tension device or spacers. Seams of adjacent rows should be spaced from each other at a distance of at least 20 cm.
Floor laying technology
The packing is done in two or three rows. Check the quality of work, the coincidence of the color scale, the absence of cracks. Using a cord, make sure that the rows are absolutely straight. Errors in installation, especially the first three rows, will subsequently affect the surface of the entire room, so they pay special attention to the corners. When everything is correct, and nothing needs to be corrected, proceed to gluing.
Disassemble the rows, except the very first, and put the material in the order of the forthcoming assembly for glue. It is applied to the comb of panels, which is immediately inserted into the groove of the laminate of the previous row. To ensure a tight connection use a mounting gasket from the piece of material to be laid and a hammer. During the fit, a surplus of glue should come out of the slot, which is removed from the surface with a damp cloth. It will prevent moisture from getting between the rows and under the floor. Water for rinsing rags is changed as often as possible to prevent the formation of bands on the panels. The first three rows, as well as the subsequent ones, grasp and dry for 2-4 hours, after which the following series can be set.
Panels of the last row, if they do not fit with the gap in the gap remaining to the wall, are adjusted. To do this, they are placed exactly on the penultimate row in the place of installation and align, superimpose the other panel with a spike to the wall, leaving the necessary clearance, and along it a line of sawing away the non-displacing part is carried out, which is then cut off. The last row should not be the same as 5 cm.
Important! At the end of the work, the premises are not used for 48 hours, after which they remove the sketches and put the plinth.
Laying on the warm floor
For laying on the base with the system "warm floor" is suitable laminate of the corresponding design, which has accompanying marking on the package or an indication in the passport. In addition, it is required to determine the residual moisture of the laminated boards.
Preliminarily lay the cement slurry evenly on the floor and allow it to dry for 2-3 weeks, after which the concrete base is warmed up, including heating for 3 weeks. The temperature is raised gradually - in steps of 5 ° C and up to full power. These works must be carried out in the summer. At the maximum temperature, the floor is heated for 72 hours. And the laminate mounting starts 1-2 days after the heating is turned off, when the base will cool down to room values. During installation on the concrete surface, the temperature should be 18-20 ° C.
Penetration of moisture is excluded by laying a film of polyethylene on the floor, which is fixed with a sticky tape. Then make a gasket of foam rubber and already on top of it install panels. After 24 hours after completion of the work, you can turn on the heating. On the floor surface, the temperature should never be higher than 26 ° C.
Glued installation
The glueless way of laying
Floating floor is mobile, which can contribute to breaking the integrity of the laminated flooring with poorly glued panels - they begin to diverge, and then bend. It is possible to level this and considerably simplify the installation by the technology of glueless jointing of plates.
There are two types of this connection - with metal locks and carved panels. And the latter are now the most common. This is due to the fact that many experts are convinced of the impractical combination of materials with different temperature expansion - metal and wood. In a laminated coating during operation, certain conditions can cause the strip to break from the metal from the panel.
Glueless installation has several advantages:
- Faster installation.
- Mounting starts from any angle and leads in any direction.
- Multiple use of panels.
- The floor is ready immediately after the installation.
- The qualification of the performers has practically no effect on the quality of the installation.
- Systems designed to join the laminate plates horizontally or at an angle are developed. This is necessary when bending is impossible or difficult - under radiators, doors and in other cases.
This way is patented. Therefore, when choosing a cover, attention should be paid to the availability on the package of data on a license or a patent. This will indicate a quality material with a manufacturer's guarantee.
Care
How to wash a laminate
Laminate flooring is very convenient because it does not need complicated maintenance. After all, the features of the production of the top layer of panels contribute to the repulsion of dust and prevent the absorption of dirt. Daily care is usually limited to using a vacuum cleaner. You can also sweep the floor or wipe it with a moistened, but not a wet rag. To remove strong contaminants and stains, use a tampon moistened with any average concentration cleaner or acetone, and then wipe the floor with a damp cloth.
Laminate has a wear-resistant and hard surface, but it can also be damaged. Therefore, the presence of stones and sand on the floor, which can cause scratches, is unacceptable. If the coating has received a slight damage, then it is removed by the paste of the corresponding color. At the entrance is recommended to put a mat.
Conclusion
The advantages and advantages of laminate floors make them one of the most preferred coatings. It is possible to imitate the appearance of expensive decors - parquet, marble and others. The condition of long-term operation of the laminate is a smooth foundation under it, as well as careful and attentive styling in compliance with the requirements of the attached instructions.
Publications on the topic
 Semen Knyazev
Laminate flooring - cheap and beautiful!
Let's take a look at this situation together: during the design of your future home or planning a repair process, there was a difficulty on your way: What kind of flooring will best correspond to modern concepts of style, beauty, and will be perfectly combined with other interior details? And also on a pocket not strongly will strike, money already on an outcome?
If you apply for advice to an experienced designer, you will most likely get an answer that such a coating is a laminate. This answer will be in most cases. But why on such a floor did the choice of a qualified specialist fall?
Why laminate floor?
The most important thing is that laminate is a very popular material, because the assortment of different variants of colors, shades, textures, textures and design solutions is huge. You will not face difficulties and will not encounter any obstacles in choosing the right laminate for your apartment. Is that too many variations in which it is not difficult to get confused. Absolutely nothing, except your imagination, does not limit you in choosing. In addition to the classic and most common types of laminate surfaces, you can also find a laminate with author's textures, funny drawings, stylized for some other, unnatural and unusual material, whether it's glass or steel sheets with rivets. Laminate is an excellent tool in the hands of the designer and for those who just want to create a unique, indescribable atmosphere in their own homes.


Let's also talk about the advantages of laminate
What are the advantages, in addition to the appearance, this wonderful flooring has?
Among the main advantages are the following:
- simplicity of installation;
- affordable price;
- large selection of colors and textures;
- a huge number of shops where you can order a laminate;
- when used correctly can serve for many years;
- possibility of combining;
- it is possible to use even if the house has pets.
I think this is not an exhaustive list, each for himself can still determine a number of advantages of laminate flooring.
What does it consist of?
We will not go into the process of laminate production, we will leave it to specialists, we will only look at the surface of the laminate as a laminate. Each of the layers of the laminate panel or as it is also called lamella performs its role. The top layer is protective, it serves, as you might guess, to remove and shield any harmful effects on other layers of flooring. He is not afraid of humidity, temperature changes and mechanical damage. The next layer is decorative. It performs the most important and prominent function - on it is a picture or texture. Other layers are needed to give the floor stability and ease of installation.
The use of laminate flooring many times justifies its value. You will not regret this acquisition, because beautiful and high-quality floors will please you with their surprising and interesting appearance for many years. 
The first and main condition for laminate flooring is a flat base. This involves laying the screed from the cement slurry. There is another possibility of leveling the surface for the future laminate coating - the use of a self-leveling liquid. But this imprinted material is a rather expensive treat. Therefore, laying the screed remains the most accessible way of leveling the base for laying laminate flooring. Consider the technology of the process. The first operation is the application of a cement test.
Rinse the floor with warm water to remove debris from the surface. Prepare kneading screeds for the same technology as concrete, then from cement and water prepare a little liquid slurry with the consistency of sour cream, adding the appropriate binder in the proportion recommended by the manufacturer.
Starting from the place where the concrete laying began, apply a layer of cement dough approximately 1 m 2 of concrete on a wide brush.
Installationlighthouse racks.Place two parallel stripes of 100 mm width on the concrete floor covered with cement-concrete test. For each strip of screed, lay the underground wooden beacons with a cross section of 75 to 37 mm. With the help of a hammer, alcohol level and a ruler, achieve horizontal level of the slats and position them at the level of the clean floor line.
Laying screed.Check the consistency of the screed by clearing it in your hand. If it is not wet enough and does not keep the shape, crumbling, add water. Spade lay the screed on the part of the floor covered with liquid cement paste and level it so that it is slightly higher than the beacons. Level the screed using a slat - the rule that you used to level the concrete. If an uneven surface is obtained, add a little solution to the recesses and repeat the procedure. Remove the rail, which is located next to the wall, and fill its place with a coupler.
Align the surface. Light circular motions, smooth the surface of the screed with a trowel or special steel smoothing. After smoothing, apply a liquid cement paste to the next square meter, set the screed and flatten it so that the joint between the two sections is invisible. Lay the screed in the entire room in the same order in which you laid the concrete.
As you move, remove the beacons and fill the loose joints with the screed.
Leave the screed to harden overnight, then drizzle with water, keeping its surface moist for a period of two, three days. You can walk on the floor after 24 hours, but you must wait at least two weeks before you start laminating the floor.
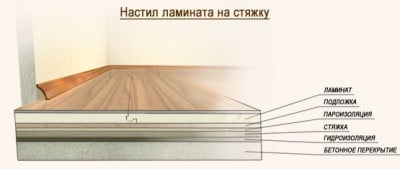
So, the surface for the flooring is ready. Now you need to lay a moisture-proof substrate on the coupler. This is usually a polyethylene film with foil.
The first panel of the laminate is laid along the wall, with a tongue against the wall, at a distance of 8-10 mm. The rows should be oriented along the light in the direction of the window, so that the seams are not visible. The panels are sealed at the joints with special glue, which penetrates deep into the fibers, thereby increasing the reliability of bonding. The grooves are glued especially carefully to avoid penetration of water into the slits. The gap between the wall and the laminate is necessary, because after laying the laminate is expanded around the perimeter by about 8 mm. The next row is stacked so that the ends of the panels in adjacent rows are displaced relative to each other by 30-50 cm. This is necessary in order to optimally distribute the load on the joining panels. The last row is laid close to the wall, the piles are pressed into the previous row with wooden wedges. Laminate panels are already available with treated surfaces and no additional processing is required after laying. The surface of the laminate flooring does not adhere to dust and dirt, so keeping the floor clean is not difficult. When cleaning, you need a damp cloth and a vacuum cleaner. After wet cleaning, the floor is wiped dry, then the laminate floor will last longer.
Floors are the most important part of an apartment or house. Twenty years ago, many people only heard of parquet or linoleum, but in our time a completely new type of coating was developed, which was called a laminate floor. Laminate can be laid in any of the rooms - bedroom, nursery, living room. A installation of the laminate depends on the class of coverage and its physical characteristics.
In place of natural materials for the floor came modern coatings - laminated parquet. The founder of the laminate is the Swedish company Perstorp. Specialists of this company cover was developed for the working surface of kitchen furniture. The term "laminate" combines two names - melanin, from which the coating is made, and lamination, that is, a method for processing melamine.
Construction of laminate elements
Laminated floors in appearance are not worse than parquet floors, and their technical properties are much better than other similar materials. Considerable advantage is also the fact that it is much easier to put laminate flooring than, for example, parquet.
Laminate itself is a paper that has a strong wrapper, so the moisture of the coating is terrible only at the joints - that is, at the sides. Laminate flooring consists of several layers. The upper layer is represented by a transparent wear-resistant film with a digital index. Classes number 31-33 are designed for a service life of about 20 years. Now the 34th grade is under development, and it is planned that it will serve for life.

Next, there are several layers of paper impregnated with resins. Here on it is a drawing that influences the aesthetic value of this coating and the consumer choice. Below is the carrier layer, consisting of a fiberboard of considerable density with moisture-resistant impregnation.
In this layer there is a lock, which is intended for fixing the laminate plates among themselves. Thermal insulation, noise insulation, durability of the future floor depends on the density, thickness and quality of the slab. The lock, in turn, allows you to easily remove and replace the damaged part of the laminate floor when a need arises.
The best locks can withstand loads of up to 1,200 kilograms per meter. An acceptable result is 700-900 kilograms per meter. The fourth layer is a substrate that is highly noise-proof and completely absorbs sounds.
Preparing for laying the floor
To self-laminate flooring should be started only after electrical and finishing works, pasting wallpaper or painting the walls. When doing such work as installing a laminate video and photo gallery will help you understand the meaning of the procedure. Before laying the laminate with your own hands, you need to carefully inspect it. Marriage is all elements with scratches and chips on the surface, with the defects of the lock and the violation of the varnish layer.
It is necessary to check that the base for laying the laminate flooring is smooth and dry. Coverage can be laid on a glued floor of PVC, linoleum and parquet board, but it is important not to allow the formation of cracks and exfoliation. If you plan to lay the laminate on concrete, then its humidity should not be above 2%.
Options for laying the laths of laminate flooring
It is strictly forbidden to place a laminate on the carpeting. To avoid the creaking of finished floors, it is necessary to put a so-called carpet layer between the laminate and the old coating, which is a felt paper or a foamed polypropylene liner. If a concrete surface serves as the basis for laying, then additionally it must be laid for the purpose of waterproofing a polyethylene film or a foam polyethylene substrate.
If necessary, additional floor leveling should be carried out using a special mixture. The floor needs to be vacuumed, clean off any irregularities and tubercles, and only then pour a self-leveling mixture, during which it is recommended to monitor, so as not to form an influx. Mix the mixture a couple of hours before laying.
Methods of laminate floors
Laminated floors are stacked in various ways, the choice of which is dictated by the specificity of the locking system, as well as the use of adhesives or the rejection of them.
Mounting according to the principle of "bar to bar"
Laying the laminate floor is possible by the technology "bar to the bar", which consists of successive actions:
- Lay the laminate stands, starting from the most remote corner from the entrance to the room. The long sides of the panel should be parallel to the light rays falling from the windows. Thus, the sides of the panels will be parallel and the walls of the room. In case the room has a round shape, you need to navigate only by light.
- The gaps between the walls and rows of panels should be based on the following ratio: for 1 meter of room, 1.5 millimeters of clearance, which in general should not be less than 10 millimeters.
- Next is to determine the width of the last row. To do this, it is worth to measure the length of the room, taking into account the gaps. If the width of the last row in the calculation is less than 5 centimeters, boards must be cut so that the first and last rows have the same width.
- The walls are wedged, which corresponds to the size of the gaps.
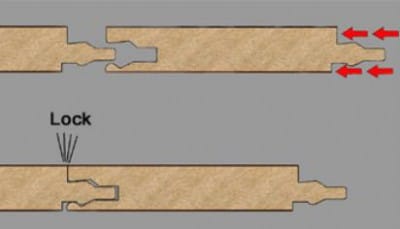
Paving with "Click" locks
In this case, you should throw aside all the tools. For laying a laminate with "Click" locks it stands:
- Take the second panel at an angle of 30 degrees, insert the product into the end groove of the previous panel and, by pressing the second panel to the floor, snap it.
- To shift the end seams of the third row by 30-40 centimeters in relation to the seams of the previous row. The rows are stacked with a piece of the panel, which is left from the previous row. If the first piece has a length of less than 4 centimeters, it is recommended to cut a new one equal to half the panel. The surface is laid in staggered order, which ensures uniform pressure distribution on the panel.
- Raise the second row and insert it at an angle of 30 degrees into the groove of the first row. The most important thing is not to stop the process until a familiar click is heard.

Installation of a laminate with a click lock

The process of connecting the bars with the click locks continues until the audible signal - click
The device of a floor with "Lock" locks
Installing a laminate with Lock locks with your own hands is considered the most economical option. The changes concern the first point of the previous instruction: you need to connect panels that are located horizontally. The grooves also coincide. Panels are joined to each other with a hammer blow on a bar of wood that is pinned to the opposite edge of the attached panel. There must be a sound "lok".
The end of the connection of the laths with the lok lock also has to report the sound signal
If you decide to install a laminate on the glue, then you should get a good water-repellent adhesive. Laminate flooring is done in a floating way, which means joining separate elements along the ridge and groove. The coating to the rough floor is not fixed firmly.
For every 12 meters square, nearly half a liter of glue is consumed. It is applied in excess, without saving, on the entire length of the groove of each next panel. Further it is necessary to arrive accurately before the sound of "beach-beaches". With the help of a damp cloth, excess glue should be removed, which serves to protect the joints from moisture penetration in them and makes it possible to disassemble the coating if necessary.

Do not save by buying cheap glue, the composition should be selected in accordance with the recommendation of the manufacturer of the laminate
Cheap PVA glue is better not to use, because it will bring only a lamentable result, after which you will have to buy a new laminate. Before the start of the operation, the coating should be given a break of 10 hours.
Proper and competent installation of the laminate with your own hands implies preliminary preparation: the material should be placed in a room with a temperature of at least 18 degrees and humidity of about 75%. Before laying the first row, it is necessary to stretch the rope along the wall and carry out alignment along it.
If the room has an uneven wall, then the first row of laminate floor should be cut along the wall contour. If the work is done with a regular saw, the material should be placed face up, using a circular saw - face down. When laying a laminate floor, it is worthwhile to focus on the first two rows. And they should turn out equal.
Laminate is perfectly protected from dust, for cleaning it is just vacuuming the floors. However, the material should always be dry, and if something spills on it, you should immediately wipe the liquid. When cleaning a laminate floor, it is highly undesirable to use abrasive cleaners, since they can damage the upper decorative layer of the laminate. In addition, the floor does not need to move heavy furniture, because it negatively affects the decorative layer of the laminate.
Installation of a laminate floor with lock connections requires compliance with the technological sequence of laying the strips, which is demonstrated by a video clip:
So, you managed to install a laminate floor with your own hands. If during the given process you observed the above instructions, you should get a very attractive cover, that by faith and truth you will be served for many years.