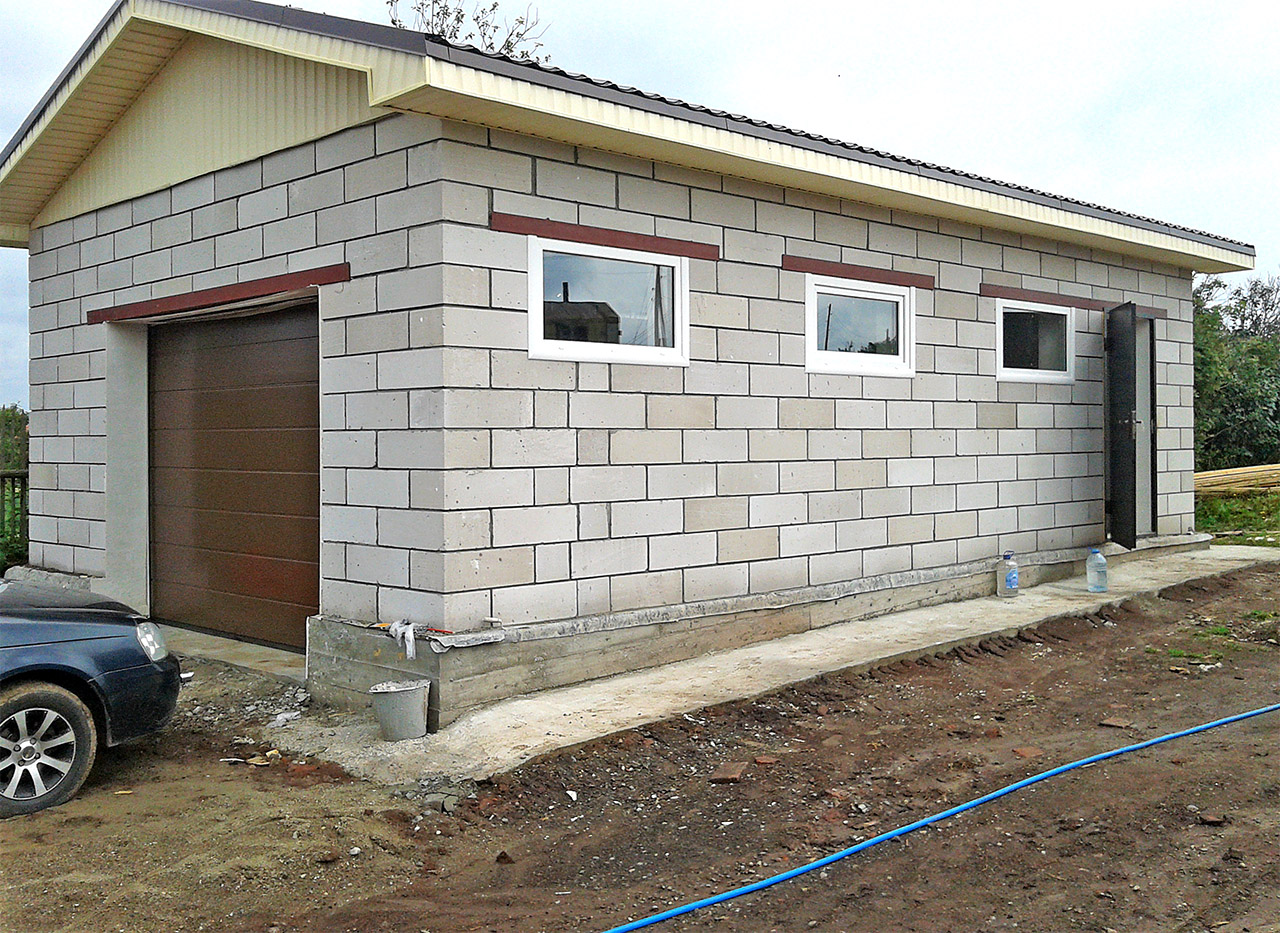
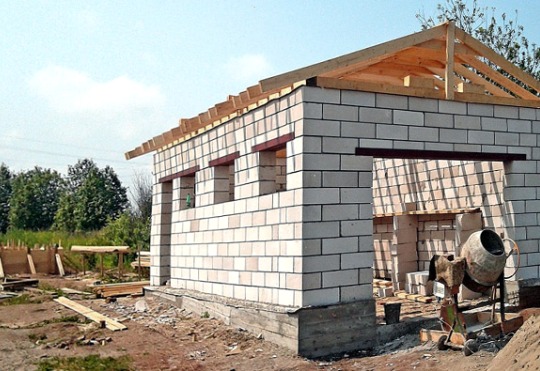
Everyone who has at least initial knowledge in the field of erection of buildings, is able to build a garage of foam blocks with their own hands. The foam blocks are an excellent option for solving this problem. With a minimum of material costs as a result, you will get a solid and reliable haven for your car.
In the garage of foam blocks it will be reliably protected from negative environmental influences, and you will be able to carry out technical inspection and repairs in comfortable conditions. In this article, we will consider the features of erecting a garage of foam blocks with our own hands.
One of the cheapest ways to build a garage is from the foam blocks with your own hands. The foam blocks are characterized by such properties as:
- Cost-effective. As we have already said, the cost of foam blocks is one of the lowest among materials suitable for building a garage;
- Ease. This material has a relatively small weight, which makes the construction of it simple, convenient and low-cost. For the construction of foam blocks does not require a strong foundation;
- High strength. Despite the low weight, the foam blocks have sufficient strength, so that the garage built of them, perfectly cope with its functions;
- Low thermal conductivity. The garage of foam blocks, built by own hands, will create good conditions for both the car and its owner. After all, it will keep the heat well. Often such buildings are not even further insulated;
- Easy installation. A light weight greatly facilitates the erection process. This does not require heavy equipment and many hands.
Excellent properties of foam blocks are due to the composition and technology of production of this material. Its structure is porous, but the air bubbles inside the material do not interact with each other. This provides a very low level of absorption, which does not have aerated concrete. Due to this, the insulation, frost resistance and sound insulation values for foam blocks are higher than for aerated concrete. Therefore, it can be applied even in places where the humidity level is high enough.
There is another advantage, because of which it is worthwhile to build a garage of foam blocks with our own hands: the foam blocks do not need exterior finish. Aerated concrete, on the other hand, can not be left open, as it is not resistant to moisture and as a result of its penetration may crack. Penoblokam does not face such a problem.
As you can see, foam blocks are an excellent choice for such a building as a garage.

For the erection of a garage, blocks with dimensions of 600x300x200 mm are usually used. This allows you to choose the desired wall thickness - 200 or 300 mm. If you are building an unheated garage, then 200 mm for walls is enough. If the building is heated, the thickness of the walls is determined by the climate.
- Determine the length of the perimeter: (5 + 6) * 2 = 22;
- Determine the number of blocks: 22 / 0,6 = 36,6;
- Calculate the required number of rows. Divide the height of the garage by the height of the block: 3 / 0,3 = 10 rows;
- Now you can easily calculate how many blocks you need for the entire garage: 37 * 10 = 370 pieces.
When calculating, do not forget to take into account the gate and the windows, if they are implied. If the thickness of the walls is 200 mm, then about 1 block of masonry leaves about 6 blocks. Based on the total area of the openings, you can calculate how many blocks will be superfluous. For standard gates and windows, you need to subtract 40-50 blocks. Total, a garage of this size will need about 300-320 blocks. This scheme allows you to easily calculate the necessary amount of material for a garage of any size.
Important! Take into account that the foam blocks are fragile, so when transporting and performing work, a fight is possible. Also it is worth taking into account the seams. Therefore, it is better to purchase the material with a margin of about 5%.
After you have decided what exactly garage of foam blocks you want to build with your own hands, you can proceed directly to the implementation of your idea. At the heart of any successful construction is a well-designed project.
Project
Future construction requires careful planning. The project is the basis for correct calculations and financial savings.
The garage project can be developed with the help of programs on the computer or by contacting professionals of design organizations. But this kind of work can be done independently. This will allow you to take into account all your wishes and implement the project exactly the way you want.
Before designing it is necessary to solve such important issues as:
- Do you need a lookout hole?
- Do I need a basement?
- Will the garage store equipment, equipment, etc.?
- Is there a working zone in the garage?
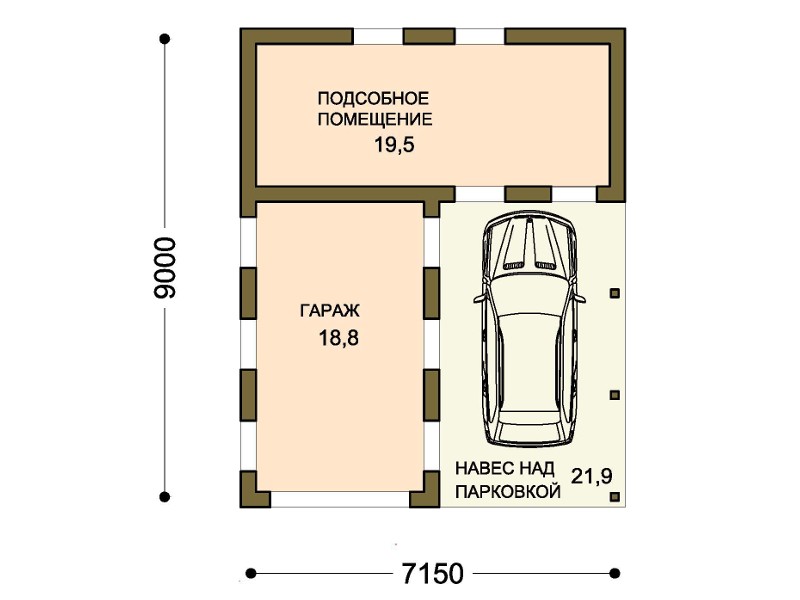
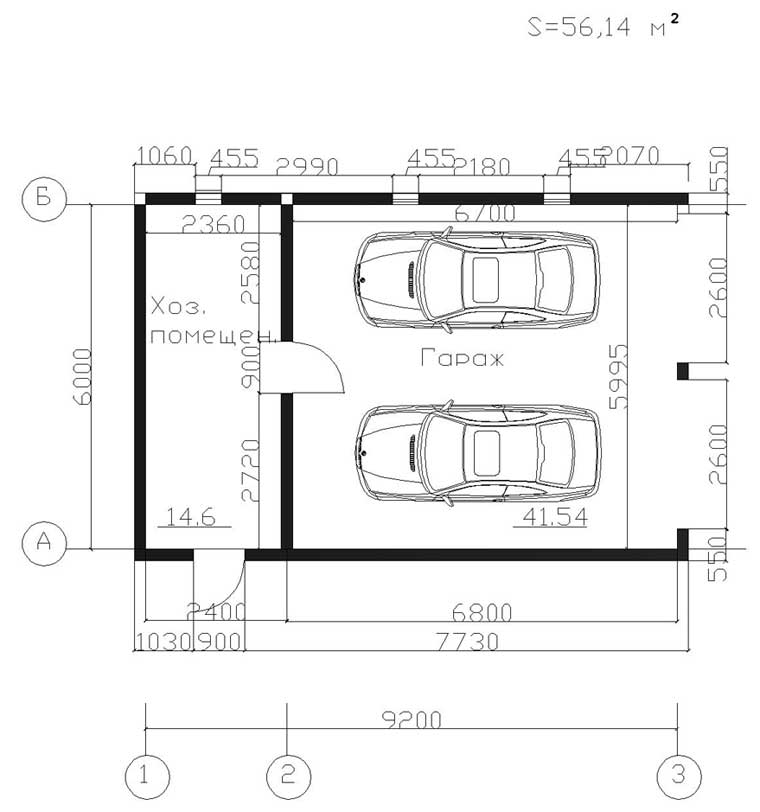
The answers to these questions will help you create a project that fully meets your needs. Also, based on the project, you will be able to select the optimal type of foundation, determine the necessary building parameters. Standard, the most demanded garage of foam blocks usually have dimensions of 3x3x6. Ready-made options standard projects you can always find on the Internet on specialized sites.
Foundation
An important element in the construction is the foundation for the garage of foam blocks with their own hands. Penoblocks, as already mentioned above, have a relatively small weight. Therefore, do not require a strong foundation. But its creation still needs to be given maximum attention, because its quality depends on the strength, reliability and durability of the future construction.
Work on the foundation begins with the markup. To perform it will require pegs, which need to drive into those places where the corners of the future garage from the foam blocks will be located. Then pegs must be connected with string. The angle between the ropes must be strictly 90º. And also marking should fully correspond to the dimensions defined by the project.
After you have marked the site, evaluate the possibility of opening the future gate. Where there will be a gate, there should be no obstacles.
If the markup is successful, you can go directly to the foundation device.
It is important to select the type of this element correctly. It is determined, in addition to the weight of materials, also the properties of the soil. If it is sufficiently dense, and the groundwater lie at a depth of more than 2 meters, it is enough to build a depth of 0.5 m. If the soil is puffy, then it is worth making monolithic foundation.
Important! If you plan to build a garage of foam blocks with your own hands with a viewing pit, then a monolithic foundation disappears. In this case, you need to do a deep ribbon or tape.
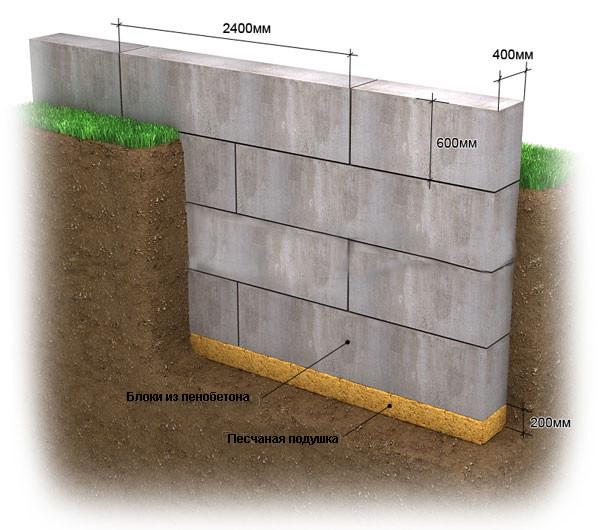
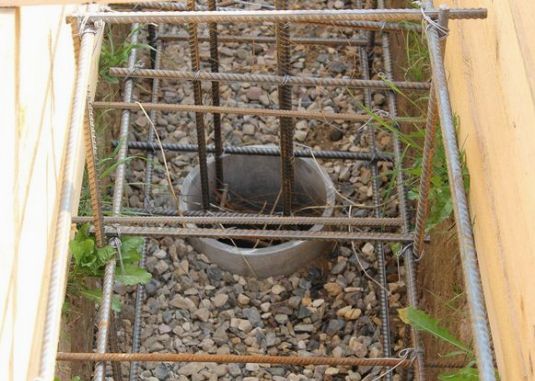
Consider the technology of creating a 0.8 m baseband:
- By marking it is necessary to excavate a trench, depth of 800 mm and width of 350 mm;
- The bottom is leveled and tamped;
- Build a pillow of gravel and sand. To torture;
- Install the formwork and frame from the armature;
- After that you can pour the solution.
The foundation must gain sufficient strength. Usually this takes about a month. If there is an observation pit in your future garage, then this time can be spent on creating it.

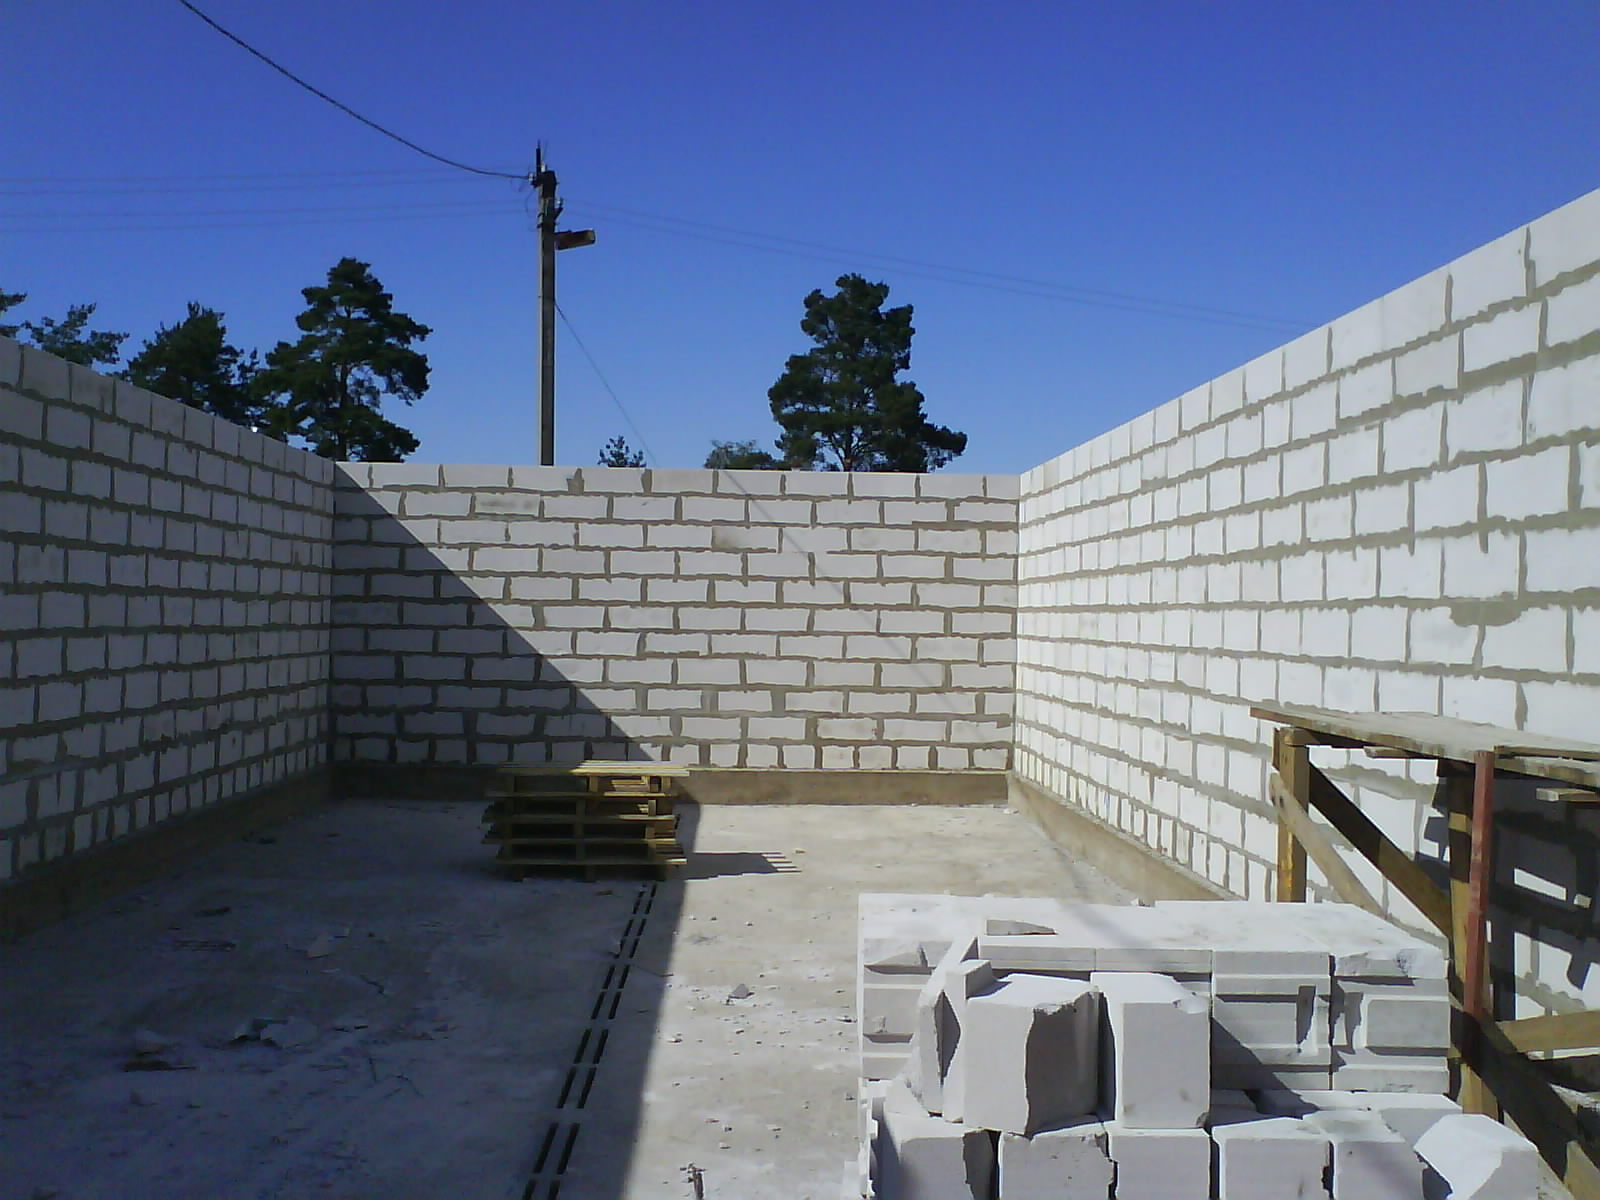
The next stage of construction is the walls. They need to be built only after the foundation is strong. The works are carried out in the following order:
- The first blocks are placed in the corners;
- Between them stretches the rope;
- Further laying is carried out by rope. The seams are laid with a special reinforcing mesh. Each next row is laid out so that the middle of the block falls on the seam between the two lower blocks. Blocks are installed long side along the wall;
- At the required height, the upper beam of the gate is embedded in the seams;
- At the level of the joist block, the masonry is carried out without block displacement.
Important! If the roof of your future garage of foam blocks is one-run, then when building walls, it is necessary to make a slope to the back wall with a calculation of 5 cm of slope per 1 running meter.
The slope is performed by trimming the foam blocks. If planned, then you need to think in advance how the gables will be closed. It can be a masonry made of foam blocks or a lining.
Most often a simple garage is covered with a concrete wall. But when we talk about the garage of foam blocks with our own hands, this option disappears, as the foam blocks can not withstand the severity of such a design. One-pitched roof is chosen more often when going to build a garage of foam blocks with their own hands. Projects from foam blocks can also be with a gable roof.
Consider the technology of erecting a saddle roof:
- The beams, exceeding the length of the wall by 200-250 mm, are installed across the roof every 800 mm and embedded in the walls;
- From the bottom are densely laid out boards on 40 mm;
- A black ruber is laid on the boards with a hem at the edge of 10 cm;
- Thermal insulation is laid on the roofing material. It can be slag or expanded clay;
- The heater is stolen cement-sand screed thin layer up to 3 mi;
- After the screed has dried, it must be treated with liquid bituminous mastic;
- Then across the building by fusing it is necessary to spread the roofing material from the bottom point upwards. Cloths are overlapped.
This way you will get a reliable and strong roof. It only remains to make a visor. Independently it can be made from a corner or buy already ready.
Goal
On the device of the gate you need to think before building the walls. Secure gates must be embedded in the masonry. You can use different gate designs when we build a garage of foam blocks with our own hands. Video about foam blocks usually offers the option of installing conventional swing gates. This option is optimal if you want to build an inexpensive and reliable garage. We offer you the instruction on installation of such gates:
- Lay a layer of waterproofing on the foundation before installing the gate. For this purpose, a roofing felt is good;
- Make a frame of the gate and weld to it on each side for 4 pieces of reinforcement diameter of 12 mm and a length of 40 cm. The pieces of reinforcement are placed on the frame so that they coincide with the seams of the foam blocks;
- Before installing the door frame, paint and prime it;
- Install the gate by checking the level and plumb line. During the installation, you can lock the gate with wooden bars.
A reliable foundation needs a solid foundation. Therefore, above the gate you need to make a beam. It should be 200 mm on each side longer than the gate.
Important! If your project assumes the second floor, then along the entire perimeter of the construction it is necessary to erect an armopause to hold the slabs.
Warming
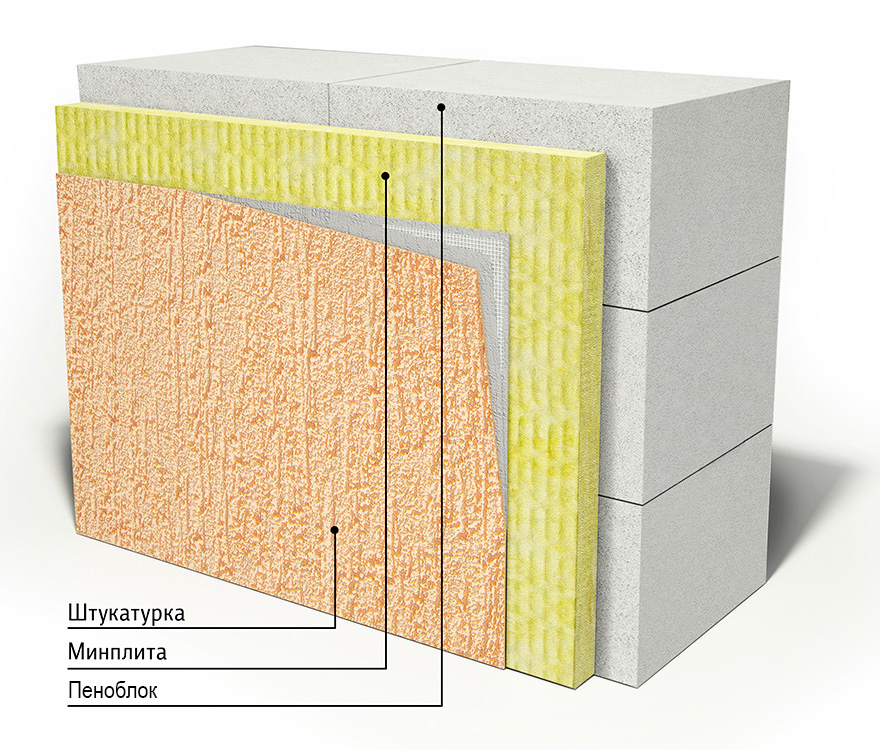
Warming of the garage must be done wisely. The difference in temperature inside and outside should not ideally exceed 5 ° C, so that the car is not covered with condensate. Therefore, it is very important to think about ventilation, and to make insulation from the outside. The most popular materials for garage insulation are:
- Styrofoam;
- Mineral wool;
- Glass wool.
They are light, cheap, easy to use. The best option is basalt mineral wool, which provides excellent sound and heat insulation characteristics of the building. But the most simple and affordable option for insulation is the insulation with foam plastic. It is executed as follows:
- From the bottom of the dowel is attached a wooden bar, on which the first row of plates is laid;
- The glue is applied around the perimeter of the plate with a notched trowel. Placement is performed in staggered order;
- The plates must be pressed tightly. After the glue dries, the insulation is additionally fastened with dowels made of plastic.
- Polyfoam must be protected from water. Therefore, it is covered with a layer of plaster with a reinforced layer. For this purpose, the slabs are covered with a thick layer of glue, into which the reinforced mesh is lapped with stripes;
- After the glue dries, plaster and facade paint are applied to the surface.
Now you know how to build a garage of foam blocks with your own hands. Penoblocks can be purchased at a low price, but their cost will be about 30% of the cost of all construction. About what price the independent construction of a garage from foam blocks will cost, we will tell further.
If you want to save, then you should build a garage of foam blocks with your own hands. The price of foam blocks is one of the most accessible among materials suitable for such a task. In addition, due to the small weight of foam blocks, significant savings on the foundation are formed. And its cost is usually a third of all construction costs. Also, you do not have to hire specialists and heavy equipment. In order to answer the question "How much does it cost to build a garage from foam blocks with your own hands?" It is necessary to know all the conditions of construction, namely:
- The area of construction, which determines the type of foundation required;
- Features of the project;
- Presence of observation pit;
- Necessity of warming, etc.
Such nuances for each project can be very much, and they all directly affect the prices for the construction of a garage of foam blocks with their own hands. Video and instructions will not give you an accurate answer to the question of the cost of such construction. But the approximate guidelines can still be called.
So, you will need:
- The foam blocks. The price of wall foam blocks is approximately 2400-2900 rubles per m³. If you plan partitions and compartments inside the garage, you will also need partition walls, the price of which is 2750-2850 per m³. Also it is necessary to take into account the cost of delivery if necessary, as well as the material battles during transportation and performance of works.
- Other materials: cement - about 200 rubles per 50 kg, sand - about 180 rubles per m³, gravel, crushed stone - about 1150, 1190 rubles per m³, timber - from 14 rubles per running meter.
"The garage of foam blocks with their own hands" - videos of this nature are often watched by those who want to save, we offer you a few points that will help solve this problem:
- Buy materials during the season of reduced prices. The majority building materials In winter they make solid discounts;
- Give up the concrete floor. In the garage, you can do without a concrete foundation. The rammed soil, covered with expanded clay, is enough for such a construction;
- Make an economical lining. The garage of foam blocks is quite simply plastered to provide protection from moisture;
- Refuse the inspection pit. In modern conditions, it is needed by the units of car owners who are really professionally engaged in the repair of cars.
- Save on the foundation as much as the soil allows. If possible, choose a foundation on piles or poles.
We hope that the above tips on erecting a garage of foam blocks with your own hands will help you build a high-quality, reliable and convenient for you personally garage with minimal costs!
It so happened that the garage is often used not only as a shelter for a car, but also becomes a kind of "men's club".
Here you can put your favorite car in order, discuss your problems with friends, and if necessary, spend the night.
We are no longer talking about such an important function of this structure, as the storage of household things and conservation.
To erection of the garage it is impossible to approach on a residual principle: "has blinded from that was". Only a competent project and the correct use of materials will make it a universal and durable construction.
In recent years, the construction of a garage of foam blocks has become extremely popular among car owners. We will consider just this constructive variant, starting from the foundation to the roof.
Why foam blocks?
The answer is simple - it's a warm, inexpensive and easy-to-lay material. The cost of blocks from foam concrete is on the average 35-40% lower than the price of red brick, and the speed of their laying is 3-4 times higher. The low weight of the material provides tangible savings when laying the foundation. Low thermal conductivity allows us to build warm room, in which it will not be cold even with minimal heating.
Good vapor permeability does not allow wet air to stagnate in the garage, relieving the body of the car from the main enemy - corrosion. The sufficiently high strength (35-50 kg / cm2) provides the walls with reliability not only in a single-storey, but also in a two-storey building with an attic space.
Foundation
The construction of the garage from the foam block by one's own hands begins with the laying of the foundation.
Here are two economical options:
- Shallow foundation on a sand cushion;
- Easy pile- band foundation.
If your garage does not stand on the problem (swampy and heaving ground), then it makes no sense to spend money on the foundation of a deep foundation. 50-60 cm penetration into the ground, dumping a 20-centimeter sand cushion (with layer-by-layer compaction) along the bottom of the trench and installing the reinforcing cage. That's all you need to do before laying concrete.
If the soil is sufficiently dense and the walls of the trench do not crumble, the concrete can be poured "vorospore" without formwork. It will be required only above the "zero" for filling a low grillage (20-30 cm).
A trench for a shallow deepened foundation foundation (option with installation of formwork in the ground) should be excavated at 20-30 cm wider than the thickness of the wall of foam blocks. This will create an additional "buffer zone" on the sides of the grillage, which will compensate for the pressure of the frozen ground.
Fill the concrete in the formwork, give it time to gain strength (1-2 weeks) after which we make waterproofing. For this, it is easiest to buy a bucket of cold bituminous mastic and cover the grillage from three sides (on the sides and on top). A simplified version is the laying on top 1-2 layers of roofing material. Penoblok not very actively absorbs water (closed structure of cells). Nevertheless, waterproofing grillage and concrete floor in the garage is absolutely necessary.
The second version of the basement (pile-tape) is a bit more complicated than the first one, but it is suitable for construction on abrasive soils. Digging a trench under a shallow foundation, in it perimeter bore holes of depth exceeding the mark of seasonal freezing of the ground. For such works, a manual or motobur fits. The diameter of the wells is not less than 1/3 of the width of the grillage.
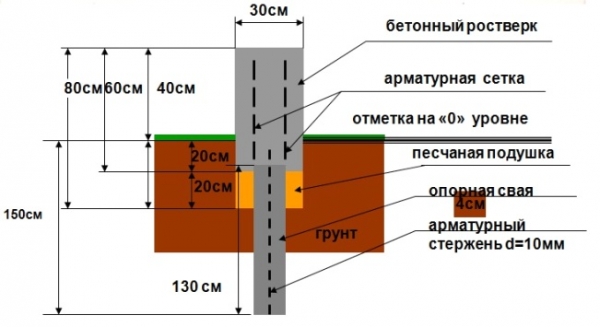
In each well (they are made in all corners, and under the walls are drilled in steps of 1-1.2 meters), put a roofing material, rolled into a pipe or trimmed asbestos cement pipes. Then, 2-3 holes of reinforcing bars are lowered into the holes so that their ends come out into the future concrete grillage.
After this work is carried out by analogy with the first option. A layer of sand is poured over the sand cushion, the formwork is put, the reinforcement and poured with concrete.
Wall masonry
The foam blocks for the garage should be chosen with a density of 600-800 kg / m3 (structural and thermal insulation). They are quite warm and durable. We do not need a smaller density, because such material is too fragile.
For masonry, you can buy a foam block (20x30x60 cm). If you want to make the walls warmer, then get a material of 30x40x60 cm. The thickness of the walls can be increased by laying blocks with a wide side down (thickness 30-40 cm).
Beginners often apply for laying a conventional cement-sand mortar. More experienced builders prefer perlite - the optimal material for obtaining a "warm seam".
It is not too expensive and makes an array of masonry equally warm, without bridges of cold through the seams. A mortar with pearlite insulation is prepared in such a proportion:
- 1 part perlite;
- 1 part of cement;
- 2 parts of sand.
Water is added in small portions as it is kneaded until a masonry consistency is reached (thick sour cream). If you have not found a clean perlite, then buy a dry mortar mix "thermoshow".
Even if you made the surface of the foundation fairly flat, still the first row of foam blocks should be laid on a 2-3 cm layer of mortar. It will allow the block to "find" its place and eliminate the risk of cracking from point loads.
Working with foam concrete, do not forget about its fragility, so 2-3 rows should be laid reinforcing mesh of galvanized steel or plastic.
Having planned a place for the gate, you need to install them on the foundation, check the horizontality, verticality and fix them with temporary struts.
Seaming is an indispensable element of technology. Especially it is important for foam blocks. Their dimensions are much larger than the standard brick, so without overlapping joints in adjacent rows and at the corners of the masonry, the wall array will not be solid and solid.

After driving the walls under the ceiling, take a break for a couple of days, so that the solution gets strength. After this work is carried out depending on what the garage will overlap.
If you are building a two-story garage or have decided to block one-story reinforced concrete panels, then on the upper row of masonry it is necessary to make a reinforced belt of reinforced concrete with a height of 15-20 cm. It will protect fragile foam blocks from crushing heavy panels and give the structure spatial rigidity.
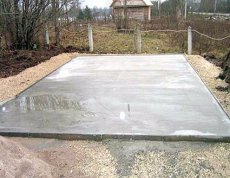
Here everything is relatively simple. After removing 15-20 cm of natural soil and leveling the base, it is poured with sand and compacted with a rammer. After that, lay a thick polyethylene film, setting its edges 15-20 cm on the foundation to cut off the ground moisture.
For reinforcement use a conventional masonry mesh (cell 10x10 cm). To create a protective layer of concrete under it, add crushed rock. Gulf the first "roughing" layer (5-10 cm) and leveling it, the screed is given a few days to set strength. After that, put wooden beacons on the concrete with a step equal to the width of the "trowel", pour in and carefully level the final screed.
There are three possible designs:
- Shedding roof on wooden beams;
- Gable roof hood;
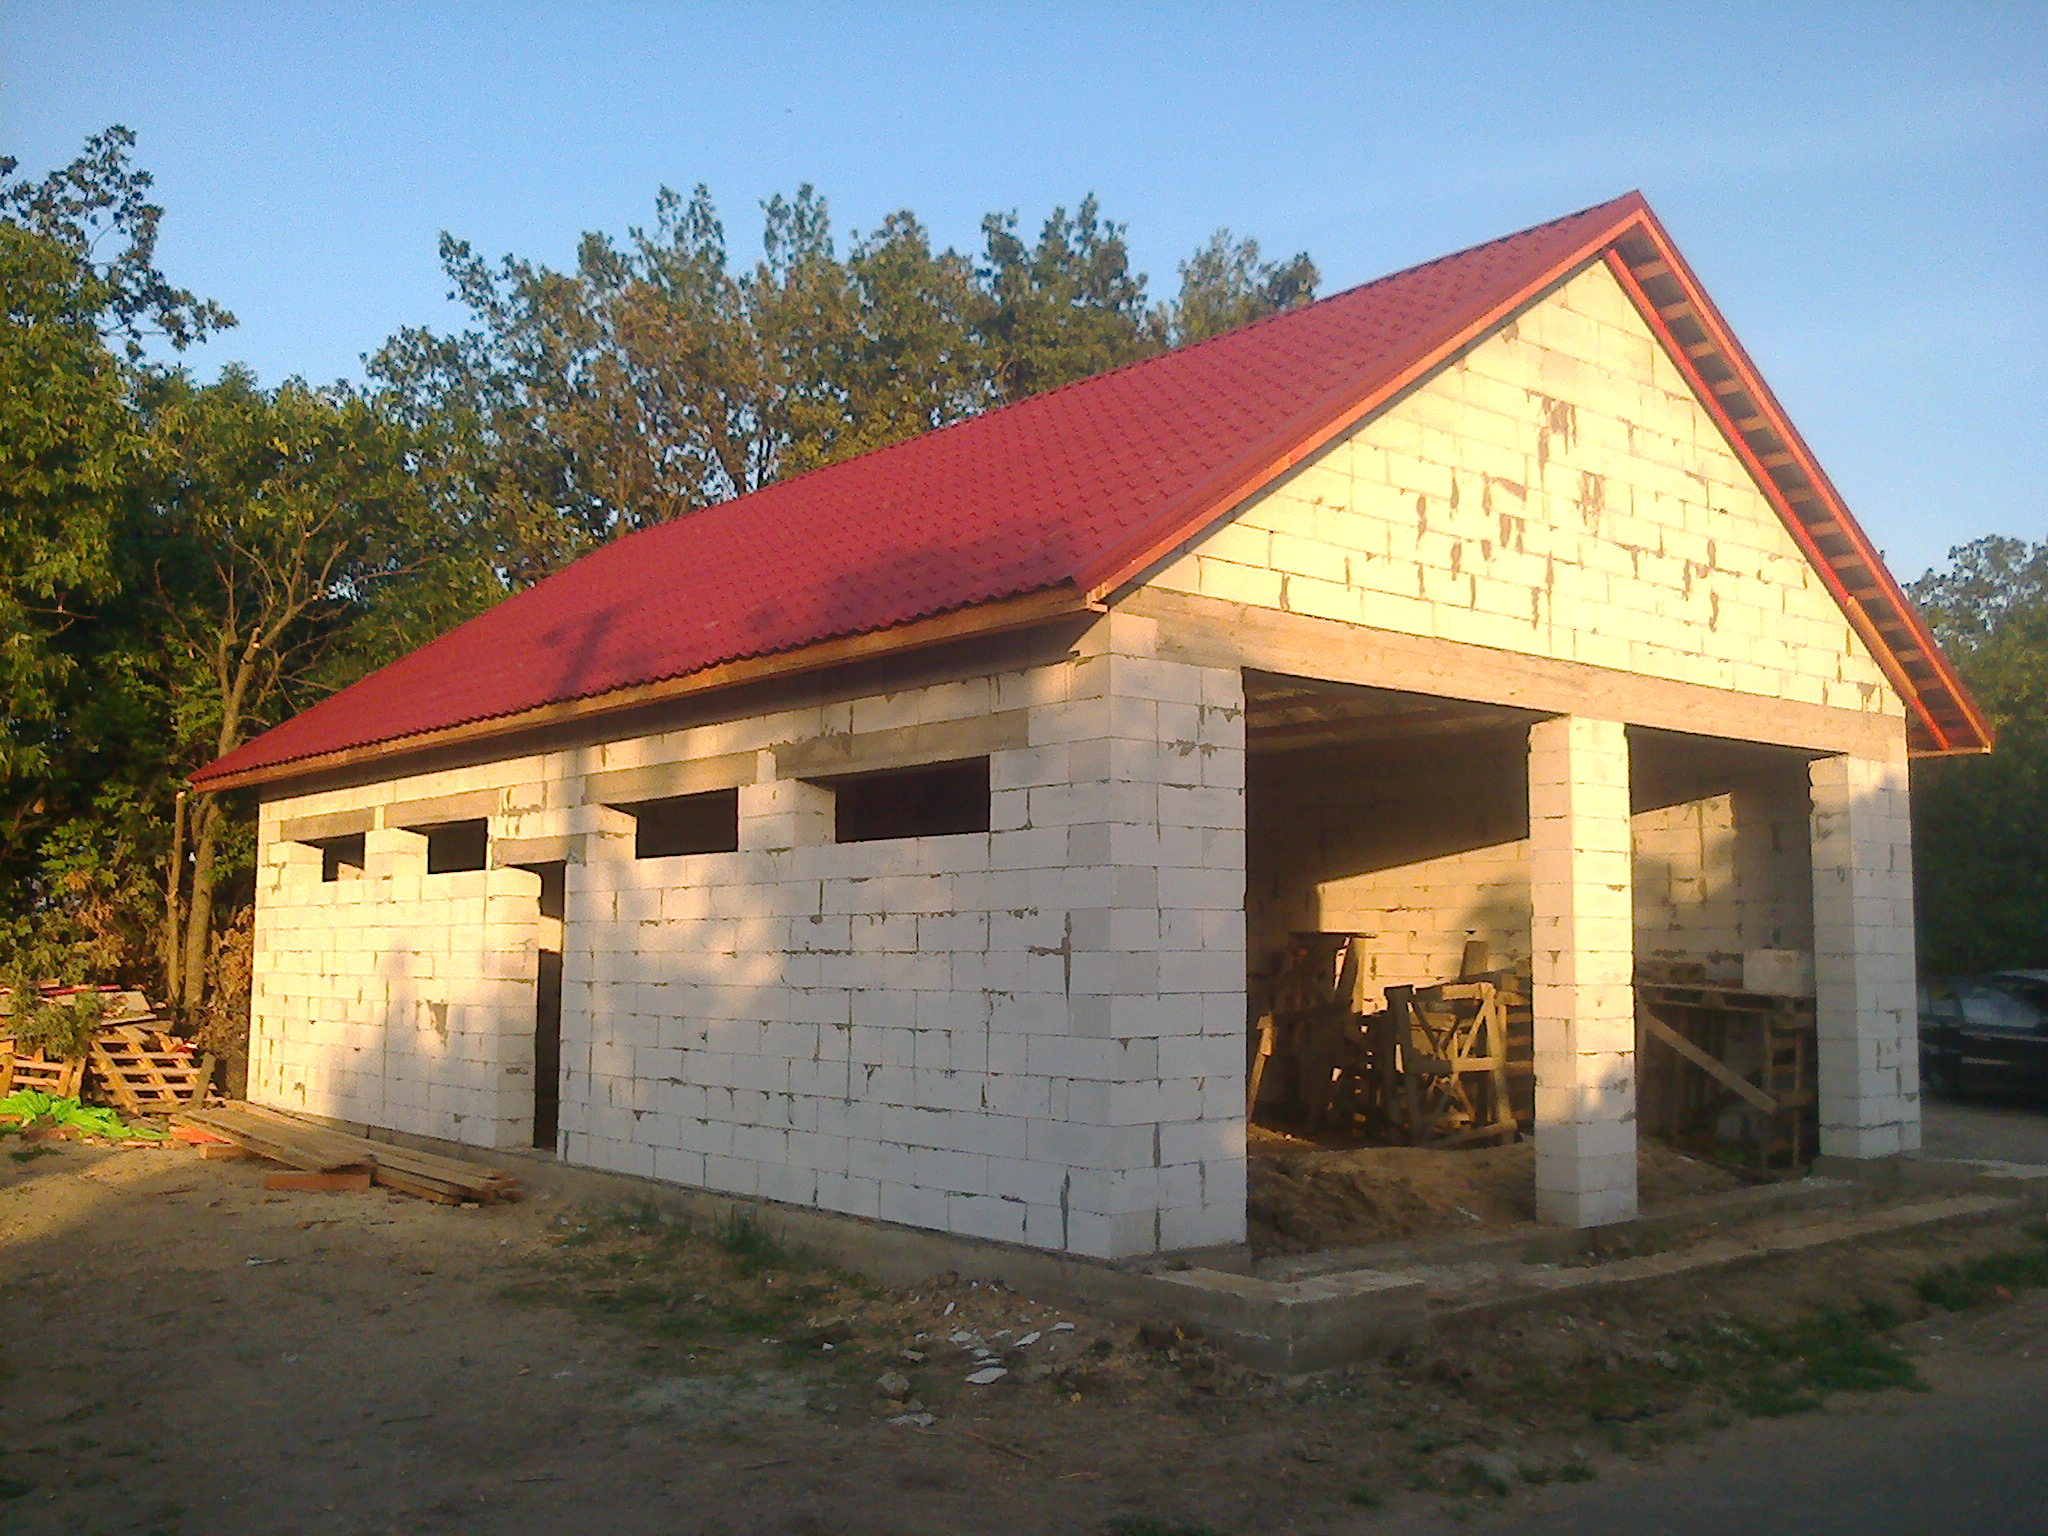
- Roof of mansard type.
If the garage will be used not only to store the car, but also as a workshop, it is better to stay on the third option. The attic structure is not much more expensive than the low pitched roof, but it is more advantageous from the point of view of ease of operation. This is especially true for cooperative garages, where the standard size of 3.5 x 6 meters is clearly not enough to equip the workshop. In addition, a warm garage with a penthouse can be used all year round.
Laying on the walls of wooden beams overlapping, they are fastened to the rafter's feet mansard structure. Begin the installation from the end walls (rear and front). Collecting the two extreme farms, between them pull the lighthouse cord and install the remaining structures. After that, fill the crate and spread the slate or metal.

If you are satisfied with a cold garage, then the construction can be completed by filing the ceiling with plywood, edging or sheet piling. If it is a warm room, then the roof will have to pay more attention. In the overlap on the layer of vapor barrier it is necessary to lay an eco-wool or roll mineral wool (a layer not less than 10 cm). The walls of the attic will also have to be insulated with one of these materials, laying it in the space between the rafter's feet and covering the inside with a vapor barrier film.
Calculation of the number of materials per garage of blocks
A set of materials for a garage with a height of 2.5 and a plan size of 6x3.5 meters includes:
- Sand (for padding the foundation cushion and the floor);
- Concrete for foundation, monolithic belt and floor;
- Ruberoid or cold bituminous mastic for waterproofing;
- Mortar solution;
- Armature;
- Foamblocks;
- Masonry grid;
- Edged board (hem of the ceiling, floor and roof lathing);
- Beams for ceiling and rafters;
- Insulation;
- Metal tile;
- Steam insulation;
- Fasteners;
- Goal.
Make a calculation of the number of foam blocks on the garage can be, by determining the perimeter of the basement and multiplying it by the thickness and height of the wall. From the obtained value we take the area of the gate multiplied by the wall thickness.
In our case, the calculations will look like this:
The perimeter of the garage is 6x2 + 3.5x2 = 19 meters x 2.5 meters (wall height) x 0.3 (wall thickness) = 14.25 m3 of foam blocks. From the received volume it is necessary to subtract the volume of the gate 2,5х2,0 meters x 0,3 m = 1,5 m3. We get 14.25-1.5 = 12.75 m3.
Now we divide this volume by the volume of one block - 0.036 m3 and get 354 pieces. We give a 15% margin for waste when cutting and transporting 354x1.15 = 407 pieces. Now it remains for us to determine how much it costs to build a garage of foam blocks, given the current prices of materials (with delivery to the facility).
- We will need 3.8 m3 of sand (padding the basement cushion) + laying the floor 2.4 m3 = 6.2 m3х800 rubles / m3 = 4960 rub.
- Concrete M 200 (5.5 m3 at 3500 rubles / m3) = 19,250 rubles.)
- Bituminous mastic cold (2 buckets of 18 kg) - 740 rubles.
- Mortar M100 (consumption = 0.23 m3 per 1 cubic meter of masonry) x 12.75 m3x 2,400 rubles / m3 = 7038 rubles.
- Armature 14 mm - 4 100 rub.
- Masonry grid 100h100h3mm (2 rolls of 15 m2) = 6 800 rubles.
- Penobloki 20x30x60 cm (407 pieces at the price of 150 rubles. / Piece) = 61 050 rub.
- Edged board 2,1 m3 х 5000 rub./m3 = 10 500 rub.
- Beams for ceiling and rafters 1,26 m3 x 5000 rub./m3 = 6 000 rub.
- Heat insulation roller for overlapping (min. 10 cm) 1,62 m3х4300 rub./m3 = 6 966 rub.
- Steam insulation 1 roll = 1 350 rub.
- Metal tile 54 m2 x 290 rub./m2 = 15,660 rubles.
- Fasteners 4 kg х 125 rub./kg = 500 rub.
- Gates (insulated with wicket) - 34 000 rub.
Total, the estimated cost of construction we have obtained equal to 178,914 rubles.
With the help of inexpensive and lightweight foam blocks, you can quickly build any structure, including a garage. This material is light enough, so it can be laid by hand, without the invitation of specialists.
Choosing a foundation for the garage
The most the best option for a garage of foam blocks is shallow ribbon foundation. If groundwater are too close to the surface, you can use pile or base plate. However, in this case it will be necessary to abandon the construction of a pit or a cellar.
Belt shallow, pile and plate foundation for the garage
Calculation of the number of foam blocks
For the erection of load-bearing walls, it is recommended to select foam blocks thickness 200 mm and density of D600. Blocks with fastening spike groove are slightly more expensive, but the masonry with such a connection is more reliable.We calculate the number of blocks required for the construction of the building 4 × 6 × 3 m. The standard size of the foam blocks is shown in the photo.
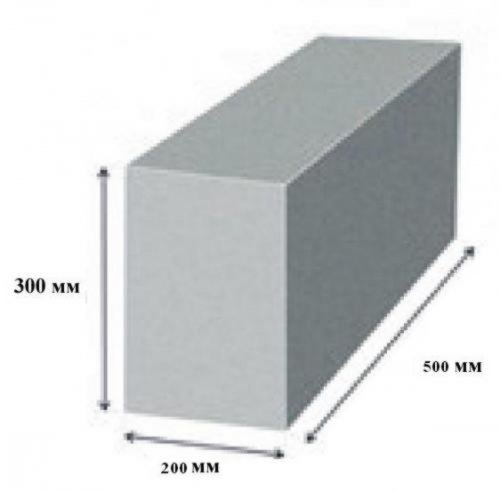
Height, width and length of the foam block
![]()
Dimensions of the garage
1. Determine how many foam blocks will fit in one row along the perimeter of the building. To do this, let's add the width (4 m) and the length of the garage (6 m), multiply this figure by 2 (after all, walls then two) and divide this figure by the standard length of the foam block 500 mm (0.5 m):
(4 + 6) × 2 / 0.5 = 40 pcs.
2. Let's calculate how many foam blocks are needed for erecting a wall with a height of 3.0 m. For this, the height of the structure is divided into a block height of 300 mm (0.3 m):
3: 0.3 = 10 pcs.
3. Now we determine the amount of material that will be needed for the erection total building. We multiply the number of foam blocks required for their laying along the perimeter of the building, on the blocks required to build the height:
40 × 10 = 400 pcs.
4. In locations gates and separate input doors (if they are envisaged in the project) there will not be any foam blocks, and this quantity must be subtracted from the result obtained.
5. The material should be purchased with a small margin of 5% for the removal and cutting of material.
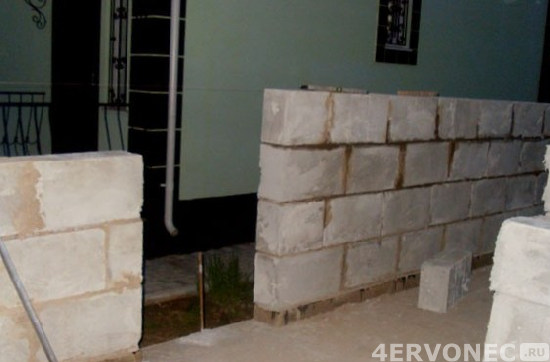
Wall masonry
The laying of walls from foam blocks can be made:through sand-cement mortar (1 part of high-quality cement and 4 parts of sand); to increase the strength of masonry, it is desirable to add a plasticizer;
To prevent the formation of cold bridges, you can use cement-pearlite mortar with 1 part of sand, 1 part of cement and 1 part of perlite;
special adhesive for foam blocks.


Plastificator for cement mortars and adhesive for foam blocks
Tip. To strengthen the walls of foam blocks of their reinforce using a mesh, which is first laid in the seams of the first, and then the reinforcement is laid every 3-4 rows. When using metal bars they are put into grooves, cut in blocks with the help of a grinder.
Types of reinforcement
The main stages of laying walls from foam blocks:
1. It is desirable to install garage doors already before laying, fixing them with temporary struts.
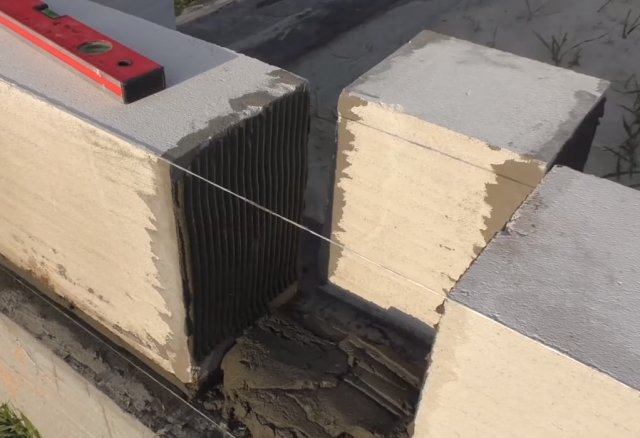
2. To control the smoothness of the installation at the corners of the building, guides (metal corners) are fixed, to which is attached pier: wire or strong cord. After each row, it is moved higher.
Cord-pier
3. In order to ensure that the material is reliably protected from moisture, the first row of foam blocks is laid on the layer waterproofing (roofing material, waterproofing, etc.) and bitumen mastic.
Tip. To strengthen the structure, you can pour a metal box into the foundation, into which foam blocks will be inserted.
4. The most difficult is the beginning of the masonry. At first the blocks are decomposed at the corners building. If the foundation is uneven, the first block should be installed in the highest corner of the building (below it there will be less solution). For joining in the middle of the row, edging (additional) foam blocks.
Docking in the center of the wall with additional trim blocks
 5. The Bulgarian will not get a smooth cut, so cutting the material is better done using special hacksaw, designed to work with foam blocks (ordinary hacksaw very quickly blunted).
6. After laying a number of surfaces carefully grinded grater or a plane on plasterboard. Remove before laying, and all irregularities on the sides and bottoms of the blocks.
Important! In order to obtain a level surface, the first row should be laid only on a sufficiently large layer (up to 2 cm) of sand-cement mortar.
 8. Adhesive mixture is applied by means of a special trowels with teeth for leveling the solution. In this case, it is necessary to lubricate the solution with not only the horizontal surface, but also the side of the neighboring block. At the chosen location, foam concrete brick should be slightly moved, and then, tapping with a rubber mallet, tightly press.

Greasing the solution
9. The second row also fits from the corners after setting the solution (after about 2 hours). Its installation is made offset block-brick by 30-50% so that the junction of the previous row was blocked.
10. Checking the stacking of each row horizontally and vertically is performed using the.

Stacking with offset and alignment of the block using a level
11. The corners of the building must be made by dressing sutures.

Dressing the corners of the building
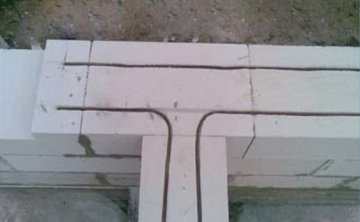
12. Above the opening for the garage door is mounted a metal beam.

Assembly of the girder beam
13. When using metal roof girders, the monolithic reinforced concrete belt should be provided in the upper row of the masonry: it is laid out of hollow reinforced blocks with the following pouring concrete. The reinforced belt can be made entirely of concrete. For this purpose, brick formwork, in which the reinforcement is laid and poured with concrete. When using wooden beams, the use of a large number of metal rods is not necessary: several rods are sufficient.
Brick formwork for pouring concrete top row
The dream of the vast majority of car owners is a spacious and cozy garage for your own car. For motorists in large cities, alas, this dream is very difficult, and often - and simply impossible to translate into real fulfillment. But the owners of suburban housing do not have a garage on their territory - just "indecent", and its construction is necessarily thought through with the overall design of the future development.
But from what to build it? It's not serious to put a metal team, you can not create good conditions for a car in it. Collect - a good option, but not everyone is available due to various circumstances. Wood - increased flammability, brick - too time-consuming. And why not stop on such an option as the construction of a garage of foam blocks? And the building turns out to be capital, and the problem of warming is half solved, and the erection itself will not take too much time.
First of all, what are foam blocks. This is one of the varieties of building materials made of porous (porous) concrete. At the stage of manufacturing the solution mass, in addition to the usual components - cement, sand water and plasticizers, special additives are added-foaming agents. Depending on the type of these additives and the mechanism for obtaining the foaming effect, either aerated concrete or foam concrete is obtained.
- So, if chemical components are introduced that cause a violent reaction with cement components with active release of gas (oxygen, hydrogen, acetylene), then aerated concrete is obtained. When leaving the still uncleaned material, gases leave a lot of open pores of sufficiently large size, which predetermines the physical characteristics of the resulting blocks - they are distinguished by high steam- and water permeability, which is not always good for the construction of outdoor facilities.
- In the production of foam concrete, chemically neutral substances are introduced, and the foaming process is caused by active mixing of the mixture with its simultaneous aeration - saturation with air (something similar happens when foaming detergents). As a result, the pores are closed (the gas is not under excessive pressure and does not tend to go outside). These blocks are denser, stronger, have much less hygroscopicity, and can be used for the construction of residential and subsidiary buildings, including garages.
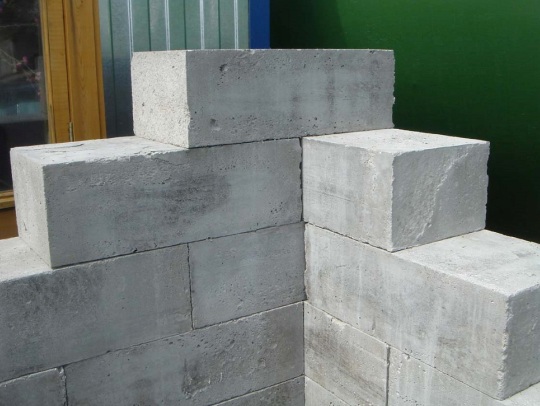
The resulting foam concrete is cut into building elements of various sizes. For the construction of walls, blocks with parallelepipeds with sides 600 × 300 × 200 mm are most often used. For so-called half-blocks, 600 × 300 × 100 mm can be used for internal partitions.
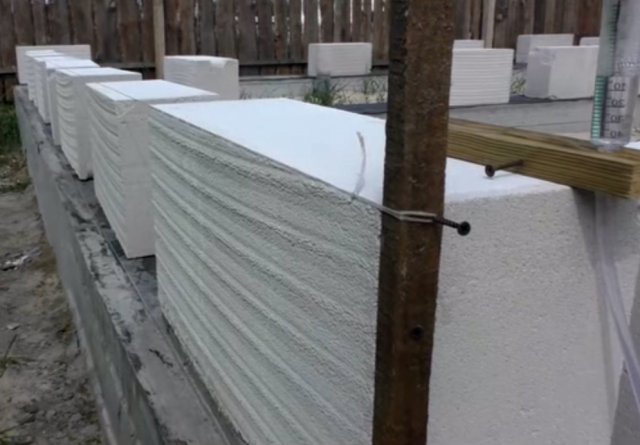
Standard packing of foam blocks - 30 or 40 pieces per pallet
Modern technological lines allow producing blocks with high geometric accuracy - the error in the sizes of quality products should not exceed 1 - 2 mm.
Some varieties of foam blocks are provided at the ends with a lock groove-crest part. Such material is certainly more expensive, but the process of the adhesive is much simpler.
For technological purposes, foam blocks are divided into three categories:
- Thermal insulating, brand D400 - D500 (the number after the letter D denotes the density of the material - kg / m³). The class of compressive strength is low, and frost resistance is not standardized at all, since such material is not used for open works, and it will not fit for the construction of a garage.
- The structural-thermal insulation foam has a much greater versatility. Its grade is from D600 to D1000, strength - from M25 to M100 (number - ability to withstand mechanical load in kg / cm²), and frost resistance class 0 from F15 to F75 (number of guaranteed cycles of deep freezing and thawing without any loss of strength qualities). At the same time, the level of its thermal conductivity is low. So, one of the most widely used in private construction foam D800 has a thermal conductivity of only 0.18 Kcal / m³ × ºC.
- The structural foam concrete is used exclusively for the erection of structural elements, since the thermal insulation qualities of it are no longer so good. Nevertheless, they exceed, for example, the usual brick almost twice. The density of structural units is 1100 - 1200 kg / m3, the strength grade reaches M150 ÷ M170. If the thermal insulation of the walls is not a determining factor, then this kind of blocks is perfect for erecting a garage.
The main advantages of building a garage from foam blocks:
- The low density of the material greatly facilitates the very construction of the garage. You can do without a shallow ribbon foundation.
- Blocks are easy to use because of their small weight - no lifting equipment or excessive physical effort is required. At the same time, their large dimensions accelerate the process of erecting walls.
- Foam concrete is easily processed - drilled, cut, milled, without the use of any special equipment.
- The material is clean in terms of ecology, does not pollute the environment and does not notset of danger to living organisms.
- Closed pores of foam concrete allow you to spread walls almost from the ground, without a high cap.
- At foam concrete - excellent noise absorbing properties, which is especially important for such technical buildings as garages.
- Blocks of foam concrete do not give much shrinkage after construction - after 3 ÷ 4 weeks you can carry out external finishing, without fear for its integrity.
There are some drawbacks to this material, which must be taken into account:
- High enough moisture absorption makes external walling mandatory with the creation of protection against atmospheric precipitation.
- There are certain difficulties with the use of fasteners - not all dowels are well kept in the foam concrete wall. However, it is not difficult to find the necessary ones.
Nails or ordinary dowels do not stick well in the foam concrete wall - you will need special fasteners
- Foam concrete blocks do not have good vapor permeability, so the problem of careful ventilation of the room is necessarily thought out, so that a damp atmosphere is not created in it.
Video: what you need to know about foam blocks
Construction of a garage of foam blocks - stages of work
The whole process of building a garage is divided into several stages:
- Drawing up a project, carrying out calculations of the required amount of building materials.
- Foundation of the foundation. At the same stage, the question of the garage floor covering and the equipment of the inspection pit is often solved immediately.
- Construction of garage walls, installation of gates.
- Roof construction.
- External and interior finish walls, arrangement of ventilation.
Drawing up a garage project, preparation of materials
Without a thoughtful project, it is impossible to begin the construction of even such a simple building as a garage. You can receive this document in several ways:
- A lot of standard projects are placed in the internet. The difficulty, however, is that they were once designed to meet specific criteria of the terrain and the needs of customers, and may not fully meet the actual conditions that exist.
- The most correct way is to contact a specialized project organization, whose employees will conduct all necessary geodetic and architectural calculations. The main disadvantage of this approach is that such services cost a lot of money.
- Optimal is the decision to take one of the ready-made developments that best suits the existing conditions, take into account your preferences and wishes and try to execute the final project yourself. Here drawings are not obligatory, they are executed with observance of all graphic rules. It is important to have a clear understanding of the volumes and sequence of all the forthcoming works.
The project should have an accurate link to the site allocated for the garage, taking into account the planned dimensions of the structure, its internal structure. Immediately, the functionality of the room is thought out - whether it is just a box for the placement of a car, or it is possible to arrange a small workshop with tool shelves, a workbench, and other equipment.
- Immediately planned construction of the roof. If it is a single-pitch, then to provide a slope it is necessary to provide a difference in the height of the walls.
- The thickness of the walls during the construction of foam blocks can also be different. For central or southern regions, a thickness of 200 mm is often sufficient (without regard to exterior finish). Thus, each block will cover an area of 600 × 300 mm = 0.18 m². If the garage is erected in a climatic belt with severe winters, then it is better to make the wall thicker - 300 mm, and accordingly the block placed in this way will already amount to only 600 × 200 mm = 0.12 m².
Proceeding from this, it is easy to calculate the required number of blocks. The total area of the walls is calculated with the deduction of the door opening and windows (if they are planned). Then the resulting value will remain divided by the area of one block in the selected position to determine the desired amount. Usually 10% of the reserve is added to the result.
Standard factory packing of foam concrete blocks - 40 pieces on a pallet. A simple calculation shows that this is 1.44 m³ by volume, 7.2 m ² with a wall thickness of 200 mm or 4.8 m ² with a wall of 300 mm. The net weight of the package can be easily determined by multiplying 1.44 by the density mark of the selected material - this may be necessary when planning the transport delivery of foam concrete blocks.
- To fill the foundation and install a garage floor, you will need the usual ingredients of the concrete solution - cement (at least M400), sand, gravel. Reinforcement of these structures implies the use of reinforcement cross-section 10 - 12 mm. In addition, reinforcement is also required to strengthen the wall masonry - there is enough diameter of 8 mm.
- To create a waterproofing between the foundation and the walls, a roll material. Usually use a quality felt, but it will be even better to apply hydroglass, which is laid on the layer of bituminous mastic.
- A separate conversation about the masonry mortar. You can, of course, use the usual, cement-sandy, but this will require thick enough joints between the blocks, and this is a stable "cold bridges" through which the heat from the room will quickly escape outward. The uniqueness of working with foam concrete is that it is possible to use a special construction adhesive composition. In this case, the joints will not exceed 2 ÷ 3 mm in thickness, and the wall will be obtained exceptionally evenly.
The composition of this adhesive includes special additives that give it high adhesion with cellular concrete, create a very strong adhesion of the blocks. When choosing it is necessary to pay attention to the fact that the adhesive to be purchased was intended for outdoor work, that is, it had the proper frost resistance.
The price of glue should be frightening, although it is certainly higher than that of a simple concrete mortar. However, the consumption is reduced by 6 - 7 times, and as a result, overall savings of at least 2 times are achieved.
Important note - work with the use of adhesive will be possible if high-quality foam blocks are purchased, with consistent geometric dimensions, otherwise all the advantages are simply reduced to zero.
Breakdown on the ground. Filling the foundation
If the project is ready, you can proceed to transfer the garage plan to the terrain.
In the corners of the future structure, pegs are driven in, between which cords are stretched. The straightness of all angles is carefully verified. It should immediately, directly on the spot, once again assess the location of the garage, no obstructions to open the gate, access road and other important nuances.
Foam concrete - the material is light enough, so in conditions of stable soil, a shallow band foundation will suffice.
- On the perimeter of the future structure, a trench with a depth of 700 mm and a width of 200 ÷ 300 mm greater than the planned thickness of the wall comes off.
- A sand cushion 100 mm thick is poured into the bottom, carefully compacted. Above it, the gravel layer is similarly laid.
- Formwork is being established. The height of the cap above ground level at the bottom point can be 150 ÷ 200 mm. It is very important to set the horizontal level of the cap as accurately as possible - when working with foam blocks this is of particular importance.
- Inside the formwork, a waterproofing coating (for example, a polyethylene film) is stretched, so that the edges extend outward along the walls. After that, reinforcing belt is installed - usually it is 4 reinforcements, located in a rectangle and connected by bridges.
- An ordinary concrete mortar is poured in, a thorough leveling of the surface is made. The setting and hardening time is not less than 3 ÷ 4 weeks.
- Simultaneously with pouring the foundation, it is possible to provide for the arrangement of the floor in the garage - the absence of walls will greatly simplify this process. The total thickness of the reinforced screed, excluding the sand-gravel cushion, should be at least 100 mm, as the coating must be able to withstand the heavy loads of the vehicle weight.
- At the same stage, it is necessary to think over and arrange the pit if it is planned. Its depth should be about 1.8 m, width - 0.9 - 1.0 m. The walls of it can either be laid out with a brick, or gradually poured with concrete with mandatory reinforcement, gradually moving the formwork upwards. The edges of the viewing hole are framed by a metal corner, which will simultaneously serve as a kind of beacon when pouring the floor screed.
If the soils on the site are unstable, ragged, then the belt foundation may not be enough. Foam concrete blocks do not like the stresses on the fracture, and when the subsidence or oscillation of the ground can give a crack.
In this case, you can choose one of the following options:
- Pour a solid "floating" foundation - a solid slab on which all further construction will be carried out. However, in this case it is necessary at once to refuse a viewing pit or a cellar.
- To deepen the ribbon foundation and strengthen it with piles, creating complex construction basis. One of the options is shown in the attached figure:
To further work proceed only after the full hardening and maturation of concrete.
Construction of garage walls
From this stage begins, in fact, work with foam blocks.
- First of all, we must determine how the gates will be installed.
- If they are already ready, then you can put them in the designated place, with strict observance of the verticality and horizontality of the overall design. The gates are fixed with wooden spacers. As the walls are raised, they will be embedded in them. To do this, on their stands perpendicularly welded pieces of reinforcement up to 500 mm long, so that they accounted for the seams between the rows of blocks.
- If the gate is to be installed later, an opening of the required height and width is left for them.
- The upper section of the foundation is covered with a layer of bitumen mastic, on which waterproofing is applied - steklodroizol or roofing material. This will create a cut-off for capillary penetration onto the walls of ground moisture.
- The first row of foam concrete blocks is always laid on cement mortar. Begin the clutch from the corner, be sure - from the highest point. The main task is to eliminate possible errors in the horizontal nature of the foundation and to reach a uniform level along the entire perimeter of the walls. To control between the installed corner blocks pull cords, which are verified by water or laser level.
- If you want to trim the blocks along the length, this is easily done by a conventional hand hacksaw with a large tooth. You can use for this purpose and chainsaw, but with the observance of the rules of special precaution.
- The next rows are laid out on the building glue. To do this, it is diluted and mixed in accordance with the instructions attached to it with a mixer or nozzle on the drill. After stirring, the solution should be allowed to stand for at least 5 minutes. When diluting the solution, excessive amounts should be avoided - it is necessary to take into account that the "lifetime" of the finished adhesive can be limited - this is indicated in the instructions.
- After laying out the entire first row and pre-setting the solution, reinforce:
- Two parallel strobas are cut along the entire masonry. The distance from the edge of the blocks is not less than 60 mm, the depth of the groove is 15 ÷ 20 mm. To make them you can use a special tool - shtroborezom, or an ordinary "Bulgarian" with a circle for the stone.
- After making the shrouds, they are carefully cleaned of dust with a brush and half filled with building glue. Then, the Ø 8 mm fittings are laid and laid in them. In this case, the corners are reinforced necessarily with a whole rod, which bends at an angle of 90 °. The overlapping of neighboring reinforcement bars makes at least 300 - 400 mm.
- After the reinforcement installation, the strobes are completely filled with a solution that is leveled to the level of the block surface.
- Next, produce the second row of masonry. Blocks are installed "in the dressing", with a shift of approximately half the length (but not less than 100 mm).
- Before laying each next row, the surface must be checked for flatness. If even small tubercles are detected, they should be removed with a float or even a plane. After that, the plane is thoroughly cleaned of dust and abundantly wetted with water - the wet foam blocks will lie much lighter and more evenly, without the formation of "spools."
- The adhesive solution is applied with the help of a trowel - a special tool that allows to distribute it evenly on the surface with a thin layer with the creation of the necessary grooves. If the foam blocks do not have a groove-groove lock, they are glued with glue from three sides - in the horizontal and two vertical planes. In the presence of locks, the solution is applied only in the horizontal plane. The solution layer should not exceed 3 mm - this is quite enough for a reliable connection.
- After installing the unit in place, it is carefully aligned vertically and horizontally, pressed manually or by tapping with a rubber mallet. The excess solution is removed, the seams are immediately plastered with this mortar level with the surface of the wall being built.
- Masonry continues in the same way, with mandatory periodic reinforcement:
- A belt under the windows is necessarily laid, below them on 1 row.
- The jumper setting area is over the windows, doors, gates.
- If it is planned to fill the common concrete belt over the wall, similar reinforcement is also carried out.
- Lintels above the gate or window (door) apertures can be poured from concrete, having arranged a timbering on wooden props. It is possible to do otherwise, to embed a channel of the appropriate width or, in the case of windows and doors, a welded structure of two corners with lintels, and then continue laying the foam blocks on this metal support. Thus it is necessary to cut off blocks a little on height not to break evenness of the top section of the general number of a laying.
- In the event that an erection is planned gable roof, you can continue the laying to create the front and rear gable.
- Is a general reinforced concrete reinforcing belt needed at the top edge of the walls? In the long run, it never hurts - it will give additional strength to the site. In addition, it is much more convenient and reliable to mount a Mauerlat for the construction of the roof. If you plan to place a room (residential or technical) over the garage, then armpoys are mandatory. But when a decision is made about a simple one-pitch roof, you can do without it.
For the arpoyapa, a 200-meter formwork is being prepared — 300 mm, the reinforcement (4 bars located in a rectangle) is laid and the concrete solution is poured.
Video: features of foam blocks
Building a roof over the garage
More information on the possible options for the arrangement of the roof is told. Here - just a few tips for installing the simplest, one-pitch roof.
The slope of the roof can be, as already mentioned, provided for at the stage of erection of the walls - a slope is planned backwards or to one of the lateral sides. There is an opportunity to do otherwise, constructing a wooden structure that provides a ramp with the same level of walls.
Shed roof will be present thin roofing, not having proper thermal insulation. Therefore, very often resort to the following method of its arrangement:
- In the direction of the ramp, I-beams are mounted, fixing them to the upper edge of the walls or to the Mauerlat. The distance between the beams is no more than 800 mm. In addition, they must extend beyond the surface of the walls by 250 ÷ 300 mm, to create a visor that protects the walls from precipitation.
- The remaining openings between i-tails Beams can be laid with masonry.
- On the bottom shelf of the I-beam planks of thickness 30 ÷ 40 mm are laid. Above them is laid a layer of roofing material, with the expectation that on each side he went up per 100 mm.
- The dry insulation is filled - slag or expanded clay, and on top of it you can lay the reinforcing metal mesh.
- Then poured a light screed, a thickness of not more than 30 mm. The mortar must be thick enough to provide the required roof slope.
- After the screed hardens, it closes soft roof. To begin with, a blasting is carried out with tar mastic, and then a ruberoid is applied by the fusion method. The strips are laid across the ramp starting from the bottom edge, so that each subsequent sheet finds to the underlying 100 mm.
External and internal wall finishing, ventilation
As already mentioned, the features of the foam blocks are such that the walls of them need additional finishing. In the choice of a particular method, there are no restrictions - they are perfectly covered by any plaster, facade paint, and so on. You can arrange a decorative lining of wall panels, tiles or siding. Inside the garage, you can also limit the layer of plaster with subsequent finishing by any accessible way, or to cover the walls with sheets of moisture-resistant plasterboard.
For normal air exchange, ventilation is required. To arrange a forced ventilation system is probably too big a luxury for a garage. It will be enough natural circulation air. In the wall of the foam blocks, it will not be possible to cut the holes into different levels - at the surface of the floor and, on the opposite side - under the ceiling. It is possible to install ventilation grilles there by providing them with adjustable flaps so that the intensity of the air flow can be changed in accordance with the season and the established weather.
So, the construction of a garage of foam blocks is quite feasible for the average owner of the site. Undoubtedly, it will require mobilization of all its forces and efforts, increased accuracy in the work and strict observance of the sequence of technological operations. Nevertheless, such construction is the least expensive, allowing to erect a capital garage in the shortest possible time.
Buildings on the plot
Foam blocks are an affordable and practical material
The garage of foam blocks with their own hands is the most affordable and inexpensive way to build a building. The estimated cost of materials is much lower than the prices for red brick, and the time for laying will take from 3 weeks. The feature of foam blocks is low heat conduction, which allows heating the room during the winter. This material does not let humidity in the garage, which saves storage items from deformation and corrosion. The foam blocks are suitable both for the construction of a single-storey building and for a two-storey garage with an attic.
Features of foundation pouring
The first stages of erection should begin with the foundation pouring. In this case, you can apply two versions of the base: a belt-pile and a shallow foundation. The latter is perfect for swampy terrain and unstable soils. A shallow foundation must be poured to a depth of 50-60 centimeters in the ground. Before this, the bottom of the foundation is important to sprinkle with special sand 20 cm thick. Also it is necessary to install a frame from the reinforcement, which will contribute to the strength of the structure.
Filling the foundation for the garage
After pouring concrete, it is necessary to give the foundation time to stand for about 2 weeks. Next, you should lay a layer of waterproofing or treat the surface with bituminous mastic on all sides of the base. A simpler and cheaper option would be the laying of roofing material, while it is recommended to use two layers of material. By its structure, the foam blocks do not absorb liquid, however, it is important to waterproof it to ensure a long life of the building.
Construction of walls
On standard sizes garage is recommended to purchase foam blocks, the density of which is 600-800 kg / m3. Such material is sufficiently dense and perfectly preserves the heat in the room. Foam blocks of lower density are not practical, because they have a brittle structure. The dimensions of the material should be 20x30x60 cm, if you want to equip a warm room, we advise you to purchase items measuring 30x40x60 cm. The walls can be made more dense if the blocks are laid on the wide side.
The construction of walls for a garage in the suburban area
To cement foam blocks, you can use a solution made on the basis of cement and sand. Specialists often use perlite, which represents the material, which makes it possible to form warm seams between blocks. A solution based on perlite should be prepared in this ratio:
- 1 packet of cement;
- 1 part perlite;
- 2 volumes of sand
Water should be added during the mixing of the solution, so that at the end a thick consistency is obtained. Also, a dry mixture of perlite can be replaced with "thermoshow". When working with foam blocks, it is recommended to remember the fragility of the material, for this you should additionally lay a reinforcing mesh made of steel or plastic. During construction, it is necessary to determine the location for fastening the gate, before checking the smooth sides of the opening.

Installed walls for the garage of foam blocks photo
At the optimum dimensions of the garage, care must be taken to re-bandage the joints between the blocks. It is especially important to do this in the corners of construction, floors and in adjacent rows. Without additional rigidity, the building will not be monolithic and solid. Having constructed the necessary height of the walls it is necessary to wait a few days until the solution between the blocks is dried up. After that, they begin to block the garage, depending on the material chosen for construction.
To overlap two-story building it is recommended to use reinforced concrete panels. On the upper row, a reinforced belt 15 cm high, made of reinforced concrete, is laid. This installation will give the strength of the structure and relieve the foam blocks from crushing.
Laying parameters of the floor
To install the floor, you need to remove 15 centimeters of the top layer of the soil, and then level the surface. Further, the formed space is covered with sand and well compacted. On top put a plastic film, it is recommended to use a more dense version of the material. The film should go out at the edges of 15 cm, which will prevent moisture from entering the structure.
To reinforce the base, it is recommended to use a special grid with 10x10 mm cells. To the floor was more dense, it is necessary to lay grout under the mortar. First make a 10.5 cm-thick screed, which should last several days. Further, a concrete pouring of the concrete floor is made, which is installed on the beacons.
Roof installation
In this case, several options for laying the roof:
- single-deck system, based on beams;
- gable construction in the form of a tent;
- roof for the attic.

Roof construction for garage by own hands
The choice of scheme depends on the purpose of the garage and its practical use. In this case, the roof structure is considered with an additional attic. This scheme is much more expensive than an ordinary floor, but more convenient to use. This is a form of building a garage, the price for the purchase of materials for which significantly increase.
If you want to build a warm garage, you can sew the ceiling of the building with boards, for example, edging or sheet piling. Also an acceptable option is the use of plywood. For heating it is recommended to equip the stove for a garage or to put a small stove. To keep the heat in the room it is recommended to lay the layer heat insulating material. Builders often use eco-wool or mineral wool in rolls. The laying layer should be from 10 cm. Roofing system It should also be insulated with a vapor barrier film.
Estimated embezzlement for construction
For many people, the important question remains: how much does it cost to build a garage? In this case, you need to calculate the approximate price and quantity of materials. We will consider the approximate estimate of embezzlement for the construction of a garage with a height of 2.5 m and parameters - 6 m in length and 3.5 m in width.

Garage Room Finishing
An approximate calculation will have such indicators: take into account the perimeter of the building, multiplying the height of the walls by their thickness. As a result, the approximate number of foam blocks required for construction should be obtained. From the received sum of cubic meters of material, it is necessary to subtract the openings for the gate.
The table below shows the name of the materials, as well as their number in cubic meters, rolls or packages. The third column shows the cost per unit of goods in rubles, in the last column, the total cost of materials is determined. It is important to know that all prices are approximate and correspond to the average cost of goods in the construction market.
|
Material |
amount |
Price per one. goods |
total cost |
|
800 rubles / m 3 |
|||
|
Concrete M200 |
3600 rubles / m3 |
||
|
Bituminous mastic cold |
|||
|
Beams for ceiling and rafters |
5050 rubles / m3 |
||
|
Thermal insulation for roll |
4320 rubles / m3 |
||
|
Solution M100 |
0.21 m3 per 1 cubic meter of masonry |
2 460 rub./m3 |
|
|
Fasteners |
122 rubles / kg |
||
|
Eaves boards |
5600 rubles / m3 |
||
|
Armature |
|||
|
Masonry grid |
|||
|
Gates (insulated with wicket) |
|||
|
Metal tile |
|||
|
Steam insulation |
|||
|
Foamblocks |
160 rubles / pcs. |
||
|
178 900 rubles |
|||
Of all the calculations it follows that the approximate cost of the garage will be 178900 rubles. This indicator does not include payment for construction work. To learn more about how to build a garage of foam blocks with your own hands, we recommend you watch the video: