One of the simplest roofing structures is considered to be a two-slope roof, besides it perfectly protects against snowfalls, heavy rains and sharp gusts of wind. You can make this design yourself.
The construction of a gable roof does not require special skills, but there are several key points that should be taken into account. Recommendations for the materials used are listed in the tables below. 
So, what you need to know in order to build a reliable gable roof construction on your own? Of course, we need to start from the support, on which the whole structure will be kept.
Mauerlat

Mauerlatt is a wooden bar, most often square, securely fastened to the supporting wall. It is he who is the foundation of the roof and the rafters are already resting on it. 
Rafters
 Rafters or rafters are inclined beams that connect the Mauerlat to the ridge beam. A ridge beam is needed to connect both halves of the roof into a single structure using rafters.
For a skate, it is recommended to choose a beam of solid wood, because it connects the structure into a single unit and affects its reliability. In order to reduce the harmful effects of rainfall on the walls of the house, the rafters are made longer by using additional stretches, creating a overhang. This makes it possible to avoid problems such as strong soaking of walls.
The angle of the gable roof is recommended to be done at 30 degrees. Such a slope simultaneously reduces the likelihood of snow falling on the roof and reliably protects against strong gusts of wind. 
Sill
 The roof is a roof element made from a bar. Its main task is to provide additional reliability to the roof ridge. It serves as a vertical support, therefore it is recommended to choose a bar for it from solid wood species and a sufficiently large diameter.
Tightening
 Tighteners are a cross bar that serves to strengthen the Mauerlatt and prevent the longitudinal loads from being able to knock down the entire structure of the roof along with the bearing walls.
Racks
 The goal of the racks is to prevent the rafters from sagging. They are additional vertically installed bars. Racks take on some of the load and reduce the risk of deformation of the structure in the future.
To ensure that the construction of the gable roof is not subjected to deformation along the diagonal, it is supplemented by beams coming from the pillars to the puffs. The optimal connection angle here will be 45 degrees.
 The last stage of the construction of a gable roof is a crate. It is done simply: narrow rails or slats are laid on top of the rafters. The distance between the slats is recommended to be small, which will reduce the risk of deformation of the roof under the influence of environmental factors. In addition, the crate allows you to easily move around the roof during construction or repair work.
Fastening of details
 Naturally, all the details of the roof need to be fixed among themselves.
In order to connect the elements of the structure diagonally to each other with each other, a passe connection method should be used. This type of connection, many builders also use to fix the parts located perpendicular to each other. It is worth paying attention to the fact that the groove makes the parts less durable, and it is possible to use it without risk only in places that do not play an important role. 
Another way of fixing parts to each other is to fix with metal plates and corners. Its downside is that screws with angular loads have the property of turning out of the base, thereby depriving the roof structure of reliability and stability. 
Photos of gable roofs made by own hands, you can see below.


Video "How to make a gable roof with your own hands"
Each master, who started an independent construction, understands that the roof with his own hands is step by step - the task though difficult, but still feasible. In the material below, we will try to understand all the intricacies of the works and understand what a step-by-step construction of the roof of a double-deck type looks like.
It is important: in order to assemble the roof of the private house as accurately as possible, and all material was purchased for it with a small margin, it is better to involve professionals for the roof design. At the design stages, they will calculate the slope angle of the roof slopes and the amount of construction material needed for it, including steam and thermal insulation, as well as roofing material and give you a ready roof project.
Types of roofs for a private house
To understand what the roof in a private house will look like with your own hands, you need to understand what kind of roofs exist. Proceeding from this and choose the type of construction.
Important: however, when designing the roof, always take into account the wind and sedimentary (rain, snow) load on the ceiling, as well as the weight of the roofing material.
So, today they often mount such roofs of a private house with their own hands:
- One-run. A roof that has a slope in one direction. This is the simplest version of the roofing system, but it is not the most reliable for a private house, since a high load is applied to such a structure in the course of sedimentation. Basically, such a roof is mounted on auxiliary premises (verandas, extensions, sheds, etc.).
- Gable roof. A very simple and at the same time reliable option to cover the roof of the house. Two slopes evenly distribute the load to the rafter system when draining water and snow.
- Hinged roof (four-slope roof). Performs a little more complicated, but it is also an equally convenient option for overlapping. In most cases, the hip roof has four sides, two of which are in the form of a trapezoid, and two - in the form of a triangle.
- Broken roof. As a rule, it is a gable roof with creases on both sides. Such an overlap is convenient because under it you can arrange an additional attic dwelling, thereby increasing the useful area of the house, especially if it has one floor.
- Multi-cloak roof. The most complicated version of the design. It is used over a large box of a private house having a complex configuration.
Important: it is worth remembering that the step-by-step construction of the roof for the house will be all the more difficult the more complex the configuration of the room. This is due to the fact that for a complex design requires a complex truss system.
Materials for work execution

Self-construction of the roof of a private house requires the preparation of the necessary tools and materials. In particular, you will need:
- A bar with a section of 100x100, 100x150, 150x150, 150x200 mm or 200x200 mm for the Mauerlat. The cross-section of the beam depends entirely on the width of the masonry of the house and the structure of the roof. In our case, when installing a standard gable roof there will be enough bar 100 x 150 mm.
- Board dimensions 150h50 mm for rafters and crossbars. The cross-section of the boards can be smaller if the load on the roof is low (depends on the roofing material). Calculation of the number of boards for rafters is done in such a way that it is possible to install rafters on one side of the roof in steps of 80-120 cm. That is, if the length of the wall of the house is 4 meters, then it will require 5 planks with a pitch of 80 cm.
Video: how to properly make a roof (step-by-step instruction on building a roof with your own hands).
Important: the step of mounting the rafter legs depends on the weight of the future roofing material. The heavier it is, the smaller the rafter should be.
- A bar with a section of 100x150 mm for racks in the roof frame.
- Hydro and vapor barrier for roofing pie.
- Board and beam for the crate.
- Electric jigsaw or Bulgarian with wood discs.
- Brackets, angles, pins and screws / bolts.
Important: a detailed video is provided below for a full understanding of the work process.
Technique of performance of works
Mauerlat device
Photo 1: 
To mount the roof of a private house strong and reliable, it is necessary to take care of the fastening of the Mauerlat - the wooden binding of the house, which serves as the transition boundary from the stone to the wooden part of the building. Lock it in two ways:
- Bay reinforcing the belt around the perimeter of the building and fixing in it building studs. The pitch of the studs should be from one to one and a half meters.
- Vmurov fixing studs in the last rows of masonry at home.
Important: the height of the height of the studs above the wall should be equal to the height of the laid beam, plus 3 cm. This calculation is necessary in order to securely fix the Mauerlat with nuts and bolts.
Cutting and installation of rafters
Picture 2: 
Roof rafters are the hardest part of the job. It is important not only to mount the rafter feet, but also to cut them correctly. In the case of the slightest skew, the whole roof frame will "walk", which is not good for the roof. So, the roofing with your own hands will be built easier and faster if you cut out a curved-stropilin from one bar beforehand and already form all the others on it.
To create a pattern, you must make an internal cut at the bottom of the board-rafter at a right angle. This place she will rest against the Mauerlat. The cut is made not from the very edge of the board, but from it it is lifted upwards 50 cm. These are the roof overhangs protecting the walls of the house from the rain. The cutout can be done by patterning a bar or by simply drawing a right angle on the board.
Now it is necessary to cut the top edge of the board in such a way that the rafter system of two parallel legs can be joined by cut edges without voids and gaps. To do this, you need to raise the board upward, lean it against the Mauerlat and raise it to the desired angle of incline. In the center of the floor overlapping to the rafter, it is necessary to draw a vertical line. This will be the cut line of the board. That is, at the top of the rafter's leg we get an oblique cut.
Photo 3: 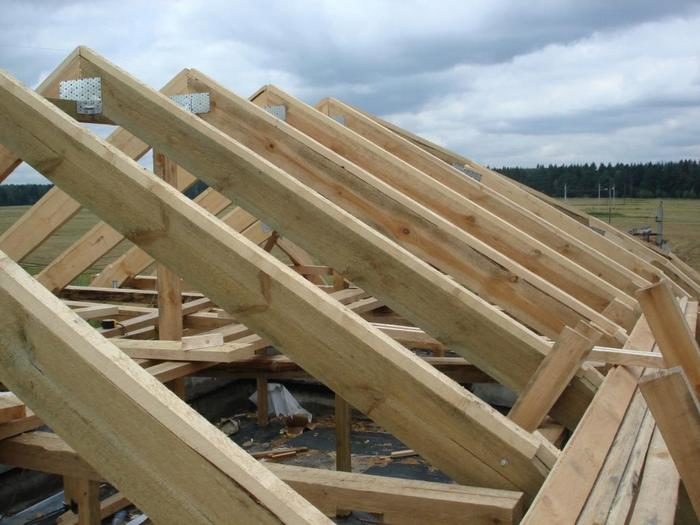
All the rafter's legs cut out according to the pattern are gathered on the ground, securely connecting them in the upper part (the skate) with brackets, screeds and bolts.
Important: if the length of the rafters exceeds 3 meters, it is desirable to further strengthen the system with crossbars - cross bars, which are fixed horizontally with respect to the triangle of the rafters. The point of the deadbolt should be in the first third of the upper part of the triangle.
The installation of the rafter system starts from the two extreme gables. They are installed, pull the control cord between them and the whole skeleton of the roof is already leveled along it. Fix all rafters to the Mauerlat with special corners and brackets.
Picture 4: 
It is important: in addition to strengthen the frame, you can use special racks supported by crossbars. A rack, in turn, it is desirable to install on the bed (special wide boards of the type of ski, which will remove the point load of racks on the floor).
Sheathing device
In the continuation of the theme "how to build a roof" it is worth noting that the next stage will be the installation of a crate and a construction roofing pie. Once the truss system is ready, it is necessary to lay the crate, which will become the basis for all other materials of the pie - steam and waterproofing, as well as for insulation and roofing material.
Picture 5: 
The roof covering can be mounted from unedged boards with a section of 100x50 mm. In this case, the step of the arrangement of the boards depends entirely on the final roofing material. The heavier it is, the smaller the step of the lathing should be. In general, the check box is approximately 30 cm.
Important: under the crate, it is desirable to pre-lay a layer of vapor barrier. She will protect the insulation from the evaporation from the premises of the house. On top of the vapor barrier already laid boards doloshetki.
Now perpendicular to the wood of the trolley, lay the beam in steps equal to the width of the slabs or rolls of insulation material. Between them, a heater is laid, safely driving it into the available grooves.
Photo 6: 
From above all cover with a layer of waterproofing material and fix it with another perpendicular crate (in this case horizontal). And already on it the final roofing material is mounted.
Photo 7: 
At the very end of the roof installation on a single-storey house, it is necessary to install a drainage system. It is made from cut along plastic pipes, or in advance they buy finished gutter elements. Now it remains to sew up the roof gables with the selected material. It can be both a tree and a stone.
Its advantages include the possibility of saving on roofing materials and scaffolding, ease and speed of construction, low weight.
Disadvantages: not very attractive appearance and lack of attic or its small size.
- Gable - much more popular than a one-track.
Its obvious advantages are relatively low weight (compared, for example, with the four-barrel one), a rather large attic space, the possibility of equipping the attic in the under-roof space, and an attractive, harmonious appearance. This type of roof is heated by sunlight from both sides.
The roof does not have special disadvantages. You can only indicate its relatively heavy weight and greater consumption of building materials than in the construction of a single-pitched roof.
For a gable roof, you need a horse (it does not need a single-pitched roof) and gutters for drainage of rainwater.
- The four-story roof
This type of roof is not very popular, because its erection is a complicated matter and it takes certain skills to build a gable roof with your own hands.
The obvious advantages of this type of roof include its aesthetic appearance, a large attic space. The possibility of quadrilateral warming makes the attic very warm.
Among the shortcomings of this species is its weight and, as already mentioned, the complexity of the construction work.
- Combined roofing
Ideal choice for a multi-level building or a structure that is not entirely rectangular in shape. It looks rather original, and also blends harmoniously into almost any area.
The roof of the combined type is much easier to erect, since it can be built in separate areas: at the first stage of the work, cover the terrace located on the second floor under one slope; then build a gable roof over the bedrooms; at the next stage, cover the serving area of the kitchen on the first floor, and so on.
In the photo, different types of roofs: 1 - one-run; 2 - gable; 3 - broken or mansard; 4 - hip (four-stage); 5 - hipped; 6 - multi-clasp.
There is also a tent roof, which is four identical ramps in the shape of an isosceles triangle; roof Sudeikina and others.
With all the variety of types of roofs, their construction is based on several basic principles. Having caught them, you can independently erect even the most complex roof.
The entire construction process is divided into several basic stages. So, we learn how to build a roof with our own hands.
Mounting Mauerlate
The foundation, which takes on the main part of the load, is Mauerlat. On it the whole roof is erected. Beams with a section of 15x15 cm are used. They are installed parallel to the roof ridge.
For the strength of the roof and stability in relation to unfavorable weather conditions, the beams of the Mauerlat should be securely secured, and this should be taken care of already when laying the walls.
To this end, between the blocks (bricks) of the masonry at a distance of 1 meter lay a solid thick rope, starting from the fourth floor. It's called wire rod.
The middle part of the wire must be fixed in the brickwork, and the ends should be left hanging down. Their length should be sufficient for the subsequent tying of the bar. If plaster is planned, the outer end of the wire will need to be installed in the solution.
Photo: Mauerlat fastening with wire twist
Mauerlatt should retreat from the edge of the wall at least 10 cm. To protect the beams from rotting, they must be laid with layers of roofing material.
Mounting the frame
To ensure sufficient strength of the roof, you need to take care of the frame. The frame of the house is the rafters attached to the Mauerlat.
It should be borne in mind that if the length of the beams is more than 4.5 cm, additional runs will have to be mounted. The optimum size of the beams is a section of 7 x 15 cm.
The rafters are attached to the Mauerlat with a special cut, fixed by 20-centimeter nails. They are hammered in this way:
- the first is clogged diagonally through the rafters into the mauelat;
- the second is nailed in the same manner from the other side;
- the third nail is punched perpendicularly from above.
Thanks to this technology, the rafter is firmly attached and does not move.
The upper part of the girders is lapped against each other in such a way that the edge of one beam overlaps the end of the other (parallel). Their fastening is done with the help of nails or bolts.
Reinforcement of the roof
To reduce the impact of the spacer force on the Mauerlat and the greater strength of the roof, the rafter legs must be fastened together by means of beams, the cross section of which is 5x15 cm.
This detail of the structure is called "bolt".
So, the size of the crossbar and the distance between the rafters that need to be connected correspond to each other. Mounting should be done with nails.
Also it is necessary to take care of fastening to each rafter leg of the filly, which is a board with a section of 50x100 cm. It is fixed with the help of metal brackets and screws to one side of the rafter's foot.
Its length is calculated as follows: 50 cm are added to the length of the overhang.
To avoid complications, you need to think about harvesting a filly beforehand. To do this, on the board, which is 15 cm wide, a cutout is made with which it is attached to the Mauerlat.
Particular attention should be paid to ensure that the boards and rafters match exactly with each other. All these works should be finished before the construction of the truss system, so that you can then simply assemble the whole structure.
At this stage, it is also necessary to choose the angle of inclination of the roof. For the correct choice, it is necessary to take into account the specifics of the terrain. For example, in the presence of heavy rainfall and a fairly cold climate, the ideal angle is from 40 to 45 degrees.
On such a roof, snow does not accumulate, which avoids increasing the pressure on the floors. The distance between the rafter legs should be 1 meter.
With a hot and dry climate, the minimum angle of inclination is 3 degrees.
In areas with frequent strong winds, the optimal value of the angle of inclination is 20 degrees.
For accurate calculation, you should use the rules used by professionals.
Builders of this value are measured using a special tool - inclinometer. Before the measurement begins, the required angle must be calculated.
For this, a special formula is used: the value of the angle of inclination is equal to the height of the ridge, divided by the figure obtained by dividing the length of the roof by two.
Oblochettka
To cover the roof you will need to make a crate. When choosing a roof tile as a roofing material, the lath must be continuous.

On the photo the structural elements of the roof: 1. Roof roof; 2. Curb; 3. the ventilation hatch; 4. the skate; 5. rafters (rafter leg); 6. auxiliary elements; 7. Counter-beam (counter-beams); 8. Roof lathing; 9. protective element of safety; 10. the cornice gutter; 11. frieze (border) of the wall; 12. The chick or the valley; 13. drainage drain pipe; 14. snow-retaining fence; 15. vent for steam output; 16. support bridge; 17. Anchor support plate; 18. Strapping element; 19. Lightning conductor; 20. connection of technical equipment from premises; 21. the air duct; 22. access to the roof; 23. Lying auditory (attic) window; 24. standing dormer window; 25. a pipe (a chimney of the furnace); 26. sloping roof overlap; 27. attic floor; 28. separation wall of the attic space; 29. heat insulation.
For the work required wooden holistic boards, the thickness of which is approximately 25 cm. Special attention should be paid to the absence of cracks and chips on them. The length of the boards should be equal to two spans between the rafters, that is to make 2 meters.
In this case, the joints will be located only on the supports. The distance between them should not be more than 5 mm. The boards used to form the ridge should be located at the closest possible distance from each other. Fastening is carried out by means of nails in length of 20 sm.
The choice of the lathing option depends on the type of roofing material.
If it is supposed to create roll soft roofs, the flooring of the battens must be whole (solid). If there is a slate or metal roof, a discharged crate is suitable.
If necessary, then you can make the flooring double. In this case, the first layer should be laid in the standard order - parallel to the ridge, and the second - along the descent, perpendicular.
Ventilation
The roofing is not enough for the roofing. We need to think about its integrity during operation.
To tile aired, you need to leave in the crate gaps, two or three ventilation ducts on each side. Channels should start at the bottom of the overhang, and end as high as possible. The width is about 5 cm. At the top, an exhaust outlet is installed to expel air.
Installation of drippers and lining layer
To protect the roofing from the harmful effects of condensation on the crate, you must lay the backing layer. Its installation is carried out only along the edges, where the probability of water leakage is high: on the inner valley, near the pipes, to the ridge.
The width of the lining layer should be approximately 40 cm. Nail the carpet with screws or nails at a distance of about 25-30 cm.
If necessary, you can lay another layer, it should be placed on top of the already nailed. You can glue the lap with bitumen glue.
Another stage of the work before the roof is to be roofed should be the installation of droppers. They are metal plates to protect the eaves from moisture.

The slats are nailed with nails at a distance of 10 cm, and the lap is 5 cm. In the same way, the drips are fixed on the ridge.
Flexible tiles are attached to the plates, which helps to improve both the functions of the drop cap and its appearance. Since the plates are self-adhesive, they must first be removed from the protective layer and then attached to the cornice. For greater reliability it is recommended to additionally nail them with nails.
Installation of roofing material
The choice of roofing material depends on the type of roof. Each option implies its own rules and installation conditions.
Flexible shingles
To facilitate the overlap and uniform distribution of the shingles, the process should begin from the middle of the cornice. Remove the protective film from the shingles and glue it to the base.
Then nails are nailed along the edges. The best option is galvanized nails with wide enough hats. The joints of the shingles must be covered with projections.
If the project assumes the presence of pipes, then along the perimeter of the cutout of the shingle, special passage elements are attached. Tiles must be glued lapped at the site of the ridge.
If there is a brick pipe that heats up, it is better to put a block of triangular shape on the corner of the pipe and the roof. At a distance of about 20 cm from the pipe cover the lining carpet, and a special connector is put on the pipe. Slots should be sealed with a sealant.
Metal tiles
Under the shingles of metal should be laid flattened crate. The amount of material can be calculated by adding the length of the ramp from the ridge to the eaves, vertical overlapping sheets and the eaves.
The first of the sheets is laid and leveled along the end and the cornice, the second one should be laid on top, and the third one - on the side. The fourth sheet is located above the second sheet.
All the resulting design should be leveled and attached to the crate with the help of self-tapping screws. In accordance with this scheme, the entire roof is assembled.
The outer corners and the ridge strips must be mounted overlapping and fastened with self-tapping screws. The horse should be closed with plugs.
Begin the coating of the metal shingles from the bottom, in the upper direction, from left to right. Tiles pre-laid out in small (5 pieces) piles. They are placed on the skates.
In this case, the load exerted on the rafters is distributed evenly. To the rafters, the tile is fixed with galvanized screws. On each of the sheets there are special wells, with which you need to attach the sheets to each other.
Eaves file
This work is carried out at the final stage. The walls should already be insulated, since the binder box should fit closely to them. Otherwise, it will be necessary either to break the filing or to leave the section of the wall unheated.
Preferably, the file is made of wood. So it will not be possible to conduct additional ventilation. The filing is a kind of box, attached to the continuation of the rafters and filly.

In the photo, the design of the eaves
Its frame is made up of two boards, one of which runs from the end of the overhang towards the wall, the second descends from the rafters. The boards are joined at right angles. Self-tapping screws or screws are used to secure the connection points.
Metal plates are also used. Between the boards you must always leave gaps of a small size. A cut of the corners of the box is made under a certain slope, and they are fastened with brackets made of metal and self-tapping screws.
Then the lower part of the frame is covered with planks along the entire length. Since they are exposed to the environment, they need to be fixed very carefully, especially around the edges. It is also necessary to pay attention to the fact that the joints of the rows of adjacent beams do not coincide. Angles need to be filed 45 degrees.
Roof insulation
Warming is no less important than the erection of the roof itself.
There are several options for insulation: from above and from inside the crate.
If the attic space is not used as a residential area, it is possible to conduct internal insulation. It will also allow you to hide the free space between the rafters.
The first thing to do is to cover the roof with a waterproofing foil all along the perimeter. Since the rafters are located on top of the crate, it is impossible to stretch the film on the sheet.
 We must ensure that the film covers all the details of the structure. Between the rafters and the crate, in the corners, wooden slats are beaten on top of the film. Then to the crate between the rafters it is necessary to nail the mineral wool. Plates of this insulation must be laid to each other end-to-end.
The next layer is a vapor barrier film. Its lower edge must be attached to the rafters. The joints of the two films (waterproofing and vapor barrier) should be superimposed on each other and tightly fixed with a construction tape.
If an attic space is to be used as a living space, care should be taken to ensure that the roof is warmer.
In this case, the film and insulation must be laid on top of the rafters and crates. The use of polyurethane foam plates should be avoided, since this material can not be densely docked.
Optimal choice as a single layer is mineral wool. It is also necessary to use a waterproofing film. The principle of work on insulation is similar to that described.
It is more reliable to use mineral wool as one of the layers and it is necessary to use a waterproofing film. In fact, the principle of insulation works is not too different.
So, we build the roof with our own hands
To build a house roof with your own hands, you need to follow the following steps:
- Fixing the Mauerlat;
- Installation of rafters;
- Rims;
- Installation of drippers, lining;
- Installation of roofing material;
- Eaves cornices;
- Insulation of the roof.
We offer you a video about the roof: