Mansard roof This is one of the best ways to increase the total area of your house, with minimal financial costs. Having built a similar design, you get an extra spacious enough room, which can become a good nursery or your personal cabinet. Also you can simply invite guests there, in general, lots of options for your choice. By equipping it, you need to be ready, that everything is important to do correctly and step by step. By itself, the attic roof is a converted loft, its creation requires a structural approach to overall redevelopment, roofing and thermal insulation. Roof construction mansard type a country house, almost no different from the construction of a conventional roof. Below, we will carefully study how to properly build a dormer roof with your own hands.
First of all, we need to consider the merits and demerits of such a roof, in order to finally decide whether to begin its erection.
Advantages and disadvantages of the attic roof
The merits of attic roofs include:
- additional room. As we have already seen above, the main advantage of the attic is an extra extensive room that you can equip as you like;
- moderate financial costs. The second factor of such a floor is the relatively low cost of its construction. Indeed, the construction of the attic will cost you much cheaper than adding additional rooms to the house due to the general expansion of the area of the house;
- view from the window. A beautiful view from the attic window will not leave anyone indifferent, since the view of the surrounding world from a height is always beautiful.
The drawbacks of the attic floor can be, perhaps, to consider the need for its additional heating. In the video you can clearly see the construction process:
Types of mansard roofs
If you decide to start building a roof pile, then first of all you need to start by designing what your work will look like in the final result, and also how to do it. The main decisions regarding the type of roofs, you need to take into account the design features of the house.
The main types of roofs are:
On the video you can see how the roof is built:
Below we consider the construction of this roof, which you can build with your own hands
Attic installation
Mansard roofs are very similar to simple pitched roofs. Each type of similar roof has its own features in the design, but in general they all have common elements, consider them:

- Roof. The surface of the roof, which is located outside, serves to protect against rain, snow and other weather;
- Rims. Basically, these are wooden boards, the roof is attached to them;
- Ridge run. The outer part of the whole roof construction;
- Rafters. This is the hinged or hanging stiffeners of the entire structure. For mansard use is made of layered rafters;
- Internal supports. Vertical beams serve to ensure the strength and stability of the roof;
- Insulating layer. Between the walls of the premises and the roof is put an insulation pie from several layers, which allows you to observe the temperature regime throughout the attic room. Insulation includes noise insulation, vapor barrier, as well as a thick layer of thermal insulation. Of course, the security of the roof itself depends on the correct insulation of the roof.
Video that will help with work:
Construction of the attic. Technology
Quite often, architects, designing the roof, overlook the significant errors in ventilation and insulation. These errors are fraught with the fact that the roof appears mold, fungus and, in general, it begins to leak already in just two years. This is because, the technology of construction of the attic is violated. Due to the fact that the attic is strongly pressed against the wall inside the room, it is very difficult to achieve good heat exchange. The entire structure of the attic must include good ventilation, thermal insulation, as well as a truss structure that will be made of fire-treated wood.

The thickness of the thermal insulation should be at least 20 cm, as the climate in our regions is quite cold in winter and hot enough in the summer. The main disadvantages of the attic are that a lot of heat is lost in the winter, and in the summer it is very hot in the attic. Proper thermal insulation is able to fully solve this problem, it will keep heat inside during the winter period, and also will not allow a large amount of heat in a strong heat in the summer.
Also it is necessary how to equip the ventilation of the roof. In summer, at a sufficiently high temperature, the roof has a property to become very hot, this process significantly increases the temperature inside the attic. Correctly laid ventilation guarantees comfortable living in the room, and also protects the roof from destruction in the winter. Sound insulation is necessary in order to reduce the noise level inside the attic, when the street is hail, rain or strong gusts of wind.
Important! To install any type of insulation preferably in a pair with a person who has experience in this matter.
Step-by-step construction of the attic
Well, it's time to consider how you can build this roof step by step with your own hands. For the construction of the attic you will need some experience in such works. Build an attic much heavier than a regular roof, because you need to observe the corners of the skates. To learn how to build this floor by yourself, you need to carefully study the work plan:

Of course, one should start with the development of the floor itself. In this you can help a specialist or, if your computer knowledge is at a sufficient level, most everything is done in a special program. Next, you really need to correctly calculate the slopes of the corners of the roof, load, etc. To do everything correctly, you need to carefully study such a book as "Loads and impacts."
Advice! Correctly to understand all, the book "Loads and influences on buildings and constructions" will help you, ed. Perelmuter A. In 2007 or under the editorship of. Gordeeva V.N. and others, 2008 or 2009, which you can download http://dwg.ru/dnl/4183
How to make rafters correctly will help the video:
How to build a rafter frame
At this stage, you have to work hard and for a high-quality task, you need at least 3-4 employees. Construction of the roof begins with the fact that we lay and fix the Mauerlats throughout the area of the house. In this case, a bar with a section of 100x100 mm is used.

This is followed by the installation of the frame of the room, its racks will be used as supports for the whole rafter construction. The cross-sections of the beam must correspond to the cross-sections of the longitudinal beams, because they will be supported by racks. To begin with, you need to install vertical racks on both sides of the building. They need to be fixed to longitudinal beams, using thus self-tapping screws and metal corners.
Advice! Screwdriver greatly facilitates the work of fastening.

So, we got two arches, we should stretch the cord between them, if its direction is strictly horizontal, it means that everything is done correctly, if not, then one of the arches will have to be shortened. Next, with the right pitch for the rafters, we put the following arches strictly on the cord. Using jumper we fix the arches, and to secure the jumpers we use special stamped corners.

Next is the installation of the upper rafters, and this is quite a difficult job. They must be installed at certain angles and centering, this is the whole complexity. Make a pattern of two boards, they must fully match the connected rafters, which we plan to make. When using this template, you should trim the rafters that are on the ground, and then put them on the right place. The installation of the rafters takes place in the same way as when erecting the inner room.

The installation of the rafter structure ends with the need to nail the crate. The material from which it can be made is plywood, chipboard or simple boards.
How to arrange a room under the roof, you can see it on the video:
How to insulate the roof with your own hands
After the work on the installation of the laths and rafters is completed, we can proceed to the insulation layer. The vapor barrier is laid from the inside of the roof, for this we attach it with staples to the rafters. Then follows the installation of thermal insulation. It is necessary to closely monitor that the layer of thermal insulation is tightly laid on the surface of the rafters. Cracks should not be, otherwise it will lead to very negative consequences in the future. The cladding is fixed to the insulation in 50 cm increments.

The waterproofing is laid on the outside of the rafters, its direct function: protection against ingress of moisture inwards. On the surface of the waterproofing there is a roof.
Attention! In managing construction works strictly observe the safety precautions.
How to construct an attic yourself can see the video:
I think you noticed that the construction of the attic is quite a serious event. On how responsible you will come to business, the longevity of your creation depends.
There are quite a few examples of how a roof roof can look. Among its varieties, everyone can choose something of their own. If you need sufficient daylight, you can install a large window. Forms of attics can be rounded or with strictly straight angles and lines. Whichever choice you make, the approach to this matter should be serious and well thought out.
With the attic you can not only increase the number of used rooms. The structure with a high roof slope looks more solid and presentable, while its erection is less expensive than the construction of a full two-story building. On how to make a roof with your own hands, read this article.
Selecting the type of roof and truss system
To equip the attic, two types of roofs are most often used:conventional gable: the roof has two inclined ramps, its ends are covered with triangular walls - pediments;
broken line: each of the skates is further divided into two, located at different angles; the angle of inclination of the upper one is much less; The ends (pediments) are in the form of a pentagon.
Broken and gable roofs
The construction of a gable roof is certainly much easier. But the attic rooms in it, unfortunately, will be tight, and the ceilings - too low. Therefore, for the arrangement of a comfortable attic, broken gable roofs with a small (40-45 °) ramp angle are more often used. And the smaller this angle, the more spacious will be the attic rooms. However, in the construction of a more complex polyline construction, it will be necessary to have additional connections between the rafters (inclined beams serving the roof frame).
There are two types of rafter systems:
layered: rafters rest only on the outer walls;
hanging: additionally rely on capital partitions.
The first option is used only in the absence of such partitions. But, since the load on the load-bearing walls is quite high in this case, it is possible to erect layered structures only if the distance between the walls is up to 8 m. In other cases, it is better to use more durable suspension structures.

Naslonnye and hanging rafter systems
On broken roof skylights, combined systems, in which the rafters coming from the ridge are made hanging, and the lower lateral ones are stitched. Such a device is especially effective for roofs that have a small slope.

Combined rafter system

Skeleton of broken gable roof
To obtain a full attic with a ceiling height of 2.5 m height of the roof before its break should be equal to 3.1 m. angles of inclination - 60 and 30 ° (the slope of the upper part of the rafters is allowed to be 15-45 °).

Mauerlat device
Mauerlat - the lower roof support, laid on the top of the bearing outer walls:1. At the device gable roof Mauerlat is attached from both sides of the building at the location of the rafters. Thanks to him, the load from the weight of the roof is evenly distributed over the entire surface of the wall. With a small mass of the roof, it can only be laid under the rafter's feet, but in our case it must be laid all along the perimeter of the wall.

Mounting Mauerlate
2. For the manufacture of Mauerlate, a bar coniferous wood 100 × 150 mm. To the tree is not rotten, it is better to separate it from the wall a layer of waterproofing. Ruberoid or bitumen is most often used for these purposes.

Mauerlat waterproofing
3. Mauerlat is attached to the base with threaded studs under a wide washer. For this, holes are drilled in it exactly according to the size of the fastenings. At the same time, their frequency should be no less than the number of rafter legs, but not more than 2 m.
4. In the brick walls it is attached to wooden plugs. To strengthen the fastening of the Mauerlat in the masonry, it is possible to provide special pockets, where it will be laid. It is allowed to bookmark the masonry with a special wire (wire rod), with which the Mauerlatt is screwed to the base. When building buildings from aerated concrete or concrete slabs in the walls for it is provided an armopoyas with inserted thick metal pins. Their length should be enough for the girth of the Mauerlate and the tightening of the locknut.
5. In wooden buildings The upper timber of the log frame or timber is used as the Mauerlat.

AT wooden houses The top log can serve as a maurelatom
Installing runs and struts
The most common way to build a roof roof is the following algorithm:1. Mauerlates are the first to be laid.
2. For convenience of movement on the roof, a temporary flooring is being prepared replacing the scaffolding.

Installation of the U-shaped frame for the roof

Terms used in construction
Runs are called additional horizontal beams. They may be:
skating: this run is supported by the upper part of the rafters, in broken roof skylights can not be used;
lateral: are located evenly throughout the roof slope, their number may be different and depends on the size of the roof and the angle of its inclination.
4. On the finished frame laid rafters of durable beams 50 × 150 mm. Additional rigidity of the rafter legs is attached with the help of struts (diagonal beams serving to reinforce the design, installed at an angle of 45 °, sometimes they are called sub-stalks).
Fastening of rafter feet
There are two types of fastening of rafters:hard: on metal brackets, bolts or with a combination of wire and nails;
sliding (articulated): in the case of moving the house rafters move along the Mauerlath along the "sled", provided in the fastenings.

Rigid connection of rafters
The hinged version is more reliable, since it avoids displacements or even ruptures of roof elements during seasonal soil movements. When erecting wooden houses, subject to shrinkage, this kind of attachment also helps the roof to "adjust" to the new position of the walls.

Articulated mounting of rafter feet

Types of fastenings of rafters
Council. To determine the location of the upper rafters, a temporary stand should be made of several beams and nailed to the mauerlate so that the top part is exactly on the center line of the roof. It can easily align the upper rafters.
The upper part of the Mauerlat should be beveled. To avoid mistakes, it is better to make a template from a thinner board, which is applied to the run and draw on it the shape of the cut. In the event that the lower part of the rafters is attached to the cuts, they are cut out already in place.
Watch a video on how to make a roof with your own hands:
The house with an attic is not just an additional living space, but also a presentable view of the whole building. Even if the premise under the roof is not heated and is used only in the summer, it still has a powerful "air cushion", contributing to the retention of heat inside the entire building.
It will be difficult to create an attic on your own, especially if you do not have the appropriate experience, because it is quite a massive and complex structure.
The attic room can be installed under different types of roofs, but the most popular is a broken or gable construction. According to the scheme of the structure, they differ slightly from each other.

In order to determine which of the designs will be more suitable for your home and will be easier to install, you need to consider both options in more detail. In addition, the master who will be engaged in the construction of the attic roof must understand which of the two types of structures rafter systems choose.
Any roof refers to one of the existing two types of rafter systems, it is a nylon and suspension structure. Each of them has a special feature, and which one to choose depends on how the bearing walls of the structure are located.
Hanging construction
Hanging construction is a system of rafters, resting only on the outermost capital walls. This happens when in the house itself, except external walls, there are no capital partitions.
This construction can be used only if the distance between two capital walls is not more than 8 m, since this system gives a high load on the foundation. To reduce it, the suspension system uses different elements, such as puffs and pins, struts and crossbars. For example, the grandmother hangs a tightening to the ridge joint, and the struts pull the beams to the rafter feet.
For beams in the suspended system, hewn logs or thick enough bars installed on the edge are used. Their cross section must be at least 100x200 mm. The floor in the attic room should be as reliable as possible, and to avoid mistakes in the parameters, it is better to charge the calculations to a specialist.
Layer system
The levitation system, unlike the hanging system, is held not only on two external bearing walls, but also on the capital partitions installed on the foundation. Therefore, when planning the construction of the attic, it is necessary to think in advance what will be the design ribbon foundation, on which the capital partitions will be installed. The damping system is perfectly suited for the attic as it can withstand high loads, in comparison with the hanging version. It provides a good basis for floor beams and, accordingly, for the floor of the attic.
If you make a rugged version of the roof skylight, then it makes sense to use a combined roofing system, that is, the side rafters are installed on the pylon type, and the skate rafters are installed in the form of a hanging system.
Mansard roof with their own hands: video, photo
When building a house of blocks or brick with an attic, often its frontal side is built of the same material. This is convenient, because you do not have to calculate the parameters of these elements of the roof and collect from the bars, the field of which to lift to the wall. But it is important to understand that the walls of the building must necessarily stand on a solid foundation and have a good thickness, since this pediment gives a significant load to the main building.
If the attic serves as another floor year-round, the pediment made of foam blocks or bricks is an excellent option for creating a living space under the roof.
In order for the attic spaces with a gable roof to be spacious and have a normal height, the angle of the roof slopes should be approximately 45-50 °, depending on the width of the end part of the structure. If you take a smaller angle - the volume of the room will be significantly reduced. Increasing the steepness of the stingrays will make the roof unreasonably high, it will be heavier, it will have greater sailiness under wind load, and material costs will be inappropriate.
Of course, the installation of a gable roof is simpler, in comparison with a broken structure, since flat rafters are used without additional connections and any kinks. But the broken design allows you to make the room in this part more spacious, and the ceilings are accordingly higher.
A broken system both in execution, and in calculations, and in a flooring roofing is much more complicated, but it does not just create a more spacious space under the roof, but also gives solidity to the entire structure. Its main difficulty lies in the large number of complex connecting elements. All ligaments must be made according to the technology, otherwise the roof will be unstable.
If the walls are built of brick or stone, the front parts should be laid out beforehand during the general masonry. In this case, to create a unique truss system, leveling on the finished gables, you can install intermediate rafters and special retaining fasteners to them.
Before buying and preparing material for a particular system, you need to design a design with the appropriate dimensions - it will become the main guide for the preparation and assembly of elements during installation.
Video: rafter system of a broken roof skylight
Mansard project
When designing a loft construction scheme, it is better to do it in different projections in order to clearly understand how the elements of the rafter system will be placed. It is important to correctly calculate what should be the height of the roof ridge, since it depends on it the size of the area.
Preparing the scheme for the construction of the roof for the attic, you need to calculate the height of the ceiling, skate and the total area of the room.
The minimum height from the floor to the ridge is 2.5-2.7 m, but if such a distance is smaller, then the room can not be called an attic, the name attic is more appropriate to him. This indicator is set by the norms of SNIP.
In order for all elements to be accurately drawn and to have the correct location in the common system, it is necessary to repel the figure with straight angles, namely from the square or rectangle - the section of the created attic room. Based on the width and height of the future room, you will never go wrong with the angles under which the roof slopes are located, with the arrangement of rafters, skates and other retaining elements. Having found out these parameters, they must be immediately entered in the drawing.
First of all, you need to calculate the middle of the width of the front wall. Further from this point is determined the height of the ridge, the ceiling of the attic, the location of the walls (racks) and the size of the eaves.
Due to the fact that each of these designs has a certain number of connecting nodes with different configurations, it would be nice to draw each of these links separately, in order to understand in detail the features of conjugation of all the elements that connect at this point.
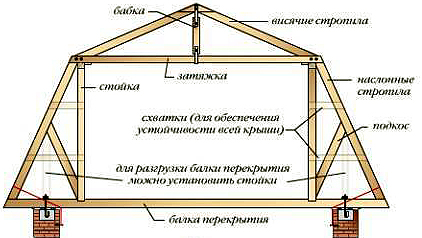
All rafter systems include basic and additional elements that may not be found in each structure. The main components of the roof of the attic are:
- beams overlapping (the basis for the remaining elements of the system). They are laid on the capital walls.
- A rope leg consisting of two sections (in the case of a broken chain) or a straight line in a gable system. The upper rafters in this case is called skate, because it forms the highest point of the roof - the skate, and the rafters that form the walls of the attic are called the side rafters.
- Mauerlat - a powerful beam, which is fixed to the capital side walls. On this element you need to install rafter legs.
- A ridge board or a beam is an integral element for a gable roof, but it is by no means always used in the construction of a broken roof.
- Construction - supporting elements, which are required to strengthen the broken and gable construction. In the first case, a lateral and ridge rafter is attached to it, and in the latter case the stand acts as a good support for the long rafter. Moreover, the racks are the frame for the plating and warming of the attic walls.
- The diagonal bracing elements further secure the longitudinal beams or racks and rafters, thereby making the structure even more durable.
- Inter-row girders are installed in the case of a broken roof for structural rigidity.
- Beams attic floor They are used in both versions of the system - they are connected by racks, and they act as a skeleton for the ceiling device.
In order to be sure that a project developed without errors, it would be nice to show it to a specialist. It will determine how correctly you have chosen the parameters of the attic to the length and width of the walls of the building.
Video: calculation of the attic roof using software
Parameters of materials for the construction of the attic roof
When the graphic element is ready, then, based on the sizes placed on it, you can calculate the amount of materials that will be needed for the construction of the attic roof. Select materials are necessary by their characteristics, which must meet the requirements of environmental and fire safety.
For wood it is necessary to provide treatment with antiseptic, which will significantly reduce the combustibility of materials. For the construction will be required:
- boards for rafter legs, the cross section of which is selected according to the results of calculations, which you will learn a little later.
- A beam of 150x200 or 100x150 mm - for beams of ceilings, depending on the width between the bearing walls, the rafter system, as well as for runs, ends or diagonal legs - provided, of course, that they are designed.
- A bar from 100х150 or 150х150 mm, designed for laying the Mauerlat.
- Usually for racks a bar of 150х150 or 100х100 mm is applied.
- Unedged board for rough floors, as well as some fasteners.
- Annealed steel wire with a diameter of 3-4 mm - for fastening some parts.
- Bolts, nails, staples different sizes, corners of different configurations and other fasteners.
- Lumber for a counterbrush and roofing material for roofing material - depending on the type of roofing.
- Steam and waterproofing membranes.
- Insulation materials intended for thermal insulation of the roof.
- Roofing material and special fasteners.
Cross-section of rafters
The rafters are provided with a roof element that perceives the main external loads, which means that special requirements are imposed on their cross section.
The size of the required lumber depends on many parameters - starting from the step between the rafter legs, the length of these legs between the support points and ending with the wind and snow load falling on them.
The geometric parameters of the rafter system are easily determined in the drawing. But in order to understand other parameters, it is necessary to turn to reference materials and perform some calculations.
It's not a secret for anyone that the snow load differs in different regions of our country. Below in the figure you will see a map on which the whole of Russia is divided into zones showing a snow load.
In total, there are 8 zones (the latter refers to the extreme zones and it can not be considered for the construction of a roof skylight).
Sg - the indicator in the table (carefully study the map and the table attached to it).
μ - correction factor, which depends on the steepness of the roof slope.
For example, if the angle of the roof slope is less than 25 °, then - μ = 1.0; if from 25 to 60 °, then μ = 0,7; if more than 60 °, the snow will not stay on the roof, and the snow load is not taken into account.
If the attic roof of a broken construction, then for different parts of it the load may have unequal values.
The angle of the roof slope can be determined by the simple ratio of the height and the base of the triangle (usually half the width of the span) or the protractor according to the drawing.
This indicator also largely depends on the region of construction of the structure, on the height of its roof and on the characteristics of the environment.
And again for the calculation it will be necessary to determine the initial data on the map and the table attached to it.
The calculation for this task will be carried out according to the following formula:
Wp = W × k × c
W is the value in the table, depending on the region.
k is a coefficient that takes into account the location and height of the building (see table).
The letters in the table indicate the following zones:
- A - open area, forest-steppe, steppe, tundra, deserts, forest-tundra, coasts of seas, reservoirs and large lakes.
- B - the territory of cities, a terrain with frequent obstacles to the wind, artificial or relief, a height of at least 10 m, a wooded area.
- B - dense urban development, the height of buildings from 25 m.
from - coefficient, which depends on the prevailing direction of the wind (roses of the winds of the region), and also on the angle of the roof.
With such a ratio, the matter is much more complicated, since the wind can have a double effect on the roofs. So, it has a tipping, direct effect on the roofing ramps. However, for small angles, the aerodynamic effect of the wind is of particular importance - it raises the slope plane due to the arising lift forces.
As you have already noticed, on the diagrams that are attached to the tables, the roof sections that are exposed to the maximum wind loads are marked, and the corresponding coefficients used for the calculation are indicated.
It should be noted that at slope angles up to 30 ° (in the section of ridge rafters) the coefficients are denoted by both negative (directed upwards) and plus sign. They somewhat extinguish the wind load, and to reduce the impact of lifting forces, you need to carefully fix roofing material and the rafters on this site, using additional connections (for example, annealed steel wire).
Once the snow and wind loads are calculated, they can be summed up and taking into account the design features of the system, to reveal the cross-section of the rafters.
Please note that these figures are for the most commonly used coniferous materials (spruce, pine, larch or cedar). In the table you can see the maximum length of the rafters between the supports, the section of the board, depending on the step between the rafters and the grade of the material.
The value of the total load is indicated in Kilopascals (kPa). Conduct this value in the usual kilograms per m2 will not be difficult. 1 kPa ≈ 100 kg / m².
As for the value of the board dimensions by its section, it is rounded upwards standard sizes saw-timbers.
What tools will be needed to equip the attic roof with their own hands?
Of course, during the work can not do without a set of tools, the list of which includes:
- screwdriver, electric drill;
- building level, measuring tape, plumb line and square;
- chisel, ax, hammer, chisel;
- electric jigsaw, circular saw, hacksaw;
- carpenter's knife.
If the work will be conducted in the environment of literate mentors, step by step and accurately, and the tool will be of high quality, the process will be much accelerated.
Mansard roof with their own hands: the main stages + video
It is important to strictly follow the sequence of work, because only so the design will be strong and reliable.
- Mounting of the Mauerlat.
Installation of any rafter system should begin with fastening on the end of the side walls of the buildings of a powerful supporting bar - Mauerlat. It is convenient to install rafter legs. It is made of high-quality bar 100x150 mm. Mauerlat is laid on the waterproofing from the roofing material, laid on the upper end of the wall (regardless of the material).
Thanks to the Mauerlat, the load is evenly distributed over the walls and transferred to the foundation. It is fixed to the wall by means of metal pins, which are pre-mounted in a crown or a concrete belt that runs along the upper edge of the wall of the structure or with 12 mm anchor bolts. They should go deeper into the wall no less than 150-170 mm. In the event that the Mauerlatt is installed on a wall made of wood, the beams are attached to it using wooden nagels.
- Installation of rafters.
The installation of the roof truss starts with the installation of joists, which can be fixed on top of the Mauerlat (if you plan to take the beams out of the room, increasing its area). In this design, the rafter legs are fixed directly to the joists.
Otherwise, they can be laid on the waterproof walls and fixed with the help of staples or corners to the inner edge of the Mauerlate. This option is used if the truss legs need to be fastened directly to the Mauerlat.
Racks should be at the same distance from the middle of the joist beam. In the future, they will determine the location of the walls of the room, namely its width.
The bars for the posts must have a section corresponding to the size of the floor beams. Racks are attached to the beams using wooden lining and special angles. But for the beginning they are nailed with nails, after which they are leveled with the aid of a plumb and construction level and only then they are fixed with the calculation for the forthcoming loads.
As soon as the first pair of racks is installed, they are fastened on top by a bar (tightening). It, in turn, is connected with the help of metal corners with posts.
When the tightening is fixed, you will get a U-shaped design. On the sides of it are installed layered rafters, which are laid on the Mauerlat or attached to the beam overlapping the second end.
On the established supports for a bar or in a rafter the groove (a special notch) is sawed out. With its use rafters are installed on the cantilever beam and fastened by means of metal staples.
To ensure the rigidity of the structure from the base of the rack to the middle of the side rafter you can install struts. If this is not enough, and you do not mind the material, it would be nice to strengthen the overall design of the fights and additional racks.
Then the middle is calculated on tightening. To this place will be attached a beam that supports the ridge connection of the upper suspension subsystem of the rafters.
The next stage is the installation of ridge rafters. They can be fastened with various connections - these can be powerful bolts with metal washers or plates or a metal cover.
After installing them to the middle of the tightening and the skate is attached.
Upon completion of work on one part of the truss structure, the rest should be done according to the same principle. The distance between adjacent rafters in such a system should not be more than 900-950 mm, but the best option is an interval of 600 mm, which will give the construction the necessary stability and rigidity and it will be convenient for insulation by means of standard mineral wool mats. But this significantly increases the construction and increases the cost of materials.
First, the side parts of the system are assembled, after which the intermediate parts are installed. They are connected together by runs that are installed between the upper ends of the posts and work like struts. So, it turns out a rigid construction of rafters attic, where there will already be a ready frame for wall finishing.
Mansard roof waterproofing
As soon as you build a rafter system, you can begin to finish it with insulating and other related materials.
It should be noted that the first coating over the rafters should be a waterproofing and windproof film. It is attached to the rafters with a stapler and staples, starting from the eaves. Cloths are overlapped (200 mm), and then joints are glued together with waterproof tape.
On the top of the waterproofing, a grating is stuffed, which will better fix the film on the surface and create a ventilation distance between the roofing and windproof material. Usually, the grating is made of boards 50-70 mm thick and 100-150 mm wide.
Perpendicularly it is fixed to the lath, on which the roofing material is laid. As for the step between racks, it is calculated depending on the size and type of sheet roofing material, taking into account the overlap required for it.
If you use soft roofing, then the plywood sheets are usually fixed to the control lattice.
How is the installation of the roofing
The roofing material is fixed to the prepared plywood or crate. Usually, its installation starts from the roof eaves and then alternately, from one of the edges - depending on the type of roof. The roofing sheets themselves are lapped. If a metal tile or metal profile is used for the coating, this material is fixed using special screws with elastic gaskets. Typically, fasteners are selected in color to the material.
The most difficult stage in covering a broken roof is the transition from layered side rafters to ridge rafters. Also, there may be some difficulties in the event that the roof provides protrusions for the arrangement of the roof above the windows or balconies.
Moreover, if a chimney comes out on the roof, it requires a separate design of the hole in the insulation layer and the roofing system, and on the roof - a device around a reliable waterproofing.
What material is better to use for the roof of the attic, you can also find out on our construction portal in the corresponding section.
Video: construction of the attic roof with your own hands
It is worth noting that the work on the erection of any roof, including such a complex, as an attic, is very responsible and dangerous, and therefore requires increased security measures. If you do not have experience in such construction processes, it is better to instruct them to perform specialists or to invite an experienced master, under whose control to perform all actions, carefully and carefully.
When constructing such a complex structure, as the attic roof with your own hands, you should consider a lot of different factors. First of all, you need to choose the type of roof, which there are many. Further it is necessary with calculation, slope of skates, the area of a roof and quantity of materials necessary for its construction.
The roof is built on certain technologies, which can not be violated. On how to make a full-fledged house in a country house attic floor and talk in this article.
Types of mansard roofs
Before we begin to understand how to properly build a dormer roof, let's see what kinds of such designs are available. Such roofs differ in shape and number of skates, the angle of their inclination, the type of roofing material used, and the degree of insulation. The choice of this or that type of roof depends on a variety of factors: the architectural design of the house as a whole, the climatic zone in which the building is located, the financial capabilities of its owners, etc. Attic can in principle be arranged under the roof of any structure.


![]()


Mansard roofs are:
- Single-edged. This is the easiest type of roof construction. There will be only one full wall under the shed roof in the attic;
- Gable. The construction of a roof roof of this type is also not particularly complicated. Its disadvantage is not a very large useful area. After all, the corners of the room under the gable roof form an unused "deaf" zone;
- Sloping broken lines. This option is much more convenient in terms of;
- Shatrovymi. Such a roof is arranged in square buildings. The hipped roof has four identical slopes;

Shatrovaya attic roof is arranged in square houses
- Valmovymi. It is also a four-story mansard roof. Instead of gables in the design, skates are provided. The roofing roof is also very convenient for the construction of an attic under it;
- Multi-clasp. Such roofs have a very complex configuration;
- Pyramidal, conical, dome. Roofs of this type are arranged on buildings of complex shape.

Under the attic can be converted roof of any design
There is also a mansard-type roof itself. Its design involves taking skates out far enough beyond the building itself on special consoles.
On a note: Most often, a double-pitched broken roof is arranged with the help of the attic. The technology of its construction is quite simple, and the room as a result is quite spacious.How to make a roofing calculation
In order to make the calculation of the amount of roofing material, insulation, hydro- and vapor barrier film, it is first of all necessary to determine the area of the future roof. It is especially difficult to perform the necessary calculations in the event that the roof is broken and has a complex configuration. In this case, the scheme of the attic roof is drawn and is divided into simple geometric figures. Next, the area of each figure is calculated. The obtained results add up.
The area of the triangle is calculated by the formula S = (bxh) / 2, where b is the length of the base of the triangle, h is its height. The formula for calculating the area of the trapezoid is S = ((a + b) / 2) xh, where a and b are the bases of the trapezoid, and h is its height. The formula of the circle is S = nxr 2, where r is the radius of the circle. The number n = 3.14

Attic roof. Drawings allow you to easily calculate the roof area
- Used roofing material. Manufacturers always indicate what the minimum and maximum angle of inclination is acceptable for one or another of its kind;
- Climatic conditions. Mansard roof with their own hands is arranged taking into account the region in which the building is located. The steeper the angle of inclination, the greater the load on the roof will be provided by the wind. But the load from snow and ice on the roofing cake and rafters will be less;
- Appointment of the building. The construction of the attic roof in our case should be developed taking into account what is in the future. Therefore, it is recommended to choose an angle such that the height from the joist to the top of the roof is not less than 2.5 m, taking into account the thickness of the thermal insulator and the skin.
Continue installing the attic roof installation of the lower (layered) rafters. For them, a bar with a section of 50x150 mm is suitable. Preliminary it is necessary to make a template from not too thick board. One end of it is applied to the Mauerlat, and the other to the run. Then mark the shape of the cut and cut it out. On this pattern the rafters are cut.
To install the upper (suspended) rafters mark the center of the roof. At the same time, the Mauerlat is fitted with a temporary stand and an extreme tightening is established. Next, a template is prepared from the board and the ends of the upper rafters are cut along it. In the center they are fastened together by metal plates. Then you need to put the suspension racks (bar 25x150mm). After that, the lower rafters are strengthened with struts (board 50x150 mm) and the pediments are sewn up.

For fixing all elements of the rafters, use galvanized corners, screws and nails.
Rims
Projects of attic roofs can provide for the use of a variety of roofing materials. Very often you can see the roofing of metal or corrugated board. Under them can be installed a thin crate. Using roll materials mounted solid.

The roof of the attic can be solid or thin
Waterproofing and installation of roofing material
The roof of the attic with your own hands will turn out to be reliable only if there is a quality waterproofing. Most often, a superdiffusion membrane is used to protect the roofs. Mount it start from the bottom. At an angle of inclination of the roof from 15 to 30 grams overlap between the rows of the film should be approximately 25 cm, with an angle greater than 30 grams - 15-20 cm. Fastens the film to the rafters by means of special staples. Over the film is packed with a grating. On it and the roofing material is fixed.

Roofing material is mounted over the waterproofing film
Important: When installing, make sure that the film does not stretch. The material should be slightly sagging. Thus, ventilation of the under-roof space is provided.Warming
With all the technologies of thermal insulation, it will be suitable for a roof skylight. With their hands, the heat insulator is usually mounted from the inside of the room. In the case of installation of insulation from the outside is pre-executed. After the laying is completed, so that the plates do not fall out, they are tightened with wire from the bottom, fixing it to the rafters.

Insulation of the roof of houses with an attic. Photo of basalt cotton wool between rafters
On a note: Most often for warmth of attics is used mineral wool. It lies between the rafters denser than polystyrene. As a result, the appearance of cold bridges is excluded.Vapor and cladding
Mansard gable roof is arranged with the mandatory use of vapor barrier material. On top of the cotton wool, it is necessary to stretch it foil into the room. Above him, is covered with a grating under the lining. Thus, ventilation is arranged. From the inside, the attic is covered with plasterboard, lining or plywood.
In this way, a reliable attic roof can be erected by one's own hands. The video below presents the process of constructing a roofing cake with the insulation laid outside.
As you can see, the procedure for erecting a mansard roof is quite technologically complicated. However, at the dacha with their own hands, with a little effort, it is still possible.
The modern attic roof is an excellent opportunity without much trouble to significantly expand the living space of your house. But, if you involve the work of builders, then it can fly into a lot of money. It is understandable that each of us thought about the question, can we do everything ourselves without experience. We assure, the attic roof with our own hands is more than real. We offer you an exhaustive instruction.
Currently the best option - A broken attic. It is quite spacious and can really become a full-fledged residential area with a large area. Naturally, this requires accurate calculations.
The construction of the attic roof will require you to take into account many factors before. Let's list the main ones.
Video about the attic roof of your house with your own hands
It is understandable that the smaller the angle of inclination, the more useful space will be on your attic. But it is far from always necessary to strive for the most gentle placement. Let's list some features of the choice:
- If your house is in a territory with a temperate climate, where it is often windy weather, and snow is a rarity, you can safely make a roof with a small slope;
- In the event that snowfalls and showers - a frequent occurrence for your area, from a shallow roof should be discarded;
- Do not forget that you need to take care of quality heat, sound and waterproofing. The attic is a living room like the other rooms in your house;
- The best materials for the roof - tile or slate. Many mistakenly put a metal coating, but with the arrival of colds, they face problems of heat saving in the attic. Please note that the materials must be fireproof and moisture resistant. The roof always consists of wooden elements. For best preservation, it is recommended that all such surfaces be treated with an antifungal solution;
- The external staircase for the attic will save considerable space in the house. The internal staircase is a much more convenient option, but it takes a lot of places. Great, if you take care of installing a ceiling staircase. It practically does not take places. As an alternative, you can install a spiral staircase, but its convenience is often questioned.

External staircase for the attic will significantly save space in the house
- First, you will need wooden beams 10x10 cm in cross section. They are superimposed over the waterproofing. The best material for it is ruberoid or roofing felt, which is sold in rolls. Working with them is quite convenient and you will not need any additional skills. If the overlap is made of wood, then there is no need to lay additional beams under the main beams.
- The next step is the installation of racks on the beams. You will use all the same bar with a section of 10x10 cm. These racks are a kind of skeleton of the walls of your attic. To ensure that they fully fulfill their functions, they should be installed no more than two meters from each other. Make sure that each of them is perfectly even. Each is recommended to check with the level and, if necessary, file in the right places. When the racks are installed, they must be sewn on both sides. For the inner side is an excellent option - plasterboard or ordinary plywood, for external - croaker. It is important not to forget at this stage to lay a heater between the racks. Each stand is separately fixed with spikes and staples. To ensure that they do not bend, we recommend that they be fixed as a temporary brace.
- Next, lay the upper beam. Its cross section should be the same as in the previous paragraphs. You can fix it as you like. But take care that the beams are held tightly and firmly.

Each stand is separately fixed with spikes and staples
- Now you need to install the Mauerlat. This is a kind of support for the rear leg, which is located at the bottom of the structure. For Mauerlat you will need a beam with a section of 40x40 cm or a board with the same thickness. Thanks to the Mauerlate, the roof rafters will be fastened to the walls with high strength. It allows you to redirect the weight of the roof directly to the walls. More than 40 cm the cross section is optional. All the same, the Mauerlatt lies directly on the wall and the load on it is relatively small. Just do not forget to put a waterproofing under it, otherwise it will start to decay with time.
- Qualitatively fixed mauerlat protects your roof from the effects of wind, snow mass in winter and other loads. Therefore, make sure that it is fixed carefully. To do this, you can use a wire with a diameter of up to 5 mm. It is best to choose an annealed wire, which is just designed for tying. In order to make the walls more durable, the wire is embedded directly into them.
- Now you need to set the rafter feet. Make markings on the rafter and mauerlate in places where the rafters will be installed. Typically, the step is 1-1.2 m. For rafters, a board with a section of 4-5 cm and a width of 15 cm is suitable. Choose only perfectly flat boards. It is better to overpay a little money for them, but be sure that the living attic with your own hands will not become for you the cause of the roof of the attic.

For rafters, a board with a section of 4-5 cm and a width of 15 cm
- Rafting legs should be supported by a ridge beam. If your attic has a large area, then the weight of its roof will be large. Therefore, the beam is an indispensable element of construction. It is not necessary only if the length of the rafters is less than eight meters. In this case, you can do with ordinary stretch marks.
- Installation of the fillets. Do it according to the same scheme as the rafters. To simplify the process, start with the two extreme ones, stretch the twine between them and equalize it when installing the following.
- Now you need to nail the floorboard to the mare. It will become an obstacle to the wind and almost any precipitation.
- Before you make a roof skylight, you need to think about where the windows will be installed. Remember that their area should occupy not less than 12-13% of the area of the side walls. Where you decide to install windows, you need to strengthen the rafters. To do this, install the cross bars. They will assume the role of the lower and upper part of the opening, where the window frame will be installed and fastened.

Before you make a dormer, you need to think about where the windows will be installed
When the previous ten items are completed, you need to carefully check everything that's done. Already at this stage you will understand how to make a roof with an attic without any problems, but always need to be reinsured. Especially in the event that you do this for the first time.
Carefully walk through the level of all rafters and beams, check to see if they really tightly and securely stick, whether there is a heater anywhere, whether it is necessary to finish problem areas. It will be better if you ask someone of the more experienced builders to assess with a trained eye whether or not everything is done the way it should. Remember that the roof in your home must be safe and strong. But if everything is normal and the design is kept reliably, you can proceed to further work:
- You have already created the skeleton of the roof. Now you need to nail the rails of the crate to the rafters. The step depends on which roofing material you choose for your roof.
- When the lath is installed, it is necessary to install a hydraulic barrier on it. In most cases, the best polyethylene film is suitable for this purpose. It is inexpensive, high-quality protection of the attic from moisture ingress and is easily attached with the help of construction staples. The main thing to remember is that the layers of the film must be laid from the bottom to the top with overlapping layers on top of each other.
- It is necessary to put over the film thermal insulation layer. One of better materials, which serves for these purposes, - mineral wool. It is light, perfectly keeps the heat and at the same time completely safe for your health, unlike many others heat insulating materials. In addition, it effectively prevents the spread of rodents in your home.

It is necessary to put a heat-insulating layer on top of the film
- When you reach the roof, follow the same procedure as in the case of polyethylene film. The roofing ball also lies from the bottom up, and the elements overlap. Take care that in those places where there is a fracture of the roof, the upper ball of the roof protrudes above the lower one. It is very important. Otherwise, at the slightest rain your roof will leak, and the structure will gradually rot.
- Installation of the ridge should take place in such a way that its design completely excludes the possibility of rainfall falling under the roof of your roof.
Completion of installation
The bulk of the work has come to an end. It is recommended to make the roof roofs multilayered so that they provide the best heat, noise and waterproofing of the entire attic. Do not forget also that the attic must "breathe". Modern windows and doors are an integral part of any such roof.
If you are not completely determined with the installation of the staircase, then for the beginning it is better to install the external one. So it will be cheaper and easier. In any case, if you feel that this option does not suit you, you can make a staircase indoors at any time, by sacrificing space in the house.
Video about gable roof
Now you know how to build a mansard roof by all the rules and do not resort to the help of an expensive team of builders. Stock up with patience, choose high-quality materials and tools, and then follow our instructions. Good luck!