Cost: depends on the size and thickness of the product, please check with the operator:Contacts.
Terms: from 7 days.
Material: high-strength washed decorative concrete is pleasant to the touch.
Color: the color of the desired shade is added to the concrete.
Using the technology of "washed concrete" allows. Technology from Nanobeton companies is always a new, highly demanded market, an original solution.
Working with concrete paths allows you to get a product with good decorative and performance characteristics. At the same time, the cost is quite low.
Method of production using the technology of "washed concrete" does not require further processing of the resulting product. At the same time, finished products (concrete sinks) have an excellent natural appearance.
The use of the technology of "washed concrete" by vibrating or vibro-pressing is also possible for the production of individual concrete products (concrete sinks). And also for plants reinforced concrete structures for the production of reinforced concrete panels and sound barriers from concrete.
* specially developed deactivators of the surface layer of concrete, depending on the desired decorative effect, as well as the composition of the concrete, give the required depth of exposure of the nature of the surface of the aggregate.
* thoroughly selected composition of concrete. Use of decorative aggregate, such as marble or granite crumb, river pebbles. The appearance of the resulting product depends on the use of the composition and color of the filler. Manufacturers of concrete products (concrete sinks), using the technology of "washed concrete", use fillers of different colors in special proportions.
The main elements of the technology "washed concrete" are:
At all times to use natural materials for external and internal design of buildings and surrounding areas was fashionable. Among the huge variety of natural natural and artificial decorative stones produced using vibro-technology, concrete products such as "Concrete sinks" made using the technology of "washed concrete" are distinguished with their natural and original appearance. The largest distribution of concrete products using the technology of "washed concrete" was obtained in Western Europe and the United States of America. For today and in the CIS countries this technology finds its admirers.
CALL US!
We can produce any products (Concrete countertops, concrete tiles, concrete panels, concrete sinks, concrete facades, decorative plaster for concrete, concrete sills, concrete urns, benches and tables .It uses concrete in the interior, decorative concrete).
Open CONTACTS.
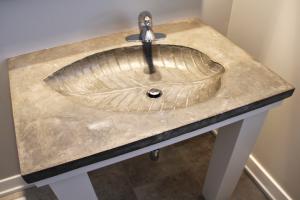

The sink and countertop is one of the main elements of the bathroom, this is the most important detail of the interior.
The shell itself should be comfortable and practical, and the working surface - strong and moisture resistant.
At the same time, it is important and external design, which does not just fit into the interior, but in many ways forms the entire style of the room.
These requirements are ideally suited to the construction of artificial or natural stone. But such products are expensive, yes, and it is not always easy to find an option that suits all parameters.
Original crafts for your home
A stone structure, including a table top and a sink - is a reliable, durable, and always an excellent looking product.
Similar construction of concrete, manufactured by their own hands by type, is not much inferior to it both in terms of characteristics and appearance.
In this case, the concrete version is cheaper, and in the construction of its own production, it is easy to take into account the features of the premises, wishes and even the caprices of the owner.
What will be required for manufacturing
Making your own hands a concrete sink with a countertop is a laborious process, requiring a lot of work with different materials.
To produce such a construction,:

The minimum required for the tool is:
Manufacturing process
The technology of making a sink with a concrete top in its own hands is quite simple.
It is only necessary to follow a certain order of actions.
Preliminary preparation
Begin work with a sketch (drawing) indicating the size of the finished product.
Practical advice!
Before the start of work, it is desirable to mark the position of the future shell with a table top on the bearing walls, to release these areas of their surface from paint, plaster and other coatings.
Manufacturing of formwork
It is best to start the manufacture of formwork from a full-scale product model.
 It can be done easily (suitable for this purpose is a thick cardboard), and the work will be simplified considerably.
After making the layout proceed to the most difficult part of the formwork - arch the workpiece for the bowl of the shell.
Then cut the pieces of fiberboard or other material of the necessary dimensions for the base and the formwork rails and fasten them using a breadboard model as a frame.
Parts fasten with screws and metal corners. Joints are treated with a sealant.
If desired, with the help of plasticine form rounded or angled (at 45 degrees) chamfers.
Important! When assembling the formwork for the shell bowl, it is necessary to provide holes for draining and overflowing the water.
Organize them easily, with the help of segments plastic pipes of the corresponding diameter. They are inserted into the holes of the formwork under the bowl.
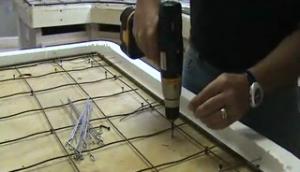
Mounting of fittings
With the help of a perforator in the bearing walls, through holes are punched under the bars of the armature.
 The arrangement of the holes is selected in this way, so that the reinforcement is in the middle of the concrete floor of the countertop and the sink.
Important! The bars of the armature, passing under the bottom of the bowl, beforehand, beforehand, bend, giving them the desired shape.
For reliable fastening in the bearing walls at the ends of the rods, steel washers are welded, which are then embedded in holes drilled in the wall with a hammer.
The whole construction is welded at the points of intersection of the rods or tied with steel wire.
Installation of formwork
The gathered formwork is pressed against the wall and fastened with steel corners, dowels and screws.
Under the foundation of the formwork temporary supports are made of bricks.
Important note! Supports under the bowl of the shell should occupy as much of the area as possible, because the formwork for it is a thin sheet of galvanized steel, which can not withstand the weight of the concrete poured.
Preparation of concrete solution
 For countertops and sinks, intended for finishing with tiles or other materials, the entire volume of concrete is cooked in the same way.
For the solution take:
- 1 part of 400 or 500 cement,
- 3 parts of a fine filler - sand or granite flour,
- 3-3.5 parts of small granite or other rubble,
- add ½ part of water to the mixture.
Important!
Water in the solution is added gradually to avoid excessive maintenance, but not to make the solution too dry and hard.
Ideal consistency of concrete solution for the sink and countertop - the consistency of thick sour cream.
If decorative finish countertops and the bowl is not planned, the concrete is poured into several layers, applying for each of them different recipes.
For the lower layer, the usual concrete M200 - M400.
The base layer can be the same or lightweight, in which a portion of the bulky filler is replaced with polystyrene beads.
The outer layer and the space along the sides of the formwork are poured with decorative concrete, in which granite or marble chips, burnt cullet and other materials are used as a large aggregate.
 When preparing this layer use a variety of dyes. Their gradual introduction during mixing and pouring will create original color patterns.
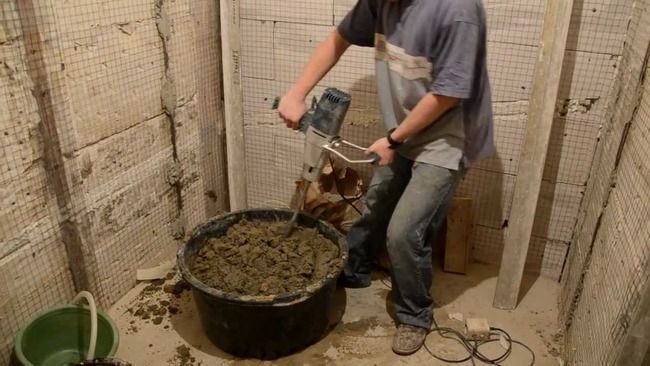
Important!! The main condition for obtaining high-quality concrete is a carefully mixed solution.
Use for this purpose a conventional bucket and a special drill bit. For large volumes, a flat container is required, in which it is convenient to mix the solution with a shovel.
Filling the structure
The prepared solution is poured into the installed formwork, starting from the most difficult place - the bowls of the shell.
During the pouring of the solution, rammed with light strokes, which makes it possible to compact the rubble and remove excess air bubbles.
Concrete is poured with one or several layers so that the total height of the compacted material exceeds the level of the formwork by 1-2 mm, because, as it dries, the concrete volume will decrease and the level will drop, precisely, by this amount.
After the pouring is finished, the structure is left to dry for at least a week.
In 7 days, concrete collects about 70% of the strength, which allows you to dismantle the formwork and begin work on the finish.
Disassemble formwork from above, in the last place remove temporary supports.
They can be left to dry up the structure and set its strength - for 28-40 days.
After dismantling the formwork, remove the plastic pipes from the drain holes and overflow.
Exterior finish
 Using ceramic tiles cover the surface with a correcting leveling layer of glue, then with a spatula-comb apply a finishing layer of tile glue and lay the tile.
On a note!
For a shell of complex shape, each tile will have to be cut!
Practical note!
For finishing the side surfaces, tile glue is more dense than for horizontal ones.
After installing the tiles and drying the glue, in the seams rub the grout using a rubber spatula.
If the exterior finish is not provided, the surfaces are ground and polished.
On the first pass a grinding machine with a coarse-grained nozzle removes about 1 mm of concrete, which makes it possible to equalize the flaws.
Then, the surfaces are rubbed with cement mortar (possibly with decorative fillers) and after drying they are again ground.
The process is repeated 3-4 times, consistently reducing the grain size of the nozzles.
After finishing the finishing works, plumbing fixtures are installed.
A hand-built sink made of concrete will cost the home master, much cheaper. In shops or in workshops, the price for similar products will exceed costs several times.
Look at the whole process of making the shell, including the formwork and shape. Only 8 minutes.
Shells made of stone, fascinate with tranquil beauty and unique elegance. Each such washbasin is unique in its kind, because its creation occurs manually. This design refinement and is very indecent money. But the inexhaustible desire of a person to save and create something with his own hands gives fruit and making a stone sink with his own hands becomes quite an achievable goal.
But it's not so easy to get a suitable blank under the sink. It is more realistic to produce decorative plumbing made of artificial stone by oneself. But the concrete shell is in no way inferior to the statue of granite or marble. Using the latest achievements in the field of concreting, you can create a real masterpiece. How to do it and how to process natural stone we will consider below.
Manufacture of a washbasin made of concrete with subsequent lining
The most important in such a time-consuming process is the quality form of the future washstand and, of course, the preparation of a special concrete mortar that will be characterized by increased performance characteristics. Consider an option is not a simple manufacture, but a pouring with the simultaneous attachment of the sink to the wall.
What will be required in the manufacturing process
In order not to be distracted or slow down the production process, it is best to prepare everything you need beforehand. Such an omission may affect the quality of the future product.
Required materials for formwork:
- dowels made of plastic + 8 mm self-tapping screws - 30 pcs;
- sheet of OSB or fiberboard. If there are scraps of different sizes of such kind in the bins, then you do not need to buy whole sheets;
- sheet of stainless tin;
- sealant. You can use any, but preferably the plumbing;
- fittings with a diameter of 10 mm - 8 bars;
- parts of plastic pipes for drainage and for making a hole for the mixer. If desired, you can purchase a headset for the equipment of the overflow system in the sink;
- polyethylene film;
- any furniture corners and pendants of the U-shape;
- bricks or other strong objects that will become a reliable support for the filled concrete formwork.
Required components for concrete mix:
- sifted, washed and dried river sand, with a fineness of 1-2 mm;
- portland cement grade not lower than M400D0;
- warm water without chemical impurities;
- if the finish is expected, then granite screening is taken as a filler, if it is not foreseen, then marble chips are used;
- to improve the characteristics of a concrete product, fibrous fibers are often added to its composition, which protects the concrete from cracking;
- any plasticizer you like and a hydrophobizing additive.
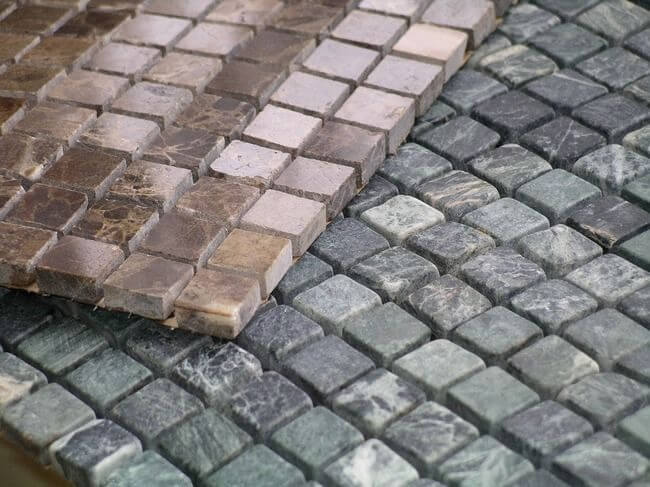
Materials for cladding:
- tiled mosaic tiles;
- grout for seams waterproof;
- tile adhesive resistant to fungal formation.
Required Tools:
- electric jig saw or circular;
- screwdriver;
- concrete vibrator;
- perforator complete with drills for concrete sizes of 8 and 10 mm;
- a hammer;
- welding;
- a Bulgarian with a diamond disc;
- scissors for metal;
- measuring devices: level and tape measure;
- mixer for kneading;
- rule;
- pencil for marking;
- gun for the pipe;
- metal beacons;
- basin under the preparation of the solution. You can use an old bath;
- crosses for tiles;
- rubber spatula;
- comb for applying glue.
Formwork and its fixing
Before you begin to make the form itself, clearly plan not only the location of the future car wash, but also consider possible changes in the subsequent repair - the finish of the walls, floor screed, etc.
What kind of shape will have a future sink made of concrete - completely your choice. You can make the formwork anywhere, the main thing is to make it smooth and high-quality. If in its geometry smooth curved sections are planned for their execution it is better to use a metal sheet. The bosom of the washstand itself is also best made from tin. After assembling all the elements, carefully seal all the seams and joints.
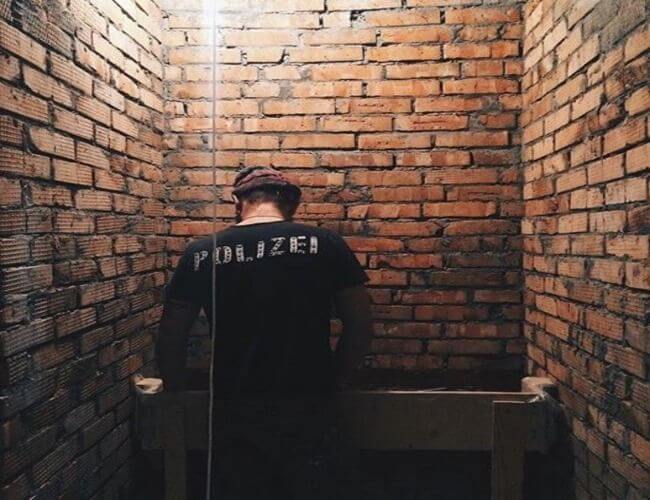
When the formwork is ready, you can proceed to fix it in the wall. It is necessary that the wall is a reliable concrete or brick construction. It is best if the shells are fixed in the corner opening. If you decide to make a street washstand, then beforehand it is necessary to make a rack of bricks or high-quality concrete blocks.
Step 1. Drilled through holes in the wall under the reinforcement structure. It is important that it is in the middle of the mold to be filled. The frame itself is held together or by means. The first method is preferable.
Stage 2. The finished formwork is fixed to the wall with screws and corners.
Stage 3. On the reverse side of the wall metal bars are welded to the reinforcing bars.
Stage 4. Under the formwork you need to build a solid foundation of bricks or blocks. It is better if it will look like a solid stand on the area of the whole form.
Stage 5. Thoroughly clean the formwork from dirt and the last time make sure the structure is even.
Preparation of concrete
Mixing the solution is best done with a construction mixer in a prepared container, and not in a concrete mixer. This approach will maximize the mixing of the components.
Stage 1. Initially, add all the cement and the eighth part of the water with additives. It is necessary to stir until a homogeneous mass is obtained. It is best to dissolve the plasticizer and the fiber first in water.
Stage 2. After the whole part of the sand is mixed and mixed, then the screening or granular crumb is added.
Step 3. After thorough mixing, if necessary, add the rest of the water.
Important! Do not seek to make concrete more plastic - this reduces its strength characteristics. The harder the mixture, the better the product will turn out.
Piling and removal of formwork
Start casting the mold is best from the most difficult and difficult places, gently vibrating the concrete before obtaining the cement milk - no more than 2 minutes. After the final filling of the mold, carefully smooth the surface of the shell and cover it with a film. After 2 - 3 days, you can carefully remove the formwork. Installation of the crane and siphon is better to postpone for a month, when the concrete product dries out finally.
Finishing of the product
After you remove the form before you will appear ready-made concrete product, which must be brought to perfection. This can be done in two ways:
- grinding;
- tiling.
If you decide to simply sand the surface, then before that you need to cover all the roughness and cracks with cement paste. It is prepared very simply - the cement is mixed with water. When the shaded surfaces dry, you can thoroughly polish it with a diamond disc. If necessary, repeat this procedure several times.

For tiling with mosaic tiles, minor flaws are not necessary. And the algorithm of laying out tiles is similar to the laying of ordinary tiles. Do not grind the grout and glue, because the surface of the shell will be constantly exposed to direct water.
Making a stone washbasin

Transform the shapeless piece of granite into a stylish washstand that looks like a model from a European design ruler - it's quite real and not as difficult as it might seem at first glance. To make a dream come true:
- solid granite or marble block. And the more it is, the easier it will be to wash the washbasin;
- disk saw with a diamond disc for working with the rock;
- laser level;
- a hammer;
- bit;
- hammer drill;
- a Bulgarian with a diamond disc.
Attention! When carrying out any work, always wear protective goggles, a respirator and tight working gloves.
Step 1. Make a marking on the front side, which will denote the boundary of the surface of the future washbasin.
Stage 2. In order to level the surface, the saw cuts straight cuts within the marking. After we strip them across. The smaller the squares are obtained, the easier it will be to remove them.
Stage 3. Using a hammer and a bit, we remove the unnecessary rock.
Stage 4. We grind the resulting surface, the side parts and the base of the future washstand. To check the resulting surface for irregularities, you can apply a sheet of plywood to it.
Step 5. Mark the bosom of the future shell. It is not necessary to depict it in the form of an ideal circle, the asymmetry in this kind of building art is more appropriate. It is best if the borders repeat the shape of the workpiece.

Step 6. With a circular saw we make straight cuts and one in the middle within the marking.
Stage 7. Now the most responsible - we begin to remove the extra rock bit so that the rounded surface of the future shell turns out.
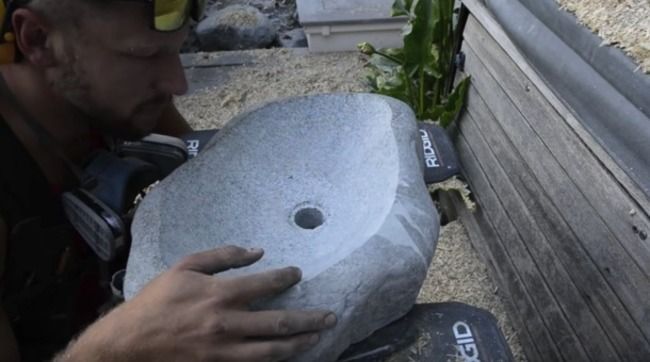
Stage 8. A rather bumpy bosom turned out to be uneven. If it seems to you that the depth is insufficient, repeat the previous step. Now you can proceed finishing finishes. It is produced using a grinder to an ideal flat surface.
Step 9. When the workpiece has turned into a stylish washbasin, bring it to the end. We make a drain hole with a drill.
Stage 10. To connect such an unusual homemade sink is not so difficult with the usual sanitary kits. By the way, for the proposed model it is necessary to select a separately standing crane, and not built in the washbasin itself.
In conclusion, when carrying out work to create a unique shell, be extremely careful and careful. And do not forget to use the building level at different stages of work.
At the core modern technologies construction works and the processes are concrete. From it the foundations, columns, external and internal walls, it is laid in paths, highways, etc. Material nowadays receives creative use in construction and in the creation of decor. Spreading recently has a technology to create washed concrete. It was previously used, but it did not spread.
More than 30 years ago, the ZhBC based on it created the exterior of facade slabs in panel housing construction. As a result, the surface of the walls of the buildings looked deliberately uneven due to the elements of the filler made of natural stone of a certain fraction uniformly protruding above it to a fixed height.
The washed concrete is created due to the different rate of ripening of the mixture in the depth and on the surface of the product. This difference is formed by the retarder of setting the solution, which is applied from the right side to the surface of the solidified product. The chemical formula of the deactivator determines the thickness of the material, which is then removed by the detergent jets.
 With the help of water, we remove the top layer of a non-hardened cement paste.
 The bulk of the material has a standard setting time for the chosen compounding of the components, and the entire surface area of the decorated surface is at a certain depth - slow. The form of the future product is filled with a mixture in the volume of which evenly divided fractions of natural stone (granite, marble, pebbles, etc.) are evenly distributed. Therefore, subsequent operations do not lead to detachment of the upper decorative layer.
Concrete, which is freed from the formwork, is given the final form by removing the upper non-frozen layer by a certain depth along the entire surface of the product. The washing action of water removes the upper "weak" layer of concrete, which did not gain sufficient strength. This leads to a surface outcrop of 30-40% of the size of each of the natural pebbles that were used in the formation of the cement mixture. As a result, the product acquires the appearance of the texture of natural stone.
Methods of obtaining
The technology for producing the material "washed concrete" is basically the same traditional as for the formation of conventional concrete. To create a solution, sand, cement and natural aggregate, which are bound with water, are mixed in the right proportions. The basis of the exteriors of the future product is determined by: the height of the filler above the surface in the washed concrete, as well as the size of the fractions of the natural aggregate and the color range of the pebbles.
"Zest" production - retarder aging of concrete. Depending on the tasks, the chemical agent can be applied to the product from different directions. The future pavement or the simplest tile in the formwork is covered with a deactivator from the outside.
Products with a more complex surface pattern are created differently. The retarder of solidification processes the internal walls of the mold, then a ready-to-use mass of concrete is placed in it. In both cases, the washout of the reagent creates the desired relief of the product. Thus, products are created with different designs, colors and textures.
Equipment and materials
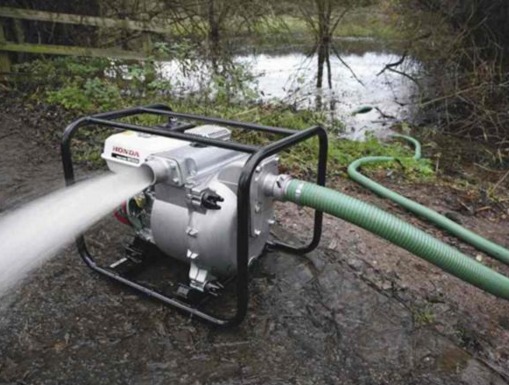 The non-frozen layer is washed off by an industrial pump.
 Enterprises that produce washed concrete on an industrial scale use specialized equipment and production lines. However, for self-made similar products will require affordable tools and equipment. It is not necessary to prepare a mixture for the production of concrete by one's own hands. For this purpose it is necessary to use means of small mechanization - concrete mixer.
The washing of a non-frozen concrete layer is made by an industrial water pump or a spray gun with a compressor (brush). So, for the creation of concrete casting, additional solid forms (wooden, plastic) of the necessary dimensions and precision of manufacture or formwork will be additionally required. In addition, we need, trowels, blades to level the upper layer of the composition in the form, wide brushes (spray) to apply the retarding gel.
Ideal option will be the use of a vibrating table to compact the mass in the mold, however, it is also possible to manually seal the material. The technology of production, of course, provides for the use of deactivators. These can be industrial gels or more affordable and inexpensive means. Chemical compositions, retarding curing, also impregnated with special paper, which is placed in molds for the production of products.
Production process
The cement slurry is mixed in a concentration of thick sour cream. Use should be of cement grade M400 and above, a mixture of fractions of natural stone with a value of 5-10 mm, up to 20 mm in different colors. Pouring ready-to-use mixture is carried out in molds or in a pre-established formwork on the terrain. When the facade of the product is formed by the bottom of the mold, it itself is pre-covered with a deactivator.
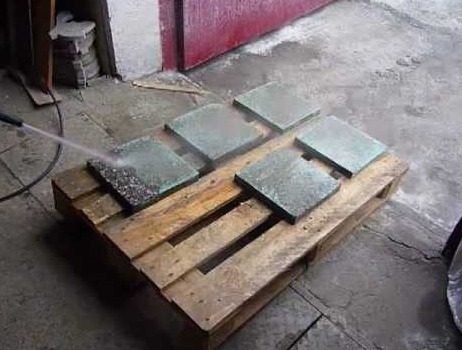
 The molds are filled with concrete and carefully leveled.
 Forms (formwork) are filled with ready-made concrete, the surface is compacted and carefully leveled. In other cases, when the front surface is outside - the sidewalk or tile is covered with gel from above. The conditions for the hardening of the material are specified by the concentration of the aging moderator (eg gel G-05). It determines the time the product is ready to flush the upper layer of the material (ranging from 20 hours to 24 hours) and the depth of penetration of the deactivator (2-10 mm). The technology of the process is specified by the instruction for the use of gels and is finally selected experimentally. In industrial conditions in the forms of vibropress.
Nuances of manufacture
In the manufacture by one's own hands and on an industrial scale, the critical time for maintaining the quality of finished products is to observe the optimum operating time of the deactivator. Early decking of the product will entail more than the unfolding of the aggregate, which will lead to its crumbling from the concrete body. Delayed - creates obstacles for the formation of a given depth of surface texture during washing.
All manipulations should be carried out promptly so that the tiles are of high quality. Panels and elements for ventilated facades are made similarly. Only on the reverse side they are installed in advance. The technology of creating designer flowerpots and flower gardens for plants provides for filling the mixture into complex shapes.
The smooth surface of the product creates a paper (for example, P-07), which has impregnation gel setting gel. It is cut and fits into shape in accordance with the card-layout. On vertical surfaces, the paper is attached to.
Molding and flushing of the layer
At the end of the aging time of the concrete, the finished products are removed from the mold by their own hands and placed on the side on which the retarder is located. With powerful jets of water, a layer of material is not washed off the sidewalk. On the production lines, as a rule, the hydraulic installation is the final equipment.
Finished products are located under it with a fixed slope, and for a couple of cycles, the unfrozen mass is washed away. After that, the washed concrete is ready for a long-term reliable operation.