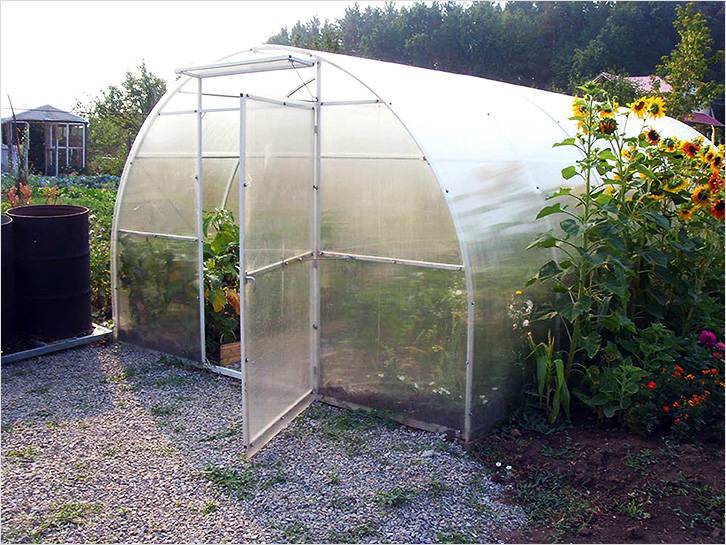
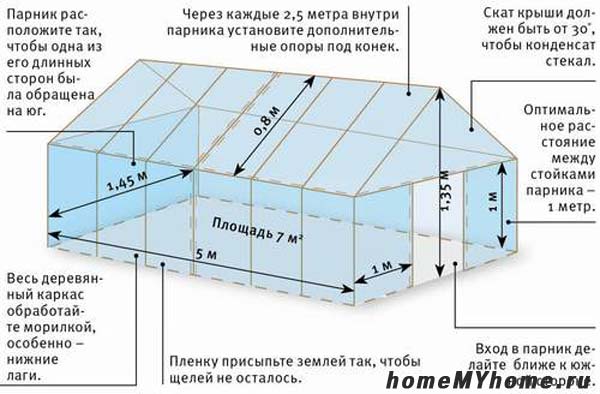
All the dacha owners are familiar with such a picture: May, warmth, the sun shines brightly, there are the first shoots of early planting, the next morning you look out the window, and there the snow fell. Of course, this is not a very favorable phenomenon, which will negatively affect yields, especially in crops that are sensitive to sudden temperature changes. If you expect an early harvest for sale, then in this case, losses can not be avoided. But to get out of this situation is quite realistic. It will not be possible to stop the snow, but everyone can protect the shoots from it. For this purpose, a greenhouse is being built.
You can find many original ideas, how and from what to build it. We suggest to understand how to build a greenhouse using polycarbonate. The article will present options for its arrangement, tell you what kind of foundation you can build, what to make a frame and how to mount polycarbonate. We are sure, after reading the material, you make sure that you can make a polycarbonate greenhouse yourself.
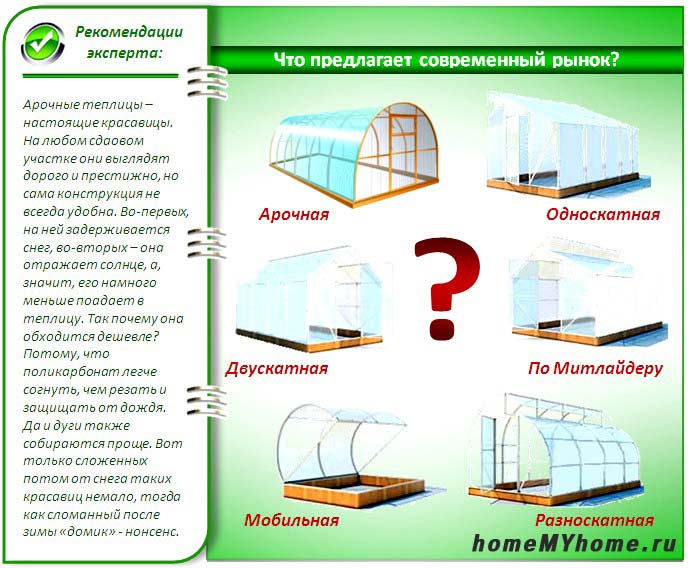
Varieties of species and forms of greenhouses
Today you can find different forms of greenhouses. Most Popular:
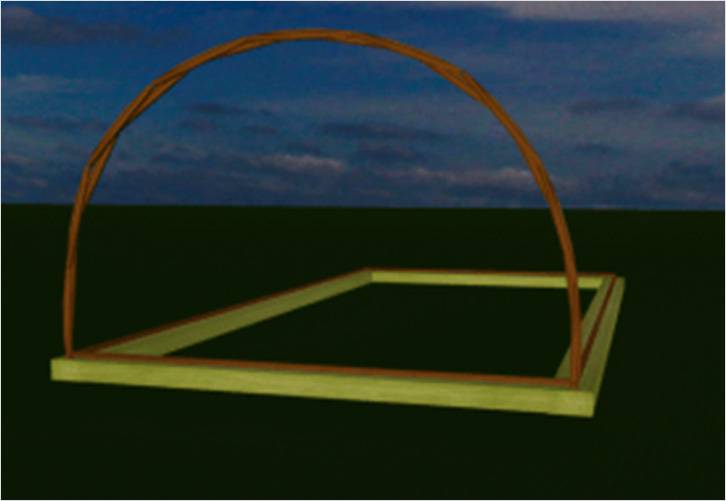
- arched;
- hipped roofs.
They differ among themselves in the form of the roof. There are also other differences, they are listed in the table:
| Comparison of greenhouses | |
|
|
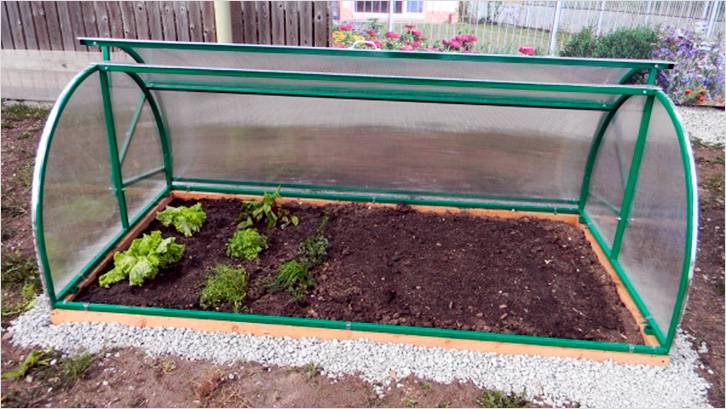
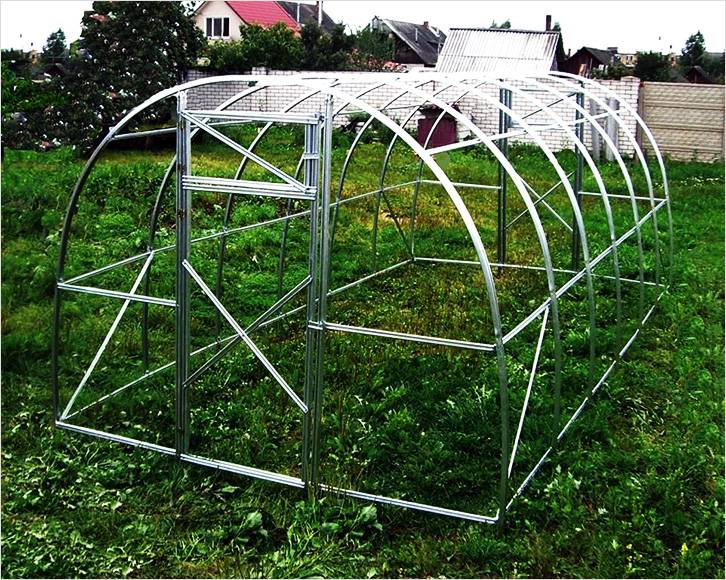
|
| The name of this greenhouse speaks for itself. The shape of the roof is semicircular. This is a kind of tunnel with walls. For this form, polycarbonate is the ideal cover for cover. It easily bends, forming a smooth arc. | Its manufacturing is carried out from separate blocks. On average, the height of the building reaches 2500 mm, sometimes higher. Length and width are determined individually. The shape of the roof is predominantly gable. |

Some greenhouses are not built to grow those or crops directly in the ground. In this case, the construction of special racks and shelves.
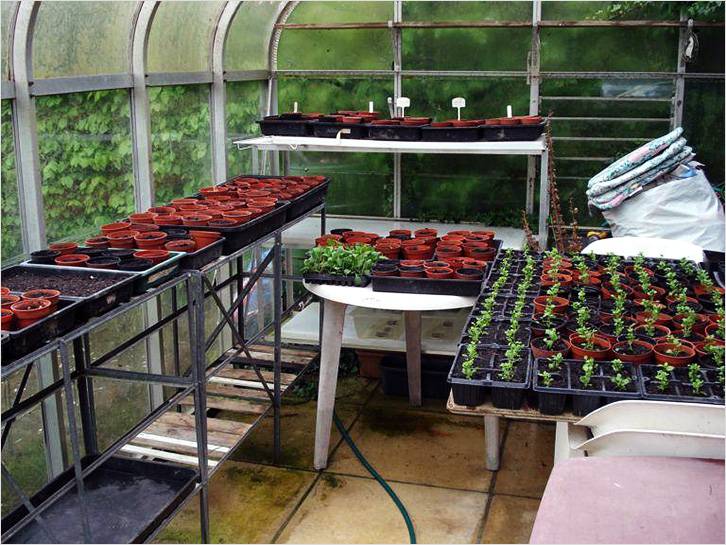
There are options for greenhouses with removable insulating panels. For example, they can be removed during the warm season. When it goes cold, removable shields are placed in their place, and they protect plants from cold and precipitation.
In any case, regardless of the chosen form of construction, the following should be considered:
- The greenhouse should be durable and functional.
- All plants should be provided with free access.
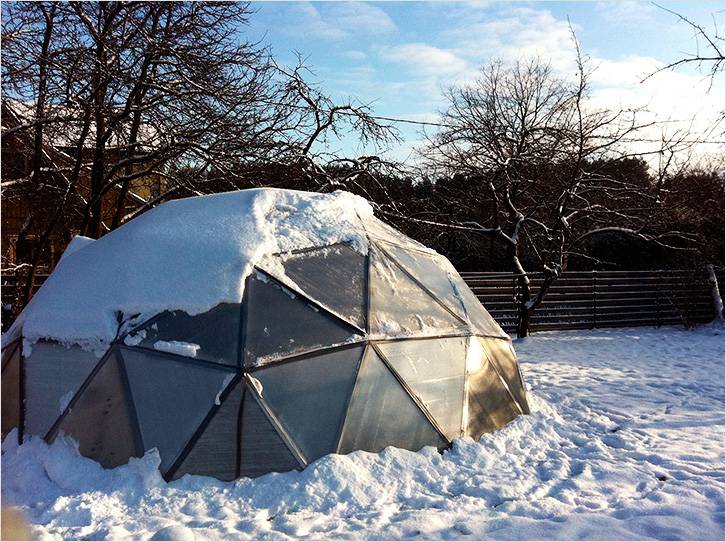
The polygonal greenhouses of the dome shape attract with its originality and form. The process of manufacturing them is labor-intensive. Moreover, it is extremely difficult to polycarbonate them.
Important nuances of choosing a location
There are several important nuances, which should be considered when choosing a location for installation:
- ground composition;
- landscape drawing;
- side of the world.
As for the landscape pattern, it is important to take into account the nature of the terrain or the dynamics of the soil state. For example, if a greenhouse is installed at a slope, then will it not be flooded by melting snow or rain. Also pay attention to the freezing level of the soil and the level groundwater. The values should not be more than 1.2 m, otherwise the rising water will wet the roots, which eventually rot.

Note! If the groundwater in your area is above 1.2 meters, then it is necessary to manufacture a drainage system for draining moisture.
As for the choice of the sides of the world and suitable soil, it is worth talking about this in more detail. With insufficient attention to this issue, the yield in the greenhouse can be poor. This will be discussed further.
Determination of soil for growing greenhouse plants
The soil must be relatively dry and even. If you dig a shallow hole where you plan to put a greenhouse and find clay in it, then this place is not suitable for a greenhouse. Clay retains moisture, so after each watering the water will stand for a long time on the surface.
Ideal soil is sandy soil. If there is no sand on your site, it is important to perform a number of additional work: dig a foundation pit, pour sandy gravel and fill a sand cushion. From above it is necessary to pour a layer of fertile soil.
Selecting the world's sides
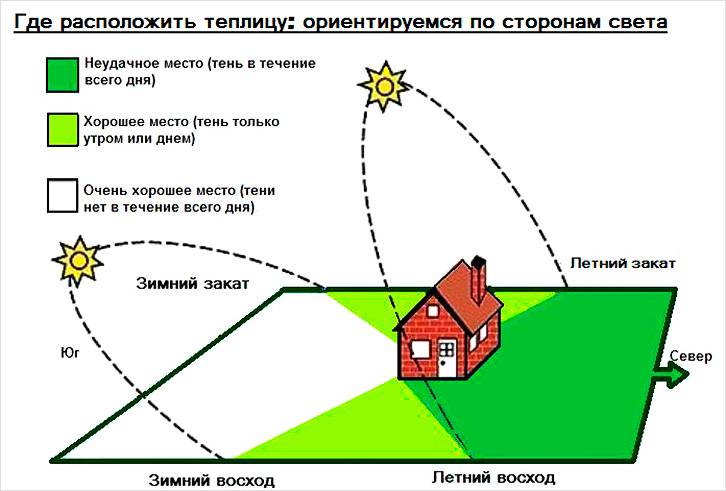
First of all, it should be noted that the correct location of the greenhouse in relation to the sides of the world contributes to a significant saving of your means. If the greenhouse gets enough sunlight, there will be no need for lighting. In addition, sunlight will provide plants with the necessary heat. Agree that the organization of heating and lighting greenhouses will require a lot of money, and after all, finance is still needed to maintain the systems and maintain them in working order.
So, there are 2 good ways to install a greenhouse in relation to the sides of the world:
- from east to west;
- from North to South.
The first option is the most effective. Thanks to this arrangement, plants will receive sunlight throughout the day.
Note! If your greenhouse is square, then these requirements do not concern it. Determination of the sides of the light is necessary for greenhouses with dimensions of 3 × 6, 3 × 8 m and more. A square greenhouse can be installed as it will be more convenient for you.
Determination of location relative to buildings and trees
An important role is played by the location of the greenhouse in relation to existing farm buildings and trees. So, the greenhouse should not fall shadow from the house or trees. If you place a greenhouse near the tree, then on the roof of the hotbed will accumulate foliage, preventing the penetration of streams of sunlight inside the greenhouse. We have to constantly ensure that the roof is clean.
Having considered the basic nuances of the location of the greenhouse, we suggest to return to our main theme. Let's talk about the advantages of using polycarbonate, as well as about the features of its choice.
Features of greenhouses from polycarbonate
Traditionally, the greenhouse is covered with glass or polyethylene. These materials are affordable. However, if we compare them with the construction of polycarbonate, then the latter has a clear advantage in terms of durability. The risk of polyethylene breaking is very high. Especially for this special effort is not necessary to apply. Glass is brittle and can break. Of course, polycarbonate can also be broken, simply by the degree of strength and practicality, it has more pluses. If the glass breaks, the fragments can get into the eyes and open areas of the skin. Moreover, the fragments trapped in the ground are very dangerous, because a large amount of work in the earth is done manually.
The advantage of such a greenhouse is that it can be done on its own. We offer you to get acquainted with the pros and cons of greenhouses made of polycarbonate:
| Advantages | disadvantages |
| High throughput sunlight. | The material is flammable, which is a danger in the event of a fire. |
| The polycarbonate fixed on a frame of a hothouse is steady against mechanical influences. | In comparison with other materials, the final cost may be higher. |
| Plasticity of the material makes it possible to give the greenhouse an arched shape. | |
| The operational period is about 20 years. | |
| Polycarbonate is resistant to negative effects of atmospheric precipitation. | |
| Attractive appearance. | |
| The low weight of the material does not require the manufacture of a powerful foundation. | |
| Ability to choose any color palette. |
Which polycarbonate to choose for a greenhouse?
The market offers polycarbonate in different designs. Our goal is to choose the most suitable material for the greenhouse. This is an important stage, because polycarbonate plays an important role in obtaining a good harvest. So, when choosing a choice, it is worth remembering the following:
- Often you can not find high-quality polycarbonate. Worst of all, it is sold under the guise of branded materials.
- There is polycarbonate of light type on sale - it has thin walls. Its use is cost-effective in a warm climate. With sudden temperature changes, this polycarbonate will become brittle. Moreover, it does not provide sufficient strength of the greenhouse.
- Often, these parameters on the package do not correspond to reality. For example, if a sheet thickness of 4 mm is declared, it may be that it is only 3.5 mm thick. And such polycarbonate is not recommended to buy.
- If you want to buy a durable polycarbonate, then an important role in its choice is weight. Normal and high-quality sheet standard sizes will have a weight of about 10 kg. The light version is 8.5 kg, or even less. The latter do not have high strength - they are fragile.
- On quality polycarbonate there is always a note about the method and method of its installation. The quality is indicated by the presence of a special protective film from ultraviolet rays.
- Quality polycarbonate is elastic and easy to use. It should not be too fragile.
If you are planning a large purchase of the material, you can ask for documentation and a certificate of quality. Usually there is indicated the weight, size, manufacturer and other necessary data.
![]()
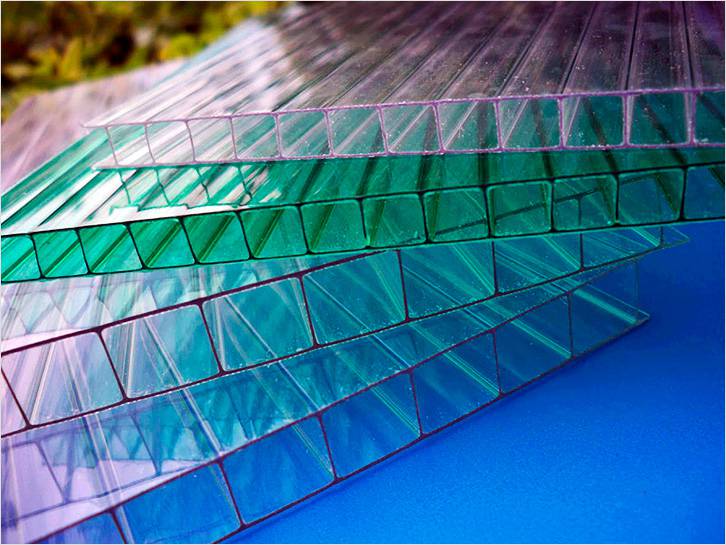
The new polycarbonate should be packed in polyethylene. On the side, which is protected from ultraviolet rays, and on the edge of the elements there must be a corresponding marking. In its absence, do not buy plastic.
For the device of a greenhouse cellular cellular polycarbonate is more often used. And this is logical, because it is relatively transparent, allows up to 88% of light, and during operation these figures do not decrease. If we talk about impact strength, it is 100 times or more than glass. Let us also highlight other features of this type of polycarbonate:
- The thermal conductivity of a material 4 mm thick is 2 times larger than that of glass. That saves energy up to 30%. High thermal insulation is achieved due to the presence of an air gap.
- The material is self-extinguishing, therefore it is considered fireproof.
- Easy to install. Teplice can be given any shape.
- The material is resistant to various atmospheric phenomena. It is recommended to use at temperatures ranging from -40 ° C and up to + 120 ° C. In the course of operation, he does not lose his qualities.
Now pay attention to the appropriate thickness of the material for the greenhouse. The optimal thickness is 8 mm. The thicker the polycarbonate, the larger the step is permissible in the crate. Thin material has a lower price, but the crate must be done with a small step, plus its impact resistance is lower.
So, when choosing polycarbonate, start from the following recommendations:
- for greenhouses - up to 4 mm;
- for the greenhouse small area - 6 mm;
- for the average area of the greenhouse - 8 mm;
- if the greenhouse has a large vertical part, then the recommended thickness is 10 mm;
- in the case of large spans, a thickness of 16 mm is recommended.
An important factor is the choice of the density of the material. For a greenhouse, it should be 800 g / m 2. Determine the density can even visually. If in the lying position the sheets do not look skewed, they do not have bends or other deformations, so polycarbonate is of sufficient density. But it's best to ask for documentation with data on technical specifications.
Which is better - ready or homemade

If you do not like to do something yourself or do not have at that time, then the ideal option is to buy an already finished greenhouse. You will acquire a complete kit, which includes a frame, fasteners, cover and the like. However, such greenhouses have a number of shortcomings, which can not be ignored. Greenhouses of factory production often do not correspond to the declared GOSTs. As a rule, such frames are less stable. Therefore, before installing them, a good foundation should be made and the structure further strengthened.
The metal frame is often corroded, and repair becomes very urgent. It's quite another thing when everything is made by yourself. Doing everything from scratch, you will never save on consumables.
Below we suggest to see the video, where the version of the finished greenhouse is given.
Video: the process of assembling a finished greenhouse from a metal profile
Variants of frameworks for greenhouses from polycarbonate
The frame can be made of different building materials. Each of them is different in quality, which affects the duration of operation. For example, a greenhouse can be made based on:
- profile pipe;
- wood;
- galvanized profile;
- polypropylene pipe and the like.
It is impossible to say unequivocally which one is the best, because everyone has undeniable advantages:
| Frame variants for a greenhouse made of polycarbonate | |
|
|
The material is durable. Under the influence of moisture, it does not corrode. Advantages can be attributed to the ease of installation. The structures have a low weight, so there is no need to make a heavy foundation. However, there are disadvantages. If there is a lot of snow in your area, the galvanized profile can buckle, unable to withstand the load. |
|
|
This material is budgetary, unlike analogues. Such a frame will last for many years. Polypropylene does not corrode. However, due to the small weight of the structure, the frame must always be attached to the ground. And very reliable. Otherwise, under the influence of the wind, the greenhouse can turn over. |
|
|
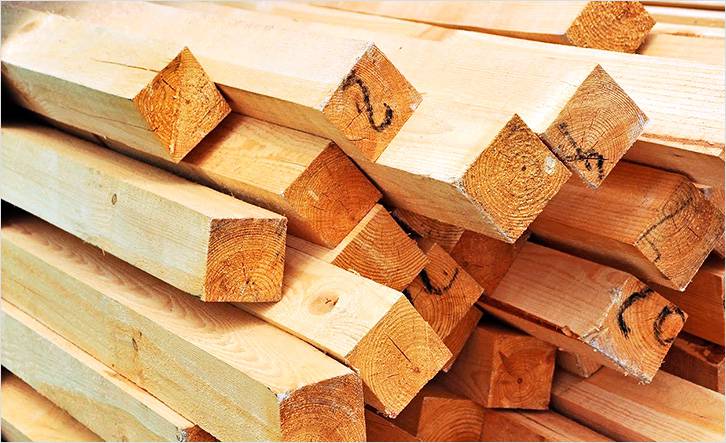
Also quite affordable material. Using this material, you can completely make a frame for a greenhouse made of polycarbonate. But here there are minuses. Wood itself absorbs moisture. For this reason, it is susceptible to corrosion and rot. Accordingly, a reliable foundation is needed, quality carcass treatment with antiseptic and high-quality wood. |
|
|
This material has a low weight. However, for the price it is the most expensive. Considering that a thick aluminum profile is necessary for the greenhouse framework, in the end everything will be very expensive. Although the quality of such a frame completely justifies itself. |
|
|
This material is unquestionably the best in its strength. However, to build such a greenhouse you will need a welding machine. Bolted connection is not the most the best option, although possible. To prevent corrosion, it is necessary to treat the profile pipe with a special compound. The installation process is quite labor-intensive and requires a lot of labor. |


What you should pay attention to when determining the structure of the frame:
- Plan a competent layout of the windows. For normal ventilation, there are 2 small ventilations.
- If the greenhouse is large, then the ventilation pans should be located every 2 meters.
- It is often necessary to think about the organization of lighting, especially if you grow vegetables for seedlings.
- Correctly calculate the number of sections and arcs in the future skeleton. Remember, the strength of the frame depends on the section of the profile. The step between each section should not exceed 700 mm. Although today you can meet ready-made greenhouses with a step between arcs up to 2000 mm. This is not the most lasting option.
- Correctly select the thickness of polycarbonate. The subtleties of this process we discussed above.
So, these are the main nuances that should be taken into account when forming the frame structure.
Variants of the foundation
Like any other structure, the greenhouse should also be located on the foundation. Simply, it can differ in the material used. It is worth noting that the base under the greenhouse should perform several important functions, among which:
- providing a reliable framework for the frame;
- avoiding direct contact of the frame wall with the ground, which provokes heat loss up to 10%;
- exclusion of penetration inside the greenhouse of dampness;
- prevention of penetration of moles, shrews and other "uninvited guests" into the greenhouse.
We offer you to familiarize yourself with several types of foundations, which are successfully used in the construction of a greenhouse made of polycarbonate:
- tape;
- wood;
- columnar.
We offer step by step instructions on construction for each type of foundation. Of course, you may know other methods, but we will describe the most accessible and common ones.
Tape
This kind of base has a high degree of strength. On it it is possible to mount a frame for a greenhouse from any building material. In addition, it provides excellent protection against penetration of cold and excessive moisture. The production of such a foundation is carried out in several consecutive stages, which are reflected in the table:
| Stages of work | Instructions |
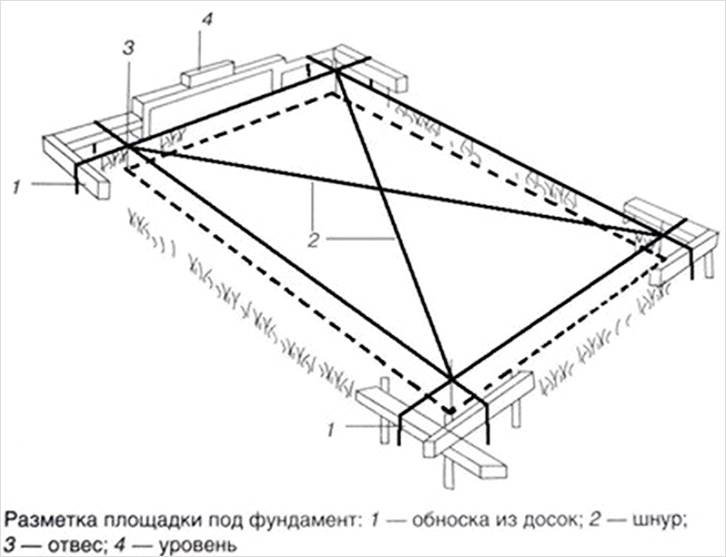
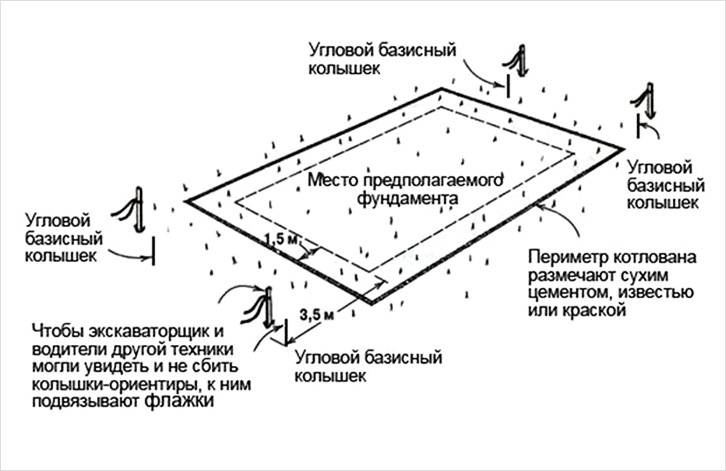
| Stage №1 | For starters, the strip foundation is marked. For this, pegs are installed along the perimeter. To obtain the correct size, you should measure the diagonals and the angles themselves. The diagram shows how to perform these processes:
For a greenhouse made of polycarbonate, there will be enough foundation with a width from 250 mm to 400 mm. |
| Stage number 2 | Now after the marking, it is necessary to excavate. Trench on the entire perimeter of the foundation is excavated to a depth of 600 mm. |
| Stage №3 | The bottom of the trench is leveled, and a sand cushion is thickened in the region of 100-150 mm. A layer of sand and rubble is necessarily trampled. This layer is necessary in order to create a good base for concrete and prevent its mixing with the ground. |
| Stage №4 | Now you need to set the formwork. In the photo you can see small area formwork, namely the way it is mounted:
The formwork must be securely fastened. Outside, it is necessary to install supports in the form of stakes or struts. It is necessary to tie the formwork together with a screed made of a wooden beam. Above the ground level, the strip foundation must be raised by 300 mm. |
| Stage №5 | At the bottom of the trench, the reinforcement must be laid in the form of a wire-bound frame. This will give strength to the ground. |
| Step №6 | Now mix the concrete solution. It is best to pour the foundation at a time. Having laid a layer of liquid concrete, it is necessarily rammed and vibrated. This will eliminate the formation of voids in the body of concrete. |

That's it, the tape foundation is ready. Depending on the type of frame, concrete metal bars can be inserted into the concrete immediately, which will stick upwards. But it depends on the type of the selected skeleton. After pouring the concrete it is recommended to cover it with polyethylene. This is especially necessary if the sun is hot in the street. The concrete will gradually dry up.
Wood

If we talk about the most simple and inexpensive foundation, then this tree. Such a foundation will allow the greenhouse to be moved to another location if necessary. However, remember the important drawback of such a foundation - the tree is corroded. At the base of the wooden foundation is a cant. Work on manufacturing is as follows:
| The technology of manufacturing a wooden foundation under a greenhouse | |
|
|
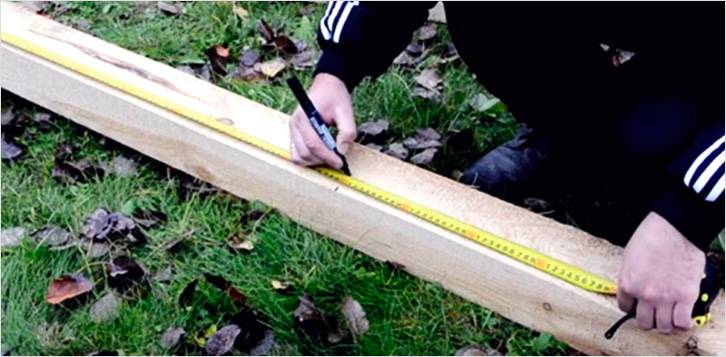
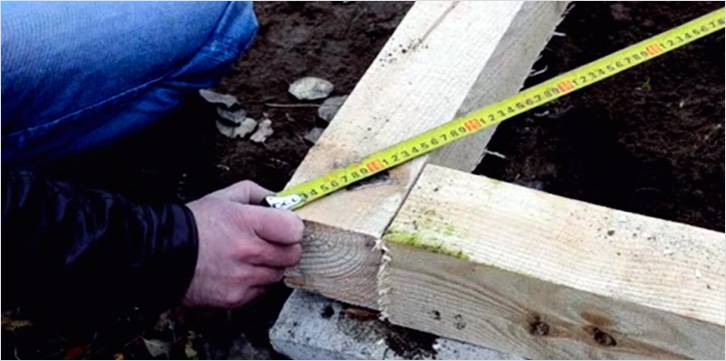
First of all, you need to make a markup. This stage of work is carried out regardless of the type of foundation. In this case, wooden beams 100 × 100 mm are used. Depending on the weight of the frame, the thickness of the beam can be larger or smaller. |
|
|
The bars are measured strictly according to a given size. Using the marker, they are marked and prepared for cutting. |
|
|
For cutting the beam it is convenient to use a chainsaw. It is important to observe the angle of 90˚. |
|
|
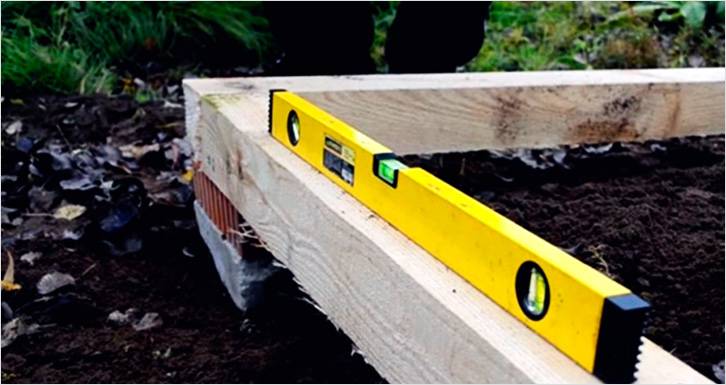
When you lay the uneven bars, use the level. Thanks to this the frame for the greenhouse will be flat. |
|
|
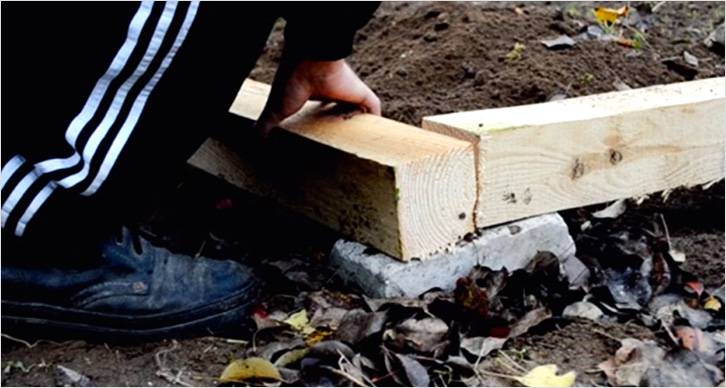
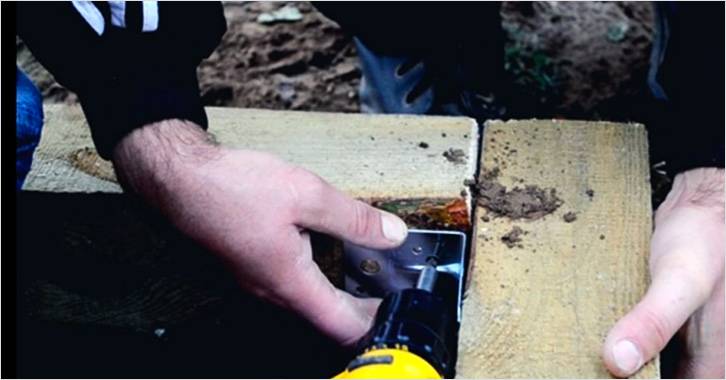
There is a method of joining the notches in the groove. In this case, a metal corner will be used. The edges of the beam are mounted on supports. Preliminary in the ground lay the foundation of bricks, blocks or make it of concrete. |
|
|
Again, measure everything in advance by level. At this stage, the supports under the bar are already laid and clearly installed. |
|
|
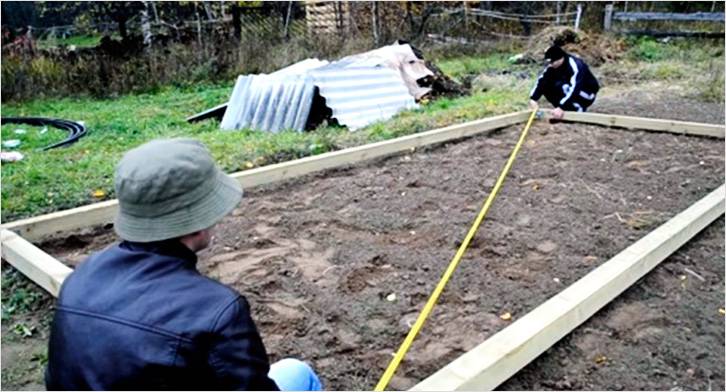
The next step is to measure the diagonals. |
|
|
Their sizes should coincide. If this condition is not met, then problems may arise. |
|
|
If the sizes are all the same, then the soil is poured under the bar. It is also necessary to make control measurements with the help of a level. |
|
|
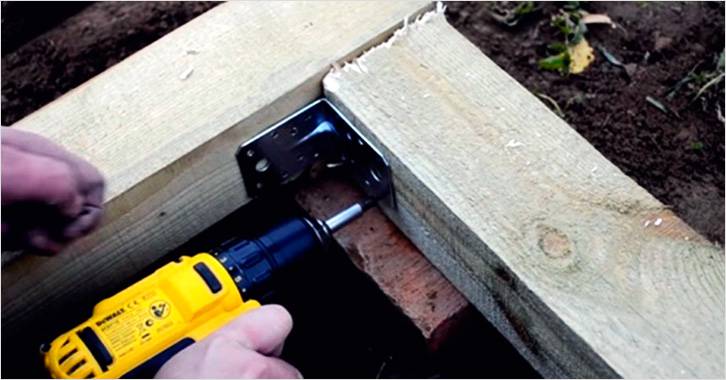
At the last stage, the metal corner is fixed by means of screws and a screwdriver. |
|
|
At the same time, monitor the diagonals so that your previous measurements are not violated. |
|
|
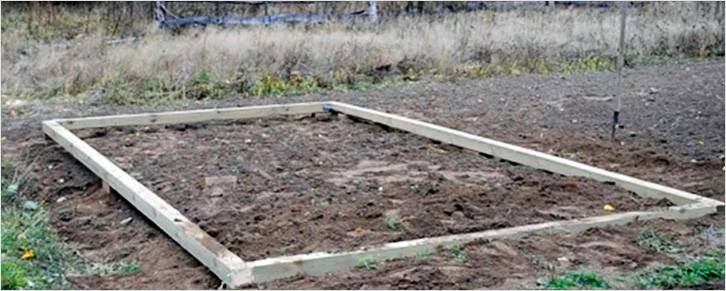
In the end result, this is the basis for the future greenhouse. |


Here it is important to highlight some of the nuances. In the method of laying the wooden foundation described above, the beam has direct contact with the ground. For this reason, the bar must be treated with a special anti-corrosion mastic. But this is short-lived, therefore, after some time, it will be necessary to repair the base. To eliminate this problem, some build a wooden base on a metal columnar foundation. How to do it, see the prepared video.
Video: marking and preparation of the foundation for a wooden foundation
Video: what will happen if you do not measure the diagonal when marking the foundation
Video: instructions for the manufacture of wooden foundations
Columnar
This type of base for the greenhouse is combined with a tape. We will give an instruction to manufacture a columnar foundation on metal pipes. From the top will be laid wooden beams. The entire instruction is presented in the table:
| Sequence of work | The process of manufacturing the tape base |
|
|
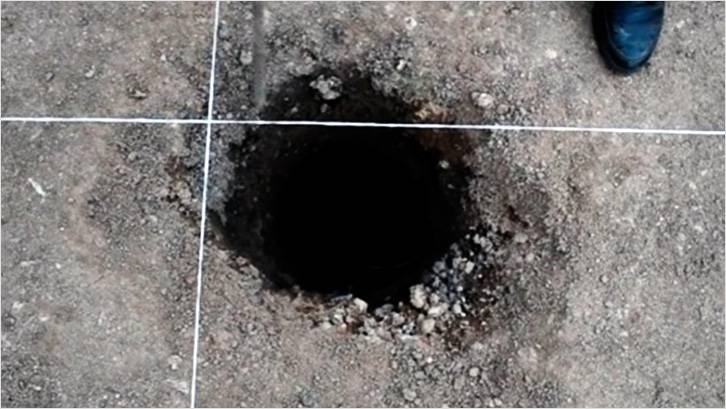
After the markup is done, we define the places under the bookmark pillars. Pillars of support must be located at the corners of the greenhouse. On the long side, the step between the posts can be up to 3 m. Everything will depend on the weight of the future construction of the greenhouse. Wells Ø300 mm are produced. |
|
|
In the finished well, a roofing material is laid, which will protect the concrete from direct contact with the ground. The ruberoid should just form the desired hole diameter of 300 mm. In the middle of the well, a pipe is inserted, the walls of which must be at least 3 mm thick. With regard to the diameter of the pipe, it can be different and 50, and 75, and 100 mm, etc. The pipe is installed strictly vertically. |
|
|
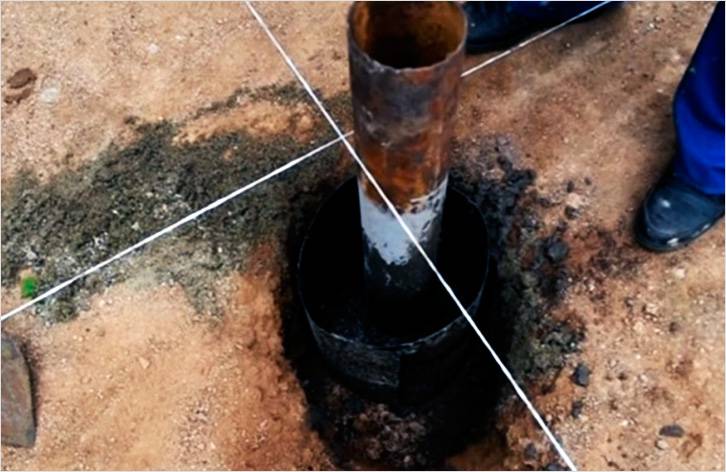
Now concrete works. The inside of the roofing felt is completely poured with concrete. To ensure that the concrete mixture does not press the roofing material, it is also necessary to pour and tamp the earth. The level of the filled concrete should be on a par with the soil or slightly protruding. |
|
|
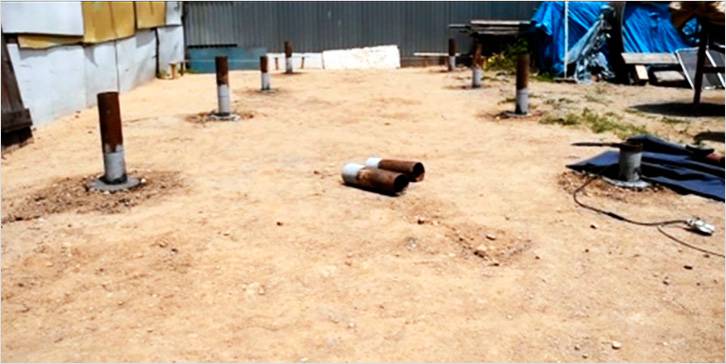
According to this scheme, each support for the foundation of the greenhouse is installed. |
|
|
When the concrete is completely frozen, it is necessary to prepare so that the columnar supports are cut to one level. To do this, it is useful such a device in the form of a clamp. When you mark the cutoff level, you can use a template to produce a smooth cut. |
|
|
The next stage will require a laser level. At one point it is necessary to install it and "shoot" it with a laser beam on all installed pipes. The pipes are marked with slices. |
|
|
After that, using a special clamp, the marks are cut with the help of a grinder and a circle around the metal. Thanks to this technology, you can ensure a smooth surface of the top of the columnar support. |
|
|
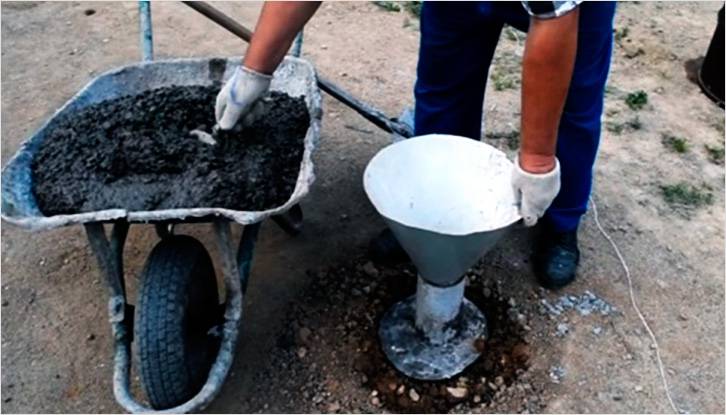
The next step is to prepare a concrete mixture. A kind of watering can be done, which will guide the entire concrete mixture into the middle of the pipe. Concrete must fill the entire inside of the pipe. As is known, when the concrete comes into contact with the metal, the latter does not rust. As the pipe is filled, take the metal armature or other pin and pierce the concrete to completely eliminate the presence of air in its inner part. |
|
|
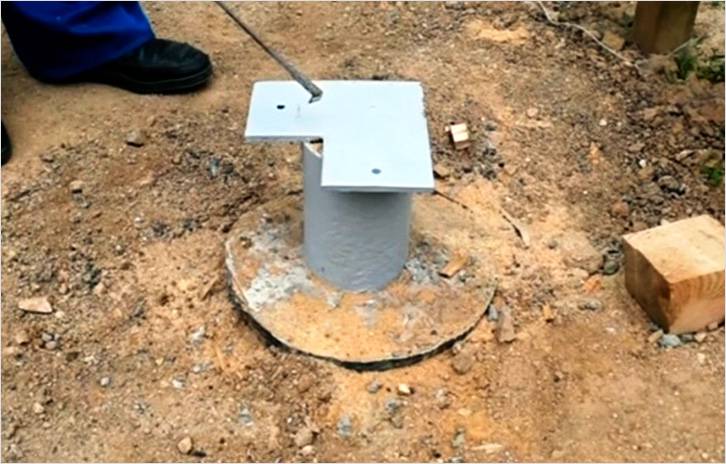
When concrete has gained strength by 50-60%, you can proceed to the next stage. Take a sheet of metal thickness of 8 mm. For corner pillars of support these corner plates are cut off. They make holes through which the wooden beams will be fastened. |
|
|
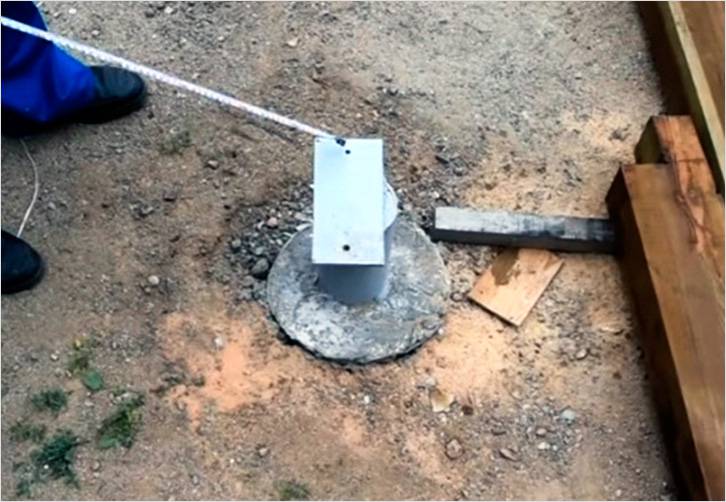
Intermediate beams will have such metal plates that will allow either to connect two bars between each other or fix the bar along the entire length. |
|
|
As a waterproofing for each columnar pedestal, these are the "podstilochki" of roofing material. From the top you can lay the boards and fix them for the subsequent formation of the frame of the greenhouse. |


Today, there are other technologies for making a foundation under a greenhouse made of polycarbonate. You should choose the most suitable option. In doing so, always consider the fact that polycarbonate itself does not have a lot of weight. Therefore, the strength of the foundation is determined based on the weight of the frame. It is clear, if it is a metal frame, then a stronger foundation is needed. Next, we propose to look at several options for making a frame for a greenhouse.
Frame for the greenhouse
As for the framework of the greenhouse, it can be made of several materials. For example, the simplest is a wooden bar. More expensive technologies are also used, including aluminum profile, metal pipes and metal profile. We offer you to familiarize yourself with the technology of making a frame with the use of different building materials.
![]()
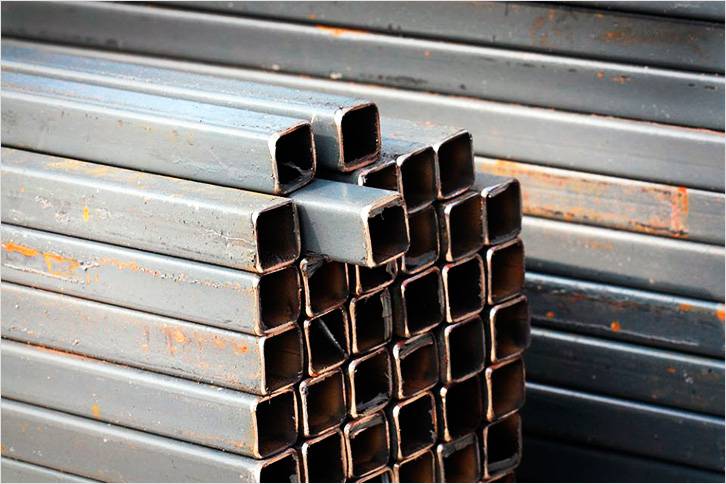
First of all, it is worth considering the features of this material. Is it so good for making a greenhouse. A metal profile pipe is a tube with a rectangular cross-section. This material has found wide application due to such technical characteristics:
- on the sides, the load is distributed evenly, this ensures greater strength of the frame;
- the meter is quite affordable;
- the presence of flat sides simplifies the fixing of polycarbonate;
- the greenhouse from the profile eventually turns out to be quite strong and durable.
The most commonly used profile pipe is a section of 40 × 20 or 20 × 20 mm.
Greenhouse drawing from the profile pipe. What is important to consider
When manufacturing a skeleton drawing from a profile pipe, it is important to take into account that the length of rolled profile pipe has a limitation: 3, 6, 4, 12 m, etc. Knowing the parameters of the future greenhouse, as well as the length of the profile, you can fairly save. How? For example, you can design a drawing in such a way as to minimize waste. Moreover, the dimensions of the greenhouse can be adjusted to the already existing profile pipe dimensions.
Note! If you buy a profile for racks, it is better to give preference to pipes with a cross-section of 20 × 40 mm, if it is cross-sections, 20 × 20 mm will be a suitable option.
When preparing a drawing, be sure to prepare the following elements:
- roof;
- upper / lower strapping;
- vertical racks;
- openings for windows and doors;
- additional elements.
The step of installation of each rack can reach 1 m.
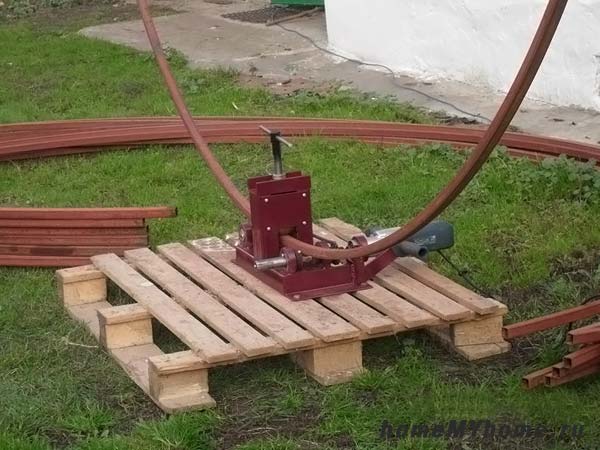
With regard to the manufacture of the roof, it is necessary to prepare a kind of farm. They can have two slopes or be in the shape of an arch. It all depends on your preferences. But also not only. To create an arch-shaped roof, it is necessary to bend the profile pipe on a special pipe bender. As for the gable roof, only welding is necessary.
Note! In addition, be sure to consider the dimensions of polycarbonate. For example, find the width of the sheet and determine where the junction will be.
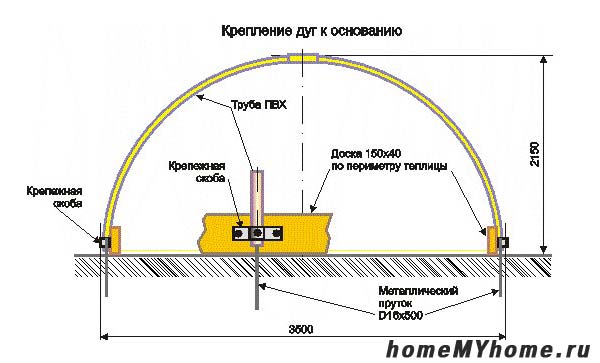
If you have an arched roof, then take into account the fact that for the construction of a greenhouse with a height of about 2 m, you need a profile of 12 m. You can use this option: buy two profiles of 6 m and connect each other.
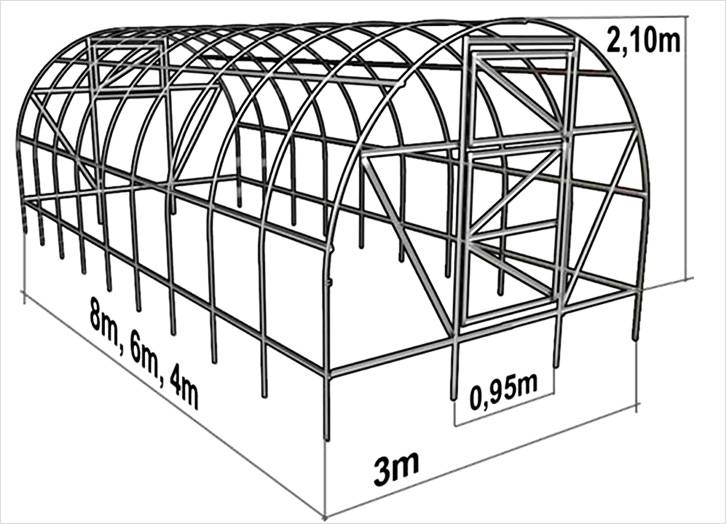
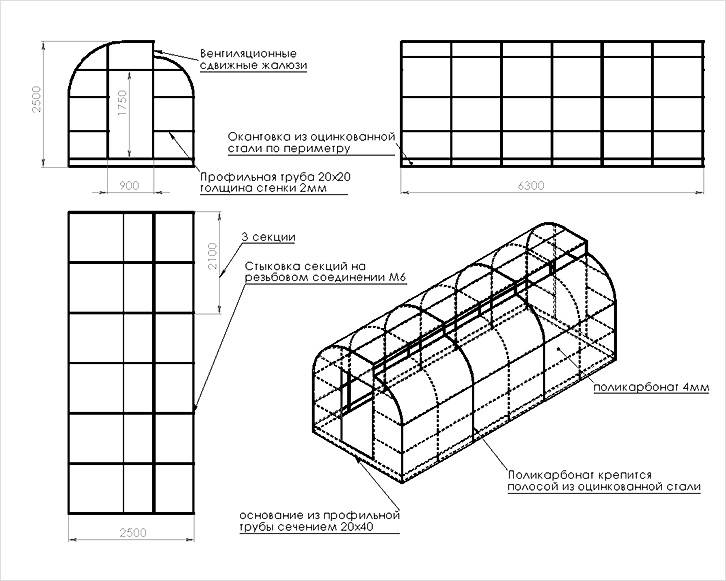
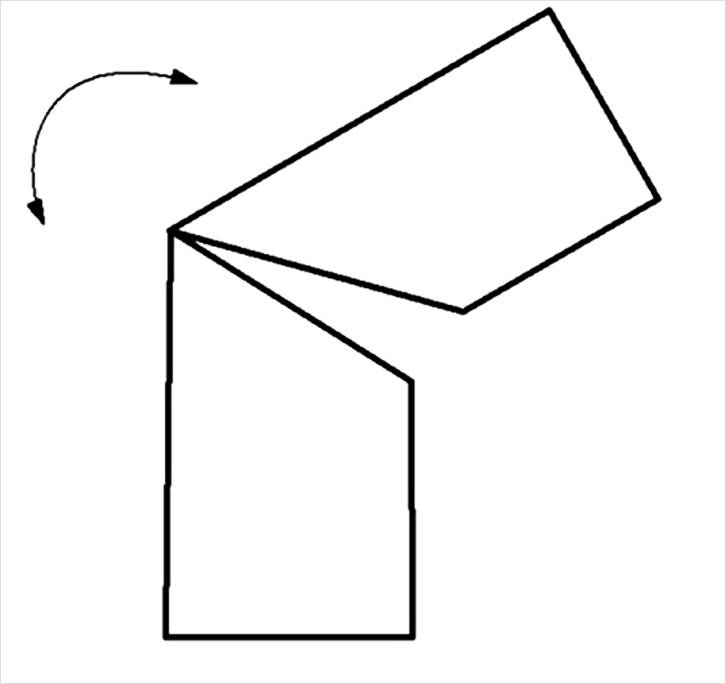
For the formation of the roof of the greenhouse is a simple option. At the same time, minimal welding work will also be required. Thus, it is necessary to make cuts of the Bulgarian in suitable places pipe and just bend it. There is such a form:

It is extremely important to perform accurate measurements and cuts to avoid mistakes. Each segment must be welded together:
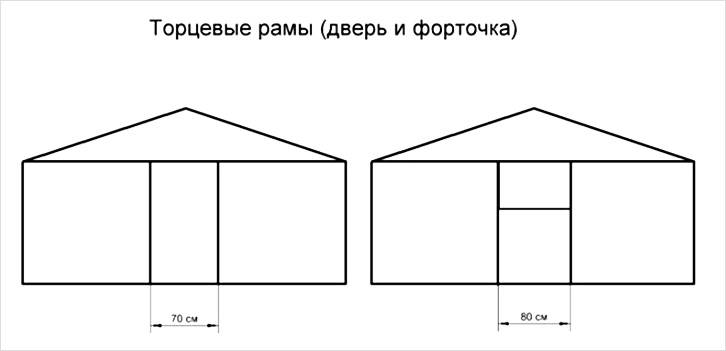
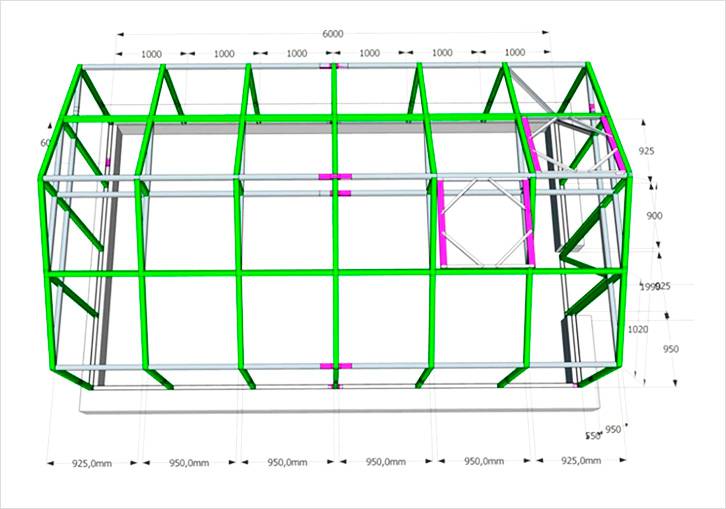
There is also a calculation regarding the location of the ventilation pane and the door in the end part of the frame. Look at the diagram:
There is also a scheme for assembling a greenhouse from a profile pipe, on which all the links are denoted:

Instructions for assembling the frame of a greenhouse with a gable roof
Now we offer a small instruction for the manufacture of a framework for a greenhouse made of a metal profile in the table:
| Sequence of work | Processes |
| Preparing the foundation | For the construction of the frame from the metal profile, a strong foundation is necessary, it is desirable to fill the belt. In the foundation it is also possible to lay mortgage elements in the form of anchors, through which the future frame will be fixed by welding or bolting. |
| Preparing a profile | Now it is necessary to cut the purchased profile into the appropriate dimensions. First of all, the frames of the frame are formed. |
| Installation of pillars of support | After this, pillars of support along the perimeter are welded to the foundation in the foundation. Mandatory in the corners, as well as with a step in the area of 1 meter. It is important to use the level to set the racks strictly vertically. |
| Mounting of the upper strapping | At this stage, the piping around the perimeter of the upper part of the pipe must be welded. Thus, all the installed racks will be connected in one design. |
| Spacers between posts | To keep the structure of the greenhouse stable, crossbars and spacers are welded. They can go perpendicular or obliquely. Their main task is to give the most rigidity. |
| Roofing | For the production of a gable roof, two sections of the profile pipe are measured. After the skate is formed, the pipes are welded at the top. You can use the method described above, doing slices with a Bulgarian. Bending the pipe, you immediately get 2 ramps, which remains welded to the structure of the frame. |
| Door installation | On one side, doors must be installed. Loops are used for this. The door frame is also made of a pipe, after which it is lined with polycarbonate. |
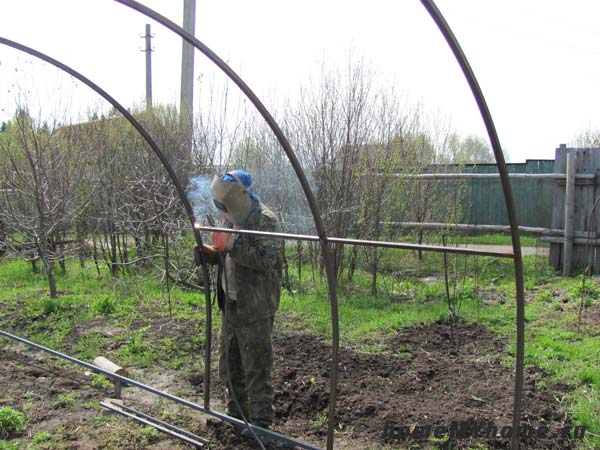
There is a technology by which all the basic elements are assembled on a flat horizontal surface. After that, the assembled farms are interconnected and fixed to the foundation.
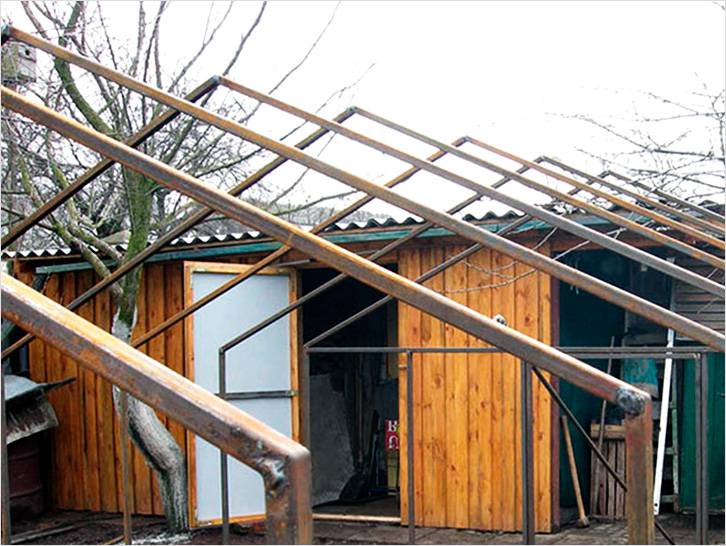
If you want to give the roof a form of arc, cut off part of the pipe and, using a pipe bender, bend it to the desired radius. Of course, it is necessary to work here. If there is no bend, some domestic craftsmen cut the pipe and bend it. But this method is inefficient, it is better to use a device for bending pipes.
We offer several video materials on the production of a greenhouse made of metal profiles. In this case, consider the options with a gable roof and in the form of an arch.
Video: manufacturing of an arched greenhouse from a profile pipe
Video: production of gable roof from profile pipe
Wooden frame for greenhouses: gable and arched
The framework for a greenhouse made of wood has its own characteristics and advantages. Among the positive aspects can be identified as follows:
| Advantages of a greenhouse made of wood | |
| Low cost | Unlike metal, the raw material for wooden hothouse is much cheaper. |
| Easy operation | When building, there is no need to use welding units. You need a screwdriver / screwdriver, a hacksaw and a hammer. These are the basic carpentry tools. |
| Repairability | If one of the elements of the structure breaks down, it is very easy to make a replacement. |
| Simplicity of fastening polycarbonate | On wooden bars fastening polycarbonate is the easiest. No need to drill holes. |
| Ecological compatibility | The material is absolutely ecological and does not pose any threat to the environment. |
| Light weight | The overall design of the frame of the greenhouse from the wooden beam will have much less weight, in contrast to the metal profile pipe. |
| Ease of care | During operation, there is no need for special care. |
Indeed, wooden greenhouses are perfect solution. They will fit perfectly into the landscape of your countryside. Now we offer to consider 2 instructions for manufacturing arched greenhouse and gable.
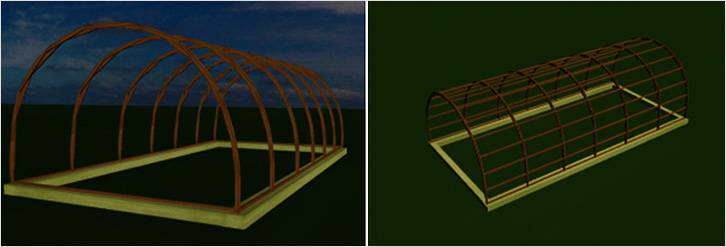
Arched greenhouse made of wooden bars

The main problem of the arched greenhouse is the making of an arch of wood. The produced arcs must have high strength. But to make such a greenhouse is possible for everyone. In this you will see for yourself now.
To begin, prepare the following construction material:
- boards 50 mm thick;
- beams 50 × 50 mm;
- self-tapping screws;
- metal furniture corners.
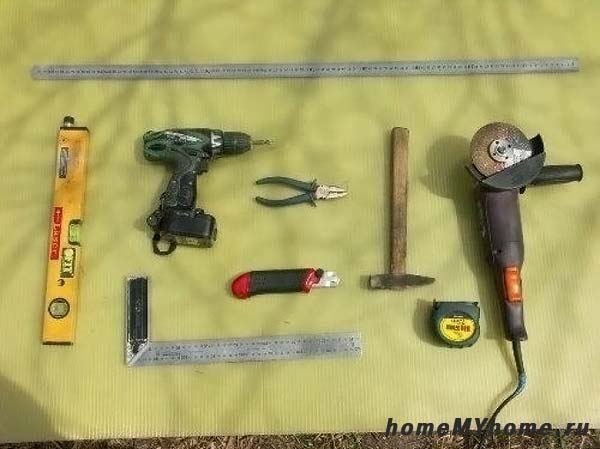
As for the tool, it is a standard carpenter's set, which includes a hacksaw on wood, a hammer, a screwdriver, a drill, a level, a tape measure, and so on.
We propose step by step to see how to make such a greenhouse. It should be noted right away that this type of greenhouse is ideally combined with a wooden foundation:
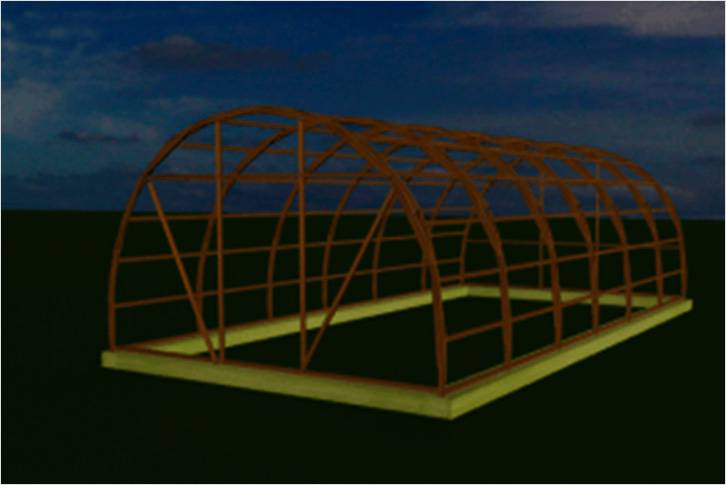
Further, some dimensions will be given. Based on your circumstances, you can replace them with your own, increasing or decreasing the construction of the greenhouse. So, first of all the most key element is made - an arch or an arc. It will consist of many similar elements:
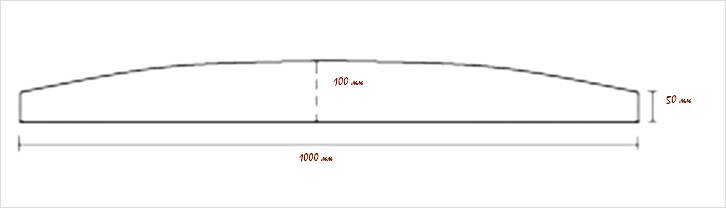
For convenience of work it is first recommended to make a template, for this purpose dense cardboard will do. After that, take a board 50 mm thick and on top of it, put your template. Marker transfer its outlines to the board. To reduce waste, place the templates on the board most rationally.

Cutting the required number of similar elements, you can start assembling the first layer of the arc. On the given scheme 17 such elements were used. In your case, there may be more / less of them.
On an even surface, the elements are laid out to form an arc as shown in the diagram:

Each element must be laid to each other as tightly as possible and without gaps. The result is an arc like this:

The second layer of the arc should act as a fastener. Mounting is carried out on this principle:
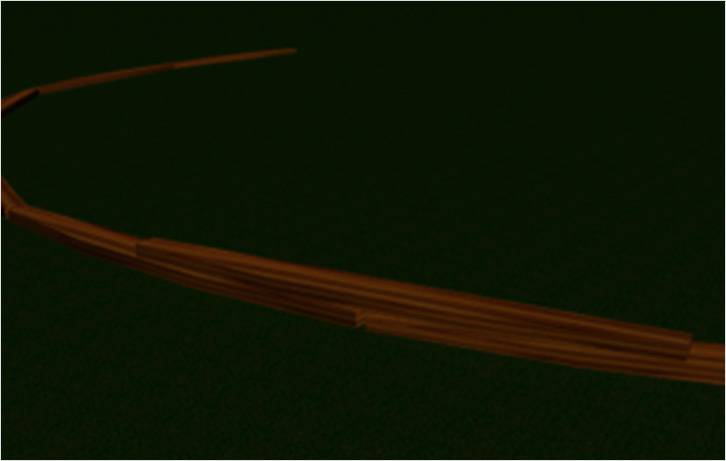
Both ends of the board should fall on the center of the already fixed element, that is, with a small offset. Among themselves all elements are connected by screws. To prevent the elements from breaking apart, it is recommended to drill holes for the screws. But the diameter of the hole should be less than the diameter of the mounting screw. So you will collect a whole arc. The number of such farms will depend on the footage of the entire greenhouse. The step between them should not be more than one meter.
Note! Once you have made all the finished elements of the greenhouse, you need to treat them with a special antiseptic against decay. This will prevent their destruction under the influence of moisture.
The next step is to fix the arches to the foundation. This is done according to this scheme:
Mounting can be carried out with the help of furniture metal corners. Step by step you will get the following skeleton:
Afterwards, the stiffeners are fixed. For this purpose a bar with a section of 50 × 50 mm is used. The length of the bar depends on the length of the greenhouse. In the end, you should get this:

Such a frame for a greenhouse made of polycarbonate can be made by each summer resident on their own. You will get a similar design:

Video: The original idea for making arched greenhouse
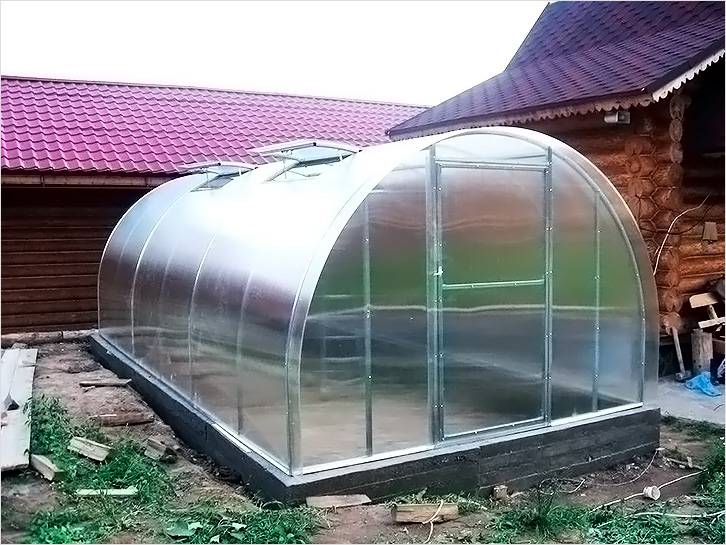
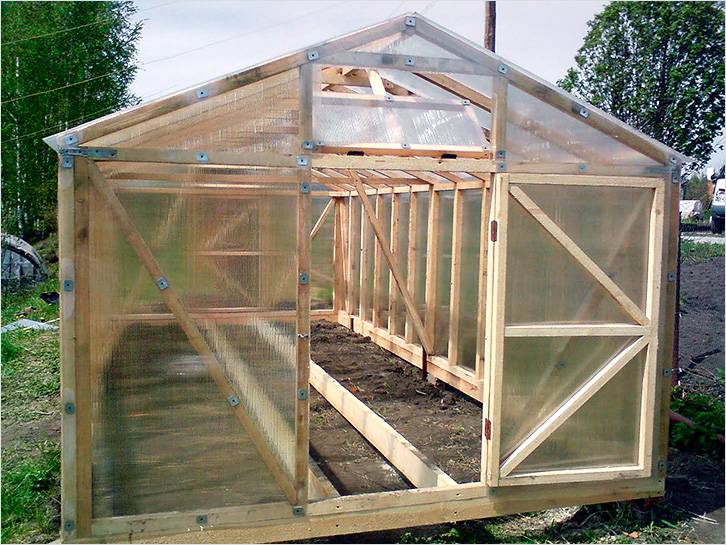
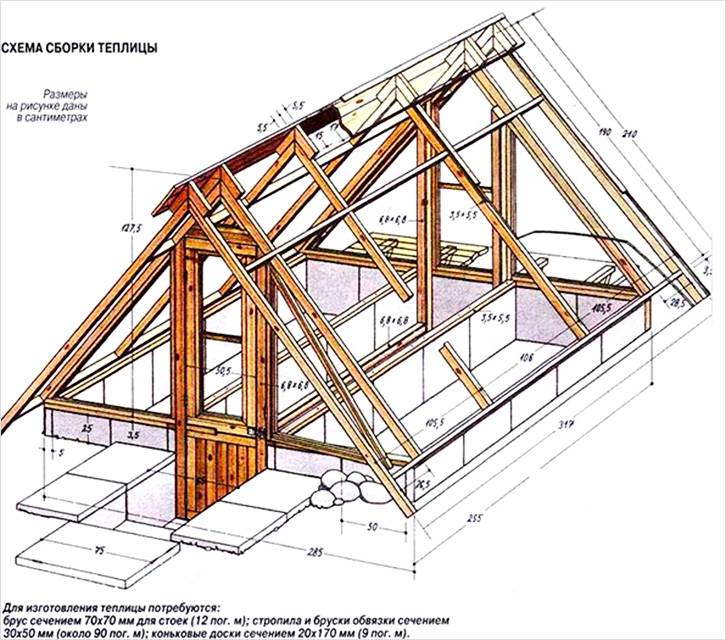
The technology of manufacturing a double-hipped wooden greenhouse
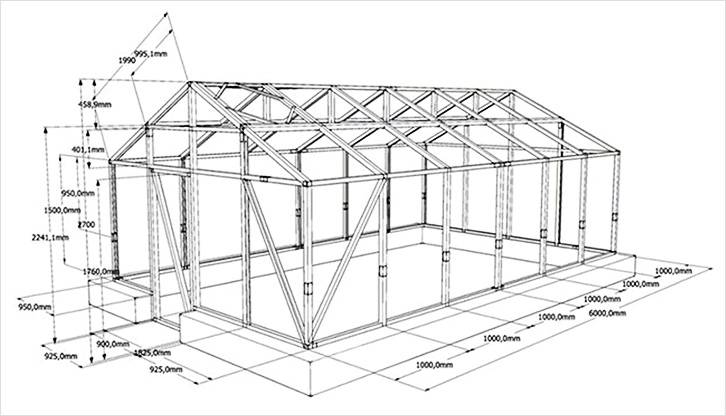
Make a hothouse with gable roof is much easier. Detailed drawings and schemes will help here. Thanks to them it will be easier to assemble the necessary building material. At the core of the frame structure, you can use 50 × 50 mm bars as supports and for a 100 × 100 mm frame.
It is worth noting that the principle of manufacturing such a greenhouse is similar to the sequence of manufacturing a greenhouse from a profile pipe. Only in this case everything is much simpler. On the perimeter, pillars of support are installed: at the corners of the greenhouse and in steps of up to 1000 mm. For greater strength, the lower strapping and the upper one are used, a bar is used for this purpose. For the rigidity of the walls of the structure, cross-pieces are necessarily fixed.
The formation of two roof slopes is performed on a flat horizontal surface. Using prepared drawings and schemes, you can cope with this work quite easily and quickly.
![]()

To join the bars used self-tapping screws, metal corners, and in some cases, nails. Below we suggest to look at the principle of manufacturing such a greenhouse.
Video: how to make a wooden frame with a gable roof
Hotbed from the galvanized profile
This material is also used to make a greenhouse. He has many positive aspects, among which there are clearly distinguished:
- simple installation;
- a small set of tools for installation;
- galvanization is not corroded;
- the frame does not need to be painted and covered with protective compounds;
- the total weight of the greenhouse will be small, which saves and builds a small foundation;
- in contrast to the profile pipe, the galvanized profile is cheaper;
- speed of assembly.
The manufacturing process is relatively simple, the description is presented in the table:
| Stages of work | Process description |
| Stage 1 | A smooth horizontal surface is required to make the frame. Otherwise, there is a risk that the frame will have unevenness, which will adversely affect the attachment of polycarbonate. So, first of all the frame of the back and front wall is made. Lay out on the ground a rectangular shape or a square (depending on the chosen form of your greenhouse). The upper and lower part of it is the width of the greenhouse, and the two lateral (left and right) are the support posts. |
| 2 stage | Measure the diagonals of the structure. They must coincide. The drop is allowed up to 5 mm. That is, you should get a level figure, but in no case a rhombus. |
| Stage 3 | After inserting the profile into each other, fasten it with screws for metal. The galvanized profile is relatively soft, so there is no need to drill holes. For each fixing unit, two screws are required. This will give the structure of the carcass more rigidity. |
| 4 stage | After the collected square / rectangle, find the middle of the upper part and draw from it upwards a perpendicular line to form the roof ridge. |
| Stage 5 | From the marked point, measure the distance to the edge of the upper corner of the greenhouse with a tape measure. As a result, you should get 2 skates of the same size. Then take a profile of the appropriate size and cut in half. On the cut, the profile is bent, and thus a gable roof is formed. |
| 6th stage | The roof element is attached to the frame. The finished structure is also additionally fastened by stiffeners. The crossbars can be arranged diagonally or crisscrossed. There is no strict rule here. The main goal is to create the necessary rigidity. According to this scheme, the second part of the front side of the greenhouse is assembled. |
| 7th stage | Necessarily, an opening for the door is formed in the end part. |
| 8th stage | Given the size of polycarbonate sheets, it is calculated how many and where additional farms should be installed. The standard polycarbonate has a width of 210 cm, so the normal span will reach 105 cm. |
| 9th stage | When all elements of the frame are prepared, it remains to install the greenhouse. Struts, ties and crossbars are required for greater stability of the greenhouse. |
To eliminate the unpleasant phenomenon in the form of a broken greenhouse, additionally set the profile diagonally between each rack. Even a strong wind load in this case will not break the integrity of the greenhouse framework from the galvanized profile.
Note! For the manufacture of such a frame is often used gypsum plasterboard profile. Therefore, you can calculate that it will be cheaper.
Video: manufacturing of a greenhouse from the zinced profile
Homemade skeleton made of polypropylene pipes
Polypropylene pipes are successfully used not only for laying water supply systems. They can be used to make home-made greenhouses, covered with polycarbonate. This material in this appointment has such advantages:
- the pipes and components themselves have a low cost;
- it is possible to transfer the greenhouse to another location due to the small weight of the structure;
- simple installation, and for work you need a special welding soldering iron and scissors;
- polypropylene is not corroded, the greenhouse will last 20 years or more.
As for the minuses, so it's light weight. Such a greenhouse will have a strong sail. For this reason, it will be necessary to provide a correct and reinforced attachment to the foundation or ground.
So, to make such a hotbed will not make much effort. The whole work consists of several successive stages:
- First, we perform the markup.
- In the corners of the future greenhouse, reinforcement is hammered into the ground, while from the ground level it should hang up to a height of 500 mm.
- After the pipe is taken and one of its ends is inserted into the armature protruding from the ground. It gently arches, and the other end is inserted into the opposite section of the armature.

By this principle, the whole frame of the greenhouse is assembled. When all farms are installed, crossbars are necessarily fixed. This requires special fittings: tees and crossings.
For fixing the crossbars, the following operations are performed:
- In the upper part of the arch a pipe is cut, later a cross or a tee will be soldered at the cutting site.
- On the cut parts of the pipe should be welded plastic cross (for this work will need help: one holds the pipe, bending it, and the second solder).
- In having 2 exits from the crosspiece it will be necessary to solder the cross members, so the whole structure will be connected to each other.
- The end parts of the greenhouse are also cut, and the tees are soldered.
Doors and windows can also be formed from polypropylene pipes. Watch interesting videos. One shows how to assemble such a hotbed using self-tapping screws, and in the second one everything is done by soldering. To such a greenhouse polycarbonate is fixed with self-tapping screws, which is very convenient and fast.
Video: features of manufacturing greenhouses from polypropylene pipes
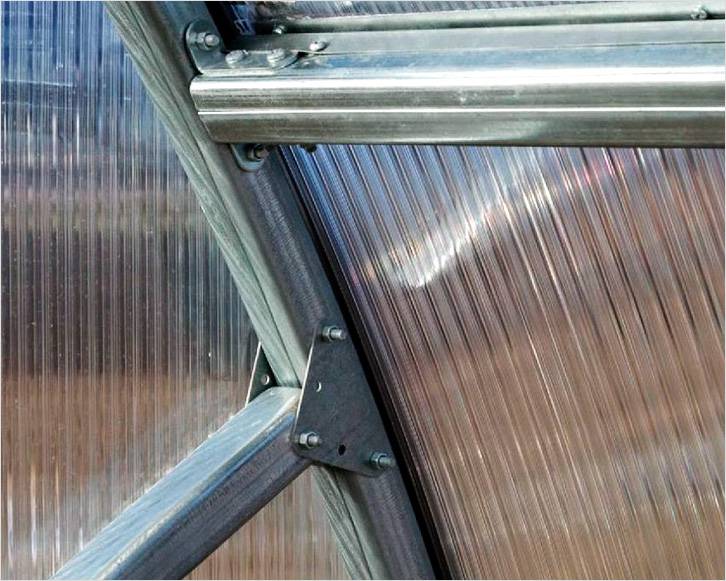
Mounting polycarbonate on the greenhouse - technology
So, the specifics of the foundation and the frame of the greenhouse were considered. As can be seen, there are many technologies that differ in complexity of execution, the cost of raw materials and not only. Now we have come to the next stage of manufacturing a greenhouse - the installation / fixing of polycarbonate. First, we'll discuss the options for the fixing material.
Regular self-tapping screws are not suitable here. On sale there are special thermo-washers, which do not damage polycarbonate, but, on the contrary, reliably hold the material. Special sealing thermowells are used. They have such positive aspects:
- The ability to easily attach polycarbonate to any type of crate.
- Inside through the bolts will not penetrate moisture and cold air, since their device implies the use of a special rubber gasket.
- The thermo washer with strong heat allows polycarbonate to expand without destroying it.

As a sealant, a neoprene material is used. It's soft enough. If the temperature regime changes, then the maximum that occurs with neoprene is compression, but it does not lose its tightness. That is, the polycarbonate sheet will move, but in no case will not crumple. As for the samorez, it is a kind of "beetles", that is, the tip of the samreza resembles a drill. After tightening the screw, the cap is closed with a plastic cap, giving an aesthetic appearance. Plus, the self-tapping screw will be protected from direct moisture penetration, which eliminates its corrosion.
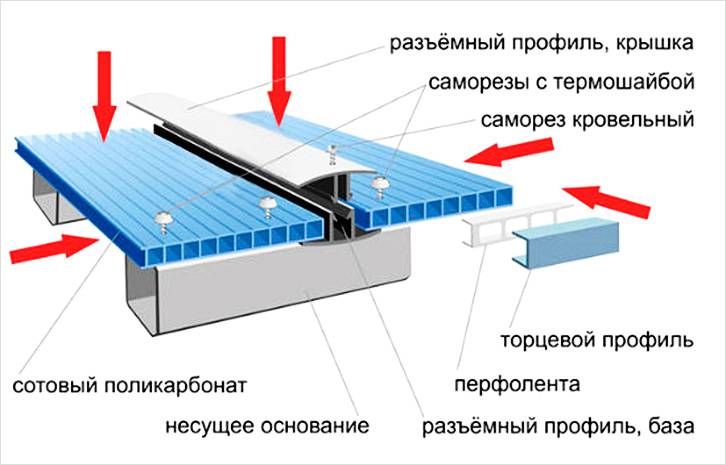
There are also special profiles for fixing polycarbonate. They can be of different types, for example, H-shaped, ridge-RP, connecting one-piece - HP and detachable - HCP, end-UP, detachable connecting - SP, wall-mounted - FP.
There is also an aluminum fastening system. Of course, in favor of this technology says the high strength and durability of the entire construction of the greenhouse. The fastening aluminum profile is produced in length of 6 m and thickness from 6 to 25 mm.
Video: varieties of fasteners for polycarbonate
Features of mounting polycarbonate

In fact, absolutely does not matter, in what position the polycarbonate sheet will be located, vertically, inclined, horizontally, etc. Separate attention should be paid to the sealing of the joints. If you use an aluminum profile for fixing, then it has a special rubber band. Polycarbonate sheets join together, forming a sealed connection.
While tightening the screw through polycarbonate, do not tighten it strongly. Sealing rubber should lightly press the sheet against the frame. Special attention should be paid to the edges and ends of the polycarbonate. They should be framed with a special protective plastic profile.
If after cutting the sheet you find burrs, uneven and heavily rough edges, then all this must be removed. Otherwise, it will not be possible to provide sufficient sealing. Additionally, we suggest to see video materials, which clearly shows the process of fixing polycarbonate to the greenhouse.
Video: technology of fixing polycarbonate to the greenhouse
Communication in a greenhouse made of polycarbonate
To build a greenhouse is one thing, quite another to supply it with necessary communications. Among the main ones, one can single out the following:
- Lighting.
- Ventilation.
- Heating.
- Watering.
This is especially important if you plan to grow vegetables all year round. If this involves your work, then it is worth considering to automate most of the processes. This will save your time considerably, although in the beginning you will have to raise a lot of money. We recommend that you watch the video in these subsections. We are confident that this information will help you make the right decision.
Artificial lighting as an addition to natural

We already said at the beginning of this article that the correct location of the greenhouse will save your money. If the chosen place is well illuminated by the sun's rays, then this is a huge plus. However, some cultures are sensitive even to a small lack of light, and this can cause negative consequences, affecting their development.
For the organization of lighting use lamps:
- ordinary incandescence;
- high-pressure mercury;
- high-pressure sodium;
- luminescent;
- halogen;
- lED.
Let's consider features of these kinds of lamps in a cut of their use for illumination in a greenhouse from polycarbonate:
| Kinds of lamps | Specifications |
| Incandescent lamps | This type of lighting gives an excess of rays. This adversely affects the development of plants, so their installation will not ensure the achievement of the original task. |
| Mercury | This type of lamps, in addition to lighting, also gives heat. However, their main disadvantage is ultraviolet radiation. Their use is allowed in combination with other types of lighting. |
| Sodium | High level of light output. The light emitted from them has a yellow-orange hue. This is excellent for the development and fructification of all plants in the greenhouse. |
| Luminescent | This type of lamp is considered the most effective. The light emitted by them favorably affects the development of plants. A low temperature, which is radiated by them, allows them to be located in close proximity to plants. In addition, you can use ultraviolet lamps, which will not allow bacteria and other harmful microorganisms to develop. |
| Halogen | High cost and short service life are a serious disadvantage. However, the emitted light most accurately repeats the spectrum of sunlight. |
| LEDs | Radiation acquires shades of blue and red spectrum. They are very popular because of their economy. In the greenhouse it is recommended to use white LEDs. |
The subtleties of organizing wiring in the greenhouse
When conducting electrical cables in a greenhouse, it is important to consider one characteristic feature. In the greenhouse is always high humidity. Therefore, the wires should be reliably protected from moisture on them. This applies to the irrigation process. Therefore, the wires should be placed in special boxes. Mount it is, than above from the ground, on the ceiling and walls.
For the development of plants to be most beneficial, the lighting process inside the greenhouse can be automated. At first it will entail embezzlement, but afterwards you will feel considerable savings.
Video: lighting features in the greenhouse
Heating is inextricably linked with lighting
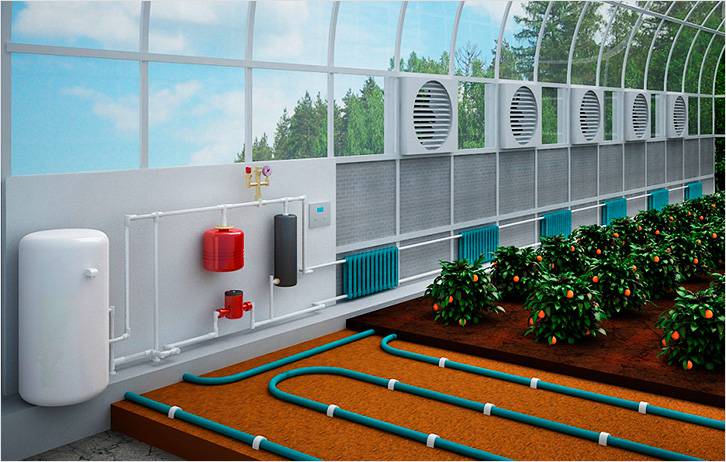
The heating of the greenhouse is directly related to lighting. Therefore, if you decide to conduct the necessary communications, then the heating should be in the foreground. Several methods of heating are known today. For example, stove heating. For realization it is required to build a special tambour in a greenhouse. The main disadvantage is the low efficiency and laboriousness of the heating process. Concerning modern technology, then here it is necessary to include water heating and electric. It is distinguished by its high efficiency. Plus, it is quite possible to automate the process with the help of special automation.
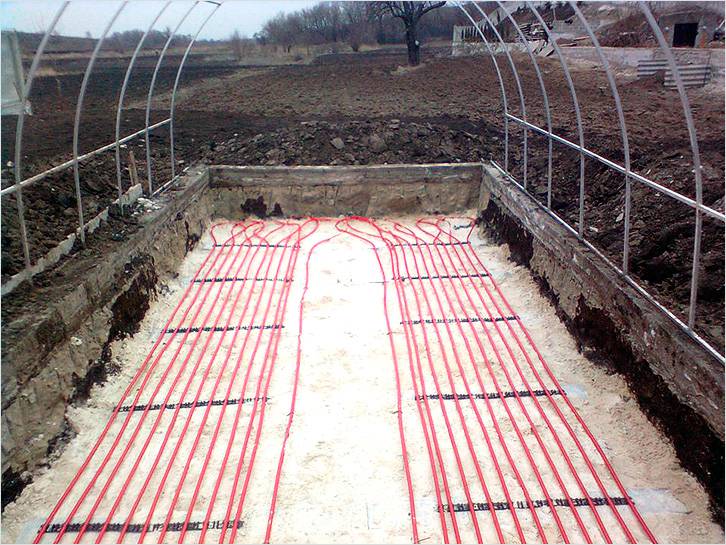
There is an interesting technology for heating the soil, it is a kind of "warm floors". Soil is an excellent conductor of heat, so this technology is in great demand, but it requires considerable financial investments. We have prepared several video materials on the effectiveness of one or another method of heating in a greenhouse.
Video: features of the organization of heating in the greenhouse
Ventilation - automatic and manual

Ventilation also affects the yield of plants. Today there are several ways of organizing ventilation in a greenhouse made of polycarbonate. The simplest is mechanical, that is manual. For this, the frame provides for the presence of windows (small windows). If necessary, the ventilation pans open to allow a change of air. The windows for ventilation can be located in the end part of the greenhouse. If the greenhouse has large dimensions, then there may be several such windows. In principle, this method is suitable for summer residents who live in the country during the cultivation of a particular crop.
If your financial possibilities permit, it is quite realistic to build an automatic ventilation system. It can be of several types:
- Electrical.
- Biometric.
- Hydraulic.
| Type of automatic ventilation | Features and differences |
| Electrical | This method of ventilating the greenhouse is considered the cheapest. It requires an electric fan and a thermal relay. The key link in the whole scheme will be the thermal relay. It will give a signal to the fan to turn the fan on / off. One of the advantages is that it is possible to install several fans and a thermostat along the entire length of the greenhouse. In order to increase the efficiency of such a system, it is recommended to install leaflets at different ends of the greenhouse, which will open when the fan is turned on. Significant minus - energy dependence. If you turn off the power supply, there will be no ventilation. |
| Hydraulic | This variant of ventilation is considered the most effective, reliable and durable. This system consists of levers, which are connected together by a transom. The principle of operation is as follows: water is poured into the vessel. When the water is heated, expansion occurs, with cooling, compression. When the expansion of the liquid occurs, the ventilation pans open, respectively, in the reverse order when the water is compressed, the pane closes. In the role of a thermometer, you can use a container inside the greenhouse. The capacity fixed on the outside is the compensator. Hydraulic hoses are used to communicate capacities with each other. Everything is relatively simple. You can watch the video at the end of this section. |
| Biometric | In this system, the device and operation of automatic ventilation is possible due to the increase in material with increasing temperature. To implement such a project, two metals with different coefficients of expansion are used. As a result, such a system has a low cost, easy to install, but has a long operational life. |
Video: organization of ventilation in the greenhouse
Watering is water, the source of life

Another important communication is watering. The method of irrigation depends on the cultivated crop. For example, tomatoes should not be watered from above, water should immediately enter the root system. Especially in watering plants need in the summer. With all this, organizing watering, you should avoid excess water and its lack, adhering to the golden mean.
This can be achieved through the manufacture of irrigation systems, which can be such a plan:
- sprinkler system;
- subsurface watering;
- drip irrigation.
Let's consider features of each of them.
Sprinkler system. The most simple way it is considered such a method of irrigation, where water comes from above. It is realized using a shower sprayer. Also there is a fountain sprayer. In this case, water is sprayed with a rotating spray head. Among the positive aspects of such irrigation can be identified:
- increase in air humidity in the greenhouse;
- imitation of rain watering;
- high productivity;
- uniform watering of plants.
Subsoil watering.With such watering, the roots immediately feed on moisture. In the ground, canals are arranged along which water flows. It is evenly distributed over the root system of certain plants. Also, plastic pipes can be laid to a depth of up to 350 mm. At the bottom of the plastic foil, after the perforated pipe and from above all this is filled with soil.
Among the positive aspects of this kind of irrigation can be identified:
- significant slowing of weed growth;
- slight moistening of the top layer of the soil;
- regular replenishment of the root system of the plant with moisture.

Drip irrigation. Well, the last method of watering is a drip. Based on its name, it becomes clear that water is supplied by drops. At the same time, it comes directly to the roots. Such a solution has a number of positive aspects, for example, water is rationally used, the formation of fungal diseases is excluded, and so on.
Each of the described irrigation systems has its own characteristics, and all of them can be automated. It will be necessary to purchase sensors and all kinds of automation.
Video: watering the hotbed, how best to do
So, the question of how to make a glasshouse of polycarbonate independently was considered in detail. If you want to add something, you can leave feedback and comments on this article. In addition to all, we offer a series of photos of ready-made greenhouses. Perhaps, they will be useful in constructing your own greenhouse made of polycarbonate.
Photo: options for ready greenhouses from polycarbonate
 Greenhouse made of polycarbonate and metal frame Greenhouse made of polycarbonate with plastic windows and doors In a polycarbonate greenhouse, you can conduct the necessary communications
ABOUT on the nature - a great option, especially if you spend time at your dacha or in a country house. Most people in a household plot a small garden is broken, where a nice greenhouse will fit in successfully. Ordering in the store such a product is very expensive, but made of polycarbonate greenhouse with own hands , whose drawings are easy to get - this is the most suitable option. Let's find out what we need for this and how to make the installation.
Polycarbonate greenhouse
Among the advantages of greenhouses from this material is worth noting:
- Durability;
- Reliability;
- Better and more durable retains heat than the hothouse, covered with a film or glass, provided the quality material;
- Keeps up to 92-95% of natural light;
- Year-round operation;

- Ease of installation when choosing a simple greenhouse frame;
- Fire safety, when exposed to high temperatures polycarbonate melts without releasing harmful substances;
- Aesthetic appearance.
Video: how to choose high-quality polycarbonate
How to make a greenhouse of polycarbonate own drawings
If you decide to collect a polycarbonate greenhouse yourself, you will need a design plan and certain materials, with a list of which you can read further.

Choice of construction
First, you need to determine the type and material of the frame for the future greenhouse. There is a huge variety of both standard solutions and individual projects.

Also important is the choice of material. In building stores, ready-made sets of metal profiles are sold that are assembled as a designer.

Related article:
A separate review provides detailed instructions for designing and erecting a structure from a profile pipe with photo-examples.
PVC can also be used as a material. They are easy to bend, light and easy to install.
And of course it's impossible not to mention the wood, which also serves as an excellent frame for these buildings, is affordable, cheap and allows you to mount structures of various shapes and sizes.

Drawing Drawing
The greenhouse with its own hands made of polycarbonate, to draw a drawing of which does not take much time, will turn out to be large and convenient, provided that all the necessary rules are observed.
First of all, you need to determine the size of the structure. They will depend on the area of the infield, and how much you are going to grow, and, of course, on the cost of materials.
![]()
Preparing the foundation
The strength and reliability of the greenhouse will depend on the quality of the foundation you prepare for it. There can be several options. The most common is the wooden base. For its erection, you will need a bar, a level, a shovel, a measuring tape 7 meters, a construction knife. It is necessary to file 2 pieces of 3 meters and 2 pieces of 3.85 meters. When assembling the box from the bar, we put the bar for convenience on a narrow part for the further convenience of mounting the polycarbonate, so that it overlaps the bar. Three-meter uneven bars should cover the end of the beam 3.85 m.

But the most reliable is the concrete foundation. If you are going to make a large greenhouse and use a metal profile or wooden bars for the frame, the foundation of concrete will be necessary because of the significant weight of the entire structure. For the installation of cement foundation we make the formwork, according to the size of the proposed foundation. We cast it with cement and let the cement harden and harden.

Manufacturing of a frame from a metal profile
If you are going to make the frame yourself, then you will need: a metal profile: a square pipe 25 x 25 mm, a machine tool, welding machine , angular. And for the further assembly of the greenhouse: sheets of polycarbonate, metal bands, metal corners, screws, including roofing.
You can easily make a greenhouse made of polycarbonate with your own hands, the drawings of which are ready. We take a square metal pipe 25x25 mm, preferably galvanized, rolled it through, resulting in an arc of the required size.
We cut the pipe into the size of the structure and weld the arc to it in steps of 0.65-1.0 m. We make 7 arcs: two at the ends, 5 at intervals.

Make the ends - connect the ends of the arcs with a three-meter square pipe 25x25 mm, weld the door frame and the windows. Either such a frame can be bought in a specialized store.

Mounting to the base
Fastening to the wooden base
On the previously exposed wooden frame or cement foundation, install the lower frame of the greenhouse along the long sides of the basement. Fasteners for wooden foundation we carry out self-cutting in the appropriate technological holes provided by the greenhouse manufacturer or drilled by yourself, in case you have made the frame yourself.
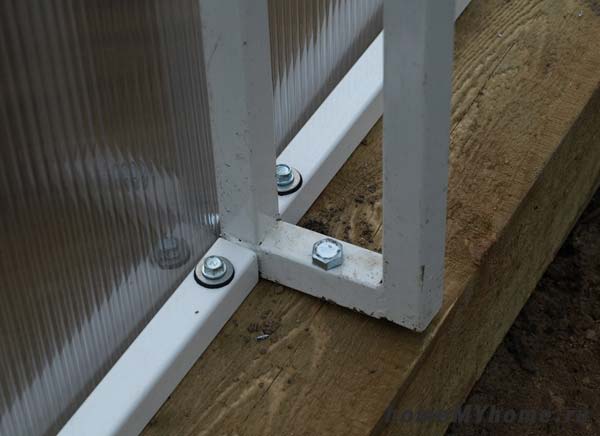
If you did not prepare the base, then directly to the wooden foundation directly arc the frame with clamps.
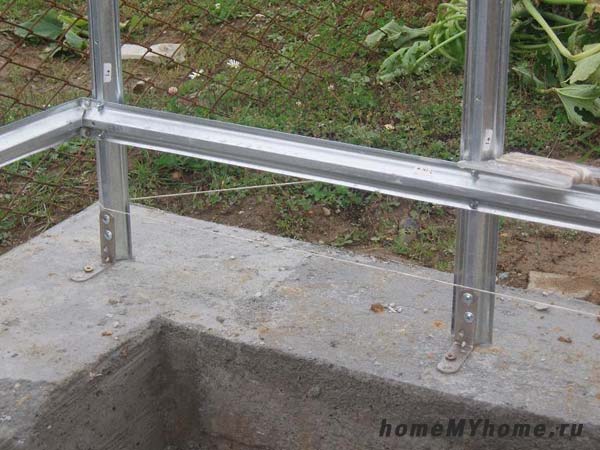
Fastening to the concrete base
Fastening of a skeleton to the base from cement is carried out by means of special anchor bolts, or metal corners.
![]()
Installation of polycarbonate
We sew the ends of the greenhouse with polycarbonate on a horizontal plane. Securing the polycarbonate at the ends, cut out the doors and two windows (as polycarbonate is convenient to cut on a horizontal plane).

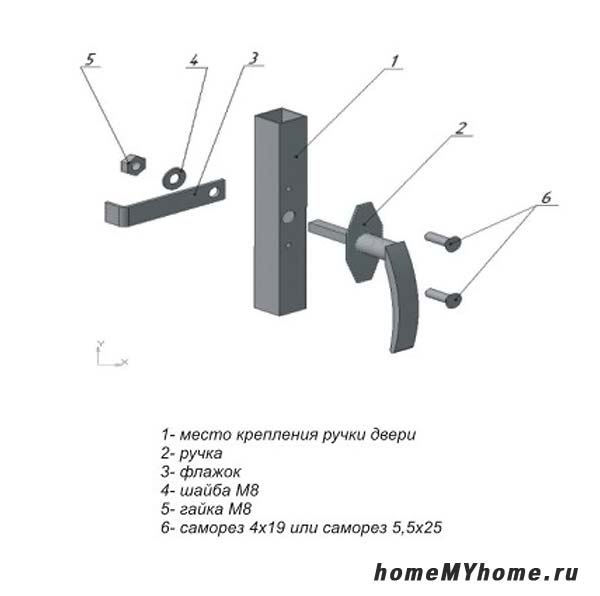
Install the finished ends. We make the installation of accessories: handles, locks, hooks for fixing doors and windows.
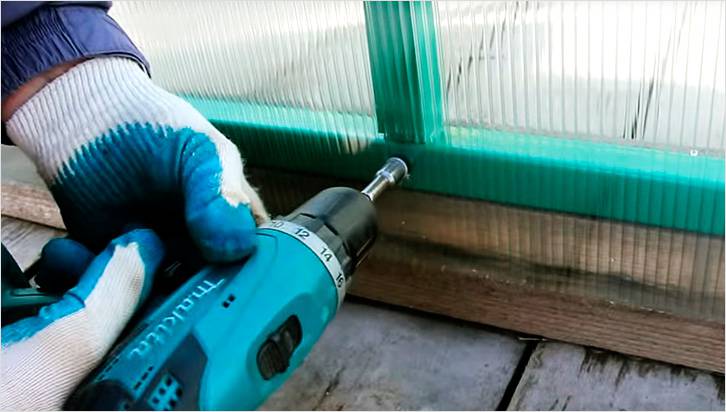
Release polycarbonate sheets from the protective film, gently weave the first sheet on the frame, level it. We deduce 1-3 sm of polycarbonate for an end, we level a edge on an end face, we fix a leaf on an end arch with roofing screws.

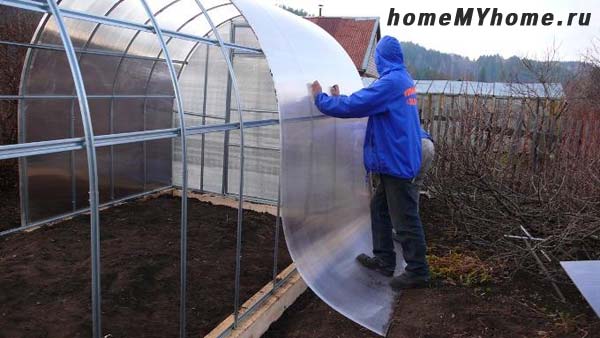
Then we take the metal zinced ribbons, we throw over the sheet, we fix the tapes with roofing screws, starting from the second arc. Throw the second sheet of polycarbonate and install the remaining tape. We make a constriction: we tighten the bands from the first sheet from the second arc, the overlap of the sheets is tightened last. And you become a happy owner of a new polycarbonate greenhouse.

If the greenhouse made of polycarbonate with its own hands, the drawings of which are executed according to all standards, is collected, then the following recommendations should be observed in order to extend the validity period.
- If the foundation is not leveled-when polycarbonate is laid, bulges and irregularities, then crevices, will be formed.
- The most reliable design of the greenhouse, withstanding winter loads in the form of accumulation of snow - a greenhouse in the form of a dome, with a sharp horse "Drop". She has one minus - a complicated installation.
- Buy greenhouses in steps of arcs at least 0.65 m if you do not want to find your greenhouse after a snowy winter with a broken polycarbonate.
- It is better to fix polycarbonate with metal zinc-coated tapes. Since this simplifies the installation / dismantling of polycarbonate.
- Polycarbonate is better to use a thickness of 6 mm and higher, depending on the available funds.
- When installing a greenhouse 6 and more meters in length, immediately install additional side windows. If possible with automatic opening.
conclusions
- Durable and has several advantages over film and glass greenhouses.
- Easy to install, when choosing a simple design; It is possible to manufacture and assemble independently.
- The ability to purchase bundling in certain organizations.
Video: how to make a polycarbonate greenhouse with your own hands
In our time, greenhouses made of polycarbonate are very popular among farmers and ordinary lovers of country life. In this article, we will walk through the process of building a greenhouse made of polycarbonate, and also consider all the pros and cons of greenhouses made with this technology.
Before we begin to consider the technology of construction let's note that the greenhouse made of polycarbonate has the following advantages in contrast to the "classical" materials for the construction of greenhouses, for example:
- Strength of the material. It is proved that polycarbonate in comparison with polyethylene or glass has higher strength qualities and is able to tolerate physical effects better than analogues. For example, polycarbonate is not subject to excessive load on the roof in the winter. Usually, greenhouses made of glass are not insured against this and in the winter from excessive snow load glass can crack and become unusable.
- Polycarbonate, in contrast to glass, is less exposed to ultraviolet radiation, which allows plants that are grown in a polycarbonate greenhouse to be less exposed to ultraviolet rays.
- It has high (in comparison with analogues) qualities for thermal insulation due to the fact that polycarbonate is a two-layer material.
- Resistant to temperature conditions. The greenhouse made of polycarbonate can withstand both the Siberian frosts (up to -50 degrees C) and the Crimean hot days (up to + 60 ° C).
- The material is easy to drill, flexible (with heating), which makes it comfortable enough to work. In addition, the material is light enough and is broken into convenient sheets. Polycarbonate sheets usually have dimensions of 600 * 210 cm, which, with the right approach, makes it possible to cover the greenhouse with 3-4 sheets.
- An important advantage is that, unlike greenhouses made of glass, a polycarbonate greenhouse can dissipate sunlight, which reduces the chance of burning plants in high temperature conditions.
- And the last advantage of polycarbonate is its cost. The average cost of a greenhouse made of polycarbonate is much cheaper than a glasshouse.
In this material, we often mention a glasshouse. We advise you to read the article on how to do it. Step-by-step technology accompanied by pictures will help you understand the technology by 100%.
Disadvantages of a greenhouse made of polycarbonate
About the advantages of polycarbonate greenhouses, we have already noted, but this material has its drawbacks:
- Durability of polycarbonate. In conditions of excess sunlight, polycarbonate is subject to so-called "burnout", which can lead to its sudden wear, which, in turn, will lead to the fragility of the entire structure.
- Quality sheets of polycarbonate. There is a risk of buying substandard polycarbonate sheets. Usually the leaf weighs about 10 kg. Before buying, ask to weigh the sheet if its weight is less than 10 kg, then refrain from buying most likely you have low-quality material that can cause big problems in the future.
- Difficulties with additional heating of the greenhouse. Polycarbonate, like any plastic is a fairly low-melting material, which makes it difficult to install a stove heating in the greenhouse. But folk craftsmen can solve this problem, if you are interested in reading about then check out the material on our website.
Determine the choice of the foundation for a greenhouse made of polycarbonate
There are many types of foundations that can be used for greenhouses. It all depends on your preferences. If you are going to thoroughly install a greenhouse in a certain place on your site for many years, then it is recommended to use a strip, brick foundation or foundation on screw piles (a novelty in the market).
But if the greenhouse on your site is still a seasonal or temporary phenomenon, then it is recommended to use a light foundation from the bar, which is erected over several hours of operation.
In addition to seasonality, an important condition for choosing the type of foundation for a greenhouse is the occurrence of groundwater on the site. If the groundwater table is at a low level, then a tape or brick foundation is quite suitable as a foundation, which is distinguished by its reliability. Otherwise (if the groundwater level is high), then the strip foundation will not work, because there are risks of deformation of the ribbon foundation, and with it the entire structure of the greenhouse.
With a high groundwater table, use a universal type of foundation - a screw pile or a foundation of a bar.
What kind of basement option choose to decide in any case you need. Below we give a description of all types of foundations for the greenhouse, but the project of the foundation is only the first task you will have to face at the construction stage of the greenhouse, so carefully approach the solution of this issue.
Foundation for a greenhouse made of bricks
In addition to the light and short-lived foundation from the bar in front of the home master, the question arises, can make a reliable and solid foundation? If you really thought about it, then we present to your attention an excellent solution - this is the foundation of brick with a ribbon cement base.
Such a foundation can last for several decades, but here, as always, the correctness of its erection influences the term. Consider the process of erecting a brick foundation in detail.
- The first thing we do is a trench depth of 40 to 60 cm will be enough. Then pour a concrete foundation onto the sand pillow.
- We stack the series brickwork. The number of rows of masonry made of bricks depends only on your imagination, so you want the higher the greenhouse the more rows you can install.
- Then lay a layer of roofing material for waterproofing.
- We fasten the anchor bolts to the lower strapping. The harness can be made even from a bar.
Below in the photo we will look at the step-by-step instructions on the construction of a brick foundation for a greenhouse made of polycarbonate.
The foundation for a greenhouse made of lumber
A foundation made of a bar is a simple solution for those who do not want to long tinker with the erection of the foundation. To build this design, you will need:
- A bar with a diameter of 50 * 50 mm.
- Iron pegs to fix the timber to the ground (provided if you do not do it on screw piles or on a brick foundation) and linseed oil.
- Drying is required in order to prevent wood from premature decay due to direct exposure to soil and weather conditions (dampness, rain, condensation).
Before we come to the technology of erecting the foundation of the timber, we note that the foundation of the timber can be fixed not only to the ground (because of what it will quickly decay), but also on brick supports or screw piles, and then make the strapping of the bar - this is the most optimal option.
Fastening of a skeleton to the basis from a bar (obvjazke from a bar)
The polycarbonate greenhouse in most cases requires a reinforced frame. It is the frame - this is the basis of the construction when erecting a greenhouse made of polycarbonate. The frame can be made from different materials, but the main materials are:
- Wooden beam;
- Aluminum guides;
- Metal pipes;
- A metal corner, etc.
Folk craftsmen mainly use wooden beams when erecting frame elements, but the tree as already mentioned above is quite susceptible to rot and the second drawback is the complexity of the design analysis for the winter period. Using wooden frame It becomes a problem. Let's consider various variants of a skeleton for a greenhouse on a timber foundation.
Fastening of a wooden skeleton to the basis from a bar
Fastening of a wooden skeleton can be carried out in several ways. It all depends on your ability and ability to use a saw and an ax. Well, if you know the basics of carpentry, then this work will not add to your difficulties. So, there are the following ways to connect the ordinary racks of the frame from the bar:
- Full felling method.
- Method of partial cutting (vbrobrusa).
- Mounting with a metal corner.
The methods of fastening the pillars from the timber to the foundation of wood
Which of these methods to give preference to the construction of the frame is a matter of skills. Fasten the beam uniquely easier with the help of a metal corner (it should be at least 2 mm wide). It will be safer to fix the log using the complete deforestation method, but on condition that you are able to correctly perform this type of work.
When the racks are fixed to the lower anchorages, it does not matter which way (full felling, vlobrusa or using metal corners). To ensure that the racks do not loosen up to the moment of the upper strapping (mounting the upper restraining beam), it is necessary to make special cuts on each rack. The slopes help fix the structure of the hothouse frame that has not yet formed.
Wooden polycarbonate greenhouse on the foundation of the timber
So, in the previous chapter, we looked at the process of creating a wooden foundation, and then fastening the wooden frame to the beam. It's time to step by step to consider the creation of a wooden greenhouse made of polycarbonate.
Sequence of work:
- We install a wooden foundation from the timber; The foundation is done on brick pillars, on screw piles or on the ground. If we choose the last option (foundation on the ground), then we dig a trench, lay a layer of sand, then we lay a brick litter with a height of at least 2 bricks or sand-cement block, then a double layer of roofing material and finally a wooden beam of the harness.
- When the foundation is finished. We begin to fasten the frames of the frame. Racks of the frame are fastened using the technology "vlapu" or "vpolderova", for reliability you can fix a metal corner. In addition to the corner, the posts are fixed with cuts.
- Racks are ready. We make the upper harness from the bar by the technology of the lower strapping.
- It's time to erect the roof. The roof can be made, or oval. Step by step instructions on the construction of a wooden greenhouse made of polycarbonate can look at the photo below.
Fastening of a metal skeleton to a bar
On an armoring from a bar the iron skeleton is fastened by means of anchor bolts, but it is better to think over ways of fastening in advance. The photo below shows the process of fastening the wireframe metal guides with the help of anchor bolts to the lashing from the bar.
Fastening of an aluminum skeleton to the basis from a wooden bar
As already mentioned above, the frame can be made not only from metal and wood, but also from aluminum guides. The aluminum frame is a fairly practical material that can easily be cut using a jigsaw for metal and screwing screws into it both for fixing to the strapping of the bar and for fixing the polycarbonate to the aluminum rails.
The main thing in this case is to drill all the holes in advance. This will not deform the structure as a result of drilling holes in an uncomfortable position.
We make a frame of greenhouses from plastic (polypropylene) pipes
I would like to note that the above methods of building a greenhouse made of polycarbonate have many advantages, but one drawback is their complexity in the subject of dismantling. Dismantling is usually needed when we do not plan to leave the greenhouse for winter or spring, but we want to use a polycarbonate greenhouse only in the summer. Plastic pipes come to the rescue.
Polypropylene pipes are an excellent helper for erecting a greenhouse of almost any shape. Pipes can easily be cut using a conventional jigsaw, which allows you to install a greenhouse with virtually no project. In addition to this, in contrast to the wooden frame, in polypropylene pipesno condensation is formed, which does not lead to the appearance of mold and, as a rule, premature deterioration of the structure due to weather conditions.
The only issue with which it will be necessary to decide in advance is the frame of the greenhouse will be collapsible or stationary. The demountable frame is twisted with screws, and the stationary frame is welded for eternity.
In the photo above, an example of a simple greenhouse made of plastic pipes was shown, but as you understand with a slight increase in wind or under the influence of other weather conditions, this design can be deformed, and the light weight of the structure and the absence of a base under the frame are all the blame for this.
Basis for a frame made of polymer pipes
As a basis for the frame, which will impart rigidity to our design, the following materials will be needed:
- Wooden beam thickness of 6 or 8 mm. for the erection of stiffeners. The long beam should match the necessary dimensions of your greenhouse.
- Bar to create the foundation foundation (if you have not already done it).
Sequence of work:
- We make the foundation of the timber and fix it to the soil with the help of metal stakes.
- We collect a frame of greenhouses from plastic pipes. Fastening is carried out with the help of special crosses designed for plastic pipes.
- Fastening polycarbonate to plastic pipes is carried out with the help of self-tapping screws. If you can not easily screw the screws, then the holes in the pipes are best drilled, and then screw in the screws.
The photo below shows a step-by-step algorithm for constructing a greenhouse made of polypropylene pipes. Fittings and frogs are used for fastening.
Continuation of the carcass assembly
The figure above shows a sample of fastening the frame for a polyethylene film. The stiffeners were practically absent, and the polypropylene pipe is an alternative to the overhead beam. But we hope the idea is clear that if polycarbonate is used as the coating, then the frame should be strengthened, making it more rigid.
For more information about the construction of greenhouses made of polypropylene, we suggest you watch a video on this topic.
Video - a hothouse made of PVC pipes by own hands (length 4 meters)
Greenhouse coating with polycarbonate
We have already examined the material about how to make a foundation for a greenhouse and what kinds of foundations exist. Next, we highlighted all the issues that concern the construction of a framework for a greenhouse and the formation of stiffeners. In turn, in this chapter, let's consider the issues of covering the greenhouse with polycarbonate.
Greenhouses usually use polycarbonate 6 and 8 mm. For greenhouses, a 4 mm-wide material is suitable, and if your task is to build a winter warmed greenhouse, then you can safely buy polycarbonate with a width of 10 mm.
Polycarbonate is a flexible material that allows it to be cut and assembled without much effort. This material attracts to its use its strength and resistance to atmospheric adversity.
When attaching polycarbonate, it is advisable not to make a horizontal surface on the roof, because The condensate formed on the roof must roll down the vertical surface of the sheets to the ground.
For fixing polycarbonate to a skeleton made of polypropylene pipes, folk craftsmen often use a fastening scheme with plastic earrings or aluminum staples. But it is worth noting that manufacturers do not recommend using this method of fixing polycarbonate.
Polycarbonate mounting with profiles
Manufacturers recommend to fix polycarbonate exclusively with the help of profiles; it is this method of fixing that makes it possible to tightly cover the greenhouse with polycarbonate, in addition it will provide a fast fastening process and reliability of the structure. Mounting with a profile provides financial costs for the connection profile, but the quality of the connections will be much higher.
For fastening screws to metal frame it is necessary to drill the holes beforehand, and then to fix the polycarbonate on the screws. Please note that the selection of self-tapping screws and sealing washers must be approached with special care. It is recommended to use self-tapping screws with thermowells with a wide support area, this will help preserve the carbonate in its integrity and prevent condensation.
Video - the technology of joining polycarbonate sheets together
Video - construction of a greenhouse made of polycarbonate
Video - assembly of a greenhouse made of polycarbonate
In order for your greenhouse made of polycarbonate to serve you faithfully, and the plants that you grow always have high yields, you must follow the simple rules of greenhouse care:
- Every spring, wipe the walls of the greenhouse with a damp cloth and soap solution, but do not add alkali to the solution.
- In the connectors and joints of sheets of polycarbonate sheets, molds, insects and other living things are often formed. During the construction phase, try to seal all joints with a sealant. This also applies to the passage of the lighting cable, wiring, chimney from the furnace, etc.
- In the winter season, sweep away excess snow masses from the frame of the greenhouse. This will allow you to do preventive measures against deformation of polycarbonate.
As a conclusion
In this material we have got acquainted with such material polycarbonate, and also considered several variants of construction of a greenhouse from this material. Your attention was offered to:
- A wooden greenhouse made of polycarbonate, which is notable for its ecological compatibility, but its service life is 10-15 years.
- The greenhouse is made of metal and aluminum frames, the construction of which requires effort, but has great reliability.
- The greenhouse is made of polypropylene (PVC) pipes. This option of manufacturing a greenhouse will require minimal (in comparison with analogues) the amount of time, but the reliability leaves much to be desired.
- And finally, a greenhouse made of polypropylene pipes with reinforced frame from a bar. This version of the greenhouse is perfect for year-round use in the suburban area.
On which version of the greenhouse to choose you. We are waiting for your comments on the material.
Polycarbonate is the optimal choice, both for industrial and for small homestead greenhouses. The polycarbonate greenhouse is built with its own hands quite often due to its strength and ease of installation. For starters, let's say a few words about polycarbonate. The material has recently proved to be an excellent component of greenhouse and greenhouse. Constructions from it, indeed, beyond competition and beyond praise. Provided that the foundation and frame were made competently. The construction of greenhouses makes it possible to increase the vegetation and yield of planted plants so that the winter season is not terrible for them. The designs reliably protect plants from rain and temperature differences and give a good harvest. This is possible if there is ventilation, heating the room and creating a microclimate. How to install a greenhouse made of polycarbonate with your own hands, and in what additional accessories does it need?
What is polycarbonate greenhouses?
Polycarbonate is a material obtained by extrusion of polycarbonate particles. Most often it is used in civil and industrial construction. He found his application and on household plots.
The use of cellular polycarbonate is very popular. It has excellent properties, allowing you to grow a rich harvest, in addition, it is cheaper than a monolithic one.
This material is shockproof. With glass, it does not go to any comparison. The strength of polycarbonate is 200 times stronger. This material has a small weight, so the construction of it can create any. Sheets polycarbonate perfectly withstand any temperature: both above +100 degrees, and frost in -40. That is why a polycarbonate greenhouse the best option for winter gardening. In addition, the designs withstand the weight of the snow, and if you make the arched version, the snow will be less likely to linger on its surface and not press on the frame. 
One of the main properties of polycarbonate sheets is the preservation of heat and the dispersion of it throughout the perimeter of the greenhouse.
Another important factor is the appearance of honeycomb polycarbonate. The greenhouse of such a material looks aesthetically pleasing, than it adorns the view of the entire plot.
Advantages of polycarbonate greenhouse
This material is made in the form of two-layer plastic sheets with different thicknesses. As a rule, when constructing greenhouses, sheets with a size of 6 × 2.1 m and a thickness of 4.5 mm are used.
Polycarbonate has a number of significant advantages in comparison with glass and polyethylene film:
- Polycarbonate has a high strength and remains intact for minor impacts (its strength is about 200 times higher compared to conventional glass).
- It completely protects the plant in the greenhouse from the adverse effects of ultraviolet rays.
- Resistant to temperature changes from -40 to +60 ° C.
- The material is able to dissipate incoming sunlight, and, accordingly, the combustion of plants is excluded.
- Double-layer plastic has high thermal insulation properties.
- The material is easy to process and can be easily cut and drilled. As fasteners for the design, you can use both self-tapping screws and electric screwdrivers.
- The weight of polycarbonate is less than glass, which greatly facilitates its installation and transportation.
- The surface of the material has a dust-repellent quality, and the contamination that has appeared is removed with the help of ordinary water.
- Polycarbonate is not flammable, but when it interacts with fire, it begins to melt.
- Its cost is similar to the cost of ordinary glass.
 Cons of a polycarbonate greenhouse
Installation of polycarbonate obliges to observe certain rules:
- The material sheets should always be closed from the front side to prevent airing and ingress of moisture and insects. In the future it causes mold, fungi and structural damage;
- It is necessary to carefully clean out the dirt and dust from the greenhouse and use only neutral detergents;
- It is forbidden to use detergents containing salt, alkali, chlorine and ether;
- Do not use abrasive pastes or sharp objects when cleaning the greenhouse. This causes damage to the outer layer of the structure;
- Regular winter cleaning of the greenhouse from snow prevents the occurrence of ice, deformations and collapse of the structure profile.
Placing a polycarbonate greenhouse on the site
The following factors influence the placement and orientation of the greenhouse made of polycarbonate relative to the sides of the world:
- Degree of illumination. At the same time, if the greenhouse is planned to be used and in the autumn-winter period, it is necessary to take into account the height of the sun above the horizon. Experienced vacationers recommend to orient the structure exactly on the sides of the world, along the line north-south or west-east (best of all), so that the sun's rays uniformly and completely illuminate the area during the whole daylight hours.
- Wind load. Protection from wind is important not only in terms of structural integrity, but also to prevent unnecessary heat loss during the winter operation period
- The optimal distance to a hedge that is able to protect a greenhouse 2-2.5 m high from the wind is 7-8 m, with the height of the fence no more than 1.5-1.8 m. Such an arrangement does not obscure the structure and, at the same time, redirects the air flow is higher than the greenhouse.
- Relief and soils. It is not recommended to install a greenhouse of polycarbonate with your own hands in the lowland parts of the infield where water can accumulate. In addition to a lower temperature, flooding is possible, which will adversely affect the crop. In addition, a place with clay or sandy soils will require additional costs for the erection of the foundation.
Types of frameworks for greenhouses made of polycarbonate
Taking into account the possibility to create a variety of designs from the profile, we can distinguish several basic forms of frameworks for greenhouses:
- arched (semicircular, arched) form - the roof of this design has a semicircular shape, which allows snow in the winter to not stay on the surface of the greenhouse. It differs in its simplicity of installation and the possibility to use all its space under rather high cultures;
- gable construction - traditional shape with gable roof. This design is more complex in the assembly and requires the construction of a powerful frame. It can be used for cultivation of plants of various heights;
- one-ditch building - such greenhouses are most often attached to the existing structure (home or summer kitchen), allow you to save space in the suburban or private plot. This design allows you to save material and has good thermal insulation. An important plus is the proximity of communications. Single-greenhouses can be installed in a separate structure;
- tent or dome structures - unique structures with excellent ability to withstand external factors: snow and wind load. Have the maximum illumination and can become a memorable decoration of any infield area;
- a hothouse-breadbasket - a model of a greenhouse made of polycarbonate with an opening top. Such a construction resembles the shape of a breadbasket. Can open in one or two sides. It has convenient access to plants for care, it is possible to fully open the lid to ensure ventilation in extreme heat. Usually small in size, used as a greenhouse, can easily be transferred to a new convenient location on the site;
 To make the polycarbonate structure durable, you need to follow certain requirements
- cleaning the surface of the greenhouse from dirt, dust, use detergent without alkali, ether and chlorine, and also do not use abrasive pastes for these purposes;
- to prevent the formation of mold and fungus, it must be ensured that the end part of the greenhouse is always closed from the ingress of insects and moisture;
- in the winter time, to ensure that on the surface of the greenhouse did not form ice, which can further lead to deformation and even destruction of the structure.
After studying all the merits and features, you can start independent manufacture greenhouses.
Step-by-step instruction on construction of a greenhouse made of polycarbonate
Before the manufacture of a greenhouse made of polycarbonate and a profile, it is necessary to separately decompose the elements of the structure, several times to look at the diagrams.
This will help to quickly and correctly connect all the elements. The construction of a greenhouse of polycarbonate begins from the collection of the lower profiles - the foundation.
Initially, ribbon foundation The wall supports and corner joints are laid out. Then they are fastened by jumpers (they are installed on the seams, they are tightened with bolts).
- Vertical supports are installed on the rounded corners. Screw to the horizontal profiles.
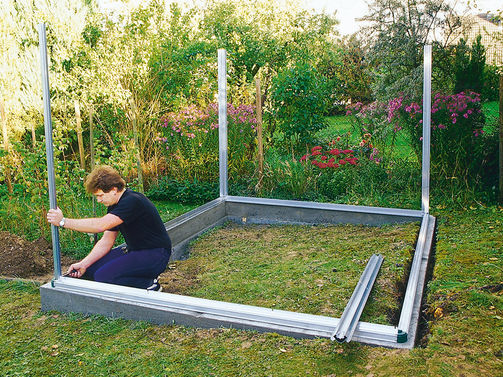
- Rack-supports are mounted on 2-3 units per wall. Loose attached to the lower profiles: in their grooves in the future will install polycarbonate.

- Mounted upper supports that will strengthen the frame and serve as the basis for fixing the roof. In addition, they will serve as a drain.

- Polycarbonate is installed in the grooves on the vertical profiles. Profiles tightly screwed to the base.
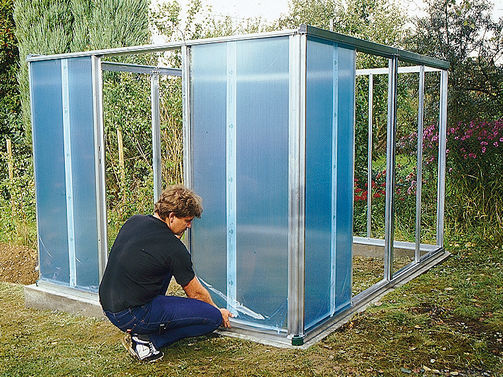
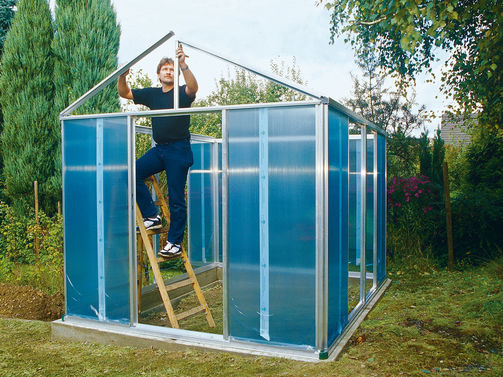
- Mounted additional profiles-rafters: they are screwed to the already fixed skate.
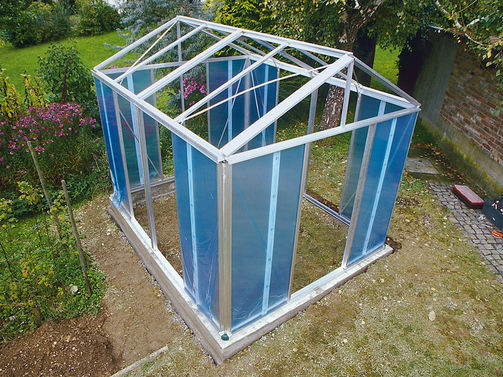
- Polycarbonate is additionally supported by thin diagonal posts: they are inserted into the free grooves of the supporting profiles. A protective film is removed from the polycarbonate.
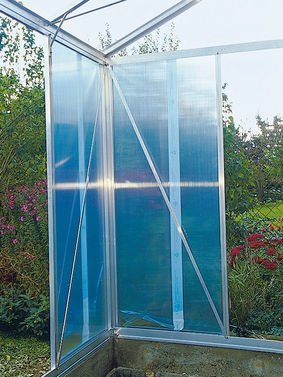
- Separately, the lifting window for the roof is assembled, installed in the free space between the profiles, as shown in the attached photos.
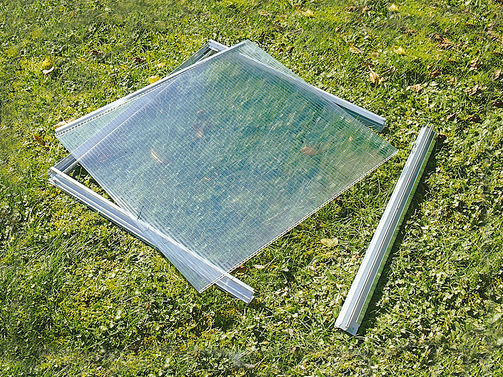
- The roof is strengthened by installing brackets between the rafters and the wall support profiles.

- All joints between polycarbonate sheets and grooves of profiles are sealed. The joints of the two profiles are closed by another thin profile.
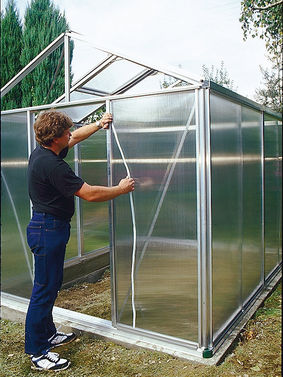
- The pediments are mounted (polycarbonate is installed in the grooves of the profiles). Two parts of the door are assembled, installed in the opening with the help of loops.

- The profile base is fastened with brackets to the ribbon foundation.

Additional fasteners for lifting the window are mounted. They need to be ordered separately: they are usually not included.
Polycarbonate, which has a cellular structure, has a longer service life than glass or polyethylene film. He is not afraid of strikes, is able to survive a strong hail and squally wind, practically does not burn out in the sun and remains transparent for a long time, therefore does not require an annual replacement.
However, installation of a greenhouse of polycarbonate of standard dimensions is not always justified. Especially this applies to small areas where every meter of land is important. In addition, a greenhouse, made by themselves, will be much cheaper.
What is polycarbonate?
Polycarbonate is a light and hard plastic that consists of two or more layers and has a cellular structure. Sheets of up to 6 mm thick have a sufficiently high light transmittance (up to 90%) and easily tolerate even significant temperature fluctuations. The presence of internal ribs makes them stiff enough and strong: if desired, they can easily be bent and shaped like a hemisphere.Polycarbonate sheets
Due to the cellular structure in polycarbonate sheets an air layer is created, which is ideal heat insulator. For the erection of greenhouses it is recommended to purchase sheets with a thickness of 6-8 mm. With an increase in their thickness, naturally, the strength characteristics also increase, but the light transmission capacity decreases. Too thin (up to 4 mm) polycarbonate is not worth buying: it is used mainly for mounting advertising constructions and shop windows. Pay attention to the density and weight of the material: inexpensive lightweight polycarbonate is less durable and will not last long.
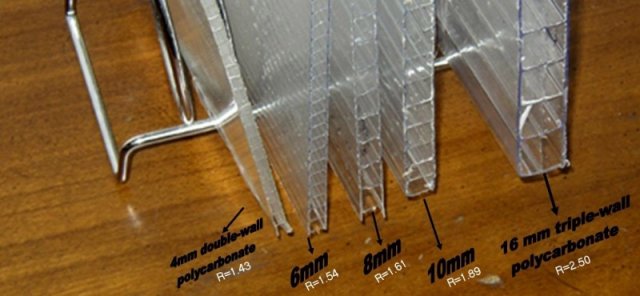
Heavier sheets with a thickness of 8 mm are used for the construction of industrial and winter greenhouses. The light transmittance of panels 10-25 mm thick is much lower, therefore they are not used for greenhouses, but high strength characteristics allow them to be used for glazing buildings and even industrial structures.
Materials for carcasses
Thin galvanized, aluminum profile or pipe from metal-plastic easy to assemble, and they can easily be given any curved shape. However, a hothouse with a frame made of such materials in case of falling heavy heavy snow or under the influence of a heavy wind can collapse. If you plan to build a frame of such materials, it is desirable to increase the number of ribs in it or to provide a collapsible structure that will be removed for the winter.To fasten the pillars at the bottom of the frame, the lower strapping must be provided. To the foundation, it is fixed by means of a corner or rather strong reinforcement.
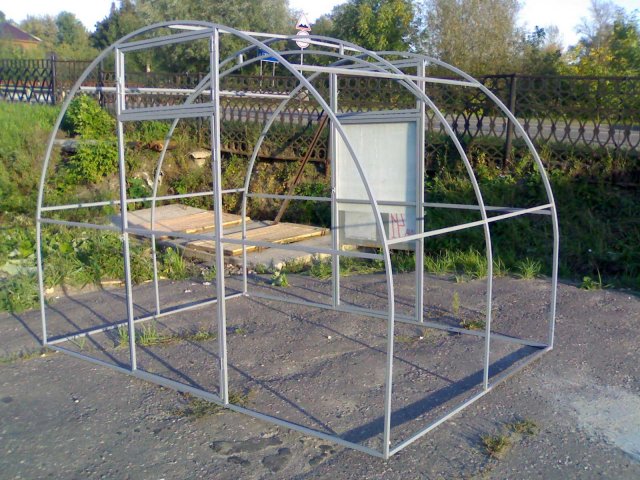
Greenhouse with frame from aluminum profile
More durable will be the frame made from the bar thickness not less than 10-15 mm. However, this environmentally friendly material in conditions of high humidity easily gives in to decay. To ensure that such a frame has served no less than 8-10 years, before installation, it should be treated with antiseptic, drying oil or copper sulfate.

Greenhouse with a frame made of timber
The most durable is the construction made of metal pipes, angle or channel. The strongest are steel pipes with a square section. However, they are very difficult to bend, so in case of their use it is better to use not a sloping one, but a roof with one or two skates. In addition, a heavy frame will require the erection of a more robust belt concrete foundation or fastening on stilts.
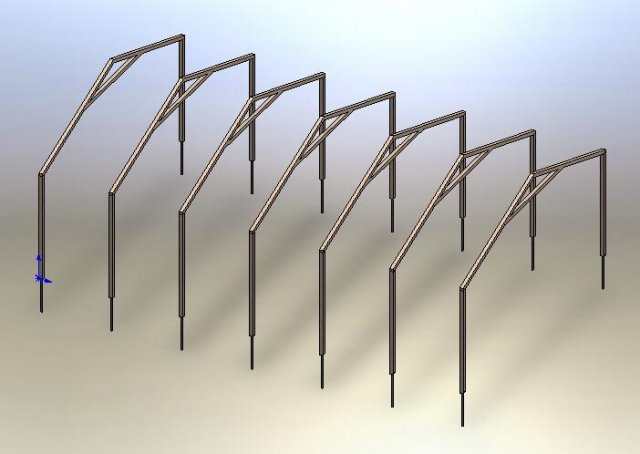
Frame with gable roof
Shape of the greenhouse
That the snow does not linger on the roof of the greenhouse, its ramp should be large enough. The most convenient is the greenhouse in the form of a hemisphere or with a slightly elongated pointed vertex.However, to ensure that the sun's rays are able to warm up the plants, it is necessary to provide for the presence of flat areas on it. If the angle of bending of the roof is too large, the probability of the appearance of glare (that is, reflected sun rays) on it is significantly increased.
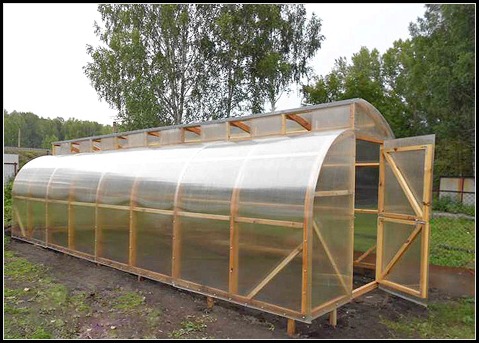
Wooden frame with a roof in the form of a hemisphere
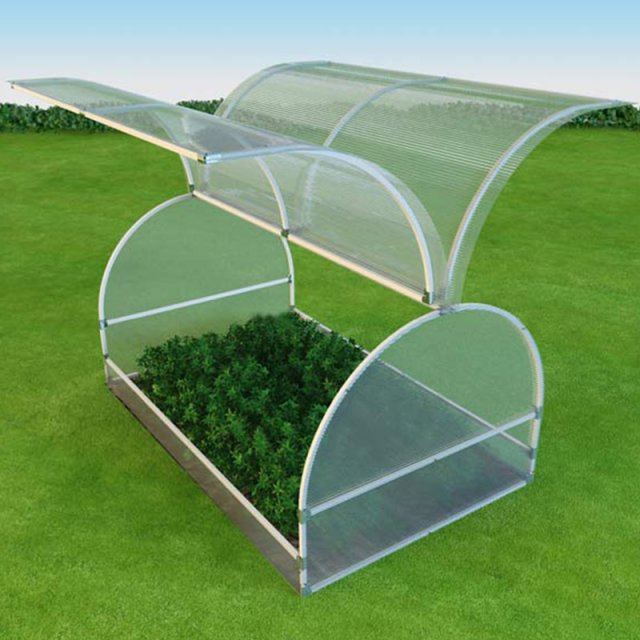
A small greenhouse with a galvanized metal frame

Greenhouse with a sharp top
Bend metal pipes or channel it is possible with the help of Bulgarian. With the help of a marker, tags are placed on them, the frequency of which depends on the radius of the bend. In the planned points, the Bulgarian makes cuts of the size of 1/2 height. After bending the profile, the notches are welded again.
Determination of the location and size of the future greenhouse
To avoid mistakes, before buying material, you need to choose a location for the future greenhouse and determine its size. For clarity you can draw a diagram, in which it is necessary to mark all racks of the frame.The roof drawing is done on a separate sheet. In order for plants to receive a maximum of sunlight throughout the day, the greenhouse should be located east to west.
Important! To remove accumulation of excessive moisture in the greenhouse, it is necessary to provide several windows for ventilation.
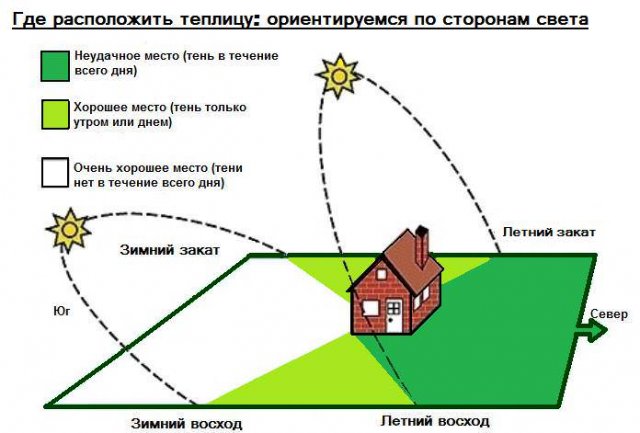
Location of the greenhouse
In order to minimize waste, the size of the greenhouse must be a multiple of the length and height of the polycarbonate sheet. The most convenient for working are standard panels measuring 2.1 × 6 m. When bending a 6-meter panel, the height of the greenhouse will be 1.9 m, width - 3.8 m. The length of the greenhouse made up of 3 sheets will be about 6 m, while the number of their junctions will be minimal. Its height can be increased by the wooden base.
At a width of 2.5 m in the greenhouse, there will be two standard beds with a width of 0.8 m and there will be enough space for passage. In a greenhouse with a height of more than 2 m, you can also place shelter beds.
Does the greenhouse need a foundation?
To ensure maximum stability and rigidity, such a structure must be fixed to a fixed base. For light structures, it is possible to use point foundation in the form of piles of any sufficiently durable material: timber, bricks, blocks of foam or aerated concrete, etc.Inexpensive foundation of timber able to withstand a structure weighing 70-120 kg. To protect the soil from erosion, as well as protect plants from fluctuations in night temperatures, it is best to cover it a little to the ground. To prepare it, a small trench is prepared for the spade bayonet, onto which ruberoid or film is deposited. Completely wrap it in a film or roofing felt is not worth it: in such a "package" the condensate will very quickly collect, and the bar very quickly deteriorates. To ensure that the pillars do not wash away the water, a "pillow" of sand and crushed stone falls under them.
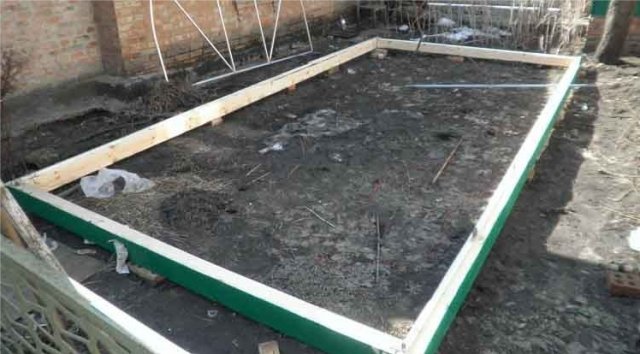
Foundation of timber
The optimal option for the foundation of the greenhouse are old sleepers, of which creosote has already completely eroded. Such material can last 30-40 years even in conditions of high humidity. Sleepers are laid in a small trench so that their upper edges are flush with the ground and are fastened with construction brackets, and vertically connected by armature or crutches. Piles under such a foundation can be made of concrete, blocks or bricks.

Foundation from sleepers
When the construction of heavy structures from the metal will require the presence or pile supports. Concrete, although it conducts heat poorly, very long warms up after winter cold, so it is better to build such a foundation only under winter greenhouses with heating.
Council. So that the soil does not spill out, the lower inner side of the greenhouse is covered with a tree.
Sawing sheets
Cutting polycarbonate 4-6 mm thick is done with a conventional construction knife. To prevent dust and debris from entering the polycarbonate cells, the upper part of the cut is completely covered by a tape or profile, and small holes for condensate drainage are left at the bottom of the part.Basic rules for working with polycarbonate:
to ensure the stability of the construction of the stiffener are located only vertically; To determine their direction, the sheet should be bent;
so that the material does not hang between the posts, they are placed in steps of at least 1-1.2 m; the edges of the polycarbonate are fixed on the frames of the frame;
high-quality polycarbonate has two protective films: blue on the side that will face the sun, and gray from the underside;
visually determine the layer with UV protection is difficult, so pay attention to the labeling;
such a film makes the sheets more durable and less brittle, therefore it is removed only by mounting; if it is not removed in time, it can "weld" under the influence of sunlight, the sheets will become cloudy, and their light-transmitting capacity will decrease.
Important! The sheets are located only with ultraviolet protection upwards. Otherwise, there will be no effect from it.
Fastening polycarbonate
After cutting, the workpieces are attached to the frame by means of self-tapping screws. To prevent crumpling of polycarbonate and blocking the "bridges" of cold thermocouples are mounted together with self-tapping screws, equipped with a rubber seal and a heat-insulating ring.The sheets are spliced overlapping 6-10 cm or combined with a special profile. To ensure that they do not deform under the influence of thermal expansion, small gaps remain between the polycarbonate panels and at the corners of the joints.

Connection profile for polycarbonate in the form of the letter "H"

Mounting with a connecting profile
The holes are located 40 mm from the edge of the sheet. Taking into account the thermal expansion of the polycarbonate, their diameter should be slightly larger (by 2-3 mm) the legs of the sealing washer.
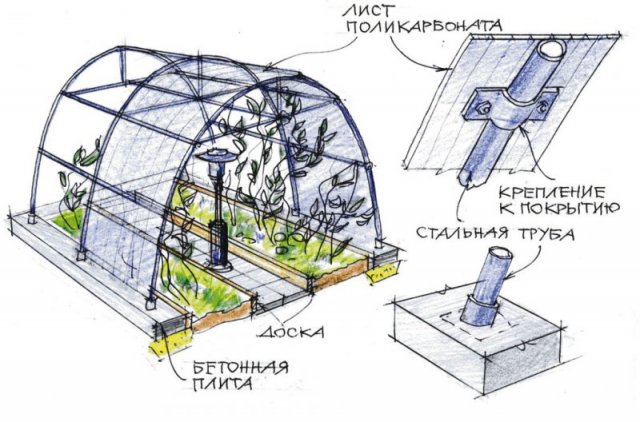
Fastening polycarbonate
To strengthen the design of the joints must be located on the structural beams of the frame. In the places where the polycarbonate sheets are sagging, rain will accumulate after the rain, and under its weight the structure may be damaged, so their tension should be maximized.
Important! If excessive tightening of screws is possible deformation and premature collapse of the roof.
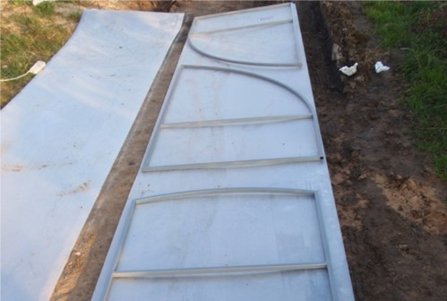
Cutting polycarbonate
End and connecting profiles are able to reliably protect the cellular polymer from the penetration of dirt and dust. They are fixed with the help of thermo-washers with a step of about 30 cm. When lapping, the sheets are additionally fastened with an aluminum self-adhesive tape. Inside the greenhouse, these connections are further strengthened by a perforated belt with holes that will ensure the outflow of condensate.
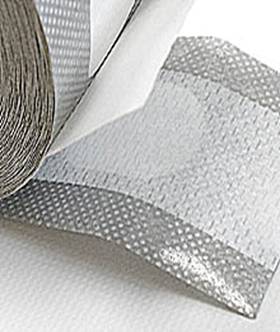
Perforated tape
Important! During installation, the penetration of moisture into polycarbonate cells should not be allowed. When it appears, blow them with compressed air.