In building modern interior the minimum amount of furniture is used. Since a large amount of furniture in a modern standard apartment makes its space even smaller. Increasingly, designers recommend using small shelves instead of cumbersome bookcases and shelving. Particularly impressive on the wall look unusual shelves.
Shelf from the old box
Interestingly on the wall looks like a shelf from a box in the frame. On such a shelf you can put not only books or magazines, but also various crafts and souvenirs.
For work you will need:
- The old box;
- paper for technology decoupage or a piece of wallpaper;
- decorative plinth;
- ruler;
- hacksaw;
- PVA glue;
- the glue "Moment.
First you need to measure the width and length of the box. Then, on the inside of the baseboard, measure the corresponding length and width of the boxes, cuts and cut at an angle of 45 °. Now you need to cut a strip of wallpaper. The length of the wallpaper strip should be equal, multiplied by the 2 sizes of the width and the length of the drawer. Spread the wallpaper with PVA glue and glue the box outside. Now glue the frame, and wait for the glue to dry. Now the ready shelf can be hung on the wall.
Shelf - honeycombs from planks by own hands
A creative wooden shelf in the form of honeycombs can become not only convenient shelving, where you can place your favorite disks or books, but also an excellent art object of the room.
To make such a shelf with your own hands, you will need:
- boards;
- Roulette;
- level;
- glue joinery;
- saw;
- Screwdriver;
- Screws;
- brackets.
You need to cut 15 identical boards 30 cm long, cut at an angle of 30 °. Then, on the floor, gather the first hexagon from the boards. Glue the boards together with a joinery glue. For reliability, you can connect the boards and screws. In this way, make honeycombs from all the boards. After the honeycombs are ready, they should be well sanded, then covered with stain and varnish for wood. In order to light the shelf on the wall, use ready-made brackets. In order for the shelf to look unusually it can be painted with colors.

It's very easy to make a glass shelf with your own hands. For such a shelf, you can use a durable glass. First you need to determine the size of the shelf, and cut out a piece of glass the right size. To fix the glass shelf to the wall, you can use special decorative holders.


Pendant shelf made of plywood - do it yourself
To make a cute hanging shelf you will need
- 4 plywood boards;
- stain for wood;
- brush;
- Drill;
- a rope;
- wooden sticks, 5-8 mm thick.
First cut out the plywood shelf, 20 cm - 50 cm in size and drill holes in them with a drill. Then cover the shelves with stain or paint with any water-repellent paint of bright color. Then take 2 ropes and thread into the holes. Place the shelves at a distance of 25-30 cm. To fix the shelves use wooden sticks. Insert them into the rope under the shelves.

Shelf from a case for a guitar and not only
Creative personalities will like the shelf, made of a case from the guitar on the wall. To do this, you just need to take an unnecessary case from the guitar, paste it with wallpaper or even a newspaper. Then hang the case on the wall and the shelf is ready.

Unusual shelf from the old TV set
A very creative shelf for the house will come from an old TV. To create a shelf, you just need to remove all the insides from the old non-working TV. And a small interesting bookshelf is ready.
 Do you like the article? Share in social networks!
Do you need somewhere to place books, textbooks, magazines? The best solution to this problem is the original bookshelf with your own hands. It has several advantages at once: firstly, you will choose the most convenient size of the product, which will ideally fill an empty place in your house; secondly, add a special thing to the interior; thirdly, do not incur high costs. As a rule, shelves have a simple structure, and drawings, diagrams and step-by-step descriptions of the work will help even the most inexperienced.
This can be a small hinged shelf, which not only allows you to conveniently arrange books, magazines, souvenirs, but also decorate an empty wall. If you do not have enough space on it, you can build an unusual shelving from similar or different shelves, where there is also a place for souvenirs, photographs, small items.
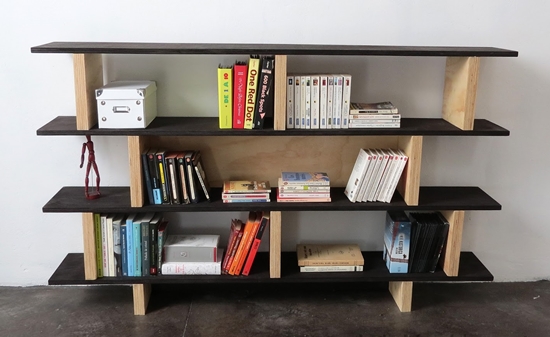
Floor bookshelves
A few modern bookshelves, combined in a small rack, there is a place in the living room, and in the nursery.
Materials and Tools
To make a rack, you should prepare:
- Plywood. You can make from the materials that you have (pieces of wood, particle board, pr).
- Joiner's glue.
- Clamps.
- Electric drill.
- Self-tapping screws.
- Sandpaper.
- Paint for wood (your choice).
A simple diagram will help to understand the way the individual elements of the structure are arranged, their number.
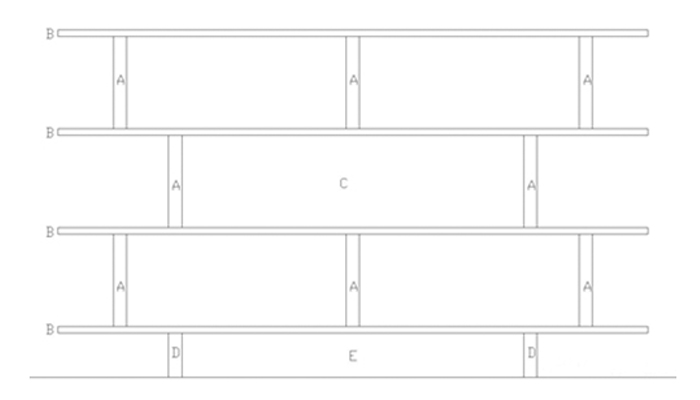
The shelf shelf consists of the following parts, which must be cut from the material used:
- 16 elements of racks with parameters 250х250 mm (in the scheme A);
- 4 shelves 1575x250 mm (in the scheme B);
- 1 back 912.5x250 mm (in the scheme C);
- 4 elements of the base 125x250 mm (in the scheme D);
- 1 base 912.5x125 mm (in the scheme E).
Operating procedure
- Sandpaper handle cuts and rough surfaces.
- If you do exactly the same rack as in the photo, then all the details of 1575x250, 912.5x125 mm (indicated in the scheme B and E) should be painted in a contrasting color. The remaining elements are covered with furniture varnish. Of course, the shelves can be made one-color or use colors that suit your interior.
- We join by means of joiner's glue details 125x250 mm (D) in pairs (legs of the rack). Fully clamp the parts with clamps. The glue that protrudes at the seams should be wiped immediately to ensure that the product is neat.
- Using a drill with self-tapping screws (2 for each joint), install the transverse bar E between the resulting support parts, having previously smeared the joint with joinery glue. Make the connection by retracting from the edge 10-15 mm, as shown in the photo. This arrangement will give the bookshelf greater stability.

- Glue in pairs all the details of 250x250 (A) forming vertical posts.
- Using a drill on the screws, having missed the joints with glue, make a U-joint of two finished vertical racks and an element of 912.5x250. This is the back (back) of the product.
- It's time to collect 2 identical shelves, each with three cross racks. First, apply the identical marking: 1 the cross-member (double A) should be located exactly in the middle of the shelf (B), the other two - on both sides of it, about 150 mm from the edges of the shelf. Then, on the adhesive and screws, fasten the structures. Check the angles of the joints using the square.
- Now you can collect the entire rack. Precisely according to the scheme, install the base, glue the contact point with the upper tier (with two compartments), then - the shelf with the back, in the end - another double element. Press the entire structure on top of something heavy until it dries completely.
Shelf-rack is ready. You can fill it with books, magazines at your discretion.
Aspiration for change
Using parts of furniture as a designer is not new. This method can be successfully applied to the example of shelves. The idea is that from the separate shelves of different sizes a construction is made - a rack, mounted on the floor or wall, in the shape that suits you.
Over time, you can change the configuration of such prefabricated furniture, as well as the number of its elements in both large and small side. MDF or fiberboard can be used as the main material for shelves. There are no rear walls in the products.

What do you need to work?
Before making a bookshelf with your own hands, take care of the availability of the necessary tools. You will need:
- A circular saw. It is useful if you yourself will cut the MDF (or chipboard) on the workpiece. It is better to turn to the workshop with professional equipment, as well as experience in doing such work.
- Drill with drills.
- Iron.
- Glue.
- Sandpaper.
- Corner.
For the manufacture of shelves on the wall will need such materials and accessories:
- 4 sheets of white MDF (if you use chipboard, then you will additionally purchase paint for finishing). From your material, cut out details with dimensions 30x30 (20 pieces), 30x50 (10 pieces), 30x70 cm (10 pieces).
- Self-tapping screws.
- Edge band.
- Caps.
- Staples for securing shelves.
Description of work
- With sandpaper, grind the cutting points of the parts.
- Use the iron to cover the cutting areas with the edge band. Trim the excess parts with a knife.
- Place the markings for the holes so that the screws do not damage when the structure of the material is screwed in.
- Drill holes in the workpiece. Screws (previously glued the place of attachment with glue), fix the drawers-shelves of two sizes to 5 pieces each. Check that all parts are connected at right angles.
- Close the heads of the screws with the plugs of the shelf color.
- Depending on your needs, the area for the rack, fold the shelves into the desired design, one or more products - hang on the wall.
- Fix the obtained design to the furniture brackets.

Original bookshelf
Make a shelf on the wall for books, not only useful, but also bright, interesting, it is possible from improvised materials: chains, hemp rope, wooden boards, other things. Unconventional things will give the interior a special memorable character.
What do we make a bookshelf from?
- 4 planks from natural wood 60х30 cm (you can take chopped chipboard or MDF).
- Hemp rope with a diameter of 2.5-3 cm.
- Plates of different colors. If there is only one - you can cover the pieces with a different number of layers stain or paint with colors in different colors.
- Brackets with special hooks.
- Anchor bolt for fixing the brackets to the ceiling or to the wall.
- Electric drill.
- Pencil.
- Level.
- Corner.
- Roulette.
Step-by-step instruction
- Prepare the boards: sand off the sandpaper on their surface, smooth out the sharp edges. If you use chipboard - cover the cutting area with a special band for the edge.
- Apply marking for the holes (the same on all 4 shelves) - 4 on each board. Draw lines parallel to each side at a distance of 5 cm from it. The intersection points are the drilling sites.
- With a thick drill, at least 15 mm, make through holes in the shelves. Similar drill in the center of each small bar-height limiter. As limiters, wooden cubes, large beads, or simply knots on the rope itself can also be used. The latter must be tied after the shelf and before the next.
- Cut the rope into two equal parts.
- Tie a strong lower knot. Gradually stretch the rope through the holes in the shelves. In this case, be sure to use prepared bars of different colors and sizes as limiters between the main elements. Carefully follow the uniform arrangement of the shelves - so that there is no distortion.
- After threading the shelves, check the reliability and parallelism of their location.
- Connect the tops of both ropes to the brackets.
- Anchorage mount, where you prefer (in the ceiling or in the wall). Hang the shelf in place.
Despite the simplicity and ease of manufacturing, such a hanging shelf, made with the use of improvised materials, will be a worthy addition to the interior. It will help to use a free wall for placing your favorite books, albums, magazines.
Bookshelves, shelving - necessary and convenient elements of the interior of the cabinet, living room, children's room. They perfectly fit into any design of the room, they are ergonomic and at the same time quite capacious.
Manufacture of bookshelves today offer both small carpentry workshops and large furniture factories. Their rich assortment, species diversity, color performance amaze imagination.
But it also happens that for the ideal addition of the existing interior, there are not enough standard factory products. What to do in this case?
The answer to this question is simple - you can create original bookshelves with your own hands. The task is greatly simplified due to the huge selection of professional tools available today for almost everyone, and the variety of source material for every taste and color.
Draw a sketch, create bookshelves with your own hands is easy. It is enough to have at hand necessary tool, paint and varnish materials and detailed instructions.
The finished product can, if desired, decorate with wood carvings, complete with a glass door, cover with colored varnish or a suitable paint, artificially aged, covered with gilding.
There are a lot of options for decoration, one of which is sure to suit exactly for your design project.
Drawing of bookshelf-shelf

We cut out the plywood for the shelves, the base and the back with the following dimensions:
Shelves:
A / 16 pieces 25cm x 25cm
B / 4 details 25cm x 157,5cm
Backwater:
C / 1 piece 25cm x 91.25cm
Base:
D / 4 details 12.5cm x 25cm
E / 1 piece of 12.5cm x 91.25cm

Bookshelf by own hands: step by step description
First of all, it is necessary to glue together the "A" parts in pairs, so as to get vertical stands. For this, special carpentry glue is used. To keep the parts together, use clamps before the glue dries.
In the same way, the "D" parts are glued in pairs, which will serve as the base of the shelf.

It is necessary to clean edges and surfaces of all parts with sandpaper. Then the shelves (parts "B") are painted in a dark color, and the remaining parts are covered with a clear varnish.
This creates a color contrast between the different parts of the shelf, which will give it an exquisite look. But, of course, you can use any other combination of colors.

To make the base, we connect parts D and E. For this, the parts D are perpendicular to the part E, the glue is applied to the joint, the parts are pressed against each other and fixed with screws.
In exactly the same way, part C and two parts A (already after they are glued together in pairs) are connected to make the back of the bookshelf.

Then we glue three parts A to part B. The adhesive is applied to the shelf itself (part B), after which the parts A are vertically installed into place. This process must be repeated twice, in order to get two shelves.
Now you can begin to collect the bookshelf. The base is placed on the floor, the top surface is applied with joinery adhesive, after which the top is put on the shelf.

For better adhesion, it is necessary to use clamps or simply place a load on top of the shelf. On the top surface again we put glue and we put from above the following section. And so on, to the very top.
Once the joinery adhesive is completely dry, the shelf can be used. The objects of interior and furniture created by own hands are several times more valuable than those purchased in a specialized store.
More photos of interiors:
The furniture, made by yourself, will create in your apartment an atmosphere of individuality, originality and convenience. After completing the shelves of wood yourself, you can realize your preferences, pick up the necessary shape, size and color of the product.
If there is no desire to clutter up space with voluminous bookshelves, you can make an original shelf for books, which does not take up much space and will serve as a wonderful element of decor.
Wall shelves will save space, free it from a large number of cabinets, give the interior an extravagant style. The shelves can serve to accommodate books, magazines, photographs, caskets, souvenirs. In the hallway they can be used for headdresses, bags or small items.
Classic wooden shelves can have the usual rectangular or asymmetrical shape. Shelves can be open or closed, suspended, floor or wall.
Wall shelves can be securely attached to the wall using anchors or dowels, in which case they will be able to withstand more weight. Products can be detachable fastened in the form of hooks and staples. With the movable fixation, the lower tier of the model is the support for the upper tier.
Manufacture of wooden shelves

Bars for a shelf of the same size are drilled from both sides at the same distance from the edges.
Before starting to work, you need to determine what purpose the future model will have, what will be its size and shape, and how much weight the product is designed for. Then you need to choose the location of the shelves in the room. After this, you need to draw a drawing of the entire structure and its individual elements.
Wooden wall shelf will have a simple design. It will be designed for relatively high loads, so it is recommended to perform it from solid boards and provide for secure fastening its details.
Materials and tools for the manufacture of the shelves with their own hands:
- boards made of wood;
- a circular saw;
- building level;
- sandpaper;
- drill;
- screwdriver;
- grinding machine;
- screws;
- self-tapping screws;
- nails;
- pencil;
- gon;
- ruler;
- brackets;
- anchors;
- hooks;
- staples;
- dowels.
The boards from which the shelves will be made must be dry.

Through the holes of the bars a rope is skipped and fixed at the ends with knots.
Beforehand, they must be sanded using sandpaper and a grinding machine.
Wooden shelves will look like honeycombs.
First you need to set the cutting angle of the circular saw by 30 degrees.
Then cut out the details of the shelves of the necessary sizes. In total it is necessary to cut 15 elements of the product.
Each board must be turned and measured from its edge 300 mm. On the marked place they perform a cutting with a saw.
After the manufacture of the elements, it is checked whether the joints of the parts are sufficiently even. For this, the products must be attached to each other on a flat surface.
Then the elements are glued together. The glue is applied to the edge of each part, after waiting a few seconds, pressing the workpieces together.
After the glue dries, holes are drilled to install self-tapping screws. All the blanks are connected together. Assemble the frame of the product, connecting the sections to each other.
Drill in each section for 2 holes to connect the structure. Screws are screwed into the holes with a screwdriver.

Angles for fixing the shelf to the wall are inserted into the end bars and securely fixed.
Then install the internal shelves. To do this, with the help of a gon, perform the necessary measurements, refine them with the help of a building level, install fasteners on which the shelves are put.
At the end of the work, the edges of the product are sanded using sandpaper.
Then you need to coat the structure with varnish. It preserves the appearance of the wood and gives the product a beautiful shine.
After the varnish has dried, the shelves are mounted on the wall. To do this, drill a hole in the wall, clog the dowel in it, mount the bracket to suspend the product.
Then the bracket should be checked for strength. To do this, you need to put some effort into it. If the bracket is held firmly, then you need to attach the finished product to this bracket, and then with the assistant to center the design.
Then mark the place of installation of the second bracket. It is installed and also checked for strength.
After that, the finished structure is mounted on the wall.
Original wall shelves for books with their own hands

The finished shelf is attached to the wall with the help of screws and an electric drill.
Materials and tools:
- boards made of wood;
- sandpaper;
- grinding machine;
- brackets;
- dowels;
- screws;
- gon;
- pencil;
- building level;
- drill.
How to make a shelf for books? It is necessary to prepare in advance the necessary number of boards of the necessary sizes. The boards should be polished and varnished.
First of all, markings for the layout of the future structure are made on the wall.
After that, install the brackets.
At the bottom of each board attach 2 large brackets, placing them at a distance of the length of the book. In the middle, install a small bracket, which is separated from the two extreme brackets by the thickness of the book.
Between these brackets a shelf is mounted. She should come right into her place.
This establishes the number of shelves required for books.
You can come up with many different ways of making wooden shelves. If you follow this instruction, check all the measurements with the help of the building level, firmly fasten all the elements, perform a reliable fastening of the product to the wall, then your model will be strong, reliable and durable. Attach all your skills, creativity and imagination, and you will create a product that is unique in its beauty, originality and convenience.
The ideal complement to the rooms are the wall shelves. They are appropriate in any part of the housing: in the hallway, in the kitchen, in the nursery, on the balcony, etc. It's not always easy to pick up ready models that would harmoniously complement the already finished interior, so try to make suitable shelves on the wall with your own hands. They can be made of wood, metal, plastic, glass, many other improvised materials and sometimes completely unexpected objects.
A little imagination, right choice models, drawings, job description, and your original shelves will take their places on an empty wall. Perhaps, the shelf is the simplest thing in the manufacture of furniture, so even a beginner does not risk anything.
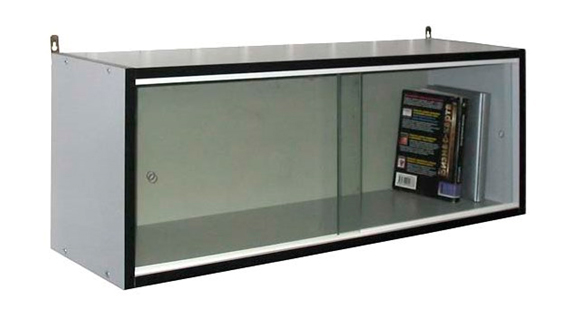
Shelf in MDF with glass door
A regular wall shelf made of two materials: MDF and glass. This is a universal and convenient product, so known to many that for its creation, drawings are not necessary. It often stores souvenirs, books and even dishes.
In addition, the shelf cover also presents a useful surface for use. And if you hang several identical products in checkerboard order, you can build a rack of interesting shape. Dimensions 100x30x27 cm are optimal, such a thing can be found in a spacious children's room and in a small office.
What do you need to make a shelf?
- Laminated MDF plate on both sides.
- Edge for finishing the ends of MDF or plastic tape.
- 2 glass canvases measuring 55x26.7 cm with treated safety edges.
- Tracks from plastic for glass placement.
- Sandpaper of different granularity.
- Mounting screws.
- Nails small size for attaching tracks.
- Brackets and dowels to hang the shelf on the wall.
- Drill.
- Electric jig saw (if you are going to cut out the details yourself from the MDF sheet).
- Screwdriver.
- Iron for fixing the edges.
- Stationery knife.
- A metal ruler, a pencil.
- Level.
The order of performance of work
- First of all, you need to apply the marking of the details to the MDF sheet, cut all the components of the shelf part. You will need to do: 2 parts (bottom and cover) - 110x27 cm; 2 lateral parts - 27x26.7 cm; back wall - 110x30 cm. If you do not have sufficient experience of such work, contact the workshop. Industrial equipment will provide high quality constructive elements and the accuracy of the cut.
- Sand it with sandpaper, degrease them. Then, using an iron, glue them on a special edge or, pulling, install a plastic edge band.
- We collect on the screws or screws the lid, the bottom, both side details. Before screwing the screws into the pre-drilled holes, fill in a little glue (remove the excess immediately with a dry sponge). This will make the connections more robust. Screws of screws try to deepen into the material, then to cover them with putty or to close with special furniture plugs.
- In the same way on the screws or screws attach the back wall.
- To hang wall shelf, you need to screw the brackets to the rear panel in the area of the ends.
- At the bottom of the shelves and covers from the inside we measure 5 mm from the edge, put the marks, then from this line we measure another 10 mm. With the help of small nails, we set the tracks for the glasses according to the marks.
- Be especially careful when preparing a place on the wall under the shelf. The distance between the brackets and the dowels must be the same.
- The glass should be inserted after you have hung the shelf on the wall. Be sure to check the reliability of its installation before use.
Shelves - honeycombs
Original shelves-honeycomb of natural wood or wood materials are attracted not only by helping to organize a place for storing various items, but also form a bright graphic ornament by themselves. The characteristic shape of the shelves allows you to hang them both separately and make up beautiful wall honeycomb compositions, docking several monochrome or multi-colored items. Over time, you can make and add new ones, taking up more and more space.

It is better to understand the feature of the connection, which is the main complexity of such shelves, the drawing will help. On the longitudinal edges of each board-fragment it is necessary to make bevels at an angle of 30 degrees. This is important for proper matching and obtaining the desired honeycomb shape. In finished form, the product will have the parameters 300x350x180 mm.

What do you need to work?
To make shelves, honeycombs, you can not do without special materials, tools, accessories:
- board or furniture board;
- roulette;
- level;
- joiner glue;
- a saw or other tool for cutting a tree at an angle;
- screwdriver, screws or pneumatic gun with nails;
- stain, lacquer or paint;
- drill;
- brackets for installation.
Description of the sequence of actions
- Preparation of parts. It is necessary to make the number of identical boards, a multiple of 6 (since one shelf consists of 6 parts). Particular attention should be paid to precise cutting of joint angles, which should be 30 degrees.
- With sandpaper, grind surfaces and cuts well. After that, the joints will be more dense, and the woody lint will not rise during painting.

- Then glue the joints with glue and additionally fix them with nails using a pneumatic gun. Excess glue immediately wipe dry sponge.

- Cover the shelves of wood with stain until the desired shade. After drying, we apply a varnish coating - we grind the rough areas with fine sandpaper - we open with a finishing layer of varnish. Instead of a varnish it is possible to use a paint which corresponds to an interior of a premise where "honeycomb" will hang.
- Finally, attach the brackets to the finished products, in the desired form they can be hung on the wall.
When the corner is empty
Traditional or original shelves will allow ergonomic use of the angle in the room. This is especially valuable if the area of the room is small, but there is a need for convenient placement of various small items. More often it happens, for example, in the bathroom, the hallway, the kitchen, etc. And the angular wall shelf can be located both in the inner and outer corner.

Tools and materials
- MDF sheet;
- electric jigsaw;
- drill with drills;
- milling machine;
- pencil, piece of twine;
- level;
- metal ruler;
- self-tapping screws;
- acrylic paint, brush;
- brackets for installation.
Step-by-step instruction
- MDF layout. Pin one end of the string to the center of the plate, and attach a pencil to the other. The length from the center to the pencil is the radius of your shelf. We have it is 40 cm. Pull the string and mark the circle.
- Using the ruler, divide the circle into 4 absolutely identical parts. There were 2 horizontal, 2 vertical parts.
- Strictly cut the line with a jigsaw.
- We cut it into 4 parts. On one of the details we measure the sector with a radius of 25 cm with the same twine and pencil. From this workpiece we cut out the upper smaller shelf.
- We use the milling machine to process the edges of the shelves.
- First, the regiment should try to fold, in order to find out where the fit is needed.
- It's time to make holes for the hardware that will be fastened, passing through the wall of one sector to the end of the next one. Screw the screws on the outside of the product so that they can not be seen.
- We connect 3 identical parts.
- We try to find a place for a small shelf, we drill holes, fasten.
- Paint the finished product in the desired color.
- You only need to hang the regiment in place. Correct the dowel plugging points and the brackets attached to the product.
