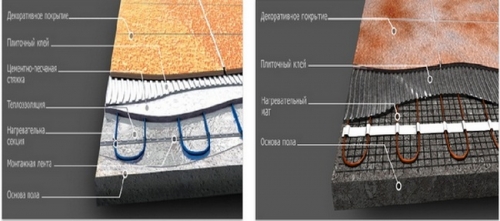
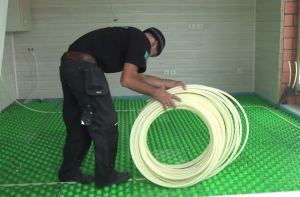
Installation of heating systems for the field can be carried out independently. To do this, you need to understand the nuances of technology and choose correct materials. In this article, the question will be revealed: which heating system to choose and how to mount it?
There are so many kinds of electric underfloor heating, and each of them can be mounted by hand. To do this, you need to familiarize yourself with the technology and make the installation according to the instructions.
The base on which the electric warm floor will be laid is wooden or concrete.
For wooden better suited , and on a concrete base it is better to lay heating cables or mats.
Heating cables - have negligible electromagnetic radiation (EMR), but under finishing material it can not harm a person.
Laying under the screed or under the adhesive layer, if it is planned to be stacked as floor covering tiles. There are two types of heating cables.
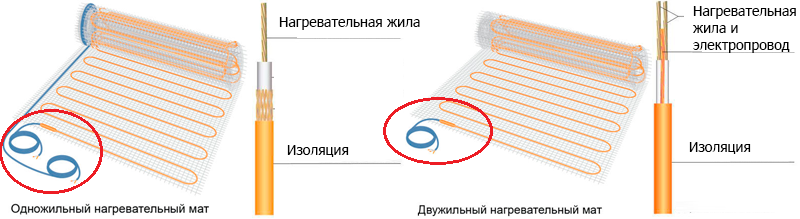
Single-core - used for heating industrial premises. It is fixed to the base with a mounting tape with a wire separation of at least 5 cm. Under such a cable there must be at least 3 cm.
Double-core - has a smaller EMR and is used in residential areas. Installation is carried out in the same way as a single-core cable. Requirements for the thickness of the screed and the pitch of the strands are the same as for a single-core cable.
 Double-core cable
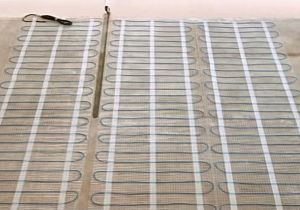
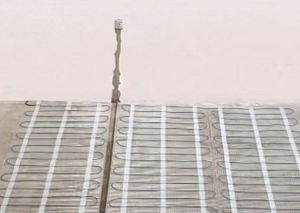
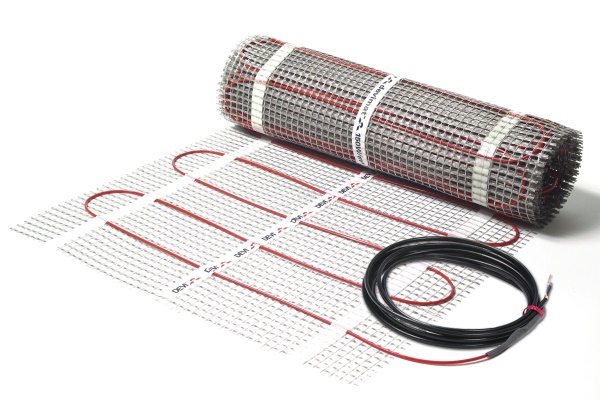
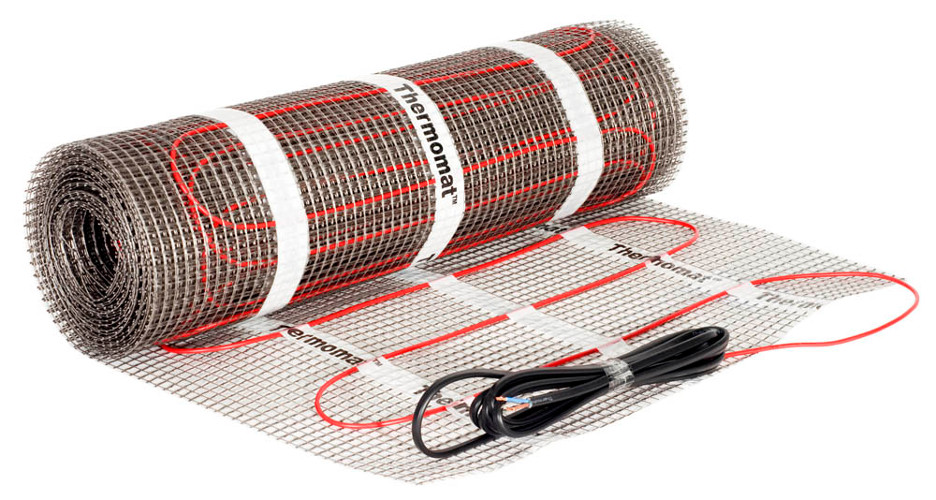
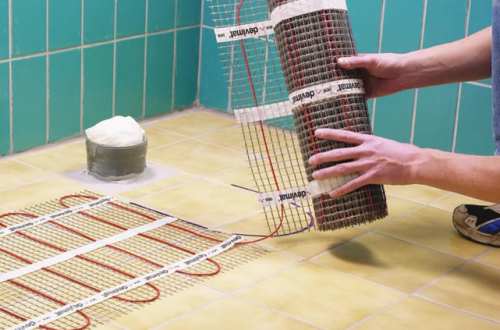
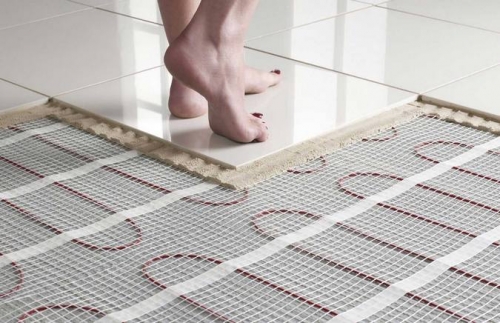
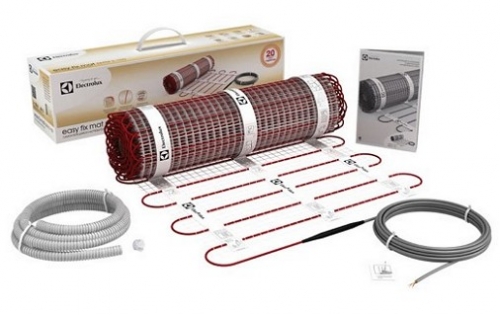
 Heating mats - in this modification, the heating cables are attached to a special mat from the mounting mesh. When installing such a heating element, it is not necessary to fill it with a coupler. On it it is possible to stack a tile, a laminate and other floor coverings.
 Heating mats
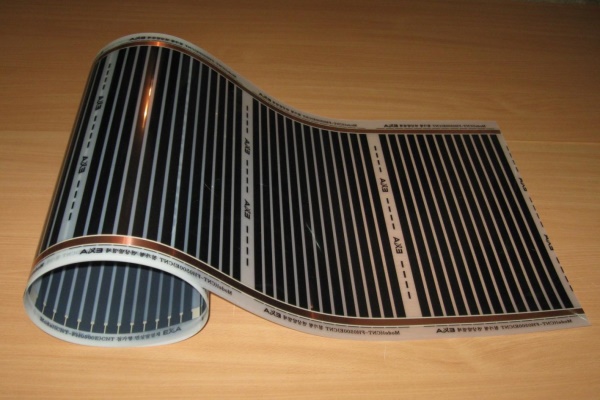
 Film heating floor - it can easily be mounted on any level base. At installation it is not required to fill the screed. It is used on wooden substrates under laminate and linoleum. Thin films fit perfectly on the surface and do not create unevenness, which can interfere with the installation of decorative coatings. Unlike heating cables, the film floor heats the room due to infrared radiation, which is beneficial for human health. Installation of film mats is simple enough to do the work yourself. Before starting work, you can watch the video on our website and make your house warmer according to the technology.
 Film heating floor
Electric floor heating can be made and connected by hands, if the person who builds this device has the skills of an electrician. You can also watch the video and learn the technology of production.
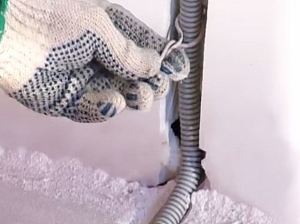
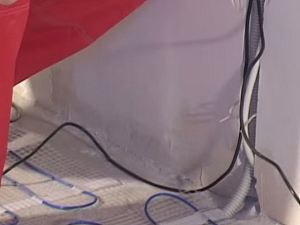
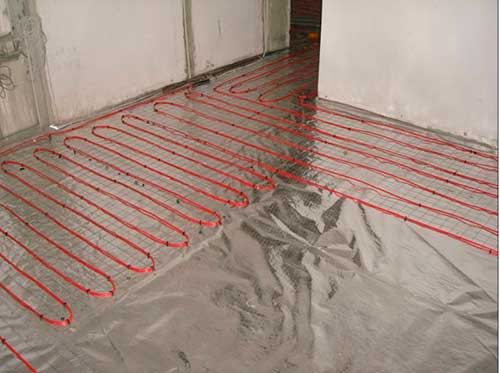
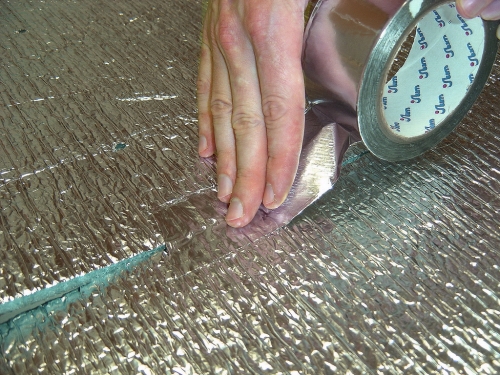
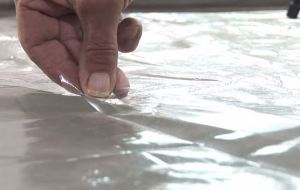
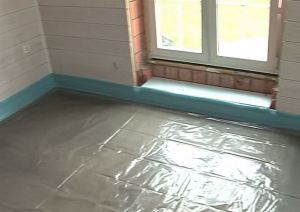
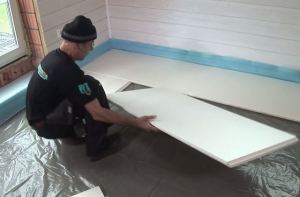
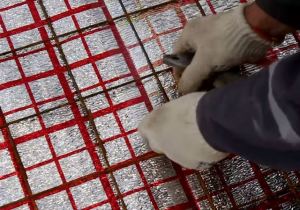
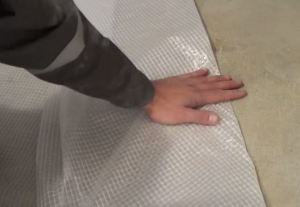
At the first stage, it is necessary to spread a heat-reflecting film on the clean and even surface. In this case, the joints must be glued with reflective tape.
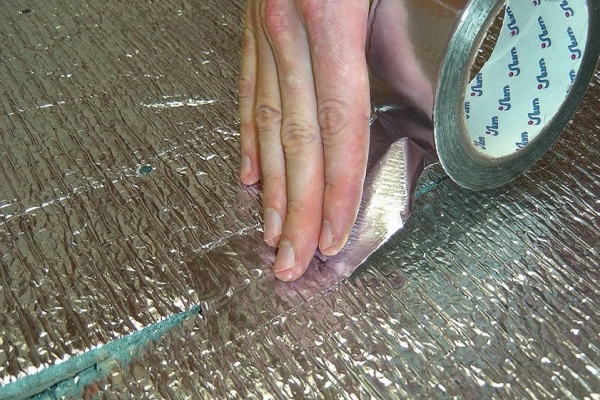 Spread heat-reflecting film
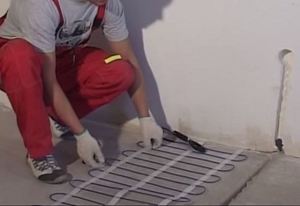
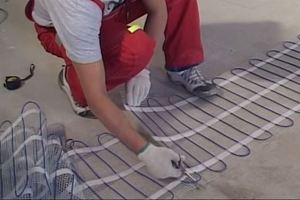
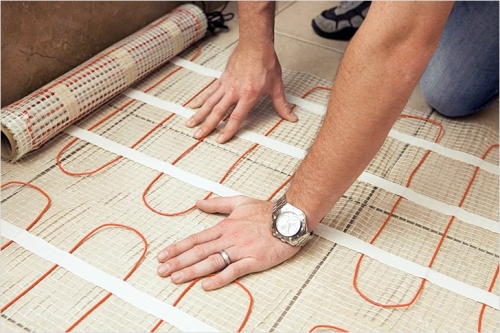
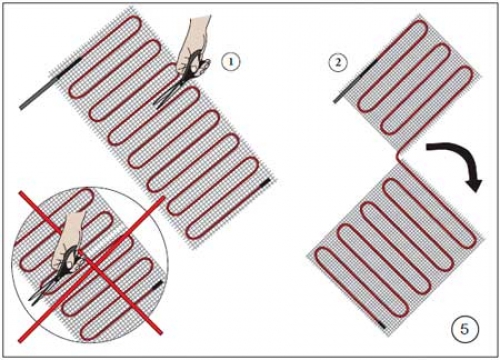
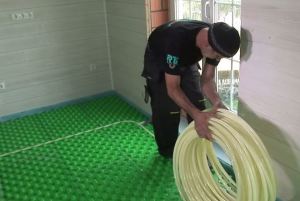
 In places where there will be no furniture or other heavy objects, the heating elements are spread. So that they do not touch each other. These elements are warmed from both sides, so there is no fundamental significance in which side to stack them. Heating mats can be cut with scissors in places marked with a "scissors" badge.
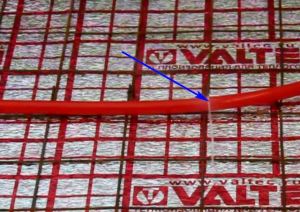
 To lay with a copper tape downwards
 NOTE - To avoid damaging the conductor, it is recommended that the heating elements be laid down with a copper tape.
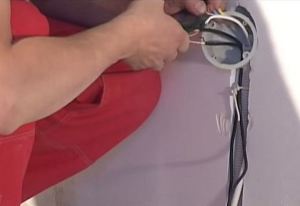
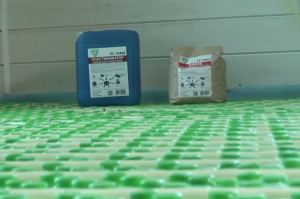
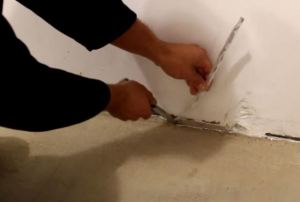
The next step is to connect the terminals to the film mats and insulate them. The terminals are included in the scope of supply and insulation also. Also in the complete set includes wires by means of which the food of the warm floor is supplied by electricity.
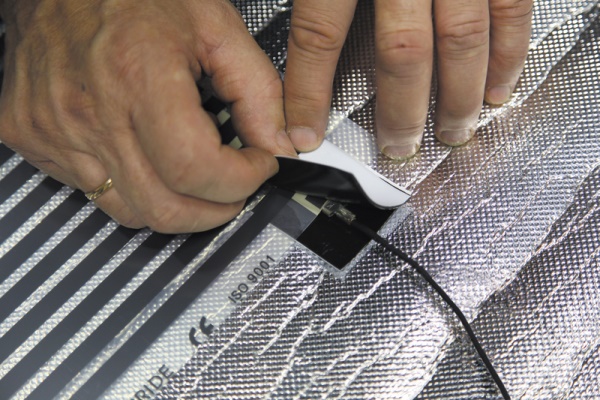 Connect the terminals to the film mats and insulate them
 A terminal with a wire is pressed by pliers to a copper conductor of an electric warm mat - this is a plus. The same is done on the second copper conductor - this is a minus. On the opposite side of the mat, connect the "plus" and "minus" terminals and connect to the thermostat. If you look at the diagram below, everything will be clear.
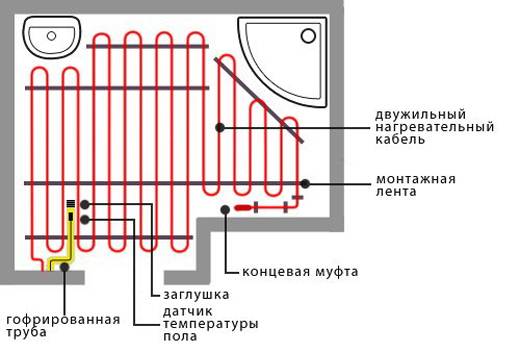
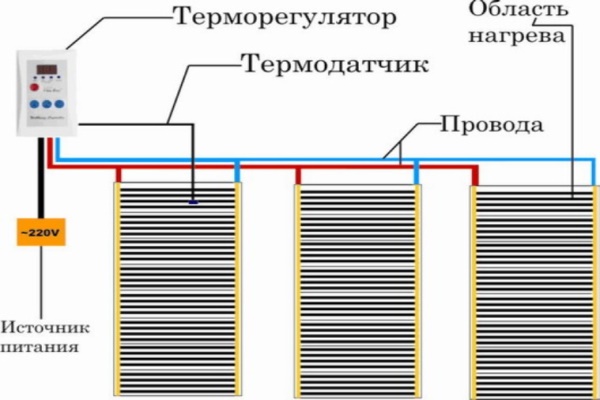 Scheme of connection of an infrared warm floor to a thermoregulator
 You can also watch a video with a detailed description of these works. Isolation is produced by the rubber elements that are included in the delivery.
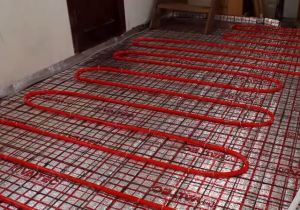
To tile glue had a grip on the surface you need to lay reinforcing mesh, which is fastened to the base with screws or dowels.
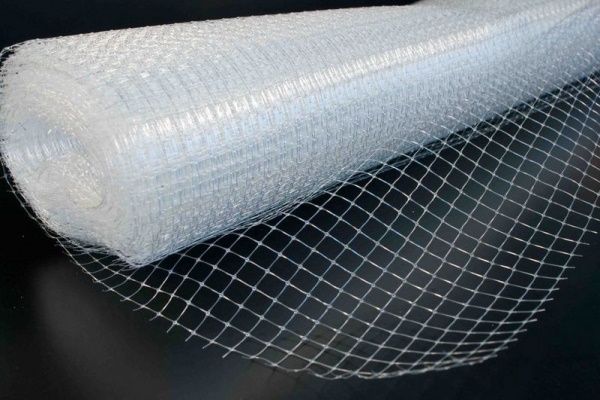 To lay reinforcing mesh
 Attention! - when the mesh is being installed, specialists avoid damage to copper conductors and contact wires.
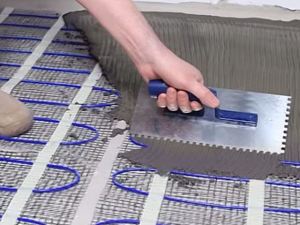
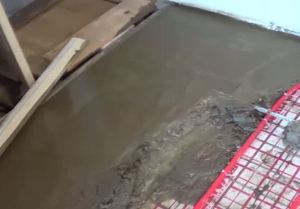
The next step is to fill the surface with a thin layer of tile adhesive. After it dries, you can produce or attract professionals.
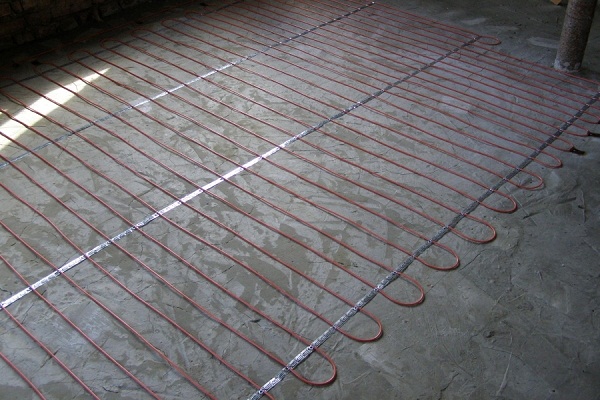
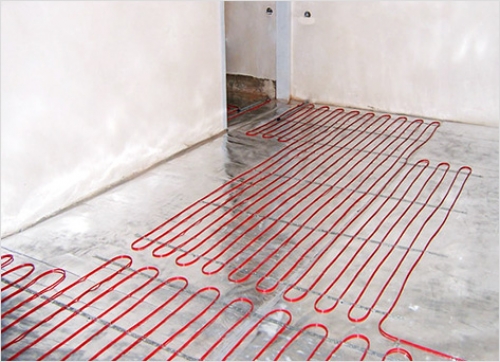
The electric warm floor, consisting of heating cables, is installed to the screed or concrete with the help of a mounting tape.
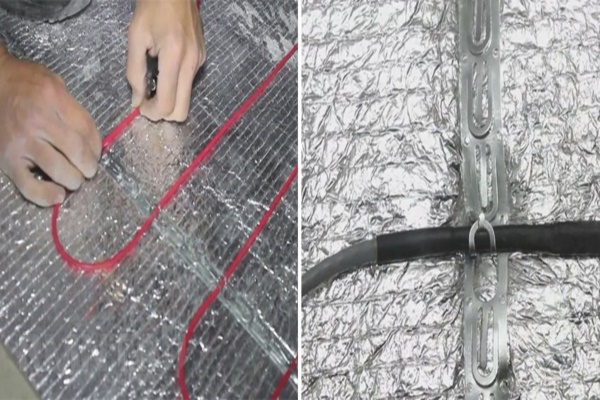 Installed with a mounting tape
 It is attached to the surface with dowels in 20 cm increments. The distance between the tapes is no more than 1 meter. The heating conductor is attached to the tape.
Note - the installation of the conductor can be done on the concrete floor and then pour the screed. If the warm floor is mounted on the screed, then you can immediately begin laying the tiles with your own hands.
 The scheme of installation of an electric warm floor under a tile
The surface of the screed is covered with a continuous layer of primer, which will ensure a reliable grasp of the glue with a cement-sandy surface. If the work is done in the bathroom, then "concrete contact" should be applied. In other rooms, use an inexpensive acrylic primer. Roller and brush carefully handle the surface with their own hands, preventing the formation of fragments on which there is no primer.
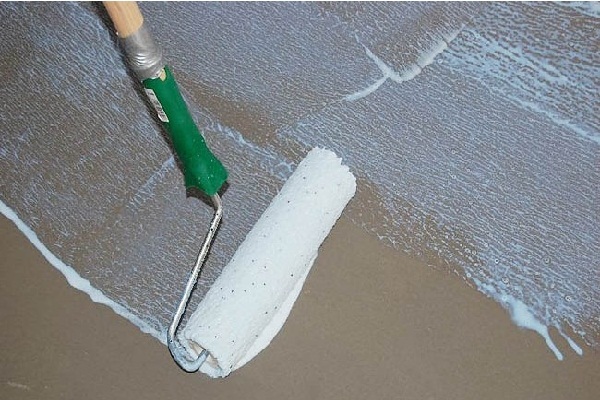 Cover with a continuous coat of primer
Warm conductors from different manufacturers have different capacities, so when calculating you need to know the power of the cable. In the instructions to the system of the warm floor, the distance of the wire, the area to which it is calculated, is indicated. You can also count by using a special calculator, which is on the Internet.
 Calculation of cable
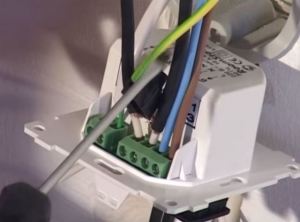
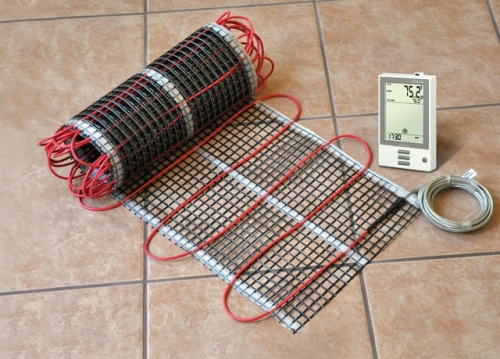
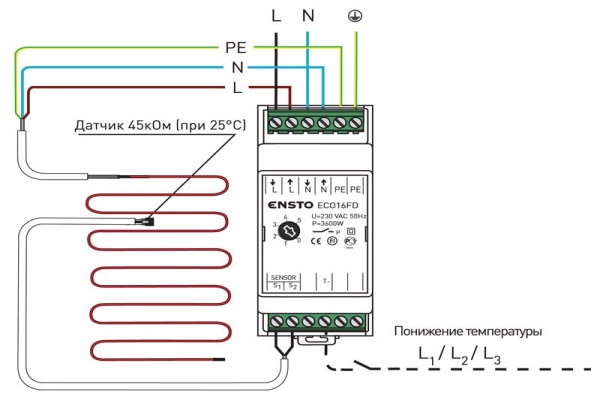 Warm floor thermostat
 The thermostat of the warm floor, by means of which the temperature is adjusted, must be installed before the beginning of the finishing works. The temperature sensor is placed between the heating conductors and connected to the thermostat.
The sensor should be located in the corrugation and do not touch the heating elements.
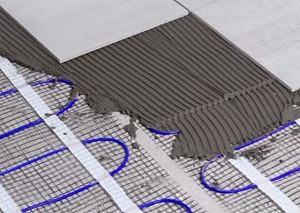
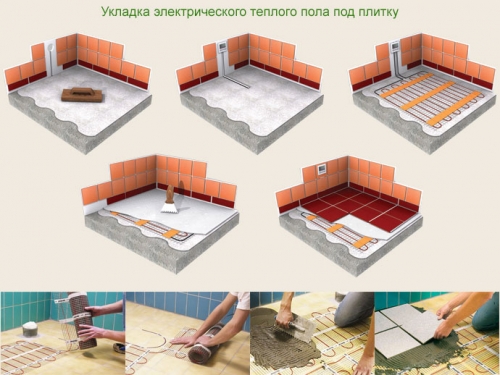
Laying the tiles on the electric floor is done according to the technology, after the installation of the heating elements is completed. Before starting work, it is recommended to watch the video and master all the steps of the standard technology.
The presence of an electric floor does not affect the technology of laying tiles. If the tiling is laid on an uneven floor, the horizontal surface of the finished surface is achieved by applying a different amount of glue on the base. For the production of such work, you should select an adhesive that is designed to glue the tiles on the electric floor.
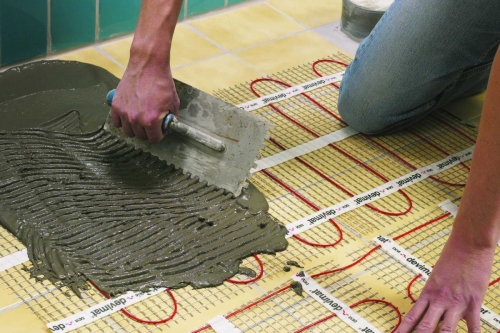
At the first stage, the adhesive is kneaded in the container using a perforator and corolla. Stirring is carried out until the lumps are completely eliminated. The glue must have a consistency of thick sour cream. Also you can use the recommendations from the manufacturer, which are located on a bag with an adhesive compound.
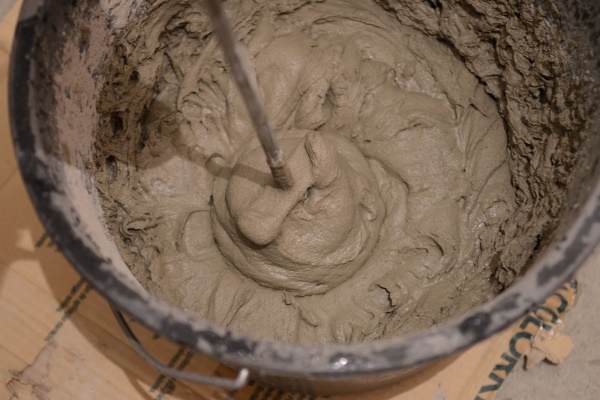 Produce kneading glue
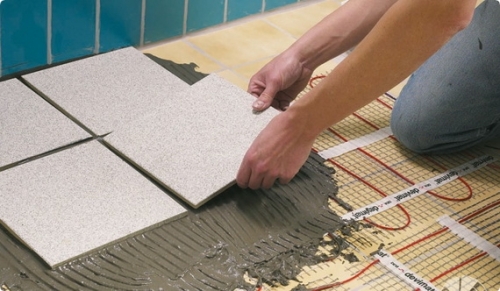
 On the base on which the heating system is installed, apply a layer of glue and distribute it evenly over the surface with a notched trowel. Next, put the first tile and expose it on the horizon, tapping it with a rubber mallet. In the same way set the second and subsequent tiles, inserting crosses between them.
 Laying tiles
 Choose the thickness of crosses you can at your discretion. On this depends the size of the intertwist seams and aesthetic appearance of the finish. For large tiles, you can select crosses wider, and for small tiles. When all the tiles have been installed with their own hands, it is necessary to wait for the adhesive to dry out. The setting time of the adhesive is indicated on the package. After that, you can begin to grout the seams. The color of the grout should be chosen darker or in the color tone of the tile. For example, you can watch a video on the Internet.
Video
In this video you will learn how to lay a warm floor electric under the tile.
Thanks to this material you will get a lot of useful information.
Photo source: kotel-kras.ru; remkasam.ru
Warm floors of electrical equipment have long become commonplace for city apartments, houses of various sizes outside the city and other administrative, economic or commercial premises. They are an additional, and sometimes the main source of heating of buildings. Moreover, it is quite economical, but only if the technology of arrangement of such floors is strictly observed.
Kinds and types of electric floors
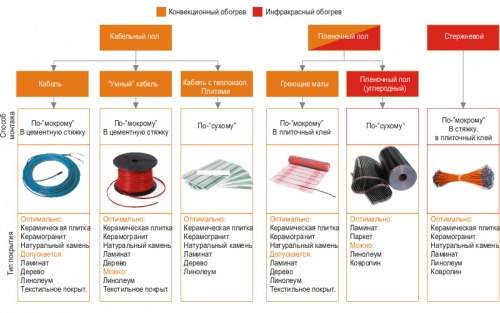
From the technical point of view, all modern electric floors can be divided into 3 main types:
- classic cable, having several varieties;
- innovative infrared-carbon, rod and film;
- and thermometers, that is, thin cables on a grid.
All these types of electrical floor have a number of generalizing features:
- they need a dry mounting base;
- they need thermal insulation with grounding;
- they are equipped with a special thermoregulator.
In addition, they are all reliable and durable systems for additional space heating.
And there are several types of electric fields that can belong to the same kind (or they may not), but differ among themselves in:
- features of installation technologies;
- combination with different types of floor coverings;
- quality of generated heat.
Thermometers or floor thin-cable on a grid
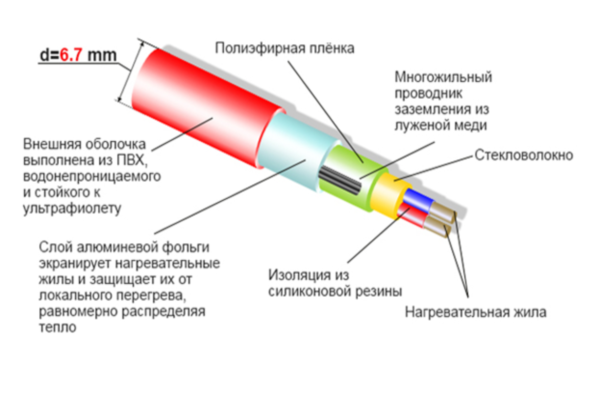
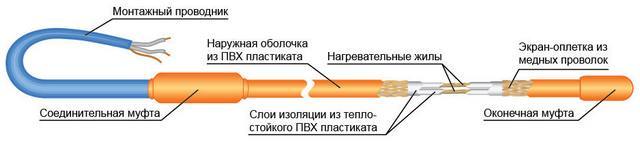
One of the most modern and functional versions of warm floors is, of course, thermometers. Such a thin cable (up to 4.5 mm in diameter, not thicker), waved in a special wave-like manner on a special fiberglass mesh, the width of which is half a meter. The heating wire itself in this cable is shielded, and also insulated and protected by an external sheath.
To create thermo-mats I use a single- or twin-core cable. But in order to equip floors in living quarters, as a rule, mats with double cable veins are used, since such material has a much lower level of electromagnetic radiation. In addition, there is no need to worry about bringing the second cold end of such a cable to the place where the mats are laid.
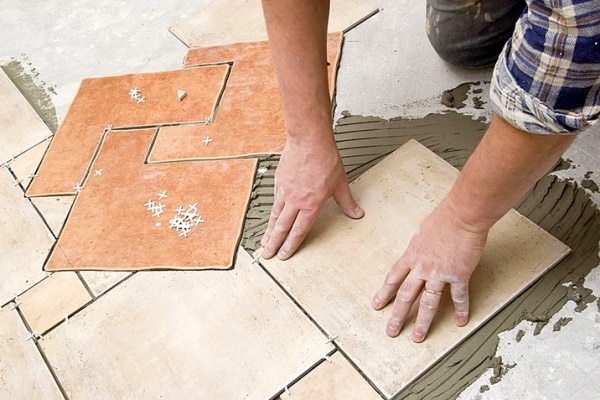
Thin-matt matte floors are placed on the finished screed or the old tile. In general, under the tile is such a warm floor - the most optimal option. Since in the process of laying the glue, on which the tiles are "planted", penetrates into the fiberglass mesh and reliably grasps it. That is, the grid takes on an additional reinforcing load. In this case, the actual heating system is immersed in the adhesive layer, without increasing the sexual level. It turns out almost ideal for premises that require only cosmetic repairs. Or where the level of sex is a matter of principle, and its rise is unacceptable.
Installation of a warm electric floor with the use of thermo-mats
If the future flooring is chosen tile, the cable heating mat is the best solution for floor heating.
Such thermometers can be single-core or two-core:
- The first is put on the prepared screed and perfectly heats the floor covering to the maximum comfortable temperature. A distinctive feature of single-core thermo-mats is two, so-called, "cold ends", with a length of 2.5 to 5 m.
- The second (double-core) is laid almost under any finish coating on the floor. This is an electrical system with much greater heat transfer than single-core heat. Has 2 ends - one "deaf", another "cold". In the installation, such a warm floor is extremely simple and guarantees the heating of the entire room, and not of any one part of it.
Step-by-step laying of single-core thermo
If you conceived the installation of a warm floor with your own hands and chose a single-core thermometer as the basic electrical system, it should be borne in mind that it fits in strict accordance with the technological cycle having a certain sequence:
Thermometers with single-core cable have a number of advantages over the same two-wire cables. They:
- cheaper;
- thinner;
- have a greater linear power, and hence a higher heating rate.
But mats with a two-wire cable, which do not have a second cold end, there is no need to necessarily bring it to the first. So, there are no special requirements for cutting and laying such mats.
The advantages of mats with a two-wire cable are described in the video review:
Installation of floor heating mats with a two-wire cable
In general, for the sake of objectivity, it should be said that, like any other truly high-quality repair or finishing operation, the installation of warm floors from single-core or twin-core thermometers requires certain (special) knowledge, as well as professional skills.
But patience and accuracy, as well as the availability of sufficient amount of free time can help a layman to install a warm electric floor with his own hands.
With two-wire mats, the installation is a bit simpler than the installation of single-core ones, but the preparatory operations are slightly more complicated. After all, thermometers with a cable in two cores can be laid almost on any surface, and it will be necessary (at least):
- clean from dirt and dust;
- align (and repair all cracks, potholes, etc.);
- and primed.
There are two professional ways of laying heating mats:
- Cable up and net down. This method is considered the most common and is implemented as follows:
- the mat is cut out;
- fits on the prepared surface with a cable upwards;
- glue is attached to this surface;
- and the tile adhesive is applied to the fixed mat with a thin continuous layer;
- the tile is laid on the dried adhesive layer.
In this installation, it is important to avoid cavities and air layers so that during operation, the total overheating and burnout of the cable is prevented.
- Cable heating down. The essence of the method is simple:
- the mat is cut out according to the installation plan and rolled up into a roll;
- on the floor, the adhesive composition is applied with a layer of 2-3 mm;
- matte roll is unfolded by cable down - the flooring is directly glued;
- and then pressed (lightly) into the adhesive layer;
- on top with a notched trowel, apply a second layer of glue (5-6 mm);
- the structure is dried;
- and then tile is laid on it.
Detailed instructions for installing a warm floor from thermo-mats are presented in the video review:
Safety during the laying of warm floors from thermo-mats
To avoid accidents and failure of the electric heating system both during its installation and during operation, it is important to comply with a number of TB requirements:
- do not shorten the cables yourself;
- not me mounting wires, breaking the couplings;
- do not touch the temperature regulator, trying to change its design;
- do not install or repair the temperature regulator under voltage.
Arrangement of warm floors is especially important for rooms with high humidity, such as kitchen, bathroom or hallway, where ceramic tiles are used as a floor covering. Tiled floors can also be arranged in the sauna, on balconies and verandas, where the installation of a warm floor under the tile will be no less appropriate. Moreover, the warm floor under the tile can be an effective addition to the basic radiator heating. The advantages of ceramic tiles are obvious: it is characterized by moisture resistance, practicality and durability, as well as original appearance. She is unpretentious in leaving, but, at the same time, remains cold to the touch even in the summer, which creates discomfort when walking barefoot on tiled floor. However, in view of the high thermal conductivity of the ceramic tile, a solution to this problem has been found - it implies the installation of a warm floor under the tile. It should be noted that ceramic tiles are an ideal floor covering in case of arrangement of the "warm floor" system, because the heating elements that are located under the floor cover contribute to warming up the room, so that the coolness of the tiled floor valuable in summer is replaced by the comfortable heat necessary in autumn . There are several ways to arrange a system of "warm floor", and the choice of the most suitable depends on many factors, each of which must be considered in more detail.
Advantages and basic types of heating systems "warm floor"
- Compared with the traditional radiator heating system, the warm floor under the tile, the technology of which will be considered further, is characterized by a number of advantages:
- During the operation of the "warm floor" system, the natural humidity of the air in the room remains;
- A uniform distribution of warm air in the room is created;
- Arrangement of a warm floor is an ideal option if a ceramic tile is chosen as the floor covering, which is characterized by high thermal conductivity and is a kind of "accumulator" of heat.

The main varieties of the "warm floor" system:
- Electric floor heating, the design of which involves the use of:
- heating mats;
- electric cable.
- Infrared (film) warm floor, which according to some classifications is a kind of electric warm floor;
- Water-heated floor.
What should be considered during the installation of an electric underfloor heating system?
Heating of the floors made of ceramic tiles can be carried out in several ways, therefore, choosing the best warm floor under the tile, it is necessary to answer several questions, which will make it possible to determine the choice most accurately. First of all, it is important to find out the following:
- Is the system you are building a primary or additional source of heating?
- What is the maximum thickness of the "warm floor" system, taking into account the ceiling height in the room?
- What is the type of heating system in the residential building where the floor heating (central or autonomous) will be installed?
- Do you plan to install a concrete screed?
Warm floor under the tile photo
Electric underfloor heating: options for accommodation
Laying of a warm floor under a tile on the basis of an electric cable or heating mats is carried out mainly in apartments where it is not possible to establish water floors, characterized by greater efficiency. In addition, the electric warm floor is characterized by ease of installation and is one of the most economical options for a warm floor under the tile.
During the installation of electric warm floors there may be variations, which depends on the conditions in which the installation will be carried out.
- Installation of the warm floor can be carried out in a layer of screed, after the arrangement of which the flooring will be laid. This option will be the most successful in case of installing a warm floor in living quarters, for example, a kitchen and a loggia. It implies the installation of a system based on an electrical cable, under which a layer of insulation and waterproofing material is laid. After laying the cable, a small layer of concrete screed is installed on top of it;
- Laying of the heated floor can be made on top of the concrete screed layer without additional heat insulating material. Installation of the warm floor directly in the screed is only possible if the floor below is a heated living room. This is due to the fact that ceramic tiles and a layer of tile adhesive can ensure proper protection of heating elements without the use of additional materials;
- Laying of the warm floor can be carried out directly under the floor covering, however this method is considered most suitable in case of arrangement of one of the types of electric floor heating - film floors. If you are faced with the need to install a warm floor under the tile, but you do not have the desire to make capital work related to replacing the concrete screed - this method will be the most preferable. However, it is important to remember that it involves the installation of a thermal insulation layer, which uses foamed polyethylene with a foil surface, which is laid over the already existing concrete screed. The next step is the installation of electrical heating elements and, if necessary, laying waterproofing materials.
Important!The film floor is a kind of warm floor that can not be laid under the tile and mounted in a layer of concrete screed.
Types of electric underfloor heating: advantages and disadvantages
Laying the electrical floor under the tile can be done using an electric cable or heating mats (thermometers). Each of them is characterized by its advantages and disadvantages, which will be considered further.
- Heating the warm floor on the basis of an electric cable is a variety that appeared before all, but it still remains relevant and is worthy of competition with mounting methods based on more modern heating elements.
Advantages of warm floors on the basis of heating cable:
- Low cost of used materials;
- After a power outage, it keeps heat for a certain period of time, which saves energy.
However, it is characterized by the following shortcomings:
- If repair of the system is required, there may be difficulties associated with the need to dismantle the concrete screed;
- The difficulties associated with correct calculation length of the conductor;
- In the case of loosely adhering the cable to a concrete screed or in the case of placing furniture over its place of occurrence, there is an increased risk of overheating the system and its failure;
- Low electrical safety of the system.
- An improved version of the arrangement of the "warm floor" system is the use of thermo-mats, which can be both convective and infrared. Convection mats are a more modern version of a heating cable fixed to a mesh base.
Advantages of a warm floor based on thermo-mats:
- Simplified calculation of the required amount of material;
- The smaller thickness of the required concrete screed;
- Less laborious styling combined with a more affordable price.
- Disadvantages of the "warm floor" system of this type:
- Difficulties arising in the process of repairing a damaged site;
- Fire hazard, which is typical for any type of wiring.
- Installation of a warm floor on the basis of a film coating is another option for installing a warm floor, during which the installation of a concrete screed is not permissible.
The advantages of the method:
- Low power consumption;
- In the process of laying the film coating does not require specialized professional skills;
- No need for complex preparatory work;
- Can be used to arrange the heating of the wooden floor.
Disadvantages of the method:
- High cost of materials used;
- The need to equip the waterproofing layer, due to low moisture resistance of the film coating;
- Higher fire risk due to the lack of fireproof concrete screed;
- High risk of damage when exposed to mechanical stress;
- Instant cooling after disconnection from the network.
Installation of a warm floor under the tile: step by step instruction
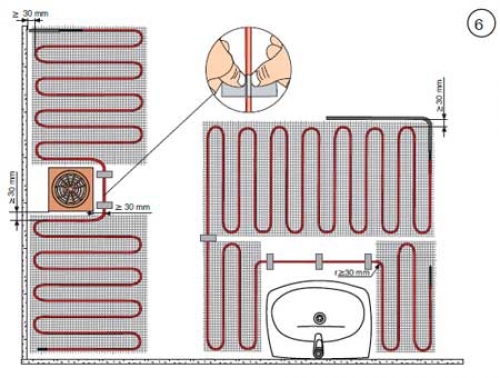
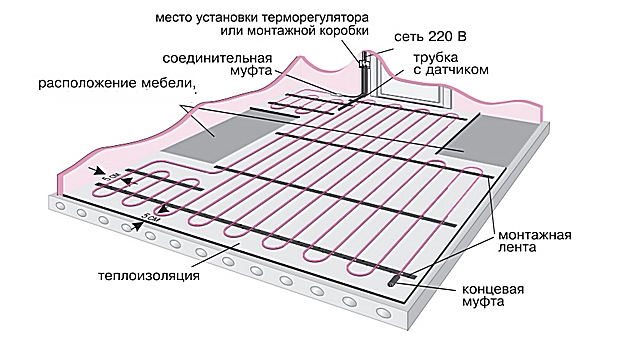
The initial stage of work involves the creation of a scheme of a warm floor on paper, in the process of which it is necessary to take into account that the installation of heating elements should not be done in places where massive furniture and household appliances are placed. In the places where the pipes and other heating devices it is necessary to organize a buffer system, implying no heating elements of the warm floor. This is due to the peculiarities of the electrical heating systems, the heating elements of which, unlike hydraulic systems, are heated equally, and if there are obstacles to heat output in the form of furniture without legs, the system elements will overheat from outside with subsequent failure. Furniture can also overheat and fail.
As a result of the development of a scheme for laying warm floors under the tile, which can be read at specialized construction forums, an incorrect figure appears inscribed in the rectangle that represents the room. The contour of this figure is a guide for laying electric warm floors. This feature of the system can subsequently become one of its biggest drawbacks, since the rearrangement of furniture can cause breakdowns in the "warm floor" system.
Important! If you plan to install warm floors in several rooms, you need to arrange several heating circuits with separate regulators and a power source (even if the distinction is symbolic). In the process of pouring concrete screed, if it is to be carried out, a damper belt is laid between the heating circuits on the floor surface.
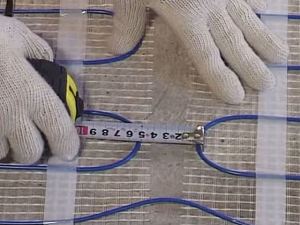
Before proceeding with the calculation work, having compiled the scheme of the warm floor, consider the step of laying the electrical cable or heating mats. At the same time try to be guided by the following recommendations:
- From walls it is necessary to retreat not less than 10 cm;
- If the configuration of your room does not allow you to lay heating elements straight, you can trim the grid, which will allow it to bend in the right direction. Using this type of installation, you can reduce the power consumption and create accents on the necessary heating areas.
Calculation of materials for the installation of the "warm floor" system
If you decide to install a warm floor under a tile, the price of which can roughly be calculated already at this stage of installation, and use it as the main source of heating, calculate the materials taking into account that 1 square. m surface requires a heater with a power of at least 140-180 watts. If the heated floor under the tile is used as an auxiliary source of heating, the power of the heating devices should not be more than 140 W and on average not exceed 80 W, provided that the building is of good quality.
In order to calculate the required amount of materials, it is sufficient to calculate the area of the room (length x width) and subtract the area from the obtained value occupied by furniture without legs and household appliances. As a result of these calculations, the area to be heated should be obtained. Next, the total power of the heating element and its length are determined. Remember that the line power of one meter of heating cable can vary from 16 to 21 W / m.
For example! The area of the room is 10 square meters. m., and the power of the heating cable you are using is 100 W / kV m. As a result, the calculated power is 1 kW. If the power of the selected cable is 20 W / m, its length should be 50 m (1000/20).
The choice of heating mat is carried out by the same principle, taking into account the usable area and the required power. In addition, you need to purchase a mounting tape, which will be used to fix the heating elements to the concrete screed.
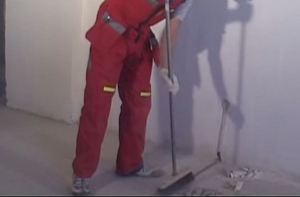
Surface preparation: features of a choice of a heater
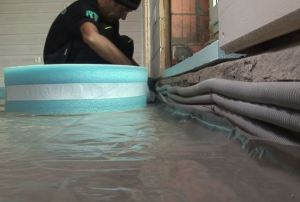
First of all, the old layer of concrete screed is dismantled to the base with the subsequent cleaning of the surface. Next, laying waterproofing materials, which should go to the wall by at least 10 cm, are carried out. A damper tape is fixed to the wall on the wall, the use of which will compensate for the thermal expansion of the floor during heating. At the end of these activities cut the excess waterproofing and damping tape.
In order to ensure that the thermal energy does not go down during the operation of the underfloor heating, isolate the floor base. The choice of thermal insulation material depends on the location of the room in which the installation is carried out, such as floor covering and the target orientation of the heating system.
- If the system "warm floor" is used as a secondary source of heating, the foamed polyethylene with a reflective foil coating will successfully cope with the function of the thermal insulation material;
- If a heated room is located on the floor below, as a heat insulator it is possible to use expanded polystyrene or extruded polystyrene foam with a thickness of 20 to 50 mm;
- If the installation of a warm floor is carried out in a room that has not been heated before (veranda or loggia), it is necessary to take care of the formation of a more thorough thermal insulation layer, the thickness of which can reach 1000 mm. The material can be polystyrene foam or mineral wool of similar thickness.
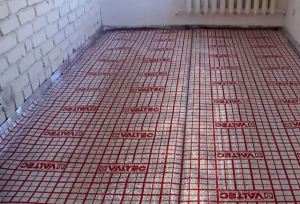
On top of the insulation layer, the reinforcing mesh is laid. Theoretically, you can do without a reinforcing mesh, but in this case you will have to add a microfiber or plasticizer to the solution.
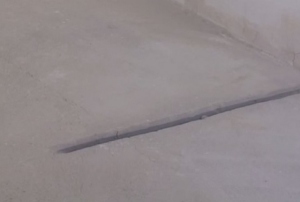
Mounting the temperature sensor and checking the heater
In order to monitor and control the system during the operation of the underfloor, it is necessary to install a temperature sensor and a special thermostat, which is an electronic or mechanical controller designed to set the optimum temperature regime and to switch the system on / off. It is mounted in the wall, in the immediate vicinity of the sockets, while the temperature sensor is mounted to the floor. To carry out the installation, create a special shtrobu in the wall from the thermostat, which in the vertical direction leads to the overlap. The sensor is placed in a corrugated pipe and led under the tile to the temperature monitoring point of the electric underfloor heating, which is the middle between the two turns of the cable. Corrugated pipe will protect the sensor from damage and, at the same time, provide easy access to it at any time, for example, if repair is necessary. The end of the corrugation, which is in the screed, is poured with a sealant to prevent the solution from entering the corrugation.
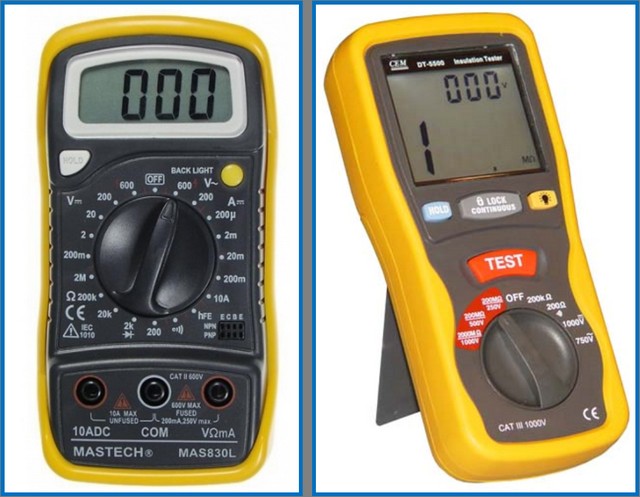
Immediately before laying the electrical cable or heating mats, measure its resistance, the end result of which should not differ from the declared passport data by more than 10%. To do this, use a multimeter, which will also allow you to determine the phase in the absence of color marking of the wires. If the measured resistance corresponds to the declared values, you can proceed to install the warm floor under the tile.
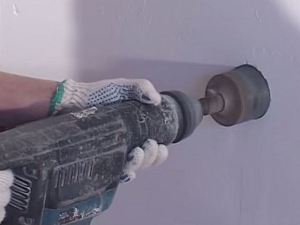
Fastening of a heating cable or thermo-mats
After preparing the surface, proceed to fixing the heating element. If you use an electrical cable as a heating element, which must be secured with a mounting tape, as shown in the photo.
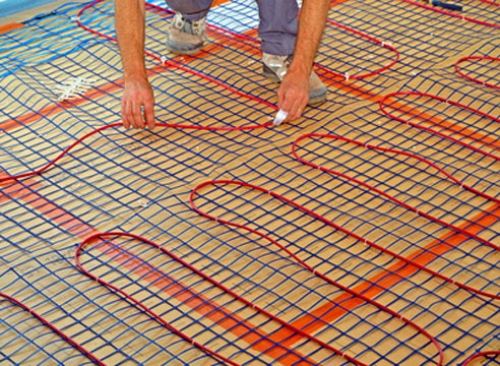
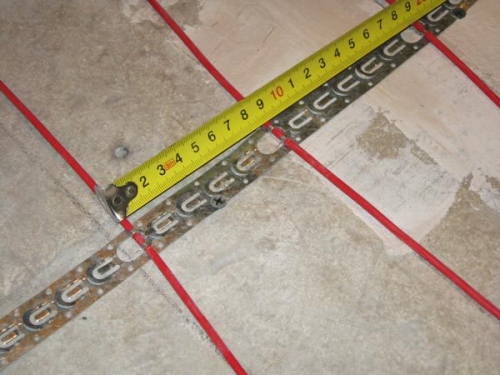
To facilitate the process of fixing the cable, use plastic clamps, which simplify the installation process. In order for the heating to be even, it is necessary to ensure that the distance between the cable turns is the same over the entire floor area. In the case of laying heating mats, you do not need to monitor the distance between the turns, since it is already sustained along the entire length. When using heating mats, it is sufficient to spread the material in accordance with the scheme and to connect to the thermostat.
After completing the cable laying, check the correct connection by making a resistance measurement with a multimeter. The value obtained should be the same as what you measured before laying.
Pouring concrete screed and laying ceramic tiles
For the preparation of concrete mortar, use materials in accordance with the following proportions:
- 1 part of cement;
- 4 parts of sand;
- 5 pieces of rubble;
- 0.6 parts of water;
- 1% of the cement mass of the plasticizer, giving elasticity to the concrete solution.
Important!The amount of water should be small, which will prevent the appearance of cracks in the concrete screed. Expanded clay and perlite are not allowed to be added to the concrete mix, as the use of these materials contributes to the disruption of heat exchange, which is the cause of the system failure.
The thickness of the concrete screed layer should not exceed 3-5 cm. After filling the concrete screed, wait until the solution has solidified. In spite of the fact that the primary hardening will come already after 2 days, it is recommended to switch on the electric warm floor not earlier than 4 weeks after the final hardening of the solution takes place.
Important! The installation of a concrete screed is only necessary if an electric cable is used, while the heating mats themselves are the basis for the tile adhesive.
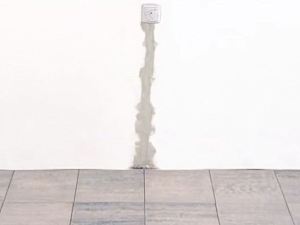
After the initial setting of the screed, proceed to finish the floor ceramic tiles.
Warm floor under the tile video
The floor, faced with ceramic tiles, with all its expressed merits, has two serious drawbacks. Firstly, we are talking about the fact that the surface can become slippery, especially when moisture gets on it. And threefold - a ceramic coating can not be called a warm material. Walking on it with bare feet or in home shoes in winter is very uncomfortable, especially when you exit, for example, from a shower cubicle or a bath.
The first negative moment can be avoided by immediately selecting a ceramic coating for rooms with a special, non-slip surface. The second problem also has a solution - it's an electric warm floor under the tile whose stacking technology can be slightly different, depending on the type of heating system chosen. Work on the installation of electric underfloor heating is not an easy task, but nevertheless it is quite affordable for independent execution by a neat and diligent owner of an apartment or house, without the involvement of specialists.
What are the advantages of electric underfloor heating?
Heating of the surface of the floor, lined with ceramic tiles, can be done by installing water circuits, or by using one of the existing electric heating systems. Both types can be used both as the main source of heat, and in the role of additional, increasing the comfort of the premises.
The water-heated floor, of course, wins in terms of economy of operation - it under certain conditions can even be connected to the existing central heating system. But the cost of its installation and the scale of the work is incomparably higher than that of any electric one. In addition, electric heating has a number of other undeniable advantages:
- Any water heating circuit requires a massive screed. If you add the diameter of the pipes themselves, the rise in the floor level is very significant, which is not always permissible in the conditions of urban apartments. It can not be discounted and the resulting additional loads on the floors. And here some electric warm floors do not require a coupler.
- By itself, the installation of an electric warm floor is much simpler.
- There is no risk of short leakage of the coolant - the probability of flooding of the lower neighbors is excluded.
- Electric warm floors do not require a cumbersome and expensive adjustment equipment. And they are much easier to adjust precisely.
- There is no need for any conciliation procedures with public utilities - the main thing is not to go beyond the allocated power limit for supplying electricity to an apartment or a country house.
Electric floor heating creates the most comfortable conditions for the residents - the evenly heated surface gives off heat, which rises to the top, with a gradual decrease in temperature as the height increases.
![]()
Ceramic tiles laid on top of the heating system, turns into a capacious "battery" of thermal energy - it is pleasant to walk around stripped, and the heated layer of tiles most uniformly gives heat to the room.
There are several types of warm floors that can be laid under ceramic tiles. The technology of mounting each of them has own nuances. Nevertheless, a lot of things in common, especially in terms of preparing the room and the required tool.
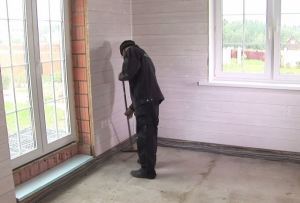
How to prepare for laying a warm electric floor
- First, mr. that attention is paid - this is the degree of insulation of the base floor. If the electrical energy goes to absolutely unnecessary heating of the floor slab or the floor laid on the ground, the owners will simply be ruined for paying bills for the consumed kilowatts. Usually, warm floors are laid on the base, which in its structure already contains a layer of thermal insulation - this is especially important for private houses or for apartments where an unheated room is located from below. Under favorable conditions, some techniques for installing electrical heating can be limited to thin foil thermal insulator.
- Secondly - the surface of the floor should be repaired. There is no sense in stacking the heating system and then - ceramic tile, if the surface has significant irregularities, cracks or crevices, areas of instability or looseness of the old screed.
- Third - in the room, to the place of the planned installation of the thermostat, a power supply line of the required capacity with an obligatory ground loop must be connected. It should be provided with a separate automatic device on the switchboard, and it is desirable to secure yourself by installing a protective device - RCD. Concerning the wiring of the line, it makes sense to consult a qualified electrician.
- The next question is the purchase of a thermostat with a temperature sensor. In the overwhelming majority of cases, they are not included in the kit tthe floor is clean, but without it its work is impossible.

The temperature regulator can be chosen to your taste - with electromechanical or push-button control, with LED or LCD display, with various design and color designs, and so on. Usually all these devices are designed for installation in a standard socket for an outlet or switch.
It is necessary to take care of the set of tools:
- The installation of a warm floor always involves electrical installation work. A tool will be required to cut the wires, remove the insulation. Before switching the wires in the thermostat, it is advisable to taper the ends - it means that you need a soldering iron and necessary consumables - solder, flux. It is best to use a construction hair dryer to seat heat shrink tubes. By the way, although in the kit tthe warm floors usually include a certain amount of "heat shrink", it would be nice to have at least a small own reserve.
- In the floor and the wall, you need to cut out the slings - for this you need to have a "Bulgarian" with a disc on the stone and a puncher.
- After stacking and switching of the electrical circuit, it is required to make control measurements - the general conductivity of the circuit and its resistance - hence, a multimeter is needed. It is also recommended to check the insulation resistance - this is done by a special device - megger.
- There are also construction works: sometimes - it is filling the screed, and in any case - laying ceramic tiles. Hence, all must be prepared necessary tools - Mixer (drill bit) for mixing mortars and containers for these purposes, spatulas - conventional and cogged, rule, rollers and brushes for primer application, accessories for marking and control - roulette, ruler, construction level, marker or pencil and t .P .
Some tools will be required in any case, others - depending on the chosen technology of laying the warm floor. This will be discussed in more detail below.
Floor heating cable type
Types of heating cables for underfloor heating
To begin with, a floor heating system with a heating cable will be considered. First of all, it is necessary to determine its version, since the cable can be single-core, two-core or with a semiconductor matrix.
- Single-core option refers to the category of the most inexpensive. The conductor is heated according to the usual resistive principle, in the same way as the helix of the iron or TEN.

The price of such cables is not high, but it is very inconvenient to work with them. The main difficulty is that both mounting ("cold") ends must converge at one point - in the place of installation of the thermostat. Considering the fact that cable crossings on the floor are strictly forbidden, this complicates and sometimes even limits the possibilities of laying.
- A two-wire cable in this respect is much more convenient.
Closed circuit is provided here by the presence of an end clutch, the "cold" end is only one, and the laying process from this is much simpler. In the role of "spiral" in different models can act as one conductor, and both at once.
The main drawback of both mentioned cables is the simultaneous and equal heating over the entire length, which is not always convenient. And yet - the scheme itself excludes the efficiency of the heating system in the event of a break at any section of the heating cable
- Semiconductor self-regulating cable refers to innovative developments.
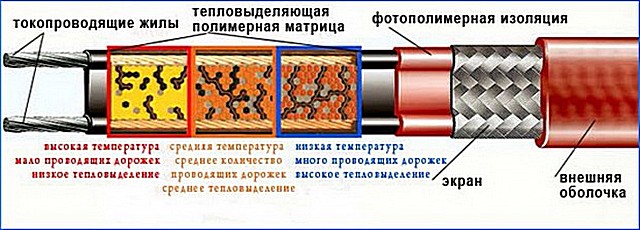
Metal wires here serve exclusively as conductors, and heating takes place in the semiconductor matrix located between them. Moreover,, the higher the temperature at a particular site, the lower the conductivity of the semiconductor, and the lower the energy consumption. Thus, the possibility of overheating is excluded, the economy of operation of the system sharply grows.
Semiconductor self-regulating cable is still a very expensive "pleasure", and if we consider the options from the "price - quality - convenience in installation", then the optimal choice is a two-wire resistive cable. About him and will be discussed below.
How to calculate the required number of cables
Work is always begun with planning the layout of the cable layout, the location of the thermostat and the connection to the mains.
- It is never planned to lay the cable under stationary pieces of furniture - for correct operation of such a system, constant heat exchange with air is required, and in its absence, the cable can overheat and fail.
- The distance from the walls and furniture should be not less than 50 mm, and from heating appliances (for example, radiators or convectors, heating pipes, etc.) - to less than 100 mm.
- It is strictly forbidden to plan the laying with the crossing of the cable.
- For effective system heating it is accepted to be guided by the fact that about 70 ÷ 75% of the total area of the room should be closed by cable.
The main planning parameters are the required cable length and the step between neighboring loops. These values need to be calculated based on the laying area ( S), the required amount of thermal energy for efficient heating ( Qs) and the specific thermal power of the selected cable model, calculated for 1 meter of its length ( QKB). Where can we get these values?
- Sit is easy to find by measuring those sections on which the cable will be laid, having calculated and summed up their area.
- Value Q sare taken equal to:
- If the floor heating is the only source of heating, then 180 W / m² in case the room is located "on the ground" or above unheated premises, and 150 W / m² - if there is a heated room from below.
- If floor heating is considered as an additional source of heat, these values will be equal to 130 and 110 W / m², respectively.
- Specific thermal power cable Qkb, W / linear meter, must be specified in the technical documentation of the product.
The calculation is carried out according to two formulas:
The required cable length is:
L = S × Qs / QKB
Having a length value, you can also find the step of laying the cable - the distance between parallel stacking loops:
N = 100 ×S / L
In order not to bother the visitors of the site with independent calculations, there is a special calculator designed to quickly and accurately determine the cable length and stacking step:
Probably, none of the materials for the finishing flooring can be compared in terms of pearls with ceramic tiles, if it is a question of rooms with a high level of humidity, or in which the floor with a high probability of water can get. Bathrooms, showers, baths and saunas, kitchens, bathrooms, hallways are typical places for which better tiles material can not be found. This coating is highly hygienic, durable, wear-resistant, very impressive, waterproof, perfectly cleanable using almost any detergent composition of household chemicals.
One only sometimes keeps the owners - the tile can not be called a "warm" material. In summer it is not necessary to remember this shortcoming, but with the onset of cold weather it is not always pleasant to walk on such a covering with bare feet or in light house shoes. However, modern construction technologies make it possible to negate this negative point. It is, of course, about the warm floors. But only to the person who first undertakes such a thing, one must first be able to understand their varieties and the peculiarities of the styling. So, the question with Tatya will be put this way: the warm floor under the tile is the best. and what is easier to install, reliable in operation under certain conditions.
By and large, on the floor, which is supposed to be tiled with ceramic tiles, you can take into account m m of the unit important nuances apply any of the existing heating systems. Let us consider them in the following sequence:
- Water floor heating - with the installation of pipes from the heating system.
- Electric warm floors with resistive heating system.
- Electric heating systems with an infrared principle of transfer of thermal energy.
Water under floor heating
The water-heated floor is the contours of pipes placed in a concrete floor screed, along which the coolant circulates from an autonomous or central heating system. This kind of floor heating can and is used as the main source of heat, and act as an additional one. Concrete screed, if it is filled correctly, with a careful leveling of the surface, in itself is an excellent base for laying any type of ceramic tiles.
Typical scheme of water-heated floor
The approximate scheme of the device of a water warm floor under a tile is shown on the presented scheme:
1 - an obligatory layer of thermal insulation. It is important to do everything so that to minimize absolutely unnecessary the energy consumption for warming the bottom of the warm floor - so that the main flow goes upward, to the heating of the room. This is especially important on the ground floors, with floors on the ground or having unheated basement (basement) rooms below. In multi-storey buildings, the issue is less acute, but it is also not worth heating the slab. Thermal insulation can be single-layered or multilayered, depending on needs and possibilities, be executed from various insulation materials - from expanded clay to expanded polystyrene or rolled foil foamed polyethylene.
2 - reinforcing layer, which can simultaneously be the basis for fixing the pipes of the water heating circuit. Often, a different scheme of pipe fastening and reinforcement is used, as will be discussed below.
3 - the contour of pipes through which the coolant circulates.
4 - the input devices of the water circuit and the adjustment of the heating temperature of the floor surface.
5 - Mandatory concrete screed, completely covering pylons laid pipes. It plays a role not only a solid foundation for the floor covering (laying tiles). One of its key purposes is to become a powerful thermal energy storage. When heated from pipes laid in its thickness, it evenly distributes heat throughout the surface, transferring it to the final ceramic coating. A well-warmed base can retain heat for a very long time, gradually giving it to the room, which helps to save energy resources used for heating. The thickness of the screed should be within 30 ÷ 60 mm.
6 - if necessary, the screed of the warm floor can be ideally leveled by filling self-leveling mortar. However, for the laying of ceramic tiles an ideally smooth plane is not required - if the leveling of the screed is accurately observed, small errors can easily be eliminated with the help of building glue already during the laying of tiles.
7 - ceramic tiles, the laying of which completes the process of finishing the warm floor.
How to choose and properly lay ceramic tiles?
The main components for the water-heated floor
Insulation mats
As already mentioned, water-heated floor only in this case will be effective if mounted on ondearly thermally insulated basis. To do this, most often used ready-made insulation mats of one type or another.
- Thin roll insulation with foil.
Independently in the design of the water-heated floor is not used often - only provided that the floor itself is already sufficiently insulated. In this case, the reflecting substrate is used so before laying out the contours and filling the screed. Fixation of pipes in this version is usually carried out on the reinforcing mesh or on the fixed to the surface of the rough floor " combs».
Fixing of pipes with the help of a mounting "comb"
- Plates from extruded polystyrene foam.
Comfortable in work, as many have lamellar parts that allow to lay the plates in a single, almost monolithic coating. They have an excellent thermal insulation effect. The high strength of the material makes it easy to withstand the weight from the hose with the pipes, and dynamic loads during operation.
The disadvantage is that there is no own waterproofing, which will have to be carried out separately. Often used as the first layer of insulation, on top of which are stacked additional mats.
- Foiled waterproofed foam polystyrene mats designed specifically for warm floors.
It's much more convenient to work with them. They can be produced in the form of "clamshell books" or as a "tractor caterpillar" - roll out on the surface of the floor. Not only do they create a single surface when unfolding, with a very tight fitting of neighboring blocks, practically without any gaps - they still have a foil layer that simultaneously functions as a thermo-reflector and a hydro-vapor barrier. Many of the models, in addition, have a special self-adhesive tape along the edge - for practically tight sealing of adjacent mats with each other.
The surface has a marking grid, and it is convenient to fasten the pipe with clamps "harpoons"
Another important convenience is the mesh applied on their surface, which greatly simplifies the process of marking and laying out the pipes of the heating circuit. And the pipes can be fixed here in different ways - just as mentioned above - with a garter to the reinforcing mesh or with the help of combs, or using special clamps with harpoon-type tips that are perfectly held in the styrofoam.
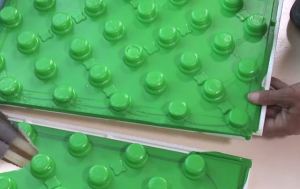
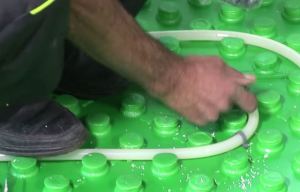
- Profile mats with retainer-boss.
If all the above mentioned mats can be used for insulation work on other sites or with other types of "warm floor", these are specially designed for water heating circuits. They combine at once four functions:
- Insulating layer of extruded polystyrene foam gives an excellent thermal insulation effect. The thickness of the insulation can be different - from very thin mats, 5 ÷ 10 mm, to 50 ÷ 70. In a word, you can choose for specific requirements for thermal insulation of the base floor surface.
- Figured ledges-bows make laying even the most complex "drawings" of the contour and fixing the pipes - a simple and understandable occupation. No additional fasteners should be needed.
- The upper polymer coating of mats becomes a magnificent hydro-vapor barrier layer, so necessary for water-heated floors. Special connecting stripes on two edges (shown in the figure with arrows) allow to lay out of the mats absolutely impervious coating.
- The profile, ribbed surface of the resulting coating allows us to do without the use of additional reinforcement of the screed, especially if a mortar with plasticizers and microfiber is used.
These mats, perhaps, only one conditional "flaw" - this is a high price. But if the means permit, then without hesitation it is worth choosing them.
Pipes for underfloor heating
Warm water floor almost always (with rare exceptions, with the arrangement of wooden floors) is covered with a layer of heat-accumulating screed. And this, of course, imposes special requirements on the used pipes for the circulation of the coolant.
Judge for yourself:
- Screed is poured for many years, and it is simply impossible to gain access to the pipe circuit for visual inspection or periodic prevention. Even a small leak, which is easily and easily eliminated in an open area, turns almost into a catastrophe, especially if the neighbors live from below. Carrying out emergency repair work is associated with a large-scale dismantling of ceramic tiles, screeds, and the exact location of the defect can only be guessed.
It is extremely difficult to find the place of leakage independently, without the invitation of specialists with special equipment.
- It is inadmissible to fill the butt joints of pipes in the screed, whether they are threaded, welded, soldered, fitting or the like (also with a few exceptions - for example, the connections of quality stainless corrugated pipes ensure complete safety). This means that the pipe must be stacked in a single section of a few tens of meters, from the entrance to the return. And all along it must be of consistently high quality.
- The pipe must have certain operational properties. This can be attributed, firstly, flexibility, so that you can lay out the loops of the contour. Secondly, a lot of kilogram screed, floor covering plus dynamic impacts will rest on the pipe. Thirdly, the circuit must withstand high temperatures - with a margin of up to 90 degrees, and the pipe material - have a high thermal conductivity for efficient transmission of heating the floors. Fourth, compulsory corrosion and chemical resistance.
At present, special plastic pipes their cross-linked polyethylene PEH, heat-resistant polyethylene RE-RT, metalloplastikovye, whose structure includes an aluminum layer, along with the same PEH and (or) RE-RT. A few stand alone are expensive metal, stainless corrugated or copper pipes, afford that can not all
Pipes fucking warm floor
Approximate technology of installation of a water-heated floor
Technological methods for laying a warm water floor may differ slightly - depending on the type of components used. But, nevertheless, the basic scheme is about one.
| Illustration | Brief description of the operation |
|---|---|
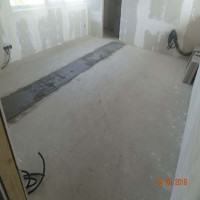
| The hallway of the house, in which it is necessary to make a warm floor before tiling it with a tile. It is assumed that the foundation of the floor does not need repair. | |
 | The first mandatory operation - a thorough cleaning of the base surface from debris, pebbles, all that can damage the waterproofing film. After harvesting, the most reasonable thing is to thoroughly apply the surface with a deep penetration composition. |
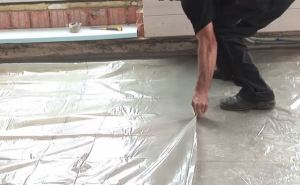 | The whole surface of the floor is covered with a dense polyethylene film, 200 μm thick. A minimum allowance of 50 mm is required on the walls. |
 | At the joints of sheets, an overlap of about 100 ÷ 150 mm is made, which is pasted with a waterproof construction tape on top. |
 | On all vertical surfaces - walls, columns, openings along the floor, a damper tape is glued. Usually it has a backing strip on the back side, protected by a substrate. It is necessary to glue the tape so that the allowance of the polyethylene film on the walls gets under it. |
 | The surface of the floor is ready for laying the thermal insulation layer. |
 | Laying of insulation mats. Pay attention - on the damper tape on the outside of it there should be a polyethylene "skirt". When laying the panels along the walls, it should be on top of them. It is necessary to fix it with the same waterproof tape. |
 | Mats can have pazo-comb or lamellar locks - this greatly simplifies the laying process. Panels are stacked "in a descent", so that the transverse joints in the adjacent rows do not coincide. |
 | The first layer of insulation is laid. To strengthen the effect of thermal insulation and to facilitate the laying of pipes, a second layer will directly be laid on top of it - mats with polymer coating and with mounting bosses. |
 | Laying of profile mats is carried out approximately according to the same scheme. Differences - when pruning them, you can not shift the rows of the layout of the boss - this should be taken into account when cutting. Such mats also have a system of locks, which simplifies their laying. |
 | After the whole surface is covered, it is possible to proceed to laying the contour of the pipes in accordance with the pre-designed and drawn out scheme. |
 | Qualitative mats perfectly withstand the weight of a person, so the tube can be gently pushed into the grooves with the foot, shod in shoes with soft soles. The pipe perfectly enters the space between the bosses and is securely fixed in them. |
 | On the steepest with the minimum bending radius, it is advisable to additionally fix the pipe with a pair of three-yoke clamps. |
 | The floor with the laid out contour is ready for pouring the screed. |
 | For completeness of the picture - the peculiarities of laying the contour of pipes on the foil insulation. The floor in this case does not require special thermal insulation (from below there is a well heated room), so the masters limited themselves after waterproofing and gluing the damper tape only by covering the surface with foamed polyethylene foam. |
 | The metal reinforcement net is laid on the floor. Its individual sections are connected by wires. |
 | Layout of pipes follows the scheme, and they are fixed to the bars of the grid with the help of plastic clamps-puffs. |
 | Paul is also ready for further operations to fill the screed. But there is one more important condition for continuing construction works - the circuit must be connected to the heating network, pressurized, that is checked for the absence of even the slightest leakage. Then the pressure in the pipes from the test to the working pressure - and only then you can proceed to the screed. |
 | A beacon system is set up. This is best done by thin profiles, exposing them to the slides of concrete. The thickness of the screed is not less than 30 mm. Do not use gypsum mixtures for reasons of speeding up the process - the screed and slides under the beacons should be made of a homogeneous material with equal physical properties, otherwise there may be very undesirable consequences in the future. |
 | Cement-sand mortar for screeds is best modified with fiber-reinforced fibers and plasticizer. When laying concrete, it is necessary to achieve maximum density, so as not to leave air bubbles anywhere. Particular attention to vulnerable areas - along pipes, combs, fasteners and other parts. |
 | Filled and leveled screed must be covered with a polyethylene film after 4 ÷ 6 hours to prevent drying out and the appearance of cracks. Remove the film can be in a week - concrete will pick up by that time sufficient strength. |
 | At the same time, it is possible to cut off the protruding edge of the damper strip along the perimeter. |
 | 15 days after pouring it is recommended to switch on the heating system, so that at the entrance to the laid out circuit there should be no more than 27 ° C. For all further work (tile laying) and for the operation of the warm floor in the operating temperature regime, it is possible to proceed no earlier than 4 weeks later. |
What conclusions can be drawn?
So, after we have considered the basic concepts of water heating the floor under the tile, you can make some generalizations.
Undoubtedly, in matters of economic efficiency in operation this kind of warm floor wins for all its "brethren". The system, with proper installation and use of high-quality components, is effective, able to create and maintain a comfortable microclimate in the house. However, there are many nuances that can either to some extent restrict, complicate its creation, or even make it impossible.
It is very problematic to make warm water floors in multi-storey buildings, and there are several reasons:
- Let's return again to the approximate scheme of the water floor.
- The total thickness of the whole "pie" is very impressive - a heater, a screed plus at least 10 mm "will eat" even the tile coating itself. As a result, you will get a floor level rise of at least 70 ÷ 100 mm - and this is in the best case. Are the hosts ready in the conditions of a standard apartment to go for this? Moreover, usually the tiles are laid, as already mentioned, in wet rooms - bathrooms, bathrooms, etc., where it is recommended to lower the floor level than in the corridor or in the rooms. Thus, "fit" into these norms will be very difficult.
- The design of a water-heated floor covered with tiles always assumes a massive heat-accumulating screed. This means that a significant additional weight load will be placed on the interfloor overlap, on which nor may not be calculated.
- If the owners plan to connect the warm floor to a centralized heating system, they should know that this is not so simple - unpleasant surprises can await them. Firstly, the temperatures of the coolant in the batteries and the heating circuits of the floor are very different, which means that installation of rather complicated and expensive adjustment equipment is required. Secondly, management companies can simply prohibit the selection of heat from the risers so as not to disturb the balance of the central system. Thirdly, if permission is obtained, it is likely that sufficiently stringent technical conditions will be set, with the mandatory installation of complex regulation equipment and heat metering devices.
Would you like to connect the heated floor to the central heating system?
Conclusion: a warm water floor for ceramic tiles is more appropriate in private construction - where it will fully show its effectiveness and economy. The device is in a city apartment - a very complicated, and sometimes even impossible, event.
Video: advice on installing a warm water floor
Electric warm floors of resistive action
Another effective source of heat for heating the floor is electrical energy. Before the water, electric floors have a number of advantages:
- They can be equipped practically in any apartment house - private or in a high-rise building.
- Their installation does not require any coherent procedures, if the total power consumption of an apartment does not exceed the limit set by the legislation (15 kW).
- Electrical heating of the floors is safer, since there is no risk of flooding the neighbors.
- Some warm electric floors also require a concrete screed, but its thickness is much smaller, and therefore - the loads on the floor base are not so large. Many types of floors generally allow you to do without screed.
- All control equipment is many times smaller, and controlling the operating modes of heating is much easier and more convenient.
- The installation of an electric floor is incomparably simpler than a water one. The total cost of components and work is much lower.
- A quality electric heated floor, with proper installation, will last at least as much as a water one - for several decades.
There is, however, one obvious drawback, which forces consumers to treat this type of floor with great alertness - this is the high cost of electricity. Alas, this can not be avoided - even with the most effective insulation of the house or apartment, the operating costs will be very significant.
However, in accordance with the topic under consideration, in those rooms where tiles are laid, such an electric heating can be made not as the main one, but only as an auxiliary, which increases the comfort of staying in the kitchen, in the bathroom, etc. Here, electric floors do not have an equal - they will be both efficient and economical.
All electric warm floors can be divided into two large groups - the resistive and infrared principle of operation. Let's start with the first one.
Warm floors with heating cables
The principle of operation of all resistive heaters is very straightforward: an electric current passes through a conductor with high specific resistance, causing its heating. By and large, irons, electric hotplates, electric heaters, etc. work in the same way. But for the conditions of the warm floor, certainly, special heating elements - cables have been developed. They are laid on the surface of the base floor according to a certain carefully calculated scheme, and then closed with a screed of a thickness of the order of 300 mm, which becomes the basis for laying ceramic tiles. This is well illustrated in the diagram:
1 - concrete flooring. Before installing the heating system, it is waterproofed with a deep penetration primer.
2 - Thermal insulation substrate. Typically, a thin foil-insulated foam foam type is used.
3 - mounting rails, to which fix the cable when it is laid out. They are attached to the base of the floor by dowels.
4 - the main element of the floor - heating cable laid out in accordance with the scheme. On the mounting rails there are special "tongue" fasteners, which fix the cable in the desired position.
5 - a temperature sensor installed between the turns of the cable, which will monitor the level of the floor heating temperature.
6 - the device for controlling the warm floor, the thermostat of the electronic or electromechanical principle of operation. To it are brought both "cold" ends of a cable, and a wire of a temperature sensor.
7 - Screed of their cement-sand mortar (preferably - with a plasticizer and micro-reinforcement with fiber fibers). In order to connect the screed with concrete base floor in foil insulation can be cut diamond-shaped "windows".
"Windows" are cut out in a foil substrate before pouring the screed
Often, before reinforcing the screeds, lay reinforcing fiberglass mesh (metal is not recommended in this situation). In the rest, the process of pouring the screed laying tile (item 8) does not differ from the water floor. Thickness - about 30 mm
The heating cables themselves can be of several types.
- The most simple and inexpensive - single-core (pos. A). Their main drawback is that both ends of the cable should be brought together at one point to the thermostat. This is quite inconvenient, especially when laying out a complex scheme.
- Much more convenient in installation works - two-core heating cables (pos. B). Only one end of the cable is fed to the control unit, and on the second one there is a special plug with a jumper, ensuring the circuit is closed. The role of the heating element in different models can perform as one vein (the second serves only as a conductor), and both simultaneously.
- The most innovative are special heating cables that have the effect of self-regulation. Between the two cores, which in this case perform solely the function of conductors, is a semiconductor matrix. Conductors create a potential difference, and the passage of current and heating go precisely through the semiconductor. Moreover, the power consumption and the heating temperature on each individual section of the cable can vary - the more heating, the lower the energy consumption. The cable itself regulates the intensity of local heating as a function of the external temperature. This gives a very good saving effect.
Cables are usually implemented ready-made kits different power and do not require additional development. In certain cases, it is possible to change the length of the cable (especially - self-regulating), but you should not do it yourself.
Video: an example of laying a warm floor based on a two-wire cable
Resistive heating mats
This kind of electrical resistive floor heating system is much more convenient to install, and as if specially designed for a tiled floor.
In fact - this is the same heating cable, but it is already laid looped on polycarbonate reinforcing mesh. This allows not only to significantly simplify the installation, but in the case of ceramic tiles - do without any screed. The warm floor in this case is laid directly on the prepared concrete surface, without using a foil substrate. With a view of approximate acquaintance with the technology, its basic steps are presented in the table:
Illustration Brief description of the operation Work begins in a prepared room with repaired surfaces of the floor and walls. The first step determines the convenient location for the placement of the thermostat. For him in the wall, at a height of not less than 300 mm from the floor, a socket is drilled under the mounting box. From the nest to the surface of the floor is cut a 20 × 20 mm penalty. On the floor, a fence of the same cross section is also made - a plastic corrugated tube Ø 16 mm with a thermal sensor inside will be laid in it. Both penalties converge at one point in the corner at the junction of the floor and the wall. The next step is thorough cleaning of the entire floor surface from debris, fragments of concrete, pebbles, etc. After cleaning, the surface is primed with a composition of deep penetration - for additional waterproofing and improving adhesion qualities. Laying the mat starts from the location of the thermostat. The mat unwinds on the floor, and it can be fixed with a drop of silicone glue or "liquid nails". To change the direction of the layout, it is allowed to cut the mesh polycarbonate substrate without affecting the cable itself. Neighboring strips of the mat should be placed in such a way that a distance of at least 50 mm remains between the cable loops. Crossing of wires is not allowed. After the mats are laid, you can proceed to the switching operations. To begin with, heat the sensor. It is introduced into the corrugated tube that is included in the delivery. The open end of the tube is closed with a special plug. The tube with the sensor fits into the penalty on the floor, so that the distance from the wall is not less than 500 mm. The second end of the pipe, bending in the corner, enters the penalty on the wall. Surplus is cut off at the place of the future installation of the mounting box. Wire loop - for a bundle of all wires of the scheme of the warm floor in a penalty in one "pigtail". There, in the vertical penalty, the cold ends of the cable are laid and laid. It is possible that the supply cable from the switchboard will also be located there. Wires are built in a junction box, it is installed in the socket for a small amount of mortar (for example, gypsum - to quickly grasp). The output wires are cut to the size required for installation, cleaned, tinned. The control vertebra of the cable is immediately carried out - the resistance specified in its passport is checked. Next, the wires are switched in the terminal block of the thermoregulator unit, in accordance with the diagram and the technical documentation of the device. After switching the thermostat is installed in the box in its normal place. A power connection is made and a test run is carried out - short-term heating of the cable. If everything works correctly, you can move on. The food of the heated floor must be switched off at the switchboard. Both penalties, and on the floor, and on the wall are embedded with mortars, for example, tile glue. At the same time, you can also glue the glue for tiling. The layer of tile adhesive is applied directly to the heating mats. Its layer must be not less than 10 ÷ 12 mm Further - all the same as with the usual laying of tiles: the distribution of the adhesive with a notched trowel, the installation of tiles with the necessary clearance, the control of the horizontal surface - and so on. Include ceramic floor tiles heated by the calculated capacity can only be after the full hardening of the adhesive composition. Usually this parameter is indicated on the package of a dry building mix. By the way, when choosing a glue it is worth paying attention to its compatibility with a warm floor - not all glues "like" frequent changes in temperature. So, let's sum up the section of resistive heating:
- For a tiled floor, this type of warm floor can be a very effective method of improving the comfort of the room.
- From the point of view of "price-quality" the best option will become a two-wire cable, both in itself, and in the composition of the mesh. Single-core has its shortcomings in the technological plan, and self-regulating is too expensive.
- From the point of view of simplicity and speed of installation the unconditional leader are mesh mats. To lay the tile is not required screed with its time-consuming pouring process and a long maturity.
Electrical resistive floor heating
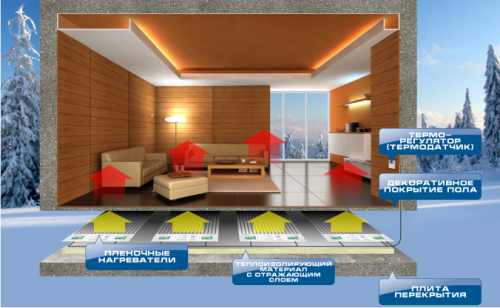
It is the thinnest of all the warm floors, which is especially important in a confined space of an apartment. Nevertheless, even with a thickness of only a few tenths of a millimeter, the film heaters are able to "give out" a powerful thermal radiation sufficient to heat the room. Such a small size of the film allows you to place it directly under the finish not only of the floor, but also of the ceiling or walls.
Infrared film elements are a multi-layered structure. Between the two layers of high-strength and chemically inert transparent polymer pass two parallel copper busbars (item 1). "Drawing" on them, there is a "stockade" of heating strips from a special carbon paste (item 2). High quality of electrical contact is provided by silver coating (item 3). At regular intervals (e.g., 250 mm) technological gaps with inflicted lines by which It is possible to cut a whole film of film into separate fragments of the required length.
The material of the heating strips is selected in such a way that, by itself, they do not pick up a high temperature, they become a good source of infrared radiation, which is absorbed by the finish surface of the floor, which leads to direct heat transfer. Screed in this case - absolutely not necessary, but a layer of insulating layer is required from below thermo reflective substrate.
Installation of film floors - absolutely uncomplicated for a man who is at least a little knowledgeable in electrical engineering and who owns the basics of building technologies. All materials and components necessary for work are included in the kit, and it remains only to observe step by step instructions. Since there is no need for concreting, all works, up to the finish of the finish coat, can be done literally in a day or two. As an example - watch the video:
Video: an example of mounting a film infrared floor
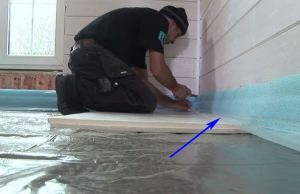
All would be nothing, but that's just such a floor is more intended for a cover of natural wood, parquet, laminate, linoleum. And what about our ceramic tiles? The film does not give the necessary adhesion with tile adhesive, and the tile will surely begin to "dance" with time and break away from the surface. Cut windows in film heaters is prohibited, and small holes, available on some types of films, still will not solve the problem.
Nevertheless, there is a way out, however, it is necessary to work here a little more. For laying the tile, a moisture-resistant plasterboard, which after the waterproofing is covered with the whole surface of the floor, already covered with film elements, is quite suitable. Drywall can be fixed either to "liquid nails" or to self-tapping screws to the base floor base. But after a very careful marking, the fasteners must be on technological breaks or transparent fields, in no case touching copper tires or black strips. Well, the surface of plasterboard after careful priming turns into an excellent flat ground for laying ceramic tiles.
By the way, in terms of its physical qualities, drywall itself absorbs very little IR radiation (not for nothing film heaters are often located above the suspended gypsum cardboard ceiling), so that there will be no large energy losses.
Video: how to make a warm film floor for ceramic tiles
Infrared rod mats
This kind of warm floors is rightly referred to as the most innovative. It combines all the advantages of both cable and film heating systems.
Probably the most innovative solution is the rod infrared mats
The mat consists of two current-carrying buses in polymer insulation, which are connected by flexible rods filled with a special carbon compound. Each from radiator rods acts completely autonomously, that is, even damage to one or more of they will not lead to loss of efficiency of the entire system as a whole.
A remarkable property of such mats is self-regulation, that is, the consumption of electricity at each specific site depends on the temperature of the rod. There is no risk of overheating - even if a section of such floor is suddenly closed with furniture (which is unacceptable with any other type of electric underfloor heating), the rod, having typed the upper set temperature limit, will simply "close" and overheat due to lack of heat sink it does not threaten.
Rod infrared floors perfectly fit under ceramic tiles.
a - base floor base, which only needs repair (in the presence of cracks or depressions) and priming.
b- thin thermal insulation layer with a foil coating on top.
at- rod mat.
g - The layer of tile adhesive is from 10 to 20 mm.
d - ceramic tile.
Screed in this case, too, is not needed - just a little thickened layer of tile glue.
Installation of a warm core floor is also quite simple, quite feasible for independent execution. Schematically it can be represented as follows:
- The core mats (key 1) are rolled over the floor covered with a reflective substrate. Temporarily fix them to the base with an adhesive tape.
- If it is necessary to change the direction or turn the tire (position 2), far from the center of the turn, is cut, the mat rotates in the desired direction, its laying continues in the same order.
- After the mats are laid over the entire planned surface, the cut ends of the tires must be connected. To do this, the supplied mounting wires (key 3) and crimp insulated terminals with heat shrink tubing (item 4) are used.
- The same terminals to the bus at the beginning of the mat are connected to the "cold" wires (item 5), which will go to the thermoregulator unit. On the reverse side of the mat, both tires must be closed with special insulating plugs (key 6).
- The temperature sensor (item 7) is installed - it should be located strictly between the stripes and the center of the width of the mat. The sensor wires are also switched in the thermostat.
- Lastly, after checking the total resistance of the mat, a 220 V power line (item 9) is connected. The general operability of the system is checked by a brief inclusion.
- Then, in the reflecting substrate, the "windows" are cut out (approximately the same as in the case of the heating cable), and it is possible to lay the ceramic tile directly on the rods, maintaining the thickness of the adhesive layer within 10-20 mm. At the same time, it is necessary to apply glue and distribute it with a comb spatula on the tile - this minimizes the risk of damage to the rod or wire.
Video: how to mount a warm rod infrared floor under the tile
Summarize.
Among infrared heaters for floors with ceramic tiles, rod mats have an absolute advantage. Moreover, they are no more difficult to assemble than film elements - tiles are much easier to lay on them, and the effect of self-regulation makes the operation of such floors safer and more economical.
The present publication did not address the issues of drafting and calculating warm floors. This is a very extensive layer information that requires separate consideration.
You can see the nuances in a separate article of the portal by clicking on the recommended link.