Accumulation of heat in country cottage or dacha construction - a pledge to create an energy efficient home. Independently lay the floor, placed on the ground on one of the types of tape foundation, you can use a screed. The technology is suitable for budgetary construction and large-scale construction works.
Features of floors on the ground
Floor covering on the ground is a multi-layer construction, which contributes to the quality ventilation and stability of the structure. Overlapping in the form of tape is justified for buildings with low basement floors and the impossibility of mounting a monolithic base.
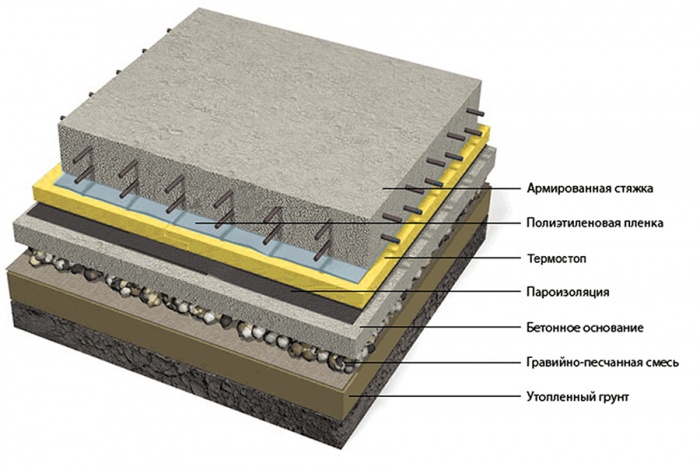
Concrete floor structures located on the soil include the following elements:
- podsypku in the form of sifted river sand, which is rammed;
- layer of medium-fractional material - crushed stone or expanded clay;
- rough cement screed;
- layers of hydro, steam and thermal insulation;
- a final screed made of cement mortar;
- finishing flooring.
Organized layer by layer construction pie protects the structure from freezing, the appearance of a condensing sediment. The design of the floor is longevous, durable, easy to implement, but requires financial investment.
SNIP: information for the developer
The device of a floor on a line of a ground will be effective if to adhere to recommendations СНиП 29.13330 from 2011. The document specifies a number of conditions under which technology will be justified: 
- Conducting waterproofing works. Optimal material - extruded polystyrene foam, placed under the sole of construction. Foamed plates contribute to the preservation of geothermal heat.
- The choice of the optimal thickness of the layers. The need to create a structure, its thickness depends on the level of subsoil moisture, structural load and the possibility of heating. With UGV less than 2 m sandpack is not used, and the black screed is replaced by the pouring of crushed stone. Loads of more than 0.2 t / 1 m2 are provided by wire reinforcement 4 mm in diameter.
- Presence of a drainage system. Draining is required at a high level groundwater. In private construction for stormwater, groundwater or meltwater use stormwater.
- Backfilling with non-solid bulk materials (20 cm of sand and as much crushed stone) with subsequent ramming will prevent the subsidence of the foundation.
- Laying of geotextile fabric is actual only in the arrangement of filtering communications or drainage. Otherwise, the soil will not condense, violating the strength of the foundation.
Technology ribbon base - Optimal for suburban construction. It minimizes the cost of performing each layer of the pie, prolongs the life of the house, maintains and is reliable.
Varieties of the base in the form of tape
The base in the form of a tape is suitable for the erection of buildings from heavy materials and on soils that are heterogeneous throughout the area. The simple technology of arrangement of a construction makes a basis of the first floor strong, prevents a shrinkage. Tape base allows you to equip the basement room, is used for the construction of houses with a complex configuration.
Tape, which is carried out under the inner and outer walls of the dwelling is characterized by its simple arrangement. The product needs a lot of building materials - concrete, timber on the formwork, fittings, etc. In building practice, several types of tape bases are created. 
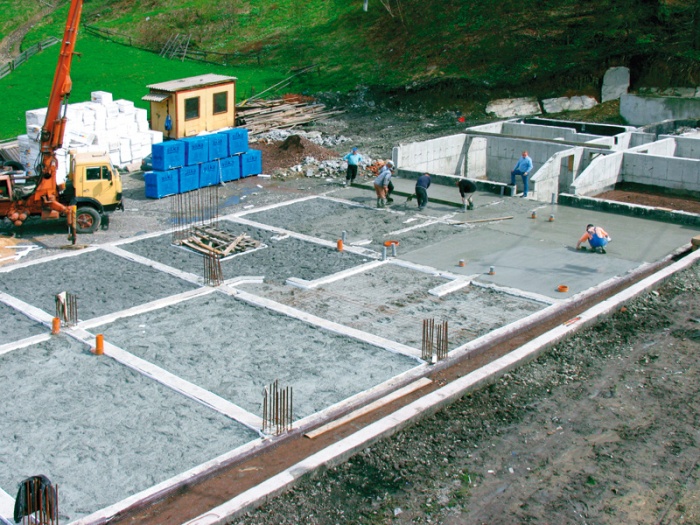
Monolithic or flood construction
It is built directly on the construction site. The structure is subject to additional reinforcement, and after hardening it forms a rigid unbroken monolith.
The foundation requires the compulsory erection of a metal or wood formwork capable of withstanding the weight and pressure of solidified cement, such as metal or wood. The frame can be removable or non-removable. For stability, concrete masses are additionally insulated, waterproofing is laid. The monolithic base is durable, with high strength.
Prefabricated ribbon base
It is assembled from factory reinforced concrete blocks, which, after delivery to the construction site, are connected by means of reinforcement and cement mortar. When erecting a low-rise structure on sandy grounds, it is allowed not to use pillow blocks.
The drawback of the design is the complexity of the ideal fit to the size of the elements in the complex configuration of the structure of the future house.
Advantages of the precast tape base are quite a lot:
- erection is carried out as soon as possible;
- labor costs for the construction of the basis are minimized by means of leasing special equipment;
- work can be carried out even in winter.
A basement or basement level is built on a prefabricated basement.
Combined structure
The combined strip foundation is used on difficult soils if it is necessary to raise the level of the first floor in the presence of a slope or on a mobile ground. The construction allows to reduce heat loss in the whole house. 
Butovoe and brick types
Bottom base refers to long-erected, but it is considered the most solid - it does not freeze and is not exposed to groundwater. Work involves a selection of the shape of the stones and their connection with cement mortar. Butotobetonny view differs from the previous equal ratio of stone and cement (50/50). Brick strip foundation is standard bricklaying with the help of concrete. It is recommended to use it on dry soils and always put a high quality waterproofing.
The foundation in the form of tape is suitable for laying the floor on the ground in reinforced concrete, stone and brick houses with a density of more than 1300 kg / m3.
Advantages of ribbon monolith
Foundations in the form of a tape allow you to organize a basement, to equip the insulation of a private house. The design has many advantages:
- prevents the penetration of subsoil gases into the correct waterproofing and backfill.
- underground space does not require the installation of ventilation systems.
- soil and slab of concrete accumulate heat, which is suitable for frame and other houses with thin walls.
- concrete screeds - a convenient base, an ideal thermal platform for the organization of "warm floors".
- the thermal insulation of the structure reduces the risks of freezing the foundation and its swelling.
- for communications laid at the level of the backfill, minimal insulation is required.
The internal space of the belt structure is filled, insulated and waterproofed before the installation of the concrete floor. 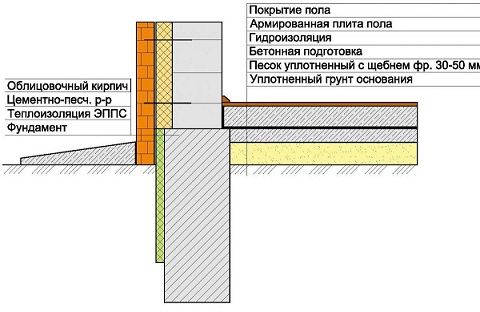
Material selection technology
Building materials for the arrangement of floors on the ground on ribbon foundation are selected depending on the level of the structure. To reduce the cost of construction, the screed is carried out, working from the top down:
- lay reinforcing frame, which will withstand linoleum, carpet, laminate, tile, boards or podsnovu of multi-ply;
- lined foil insulation, reducing the number of heating points;
- lay waterproofing, mainly - ruberoid, film;
- cover the sub-base with a thickness of 4-7 cm on the basis of M200 cement, crushed stone and sand;
- form a sand cushion, which is compacted with a vibration plate to a depth of 20-30 cm.
- pour the main screed of strong concrete.
The selected materials will enable technologically correct construction of the floors. The amount of consumable raw materials can be determined approximately. For a standard floor surface, 30 cm of sand, 5-10 cm of concrete, 10 cm of insulation, 5-7 cm of screed and finishing materials will be needed according to the level of the soil.
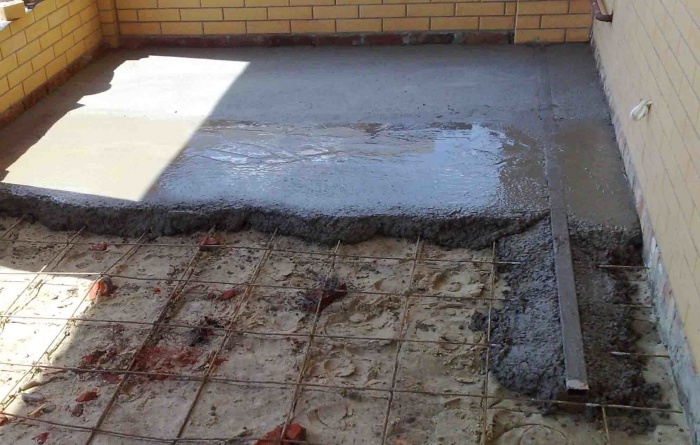
Arrangement of floors on a strip foundation
All the works are divided into several stages. When you perform each, you must follow the algorithm - so the design will be strong and reliable. 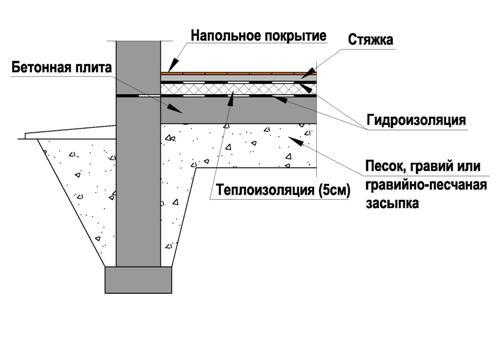
Backfilling of the sand layer
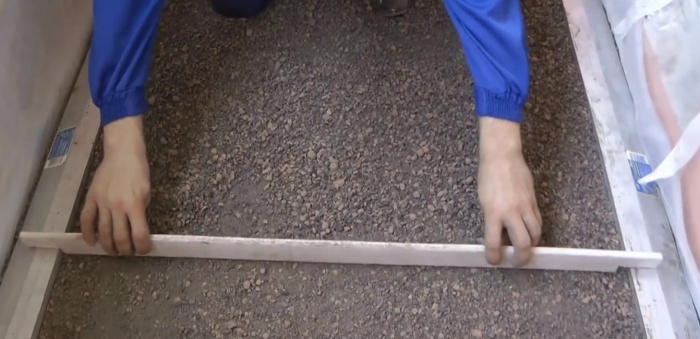
Before the commencement of measures, it is necessary to take into account the need for ramming of loose raw materials - manipulations will compact the sand cushion. Tasks are carried out in stages:
- The sand is laid down with a layer of 10-15 cm and is compacted in a dry form with a vibration plate.
- Watering of the packed material with a hose with a nozzle-sprayer is carried out. It is important not to oversaturate the material with moisture, because in the future it can not be damaged.
- The seal is re-applied. The vibratory plate is used twice, changing the direction of motion.
- The sand is re-spilled.
On the moistened material, it is necessary to walk several times with a vibration plate and wait until the layer dries.
Construction of reinforcing cages
The foundations of the tape type are difficult to reinforce - the process is labor intensive. Experts advise adhering to the step-by-step technique of works:
- Lay a few smooth cross-bars with a diameter of 6-8 mm, extending them by 100 mm.
- Calculate the step - the distance to which the cement slurry will be poured.
- Place on the transverse pins a ribbed longitudinal reinforcement with a diameter of 12 - 16 mm. Form the lower belt.
- Mount the top rods in the vertical position.
- Lay on the elements 2 longitudinal bars. Form the lower belt.
The joints of the reinforcing frame are welded, tied up with clamps or tacks. 
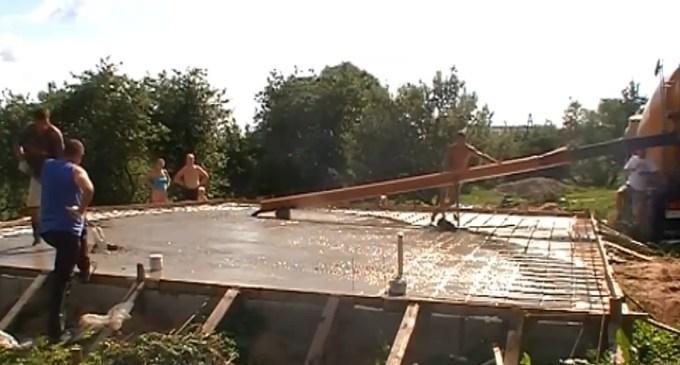
Filling the foundation on the cushion
The foundation-subbase is created on an already prepared cushion of rubble and sand. Concrete mass is made in proportions 1: 3: 6 on the basis of cement M200 and other materials. Independent concreting consists of the following steps:
- Filling the starting layer 10 cm thick.
- Secondary filling of the mixture to a height of 40-50 cm.
- Sealing of the mass with a vibrating ram or piercing with a reinforcing pin.
To reduce the time of work, the grout is poured in one step.
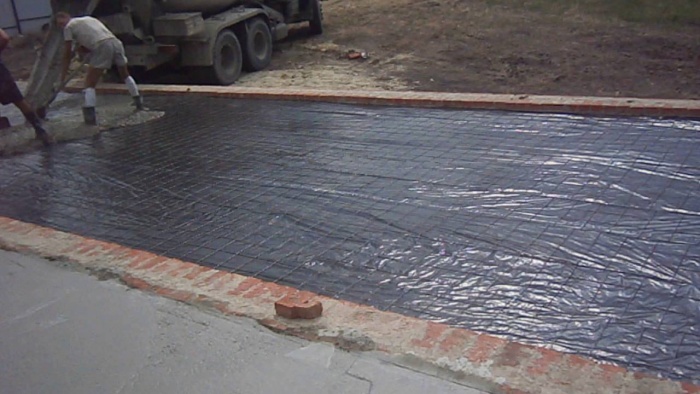
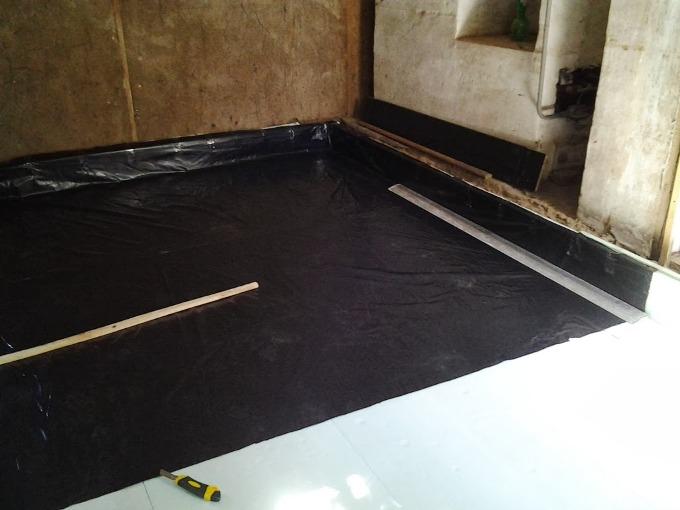
Laying the waterproofing layer. Steam insulation
Works are designed to protect the clandestine structure from moisture. The prefabricated structure ensures the uniformity of the overlaying of materials for fusing or stickers. The procedure for preliminary concreting is relevant in conditions of a close location of groundwater or in the arrangement of basements.
The process of waterproofing is carried out according to the construction algorithm:
- Polyethylene film thickness of 150 microns is overlapped 15-20 cm, and then the joints are glued.
- For a reliable protection against penetration of moisture and condensation, a second layer of hydroprotection is similarly applied.
- Carried out insulation foam or extruded polystyrene foam. They are placed in a layer of 10 cm.
Using foam, protect it from contact with cement mortar of polyethylene film. 
Types of screed
Arrangement of the floor on the ground is carried out in two techniques - dry and bulk. The choice of technology remains at the discretion of the owner of the site.
Execution of dry screed
The technology provides for the formation of layers - a cushion based on rubble, sand foundry, rough screed and waterproofing. Then, using special ready mixes, screed floor covering. Finished compounds are laid like this:
- Establish beacons (bars or profiles), fix them with putty.
- Fall asleep between the beacons of a tiny expanded clay composition. Level the material along the layer of waterproofing.
- Lay the plates, which are fixed with glue-sealant or with self-tapping screws 19 mm long.
Finishing installation works The edges of the film are cut off, and the resulting gaps are sealed with a sealant.
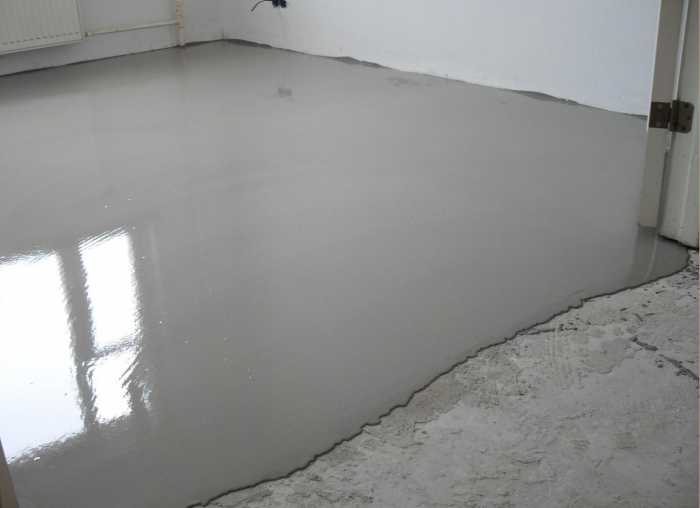
Tight floor screed
The technology of the filling floor creates an ideally smooth surface for subsequent finishing. Coverage has several features: 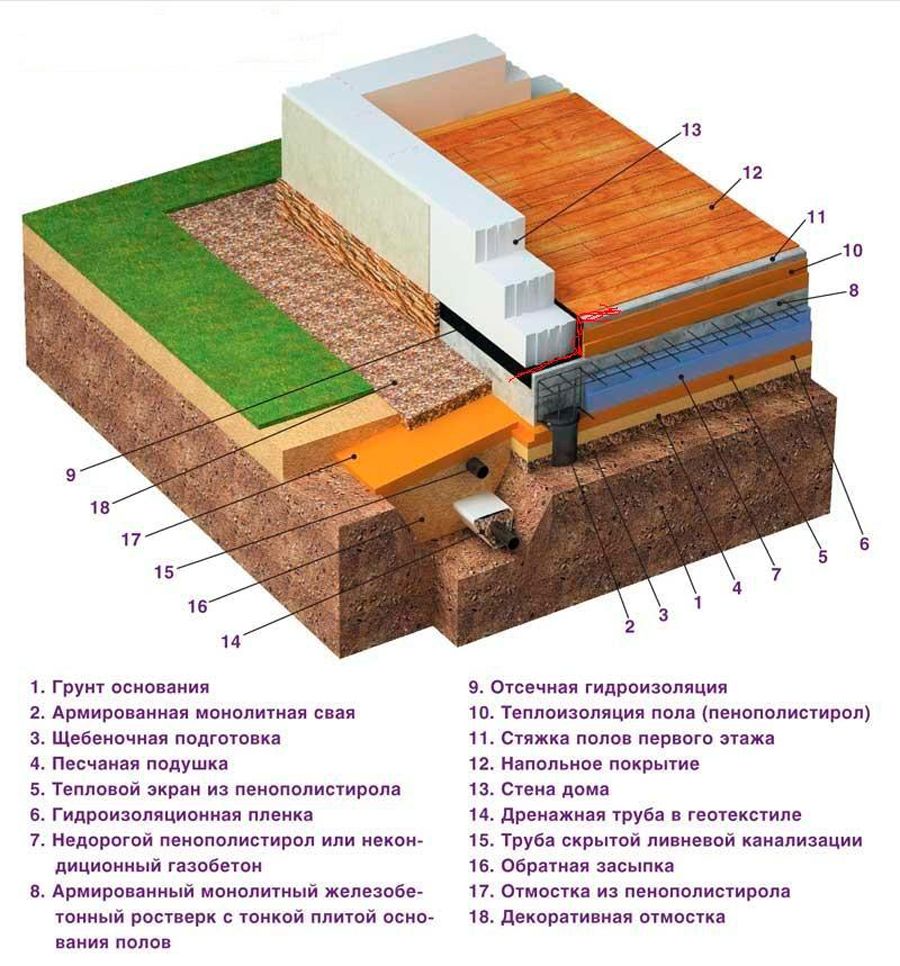
- The waterproofing layer is cleaned of dust and processed liquid glass, diluted with water in 2: 1 proportions. The surface is processed in 2-3 layers, after complete drying of each (1 hour);
- The mixture for pouring is prepared manually on the basis of loose material and water. The composition should be kept for 10 minutes and repeat the kneading.
- The mass is poured onto the floor with a layer of 0.3-1 cm and is spread with a spatula.
- Air bubbles are eliminated - a needle roller is rolled on the surface.
- Formed after drying mixture is eliminated with a putty mesh.
- Finishing is performed after the mass has solidified.
Arrangement of the filling screed compensates for the load of the house, eliminates shrinkage of the walls, isolates noise from the heating equipment.
Construction rules
Carrying out the floors on the ground, try to observe the boundaries of the layers, carry out piling and laying waterproofing along the lighthouses. While conducting communications, place the wires in a metal box, the holes of which must be sealed. Be sure to check the quality of the layers - only so the structure will get strength and reliability. Floor at the level of the soil can be covered with a heater, on top of which lay boards, tiles or laminate.
With technologically correct floor design, careful control of the height of the layers, selection of the strip foundation, the product will last up to 50 years.
In this article, I will debunk one very persistent myth of overlapping on the ground. Very often in the consultation (link), I am asked the question of how best to make an overlap at home, describe the scheme, ask about reinforcement, the thickness of the slab, the class of concrete, and then it turns out that this plate is planned above the plinth and there will be compacted soil beneath it. You know, I have never met a more chic way of burying such a darkness of concrete and reinforcement. What for? Why make an overlap on the ground?
Overlapping is a reinforced concrete slab that covers some space - the basement, the first or second floor, etc. Always under the ceiling there is an exploitable volume. And even then the cost of materials and work reinforced concrete floor unreasonably large. And then again and again I hear about the plans of people to put such a plate on the ground. Of course, they want to keep it on the walls, sometimes even pinch-to make it work like a regular stove. And it will work, because you are ready to invest so much power and money into it. Someone goes even further and makes a non-removable formwork underneath the slab - another chic way to bury the extra money. Someone just makes the preparation of concrete or lays the film so that when concreting the milk of concrete is not absorbed into the ground (if, of course, he knows about it). In general, there are lots of options. And I have only one question in my head: why?
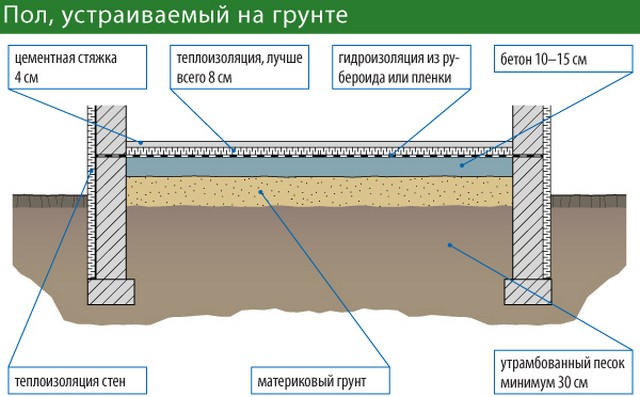
There is an excellent solution for organizing the floor of the ground floor. It is called the floor on the ground. This is not a massive reinforced concrete slab, it's a simple patty, consisting of screeds, waterproofing, insulation and top layers according to the idea (whether it's tile, linoleum or laminate). If desired, you can arrange a warm floor in this patty. At desire it is possible to refuse in general from couplers and to arrange classical wooden floors on logs. But all this will not be massive and solid reinforced concrete structure, but only floors on the ground - on a carefully compacted soil. They are made after the erection of the building and in no case are built on the walls. Floors are an architectural element that does not have to eat a lot of your money. Couple thin screeds it will cope with the load that you can load your floors. You will still compact the soil: at least under the stove, even under the floors. So why pay more (sorry for the phrase?)? Strength of your home stove does not give - I'm telling you as a designer - but I will eat a lot of energy and money.
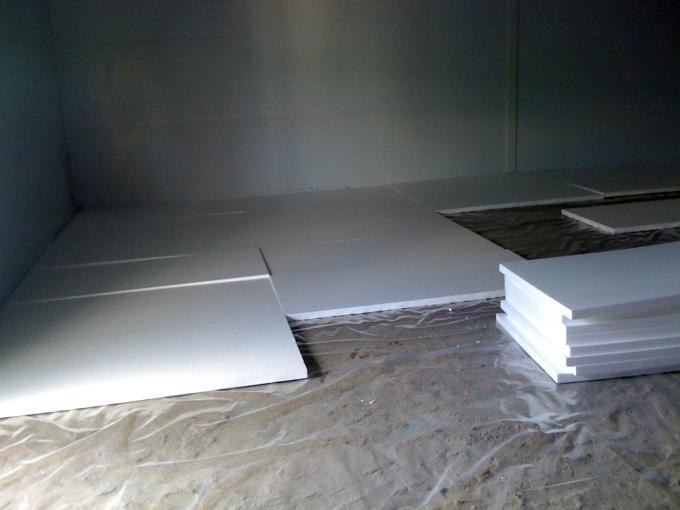
Here is an example of a floor cake arrangement on the ground from a sex benefit by specialized firms producing flooring materials. Not the fact that their materials will be the most profitable for the price, but the essence of this "patty" can be withdrawn - it will not change from the manufacturer.
In this pie there is already everything you need: screeds for strength, waterproofing, insulation ... In a reinforced concrete slab, apart from the strength characteristics, there is nothing. So it will be necessary to lay materials in addition to the slab in addition to the slab, which ensure comfortable operation of the dwelling.
I thought for a long time, how did people come to such a strange decision - to make an overlap instead of sex? The only answer that came to me is the kind-hearted advice of unscrupulous builders, the more work, the more money. Maybe, of course, someone in the comments will suggest another option. I will wait.
In general, think for yourself what to choose: a slab on the ground or floors on the ground.
Comments
0 Irina 03/27/2015 19:08
Alex, I asked
Quote:
On the plan, I see only the level of the walls (and by the way, the plates on the right are supported by walls with a height difference of 100mm ??? they will lie obliquely?). What level of garage floor and floor level is planned in the house? I understand that leaving the garage where the mark is -50mm? And now the top of the wall is the same as the ground level, right?the floor level, the level of the top of the socle walls, the ground levels - if they are different
I just want to figure out why you needed to spend money overlapping the ground. While the reason I did not find ... Answer my clarifying questions, please.
Tape foundation is quite common, as it can be created without the use of heavy construction equipment. But when creating such a foundation, one must be prepared for certain troubles. If it does not create a depletion, it will lead to the appearance of a condensate in the underground space. To avoid such problems, it is necessary to make a closed cellar with ventilation. But a simpler option is to create a floor on the ground on a ribbon foundation.
Features of the floor of the first floor of the house on the ribbon foundation
It is worth remembering that the ground under the floor does not freeze and is saturated with moisture. That's why in the socle of the house ventilation holes are made, which remain open even in winter. When creating a ventilated underground space, you can use any heat-insulating materials.
If the basement of the building is low, there is not enough space to create ventilation. It is in such cases that the floor is created on the ground. During the creation of such a floor, it is worth remembering that the repair of communications will require a complete removal of the screed in the place where they are installed. To avoid such problems, it is enough to make duplicate sleeves of all networks under the floor. In this case, with clogging, you can connect to duplicate networks without destroying the screed under the floor.

Features of floors on the ground
Before you begin to create floors on the ground, it is worth to learn about what requirements are imposed on such structures:
- To protect concrete structure from the effects of moisture, it is necessary around the house to create a drainage system. It is also important to create a storm sewage system so that all water immediately leaves the building. If this is not done, the foundation and floor of the first floor will be constantly exposed to moisture, which will lead to its destruction. It is worth remembering. That the drainage system should be designed for the maximum amount of water that can accumulate around the structure.
- To backfill the excavation under the house you need to use rubble and sand. If you apply soil, the house will start to sag, which will lead to deformation of the structure. It is important to compact the rubble after filling the layer with 20 cm. If this is not done, the material can survive after the construction of the concrete structure.
- Before the construction of the floor of the first floor, one should not create a layer of geotextile, as this will reduce the effectiveness of soil compaction.
![]()
What does the pie of the floor consist of on the ground?
To properly make the described type of sex, you need to create all its layers:
- The lower layer consists of sand and gravel. These materials are carefully punched before laying the subsequent floor elements. This is necessary to ensure that the building does not shrink after erection.
- After creating a layer of sand and gravel, a concrete slab is formed. Its thickness should be from 4 to 7 cm. The plate is made of low strength concrete.
- After that, waterproofing material is laid, which is necessary to protect the floor from moisture coming from the ground. For waterproofing it is worth using different roll materials.
- Thermal insulation layer should be made of durable material. Its height depends on climatic conditions and material features. The creation of a heat-insulating layer helps prevent heat loss and save on heating at home.
- After that, reinforced concrete screed is formed. It is the basis for laying flooring materials. On the screed can be laid linoleum, tile, board, cork and other materials. It is worth remembering that before laying the parquet it is necessary to create a base of multilayer plywood.
Important! Since the depth of excavation under the floor is greater than the mark on which the bottom of the sand cushion should lie, it is necessary to fill the groove with soil, which is carefully compacted after each layer of 20 cm. The height of the cushion should be at least 60 cm.
Creating a floating bulk screed
Creating a floor on the ground in any case implies the arrangement of a base of low strength concrete. It can create a reinforced concrete slab, but often the owners of houses install adjustable lags on which the finishing material for the floor is fixed. The floating bulk screed is created as follows:
- First, a sand cushion is created. During the filling, it is necessary to ram each layer 20 cm thick. If this is not done, the material will begin to settle after the building is built.
- After this, a rough screed is created, which is not reinforced with metal rods. In some cases, a film waterproofing is laid under the screed. But this is also not necessary. The concrete screed can have a height of 50-70 mm. To create it, M100 concrete is usually used.
- At the next stage the waterproofing membrane is laid. Ruberoid or film is often used. The material should be laid in 2 layers to reliably protect the floor from moisture penetration from the ground. The material must be wrapped to a height of 15-20 cm.
- Then the heat-insulating material is fixed. For floor insulation, it is worth using extruded polystyrene foam. It is much more effective than other heaters, which are presented in construction shops. This material is resistant to moisture and can be used for a long time.
- At the last stage, a final tie with reinforcement is created. To do this, a grid of wire is created, the size of the cells is 50x50 mm. For casting, concrete M150 with aggregate made of crushed stone is used. It is important to take into account that during the creation of the solution, it is not necessary to use clay.
Important! To reduce heat loss, you can make the floor heated. To do this, during the creation of the final screed there is installation of pipes with a coolant into the concrete.
Installation of wooden logs
The installation of adjustable lag is the most budgetary option, which is chosen by the owners of houses on the ribbon foundation. Overlapping with lags is created as follows:
- At the first stage, a sand pillow is created. It is important to make a rammer every 20 cm, because if you do not do this, the structure after construction can settle.
- After that, waterproofing material is laid. To ensure that the floor is reliably protected from moisture, it is necessary to install in 2 layers.
- At the next stage, the concrete screed is poured, the height of which should be about 60 cm.
- The next stage is the installation of supports for adjustable lag. The upper part of all supports is cut in such a way that the installed lags are at the same height.
- The space that remains between the lags, it is necessary to lay thermal insulation material. For insulation, extruded polystyrene foam can be purchased, since it is sufficiently strong and durable. Also often used basalt wool
- The next stage is the creation of a rough floor, which will subsequently be laid flooring.
- After selecting a certain material, it is fixed to plywood or boards.

The described work on creating a floor in a house on a concrete tape can be done with your own hands without the involvement of professional builders.
Dry screed on the ground
The floor in the house on the ribbon foundation can be created by the method of dry screed. In this case, the work is carried out in several stages:
- First, a sand and gravel pillow and a rough screed are created, as in the previous case. All other work when choosing this option is conducted using a different technology.
- After this, the installation takes place waterproofing material. To isolate the floor from moisture emanating from the ground, it is worth using polyethylene film.
- At the next stage, beacons are installed. It is best to use plaster profiles. During installation, it is important to ensure that all items are horizontally positioned.
- Then it is necessary to fall asleep between the beacons of claydite crumbs. It is leveled by the lighthouse rule and rammed.
- After this, the piling of gypsum fiber boards takes place. Joints of all sheets are glued and fastened with screws. It is worth remembering that the joints of different layers should not coincide.
Features of the work
During the execution of the described work, several subtleties should be considered:
- Before creating a foundation and a floor on the ground, it is necessary to completely remove the fertile layer, since it is not suitable for ramming. It is important to remove all roots of plants that are located under the house.
- As a waterproofing, it is best to use different modifications of PVC or polycarbonate. It is worth remembering that the material should be stacked in 2 layers. In this case, he must not only stop moisture, but also protect from penetration of steam.
- When laying the waterproofing material, it is necessary to bring it to the walls of the tape base of the house by about 20 cm. After the floor has been created, the surplus of the waterproofing material must be cut off.
- The thickness of the heat insulator should not exceed the height of the strip foundation.
- During the filling of the final screed at the edge of the walls, it is necessary to lay a damper belt. It is necessary to compensate for screed extensions. It also prevents cracking.
During the creation of a floor on a ribbon foundation, the thickness of the soil must be selected taking into account the specific climate in the region.
A fairly common practice in private construction is the floor on the ground on a strip foundation. This option was especially popular due to its numerous advantages, including economy and simplicity in the construction, as it does not require expensive materials and heavy equipment for its arrangement.
Sex on soil - quality and technology features
What is sex on the soil? This is a construction that does not have a distance between the ground and the floor - it is located directly above the ground, excluding the possibility of air strata.
Most often, the floor is arranged according to the soil in houses built on a tape basis (it is poured between the walls of the base), so it is not bearing. The weight of the walls and roof of the building lies on the base, and the floor takes the load from the finish, interior items, curtain walls and people.
The structure of this type of floor is multilayered. Each of the seven levels plays a role, affecting the quality of the finished structure. The floor on the ground consists of:
- Soles
- Bedding layer
- Waterproofing
- Heater
- The main carrier layer
- Leveling screeds
- Finishing coating
Having understood the purpose of each layer, it will not be difficult to find materials for the arrangement of the floor. And thanks to their availability, you can save a lot.
Advantages and disadvantages
The installation of floors on the ground with a strip foundation has both positive and negative moments.
Among the advantages of this type of floor can be noted:
- The fact that it is suitable for pouring on most types of soils;
- Resistance to winter whipping;
- A small consumption of concrete mix, when compared with a plate basis;
- Easy to install;
- Ability to self-bookmark without hiring professionals;
- No need for additional insulation of utilities;
- The fact that he is immediately ready to lay any floor coverings;
- No need to ventilate the underground.
In the presence of a large number of obvious merits, sex on the soil is inherent and disadvantages:
- By erecting an impressive basement, the deepening of the tape base should be covered with a considerable amount of earth, which is fraught with unnecessary costs;
- If the territory for building has a high level of groundwater, laying the floor on the ground does not make sense.
Varieties of sex on the ground
The device of a floor on the ribbon foundation does not require large physical and material investments, because all construction work can be done independently without the help of specialists. It is worth knowing that there are two options for flooring on the soil, performed by:
- Concreting;
- Wooden beams.
Both options have their own characteristics.
The method of concreting is known as a suspended floor on the soil - the soil in this case is a formwork for a reinforced concrete slabs. The finished construction is very strong and reliable.
The method using the log from a tree differs from the previous one in that it provides for the airing achieved by raising the floor above the ground.
To determine the choice, it is worth considering the technique of mounting each type of floor.
Mounting using concrete pouring
Filling the floor on the soil with a concrete mixture is carried out in several steps:
- The upper level of the installation is set - the doorway serves as a landmark;
- A filter cushion is made. For this, gravel is poured and tamped, a similar procedure is carried out with river sand;
- Isolation from steam is carried out. On a sandy mound, entering the walls, a pair of layers of plastic film is stacked. The thickness of the material should be 3.3 cm. Instead of a film, a membrane is often used;
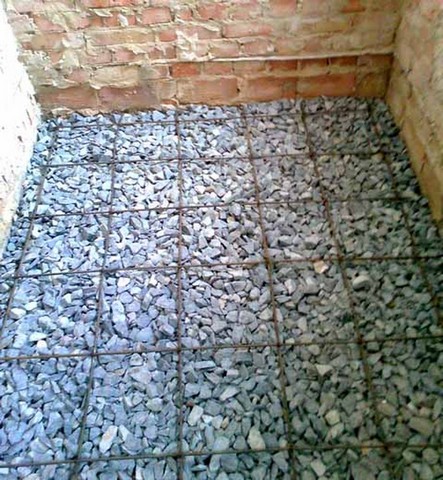
- To add strength to the future floor mounted reinforcing mesh;
- Beacons are installed with the help of screws and dowels;
- A concrete solution is prepared: cement, sand and water are mixed. The ratio of cement to sand should be 1: 3, respectively. To simplify the work process, you can order a ready mix.
- The solution is filled with strips;
- The concrete is leveled by the beacons by means of a rule;
- Heat insulation is produced. As insulation, the most commonly used foam plastic, polystyrene foam, expanded clay or mineral wool. The choice depends on the preferences of the owner of the house and its financial capabilities;
- The finishing layer is mounted.
One of the main advantages of a concrete screed is its evenness, due to which it is possible to mount the most "capricious" final coatings, like the 3D floor.
Mounting with wooden beams
Installation of the floor on the ground with the help of beams made of wood is done in several steps:
- The soil is filled with gravel - the thickness of the layer should be 5 cm. The crushed stone is rammed, then covered with bitumen;
- With the help of the building level, beacons are installed, which will serve as the subsequent mounting of brick supports;
- A screed is arranged - it will become the basis for bedside tables;
- On the floor area, brick tables of the same height are placed (the maximum height of each should not be more than 20 cm) at a distance of 0.8 m from each other;
- The ends of the supports are wrapped with ruberoid (the opening on the brick block is not more than 4 cm);
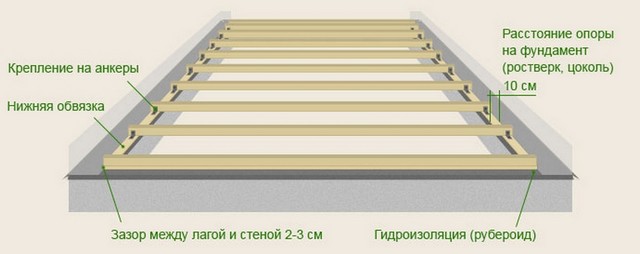
- The beams are laid on the nightstands (the distance between the lags and walls should be 2 cm) and fastened to the dowels and screws;
- The sheet piles are densely packed, nails are nailed to the beams;
- The smoothness of the resulting structure is verified by means of a level, all defects are smoothed by the plane;
- Hats of nails are puttied;
- Surface primed;
- If desired, thermal insulation is made;
- The final layer is mounted (you can simply paint the surface or cover the floor with varnish).
The main feature of the floor on the ground is its multilayeredness, and each level has a special purpose. Thanks to a wide range of various materials in the modern construction market, any master will be able to qualitatively equip each layer. Concrete or wooden floor on the soil - choice for the owner of the future house. Whichever option is bet, the main thing is to follow the recommendations for installation and carefully follow the instructions. If the work is done correctly, the flooring will be durable and durable.
You can understand people who want to reduce the cost of construction and actually on the device floors on the ground. Here is one example. There is a foundation. In order to save money, backfilling is not always used. Instead, you can just put the top panel on top. Most often these are round-holed panels. But there are several nuances when using them.
The first thing you should pay attention to is that the round-holed panel is not designed to work in such conditions. To date, all such panels are prestressed. It is understood that the panel is fixed to the base of the foundation by anchors. And this is her weak point. The protective layer of these fasteners is thin. And first of all, it is the steel anchors on the edges of the plate that are struck. Then the reinforcement begins to collapse. And followed by concrete.
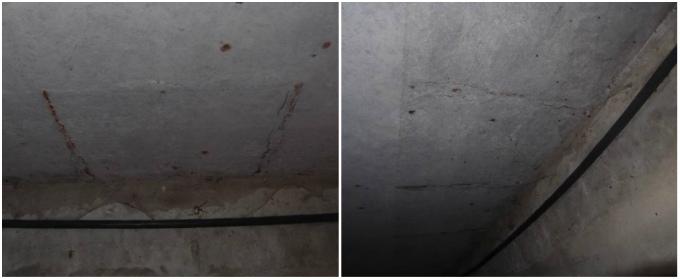
This process occurs because there is free space between the ground and the slab. Moisture from the ground evaporates and condenses on the concrete, as its temperature is low enough.
At the moment, people rarely pay enough attention to protection from freezing. As a result, a large amount of frozen condensate forms at the junction between the slab and the foundation. It is there that the protective layer of reinforcement anchors is the least.
This can be avoided quite simply. To do this, you need to punch through ventilation holes in the supports, on which the plate is laid. They work due to the fact that the wind blows out excess moisture from under the plate. As a matter of fact it is an eternal draft created by own hands.
But here everything is not so simple. It is necessary to take into account the height of the socle. In winter, snow drifts can block outlets. Therefore, the distance from the ground to the holes must be at least 50 cm. Depending on the climatic conditions, this value can vary.
Unfortunately, not all homes meet these conditions. The panel is located much closer to the ground and as a result to organize similar outlets becomes very problematic. In this situation, in the absence of a qualitatively constructed basement, it is necessary to make floors on the ground.

But their fulfillment by forces is far from every builder. And the question is not in the exceptional complexity of the work. Rather, the problem lies in not understanding the importance of meeting certain conditions. For example, elements such as crushed stone and concrete preparation are obligatory for execution, but the reasons for this can be called far from every professional. Therefore, it is so important to understand the reasons why this or that layer is being made.
So, the first thing that is being fulfilled is the foundation. Then it is waterproofed and sprinkled. The next important step is backfilling. Of course, this will require additional financial costs. But without this, it is impossible to make floors on the ground. Naturally, the situation is implied that there is simply not enough space for the outlets.
When doing backfilling it is necessary to take into account that it should be done step by step, in several layers. The layers should not exceed 20-30 cm in thickness. The reason is very simple. The usual ramming has a mass of about 150 kg. Therefore, it can not press more than 30 cm of soil.
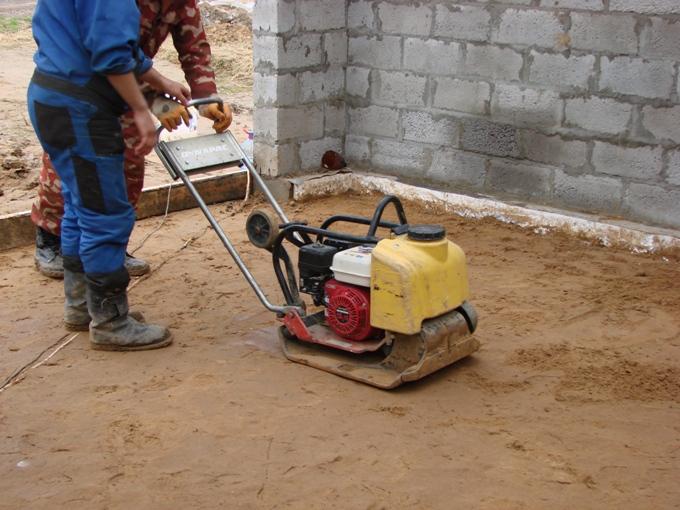
To make ramming happen more efficiently, crushed stone is used. But do not even align it with a shovel. The detritus should also be compacted. The fraction of crushed stone should be of the order of 40-60 mm. When it is rammed, the force will be redirected to the ground. Since it will be concentrated by small pebbles, then the effect will penetrate deeper. This is the difference between crushed stone and soil compacting.

The next stage is concrete preparation. In this case, it is used as a base for gluing the vapor barrier. Do not be confused with waterproofing. It protects only from water. And in this case, you need to protect yourself, including from the steam. Since the soil has natural moisture, and the temperature inside the building is positive, the moisture will begin to evaporate. Without vapor barrier moisture will get into the floor construction and condense there.

Steam insulation on bitumen base or mastic can be laid exclusively on a rigid base. Since the workers have not yet learned how to fly, they will have to walk on this basis. If it is soft, under the vapor barrier, there may be a void that has arisen under the weight of a person. Or there just rock roll. As a result, the vapor barrier has a high chance of simply tearing. Accordingly, it can not perform its functions. Therefore, for the compacted soil, concrete preparation or screed is performed. Preparation is done using low-strength solutions, in high-strength is simply not necessary, enough concrete grade B7.5.
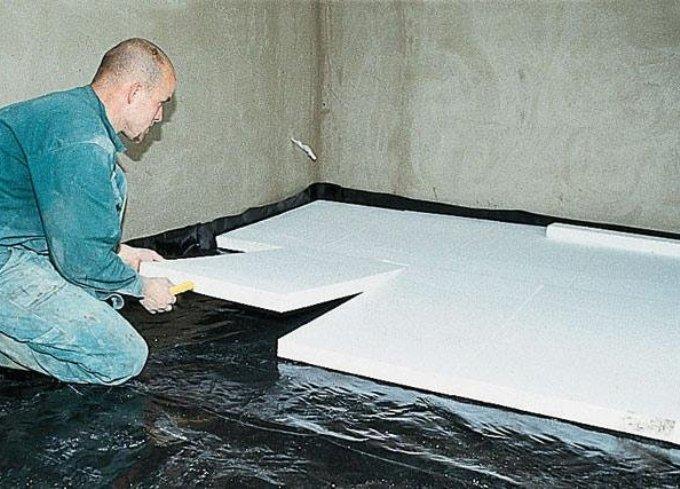
Next - laying insulation. For this you can take advantage of different materials, but best of all - extruded polystyrene. It has a low water saturation coefficient and is sufficiently durable. In this case, it has a high crushing strength.
After it is laid on the waterproofing both horizontally and vertically to protect it from the cold coming from the walls, a screed is made. It is also called floating, since it does not have a rigid coupling with the base. It must be reinforced with a welded mesh. If the floor is located in the living room, then enough cells 100x100 and a diameter of 3 mm and a thickness of the screed 5-6 cm. If it is a garage, then take a grid with a cell 50x50 mm and wire 4 mm. The height of the screed is not less than 10 cm. At the same time, it must be made of concrete with the use of crushed stone with a fraction of 10-20 mm.
Further on this screed is done the finish coat. And absolutely any. It can be a wood, since a vapor barrier is made, or a ceramic coating. All this complex of works is expensive, but reliable. Of course, it can be cheaper. But if you use expensive finishing materials or floor heating, water or electric, then it is better not to use the economy options.
How to save on the floors on the ground?
Mention of the possibilities to save on the floor on the ground still worth it. Instead of a vapor barrier, you can use a conventional polyethylene film, always in two layers. It is sold as a sleeve. To lay it it is necessary with an overlap of 15-20 sm on the condensed basis. But do not put the film on rubble. This is a fairly gentle material. Therefore, under the weight of the builder, it can tear. Accordingly, the moisture will fall into the floor covering. As a result, a fungus and unpleasant odors.
But if the thickness of the backfill does not exceed 20 cm, then you can compact the soil with clay, even slightly moistened. And already on this clay base you can put polyethylene, necessarily with an overlap. Also, it's safe to say that polyethylene film does not give a full guarantee that moisture does not get into the body of the floor. But if the decision was still made, then the whole subsequent work package remains the same. Similarly, the insulator is stacked. Then the screed is reinforced with steel mesh.
Of course, such a design will also perform its functions. But professionals advise to use it in less important rooms. It can be guest houses, sheds, garage. That is, those rooms in which expensive coatings will not be used. Just to not take chances.
These were the basic principles of constructing a floor on the ground.
How not to do?
Thanks to the Internet, a large amount of incorrect information, in particular advice and recommendations concerning the device of sex, is now freely available. One of these recommendations is the use of geotextiles. This is the advice of one of the regular visitors of construction forums. He proposed to lay geotextiles on the ground. Then it is planned to make a backfill with rubble or expanded clay. But this is extremely inexpedient. If you recall the above, then if you try to compact the soil, the geotextile simply will not let it. Whatever the force of the ramming, the geotextile will hold the rubble and will not condense the soil. This material has a sufficiently high tensile strength, so the ramming is useless.
Therefore, the soil must be compacted before laying the geotextile. Is it logical? No. In this case, the need for geotextiles completely disappears. It is neither vapor barrier, nor waterproofing. To make it a little clearer, geotextile is used in completely different conditions. For example, if you want to make a drain, filter the sand or gravel. Accordingly, such a design is completely ineffective, irrational and unacceptable.
In addition, the recommendation referred to the use of expanded clay. This point also requires clarification. Expanded clay is a specific material. He is very quickly gaining moisture. Accordingly, as a heater for this design, it is completely useless. The reason is very simple. In just a week, it will be completely saturated with moisture coming from the soil and stop performing the functions assigned to it. That is, it will be wasted money.
After that it was recommended to make a screed and finish coat. Without water vapor insulation and insulation. Again, this will be wasted finance. That is why it is necessary to be extremely cautious about the information read on the Internet, it is necessary to double-check it and not to go against such "specialists".
Also on the forums the question is often asked: "Why is it not recommended to use claydite-concrete for the floors on the ground? He's light and strong. " This question should be answered more fully. Yes, it has a low weight and is quite strong material. But it is a terrible heat insulator. To date, there are many much more suitable materials. This is both extruded polystyrene foam and foamed glass. As for glass, it costs almost 2 times more expensive than polystyrene, but it is an ideal protection against rodents. Even moles can not break it. So this is an additional guarantee of tranquility for the inhabitants of the house.
And if you go back to claydite concrete, as a material, you should take into account that he is very cranky. When preparing keramzitobetonnaya mixture, the clay itself absorbs a lot of moisture. And he takes it from concrete. And only in a day, when the cement just grabbed, the following situation occurs. Porous expanded clay absorbs moisture from the concrete. A day passed by. As a result, a cement slurry, which is a kind of glue, envelops the expanded clay. Accordingly, all moisture is clogged inside. Thus, claydite concrete will not dry for a month, unlike ordinary heavy concrete with granite filler. This process will last for 2-3 months. And if such concrete will be used in a basement with weak ventilation, then about any subsequent finish of the floor it will be impossible even to stutter for a long time.
Otherwise, moisture, which will continue to evaporate from the expanded clay in the absence of vapor barrier, will spoil any finish coating. It just undermines the wooden floor, it just swells and rises. If ceramic tiles were used, a fungus would appear on its seams, and a persistent unpleasant odor would appear in the room.
Thus, if the decision to apply claydite concrete was still taken, a much longer technological break would be required to dry it. It is also necessary to measure the moisture of the base before laying the finish of the floor.
As mentioned earlier, there are two principal approaches to creating floors on the ground. This is an economical option and budget. In the first case, a polyethylene film is used, which is laid on the ground. At the top is already laying insulation, screeds and finish materials. This option is preferable in rooms where cheap finish is planned: cheap ceramic tiles or inexpensive floors.
But if it is planned to make heated floors or to lay an expensive finish coat, then saving is no longer recommended. The reason is that the likelihood that the film will break through the grid during the execution of the work or be pushed with a stone remains large enough. Therefore, the subsequent laying of expensive floors should not be saved at the preparatory stages.
But the forums regularly ask questions about the use of the film. And they demand an answer.
Can I use black polyethylene film in one layer not for vapor barrier, but in order not to pour concrete on the ground? It is inexpensive and it seems that it will be better.
But do not forget that the best enemy is good. As has been stated many times, the film does not give 100% tightness. Professional builders when dismantling such structures regularly observe a layer of water between the film and concrete. Moisture is always in the ground, and concrete or mortar is always inertial materials. Therefore it is at the boundary of the soil / concrete that the dew point will form. Accordingly, between the film and the concrete, moist air will condense. This is a natural physical process.
The following situation is obtained. There is concrete. Under it was laid a film. Just like that - it's inexpensive. But in concrete there is always a surplus of moisture, because in order to grab cement, only 5-10% of water from its mass suffices. Naturally, there is much more water in the solution and it needs to go somewhere. Question: where? Upstairs, she can not leave, because there will be a vapor barrier, and in the ground will not be able to seep because of the paved polyethylene. Accordingly, the water chemically bound in the concrete structure will not go anywhere, and the excess moisture condenses in the layers between the concrete and the polyethylene film.
A moist environment at a positive temperature is an ideal medium for the development of microorganisms. And the concrete will start to become covered with a black coating. This does not always happen. But often when dismantling such screeds, the concrete is completely painted in black and blue shades. Of course, there is no particular danger to the health of the residents. On the top there is a vapor barrier and a heater, for example the same extruded polystyrene, which does not let any fungus up. But concrete will somehow work in difficult conditions and the period of its operation will be much less.
If the film under the concrete is damaged somewhere or there are loose joints, the moisture that will rise from the ground will only strengthen the effect. And the film will retain moisture and prevent it from leaving. Accordingly, moisture gradually accumulates and leads to various unpleasant moments.
And what if there is no such film? If the groundwater is sufficiently deep, then the moisture content of the soil itself will be about 15%. The reason is capillary moisture. It rises from the groundwater table and raises the humidity. It all depends on the type of soil. If it is sandy soils, then the height of the capillary moisture rise is no more than 30 cm. If the soils are clay, the height will already be one meter and one and a half. Accordingly, the humidity in the area of the boundary between the soil and screed can be much higher.
On the other hand, the moisture content of the solution is 100% at the time of pouring. Even if it is 90%. And even with high humidity of the soil, excess moisture will still go into it. Proceeding from the physical laws of diffusion, it turns out that after a while the humidity of the concrete and soil will eventually equalize. To the same 15%. Naturally, in different situations this value can vary. But in any case, the less the moisture of the concrete screed, the better.
And if you lay the film, this moisture content of 90% will persist throughout the life of the screed. Of course, to pay money so that the concrete bought for its own savings worked in the worst conditions - an inalienable right of the consumer. But still it is not worth it. This is simply not necessary.
Application of vapor barrier in the floors on the ground
Next questions:
- Do I need to round the concrete screed when I go to the wall, so as not to tear the water vapor barrier?
- How much does he need to dry to put the surfaced water vapor barrier on top?
The fact is that the vapor barrier, in contrast to the waterproofing, does not necessarily require gluing to the base. If there is a screed, which is closely adjacent to the wall and it is necessary to make a vapor barrier, it is most important to glue all joints. But we must take into account that all the adhesions of the vapor barrier strips should be very reliable.
As a result, when the membrane warms up, it becomes very elastic, wrapped around the wall and everything seems to go fine. But do not forget that after a short while it will cool down. And then the vapor barrier layer will necessarily decrease in volume and a kind of stretch will occur.
If, when laying the screed, all the angles between the wall and the floor were not rounded, then there is a void. In this there is nothing to worry about. But there is a serious danger that with the subsequent laying of the grid it is very easy and at ease to tear the vapor barrier. To do this, it will be enough to hit the edge of the net in a corner, hit with a boot, press in the rubble - whatever. And to protect yourself from such accidents is impossible. This is the same construction. That's why you need a device for this rounding. It will serve to minimize the human factor and the likelihood of such unforeseen situations.
If you make a round, then such voids are not formed and the vapor barrier is protected. And some random impact will not do anything to her. The vapor barrier will not break, because under it there is a hard base.
Therefore, when the base was formed and the vapor barrier is soldered to the walls, it simply does not make sense to glue it to the screed. It is enough to dissolve the joints. That is, ensure the integrity of the layer. And then it just pushes it from above.
Of course, if the screed is completely dry, then the vapor barrier can also be welded. Pre-concrete is primed with a bituminous primer, and then a layer of vapor barrier is welded. Labor intensity will be an order of magnitude higher, but it will be soldered to the base. There will be an occasion to be proud of yourself and sleep peacefully at night.
But in general, as soon as the concrete screed will withstand the weight of a person, it is possible to start laying the vapor barrier. The main thing is to solder it to the walls and it's necessary to dissolve all the joints. A canvas can simply lie on the concrete.
One of the frequently asked questions: "To what height should the floor waterproofing be made on the ground?".
As the isolation is usually used euroruberoid. It is heated on one side with a burner, so that a kind of fusible waterproofing is obtained. It should also be laid not only back to the wall, but also with overlapping on the wall. In this case, you can protect yourself against various accidents, such as sucking moisture on the wall. As a result, the entire cake of the floor is protected from possible penetration of moisture.
Accordingly, after laying the waterproofing, it is possible to lay an extruded foam polystyrene with a thickness of 30-50 mm as a heater. Some people think that this is not enough, that much more is needed, but in fact it is not.
If the basement is insulated, then there simply can not be freezing. And the temperature of the soil is usually about + 5-10 Celsius. Therefore, in the heat engineering calculation, assuming even a floor with heating, a temperature of 20-25 degrees, the difference is not more than 15 degrees. At the same time, the wall works at swings of up to 50 degrees. Therefore 30-50 mm. Polystyrene will be enough for protection.
Returning to laying the floor, after the waterproofing and laying insulation is screed. It must necessarily be reinforced. The fact is that when laying concrete on a non-rigid base, for example a heater, expanded polystyrene, mineral wool or sand it is desirable to reinforce it. This will help to compensate for all possible nuances on the unevenness.
It is up to the top of the coupler and it is necessary to conduct a vapor barrier. Waterproofing is carried out a few centimeters higher. It is laid on a layer of insulation to protect it from damp concrete. It is necessary to take into account that the foam PSB is afraid of alkaline medium. And cement is just an alkaline medium. Accordingly, on contact, it will collapse. But if you use extruded polystyrene foam, then he absolutely does not need a film. This material is much more reliable in quality and is made using more expensive technology. Therefore, there is nothing to worry about if the film does not fit. Even with subsequent dismantling, after a long time, no signs of corrosion or incompatibility were observed.
Accordingly, this film is completely unnecessary. All the more, the Euroruberoid is covered at this point with a film on both sides, so that its layers do not stick together and it can be stored longer. And after it is laid, this film retains its integrity, so there is no need for additional coating. It is enough to lay the extruded polystyrene foam on a vapor barrier made of Euroruberoid, and this can be stopped.
Moreover, the additional film will necessarily damage the armature or pipes, which will be laid in the screed.
Wall insulation with expanded polystyrene
The layer of thermal insulation is 50 mm of expanded polystyrene simply laid and it is not necessary to fasten or glue it, and categorically. The fact is that when the top is made screed, and about 5 cm, then its weight will be somewhere around 400 kg per square meter. So anything can not happen. Below than the vapor barrier foam polystyrene will not fall. Screed so strongly presses it, that any additional fastenings are simply not necessary.
Stacking insulation on the wall is not always required. Usually enough external insulation socle. But in some cases it is possible to lay foam polystyrene not only on the surface of the floor, but also to the level of the screed. This will prolong the cold air path along the wall. Accordingly, he will have more time to warm up. Its use depends solely on the design and external insulation. If it is not provided for, then there is no need to use expanded polystyrene.
But the damper band is paved at the edges. In this case, even before stacking expanded polystyrene. It will compensate for the deformation of the screed due to the temperature difference. This is especially important when laying warm floors. They warm up to 25 degrees, respectively, the screed will increase in size. The damper belt compensates for these changes, and the expanded polystyrene is not completely. He can shrink, but to regain the former volume will no longer be able to. Foamed polyethylene or a damper tape is able to restore its volume. It is important that no debris gets between it and the concrete.
Therefore, it is necessary to check with the project to check whether it is required additional insulation. If yes - it is better to foam polystyrene after all, if not - then you can do without it.

Is it necessary to weld the reinforced mesh? When laying a concrete screed on a heater, a grid with a cell size of 100x100 and a diameter of 3 mm is used. There is an opinion that it must be welded or bound and then poured with a solution.
But the grid is not a carrier element in full understanding. It is necessary to compensate for deformation in the screed, so that in case of deformation of concrete and cracks, shrinkage of the screed does not resemble drifting ice floes. That is, reinforcement is required to ensure that the screed always lies flat. And in the event that even microcracks go, you can not worry about anything.
Laying pipes in the floors on the ground
What if pipes are laid in the screed? How to fix them? Is it worth it to attach them to the reinforcing mesh or can it be required to strengthen them much better? On the Internet, there is even a council to break through all layers, including hydro-, vapor barrier and fasteners to install in concrete preparation.
A quite natural question arises. And how will these layers perform their functions in this case? The answer is also simple - no way. So do not listen to delusions. Even 15 years ago, when the floors on the ground only became popular, all materials were imported from Germany. Then, as a vapor barrier, the film lay down, and on top a white foam. It had pimples and pipes stacked between them. In the case of a smooth surface, plastic fasteners were used, but they were also fastened so as not to reach the vapor barrier. Apparently, such advice occurs when someone sees the process of laying floors on the ground, but does not understand exactly how it is done. Nobody ever hooks pipes through all layers.
Pipe fastening is required solely for fixing pipes during the filling of the screed. It is necessary that the pipes do not leave the positions laid down by the project. There are no large loads there, so no special effort is required to fasten the pipes.
With regard to heating pipes and water pipes, they must necessarily be put in myrilon. The fact is that these pipes are much larger than the pipes of the warm floor and they change their sizes not only from the temperature difference, but also as a result of the hydraulic hammers. As soon as the faucets open, a microhyrodrop takes place along the pipe, and the pipe increases in size accordingly. Therefore, she should have such an opportunity. Otherwise, the pipe will break in a weak place. This is especially noticeable after a long absence of tenants in the house, and as soon as hot water is turned on, the pipe will expand substantially.
But in this case there is a small space above the pipe to the top of the screed. To ensure that the thin layer of screed does not deteriorate from walking and other loads on the floor, it is worthwhile to lay the plaster grid over the pipes, preferably in two layers. In this case, she will protect the concrete screed from destruction.
Over the pipes of the warm floor it is considered necessary to make a screed 5 cm thick. In fact, there is no consensus on this issue. If we consider the physics of the work of warm floors and the vectors of heat distribution, then the following situation arises. From each pipe heat covers a certain surface of the floor. It is good when the sectors of heating overlap each other. In this situation, the floor warms evenly, it is very pleasant to walk on it.
But if you reduce the thickness of the screed there is a so-called "zebra effect". As a matter of fact, it represents alternating strips of cold and warm floor. The fact is that the pipes do not heat up the whole floor, but exclusively the surface directly above the pipes. As a result, walking on the floor turns into a game "find a warm place." One step is warm, the other cold.
This effect is strongly manifested exclusively at the beginning of the use of sex. When the heating system is working for a long time, this zebra is equalized by the horizontal distribution of heat and the temperature drops are felt much less.
A certain thickness of the screed is needed just in order to minimize the areas of temperature changes. If there is a distance of 15 cm between the pipes, then the screed should be about 4 cm thick. From above, for example, will be located another centimeter ceramic tiles and this will be quite enough. If the pitch of the pipes is greater, then the thickness of the screed should increase. But even if this condition has not been met, the temperature drop will disappear with time.
On the other hand, if you make a too thick concrete screed, then it will require much more energy to warm it up. This will increase the inertness of the floor and the time it warms up. But if the house is permanently resident, then over time, a certain temperature is reached, the sensors are triggered and the system is turned off. So the thickness of the screed on the floor should not exceed 7 cm.
There is an opinion that before pouring a solution it is required to heat the pipes of the warm floor to the maximum temperature. In this case, the pipes will be maximally expanded. And later, when the coupler stiffens, the pipes will not break through the floor, expanding from the temperature. But this is also a tip from the category: "I heard a ringing, but I do not know where he is." It is necessary that the floor is constantly under pressure. But there is no need to warm it up. The fact is that cement dust can get anywhere. Therefore, at first they use a temporary boiler or even wood heating. Accordingly, there can be no question of launching a system of floor heating. It just is not mounted. Work can continue in the boiler room. So about the launch of equipment during the general construction works simply can not be a speech.
That is why it is wrong to run the underfloor heating system before the completion of all construction work. Also do not forget that too high a temperature is not at all useful for a concrete screed. It will not gain maximum strength and will lose moisture too quickly. Therefore, a sauna will be created in the room and it will not lead to anything good.
Pipes of a warm water floor must always be under pressure. They really will increase in size, but thanks to this all the loops will take their places. In addition, in the situation, if someone pierces a hole in the floor, for example, after trying to break a hole in the floor with a puncher to fix anything, this will become immediately clear. The needle of the pressure gauge will immediately fall, signaling a low pressure in the system, and the tenant will be able to quickly determine the place of break through a trickle of water, firing from the pipe and a wet spot on the floor. Here are two reasons for the pipes to be necessarily under working pressure. But there is no sense in specifically pumping the temperature when pouring screed.
Laying of ceramic tiles and porcelain tiles
Now the general fashion has gone to use the most expensive solutions, especially elastic glues, for laying ceramic tile and granite. But this is absolutely pointless. The fact is that these expensive glues expand from temperature in the same way as cheaper ones. All of them are made on the basis of cement, that is, if the cement solution from heating is expanded by 1 mm, then the more expensive glue will also increase in size by 1 mm in the same way.
But here in the cement mortar for screeding it is still worth adding a special additive. It is done in order to fulfill the functions of the deterrent and to obtain at the same costs a higher grade of concrete. Here it is necessary to work proceeding from the rule - the underlying base should have a higher mark than the upper layers. This will prevent stratification, providing a normal bundle. Therefore, the grade of the solution should not be lower than M-50 or M-70. This is required to normally operate the tile and it just did not fly off the floor. This is the only restriction and there are no additional requirements and additional measures to strengthen the cement glue. Even ordinary cement glue will serve without any complaints for at least 10 years.
Alternatives to floors on the ground
If you fulfill all these conditions and carefully approach the creation of the patty of the floor on the ground, it will become a very reliable basis for all future finishing of the room.
Unfortunately, a situation is possible where the soils are unstable. In this case, there can be various unforeseen problems. One of the most striking examples is the subsidence of the floor. One has only to imagine how, after finishing the repair, after a while, the floor abruptly sags, and the plinths remain hanging on the wall. This is unpleasant and scary. Therefore, in some cases it is worth considering alternative solutions.
If we go back to the beginning and recall the whole scheme of device floors on the ground, it turns out that most of all the work is aimed at preparing for putting the water vapor barrier. And already on top of her laid insulation, warm floors, communications and cement screed.
Thus, any subsidence of the floor and any possible problems are often associated with improper preparation or problems with soils. In order to avoid such situations, you can use monolithic plates instead of backfilling and lean concrete. But unlike round-holed panels they do not fit on the foundation of the foundation, but are a part of it. Therefore, problems with the fact that the anchors are rusted, and its integrity is violated, is simply not there. Hydro and vapor insulation and all subsequent work are carried out on top of this plate.
Unlike ground floors, monolithic foundation It requires much less construction costs. Its thickness should be only about 10 cm. Moreover, it is possible to form this coating directly during the laying of the foundation. Thus, instead of a set of split plates, a single disk will be obtained. Its strength and performance in this case will be much higher.
But how to do that? In fact, it's quite simple. During the laying of the foundation at the stage of the formwork creation, it is necessary to make a base for such a slab. The only thing between the ground and the slab is to leave a protective space. Formwork can be made all-in-one and leave it under the floor after completing all the work. She can calmly rot. On the other hand, the role of the formwork can play a primer. It can be anything, the main thing is for the builders to be able to walk on it and do their work. But it does not require special tamping with ramming. The only thing is important to ensure that between the future slab and the ground was a protective layer of at least 20 mm of protective space. The reinforcing mesh is laid on top and everything is concreted.
But this procedure has its drawbacks. First of all, this is a large expense of the board on the formwork. Or it is necessary to fall asleep a sufficiently large volume of soil under the monolith. Of course, you can do without the ground, sacrificing the board. On the other hand, sometimes it is much cheaper to fill the soil. The only question is which option will be more profitable from a financial point of view. By the way, in order to save money, you can use the formwork boards several times, pouring the foundation in stages. After completing one part of the foundation, you can remove the boards and go to the next stage. Thus, the consumption of the board, and, accordingly, the money for its purchase will be fewer times.
When pouring a grate, you can leave the reinforcement about a meter long on top of the plate plane. Subsequently, after drying the solution, it will bend and become a bond and an additional fastening element of the monolithic slab, just in the places where the greatest load is required.
But in this case, as in floors on the ground, it is important to anticipate all communications in advance. It is mandatory to check the pressure of water and sewer pipes. In the event that any mistake is made, the financial costs of repairs can be very, very large.
In general, which gender option to choose - depends on many different factors. So if to the floor of the first floor there is free space and you can hold the vent, then the best option will be the use of circular plates. Otherwise, you should not save and better use the technology of the floors on the ground. If the soils are unstable, other technologies should be used to avoid problems. The choice is always the customer. But the consultation with a specialist will help you make no mistake and perform work on the foundation and floors of the house qualitatively. This is the basis of all future interior decoration.