Increasingly, such a process as it becomes a matter of routine, that is, it is often used to change the size of the rooms used or their design. In carrying out this process without the transfer of partitions can not do. But, as usual, usually partitions are demolished to expand the rooms or combine two into one as shown in the video and photo. Not so rarely began to apply a different kind of redevelopment, where there is a need to install, for example, additional in the bathroom. An example of such redevelopment is the creation of a two-room apartment with three rooms, while changing the design of the room, as seen in the video. That's where it becomes necessary to make walls from plasterboard with your own hands (if that's the goal you want to achieve).
Why it is necessary to make walls from plasterboard, you ask, because it's all about two very important issues related to the production of such a construction process, as the installation of the partition and its design. The first moment is the cheapness of the material. It should be noted that gypsum board is cheaper, for example, brick as the main wall material, almost twice. And this is the case if you count the related materials such as metal profiles and fasteners.
The second moment is a simple installation, which means that the process of building a drywall wall and the possibility of creating the desired design of the premises are cheap. That's why there are so many questions about the independent construction, which so many ordinary people today are asking. All is correct, in our century of global economy, every penny is in the account. So why not take advantage of the moment to save money from the family budget and make walls or ceilings from such inexpensive material, the design of which can be created independently. For a better understanding of the process, you can watch the video.
We build a drywall partition with our own hands

Profile fixing on the ceiling
So, this article will answer the question of how to make a drywall partition in your own apartment without the help of professionals whose design will meet the overall interior. As it should be for drywall, it is necessary to prepare for the process, for which you need to study such a document as an instruction for its use, view the video, purchase all necessary materials, namely:
- plasterboard sheets;
- metal guide profiles;
- self-cutters of two types: for metal and for gypsum board - all screws from the category of piercing;
- plastic dowels with screws and metal anchor wedges, which are used to install profiles to the ceiling, as the video shows.
From the tools you need:
- drill-screwdriver;
- perforator;
- scissors for metal;
- roulette;
- laser level.
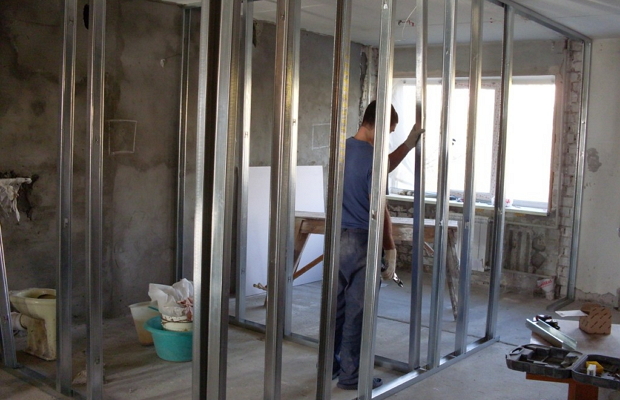
Note immediately that the interior walls of plasterboard, as well as the ceiling can be built in three ways, everything here will depend on the amount of material used and the design chosen for them. So, the ways: simple installation with one-sided laying, two-sided and two-sided double stowage. As practice shows, the most common and popular option is installation by method number two. We will consider it. But let's preview the video.
To do this, you will need to purchase two types of metal profile PN50 and PS50, that is, a guide and a rack, which is necessary to make both walls and ceilings. The first step is to install a level with which a vertical line will be exposed for attaching the rack section. Precisely on the specified line it is necessary to make the installation of the profile to the wall and fix it using plastic dowels and screws.
Attention! Do not drill the profile separately from the wall, apply it to the surface and drill through the places where the installation will be done, installing the dowels, and then fixing it with self-tapping screws, the distance between which should be within twenty to twenty-five centimeters.

Installation of the second rack-mountable profile
In the same way, the rack profile is mounted from the opposite side of the room, as shown in the video, that is, the two profiles will define the wall. Next, you need to do the installation of the guide profile on the ceiling. All the same operations as with the walls, the only difference is the fasteners. In this case, it is best to use metal anchor wedges, the distance between which is the same 20-25 centimeters. If the length of the profiles does not allow one element to close the length of the partition, it is possible to mount two or one and a half profiles, or to cut one of them into a missing size and join the profiles by inserting one into the other.
Next, the guide profiles are installed and attached to the floor, but with one condition - it is necessary to determine the design and size of the doorway, which will have to be saved without installing the profile. Then you need to mark on the floor of the installation site of vertical rack-mount profiles, the distance between which is determined by an indicator of 60 centimeters. After that it is necessary to prepare the necessary number of racks, cutting them exactly according to the size of the floor-ceiling. That's where the scissors for metal cutting will come in handy.
Precisely in the layout, set the vertical profiles so that they enter inside the guide profiles, which are installed on the floor and on the ceiling. Put them vertically and secure with screws that connect the racks and recumbent profiles. Start fixing from the floor, after which you can go to the ceiling, after checking the posts for verticality.
Creating a doorway

Metering and frame installation
Now you need to decorate the doorway, retaining its design, for which you need to make a horizontal upper crossbar. It will be made of the same metal profile. To do this, you need a profile larger in size than the width of the opening. It will have to be prepared, that is, cut from two sides and make of it a construction resembling the letter "P". This construction is inserted into the opening in such a way that the legs of the letter "P" are looking down. The crossbar is fixed at a height equal to the opening.
In order for the side racks to define the doorway to withstand the loads, they are reinforced by internal wooden slats, which are fixed with screws. Everything, the frame is ready for installation of drywall.
Installation of gypsum boards

Installation of plasterboard sheets
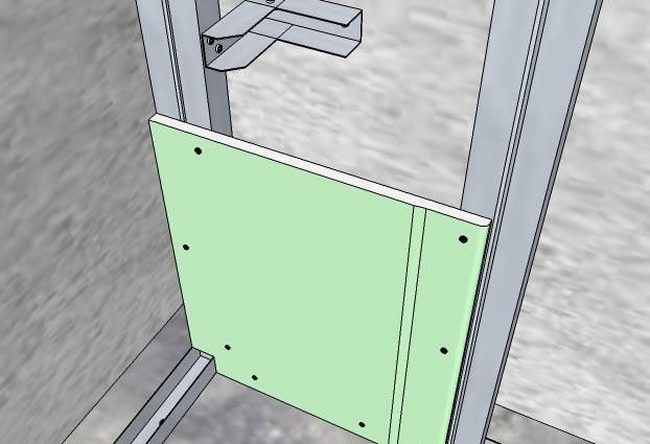
Plasterboard sheets are installed to the frame in such a way that from the floor to the sheet there is a space equal to fifteen millimeters. The gypsum board is fixed to the metal profiles with piercing screws having black color. Mounting should be carried out along the entire perimeter of the sheet and in the middle, where the intermediate profile is set, with a step of 15-25 centimeters. Hats of self-tapping screws are recommended to be poured into the body of the material to a depth of 1-2 millimeters. The distance from the edges of the sheet to the attachment point should not be more than ten millimeters.
In the event that one whole sheet does not cover the wall opening in height, one of the sheets will have to be sacrificed. Sliced pieces are attached in the same order as the one-piece sheet. By the way, gypsum cardboard is cut with a knife, and then breaks.
Attention! Solid and notched gipsokartonnye sheets must be installed on the frame in staggered order. That is, the first vertical row is a one-piece sheet at the bottom, cut at the top, the second row, on the contrary, is cut at the bottom, one-piece at the top.
Thus, the entire surface of the future wall is filled. On the other hand, it is installed exactly in the same order. It remains only to finish the plasterboard partition, so that it corresponds to the basic concept of the interior of the room, emphasizing the chosen design.
Remodeling of bathroom and toilet

The wall is almost ready
The easiest way to redevelop is to connect the bathroom and toilet room to a single bathroom, where provided. But in some cases - this also happens - the bathroom, on the contrary, is divided by a partition. So that's it in this case, and this is the partition in the bathroom and toilet, where the increased humidity - it's normal, you need to use a moisture-resistant plasterboard. To avoid confusion, the producers tint the material with a greenish tinge. So do not go wrong.
For those who still decided to build a partition of plasterboard with their own hands, we offer a video for this article, where you can also pay attention to some points concerning the skills of the master with the material and tools.
Related Posts:
Make the walls of plasterboard with their own hands in a residential apartment or house is not difficult. It is enough to study the technology and the basic nuances of similar installation worksso that they can be carried out without much difficulty.
1 Profiles for the production of a strong framework - the basis of walls from the GKL
The construction of their homes often requires the construction of new internal walls and various partitions. Such a need usually arises with a large-scale redevelopment of houses and apartments and when buying housing without interior decoration and the division of space in a new building. Solve this problem allows the installation of walls from GKL - gipsokartonnyh sheets, on metal profiles.
Installation of drywall with your own hands does not require special construction knowledge, and you have the opportunity to build a truly durable and reliable design.
The installation of walls from the GCR is carried out on a frame made of the already mentioned metal profiles. The latter have in their marking such letters:
- W - used to build a common "skeleton" of the wall surface;
- D - to create a wall plane;
- U - guide profiles;
- C - support profiles (mounted in products marked U, characterized by high bending strength due to the special ribs provided for in their design).

The frame is constructed of metal profiles having the following complete marking:
- CD - the key component of the "skeleton" of the future wall, the standard size of such profiles is 60x27 mm.
- CW - products for racks, which has a frame, they are characterized by dimensions from 50x50 mm to 50x100 mm. Their more strengthened and thick-walled analogue is the UA profile.
- UD - a guide element 28x27 mm (needed for fastening the CD-profile).
- UW - guide rail 50, 75 or 100x40 mm for fixing CW-products.
The frame for walls of a large width, for example, for those in which it is planned to mount a variety of communications, is usually made from profiles UD and CD. And the installation of partitions is most often made from products marked with UW and CW. Pay attention - the installation of a wall of gypsum board requires the use of two guides. They are installed at the required distance on both sides of the wall surface parallel to each other.
2 Building the framework of the future wall - the beginning of the work
Let's see how to make a metal "skeleton" for the wall in the housing of the profiles CW and UW. The frame is made in rooms with walls ready for decoration finish materials and floors with screed.
The first step of construction is the application of a wall marking to the floor surface, which we plan to make. The implementation of this operation requires consideration of such important points:
- In old buildings (and often in new homes), there are almost no rooms with absolutely straight angles between the walls. At different ends of the room, the difference between the angles can reach 2-4 cm. In this connection, when performing the marking of the wall structure, it is necessary to make a binding directly to the two opposite sides of the room, to average the results of calculations and to orient to the averaged parameters.
- When making the marking of the very first line, remember that it serves to equate not the final wall, but only the guiding metal profile. That is, the applied mark will subsequently have to add to the thickness of the gypsum board, as well as the putty and immediately finishing wall layer.

After marking the first line on the floor, transfer it to the walls and the ceiling surface using a laser level. If there is no such, use a regular plumb bob. Then fasten the UW profile guides to the ceiling and floor, fixing them with impact screws and dowels.
To make the frame reliable, the hardware should be installed at the edges of the metal bar and 40-50 cm apart. After that, the guides are mounted on the existing walls. Experts recommend that all profiles be installed using a tape that serves as a sealant. It is placed between the supporting surface and the guides.
Next, we install and fix the pillars (support) of CW products along the edges of the guides. In addition, we mount the support pillars in the places where a window or doorway will be created. It is faster and easier to make a frame, if you fix the profiles in the first place on the lower guide. After that, you can install them in the upper guide. Do not forget that you should leave some space on the sheets of drywall and the finishing layer.
Several useful advice from the pros:
- The guides and racks are best fixed with self-tapping screws.
- The profiles are mounted inside the opening with the front part.
- Racks for window and door openings need to be further strengthened. For this purpose, wood bars are usually used. They are installed inside the profile. Bars are almost never used if plasterboard walls from AU-profiles are being built.
3 The final stage of work on the creation of the metal "skeleton" of the wall
Next, you can proceed with the installation of vertical support CW-products along the entire length of the resulting "skeleton". From the adjacent wall, the very first profile is set at a distance of 55 cm, and between the other supports, a distance of 60 cm is maintained. At this stage it is important to constantly monitor the strictly vertical arrangement of the profiles.
Increased attention should be paid to the edges (horizontal) of the window and top of the doorways. To form them, use the profile UW. It should be longer than the width of the opening by 30 cm. On the side folds of the front section of the UW profiles at a distance of 15 cm from the edges make a mark. The distance between them should correspond to the width of the planned opening.

After this, you should:
- cut under the 45-degree angle of the side profile (up to the base of the metal product);
- bend the edge of the UW profile to obtain a U-shaped preform;
- the construction in the form of the letter P is stretched by the bent edges along the sides of the aperture to the posts, and then it is set to the required height and fixed by screws.
After performing all the operations described above, the oblique "ears" appear on the horizontal section of the workpiece. They also need to be screwed.
As a result of simple actions, we have received with you a reliable frame, which can easily withstand the weight of gypsum boards. The geometric parameters of the latter are standard - 120 for 200, 250 or 300 cm. In the next section we will figure out how to mount the GCR on the frame we made.
4 Installation of gypsum boards - procedure fineness
You are most likely to have to cut the GCR when creating a wall. Doing this is easy if you use a construction standard knife equipped with several blades, which can be changed if necessary. Cutting drywall is as follows:
- place a sheet of material on a solid, maximally flat surface;
- pencil the line on which you want to cut the GCR;
- gently cut the top cover of the product, shift it along the intended line to the edge of the surface;
- very carefully break GCR.
After that, you should return the product to its place (it will stand on the rib and bend), turn it backwards, carefully cut it, place it on the edge of the support surface and finally separate the "extra" part from it.
On the cut end of a gypsum board, a chamfer is usually additionally made, oblique at an angle of about 22.5 °. It must be performed on the edge of the GCR, adjacent to the strip of drywall, located either below or above the sheet. Such a bevel is made by means of a plane, which is intended specifically for working with the GCR. The need for this strip occurs when the ceiling height in the room is greater than the length of the sheet.

From the mountable end-to-end of the support surface of the first sheet of gypsum board, you must always remove the side chamfer. This is done by cutting a strip about 5 cm wide on one side (along the entire length) of the product.
The connection of the metal frame to the GCR is 3.5x35 mm. First fix the edges of the sheet, then install the fasteners along its middle line. The distance between adjacent metal products is selected from 100 to 250 mm. A longer distance is not recommended, since the strength of the structure will be greatly reduced.
From the floor surface, the GCR should be mounted at a distance of 1-1.5 cm. Thus, you will ensure the integrity of the constructed wall during its operation. Another important point. Hat screws when screwed into a sheet should not protrude beyond the level of the wall, they need to be slightly deepened in the plasterboard.

After the installation and fixation of the first sheet is completed, you will need to cut the drywall to cover the distance from the GCR to the ceiling surface. On the strip do not forget to make chamfers (from the sides, which will be connected with plasterboard and directly with the ceiling).
Further on the walls is carried out and quite simple. All subsequent products do not need to be cut off. Mount them in staggered order - the whole GKL after the first row is placed under the ceiling, and from the bottom add the missing strip. One side of our new wall is lined with plasterboard.
Before proceeding to the plating of the other side, it is necessary to lay electrical cables in the wall (if you decide to "hide" the wires). At the desired height in the middle of the metal profile, make 3.5-centimeter holes. In them, you then skip the electrical cables. Be sure to bend the edges of the holes, otherwise their sharp parts can damage the communication. Wires, we note, it is recommended to place in the wall in a corrugated pipe.
The cover of the other side, I think, you will perform without much difficulty. After all, you now clearly know how to mount drywall. Then you will need to fill in all the clearances of the design made. Joints between sheets and internal corners are first glued with a sickle (special net used in finishing works), and then level (we advise you to take the starting compositions).
Finishing putty is used to seal the places where the fastening elements are. It must be applied and before you paste the wall with wallpaper or paint its surface.
This sheet material is currently the most popular for facing internal partitions, and the installation of a wall of plasterboard is the most simple and productive in construction. Therefore, it makes sense to consider what is the cladding of walls with this material in more detail.
The first action preceding the beginning construction works, is the layout of the room. If the decision is made to finish the surfaces to perform the installation of drywall, you should consider some points.
Standard sizes sheets of this material are 1200 - 1300 x 2500 - 4800 mm with a thickness of 6.5 to 24 mm. In this case, almost every size is intended to fulfill its specific task.
To reduce the laboriousness of work, reduce the consumption of fasteners and maximize the effective cutting of the material, these data should be taken into account when planning the room. For example, the ceiling height is considered comfortable at 2.5 meters, it corresponds to the size of the sheet. Often this parameter is assumed to be 2.53, we will indicate the reasons below. Similarly, the width of the premises is desirable multiple of an integer number of sheets. Or a multiple half size, then cutting the material will be optimal.
When determining the dimensions of rooms, one must also take into account the thickness of the inner partitions and partitions, since this factor will also affect the cutting of the material. This means that we are moving to a deeper detail - to determine the dimensions of the crate and the selection of materials for its manufacture. And for each such detail lies the amount of labor and financial costs.

Types of plasterboard
Based on the properties laid down by developers in such building materials, the GCR is divided into the following types:
- ordinary drywall. Consists of a layer of gypsum dough and a coating of cardboard on both sides, used for finishing rooms with humidity within the limits of the norm. Widely used because of ease of use, good workability, low weight and economy;
- GKL with fire-resistant characteristics. Convenient for use in utility rooms such as summer kitchens and other non-residential premises. Can be applied near heating devices, ovens and fireplaces;
- moisture resistant gypsum board, which allows its use in conditions of premises with high humidity - baths, bathrooms, bathrooms and others. Thanks to the use of special additives, it is protected from the effects of fungus and mold. Ideal for finishing country houseswhere humidity is usually increased compared to urban apartments;
- fire is a moisture resistant material, which is almost universal.

By appointment, gypsum boards are divided into the following categories:
- arched - with a thickness of up to 6.5 mm, allowing large deformations in several planes simultaneously, such properties also give it reinforcing fiber additives;
- ceiling - thickness up to 9.5 mm, lightweight design;
- wall - for finishing walls and installing partitions, thickness 12.5 mm.
At this thickness, which is the most popular, the weight of a standard sheet of 1.2 x 2.5 meters is 30 kg.
Tool for working with plasterboard
The material does not have high mechanical properties and is easily processed with a simple tool. You can use this tool:
- saw - hacksaw for wood. Purpose - cutting sawdust sheets on the part during installation;
- saw blade - to perform long straight cuts when cutting;
- electric jigsaw - sawing out details of a complex shape by marking;
- knife construction - cutting edges of parts after sawing;
- roulette - measurements during marking and cutting;
- plumb bob - control of sheet position in space during installation;
- the carpentry level is the same;
- electric drill - drilling holes for fasteners;
- screwdriver - installation of fasteners for fixing parts from gypsum board, assembly of frame from metal profiles;
- a set of spatulas, including narrow, medium, wide, angled metal and rubber;
- brush paint - for primer application;
- roller foam - for the same purpose;
- drill bit for mixing dry mixtures;
- sandpaper №4 or №5;
- container for stirring mixtures.

This is the basic toolkit with which the alignment, priming, and decorative finish walls made of plasterboard.
In addition, you will need materials:
- primer - to strengthen the surface of walls;
- acrylic putty - repair and preparation of the surface of gypsum boards for application of the main leveling layer;
- ribbon - woolen fiberglass;
- fasteners for gypsum board - self-tapping screws of special shape;
- insulation for laying under sheets of gypsum board in the construction of partitions for insulation and sound insulation;
- GKL different sizes, including thickness of 6.5 mm - to create spatial forms of parts; thickness of 9.5 mm - for ceilings; thickness 12.5 mm - for wall cladding, thickness up to 24 mm - for laying the floor covering with a dry screed.

Wall assembly from GKL
To build a wall of this material, you will need to first build a foundation for it - metal or wooden frame for drywall. The choice of material for the wall issue is far from idle. Given the apparent benefit of using wood, the developer is littered with many difficulties associated with the properties of the material:
- necessity antiseptic treatment each detail, which will help to get rid of the risk of development of rot or fungal diseases. Fire-fighting, especially if hidden electrical wiring is built inside the frame, which often happens. In addition to working wood, the wiring should be placed in a flexible corrugated hose made of special materials;
- careful selection of material on the grounds of straightness and absence of screw deformations;
- changing the size of parts with fluctuating humidity conditions in the room, which is especially important for out-of-town buildings with periodic visits, resulting in warping of the frame and swelling of the wall surface.
All these difficulties will inevitably require, in addition to material costs, a lot of time.
All these shortcomings are deprived metal frames, made of galvanized steel in the form of bent perforated profiles.
Several of their types are designed to be performed various elements construction:
- Ceiling profiles, denoted as CD, cross-sectional dimensions 60 x 27mm.
- Ceiling guide profiles CW 28 x 27 mm.
- Rack, UD - 50 x 50, 75 x 50 and 100 x 50 mm.
- Guide profiles with dimensions of 50 x 40, 75 x 40, 100 x 40 mm.
The standard length of the guide profiles is 3 meters, the ceiling and rack-mount profiles are 3 or 4 meters.
As accessory parts, U-shaped straight suspensions for connecting ceiling and CD profiles are produced.

In addition, angular framing profiles and, perhaps, arched ones will certainly be needed.
The skeleton of the metal-profile for the wall begins with the marking of its location. It is produced on the floor, and then transferred to the ceiling with a plumb and a paint string, which will ensure a strict vertical structure.
The construction of the wall or partition must begin with the creation of the frame, while using the profiles guides UW and rack CW.
Fastening of details of the basis should be carried out with a step of at least 60 cm.
When choosing the step of the arrangement of the racks, it should be remembered that the dimensions of the drywall sheet are multiples of 600 mm, so the racks are placed, being guided by this parameter. Attention! At the location of the door on the floor, you need to break the frame.

- on one side of the frame, you need to pull a film of steam protection, for which a polyethylene film with a thickness of the order of 200 microns is used. It is pulled on a frame and fixed with a scotch tape;
- you need to understand how to fix a sheet of drywall. Important! To perform this work, self-tapping screws of a special design are used.
- Pay attention to the shape of the screw head. It allows, without destroying the surface of the coating, to fasten the sheet flush.
- similarly install the other details of the wall paneling on one side, making a cutout under the doorway;
- the openings between the posts must be filled with a heater, which simultaneously acts as an acoustic protection device. Otherwise, the double hollow wall will work as a resonator, amplifying sounds. For this purpose, various materials, both slabs (microwaves) and rolls, such as an isover, a thermal insulation device of more than 2 layers, will necessitate the construction of a three-dimensional frame. Warming of the walls and the soundproofing device will allow the residence to be comfortable enough;
- before sewing the second side of the frame, you need to install a second layer of steam protection, acting in the same way as for the first side;
- sheets of gypsum board are sewed over the steam protection with screws of 6 or 8 mm in diameter. Their installation is performed in steps of at least 250 - 300 mm. Therefore, it is not possible to perform this operation manually with a screwdriver, without a screwdriver here is indispensable.

Attention! Cutting of galvanized carcass profiles must be done manually with a hacksaw. The use of a hand grinder undergoes a protective layer, subsequently metal in this place will actively corrode. After cutting, the butt should be painted over with a special protective paint, 85% consisting of finely divided metallic zinc.
Aligning walls with plasterboard
Often, during construction or repair, the layout of the wall or partition wall is much easier to perform using GCR than plaster. Usually this is also done with the use of a frame, when the plasterboard is fastened to the wall on the profile. Before fixing the profile to the wall, you need to determine the point of its closest location to the wall and install floor and ceiling guides. Then the installation of racks will not cause problems, since they are all structurally already remote from the walls.

As a result of the work done, a smooth wall is obtained and it remains only to prepare its surface for the application of the finish coat.
There is a way how to level the wall with plasterboard without a frame. It should be noted that the surface quality of the substrate must be high enough. Before fixing the plasterboard to the wall without profiles, you need to carefully remove all the protrusions that may be a hindrance. The plant technology can be this:
- attach to the wall a detail from the GCR and drill the fixing holes. At the same time, there will be traces of the drill on the base surface, which will be the marks for the fixing holes;
- remove the part and drill holes for these plastic inserts;
- apply on the wall adhesive composition on a cement or gypsum basis, level with a comb spatula. You can also use polyurethane adhesive;
- install the part in place, fasten it with screws.
Knowing how to paste drywall to the wall, you can easily cope with the rest of the cover.
Surface puttying
For the final preparation of the plane of the walls for the finish coat, it is used for finishing with putty. This is done like this:
- priming with the recommended composition, gluing corners and joints with a serpent;
- application of the primary layer of putty, grinding after drying;
- finishing of the surface with the final composition of puttying, drying, grinding;
- thorough cleaning of the walls and the entire room from dust;
- finish priming of the walls under the final coating.
Knowing how to make a wall from gypsum board, any developer can cope with this task independently. It is only necessary to correctly use the information obtained here.
At the same time, invited specialists will perform this work at a price per square meter from 600 to 800 rubles. However, in any case - success to you!
The main task of repair in most homes and apartments is to bring the walls into a normal state. After all, a couple of decades ago, almost no one is perfect smooth walls and did not think about it. Aligned on the principle of "at least somehow." You can correct the situation by all rules: knock down the old plaster and completely plaster on the lighthouses. This is correct and reliable. But long, dirty, expensive. It is easier to use so-called dry methods: to level the surface of the wall with plasterboard (GKL). The second task, which often has to be solved in the process of repair: redevelopment. We remove the old partitions, put new ones. New interior and decorative partitions are also made using plasterboard. How to level and put the walls of plasterboard with your own hands and tell in the article.
How to wall plasterboard walls
To begin with, consider the case when you need to align the surface of existing walls. There are three options for fixing drywall to the walls:

The latest technology - the installation of gypsum paste on glue - is the fastest, but it also has drawbacks. The first - not everywhere under the finish is glue, therefore it is problematic to hang cabinets on such a wall. If you plan to fasten something to the wall, at this height lay a solid layer of glue or install a scaffolding beam, which will also be an additional beacon when setting the sheet level. Then the problem will be solved. Another disadvantage is that there are small differences. That is, the surface is not ideal. The difference is 2-3 mm. Between the "pieces" of glue the sheet slightly bends. However, this is a good way to quickly align the wall.
More details on how to glue drywall on the wall look in the video.
Mounting to the frame
Since when attaching plasterboard to the wall, no fasteners are needed, then we will talk about the frame and basically about the metal. The rules of fastening to wood are the same, just using screws for wood.
GCR dimensions and purpose
A few words about the size of the sheets and how to put plasterboard on the walls. Standard sizes are as follows: the width is always 1.2 m, the height is 2.5 and 3 meters. Sometimes there is a "nonstandard" of a shorter length: with smaller ones it is easier to work, but more seams are produced, which then have to be closed. GCR thickness:
- 12,5 mm - universal material for walls and ceiling;
- 6 mm and 9 mm for curved surfaces.
It is often said that 9 mm sheets are ceiling. But manufacturers do not have such recommendations. Any of the manufacturing plants positions thin sheets, like those used to finish curved surfaces.
Bevels are made along the long edges of the sheet. They are needed for the joint to be glued with reinforcing tape and sealed with putty. It is the side where the bevel is the facial. It is turned inside the room.

How to join
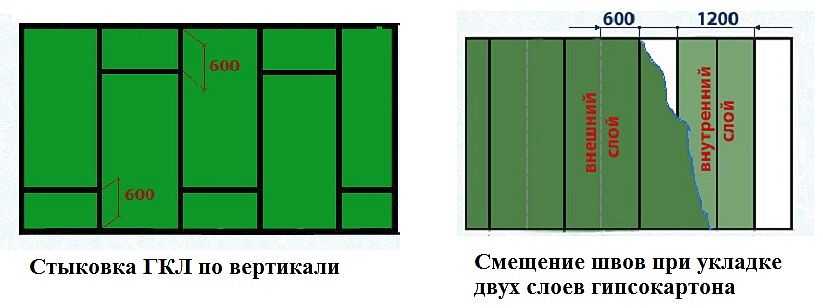
If it is necessary to join the sheets in height, place the joints so that a long longitudinal line does not form. They say that the sheets are stacked with or without a shift. It is desirable that the displacement is not less than 40-60 cm. Long joints are the most likely places for the appearance of cracks. Shifting the seam, you are almost 100% likely to get rid of the cracks (an example of stacking sheets, see the figure).
If the wall is covered with two layers of gypsum board, then vertical seams also shift. The sheet on top should be installed so that the joint of the bottom falls on its middle (a shift of half the width - 60 cm).
Than to strengthen and with what step
During installation, the sheet is pressed against the frame and fixed with a screwdriver and special screws with flat heads. If the frame is made of metal, take the screws of TN25 (3,5x25 mm). In stores they are called "for drywall". Length - 25 mm, color - black (more often break) or white. For a frame made of wood, they are close to the size with the flatest head: there will be less putty.
It is important to tighten the fasteners to the required depth during installation: the hat should be recessed into the sheet, but the carton must not be torn. It is also necessary that the screw is mounted strictly perpendicular to the plane of the sheet: it is less likely to damage the layer of cardboard, which in this design is responsible for rigidity.

See how you can simplify the work and make it so that the screw goes to the required depth, see the video.
When assembling the frame on a solid wall, the distance between the posts should be at least 60 cm. Then it turns out that each sheet is fastened to three vertical profiles: two at the edges and one in the middle. The edge of the sheet is in the middle of the profile.

Departing from the edge 10-12 mm, screw the screws. They can be set, as in the figure above, one opposite the other, or you can - with an offset, as in the figure below. The installation step is 250-300 mm. They are attached along the perimeter and along the middle profile.

Another important point: when cutting out sheets, keep in mind that its height should be 10-12 mm shorter than the height from floor to ceiling. This is necessary in case of shrinkage: that the wall or partition has the ability to compensate for the change in height without cracks (especially important for wooden and panel houses).
This, perhaps, all the main points of work with gypsum board (without taking into account the features of mounting profiles).
Plasterboard partition
To install the partition is somewhat more complicated, therefore we describe the process in steps with the photo.
Markup
First mark the place of installation of the partition. The simplest way to do this is with a laser plane builder (laser level). This straight line is applied to walls, floor and ceiling.
If there is no laser level, you will have to use the usual construction (good quality) and a plumb line. First, mark a line on the floor - it's easiest. Then, with the help of a level, move it to the walls. If both lines on the walls are vertical, the straight line connecting them must be strictly above the line on the floor. So it or not, you can check with a plumb line, dropping it from a mark on the ceiling to the floor line.

Partitioning using a level and a plumb line
It is necessary to achieve an ideal coincidence - this affects the quality of all works.
Assembling the frame
We will consider the assembly of the frame from galvanized profiles. On the intended line on the floor and ceiling, guide profiles are installed. It has the marking UW or PN - the bearing profile. Fastened most often dowels - 6 * 40 mm or 6 * 60 mm, the distance between two dowels - 30-40 cm.
The PN profile has a standard depth (wall height) of 40 mm, but can be of different widths of 50 mm, 75 mm or 100 mm. The thickness of the partition depends on the width of the load-bearing profile, as well as the thickness of the insulation and / or the soundproof material that can be laid there.

The supporting profiles are inserted into the guide profiles - racks. They are labeled CW or PS - a rack-mount profile. It differs from the guide by the presence of additional shelves on the walls. These shelves make it more rigid, increasing the bearing capacity. The width of the racks depends on the width of the carriers: they must be the same. That is, the racks should be of the same width. It is between them that the heater is then installed.

Racks to the guides are attached in two ways. The first is used mainly by professional builders. They work as a cutter - a special tool that breaks and bends the metal, securing the two parts. Builders, amateurs with independent work with gypsum cardboard, attach to "fleas" (also called bugs and seeds) - small screws with a screw at the bottom - TEX 9.5 (3.5 * 9.5 mm). They drill the metal themselves, speeding up the assembly process (no need to drill holes). The posts are fixed to each side with at least two screws.
One thing: if you are placing a partition in a multi-storey building or on the ground floor of your house, then together the joint of the rack and the ceiling guide, place a special film or some material that will prevent the appearance of the creaking. When people walk, there are fluctuations that are transmitted to profiles, because of what they rub and creaks. The second option is to make racks 1 cm shorter. It is more correct: and the shrinkage of the house is provided and there are no unpleasant noises.
Step installation of racks - 60 cm or less. This distance is due to the width of the sheet of gypsum (gypsum board), which is standard equal to 120 cm. As mentioned before, it turns out that each sheet is attached to three posts. So it turns out that there should be 60 cm between the verticals.
If the gap between the two pillars is more than 60 cm, but less than 120 cm, a vertical profile is still placed between them in the middle, otherwise this section will "bunch" - the sheet will stagger and sag. Another thing: the first rack is attached to the wall a little closer - the first sheet will be attached to the entire plane of the extreme profile, so the distance should be slightly less - 57.5 cm.

Profiles, to which the doors or windows will be attached, it is desirable to strengthen. The easiest way to do this is with a wooden block of the appropriate size. It is inserted inside, and fastened on a pair of screws. Use dry wood to prevent scraping.
After all the racks are exposed and fixed, the designs attach greater rigidity with the help of jumpers - horizontally mounted pieces of racking profiles. They are made in one of the three ways suggested in the photo. The third option is most easily manufactured and easily installed.

The jumpers are usually located at the same height as the two sheets. Their edges must be fixed, so jumpers there are necessary. In the rest - in 60-80 cm steps. If the wall is large - put in 60 cm, if small, enough 80 cm. Cross-pieces above the doorway are required: on the height of the door frame. They are also desirable to strengthen by investing wooden block.
Laying of communications
After installing all the crossbars, you can proceed with the installation of communications and wiring. It is desirable to mount all electrical wires in the corrugated hose. If the partition is set to wooden house or on a wooden frame, it must necessarily be metal. In houses of incombustible materials, in plasterboard walls on a frame made of galvanized steel, the use of plastic corrugated hoses from non-combustible raw materials is possible (there is a note "NG").
Gypsum cardboard and heat / sound insulation
After the laying of communications, the installation of gypsum boards is started. They are mounted as well as in the case of plating. The wall covering of plasterboard with its own hands starts from one side. Then, on the other hand, between the profiles (bars) of the frame, a heater and / or a sound insulator is installed. After its installation, the GKL wall is sewn on the other side.
Insulation for walls and partitions of plasterboard use the usual:

In principle, it is possible to use other heaters, but the listed ones are the most popular ones.
How to cut drywall
Making walls of plasterboard with your own hands, you have to cut the sheets: not always they become whole. To do this, you will only need a sharp office clerk (for paper), a long smooth object - a ruler, a board, a bar, a level, a rule, etc. And a wooden bar length of a couple of meters, but it is not necessary, it's just easier with it. That's all. An electric jigsaw may be needed when cutting curved lines, but there will be a lot of dust.
The sequence of actions is as follows:
- conduct a pencil on the front side of the line on which you need to cut the drywall;
- apply a ruler (a bar, a board) along the line and cut the cardboard with a stationery knife;
- under the cutting line we put a bar;
- on the shorter side we tap with the palm, because of which the gypsum breaks along the line of the cut;
- we break the sheet along the entire length of the cut;
- bend the broken piece, cut the whole cardboard.
Everything is really very simple. The main task: to correctly mark out. Further problems do not happen (unless the sheet is not beaten).
Video lessons
Not all subtleties can be described, some are better to see. We picked up videos in which there are particularities of working with plasterboard. In general, they concern the assembly of a framework of profiles. This is really the most time consuming part. And on how correctly the frame will be made, depends how much the wall or partition will be.
How to make a false wall of gypsum board
How to make reinforced struts in a partition. This method of assembling the skeleton is non-standard, but this does not mean that it is incorrect. Racks are really harder. This is necessary if you build a full-fledged interior partition. Here the gain will not hurt. The downside is that more time will be needed, and the cost of such a frame is higher.
Which profile is better: smooth or corrugated. In the market there are different models of profiles, including those with uneven, and rough walls and side walls. With an equal thickness of metal, it is more rigid, which, it seems, is good. But how good is it at work? Watch the video.
Partition of plasterboard from the beginning to the end. Here you are photographed step by step installation of the partition. Everything is completely accessible, you can take as a basis and build walls from plasterboard with your own hands.
You can zonirovat room for two or more parts, which is very convenient in large rooms or in apartments of free planning. Drywall is used for a variety of purposes, for example for wall sheathing, for ceiling finishing, for partitioning. Such buildings in any room look stylish and modern, especially if you use various design techniques for decorating.
Partition by hand from gypsum board - drafting
Before you perform the construction of a gypsum plasterboard with your own hands, you will need to form a project, according to which the work will be carried out.
The project includes:
- Drawing;
- Application of exact dimensions;
- Calculation of the exact amount of fastening material;
- Calculation of profiles and plasterboard.
If you plan to install several partitions simultaneously, then you need to start the drawing with the main structure, which will support the other partitions.
It is necessary to create a front figure, which depicts the supporting structure, jumpers and even sockets with switches. The question is, why? That in the course of the work you could prepare the material for their transfer to another place. When covering the structure with sheets, it is necessary to fasten the edges to different profiles from the frame.
Thus, the load is distributed to the entire area over the frame without overloading. In the drawing, there should be a drawing of how the partition will look after installation. In addition, it is necessary to draw up a detailed plan, which prescribes each stage of the work.
We make partitions from gypsum cardboard with our own hands: a step-by-step instruction
Sometimes it is impossible to remember every nuance in memory, for example, to install a profile, its facing and the like, and step-by-step instruction this is what you need.
A well-designed step-by-step instruction is an opportunity:
- At the design stage, make changes;
- Eliminate the formation of defects;
- Follow a clearly worked out plan.

After drawing a drawing for the construction and finishing works, it is necessary to begin marking on the walls and on the floor in the room. For accurate line drawing, it is worth using roulette and preferably a laser level.
Once the marking is done, you need to prepare the profile guides. Namely, a sealing tape is applied to one of the sides, which will allow to fix the profile as tightly as possible, firmly and without gaps. For installation of profiles it is necessary to use dowels and self-tapping screws.
The rack profile is mounted at a distance from the wall, but the first must necessarily adjoin it. The upper and lower rails are used to mount the racks. If there is a need to increase the soundproofing properties of the structure, a sealing tape must be applied before installing each profile. Once the latest rack-mount profile is installed, you can proceed to subsequent work.
How to make a plasterboard partition
Before framing the frame from the profiles, you need to prepare the GKL canvases.
This will require:
- In the drawing, divide the plasterboard coating into elements;
- Mark each element on the canvas;
- Gently cut out the details.
When installing sheets, the material should be applied with untreated edges to the central part of the profiles. Fixation, as was said earlier, is performed by self-tapping screws.

The step between the screws should be 3-5 cm and must be the same. Once the first sheet is installed, you can proceed to the installation of the second, and with the greatest possible care, so that joints do not form between the webs.
If the edge of gypsum board slides off the profile, then it can subsequently become a cause of skewing of the webs and accordingly a loss of the proper design. If it is required to lay the communication behind the plasterboard walls, they should be carried out only in a horizontal position and in a special anti-fire corrugation. In this way, it is possible to prevent ignition upon closing and the natural occurrence of a fire.
Often the use of a heater is required. The choice depends on your personal preferences, as well as on how much strong level of heat conservation is required in the room. Mainly used mineral wool and expanded polystyrene. Styrofoam is a modern product, manufactured by modern technologies. It has excellent performance properties and does not lose them even over the decades.
How to make a drywall partition: installation tips
It's not so easy to do gypsum plasterboard partitions, especially if you need to install a door frame. To ensure that the structure has been strong and has not lost its stability, it is necessary to approach the installation of the frame skilfully. Installation of the door is carried out before the gypsum sheets are laid, and after the support of the partition is installed.
In other words, once all the profiles have been mounted, you can:
- Carry out the installation of the doorway;
- Install the door frame;
- Mount the canvas.
The doorway can be either standard or irregularly shaped. Depending on the chosen design, it is sometimes necessary to make changes to the project, which should be done at the planning stage.

This can affect the purchase of material and fasteners. Wherever the door will be installed, the presence of a rack profile equipped with stiffeners is mandatory.
The reinforcement of the doorway can be carried out by means of the guide profiles. Regardless of the choice of the method of hardening, the door frame must be as stable as possible. It is worth noting that gipsokartonnye partitions have one particularly distinctive feature. With their help you can hide a significant amount of communication.
Inside the frame, plumbing systems and electrical networks are often laid. To do this, do not need too much action and special equipment, since everything is easy and simple. Naturally, the laying of communications occurs when the carcass is installed and before the cladding. When laying water pipes will require additional waterproofing to prevent the formation of rot and mold, which will lead to the gradual destruction of drywall.
Advantages of the material: we make a partition of plasterboard
Before choosing the material for the partition, it is worth familiarizing with a number of advantages of drywall, which in many respects surpasses other finishing cloths.

Benefits:
- The gypsum board weighs not much, so the design does not require the erection of columns or the use of a large number of profiles with stiffeners.
- Gypsum board has excellent load-bearing capacity. On the walls of such material you can attach shelves, flowers and other items.
- A properly made gypsum board partition will last for years and will not lose its proper appearance.
Now there is an opportunity to purchase a moisture-resistant plasterboard, accordingly the partition can be erected not only in the living room, but also in the bathroom or toilet.
Instructions: how to make a partition of gypsum board (video)
Interior gipsokartonnye partitions can be very different in form and form, so you can create the most incredible design in the interior of an apartment or a private house. Partitions made of gypsum will cost at a cost not too expensive, which is the main and important advantage.
Attention, only TODAY!