From the finishing works depends the appearance and durability of the interior, as they determine the level of comfort of living in the premises. Finishing works can be made as part of the repair, but can act as the final stage of construction.
Be that as it may, the correct procedure for performing the finishing work is very important. Often people ask themselves how to start - from walls or floors? The question is quite complicated, because when you select an incorrect sequence, you can easily spoil what has already been done.
The order of the finishing works depends heavily on the technologies and materials chosen. As for the floor and walls, first usually the wall works are made, and after them they proceed to the floor. Although some masters first do rough work on the floor, and then begin to finish the walls, and then mount the finish flooring. Let's consider step by step the order of work ...
Dismantling work
It is necessary to start with the dismantling of old coatings, if this is necessary. After that, the partitions are erected and the sites for the radiators are prepared. Also at this stage, the installation of electrical wiring should be performed. Attention should be paid to the fact that under the partitions we mean not gypsum plasterboard systems - we'll get to them later.
First, you need to make a waterproofing of the base foundation, lay all the necessary communications and arrange a concrete screed. To ensure that the screed is not contaminated during further work, it can be covered with cardboard or film.
Plaster of ceilings and walls
The specific technology of wall finishing is chosen depending on what you will do in the future.
Installation of window sills
It can be done before plastering walls, but in this case they will have to cover up something.
Preparing the floor for finishing
This stage of the work is not necessary, since the specific types of coatings can be laid directly on the concrete screed. Also at the same time, it is possible to perform wall decoration with gypsum boards, erecting all necessary partitions. Since most of the installation is done using wireframe technology, the risk of heavy pollution from work is minimal. Next, plastering and grinding of GCR is performed or the walls are finished.
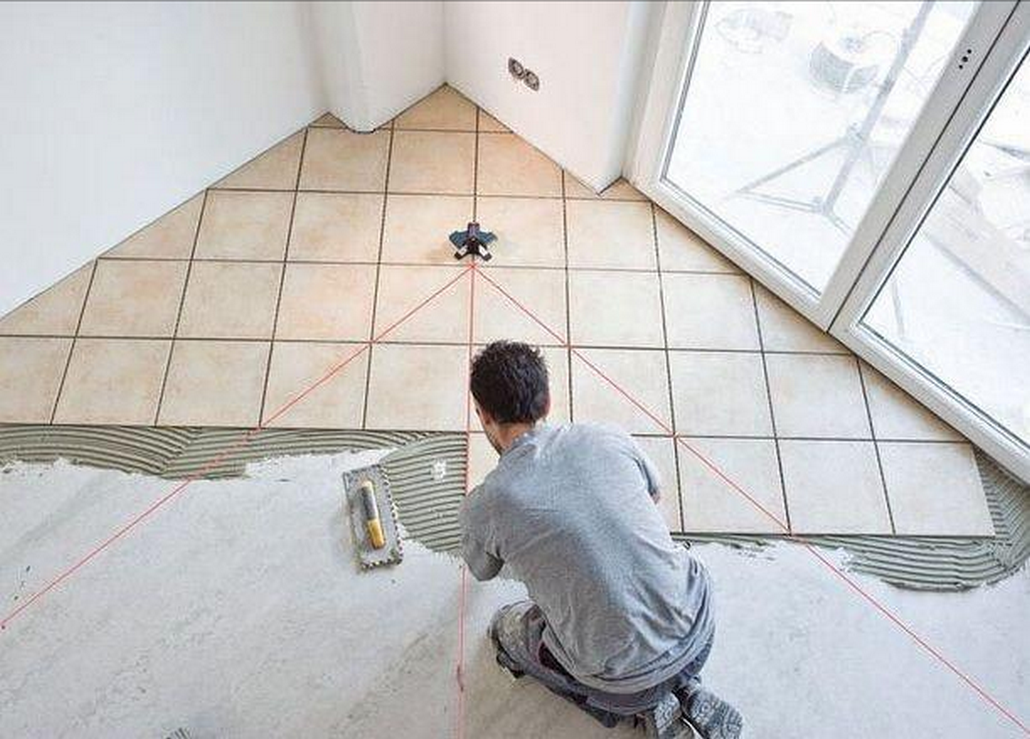
At this stage, installation is performed ceramic tiles on the walls, if this is in your plans, and also the surfaces are primed for painting. At this stage, the initial painting of the walls is carried out. After this, they begin laying the wooden floor coverings, since there will be no more wet work.
Installation of doors and skirting boards
The front door is installed first - immediately after the creation of the house box and the installation of the roof. Finishing of the floors from the wood with varnish or paint is carried out.
Staining of walls
The walls are carefully painted after all the floors and plinths are securely protected with a film. At the very end you need to install household appliances and arrange furniture.
Only high-quality screed can guarantee a flat surface of the floor and any kind floor covering - parquet or laminate, linoleum or carpet. At the same time, sex is the most exploited and wearing surface in any home.
Timely repairs of the floor will save you from having to invest significant financial resources in its complete rework. To order the repair of the floors and get professional advice, you can click on the link below: http://polimerbeton.net/repair-floors.
Typically, the defects of the screed owners of the apartment discover, undertaking the renovation of the flooring. If you decide to remodel linoleum or replace old wooden floors with modern laminate, do not forget to check the quality of the screed.
Possible defects and their causes
- Small and large cracks in the screed may appear due to the use of a poor-quality solution for pouring. Another possible reason for such defects is the absence of shrinkage seams.
- Small holes, located on the entire surface, could arise in the event that the coupler was flooded without priming the base.
- Flaking of the screed can occur due to poor surface preparation before pouring and its poor cleaning.
- Strong dusting of the screed may occur during operation of increased intensity. Another reason is the use of poor quality concrete in the preparation of mortar.
Depending on the defects identified, a decision is made on further actions regarding the screed. Repair is advisable in the event that the area of sites with defects does not exceed a third of the entire floor. Otherwise, the best solution is to replace the entire screed.
Repair of screeds and elimination of defects
If small cracks are found, they will not create any special problems. Cracks slightly widen (using a hammer and chisel), clean and dust off the site. The surface of the prepared crack is treated with an epoxy primer and filled with a solution.
Do not forget that the primer should be allowed to dry well, and after drying the cracked solution, the surface must be ground and cleaned.
Repair of deep cracks is carried out according to the same scheme. The only difference is that the solution is poured into the crack in several stages. After each pouring, they give him time to freeze.
Careful execution of works and use of high-quality materials will allow you to forget for a long time that such repair of a floor.
In addition to the video
Date of publication: 21-09-2015
- Floor leveling: from wood to concrete
- What and how to insulate?
- Sound insulation "floating floor"
- Adjustable floors
Floor surface of laminate
When repairing in any apartment, much attention is paid to the condition of the floor, be it an old house or new modern high-rise buildings. In this case, many are no longer limited to conventional or plywood sheets, and begin in the apartment with a leveling base, a device for effective heat and sound insulation, and then begin to lay the selected flooring.
Similar repair work in apartments can be very different, it all depends on the type of foundation (wood or concrete), the condition of the floor, the need for its alignment and the appointment of the room. We will consider the full range of works that can be applied in this situation.
Floor leveling: from wood to concrete
The first and one of the most important stages is the work on leveling the base of the floor. For wooden structures, most often it is the laying of sheets of plywood or chipboard and fiberboard. For concrete - laying cement screed.
How to work with a wooden base? Before you begin to level the wooden floor, you must first diagnose its condition. In this case, the individual floorboards and other elements of the base are carefully inspected for cracks, mold and rot, damage by insects.
Damaged elements must be replaced with strong, loosened parts with nails or self-tapping screws. The simplest version of alignment is the laying of plywood sheets with a thickness of two and a half to five millimeters.
This method allows you to get rid of a fairly large swings, although completely align the base and will not succeed. This method is suitable only for laying soft flooring materials like carpet or linoleum.
For leveling the surface, you can use a plywood thickness of ten to twelve millimeters, this will change the configuration of the base, removing irregularities and making the floor almost perfectly smooth.
When flooring such boards, it is important to remember that at the joints of walls and floor should be left temperature joints of 10-20 mm, and between individual sheets - at 5-10 mm. This is necessary to vent the base and prevent deformation when changing the temperature and humidity conditions.
Fastening of sheets to the base is made by self-tapping in steps of 50-60 cm. For sheets of fiberboard, nails are used, they are mounted at a distance of 150-250 mm from the center and 15-25 mm from the edge of the sheet.
The concrete base is leveled using a cement screed, either. Before this, it is necessary to fill with filler all potholes, cracks and other defects of the surface, remove dust and debris from the surface. After the plaster coat has dried, a layer of screed is applied to the floor, the thickness of which depends on the condition and unevenness of the substrate. Sometimes, for this, polymeric leveling compounds are also used, which, with a relatively small thickness, create a perfectly even coating suitable for the flooring of any finishing material. About the device of adjustable floors we'll talk a little later.
Back to contents
What and how to insulate?
After leveling, care should be taken also for the insulation of the floor, because more than twenty percent of the heat loss occurs precisely through its surface. The modern market offers a huge number of different materials, which are suitable for effective thermal insulation of the base and have the following features:
- low thermal conductivity;
- high strength;
- resistance to temperature changes and high humidity.
The most commonly used mineral wool, expanded polystyrene and boards from wood fiber and shavings. Basalt cotton wools are relatively low price, they are available in a convenient form of mats or rolls, easily mounted on the floor, leaving no gaps. In addition, they are not afraid of moisture and repel water well, keep the heat, are a good soundproof material.
Expanded polystyrene plates are considered more advantageous option for insulation of apartments, but their cost is higher. This material does not absorb moisture, does not burn, does not leak steam, its strength is high enough, it is not affected by temperatures, insects. But when laying it is necessary to ensure that no voids and gaps remain. Usually, when they occur, it is recommended to fill them with mounting foam or pieces of mineral wool.
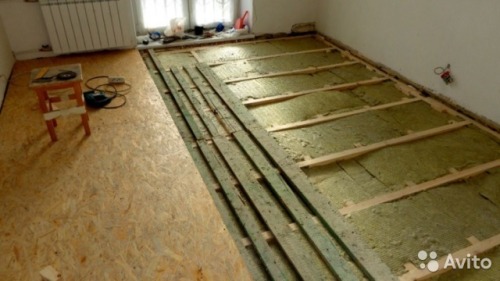
Recently, the method of thermal insulation due to the use of wood chipboards and sheets of wood fiber has become quite popular. They have very low thermal conductivity, are durable and stable, environmentally friendly. In order to perform thermal insulation by this method, a lag is required. Let us consider this process in more detail.
The base is exposed to concrete and carefully inspected for defects. All cavities and cracks should be filled with mounting foam, after which a polyethylene film is lapped on the surface, which should not have tears and other damages.
Now you can start laying wooden logs and distribution boards (these can be chipboard, moisture-proof plywood or plasterboard).
We begin the flooring with the installation of edge strips near the walls with a thickness of 20 mm and a height equal to the thickness heat insulating material. Such strips will make it possible to reduce audibility in neighboring rooms when walking. The logs are laid in steps of 50-90 cm, depending on the size of the insulation and the type of flooring. The thickness of the insulation for the first floors should be at least five centimeters, and for the rest - three.
After installing the heater on top of the lags are attached self-supporting materials, that is, sheets of plywood or other selected material. The joints of all slabs must at the same time occur on the surface of the log, fastening is performed by self-tapping screws.
Repair of floors - where to start? The owners of the dwelling, as a rule, ask this question, when they notice that the floor in the apartment noticeably fades, becomes worn and unattractive. The main topic for the disorder becomes the future expensive replacement of either a laminate, a parquet board, or any other covering of your floor.
However, it is not necessary to hurry to spend personal finances on professional workers - it is possible to repair floors from tile or laminate with your own hands. However, before you try to start repairing the floors with your own hands, it is important to know certain subtleties and nuances of your upcoming works. In addition, depending on the location in which the repairs will take place, certain questions should be asked. For example, to repair a floor covering in a bedroom is much more difficult, rather than to carry out repair of a floor in a toilet. One of the most acceptable options will be a comprehensive renovation of the floor covering throughout the apartment. In most cases, the forthcoming work will not be carried out in such enormous volumes that for this it was necessary to hire additional workers. Therefore, you will cope with them alone.  Laying of parquet board
A modern alternative to laying parquet through classical technology is parquet board . Its laying is a very uncomplicated process, which even a beginner can easily cope with. The necessary finishing material will be required in the amount that will come from the area covered by the floors, as well as from the configuration of the room itself, in which the finishing work will be carried out. The sheets of a parquet board can vary in size depending on the country of their production, this must also be taken into account. To the floor area, in general, add 2 to 5%, and, based on this result, calculate the area of the parquet board, which you will need. A greater percentage is added if the room is not rectangular, but, for example, multifaceted. In addition, the consumption of the raw material will increase considerably if you choose not on direct stacking, but, say, on brick or diagonal.
Repair of floors - where to start? We offer you detailed scheme events, which will allow you to significantly facilitate work.
1. Lay the substrate on the floor. This stage is very important, which, to our great regret, newcomers are often missed. Parquet board - the coating is rather rigid, so its difference from laminate is that it does not repeat some unevenness of the floor. This helps to fix the substrate. In addition, it will allow you to avoid the characteristic squeaks, which will inevitably arise two or three months after it is laid parquet board without a substrate.
2. After this, the parquet board is laid directly from the door. At the same time, it is necessary to count on the level of the door lock to have a heating riser.
3. Then you should put a solid board, measure the distance, which is not enough to the wall, and cut off the required part from the other board. Parts in the lock are connected with a rubber hammer. Why do not you use an ordinary hammer? Such a tool can break the lock in one stroke, and a quality connection does not work. one should think about one more actual moment along the length of the board to the wall should suffice approximately about a centimeter. After all, a tree is a material that can absorb moisture into itself, and if you do not leave a reserve, one day your floor will simply swell. And, consequently, you will need to repair the floor in the apartment again.
4. Similarly, we begin to collect our gender, like a puzzle of some kind, 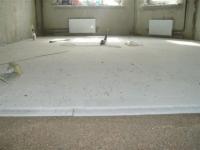 systematically in size cutting off and connecting at the same time on the locks of the board.
5. In a private house, floor repair with a floorboard also has a number of appropriate features.
The main advice in this case will be setting thresholds if your cottage does not have them between rooms. Installation without thresholds does not tolerate a parquet board, because during the arrangement of furniture the natural expansion of the parquet board will be difficult.
What are the sexes?
Repair of floors - where to start? In private houses, polymeric floors are not generally used, although there may be various exceptions. Similar covering of floors - polyurethane, methyl methacrylate and epoxy floors - is mainly used in places where your floor is constantly exposed to chemically aggressive, harmful substances. In those cases when you resort to the help of specialists from repair organizations, be prepared for the fact that you will face a number of unpleasant difficulties. However, you can avoid them if you competently and smartly come to such an urgent issue as repairing flooring.