Today, the industry offers several types of warm floors, such as, for example:
- electric,
- infrared,
- water,
- other.
The most common are water-heated floors. In many ways, popularity is explained by the durability and reliability of such a system. However, without the correct design of such a floor, the costs of erecting such a floor may increase substantially, and its operational properties will decrease.
Designing of heated floors
The design of the water-heated floor can be compiled independently, or by specialists for a fee. Either way, some initial data will be needed to compile the project.
Advice!
If the installation works will be performed by special workers, then the project must be done, because on its basis it is possible to draw up an agreement under which conditions it will be possible to make claims.
To build a similar system with your own hands, a project is also necessary. Often the cost of installation or home exceeds the cost of all interior decoration. With a competent design and calculations, you can save considerably by not buying extra shaped elements and materials.
Initial data
So, for the design of water-based floors you will need to know, or you will need to tell the designer the following data:
- Plan of the whole house. If the house has several floors, then the plans are all floors;
- Information about what material is made of external walls, windows, doors, as well as their types;
- Indicate the required temperature, that is, the desired temperature in the room;
- The location of the boiler installation, as well as its height above the floor level;
- Presence of risers, bends indoors;
- Some information about the location of furniture.
After collecting all such data it will be possible to make a thermal calculation. And already on its basis, and also on the basis of some of the data given above, to draw up a scheme of installation.
I must say that before designing a warm water floor, it is not superfluous to take care of such things as the location of furniture, a boiler and others. It is necessary to decide in advance. This is due to the fact that under large pieces of furniture do not fit, in order to save money.
Installation diagram
When designing the projector, the designer will also create a layout for the installation. In case it is created by oneself, then all its individual elements are taken into account immediately.
But when creating it by other persons, it is better to take care of the following provisions:
- The scheme of partitioning the surface into separate sections. It must be said that this is a very important stage, since for large areas the temperature expansion of materials can lead to cracking cement screed. This is why temperature seams are arranged between the individual sections.
The area of one plot should not be more than 40 square units. Premises of U-shaped and L-shaped form should be broken regardless of the area;

- Indication of the presence of compensation (temperature) seams, which were discussed a little higher.
They are the gaps between the individual sections, which are filled with the following material:
- Pieces of EPPs;
- Foamed polyethylene.
Pipes in such a seam should be placed in a casing. In the role of the casing, corrugation can act.
- Mounting technology. Knowing it, you can easily select and purchase the necessary materials. It should be noted that two main technologies are now distinguished: "wet" and "dry";
- Depending on the wishes for the temperature inside the room, the temperature of the pipes. You need to know it in order to choose the right coating.
For example, parquet is allowed to heat up to 25 degrees, no more. Knowing that the temperature of the supply pipe will be, for example, 32 degrees, this option of finishing does not work.
What documents should be
So, after carrying out all calculations, as well as drawing up descriptions and layouts, the following documents should be on hand:
- The plan of the heating system;
- List of all necessary equipment and all materials.
The plan itself should contain the following data:
- Installation locations and dimensions of radiators;
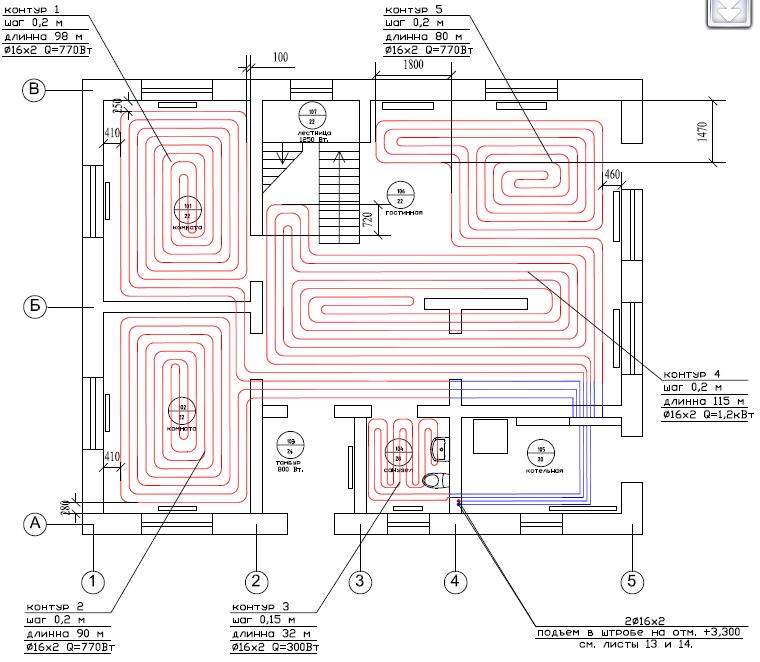
- The layout of the pipes, on which their diameters and the lengths of all straight sections should be indicated;
- Layout of pipes, which should indicate the distance between the pipes, the temperature of the coolant in each pipe, as well as the lengths of all the contours and the diameters of the pipes in them (all this can also be indicated in the previous scheme);
- Some data on the power that is required for heating each individual room (ie the power of one radiator and their location);
- Some information on setting up automation.
It should be noted that all such data can be found out by yourself, and also on the basis of them, the thermal calculation of the water floor. However, in the event of an error, you will either have to finish something or alter it.
Required material
As already mentioned, the design of warm water floors is accompanied by the compilation of a list of necessary materials.
In general, it should include:
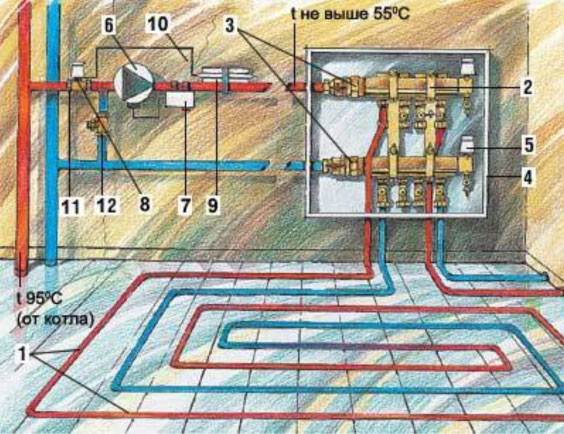
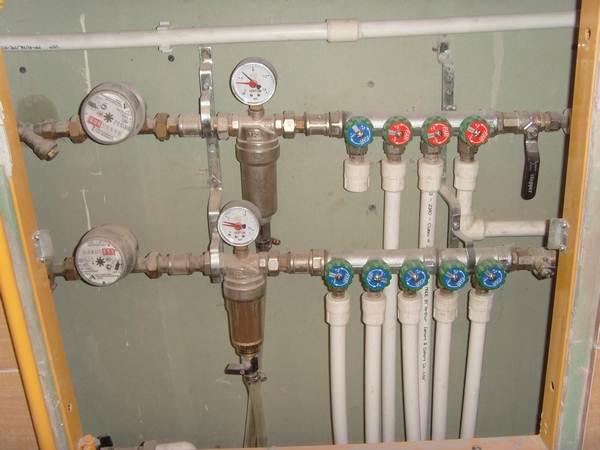
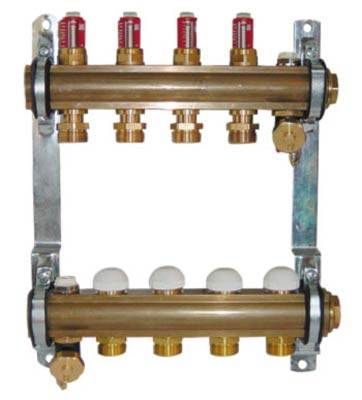
- Collector cabinet;
- Cement, sand, plasticizer;
- Distributor and flowmeters;
- Mounting for pipes;
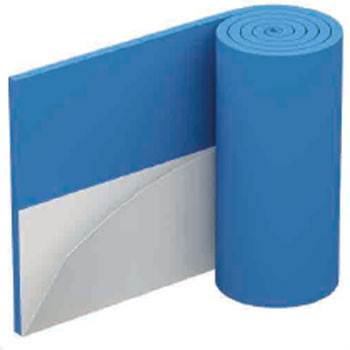
- Material for expansion joints, as well as a buffer tape or strips of EPPA;
- Thermal insulation;
- Pipes that are specially designed for heating systems. They must withstand high temperatures, high pressure and do not pass oxygen.
Some other issues considered at the design stage
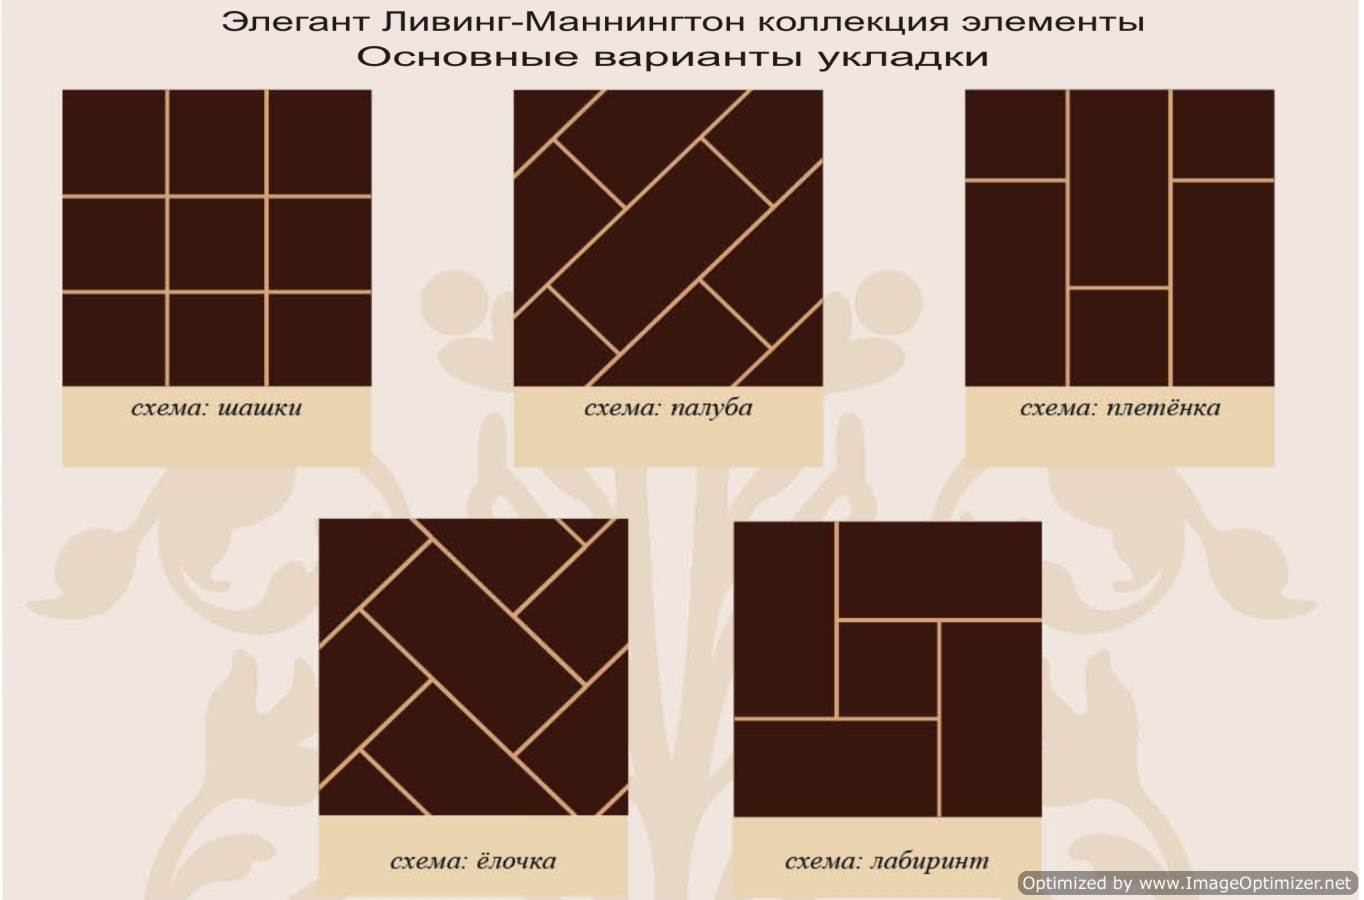
At the stage of designing a warm floor it will not be superfluous to draw a scheme of laying taking into account the location of furniture and existing schemes. In addition, you need to take care in advance for a clean finish, based on those factors, which were discussed a little higher.
It is necessary to determine and with the coolant, that is, what liquid will flow through the pipes.
Advice!
It is better to define such questions at the design stage, since now it is still possible to change something.
For example, allocate a suitable layout for the installation taking into account the location of the boiler, collector, furniture and other items.
If, then, when the calculations are made, it turns out that the scheme simply does not fit, then everything will have to be remade anew, but not the fact that the purchased material is useful all, and its price is high.
Types of schemes
So, for today it is possible to allocate only two basic schemes of packing:
- Spiral;
- Snake.
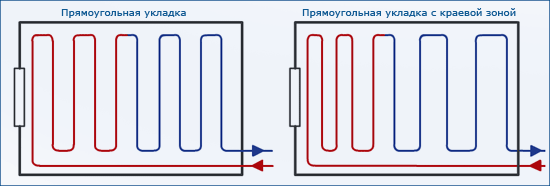
Yet the rest will be just different variations. For example, there is a snake with a marginal zone and without it.
Features of both schemes
We will say that the "snake" scheme is suitable for most small rooms. Such a scheme is characterized by uneven heating of the pipes.
The pipes that are closest to the collector cabinet, that is, at the very beginning, will warm up most quickly. These pipes are laid along the wall, which is characterized by the greatest thermal losses.
The distance between the pipes in such a scheme should not exceed 30 cm. Otherwise, warm places (above the pipes) and cold (between the pipes) will be clearly felt. As for the most extreme pipes, the distance between them should be made even less - 20 cm, or even less.
As already noted, snake laying gives an uneven heat distribution. To get rid of this effect, you can simple way - lay one more snake, only in the reverse order.
The second scheme, just solves the problem of unevenness. The spiral is constructed in such a way that the pipes (supply and return) are laid parallel to each other. For this reason, in each section (above the supply and return pipes), the temperature will be approximately the same.
This scheme is used for rooms with large areas. Pipes are stacked at a maximum distance of 20 cm from each other. It is recommended to lay them on an even smaller distance.
O is determined by the minimum bend radius of the pipe. For example, for a pipe with a diameter of 20 mm, the minimum bend radius is only 10 cm.
Conclusion
Even more interesting on this issue can be clearly seen in the video in this article. "Width =" 640 "height =" 360 "frameborder =" 0 "allowfullscreen =" allowfullscreen "\u003e
Conclusion
As can be seen from all of the above written, the instructions for drawing up a draft of a warm floor do not include any complex actions. The biggest problem can only become calculations. However, by finding some initial data, you can easily cope with it and take it off.
The most important goal of the plan is to accurately calculate the required amount of material and optimize its consumption, but at the same time achieve the desired result.
Even more interesting on this issue can be clearly seen in the video in this article.
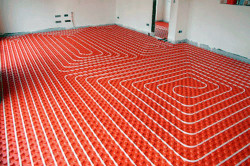
A water-heated floor is one of the most common variants of a heating system. Such heating can be used in apartments and private houses, in production halls and living quarters. Installation of a warm floor does not require special financial and time costs. Such heating can significantly reduce the cost of boiler heating and electricity, which makes the water-heated floor very popular among numerous consumers. There are several schemes, according to which the device of a water-heated floor can be made. Each of them has its own peculiarities, advantages and disadvantages.
Warm water floor is considered a fairly common type of heating, thanks to the convenience, ease of installation and affordable price.
Available schemes for laying warm water floors
The most popular schemes for laying a water-heated floor are as follows:
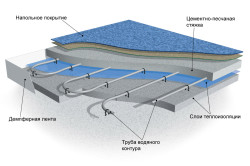
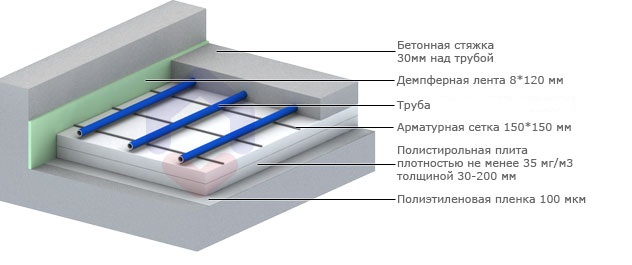
For a competent device of a water-heated floor, it is necessary to know the components of its construction: under the water circuit, a layer of thermal insulation is required, and a damper strip is necessary around the perimeter of the room.
- Snake - a scheme in which pipes are laid along the wall, rounded at the end and sent in the opposite direction, thus covering the entire surface of the room. The main difficulty in laying the pipes of a warm floor with a snake is the design of the turning zone, for it is very difficult to bend a pipe with a small step, and laying pipes of a warm water floor at a great distance from each other will not achieve the proper heating effect.
- Double snake is a scheme similar to the previous one, with one difference: in this version 2 tubes are used, directed parallel to each other. The distance between the pipes should not be more than 2-3 cm.
- Spiral (or snail) - a scheme in accordance with which the pipes of the system of water-heated floor are laid along the perimeter of the room, gradually moving to its middle. Reaching the middle, the pipes are reversed in the same way to close the chain.
- Combined scheme - the way in which for a single room several variants of pipes are used. Excellent for non-standard rooms, with protrusions or grooves.
Snake and double snake: features of circuits
When laying the pipes of a warm water floor, a sufficiently large temperature variation of the floor surface is obtained. In view of this, at the beginning of the room the temperature is the highest; the coolant is supplied from one side, and to the end of the room the floor is colder, because the cooled coolant leaves through the return duct.
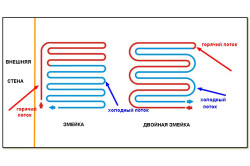
Picture 1. Scheme of laying a warm water floor with a snake.
Another significant drawback of this solution is that this method of laying requires considerable experience and skills during installation. For example, it is often found that with this method of laying, the pitch between the pipes is made from 200 mm and even more, because installers can not bend the pipe for laying with a smaller pitch, especially if pipes with a diameter of 18-20 mm are used. Although the step can be reduced to 100 mm. At the ends of the loop, with this, it is necessary to make small rings, which is very laborious.
There is also a way of laying, known as the double snake. If you carefully study this method, you can see that the temperature drop has decreased, but the installation did not become easier.
Professionals use the method of installing the system by a snake, except for aligning the adjacent zones of the heating system contours, and rarely enough for installation in sanitary units where it is necessary to bypass many different devices (toilet bowls, bathtubs, etc.). And then, this method is used, unless if the area of the room is too small. If the area of the room is more than 5-6 sq.m, then you can safely mount the floor with a spiral.
Or, for example, first you cut off the outer walls, then lay the pipes snake in the middle of the room. In this case, it is possible to achieve the optimum temperature distribution.
Most the best option The application of a snake is a combination of this method with others.
The layout of the snake and double snake is shown in PICTURE 1.
Scheme "spiral": features and advantages of the solution
Picture 2. Scheme of laying pipes of a water warm floor with a spiral (cochlea).
The most popular way of laying pipes of a water-heated floor is a spiral (or snail).A scheme for such a stacking is shown in PICTURE 2.
This variant of laying consists in the fact that the pipes begin to lay around the perimeter of the room, tending towards its center. This leaves room for the product to be returned from the center of the room to the outer perimeter of the room.
The spiral mounting scheme has proved to be the most effective and most reliable method. Among other things, spiral laying is the least laborious. When using, for example, modern heated floor systems, one person can lay a spiral.
The main advantage of this method is, of course, the correct temperature distribution on the floor surface in the room, which provides maximum comfort and convenience in operation.
Another advantage of this method of laying is that in this case it is possible to make any step between the pipes. For example, you can successfully mount products in increments of 10 mm to any desired step.
The main advantage of the water floor laid in a spiral pattern is the correct distribution of heat throughout the floor surface.
Laying a spiral, you can create a system of excessive power. Although there is an opinion that such an overstatement of power is not rational. Judging by the feedback of users, it is very comfortable for them to use the system with minimal heating costs and this justifies the rest of the arguments. The advantages of overstating the power are that due to this, the time of inertia of the warm floor is reduced. In this case, the savings are due to a decrease in the temperature of the coolant.
The scheme of laying the pipes of a warm floor with a spiral is universal. The spiral can be strengthened by edge zones, for example, large windows, stained-glass windows or external walls. Thus, using this particular pipe laying scheme, this is very easy and simple. All you need is to just reduce the step in the required area. The rest of the zone is covered by the usual calculated step.
Scheme laying spiral allows you to arrange a heating system in rooms of all sizes and shapes.
Among other things, the way of laying a snail can be combined, for example, with a snake. The snake can cover the outer perimeter of the walls, then in the middle the room can be worked by a spiral. This is an excellent and very effective option.
Combined warm floor: features of this solution
Combined scheme of laying the water-heated floor includes both of the above. For example, half the room can be laid with a snake, and half with a snail.
In addition, the water-heated floor can be combined with an electric warm floor. Such systems are most often installed in those houses where the main role in the heating system is played by the water-heated floor. In autumn and spring, there are periods of time when it is not worthwhile to turn on the heating to full capacity, but to create the most comfortable living conditions, it would not be superfluous to raise the temperature in the room by several degrees.
If in houses with individual heating systems it is possible to turn on and set up the heating independently for the minimum temperature regime, this option is not available in apartments with central heating. It is in this case, and comes to the aid of a combined floor with heating, the electrical part of which will allow you to create a favorable microclimate in your apartment or house. The installation of such a system is quite simple, but it requires special attention when working with the electrical part, so it is best to entrust it to a specialist.
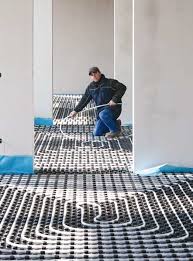
Heating the house with the help of such a novelty as a warm floor, is becoming more popular every year. The secrets and nuances of the technology of warm water floors are actively mastered by the population. As for the advantages of such heating of houses, we will talk about this later. Here consider in detail a diagram showing the technology of laying the water floor. And for you to understand better, we provided material useful video.
So, start laying with a preliminary surface preparation. Therefore, if necessary, first make a screed for better alignment.
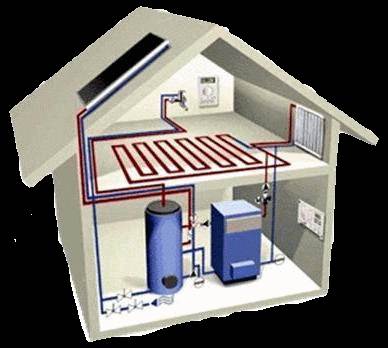
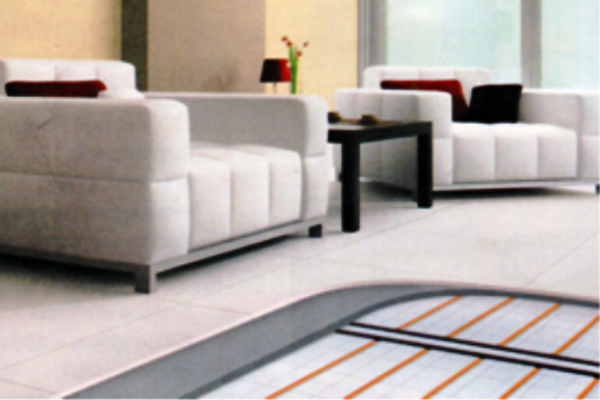
The water floor can become a worthy option for an additional source of heating the house
Ask any professional, and you will be called two types of water-floor systems: concrete system and flooring.
The concrete system for installing a warm water floor is considered more common
Concrete is more common. The pipes of the water-floor contours are poured with concrete, and the distributors will not be needed additionally.
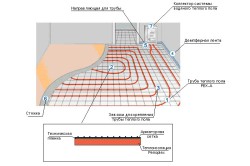
According to this technology, the floor is installed in accordance with this scheme:
- The room is divided into sections;
- The base is covered with a heat-insulating layer;
- The reinforcement mesh is laid and the contours are installed;
- The heating system is pressurized and poured with a concrete screed;
- Finishing is done.
On the perimeter of the walls are put a damper tape, this is necessary to compensate for the thermal expansion of the screed. The width of the tape should be sufficient to cover the layers of the screed and heat insulator.
Under the system of the water floor, and also on top of it is laid the thermal insulation material
The next stage is mounted insulation. The density and thickness of it depends entirely on the content below the floor. If there is warm room, the thickness should be of the order of 30 mm. If a cold room or ground is under the floor, the thickness of the insulation must be at least 100 mm. As a heat insulator is often used expanded polystyrene, but it can also be a cork or some other material.
Nuances of installation
The reinforcing mesh is placed under the pipe contour. Most often stop the choice on the grid with a cell of 150 x 150 mm and a diameter of 4-5 mm. Tubes for a warm floor are fixed to the grid using plastic ties. If double reinforcement is done, it is additionally possible to put a grid layer on top of the water-floor pipes. Then the pipes are installed. Depending on the project, the laying step (range 75-300 mm) is selected and a specific scheme for laying the contour pipes is carried out. The pipe is fixed with plastic clips. In those places where the seams pass, a corrugated pipe is stretched, it is necessary for protection and thermal insulation. There are several schemes of pipe laying, when a so-called working loop (heating) is formed. They call such schemes of laying differently: a snake, a double snake (the so-called "meander"), a spiral or a spiral with a displaced center. When making a loop in the form of a snake, the hot water is supplied from the side outer wall, where heat losses are higher than in the center of the room. With a similar circuit, the heat distribution is uneven. To correct the defect, it is recommended to make loops in the form of a double snake or spiral. The areas near the exterior walls of the building are called border areas. It is advisable to reduce the pitch of the pipe to compensate for heat leakage.
More details on how to put the reinforcing mesh under the contour of pipes, will tell (and show) the video:
Before the start of laying, it is determined with the pipe layout. The most common of these types of pipelaying is the laying of snakes and snails. The latter option is preferable, since the floors with it are heated more evenly.
Step stacking is better to calculate individually for each project. If the warm floor is made as the main heating system, the pipes are laid in steps of 100 or 200 mm, while at the walls that border the street, at least 6 rows of pipes are laid more often, and in the central part of the room and near the inner walls - less often. For a comfortable system, the optimal pitch is 150 mm.
Water floors are good in that they do not overheat, so that when installing them, you do not have to take into account the arrangement of furniture in the house.
The desired length of pipes for each circuit is not more than 80-90 m. The recommended values are 50-60 m. If you received a larger number when calculating the length, you must make two circuits with the same parameters.
Connecting two or more circuits to the system is performed using a collector located on the wall.
Connecting the pipes to the manifold
To connect the pipe to the collector, use fittings with Eurocone. Connectors (compression fittings, eurocone) are used to connect polyethylene and metal-plastic pipes to the collectors and to the radiator connection points.
Completing the laying of the warm floor, the entire system must necessarily be tested and tested.
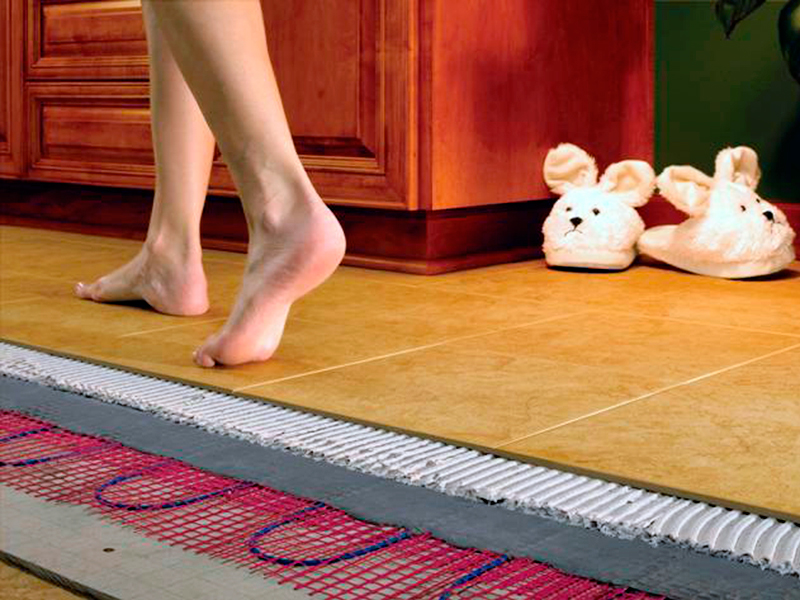
For the finishing coat for water-based floors, materials such as ceramic tile or porcelain stoneware.
To get you a good quality system of warm water floors, please familiarize yourself in advance with this useful video material:
If there are radiators in the heating system of the house
In the case of a combined heating system, a mixing unit is required to precisely adjust the temperature in the floor circuits, which consists of parts such as a circulation pump, a control valve and a shut-off and safety valve. The pump will be needed to circulate the heating medium in the system of warm floors, with part of the water flowing into the mixing unit from the heating system, and the rest circulates through a closed loop. The regulating valve changes the ratio between the parts of the flow, so that the temperature of the water is regulated. At the entrance to the loop the water temperature should not be more than 50 degrees. Mixing unit, depending on the possibilities, either buy ready, or collect their own hands from the components.
Intelligent Automation
The system of a warm floor can be made on automation, then there will be a convenient temperature control in each individual room. This is achieved by the servo drive on the manifold and the thermostat. The room thermostat and servo drive can be connected to each other by an electric wire or a radio channel.
It happens that TP is the only way to heat the room. But most consumers still prefer a combined heating system at home. Watch a useful video:
Which pipes are better
In many respects, the durability of a system of warm floors on a water basis is determined precisely by the quality of the pipes used. AT floor heating apply polyethylene or metal plastic. Both types of pipes are quite suitable, and both are strong and flexible, are characterized by corrosion resistance and are resistant to temperature fluctuations. Polyethylene pipes for the system of warm water floor come from "sewn" polyethylene PEX and linear PERT.
Site calculation
As already mentioned, in the beginning it is necessary to divide the room into separate sections. Their number will depend on the geometry of the room and its total area. The maximum area of the plot is recommended approximately 40 m2 with a ratio of sides of at least 1: 2.
The need for such areas is due to the temperature expansion of the screed, which must be compensated, otherwise there will be a cracking.
Installation
When installing the floor on a previously well-cleaned base, a heat-insulating layer is laid, which should be the main obstacle to heat leakage down. Heat must flow upward into the room. Thermal insulation layer can be made of any suitable material from those that are permitted in construction as a thermal insulation for floor structures.
Judging by the statistics, most often use polystyrene (polystyrene) or penoplex. Laying of the heat-insulating layer is performed with a density of at least 35 kg / m3, and the thickness of the layers can be in the range of 30-150 mm - depending on the thermal conditions of the house and the real floor heat loss. The perimeter of the room is laid with an edge band, which compensates for the thermal expansion of the screed.
Over the warm water floor is often laid ceramic tiles.
Over the system of a warm water floor is often laid ceramic floor