The advantages of a pitched roof include:
- Simplicity of design and low weight;
- Profitability, a small amount of building materials for the roof;
- The possibility of erecting a roof with a slope angle of 3 to 45 degrees;
- High ability to withstand snow and wind loads depending on the slope angle;
- Most roofing materials are suitable for a shed roof, which allows you to implement any design solutions;
- On a shed roof, you can arrange a platform for relaxing or sunbathing.
Shed roof has disadvantages:
- Under pitched roof it is impossible to arrange a full-fledged attic or attic;
- In regions with strong winds, full-fledged insulation of a pitched roof and lee walls is required;
With a large snow load on a shed roof with a slight slope, it is necessary to remove snow in a timely manner, however, this drawback is easily solved the right choice roofing.
Shed roof construction
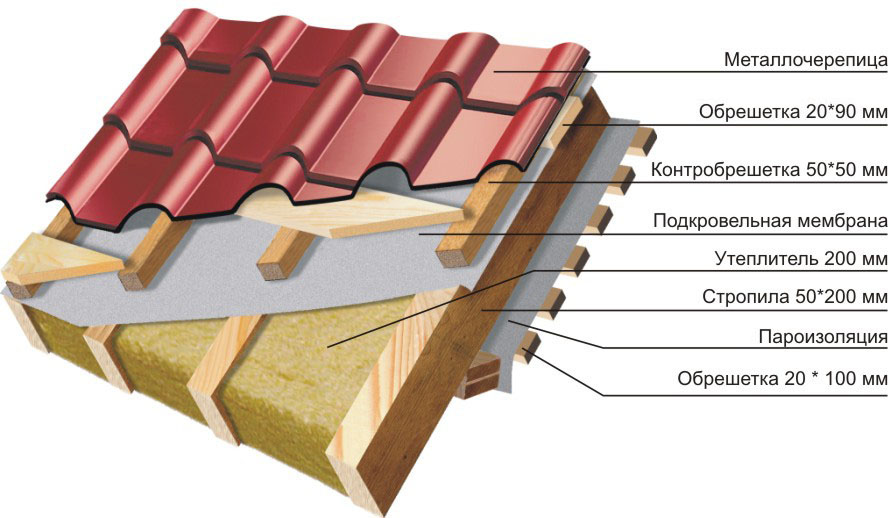
A shed roof usually consists of a truss system, lathing, insulation, roofing and external cladding of gables and walls. Depending on the type of building, the shed roof truss system can be of three types:

In addition, shed roofs can be divided into ventilated and non-ventilated. Non-ventilated roofs usually have an angle of no more than 5 degrees and require high-quality insulation, hydro and vapor barrier. Ventilated roofs can have any angle of inclination, their feature is the presence of free space between the roof and the ceiling and ventilation holes on both sides of the roof or on the gables. The air gap allows you to improve the conditions for the removal of water vapor from the insulation, to extend the life of the structure.
The angle of inclination of a shed roof is directly related to the used roofing. For soft roof or roll materials they use a slope angle of up to 10 degrees, with a slope angle of 10 to 20 degrees, they usually use corrugated board with a longitudinal profile and a wave height of 30 mm, slate and ondulin can be laid with a roof slope of 20 degrees, and metal tiles - from 25 degrees. When calculating the roof, it is necessary to take into account this dependence and make a choice in accordance with the purpose of the roof and the selected coating.
Shed roof technology
The construction of a shed roof, with all its advantages, is not always possible. With a large amount of precipitation accompanied by wind, as well as a large snow load, it is better to choose a different type of roof, gable or hip.
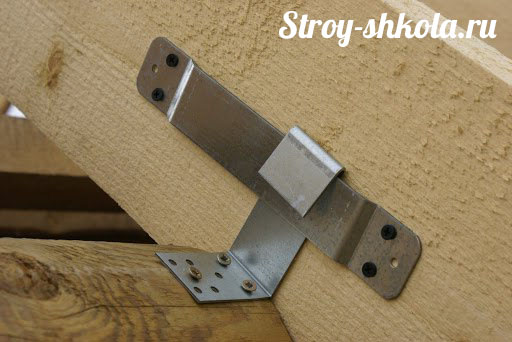
Video - fastening the truss system for a pitched roof
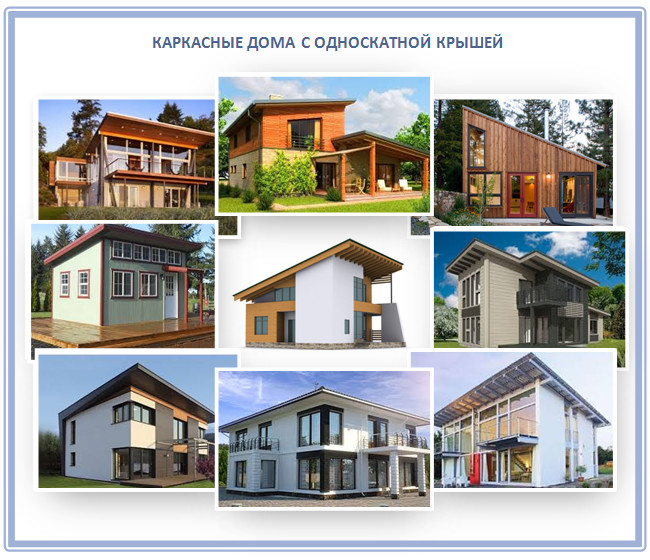
Shed roof, according to modern architects, is of the main decisive importance in the development of not only economy class housing, but also stylish. After all, the forces and costs that usually go to the construction of a multi-slope can now be directed to the exterior. For example, building a pool in front of the house or adding a barbecue terrace. And the rest of the shed roof is not inferior at all in anything.
Therefore, it does not mean at all that a house with a pitched roof will turn out to be unsightly or too simple. On the contrary, by playing with the slope and direction of such a structure, roofing material and interior space, you will get a unique architectural design that no one you know will definitely have. And our website will make such a house inexpensive in construction and modern both inside and out!
Architectural Benefits of Shed Roofs
Of course, where gable roofs have existed for thousands of years, everything unusual seems ugly and ridiculous. But the Eiffel Tower in France in the early years of construction embarrassed the locals with its "simpleness".
The fashion for shed European villas came to the Russian expanses quite recently. And until now, individual architects are rebelling against this trend, calling mono-pitch roofs exclusively "barn" and arguing that clients do not even look at such projects.
But in fact, not only the customers of their future “dream house”, but self-builders with golden hands are increasingly making the roofs of their buildings exactly pitched, with different angles, directions and combinations with other roofs. Because, apart from the more dynamic look that only a sloped plane can give, shed roofs are actually more functional and even economical.
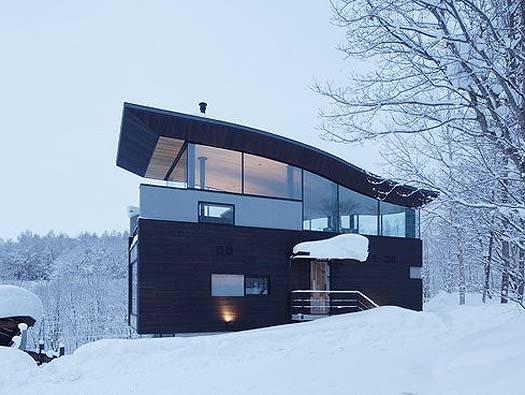
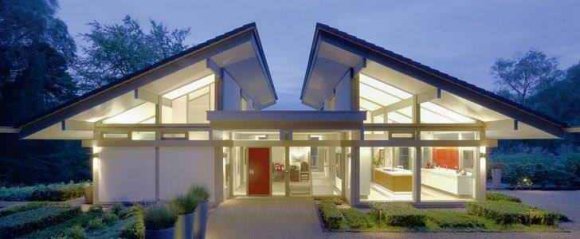
Most often in world practice, shed roofs can be found in Finnish houses, which are known for their pleasant combination of modesty and restraint:
 .
.
In warm and hot countries, houses with a shed roof are especially popular: no insulation is needed from the inside, the design always looks original, and such a roof is much cheaper in terms of costs. So the northern countries began to adopt this useful fashion.
For example, not so long ago, a new type of residential building was created in Norway - high-tech, with a shed roof with a slope of 19 °. It generates its own energy thanks to solar panels on the roof: the atrium has enough thermal mass to accumulate enough heat during the day and release it all night. And not only to give, but also to provide the whole house with electricity.
And for water heating of walls and floors, rainwater heated by the sun is used, which flows down the shed roof directly into the drain. With a conventional gable or hip roof all this would not be possible to implement!
Is it worth it to make a "one-slope" for a residential building?
Until recently, shed roofs could not be called popular in Russia. It so happened historically that due to the winds and heavy snows in this country, it was gable roofs that proved to be the most practical, which were sharp in snowier regions, and gentler in more windy ones.
And purely visually, the indigenous population is accustomed to seeing roofs with a slope of at least 30-40 ° on houses, where there is a traditional attic for storing a variety of things. And shed roofs carry such inconveniences:
- An incomprehensible space at the upper Mauerlat. You don’t use it under the attic, but the attic turns out to be unusual. Leave it without an attic - then the entire geometry of the interior will seem broken and cause discomfort.
- On a shed roof, rainwater exerts twice as much pressure as on a gable roof. Why? It's simple: all the liquid that gets on it flows along one slope until it falls to the ground. And if you take and break this slope in half, a “house”, now the water will be divided at the ridge into two streams. And this is twice the amount and influx. This is why shed roofs are problematic in terms of leaks, especially if you choose the wrong one. roofing material.
- A shed roof is one integral plane, and this is a real sail. That is why, during storms and strong winds, it is precisely such roofs that suffer in the first place.
- The need for a strong rafter system. The load here is always distributed less than that of a gable roof, and therefore the rafters will have to be made thicker and stronger.
- A complicated ventilation system, which is sometimes not paid any attention at all, and then they are surprised at the short service life of such roofs.
- Another disadvantage of such a roof is that it will have to be cleaned during heavy snowfalls, otherwise the roofing material and the building system may break. And on ordinary days, on the contrary, the snow itself descends from such a roof, and not like an avalanche, but gradually.
- Unpopularity of experiments. Even more: neither the rich nor the poor want to risk their own investments in construction, and the designers completely fall into despair from any unusual roof.
Because of all these reasons, shed roofs in our country in 99% of cases are found only in baths, garages and summer country houses. Although at the same time, in a region with little snow and not very windy, such a roof could bring many bonuses, including the same unusual stylish design.
Frame houses with a pitched roof are considered the most energy-efficient. This does not take into account the fact that the area of the southern wall in such a house will be the largest, and the northern wall - the smallest. Now see the difference with gable projects? Moreover, the northern side itself is still being built without windows, and serves as one of the walls of the utility room: a boiler room, a boiler or a supply room, where garden tools are stored. But the presence of an attic under the roof in private construction is already considered obsolete.
A shed roof is remarkable in that it has:
- Simple design. So simple that with a small private construction, they don’t even make particularly accurate calculations for it. There is no need to adjust the slopes to each other, to achieve the identity of their weight and load on the walls. There is no need for complex support systems, which are often found in other types of roofs.
- High practicality. In addition to the basic functions of the roof, its minimum angle the slope is also used as an open area for a variety of purposes.
- Reliability. Due to its simplicity and unpretentiousness, such a roof is actually also the most reliable among all others.
And from the practical aspects, we highlight the following:
- The ability to arrange a house without an attic and the problems associated with it.
- The original geometry of the ceiling, which is used as a separate design element.
- The absence of a ridge and cracks under it.
- The ability to drain rainwater and snow from the roof in only one direction - where the slope is inclined. This is important if people are walking right in front of your house (like on the streets of the city) or if you have broken beautiful garden and don't want to flood it in the rain.
And, of course, the simplicity of construction work:
Know-how: shed roof combinations
There is one new architectural mod: gable roof, which consists of two single-sided, but not connected in the ridge. And technologically, we are still talking about two separate shed roofs, which are built according to all the rules. And in the middle they place either a flat part or an open terrace between the two halves of the house. Incredibly successful and functional solution, we note, which allows you to add more natural light to the house.
Shed roof houses are recognized all over the world as the most favorable in terms of energy saving. Which is not surprising, because the cube also takes the first place in this regard, and what then is such a house, if not a cube?
Now we will reveal a secret to you: it's all about compactness. Any structure is said to be compact if it has, as far as possible, the minimum area of all external surfaces. So, a house is sometimes built according to rather intricate projects, when almost every room has three external walls, plus an even more complex roof. And sometimes it happens that the rooms have only one such wall, and the roof is generally shed.
What is the point? The fewer such external surfaces that come into contact with cold outdoor air, the warmer the house itself will be. That's why compactness is so important in construction!
In this design, everything is simple: shed roofs are built according to the same patterns, but are based on two parallel Mauerlat-runs. And the main plus is that such a non-spacer construction does not “push apart” the walls of the house with its pressure, which means that there are already much less strength requirements for the frame structure itself. True, in such a house there must be at least two internal walls.
And in modern architecture, a new style has recently appeared: roofs united into a single whole, which have a slope in different directions.
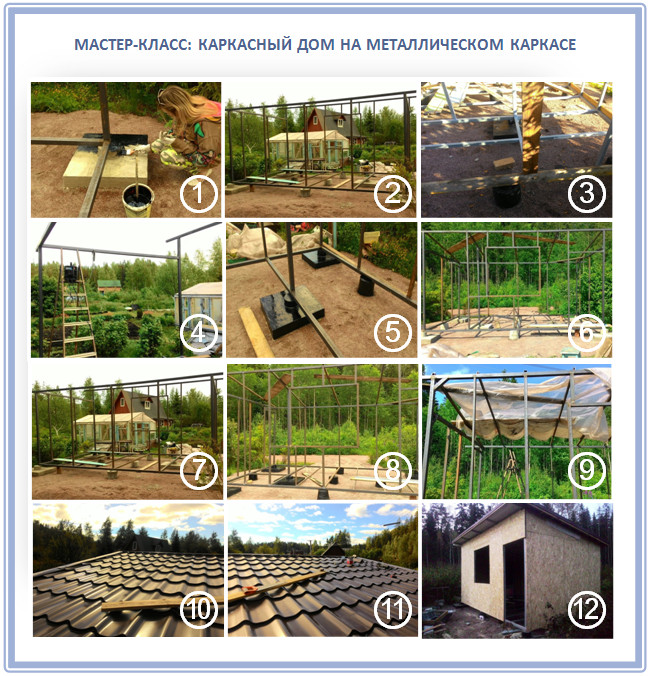
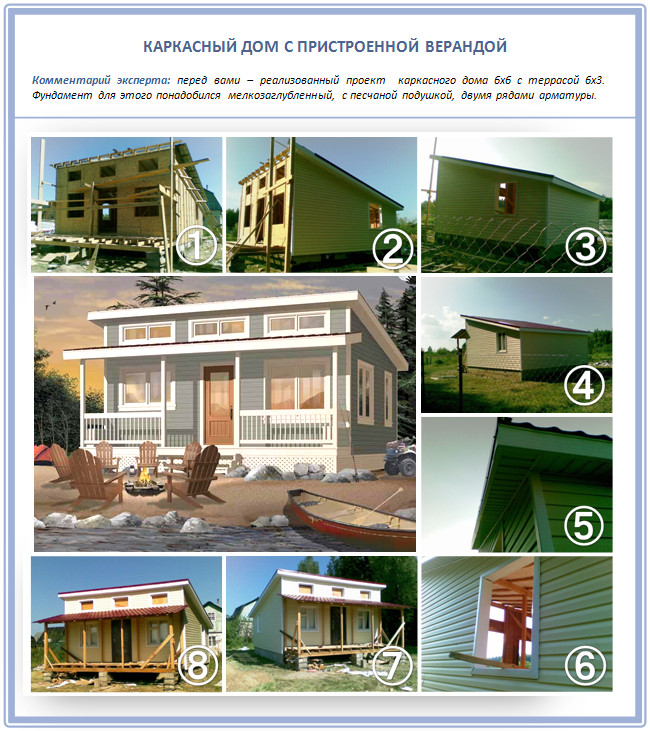
Modern frame house: from the foundation to the roof
A frame house with a shed roof is a structure made of lumber and fixed wood panels. The frame of such a house itself must be built either from metal or from hardwood timber. It is solid, while the rafters on the roof should be made just from conifers. Now let's explain.
The fact is that solid woods tend to keep their geometric shape and not change over time: they do not dry out, do not shrink, do not twist. And, of course, in bending, due to such properties, they work poorly. But conifers are just good because they do an excellent job with dynamic loads, which is why the walls are made static and strong, and the rafters are more flexible and withstand both shrinkage of the house and a slight deflection due to snow.
Although on metal frame wonderful houses are obtained:
Foundation for a frame house
Under a small one-story house, the easiest way to do columnar foundation. But, if you are building a solid two-story frame house with a shed roof, the technology will be a little different.
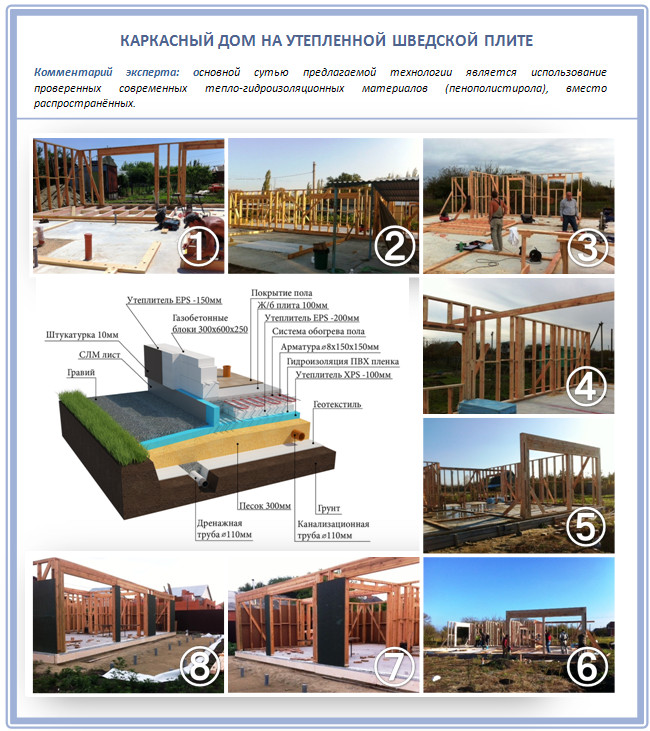
The fact is that a simple columnar foundation is no longer suitable here. A frame house, worse than any other, endures seasonal ground movements, subsidence of the earth, or other similar problems, and therefore experienced builders are advised to do it for it. slab foundation. This one takes all the dynamic loads on itself, and the integrity of the frame is preserved.
Therefore, for two-story house make a base like this:

Or a more modern insulated Swedish stove:
Technologies of frame construction of walls
In total, there are two main technologies for frame construction.
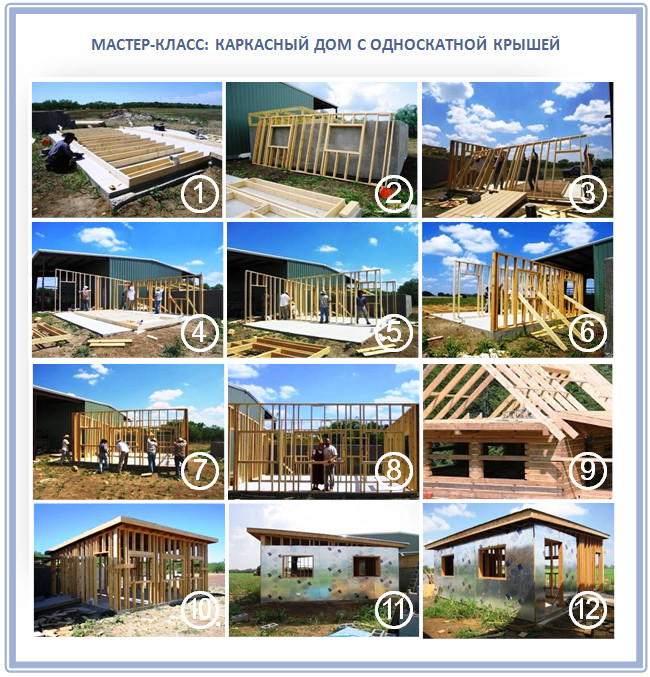
Frame and panel technology
In this case, the frame house is built from different individual building materials: beams, cladding, insulation, interior decoration, steam and waterproofing. All this is attached to the frame in its sequence, and as a result, we have a house that is no worse than a timber building in terms of quality.
Here is a good example of construction using this technology:
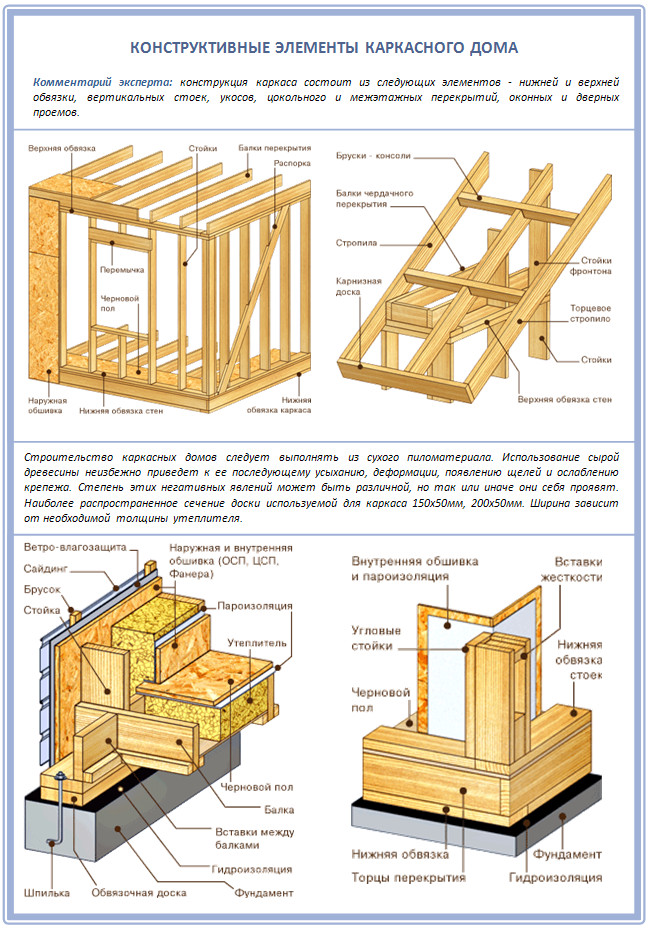
And the main components of a house built using this technology look like this:
Frame-panel technology
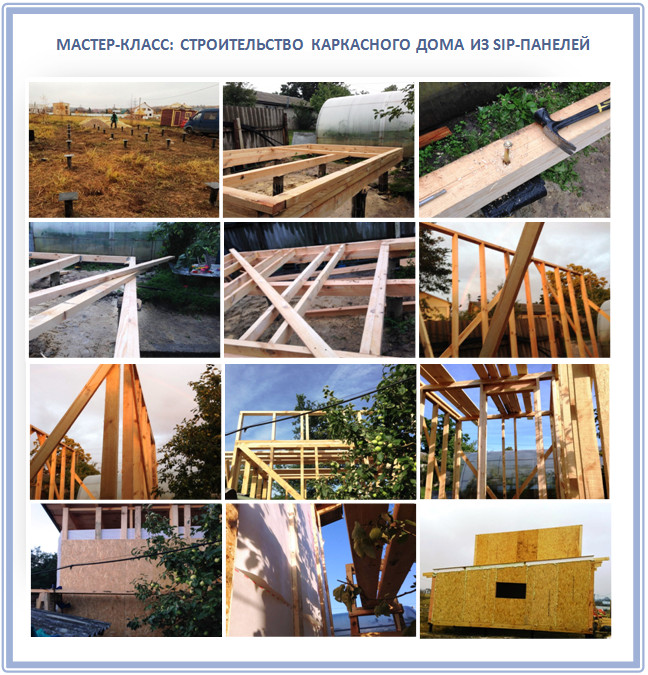
To assemble such houses, a detailed project is initially made, according to which shields of the required size are already manufactured in the factory. We are talking about multilayer panels, which already initially include inner lining, insulation and all types of insulation. All you have to do is attach these shields to the frame of your house, which only takes two days in total. As a result, the whole house, from design to roof arrangement, is built in just a week.
So, insulated SIP panels are the most popular in frame-shield technology. SIP is Wall panel, which is designed to carry longitudinal loads. A frame house based on Canadian technology, which just involves the use of SIP, turns out to be especially warm and integral.
And during construction frame house From such a material, the following question arises: should the roof be made from the same material, or is it still traditional? With beams, rafters and lathing? The fact is that everything here is decided by the length of the overlap.
So, with small spans, up to 5-6 meters, the shed roof of a frame house may well be from SIP. It will be already insulated, durable and easy to perform. Moreover, SIP has good bending strength. But for large spans, it is better to build a traditional floor and reinforced rafters. After all, you can’t make a complex roof out of SIP, but just a shed roof is easy enough:
It is only important to know how to properly connect floor beams with such walls:

Shed roof device on a frame house
A shed roof in the design world is also called a monoslope. Modern architects see a house with such a roof somehow differently than a shed or hip roof: lighter, airier and more stylish.
A shed roof behaves remarkably where spans are from 6 to 8 meters. Usually, the slope of the slope is made to the north, and large windows are equipped in the southern facades. Often, external insulation of such a roof is practiced: from above, extruded polystyrene foam, which is filled cement screed, and on top of it - a roofing carpet.
What is also good, the drainage system in such a roof is simplified and is needed only on one side, and not on two or four at once. But this is not necessary: on a slope oriented to the south, solar collectors are often equipped abroad.
Step 1. Design
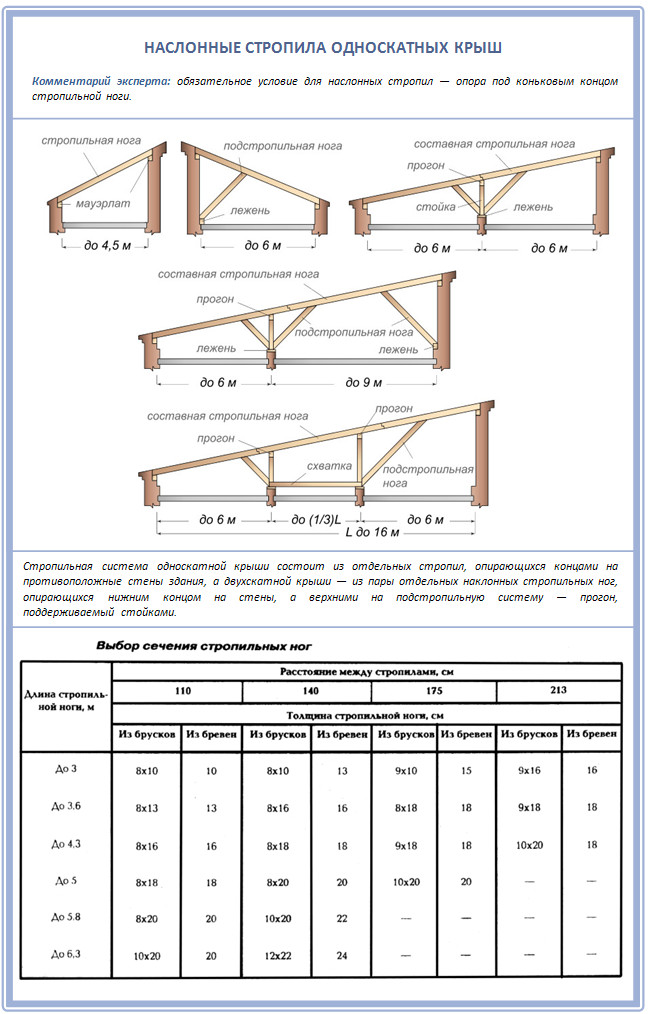
A shed roof of any format always differs from a gable one in that here the rafters are not connected in the ridge, but are attached to the walls of the building with both ends. Those. there is no skate at all. The only exception is the run on which the layered rafters are attached, but it never exceeds the level of the entire slope in height.
If you are building using frame-panel technology, then it will be easiest for you to create a wall difference:

But if you use sip panels or the walls are already made at the same height, then you will have to make roof trusses.
Slanted rafters in a pitched roof are made when the building has an internal strong partition. After all, the longer the rafter leg, the more there is a danger of its deflection or eversion. And therefore, if it is possible to support such rafters, you need to use it.
In this case, a run is attached to the carrier partition:

Now we make the rafters twice as short - so that each of them rests on the wall with one end, and on the run with the other. And be sure to check the angle of inclination of such rafters with a laser level - it must completely match. And outwardly, such a roof will not differ from simpler shed roofs.
But in general, the shed roof rafters can be in all of these options:
Although the rafters in the shed roof of a frame house can be generally non-expanding:

Hanging rafters are good because they can be built directly on the ground, in the form of ready-made farms. After all, their main difference from the layered ones is that the load is now transferred to the rafter triangle itself, and not to the walls of the building. And this is quite reasonable, because most often shed roofs are arranged just on small buildings, such as a bathhouse, a garage or a change house. And the walls of those usually do not please with a special fortress.
So decide: if your building is not distinguished by the monumentality of the walls, make hanging rafters, and if it is more or less strong interior walls- then layered. The choice is pretty simple!
Step 2. Mauerlat cutout
Decided? Then specify the future angle of inclination of such a roof and make a template for the rafters:
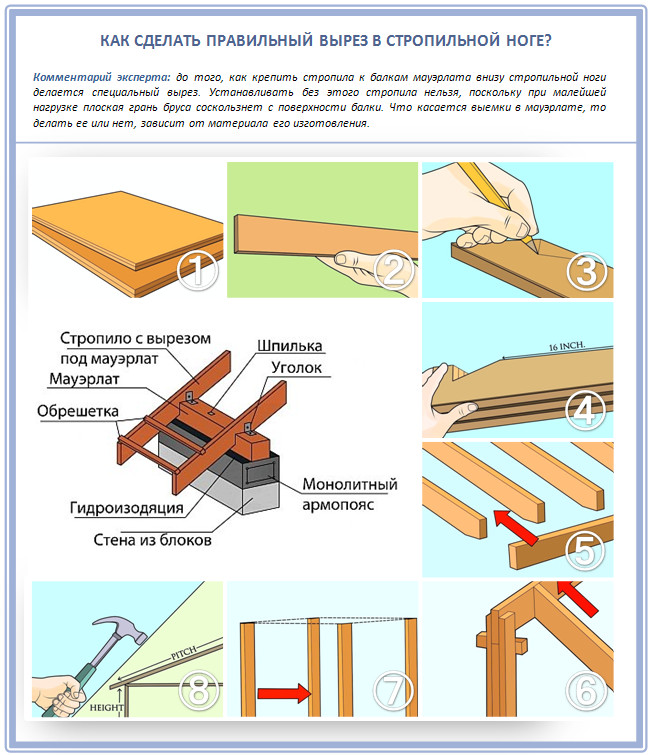
And the cut itself needs to be made in order to support the rafters of the shed roof on the Mauerlats. The main task of the Mauerlat is to compensate for the horizontal unevenness of the walls. That is why, when laying it, be sure to arm yourself with a building level.

Step 3. Making rafters
For this task, you will need the following fasteners:

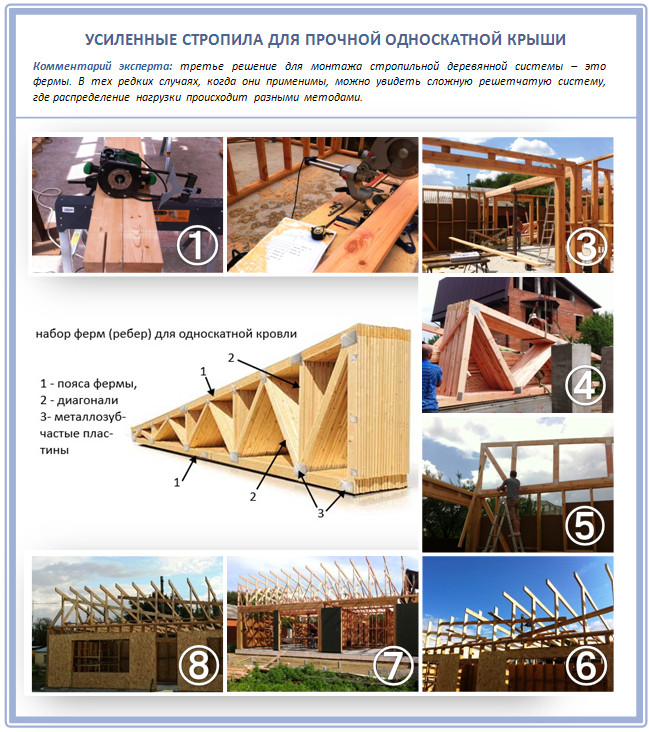
And how difficult your rafters will be depends on what load is planned for them. The higher, the rafters should be more reinforced from the inside:
Step 4. Calculation of the crate
As soon as you fix the rafters, go to the crate. The smaller the slope of the shed roof, the more often the crate should be (up to a solid one):
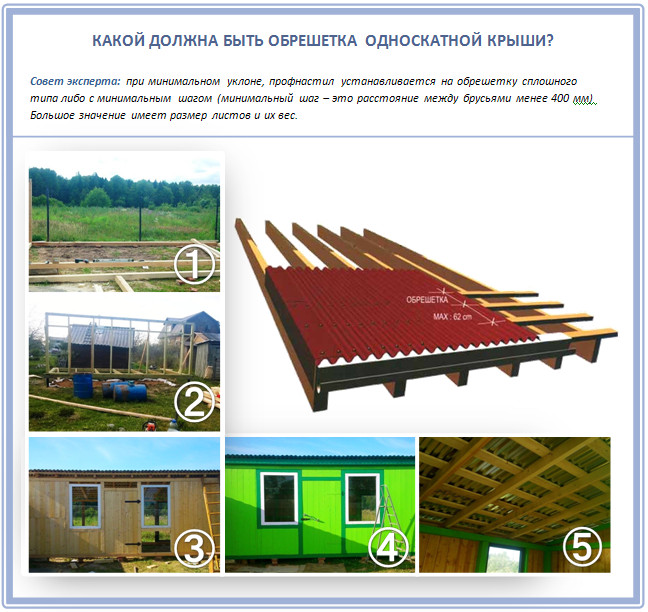
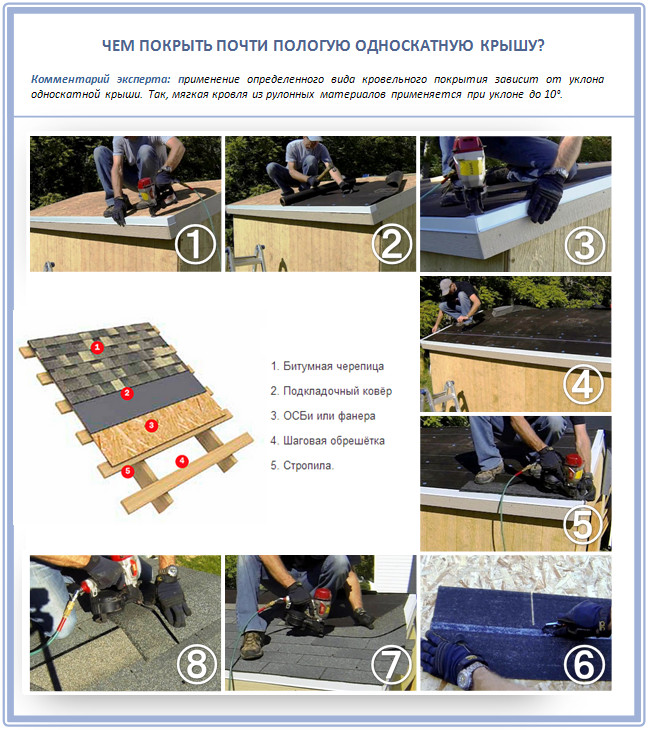
Step 5. Roofing
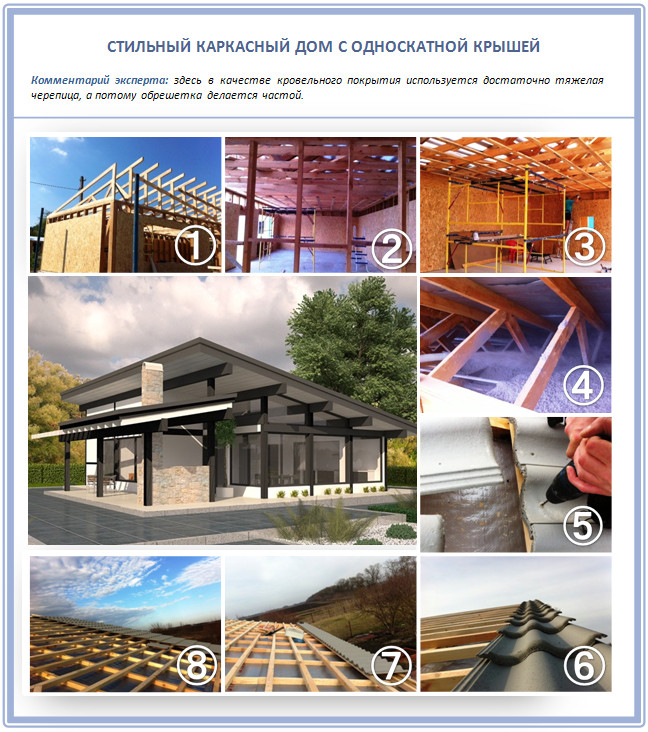
For a slight roof pitch, use soft tiles, which is generally most often found on frame houses:
And on steeper slopes - whatever your heart desires, just calculate in advance the weight of the roofing for the whole house and foundation:
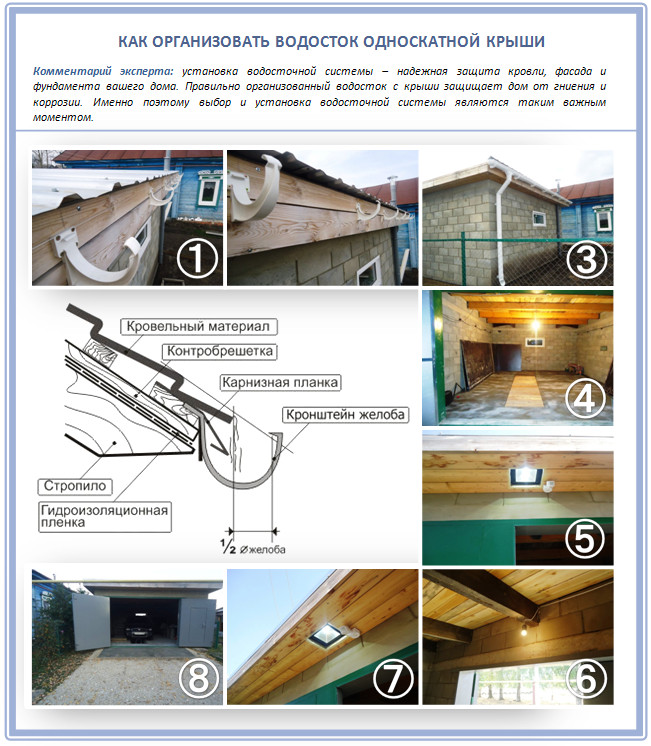
It remains only to lay the selected roofing and arrange a spillway. Which, fortunately, in a shed roof is done on one side only:
Step 6 Glazing
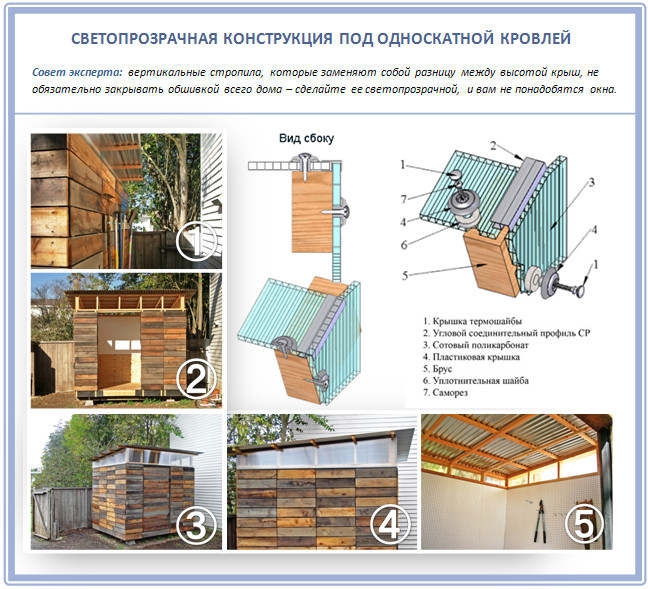
Since relatively recently, a new fashion has appeared in frame construction: cleanliness, conciseness and a lot of glass surfaces. What is most easily achieved precisely through frame technology, for which the presence of a single-pitched roof instead of massive and clumsy multi-pitched ones is a real outlet:
The easiest, according to modern architects, way to bring more light and lightness into a frame house is to make transparent inserts into the roof or completely transmit some part of it. For example, above a covered veranda or part above an attic. And in fact, we are not talking about glass at all, but just about modern roofing polycarbonate, which is more often used monolithic or corrugated. There is a separate article about this on our website, but here we will note only some technical points.
When choosing the thickness of the polycarbonate that you are going to use for the construction of the roof, calculate in advance the climatic and static loads. You have probably seen a photo where beautiful, durable greenhouses have completely broken roofs in the spring? And all because when buying, the owners decided to save on quality, without calculating, such tons of snow fall in harsh Russian winters. You wouldn't want something like that to happen to your roof, would you? After all, replacing the top of an ordinary greenhouse is not difficult, but replacing the roof of a house is a real problem.
You need to fasten profiled polycarbonate sheets to the roof using the same fastening that is used for the metal profile. These are self-tapping and self-drilling screws of the STSD type. The sheets themselves are fastened together with special profiles, which are equipped with EPDM rubber seals. All this is necessary so that such a beautiful roof does not leak. There is also a special connecting aluminum profile- for polycarbonate P-6066. It consists of a special clamping bar and a sealant, but it already needs to be fixed with self-tapping screws directly to the pipe or crate.
In addition, if you still have polycarbonate residues (after all, standard sheets are produced), use it for glazing utility rooms:
And the excess from another roofing cannot be applied in this way.
A house with a shed roof, built using frame technology with a competent approach, will be the most modern and stylish!
A shed roof is an original and at the same time affordable solution for almost any building.
Advantages and disadvantages
Shed roof - a creative solution for a residential building.
The advantages of such structures are as follows:
• Ease of design.
• Cost (saving 30 - 35%).
• Material savings (consumption is 2 times lower compared to gable options).
• Ease of installation.
• Resistant to strong winds.
Tip: for regions with lingering winds, shed roofs are the best option.
• Speed of installation.
• Availability of repair.
A few fly in the ointment in this barrel are present:
• Inefficient use of the attic. It will not work to equip an attic with such a roof.
• The drain is directed to one side. This requires the creation of a solid drainage system.
• The structure is less attractive.
Because of these factors, pitched roofs for large buildings are rarely used (with the exception of combined structures). Most often they are used for outbuildings, garages, baths and outbuildings.
Preliminary procedures
The roof is made from different materials (galvanized, siding, roofing material, etc.). We will consider the option with slate.
Calculations
Before starting work, it is required to make calculations. First of all, you must determine the orientation relative to the prevailing wind. It should pass from the bottom up, as if trying to climb. In this case, the pressure on the structure will be minimal, which will ensure its durability. If we are talking about a combined roof, then it is the shed roof that will set the tone for construction. Its location must be determined first.
When using slate, the slope should be 20-25 degrees (roofing material - 10, tiles 30-35). When it comes to small buildings (for example,) many people prefer to make calculations “by eye”, due to the small amount of materials. For those who are faithful to the queen of sciences, we present the formulas:
1. Lf \u003d Lst x tgA, where Lf is the height of the pediment, Lst is the length of the wall, A is the angle of inclination.
2. Lstr \u003d Lf / sinA, where Lstr is the length of the rafters.
Tip: to find the sine and tangent, use the Bradis table.
Example: the length of the wall is 5 meters, and the angle A is 25 degrees. The length of the pediment will be: 5 x tg25 ° = 2.35 (m). L rafters will be: 2.35 / sin25 ° = 5.6 (m).
Based on the values obtained, we make calculations of materials, not forgetting to add 10% (for cutting and scrap).
Preparation of tools

Laser level - the guarantor of high accuracy
To achieve this goal, you will need the following:
• Board (not edged).
• Wooden bars.
• Slate.
• Nails.
• waterproofing material.
• Knife.
• Level.
• Construction stapler.
• Hammer.
• Saw.
Main front of work
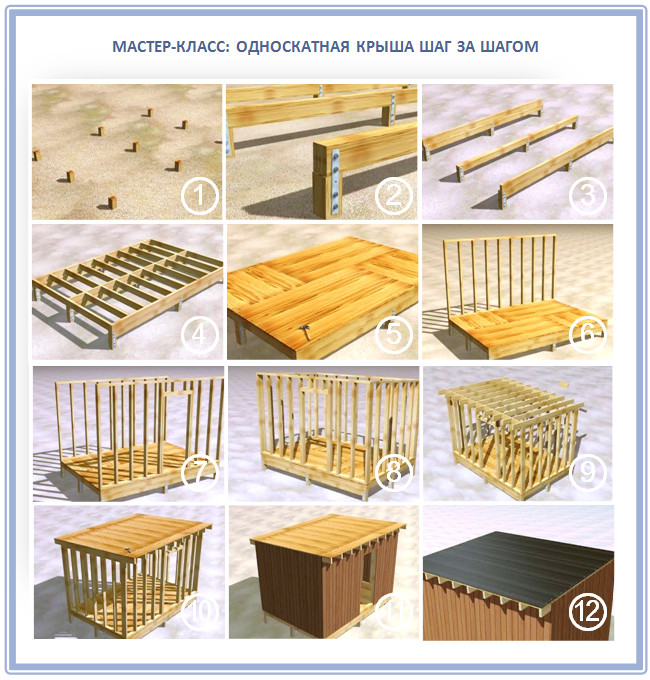
Let's move from theory to practice. The whole process is divided into stages.
Installation of beams
Schematic design device
First of all, we create supporting structure from beams. It will hold all the other elements. The work is done in the following sequence:
• We fasten the beams to the Mauerlats (beam located on top along the perimeter outer wall). This technique is used if there is no reinforcement belt on the walls or it is too uneven.
• Mauerlats are placed horizontally on top of the waterproofing. We fix them with anchors and wire.
• The size of the beams and the pitch depends on the length of the span and the expected weight of the structure. Most often adhere to the range of 75-95 cm.
• On top of the beams we lay the flooring from the boards (for walking on the working platform). An alternative solution is prefabricated scaffolding. They are more stable and reliable than the construction of the boards.
• On fixed beams we mount vertical racks. They must be set strictly according to the level and securely attached to each beam. We fix the racks vertically with the help of braces.
• On top of the supports we put the top run. Due to this design, the rafters will be held, so it must be placed horizontally.
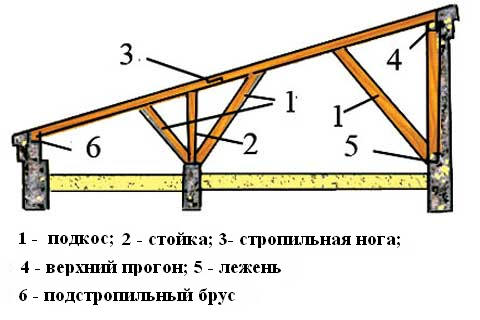
rafters

1 - walls; 2 - rafter leg; 3 - beam; 4 - support; 5 - Mauerlat; 6 - one more support; 7 - brace; 8 - run; 9 - finishing.
Now we mount additional elements - rafters:
• From above they are fixed to the strapping with nails (20 cm) and construction staples (driving angle 45 degrees). From below, the rafters are attached in a similar way. The result should be a set of right triangles.
• Rafters can be mounted directly on a vertical support, but then you need to set them to the level with jewelry accuracy. This is only possible for skilled craftsmen. The upper strapping gives strength to the structure, so it is better not to refuse to use it.
• If the rafters are very long, you will have to create intermediate supports. They are fixed to load-bearing walls. In extreme situations (when the span is more than 4 m), support stops can be created.
crate
We figured out the rafters. Now our task is to create a crate. It is made from 3x4 cm boards (from the point of view of economy, it is better to use non-edged ones) or 5 x 5 cm bars. We nail these elements perpendicular to the created rafters.
We make the step of the crate about the same as the beams. To give wood durability, it is recommended to cover it (bars, beams and boards) with an antiseptic.
A few words about waterproofing
It is recommended to use waterproofing film to protect the premises from moisture. It is sold in rolls. This is done before installing the crate.
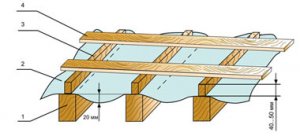
1 - rafters; 2 - film; 3 - slats; 4 - crate.
You need to fasten the film to the rafters with a stapler, starting from the bottom. Finally, it is fixed with the help of longitudinal rails laid along the rafters. The crate is installed directly on the rails, which creates natural ventilation in the room. Waterproofing is required if the slope is small (less than 20 degrees).
Completion - laying the roof
At the end, it remains to fix the roofing material (in our case, slate). Each sheet has prepared holes (nails are hammered into them). The slate is laid with an overlap of 15-20 cm.
Shed roof is the simplest option among all types of roof structures that exist today. When building residential buildings, such roofs are extremely rarely equipped. Predominantly shed roof structures crown a variety of sheds, saunas, garages and other similar buildings.
If you wish, you can handle the device of the considered design with your own hands. It will not take much time and money to work, you just need to follow the recommendations received in everything.
Shed roofing systems have many advantages, which include:
- extremely simple design. To draw up a project and directly install a shed roof, you do not need to have special knowledge and have extensive experience in performing such work;
- resistance to adverse weather conditions. It is only necessary to choose the correct slope of the roof slope, and precipitation will not linger on the roof surface for a long time;
- economy. The installation of a shed roof does not require serious financial investments. Maintenance and repair of such a roof will also not require large expenses.
Thus, a shed roof in many cases is the most optimal solution. The only inconvenience may arise if the owner wants to equip a residential attic. In this case, he will have to additionally understand the arrangement of load-bearing walls with different heights, the features of the truss system and other related points. It is precisely because of the mentioned nuances that most often they refuse to use a shed roof to cover residential buildings.
The first thing you need to pay attention to if you want to build a pitched roof yourself is a project. First, decide in which direction the future roof of your house will be tilted. The slope should be directed to the windward side.
Find out which direction the wind usually blows at your home. Possession of such information will allow you to create the most reliable roof structure and significantly increase its service life.
Deserves special attention rafter system. Although the rafters are extremely simple in the case of shed roofs, it is very important to design them so that the finished frame contributes to an even distribution of incoming loads.

The calculation process takes into account a lot of reference data for a particular region of construction. Do not be too lazy to clarify the necessary information in a separate order in order to avoid problems with the roof in the future.
Choose the correct slope. Consider not only the level of atmospheric loads characteristic of your place of residence, but also the features of the selected finish. The higher the level of precipitation, the more you need to tilt the roof.
![]()
![]()
However, at this point it is important to remember that with an increase in the angle of inclination of the slope, the windage of the structure increases, i.e. the roof will be subjected to higher wind loads. In everything you need to be able to find the optimal values, the so-called. "golden mean".
When choosing a roof slope, be guided by the features of the selected roofing material. So, roll coating can be used with a slope of up to 10 degrees. If slate is used for covering, the slope of the slope should not exceed 20 degrees. In the case of slopes with a slope of 20-35 degrees, it is best to equip a seam roof. If the owner gives his choice in favor of tiles, it is recommended to make a slope with a slope of 25-35 degrees.
When determining a suitable roof slope angle, pay attention to such a parameter as smoothness. finishing material. The smoother the material you choose, the smaller the angle of inclination of the ramp should be.
If your house will be located in an open area, the slope of the slope must be reduced in order to reduce windage. When building a house surrounded by fairly tall trees, the roof must be tilted more so that rain and snow can leave it on their own.
Design features of a shed roof
There are ventilated and non-ventilated pitched roofs.. When choosing a specific option, focus mainly on the purpose of the building. Non-ventilated shed roofs are usually placed above terraces. In such a situation, it will be enough to tilt the slope by 3-5 degrees. However, in winter, the owner of a terrace with such a roof will have to pay extra attention to cleaning the roof from snow mounds.
Ventilated roofing systems are mounted on houses, saunas and other buildings that require the creation of a favorable microclimate. To ensure ventilation, it is enough to create a gap between the layers of insulating materials and prepare technological holes on the side ends of the roof. Ventilated roofs last much longer than their non-ventilated counterparts.
Shed roof structures are equipped on the simplest truss systems. The construction technology of such a roof requires the obligatory presence of a Mauerlat - this is a support beam fixed on the outer walls. The racks of the truss system will rest on this beam.
The slope of the structure is created due to the difference in the heights of the walls of the house. If the load-bearing walls of the building are of the same height, a pediment is fixed on the corresponding wall (taking into account the required slope direction). Thanks to this simple design, the required height difference will be set.
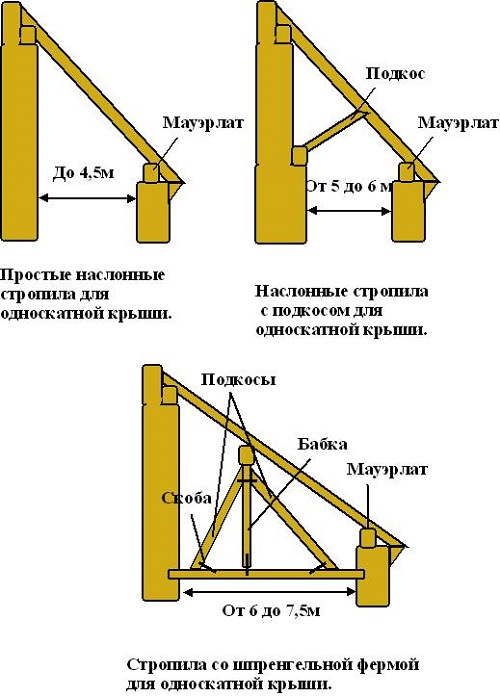
When choosing the design of the rafter system, it is important to take into account such a parameter as the span length. If the walls on which the rafter legs rest are no more than 450 cm apart, no additional strengthening of the rafters is done. Otherwise, the rafters are supported with the help of a rafter leg - this is a bar, the lower end of which rests on the bed. The latter is an additional supporting element, fixed along the wall, which has a greater height. This recommendation is relevant for cases where the span between adjacent walls is 4-6 m.
If the span has a length of 6-12 m, the middle of the rafters should rest securely on a special run fixed on the racks. Rafter legs are installed on the sides of such a rack. Parallel to the supporting walls is the previously mentioned bed. The distance between the post and the wall in each direction can be a maximum of 600 cm.
If the span is more than 12 m, 2 supports are mounted from the run with the involvement of the bed and reinforcing racks. Supports are located no further than 600 cm from the walls. The gap between the individual posts should be no more than 30-35% of the total length of the entire span. To fasten the racks to each other, use a grapple.
Rafter legs are fixed between the rafters and the support posts. Each rack is combined with one rafter leg. Racks are fixed in the direction to the bearing wall, located at a minimum distance.
Preparing accessories for mounting the structure
Pre-prepare everything you need for a shed roof, so that in the future you will not be distracted by the search for missing fixtures.
Single pitch roof mounting kit
- Boards and bars.
- Nails.
- Antiseptic impregnation for wood elements.
- Thermal insulation material.
- Moisture isolation.
- Vapor barrier material.
- Fasteners.
- Hammer and axe.
- hydraulic level.
- Sharp construction knife.
- Yardstick.
- Hacksaw.
- Construction stapler and staples.
- Carpenter's pencil.
- Brush for applying antiseptic impregnation to wood.
It is important that the wood from which the roof frame will be assembled has a moisture content of no more than 20-22%. Check that the boards and bars do not have any defects. Before you start setting up roof structure treat all wooden parts with an antiseptic and fire-retardant impregnation.
The procedure for installing a pitched roof
The technological process of installing a shed roof begins with a Mauerlat device, after which a rafter system is erected and a crate is mounted, and at the end a roofing “pie” is created from insulating materials and a finishing coating.
Mauerlat is one of the most important elements of the system. The Mauerlat functions were described earlier. For the manufacture of this component, a strong timber with dimensions of 15x10 cm is perfect.

Rafters can be made from glued laminated timber 10x10 cm or boards 15x5 cm in size. If the rafter leg has to be assembled from two parts, do everything so that the joint rests on the rack.
Previously, in the places where the rafter legs fit to the Mauerlat in the rafters, special technological cutouts must be created. Use nails to fasten structural elements. When choosing the installation step of the rafters, be guided by the width of the heat-insulating material. Also, be sure to consider the weight of the future finish. The heavier the roofing material, the smaller the spans should be between the rafter legs.

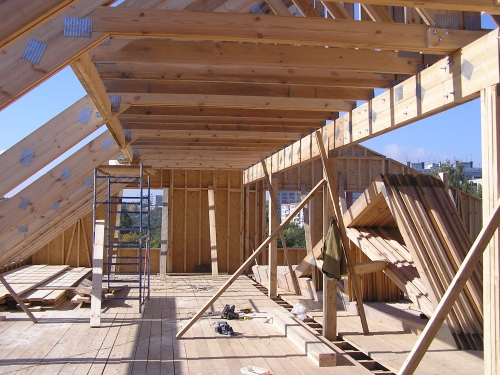
First step. It is best to assemble the elements of the rafter system on the ground. The most popular rafter system for a shed roof is sloping rafters.
The "legs" of the inclined rafters rest on external walls at the required angle. From above, the elements are connected and securely rest on a wooden beam. The latter is supported by struts and racks. Struts are attached to load-bearing external walls or partitions.

Second step. Stuff the crate across the rafters. The crate, as well as the counter-crate, is traditionally made of 5x5 cm bars. However, more and more often, the owners opt for a solid crate, for the manufacture of which plywood or boards of the appropriate thickness are used. A solid crate is as convenient, reliable and versatile as possible.

Third step. Create a counter grid. To do this, fill wooden slats along the rafter legs. So you provide a gap between the insulation and the finish roofing. This gap is needed for ventilation.

Fourth step. Lay the insulation in the space between the rafters. Most commonly used mineral wool. Another common material is polystyrene. If you wish, you can use more expensive and modern thermal insulation material. In most cases, thermal insulation 10 cm thick is sufficient. In regions with a very cold climate, it is recommended to increase the thickness of the insulation layer.
Fifth step. From the side of the attic, attach a vapor barrier film to the rafter system. It is attached without any problems with the help of a construction stapler and staples. Also, this work can be done before laying the insulation, there is no difference.
Sixth step. Lay a waterproofing material over the insulation. It is better to use a special film that will allow evaporation from the under-roof space, but will not allow water to penetrate inside. Such films are sold in hardware stores. To fix the waterproofing, use a construction stapler and staples.
Seventh step. Lay your chosen roofing. At this stage, everything is individual and the order of work depends on which topcoat you have chosen. Stick to the recommended technology.
On this, the shed roof device can be considered almost complete. All that remains is to install additional accessories in the form of a drain, a weather vane, etc. At this point, focus on your own preferences.
Thus, the installation of the roof without any problems is done by hand. There is absolutely nothing complicated in the construction of a pitched roof structure, you just need to follow the instructions in everything and do not forget the recommendations received.
![]()
![]()
Successful work!
Video - Do-it-yourself shed roof step by step
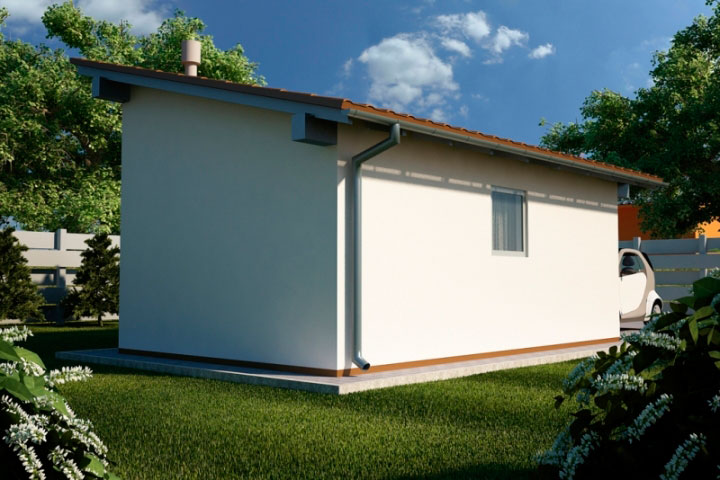
Projects of houses with a shed roof are in demand, which indicates the rationality, efficiency and economic viability of roofing with a single slope.
A shed roof is popular not only in private housing construction, but is also widely used to cover an extension to a house, sheds, temporary buildings, garages and outbuildings. From the point of view of construction, a shed roof is a rectangle located in one plane and without bends.
Benefits of a pitched roof:
- less exposure to wind load. This is due to the fact that the windage at the roof with one slope is lower;
- There are no restrictions on the choice of roofing material. This is due to the fact that the angle of inclination of a shed roof can be minimal, starting from 0 °, i.e. has a completely flat surface;
- simplicity of design. Provides the opportunity to build a pitched roof with your own hands;
- relatively fast construction. Reducing the number of structural elements reduces the construction time;
- light weight. The statement is true for roofs that do not cover the attic floor;
- you can create complex configurations from many slopes located at different heights. Then technically it will be a shed roof, but in practice it will be an unusual roof;
- saving resources - material, time and money;
- the construction of a shed roof is the only option in the case when there is a ban on the slope of water on carriageway, to the site of neighbors, etc.;
Despite a significant reduction in the area under a shed roof, it leaves the possibility of building an attic.
Disadvantages of a shed roof:
Every medal has two sides. So a shed roof has its drawbacks:
- the need to install a more reliable drainage system. Since water flows in only one direction, a larger diameter system must be selected.
Nuance. It is better to give preference to a metal drainage system and fix the brackets at a distance of 40 cm.
- insignificant usable attic area with a slight slope;
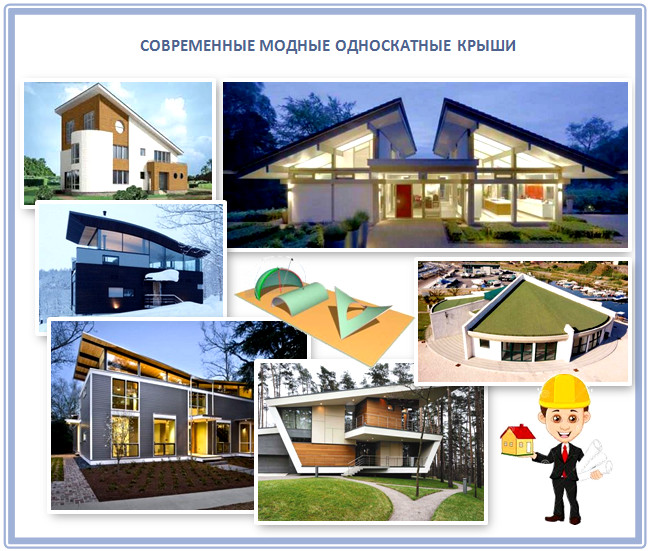
- nondescript appearance. This shortcoming is very conditional. Because with imagination, even a shed roof can be made very beautiful. The original roofs in the photo can transform any country house.
As a result, the benefits are much greater.
The material was prepared for the site www.site
How to make a shed roof with your own hands
Selection and preparation of lumber
To make a roof with one slope correctly, you need to prepare the appropriate quality material:
- Log or timber. Mauerlat, beams and rafters will be made of them, so you need to pay attention to the quality of the lumber. The wood must be dry. Permissible humidity is not more than 20%. Preferably from larch or coniferous species. The cross section of the beam depends on the size of the roof slope and the weight of the roofing material. In any case, it is better to take with a margin - a bar with a diameter of at least 100 mm, a log with a section of 100x100, 120x120 mm. Bars pre-treated with antiseptics will last longer. In addition, they will be protected from fungus, mold, wood bugs and other pests.
Nuance. Glued laminated timber has higher characteristics. Despite the slightly higher cost, it is better to give preference to this material.
- Boards (25x100) or timber (50x50) for battens. Suitable material is not the highest grade. The main thing is dry, not very knotty and without bark.
Even if you plan to close the OSB slope, you still need boards in order to move normally on the roof.
Nuance. The thickness of the board depends on the type of insulation that will be used.
- Edged boards. They have higher requirements. Since they are installed in a conspicuous place and play the role of an end (wind) bar.
Nuance. These boards can be replaced with a special additional element if a metal tile is used.
- fasteners. Nails, self-tapping screws, anchor bolts, burnt wire. For each fastening, we will use the hardware that will provide a more secure fixation.
Nuance. arranging pitched roof in areas with strong wind load, it is better to use two types of fasteners in one place.
- insulation;
- vapor and waterproofing film;
- roofing material.
Of the tools you will need: a hammer, a hacksaw for wood, a stapler, an ax, a knife, a screwdriver. As you can see, all those tools that any owner can find.
Shed roof calculation
This is perhaps the only stage that is best left to professionals. You can use a calculator. But in order to be able to control the correctness of the calculation, you need to have basic information about the consumption of material.
- bar. The total number and cross section of the beam is determined by the parameters of the slope. The height and length will determine the number of rafter legs and their length. The legs are set at a distance of 0.6-1 m.p.
Advice. The thinner the beam, the more often you need to mount the rafter legs.
The optimal section, depending on the length of the leg, can be calculated from the table.
- Boards. The total footage of the boards depends on the roofing material. For example, the pitch of the sheathing for a metal tile is 300 mm. for the two lowest boards and 350 mm. for others. The crate for slate is mounted in increments of 440 mm. For a flexible roof, the step is arbitrary, since the laying technology provides for the manufacture of a solid and even surface.
Nuance. It is better to withstand the requirements for the installation of roofing material. Otherwise, the manufacturer declines all responsibility for its functioning.
The amount of lumber for a windboard is equal to the perimeter of the slope minus the length of the bottom of the slope. The bottom is closed with a cornice strip.
insulation is equal to the area of \u200b\u200bthe slope.
Advice. The calculation is affected by the type and density of the insulation, as well as the purpose of the attic. For example, to insulate the roof, you need to lay mineral wool with a density of 50 g / sq.m. in three layers. The higher the density, the lower the number of layers.
There should be at least two layers of insulation. They need to be laid in a checkerboard pattern to eliminate cold bridges.
- roofing material. Influences the permissible angle of the roof slope. There are various schemes for determining the optimal angle, taking into account wind and snow loads. You can refer to the diagram below.
An increase in the angle of inclination leads to an increase in the area of \u200b\u200bthe slope, and hence to the consumption of material. The optimal angle is 25°. This is enough for a roof covered with the most popular materials - metal tiles, slate, seam roofing, corrugated board. And the wind load is reduced to a minimum level. For your information, an increase in the angle from 0° to 45° leads to an increase in the slope area by 1.5 times.
At the same time, for regions with a significant snow load, a shed roof should have an angle sufficient for snow to slide. Otherwise, the snow will push through the roofing material.
Nuance: the ramp should be tilted to the windward side.
Advice. Accounting for the terrain will affect the angle of inclination of the pitched roof. If the house is surrounded by trees that will reduce wind speed, the angle of inclination should be greater. If the cottage is located in an open area, the slope can be made more gentle. The wind will blow away the snow.
Do-it-yourself shed roof installation implies the presence of drawings. This will save you from having to keep in mind all the dimensions and remember how it was planned to fasten this or that element.
Shed roof installation - step by step instructions
1. Installation of the truss system
There are two options for the device of the truss system:
- installation of load-bearing roof elements (rafters) on walls that are on different levels. The exception is absolutely flat roofs;
- the manufacture of triangular trusses, combining a rafter, a beam and a rack. Such a design can be made if the walls are on the same level.
The first option for installing rafters is cheaper, as it simplifies installation and reduces wood consumption. But, in this case, it is required to raise the load-bearing wall to the desired height. To rest the upper part of the rafter leg against it.
The second, on the contrary, increases the consumption of wood. But it reduces the installation time and simplifies the work, because the installation of triangles can be performed on the ground. On the other hand, in order to lift ready-made triangles, special devices are needed.
The choice of method does not affect the quality of installation or the service life of the truss system. Thus, the final choice is up to the developer.
The second point that is important in the construction of the roof is the arrangement of the rafter leg. Or rather, the need to use struts (additional supports). The number and location of the struts depends on:
- the distance between the wall and the junction of the roof;
- rafter leg length;
- the weight of the rafter leg (type of wood and its diameter, section);
- the angle of inclination of the roof;
- type of roofing material;
- type of insulating material.
2. Installing the Mauerlat
Mauerlat is an additional element that allows you to evenly distribute the load on the load-bearing walls. The lower edge of the rafter leg rests on it.
Mauerlat is installed on a load-bearing wall or between beams and securely fastened.
The material from which the load-bearing wall is built determines the type of fasteners used:
- for brick buildings, you need to use annealed wire;
- for buildings made of porous materials - reinforcement, with a length equal to 2/3 of the width of the block;
- for a log house from a bar - an anchor bolt. But often the upper crown plays the role of a Mauerlat;
Advice. To protect the Mauerlat from moisture, you need to put it on roofing felt or other insulating material.
3. Installation of floor beams
It is worth noting that the rafter leg can rest on the floor beams. Then the installation step of the beam must correspond to the calculated installation step of the rafters.
The fastening of the rafter leg to the beam is shown in the figure.
Regardless of the option, the leg is installed on the Mauerlat by washing down. Which must be done exactly so that the gap between the leg and the Mauerlat is minimal.
4. Installation of rafter legs
With a span width of more than 4.5 r.m. install spacers (rafter legs). Their purpose is to prevent the deflection of the beam. Installation of spacers, depending on the length of the span, is shown in the photo.
5. Installation of shed roof sheathing
The step of the lathing depends on the type of roofing material. The batten board is attached to the rafter leg with nails.
Advice. For pitched roofs attic floor you need to think in advance about the installation location of the roof window. In this place, the crate is not needed, but it is required to install two horizontal lintels for a more reliable fixing of the window. Jumpers are made of the same material as the truss system.
Shed roof construction - video
6. Shed roof insulation
It is carried out by any heat-insulating material.
Warming sequence:
- waterproofing attachment. The film is overlapped with a construction stapler;
- insulation installation;
- performing a checkerboard. It is needed so that the vapor barrier film does not touch the insulation;
- vapor barrier installation.
Advice. More efficient use soft insulation, it fills voids better and is easier to install.
With a minimum roof slope, it is better to use loose insulation - expanded clay or sawdust. Even with water flowing, this material does not get wet.
7. Installation of roofing material
It is carried out in accordance with the requirements put forward by the material manufacturer. We recommend that you familiarize yourself with the installation technology of metal tiles and ondulin.
Prevention of errors and damage
Shed roof will last longer if you periodically inspect its main elements. Incorrect calculation, improper installation or moisture damage may lead to the need to strengthen or replace part of the rafter leg or other element. Sometimes wood is affected by rodents or tree bugs. Depending on the degree of damage, the tree must either be treated or completely / partially replaced.
From time to time, you need to remove the debris that has accumulated on the roof slope. After all excess weight she has absolutely nothing to do. It will only trap snow and increase the load on the roof.
Conclusion
Within the limits of the article, we tried to consider in detail all the nuances regarding the construction of shed roofs. Starting with studying the advantages, disadvantages of the roof and choosing the materials necessary for work, and ending with step-by-step instructions on how to build a shed roof with your own hands.