Specialization: decoration of facades, interior finish, the construction of dachas, garages. Experience lover-gardener and gardener. Also there is an experience of repair of cars and motorcycles. Hobbies: playing a guitar and a lot of other things that do not have enough time :)
Warming wooden house outside allows not only to provide comfortable living conditions, but also to save on heating in winter. However, it is necessary to be engaged in this procedure correctly, as a violation of technology can lead to the fact that the walls of the building will very quickly become unusable. Therefore, in the following, I will describe in detail how the external insulation of two modern technologies.
Features of insulation
First of all, it should be noted that there are two technologies for outdoor insulation wooden houses:
- hinged (ventilated) facade - the principle of this technology is the installation of the frame on the wall, which is later lined with siding, lining or other finishing material. The heater is located in the space between the wall and the finishing material.
This technology is the most preferable, as wet work is excluded. In addition, the facade is more durable and durable; - wet facade - in this case, the walls of the house are pasted with a heater, and then plastered on a special technology.
Below I will tell you how to properly perform warming at home in both cases.
Suspended facade
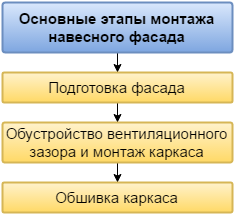
The process of mounting the hinged facade includes several basic steps:
Materials
First of all, let's consider what and how to insulate wooden house outside on technology hinged facade. To do this you need the following materials:
| Materials | Features and functions |
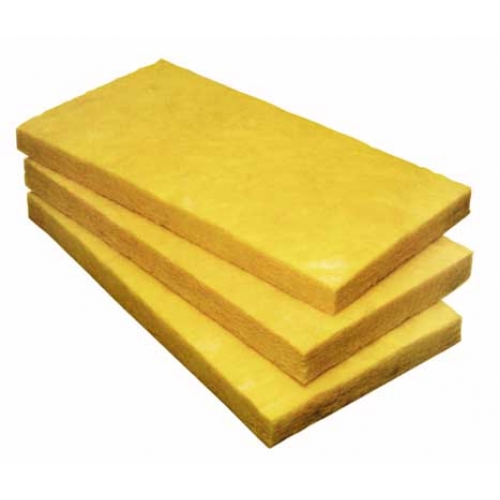
| Heater | The optimal solution is mineral wool. I must say that people are often interested in - is it possible to insulate the walls of a wooden house with foam plastic? In principle, the use of foam is allowed, however, it should be taken into account that this material is combustible enough, besides it does not let steam pass, which will negatively affect the indoor microclimate. Therefore, it's better to overpay a little, but still use minvat for these purposes. |
| Frames for the frame | As a rule, we use beams or even boards. Attach them to the wall using metal corners or brackets. I must say that as an alternative to the boards or bars, you can use the profile that is used to mount the drywall. |
| Steam insulation film | Protects the heater from getting wet. |
| Finishing material | This can be a lining, block house, siding or any other facade material. |
| Intervent insulation | Usually a jute bag is used, however, it is possible to fill the slots with a special foam or other suitable materials. |
| Antiseptic for wood | Protects the walls from the negative effects of moisture, putrefaction and other biological effects. |
You can insulate the foam with your own hands the base of the house. This material is strong enough, resistant to various negative effects, and also has the property of self-extinguishing in the event of a fire.

Preparation of the facade
Before you insulate the wooden house from the outside, carry out the following preparatory work:
- perform dismantling of all hinged elements that can interfere with work - these are ebbs, canopies, window sills, antennas, etc .;
- then treat the walls with antiseptic impregnation;
- in the completion of the work, it is necessary to fill with the insulator all the intervening gaps, if any.
To start warming the wooden house can be no less than a year later, its construction, so that the building managed to shrink.

Mounting of carcass insulation
The next stage is installation. The instruction looks like this:
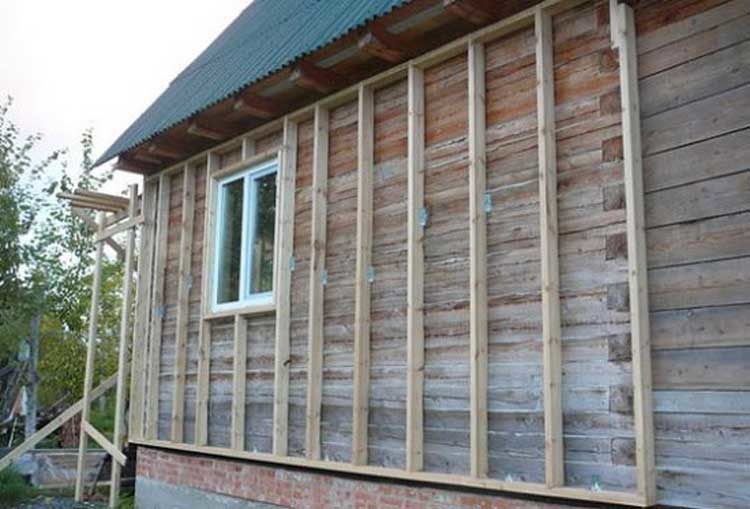
- installation of the frame begin with the arrangement of the ventilation gap. To do this, attach a board about two centimeters thick to the walls. You can arrange them both vertically and horizontally, the main thing is that later you can attach the racks to them;
- further to the boards a vapor barrier film is attached with a stapler. It must necessarily be lapped and vnatyazhku that between it and the wall formed space. It is desirable to glue the joints of the film with adhesive tape.
I must say that the network offers a lot of schemes for warming walls without ventilation gap, however, in this case, moisture can accumulate in the space between the wall and the heater, which leads to negative consequences; - after that the racks are assembled. Begin with the installation of two outer racks, between which stretch ropes, serving as beacons for intermediate racks.
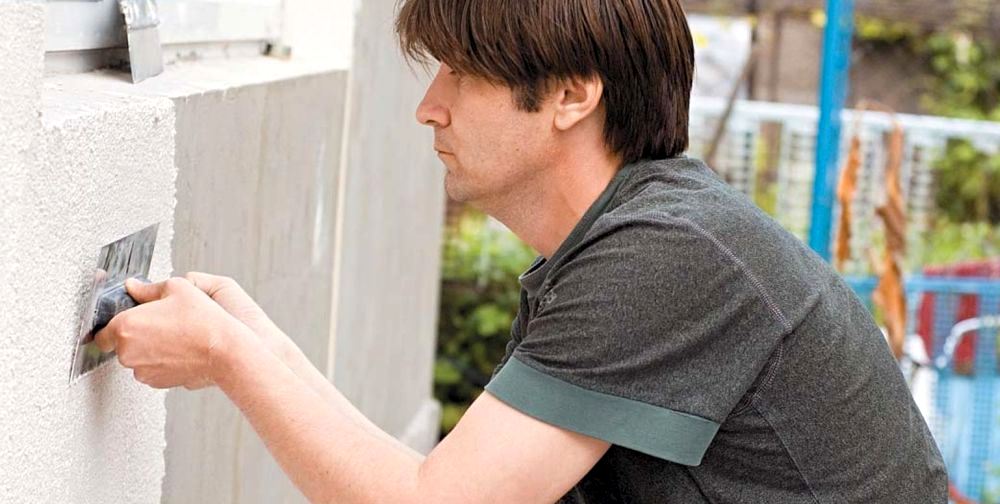
The upper racks are installed at the same distance from the wall, strictly vertical. If you use boards as racks, then fix them on the walls with metal corners and screws, as shown in the photo above. After that, install the intermediate slats, which are located one or two centimeters from the width of the plates of the mineral wool.
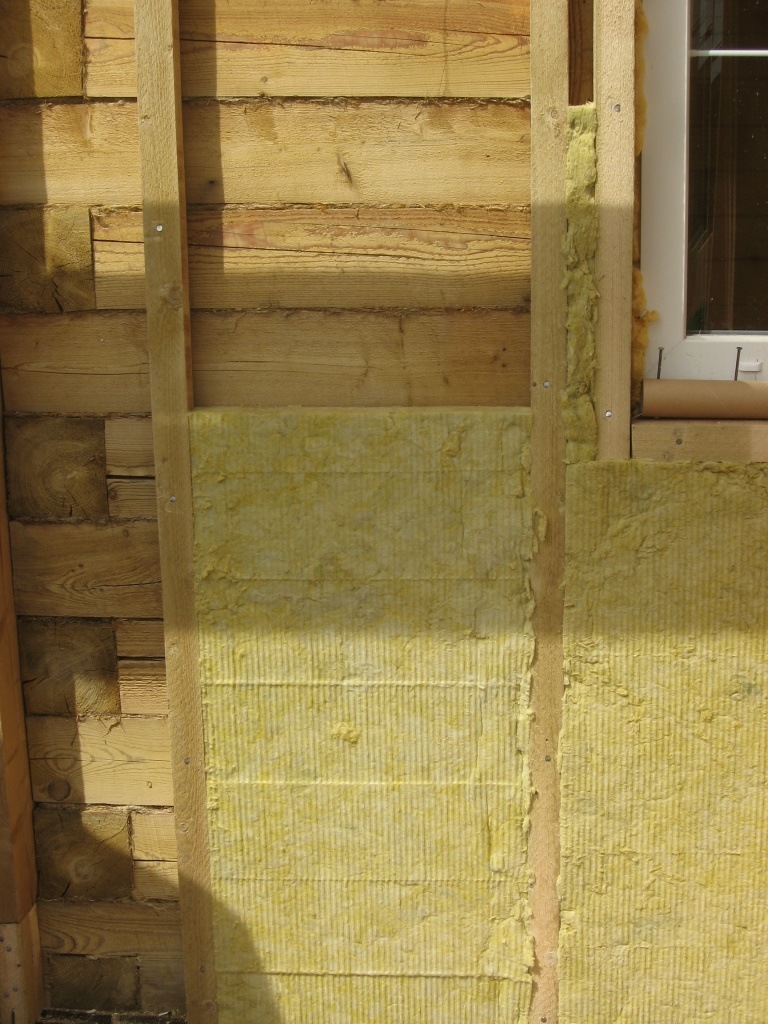
Then the thermal insulation material should be laid in the space between the posts. The mats should fit tightly to each other and to the posts, so that no crevices are formed in the heater;
- then a vapor barrier film is attached to the frame. As in the first case, it must be overlapped. Lock the film can be using horizontal rails, which will additionally hold the heater;
On this, the facade is finished with its own hands.
Skeleton casing
The final stage of the work is the skinning of the frame. As already mentioned above, there are several options for finishing. If you do not know what material is better to decorate the facade, then focus primarily on value, practicality, individual preferences, etc.
For example, lining is an environmentally friendly material, besides it allows you to keep the attractive appearance of a wooden house. Vinyl siding is more practical, easy to clean and does not require care.
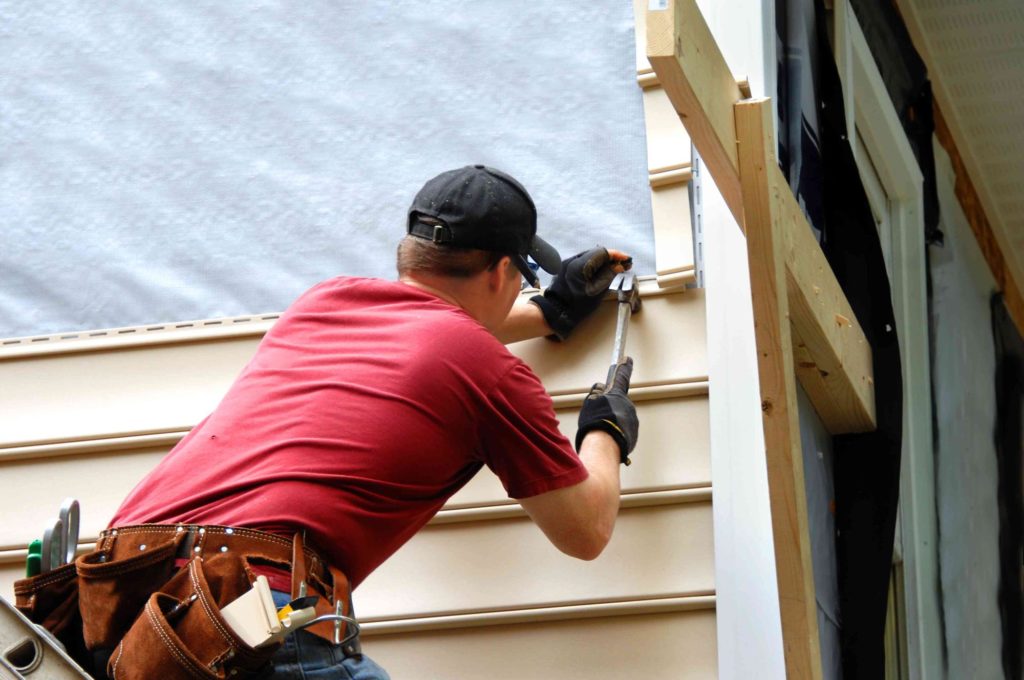
So, if you decided to use siding for plating, then the work is done in the following order:
- before you attach the panels to the wall, you must install a starting profile, which is located horizontally along the perimeter of the house. In this case, the distance from the ground or blind area to the profile should be about 10 cm;
- then corner corners are installed in the corners of the house;
- after this, the first row of panels is installed. In the lower part, the siding is started in the starting profile, and from above it is attached to the crate by self-tapping screws;
- according to this scheme the whole house is covered;
- before installing the last panel, fix the finish profile;
- in the completion of work, additional elements are installed - slopes, low tides, etc.
On this the siding of the facade is completed with siding. I must say that approximately the same principle is attached and vagonka, the only thing for its installation is not used profile.
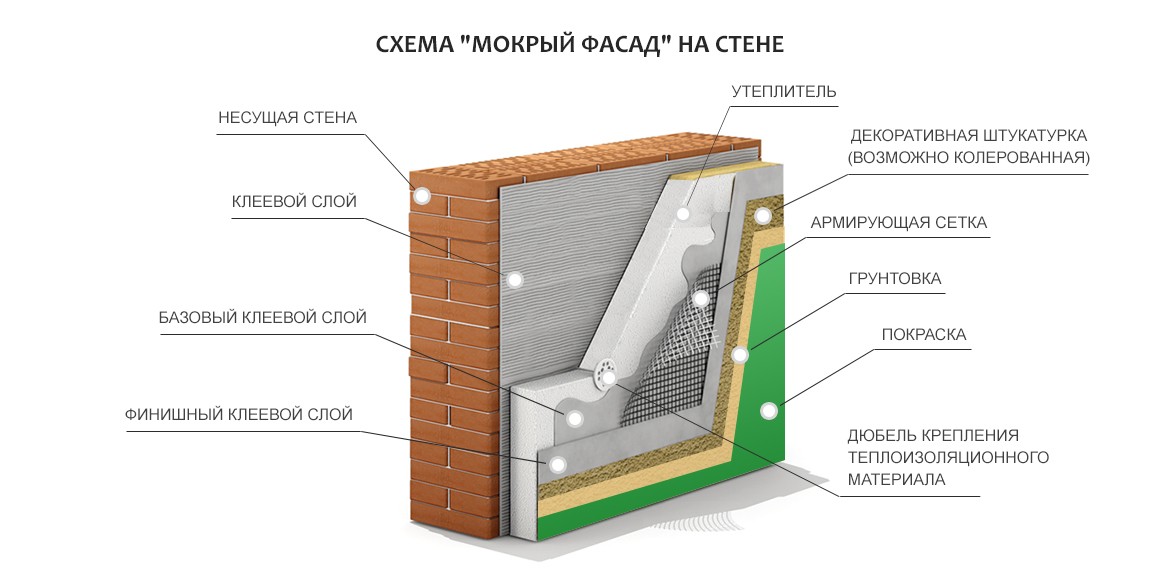
Wet facade
The process of mounting a wet facade involves several basic steps:

Preparation of materials
Choosing what kind of insulation is better to perform the thermal insulation of the walls, in this case it is also better to give preference to the mineral wool. Of course, in addition to insulation, you should also purchase some other building materials:
- adhesive for mineral wool;
- dowels-umbrellas;
- fiberglass reinforcing mesh;
- perforated corners
- decorative plaster;
- a primer;
- facade paint.
After preparing all these materials, you can start working.

Wall warming
As in the previous case, the work begins with the preparation of the facade. This procedure is carried out as described above.
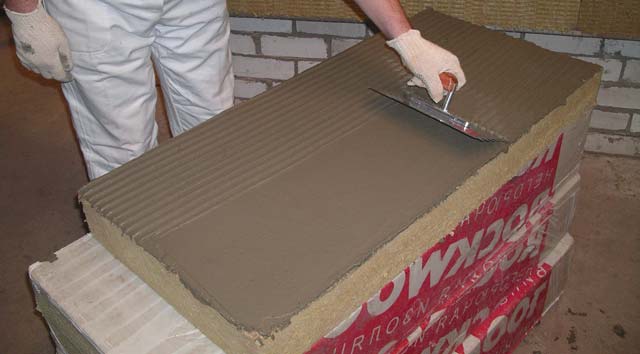
Then the walls are glued with mineral wool under the plaster:
- first of all, you should prepare glue, according to the instructions on the package;
- then apply the glue on the mineral mats with a notched trowel. If the walls are uneven, the mortar should be applied with "lintels", which will allow adjusting the position of the plates against the wall.
In the process of gluing mats, use the building level, and also tighten the beacons so that all the plates in each row are in the same plane;
- on this principle all the walls of the house are pasted;
- then the mineral wool is additionally fixed to the wall by dowels-umbrellas. To do this, drill holes in the wall directly through the heater and hammer the dowels in them with a hammer. Umbrella hats should be slightly recessed;

- after that, you need to paste the window openings with mineral wool. This procedure resembles the installation of slopes - cut the cotton wool on the panels of the right size and cover them with openings. On the window slopes dowels are usually not installed, but on the door they need to be installed.
- then you need to check the quality of the work done, applying the rule to different parts of the walls. If there are hillocks on the wall, they can be removed with a special float;
- further on all external corners glue perforated corners, using for this purpose the same glue;
- at the end of the work, glue all the dowel cores with glue, so that in the end the facade had a smooth surface.
When working with mineral wool, use personal protective equipment, as getting on the skin it causes irritation.
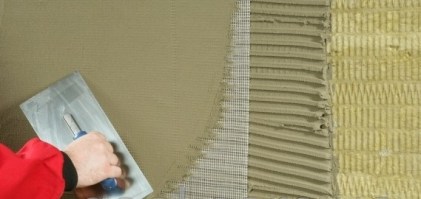
Reinforcement
The next stage is reinforcement. In fact, this is a rough plastering. It is carried out in the following sequence:
- prepare the mesh by cutting it into the desired size. In this case, consider that on the wall it should be overlapped about 10 cm;
- then cut slat liners;
- then glue the mesh to the slopes. To do this, the adhesive should be applied evenly a few millimeters thick on the surface of the mineral wool, after which immediately attach the mesh. To "drown" the mesh in the solution, from above, draw a spatula on it, as shown in the photo above;
- after reinforcing the slopes, the grid is glued to the walls by the same principle;
- after the surface is dry, the adhesive is applied once again with a uniform thin layer. Use a wide spatula to remove any irregularities on the surface of the walls. This procedure is carried out on the same principle as shpatlevanie.
People are often interested in forums - how is an old wooden house better insulated? If the structure has lost its geometry, then the best choice there will be a brick facing. In this case, between facing wall and mineral mats are laid with wooden walls.
Decorative plastering is much easier and faster than reinforcement. The main thing is to follow a certain sequence of actions:
- first of all, it is necessary to treat the surface of the wall with a primer. To do this, pour the liquid into the tray and then apply it to the wall with a paint roller. To achieve maximum effect, the primer is applied in two layers;
- then prepare the solution according to the instructions on the package;
- then the decorative plaster should be applied to the walls with a small or wide spatula. The layer should be as thin as possible;
- when the plaster begins to seize on the walls, it should be wiped with a malka, making circular or reciprocating movements by hand. This will create a certain pattern.
I must say that the application of decorative plaster within a single wall must be performed in one step, otherwise the wall on which you interrupted work will not be visible to the wall.

Painting
Painting is also a simple and quick procedure:
- work begins with the preparation of paint - the composition should be stirred and, if necessary, tinted;
- then pour the paint into the bath for the paint roller;
- then dip the roller into the paint, lightly squeeze it on a special area in the bath, and treat it with a wall;
- for touching hard-to-reach areas, use a paint brush;
- after drying the surface of the walls, apply a second coat of paint.
Conclusion
The warming of the wooden house from the outside, as we found out, can be done in two ways. However, in any case, in order to achieve a qualitative result, it is necessary to strictly follow the above instructions.
For more information, see the video in this article. If you have any difficulties during the work, ask questions in the comments, and I will be happy to help you.
It would seem that the question is quite simple - and the methods have long been worked out, and the choice of heat-insulating products is significant. But after all, it's not about any structure, but about a wooden house. Concerning its warming there are a number of nuances that can not be neglected.
It's all about certain features of this building material, like wood. First of all, it is its susceptibility to putrefaction, the ability to "breathe" and keep the heat well. The latter two properties allow maintaining comfortable conditions in the premises, as a rule, without significant additional costs. For example, for the acquisition (and professional installation) of climatic equipment, due to increased consumption of en / resources (including fuel for the boiler). At least, the indicated devices are operated in wooden houses not as intensively as in buildings made of brick or cellular concrete. So, let's consider in detail how and what is best to insulate a wooden house.
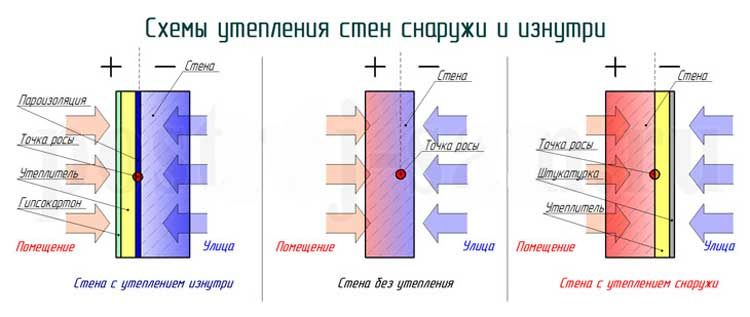
In order to understand the technology of works, it should be explained why the insulation from the outside for a wooden house is the only true solution. Such a method of reducing heat losses is the main one for any structures, since it has a number of advantages. For example, does not reduce the useful area. This is one of the drawbacks of arranging this protective layer from within. But for the log is more relevant another.
It's all about the so-called "dew point". Outdoor installation insulation removes it from the perimeter of the house, and condensate is formed in the ventilated space. Therefore, in the cold time the tree does not freeze, and in the warm - the process of decay does not begin. If the insulation is laid on the walls of the premises, then the "point" is shifted inwards. As a result, the logs (cant timber) remain unprotected, and the condensate settles in the thermal insulation material, which initiates the development of mold and fungus, not only in it, but also in the rooms.
Than to warm a wooden house
If you take a closer look, the choice of materials is not that big.
Plates of expanded polystyrene
They differ not only in regular geometry, but also in "rigidity". Therefore, to fix them, the foundation must be carefully leveled. For the timber is still acceptable, especially if the walls were erected by professionals. And what about the logs? In addition, the foam does not pass through not only moisture, but also air. Therefore, the main attraction of a house made of wood - regulation of the microclimate - will be completely leveled.

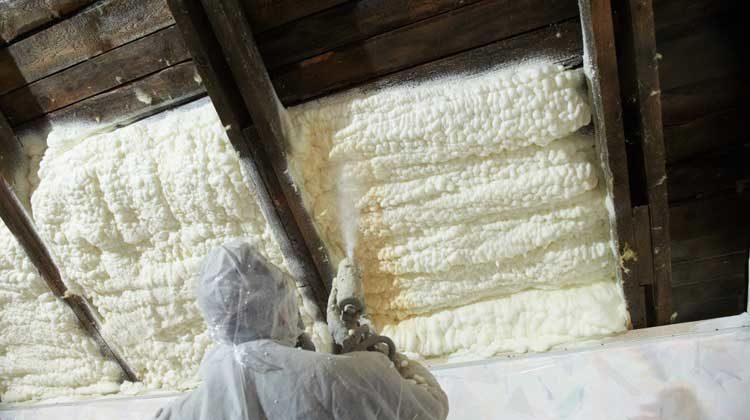
Sprayable formulations
Typically, polyurethane. The disadvantages are even greater, and special equipment is also needed. But the firms that provide this service (for PU insulation) keep silent about another rather significant disadvantage - low maintainability of the layer. After all, it sticks to the surface on which it is applied. If in the literal sense of his "pick off" from the brick or reinforced concrete will still work, then what about the tree? After all, it is rather malleable to mechanical influences, and damage to logs or timber in this case can not be avoided.
There are other types of insulation for wooden buildings, which are recommended to use the authors of some articles. But all listed materials (particleboard, flax fiber and the like), taking into account the specificity of the log structure and in terms of durability hardly deserve attention.
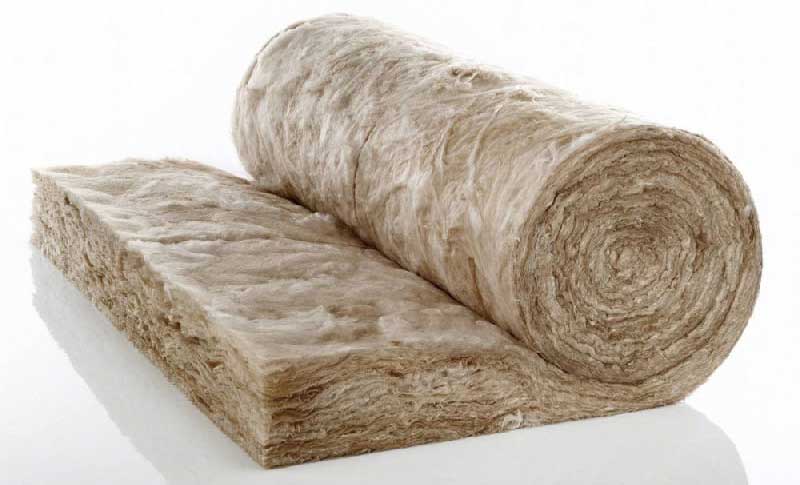
To insulate buildings from wood, only mineral wool should be used. Excellent vapor permeability, elasticity, low weight - in fact, all the main criteria for a wooden house, this thermal insulation completely corresponds.
Warming the house outside - how to do it
Surface cleaning
It is with this that any repair or finishing work begins. For a wooden house, primary inspection is especially important. It is necessary to identify all pockets of wood damage, determine their nature, ways and means to repair defects. This is a separate topic, and.
Treatment with special preparations
For a wooden house, both fire suppressants and antiseptics are equally relevant. Features of their use and formulation are indicated on the package. It is clear that it is desirable to engage in this with positive weather and clear skies.

All types of wood are characterized by porosity. Although more often speak of the hardness or density of the lumber. Proceeding from this, the appropriate compositions should be selected. Their list is quite large, and the specifics of the application can be very different. The best are those that penetrate the structure of the material deep enough and do not "close" the pores. Otherwise, the tree can not "breathe".
Installation of the vapor barrier layer
Its main purpose is to ensure the ability of the tree to self-regulate the microclimate and at the same time protect the material from direct contact with moisture. There are many varieties of films and membranes on sale. If the first option is chosen, then it must be taken into account that all the samples differ in their performance, and therefore in the specific use. The film costs less, but for a vapor barrier you can not use the usual modification from the p / e. It is airtight, and together with water it does not let in air. It is worth considering when choosing products.
The fastening on the outside of the wooden house is quite simple - using a stapler (staples). It is only necessary to take into account that the strips must be mounted with a slight "overlap", and the joints covered with adhesive tape (adhesive tape).

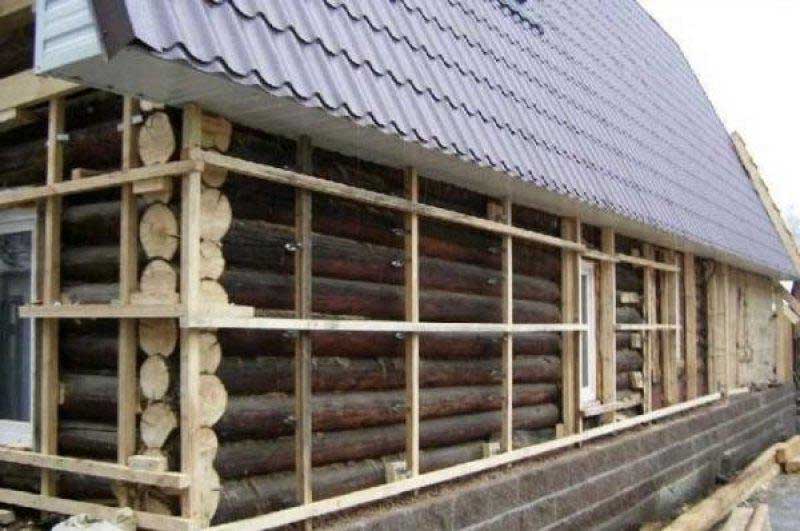
Construction of the supporting frame
It is also called a crate. What is its peculiarity with respect to the wooden house? It is necessary to take into account the coefficients of thermal expansion of materials that are fastened together. Metal racks in the installation are much more convenient, but since the house is made of wood, it is not practical to use them. Only wooden bars corresponding length and section.
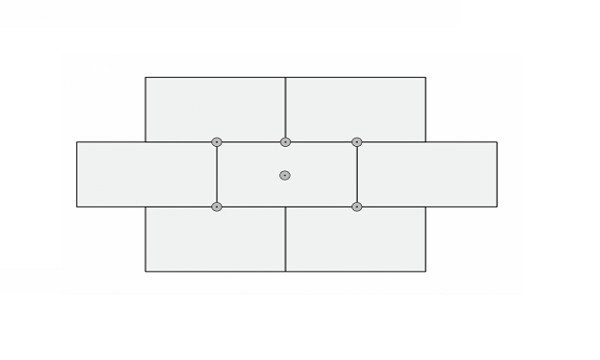
Dimensions of seats (cells of the crate), as well as its design, are selected based on the geometry and performance of the insulation. Mineral cotton wools are sold with slabs or rolls, so it is not difficult to make a layout scheme.
Another nuance concerns the fasteners. For self-locking screws or screws, do not use screws. They "tightly" grab a load-bearing structure, but this should not be. The wooden house is somewhat "played" under the influence of external factors (a feature of the material), so the fastening to it of the battens is only by nails.
What to consider
The reliable position of the heater is ensured by the fact that during the laying process the samples are slightly compressed. Then, due to their elasticity, they straighten somewhat, which determines their reliable "coupling" with the slats of the supporting frame. Counting its parameters, you need to select the cell sizes so that they are slightly less than the thermal insulation products. Then they will not need any additional fixing on the outside of the house.

Laying of insulation material
There is nothing complicated in this, especially if the scheme is made correctly. Minvats are well cut with an ordinary knife, bend, so no problems arise.
Features:
- On the problem areas of the walls (complex configuration, slope and the like) it is worthwhile additionally fixing the insulation with special nails - anchor ones.
- Slots in places of abutment of a heater to racks of a skeleton are closed with the same adhesive tape building.
- Installation of thermal insulation is carried out from the bottom upwards, in rows.
- In regions with frosty winters, the insulation (depending on the thickness of the samples) can be stacked in 2 layers. In this case, the slabs for the second are scraped so that, after mounting, their joints in the rows do not coincide. That is, a fastening with a small offset.
Calculator for calculating the amount of insulation
Using a conventional foil film will cause moisture to accumulate in the heater. There is nothing to comment here.
Control Grating
It is necessary to create a so-called ventilated space. In most cases, it alone is sufficient to ensure an effective drainage of liquid due to natural circulation air flow.
The parts of the counter are rigidly fixed on the rails of the supporting frame. Their elevation above the last, and also what exactly to use as these elements of the design, depends on the material finishing finishes wooden house. This can be both trimming bars, and the profile of the metal. In this case, the temperature expansion is not fundamental.
On a note!
- Warming the walls of the house from the outside is only a partial solution to the problem of reducing heat loss. Do not forget about such parts of it as the basement and the foundation (if it rises above the ground). Here it is useful and polystyrene foam, and the spraying can be done, taking into account small area cover, with their own hands. There are special devices, and are not so expensive. And although in actual fact they are disposable (despite the fact that the manufacturers claim otherwise), taking into account the acceptable price, it is possible to realize such a variant of insulation outside the lower part of the wooden house.
- When choosing a variety of mineral wool, it is desirable to focus on products of the "eco" category. From all points of view for houses made of wood - this is the best option.
Warm house to you!
- The choice of material for the warming of the wooden house
- Calculation of quantity of materials
- Stacking of a wooden house heater
- Final finishing of walls
If you perform the thermal insulation of a wooden house, it can be used not only for summer holidays, but also for permanent residence throughout the year. Thermal insulation of the house will significantly save on its heating in the winter. You can warm your house yourself.
After that, install the crate. Over the moisture insulation mount the slats. Beforehand, it is necessary to measure the width of the mineral wool plate, since they are produced in various sizes.
From this value, subtract 2 cm. The resulting distance must be maintained between vertical bars on the entire surface of the wall. The first rail is fixed with screws to the corner of the building. Then, when they warm the other side of the house, the extreme rake will be attached to this rail.
The other racks are set at the same distance from each other. This distance was determined at the beginning. When installing rails, it is necessary to observe their verticality, which must be systematically controlled with the help of a building level. After that, they start mounting the mineral wool. Cut pieces of cotton of the required size with a sharp knife. Plates are laid close to each other. For this purpose, a distance reduced by 2 cm was specially left between the slats. This ensures dense packing of the material without crevices.
The heater is mounted using metal anchors. To do this, in the plate between the bars at a distance of 50 cm from each other, through the plates, the surface of the wall must be drilled holes. Then the anchors are slammed into these holes. Then, cores having a special bonnet are placed in the anchors. At the same time, the anchor is fixed, and a strong laying of the insulation takes place.
Then lay the waterproofing insulation. After all the thermal insulation has been laid, it is necessary to mount one more layer of the film for waterproofing. In this case, the film is installed with a rough side to the mineral wool plates. Due to this, moisture will be removed from the heater and the moisture can not pass in the opposite direction. Waterproofing is installed with a stapler by attaching the staples to the bars.
Before you insulate the wooden house from the outside, it should be noted that for buildings made of wood, it is not always necessary to provide for the insulation of the walls. Wood itself is a good protection against cold. In the process of exploitation, the tree loses the ability for thermal insulation, so it is necessary to decide whether to insulate the structure at the design stage of the building.
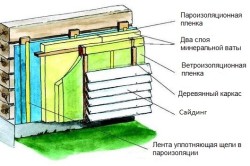
Experienced builders, beginning with the warming of the walls of the house, always make up a special scheme that determines the stages of the work and all the necessary types of materials that will be used in the process of warming the walls of the wooden house from the outside. Layers of insulation must be laid in a certain sequence. This allows you to provide with accuracy how to properly insulate a wooden house with your own hands. Initially, to insulate an old or a new house, they arrange a vapor barrier, and then mount the frame, on which it is necessary to lay the plates and the next frame. After the completion of all the work is done skinning.
Types of materials for exterior wall insulation
Thermal insulators can be as follows:

- mineral wool;
- styrofoam;
- polyurethane foam;
- penopollex (polystyrene).
All materials have a different structure and manufacturing technology, so they have different abilities for thermal insulation. Very effective for outdoor insulation is polyurethane foam, which is mounted by spraying. This explains its wider spread. At the same time, one can not care about replacing the old thermal insulation layer with a new one in the next 30 years. Polyurethane foam has high ecological compatibility, good fire resistance, low moisture absorption, low weight.
To completely perform the insulation of a wooden house from the outside, it is necessary to apply various materials. As a heater in practice, you can use and mineral wool slab. This material is widely used in construction because it is non-combustible and resistant to mold, rodents and insects. It is mineral wool that is the best protection of housing from unfavorable weather, frost. It serves as an excellent noise isolator.
What material for insulation of walls to choose
Finding out what is better to insulate a wooden house, it is necessary to determine what characteristics of a heater are the most appropriate in a particular case. For example, if you want to insulate an old wooden house. The above materials can be presented both in the form of rolls and sheets. Each of them has its advantages and disadvantages. For example, foam structure of polyurethane foam allows to provide the best protection of walls against frosts, from street noise.
The composition of raw materials for the production of mineral wool include rocks artificial stone and pressed melt rocks. Exist different kinds mineral wool, but they all inherent property of fireproofness and resistance to deformation. Mineral cotton wool does not withstand sharp temperature changes, and also loses its properties as a result of contact with moisture.
Penopolymers include foam polystyrene having cells less than 0.2 mm. Thermal insulation of a wooden house from outside with foam is made on the basis of the use of ventilated facade technology. Pre-insulation of wooden walls requires the construction of a frame, and between its beams the material itself is laid.
Many carry out the warming of the wooden house from the outside, stopping their choice on the penokplex. This is due to its resistance to frost and sudden changes in temperature, a long period of operation, ease of installation. At the same time, this material has low thermal conductivity, poor moisture absorption, and it is prone to damage by rodents, which is its main difference from mineral wool. This kind of material, like foam foam, is not fireproof.
Thermal insulation of the walls of the wooden house with foam plastic is the most popular in construction. Insulation has special properties, which are determined by the size of the cells, density and manufacturing method. It allows to reduce heat loss of enclosing structures. Often, polystyrene is used as an external insulation due to its light weight, reasonable price, ease of installation and other characteristics, including good thermal insulation properties. Polyfoam does not have good vapor and gas permeability, so air does not penetrate through it. To properly insulate the wooden house with polystyrene, it is important to use a suitable paint and varnish, otherwise the material will deteriorate over time.
How to mount the insulation from the outside
Before you insulate the wooden house from the outside, it is necessary to perform a vapor barrier.
For this, you can use polyethylene, aluminum foil or roofing paper. The selected porous insulator should provide good ventilation of the facade. If in a wooden house walls are made of round logs, then the need to make a vapor barrier is practically absent. If the surface of the enclosing structure is smooth, then the vapor barrier device will not be superfluous.
Thermal insulation of wooden houses from the outside begins with the filling of slats, the thickness of which is 25 mm. The step size between the slats should be observed up to 1 m. Only after that it is possible to start laying the vapor barrier layer. In the slats from below and from above it is necessary to make holes with a diameter of 20 mm. To seal the places of fixing the vapor barrier to the rails you will need an adhesive tape, with which you can increase the tightness of the vapor barrier layer.
External insulation of the walls of the building from the wood begins with the manufacture of a frame of boards, the width of which is 10 cm, and the thickness is 2 times smaller. The boards should be filled on the walls, observing the vertical position of the material. To this end, each board is placed on the edge, and between them should be provided a distance of 20 mm less than the width of the thermal insulation material.
When the wooden walls are insulated from the outside, the device of the mineral wool plates is produced with the help of boards. In this case, the insulation layer should not contain any gaps. Laying in two layers is carried out by ensuring maximum contact of the surfaces of the thermal insulator, on the layer of which the waterproofing is then assembled from the films nailed on top of the frame with the help of nails. To seal the joints, a self-adhesive tape is used. Thermal insulation of wooden houses from the outside ends by stuffing the slats on the layers of steam and waterproofing, closing the frame with a net against insects and rodents, and also installing the planking, depending on the design of the structure.
More articles on this topic: 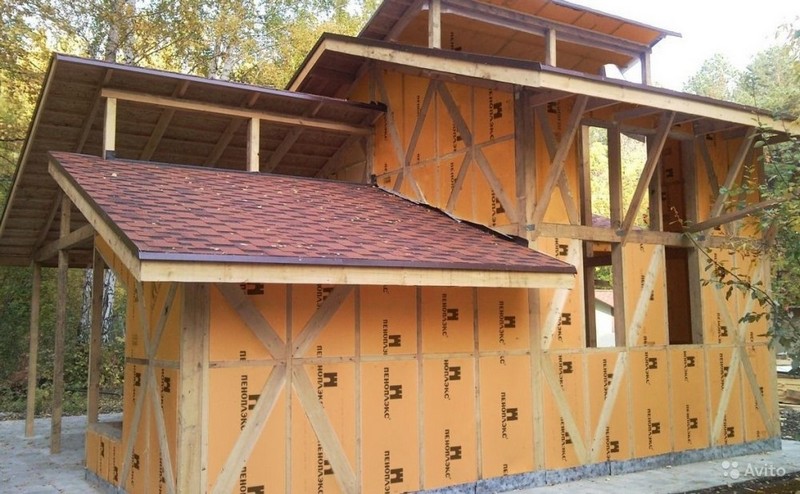
In our country, quite a few private houses are built of wood. Firstly, it is easily accessible in most of Russia, and secondly - environmentally friendly, easy to process, inexpensive and well-kept heat. However, a low coefficient of thermal conductivity, not a reason to not make the insulation of a wooden house from the outside.
And it is from the outside that it is more practical and effective. In most regions, winters are severe enough, and in the off-season rains and high humidity are not uncommon. It is these factors that do not benefit the material such as wood, and are capable of quickly destroying it.
Than to protect from a cold inhabited construction
Materials that create thermal protection of the walls are produced a lot. But to ensure that the insulation of the walls outside the wooden house was reliable and practical, not all fit. The more often they use, and what to choose - this question interests many homeowners.
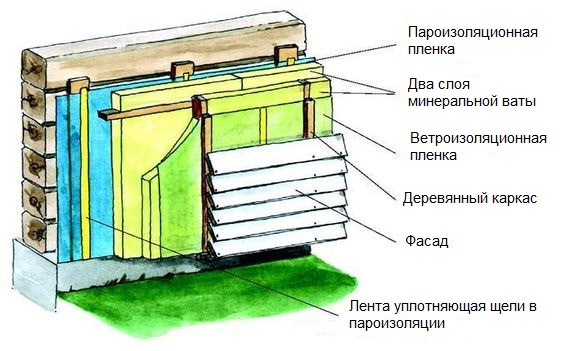
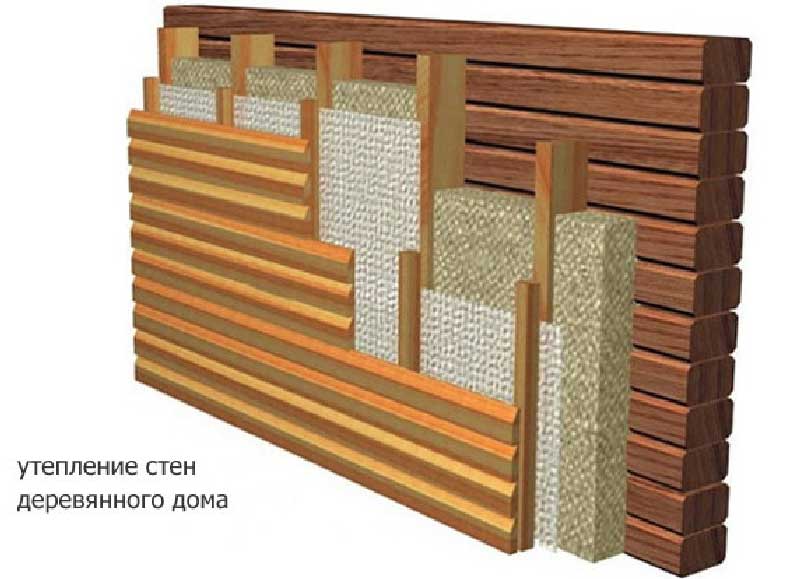
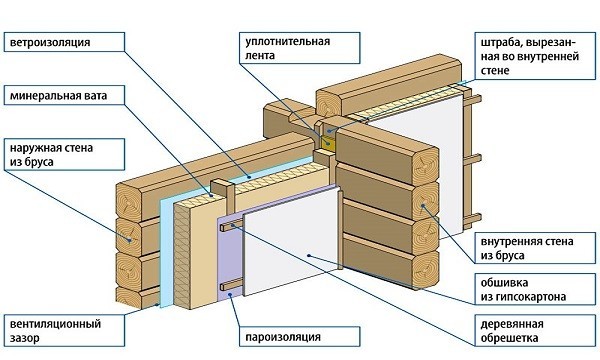
Thermal insulation materials
- Interior trim.
- Frame made of wood.
- A layer of vapor barrier.
- Insulating layer.
- Waterproofing.
- Finish casing.
Note!
So the insulating "pie" should look like.
Observing the sequence of layers, and not ignoring any of the items, you will achieve a positive effect.
And, making the insulation of wooden walls from the outside, pay special attention to the fact that there is a small gap between the heat insulator and the wall.
The gap will not allow the wall to damp, become covered with condensate, and keep the warming layer dry.
Ingredients of insulating pie
Now we need to understand each point a little more.
Implementation of insulation work

Note!
This is necessary in order for the heater to fit tightly into the grooves, and there were no cracks.
The bar is more delicate to use undesirable, otherwise you will get an insufficiently reliable design.

What should be foreseen additionally?
You can say that you have made an excellent, reliable protection for your home. Now the house will not only be much warmer, the walls will not die and deteriorate, and you will not be repaired soon.
If you conduct the insulation of the walls of a wooden house from the outside with your own hands, pay attention to the fact that now the window and doorways are deepened, about 25 - 30 cm. This does not look very attractive, and it works inconveniently.
Therefore, try to trim doors and windows with siding or other material, decorate window sills and jambs. Along the way, you can fill all the slots with mounting foam, so you will additionally insulate the house.
Order of work
So, if you are to finish the exterior, think through the stages of the process and prepare well for it.
What needs to be done to make the work swear and the result bring the expected benefits?
- Decide on the choice of insulation material. Consult with specialists if there are any doubts. A heater may not have the highest price, but very good characteristics.
- Before purchasing, calculate the required thickness and material. It should be taken with a small margin, in case of marriage.
- Strictly observe the sequence and technology of work. Ignoring any of the items may lead to a substandard result.
- The technology of warming a wooden house from the outside is quite simple, but provides for mandatory waterproofing. If it is not made, even the best quality material will soon become worthless.
Conclusion
Many people are attracted to the work of builders, but most homeowners are quite capable of coping with the process on their own. After all, the materials for finishing are lightweight, easy to install. It does not really matter what your house is and what it is built of. The beam, log and other wooden structures, in fact, are finished the same way.
In the video in this article you will find more information on this »width =» 640 "height =" 360 "frameborder =" 0 "allowfullscreen =" allowfullscreen "\u003e
Even if you have conceived the warming of the loggia in the apartment, the cladding of it in stages will be about the same as in a private house. Moreover, balconies, especially on the lower floors, are in great need of additional protection. Simultaneous and sex will give a very good result. Now you will spend much less on heating, and at home it will always be warm and comfortable.
In the video in this article you will find additional information on this topic.