Owners country houses They try to make their stay as comfortable as possible. For this purpose, the plots are gradually built up with various outbuildings and other structures. Awnings occupy a special position among them due to the versatility of their use.
Wooden canopies can perform several different functions, depending on the needs of the owners of the site.
- Serves as a covered area for cars. The carport can stand alone or next to the main building or outbuilding. During the construction of such a structure, it is possible to provide for subsequent wall cladding - then the canopy will turn into a full-fledged garage.

- Used as an open veranda. A shed is attached to an existing house, and the floor is made of boards or tiles. Such canopies have many different decorative elements and serve as decoration for the facade of the house. In addition, they are used for outdoor recreation.

- Used to create a pergola. Sheds that are simple in design can become a real highlight of the landscape of the site.

- Protect barbecues, swimming pools and other buildings from the negative effects of natural precipitation. The dimensions of the canopies range from several meters to several tens of meters.

No two buildings are completely identical, both in terms of architectural design and possibilities of use. If the design of residential buildings is allowed only professional specialists, then anyone with minimal experience in performing construction work can create sheds. Due to this approach, there are a huge number of canopy options, and this number increases every year.
General requirements for structures
Regardless of the type and purpose of the canopy, all structures can be extended General requirements. Compliance with them guarantees the longevity and reliability of the structure.
- All wooden materials It is strongly recommended to impregnate with effective antiseptics. Lumber is used outdoors, and wood reacts negatively to such conditions. Due to impregnation, it is possible to increase the period of use of canopies by at least five years. It is better to use coniferous wood, as they contain natural resin that protects against decay processes.

- The fixation of the sheathing and roofing should be as strong as possible. This requirement is explained by the fact that the open roof is strongly undermined by gusts of wind, and the unreliable rafter system becomes loose over time. As a result, the roof loses its tightness and critical mechanical damage may occur.

- Preference should be given to flat pitched roof, since it is quite difficult to install gable roofs on sheds. Such requirements limit the size of structures. In some cases, it is necessary to install additional vertical stops in the operating area of the canopy.

- The slope of the roof must take into account not only existing scheme drainage, but also the direction of prevailing winds. This is an important condition for increasing the safety of the canopy operation.

And the last mandatory requirement - during the work must be strictly observed building codes and rules developed for the construction of wooden structures.
Prices for timber
Construction stages
Construction work will cost much less, and the canopy will be installed faster if all actions are thought out and calculated. consists of several stages, and professionals recommend performing them without fail.
Table. The sequence of stages in the construction of a canopy.
| Construction phase | Description and recommendations |
|---|---|
| You have to start with a choice construction site, which directly depends on the purpose of the canopy. If it is vehicular, then there must be access roads to it; for the rest, pedestrian paths are thought out. After this, you should draw a sketch of the future structure indicating overall dimensions. If you have the skills, then it is very advisable to make working drawings of all structural elements, paying special attention to loaded ones. | |
| The amount of lumber is directly dependent on the size of the structure. You must immediately select the dimensions of the boards and beams. At the same time, try to stick to the golden mean - have a safety margin, and save cubic capacity so as not to artificially increase the estimated cost of the canopy. | |
| All operational characteristics of the structure depend on the strength of the frame. There are rules for creating architectural structures, they must be followed. Lumber must be impregnated with antiseptics. | |
| Type roofing coverings selected in advance, a certain sheathing is constructed under them. A canopy is not considered a durable structure, and therefore it is not recommended to cover it with heavy roofing materials. |
The dimensions of the structure are determined by each developer individually, but to make it easier, you can use the advice of architects.

In any case, the height of the canopy cannot be less than two meters. If you do it lower, then the person instinctively tilts his head when entering, and this creates great inconvenience and indicates insufficient experience of the builders.
Prices for construction boards
Construction boards
Step-by-step instruction
For example, consider one of the most complex options for canopies with. The canopy frame is made of laminated veneer lumber 200x200 mm, the vertical supports are buried in the ground to a depth of 100 cm, placed on a bed of gravel and sand, and then filled with concrete. All sections of timber in concrete are impregnated with modern modified bitumen mastic. Before pouring, the supports were placed in a strictly vertical position.

Canopy posts are often concreted in the ground; to protect them from rotting, the lower sections are treated with bitumen mastics and additionally protected with roofing felt and other materials. waterproofing materials. This technology increases the service life of canopies, but creates problems when the need arises. repair work or complete dismantling of the structure.

Experienced builders strongly recommend placing supports on the channel. The rolled products are concreted to a depth of 50 cm, pieces 40–50 cm high are left above the ground. The distance between the shelves should be 0.5–1.0 cm larger than the dimensions of the beams. Three holes Ø 14–16 mm are drilled in the channels. Next, beams are inserted between the channels, holes are also drilled into them, and the elements are tightened with bolts. This design completely eliminates rotting processes. In addition, the canopy turns out to be mobile; it can be disassembled and moved to another place.

Instead of channels, you can use special mortgages for anchors. They are U-shaped, and a long rod is welded at the bottom. The rod is concreted, the upper part is located at ground level. The timber is also secured with bolts; for this purpose, technological holes are provided on the shelves.

Prices for different types of cement
Preparatory work
Step 1. Install a strapping belt made of beams on the supports. The fastening of the elements must be very strong - the canopy has gable roof, and it requires a stable structure. Do the work slowly, do not swing the vertical supports. If there is a danger of violating their stability, then all elements can be temporarily connected to each other.

Step 2. Soak the boards with antiseptics. Treat them with a roller; the surfaces of the lumber should be dry and clean. To avoid omissions, it is strongly recommended to perform impregnation twice. Pay great attention to the ends; due to the structure of the wood, it is in these places that moisture is absorbed most and penetrates quite deeply into the boards.

Step 3. Start assembling the roof trusses. They are made from boards 200x45 mm, standard length 6 m. The trusses are assembled according to a template, the individual elements are fixed together with self-tapping screws and special bolts. The design of the trusses is the simplest, each consists of two rafter legs, a vertical post, two braces and a brace.

Place finished structures on a large, flat area. Make sure all trusses are the same size.

Step 4. To increase the strength of fastening the guy wires, they must be additionally secured to the rafter legs and the vertical post with bolts. This is done in the following sequence.

Important. All fresh cuts of lumber must be impregnated with an antiseptic. It should always be at hand.

Impregnation for wood "Biotex Universal"
Each truss has two guy wires. When the roof trusses are ready, you can continue assembling the canopy frame.
Frame assembly
If the garage shed has paving stones, then it is advisable to install it before assembling the frame - it is much easier for builders to work on a clean floor.
Step 1. Attach the horizontal beams to the vertical supports with bolts. They must be screwed into specially drilled holes. Tighten very tightly; the connection must withstand significant lateral forces. To increase strength, you can additionally connect them with metal brackets made from building reinforcement Ø 6–8 mm.

Step 2. Saw down the rafter legs to install the finished trusses on the canopy. Take measurements and make cuts in the first truss, it is better to work with a portable electric circular saw.

Practical advice. Make trusses as accurately as possible, they must be completely identical. If you meet this requirement, then the cuts of the rafter legs can also be made according to the template.
This makes it much easier and faster construction works, there is no need to waste time taking dimensions for each truss.
Step 3. Place the structure in place, temporarily fix it with various supports. The truss must be stable; later the supports are dismantled. Screw the truss to the beams using metal corners 50x50 mm with a thickness of at least one millimeter.

Step 4. In the same way, place the last canopy truss, stretch a rope between them and install all the remaining elements along it.

Temporarily fasten the trusses together with pieces of boards, slats and other available lumber.
Practical advice. The difference in height between the outer trusses should not exceed two centimeters. If your spread is greater, you will have to level the structure. This is quite long and difficult; it is much easier to avoid making mistakes than to correct them later.
Roof installation
For a canopy as a roof covering it is used bitumen shingles. It is installed on a continuous sheathing made of OSB board 12 mm thick. Modern non-woven material with bitumen impregnation is used as a lining waterproofing barrier.

The base is solid, the slab is attached to the rafter legs with ordinary nails or self-tapping screws. Installation technology flexible tiles standard. Final stage arrangement of the canopy - installation of a drainage system.

Prices for bituminous shingles
Bituminous shingles
Video - DIY wooden canopy
Wood is easy to work with, and even a novice craftsman can build a small shed from timber and boards. But wooden structures are noticeably inferior in service life to metal ones, and if you need a durable and strong canopy, then you should prefer a structure made from profile pipes. You can read how to assemble it and what you need for it
A year after building the house, I wanted to attach a canopy to its front wall. So that it is functional, but at the same time very simple in design. What was required from the canopy? The most important thing is that thanks to it I wanted to get an additional place for summer relaxation, protected from sunlight and rain. For outdoor gatherings, so you can have lunch in the courtyard and relax on a sun lounger. According to the project, the canopy was supposed to be a kind of replacement for an open gazebo, but with a simpler design. So that during construction a minimum of material resources and physical effort is spent.
Within 2 weeks the plan was implemented. Based on the acquired practical skills and knowledge, I would like to bring to your attention a report on the construction of the simplest classic canopy attached to a house.
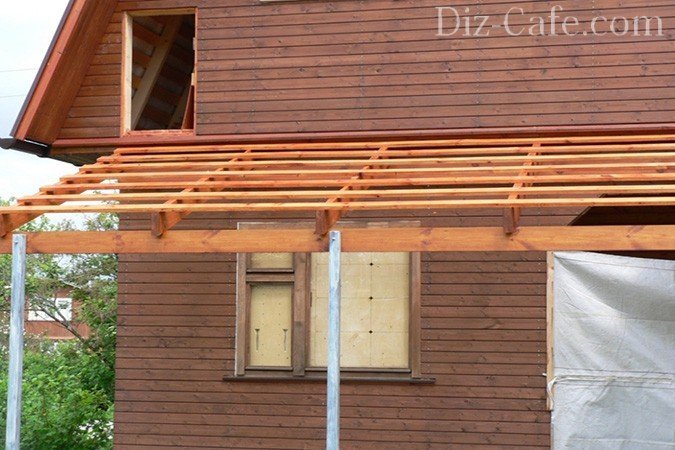
The design chosen was standard for this type of canopy. This is simply a roof truss system on supports. The dimensions of the canopy in plan are 1.8 x 6 m, the height to the roof is 2.4 m. On one side, metal pillars (4 pieces along the facade) are used as a supporting element, on the other, a board screwed to the wall of the house. The roof covering is Ondura sheets (analogous to Ondulin, with larger sheet sizes). It is planned to install lattice bars between the pillars so that you can sit in the shade under a canopy, enjoying nature and fresh air, even in the midday heat.
So, I’ll start the story about how this idea was realized. I hope I can clearly describe the whole process.
Step #1 – installation of metal poles
I started by installing metal pillars, that is, the vertical posts of the canopy, which will support the roof truss system. There are only 4 of them, they run along the facade, at a distance of 1.8 m from the wall. According to the plan, the length of the canopy is 6 m (along the entire length of the facade of the house), so the pitch of the racks is 1.8 m (taking into account the roof extensions on both sides of the racks).
4 were purchased for racks steel pipes 60x60x3 mm square section, 3.9 m long. They will be buried 1.5 m into the ground (below the freezing level), 2.4 m will remain on top. This will be the height of the canopy.
First, I marked with pegs the places where the posts should be installed - strictly at a distance of 1.8 m from the wall. I measured everything and calculated the horizontal lines. Then I took a drill with a 150 mm nozzle and drilled 4 holes 1.5 m deep.

According to the planned program, under the racks it will be poured pile foundation made of concrete. This is done as follows: each rack is installed in a pit into which concrete is poured. The result is reinforced piles holding the posts.
It is not advisable to pour concrete directly into drilled holes. It is necessary to make insulation, which will simultaneously serve as formwork. To do this, I decided to use roofing felt sleeves - sections of roofing felt rolled into a cylinder. The length of the sleeves should be such that the concrete piles protrude 10 cm above ground level. For a pit 1.5 m deep, at the bottom of which a 10 cm sand cushion will be poured, sleeves 1.5 m long are required. The diameter of the sleeves is 140 mm.

Concrete poured into roofing felt sleeves holds metal posts
I cut pieces of roofing felt, rolled them into sleeves and fastened them with tape (you can use a stapler). Next, a 10 cm layer of sand was poured into the bottom of each hole and a sleeve was inserted there. The concrete formwork is ready.
Metal stands were installed in the sleeves. First - the two outer ones, I aligned them vertically and height (2.4 m), pulled a cord between them and placed two intermediate posts along it. Then he poured concrete into the sleeves (from ready mixture, just added water and that’s it – very convenient).

I allowed 3 days for the concrete to set and cure. It is not advisable to load the racks during this time, so I started preparing the wooden parts - support boards and rafters.
Material on how to build a terrace will also be useful:
Step #2 – making the roof
The roof structure includes 2 support boards on which the rafters and all roof structure. One of the boards is mounted on the wall, the other on posts. Rafters are laid on top of the support boards, in the transverse direction.
The boards were taken with a section of 150x50 mm, 6 m long. Since the canopy was originally planned as a solid but inexpensive structure, I bought unplaned boards. I planed and sanded them myself, which took some time. But I was confident in the result and smoothed the surface to the highest standard.
The rafters will be laid in the grooves of the support boards. Another one headache– you need to cut the grooves, and at the angle of inclination of the rafters. To determine the angle and insertion locations, we had to perform a test installation of the boards. I screwed such a board to the wall with 140x8 mm wood grouse, and to the metal posts with 8 mm studs using washers and nuts.

Now that the support boards are in place, a small tool was used, with the help of which I determined the angle of inclination of the rafters. After which the boards were removed and grooves for the rafters were cut into them, taking into account a known angle.
The rafters are also made of boards 150x50 mm, 2 m long. There were 7 rafters in total. Their installation step on the support boards is 1 m.
After fitting the rafters to the grooves, all parts were painted with Holz Lazur JOBI glazing compound in teak color.
Then everything was installed. Support boards- as during preliminary fastening, that is, with the help of wood grouse and pins. The rafters were laid on top, in the grooves of the boards, and hammered in with nails. Each groove required 2 nails driven through the rafters obliquely, towards each other.

For the sheathing under Ondura we used 100x25 mm boards, 6 m long - 7 pieces. I screwed them across the rafters with self-tapping screws.
Ondura sheets are laid on the sheathing and nailed with rough nails with plastic caps to match the color of the flooring. In fact, the roof is already ready, now you don’t have to worry about rain and arrange a place under a canopy. For example, bring a garden table and chairs there.
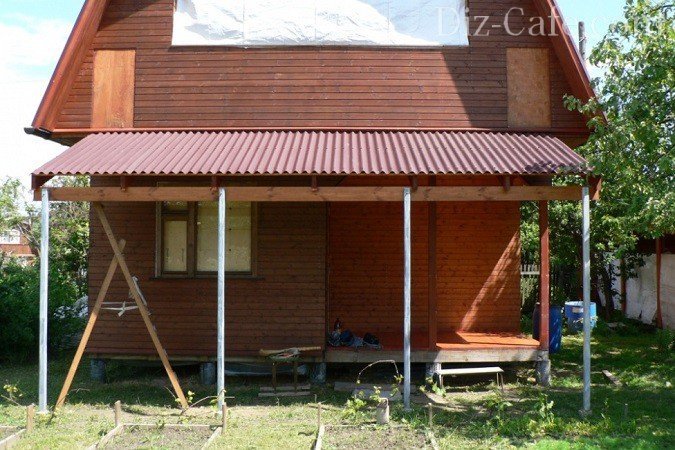
Canopy covered with sheets of Euro slate Ondura
The ends of the rafters remained open, which is not very good in terms of decorativeness. And there was nowhere to attach the drain. Therefore, to complete the roof, I screwed a 6 m long frontal board - clapboard - to the ends of the rafters.

The front board covers the ends of the rafters and creates support for the gutter
The next stage is fixing the drain. Two 3-meter drains are mounted on the front board. The drainage from the roof goes into a watering pipe through which the grapes will be watered.
Step #3 – pouring the foundation for the mini-wall
To prevent water from getting under the canopy during rain, I decided to make a low brick retaining wall between the posts. It requires a strip foundation, which I made using standard technology. I dug a trench between the supports using the bayonet of a shovel and set out the formwork from the boards. I poured a 10 cm sand cushion at the bottom of the trench. And on top of it I placed 2 reinforcement bars on supports to fasten (reinforce) the foundation.
I was afraid to do it without reinforcement, you never know, it might crack and fall apart. Then he mixed the concrete and poured it into the trench. It was necessary to wait until the concrete set and hardened, so I decided to return to the supporting wall later. And now – start decorating your building.
Step #4 – installation of covers on posts and trellises
It's time to look at the canopy with a critical eye. The metal uprights of the canopy stood out a little from the overall composition. I decided to decorate and refine them by sewing them with wooden overlays. Just for this I have a few 100x25 mm boards left. I secured them on top of the metal posts using pieces of M8 studs, washers and nuts. There was space left between the overlays (on the side where the trellis was installed), so I inserted a 45x20 mm rail there. The slats formed protrusions; the horizontal elements of the trellis will be attached to them.

The time has come to attach the trellises. I chose a lattice pattern for them with a carved hole in the center. This hole allowed me to use not only long slats for the trellis, but also trimmings. We can say that it turned out to be a waste-free production. And this pattern looks more interesting than standard monotonous squares.
The slats for the trellises were made by longitudinally dissolving the 100x25mm boards I had. The board was split into three parts, and the resulting slats were sanded. The final cross-section of the slats (after grinding) is 30x20 mm.
I made the trellises without a frame; the slats are attached only to the vertical protrusions of the posts. At first, I set up horizontal slats, screwing them to the protrusions with self-tapping screws. Then, vertical slats were secured on top of them. The result was a decorative trellis, near which the wife planted grapes. Now it is already winding with might and main along the trellis and has almost blocked the wall of the structure. The shade protects from the midday heat. This is very useful, since the canopy is located on the south side of the house and without a canopy it was almost impossible to rest here during the day due to the abnormal heat.
Material on how to attach a veranda to a house will also be useful:

Trellis are assembled from slats directly “on site”

Step #5 - building a retaining wall
The last stage is the construction of a retaining wall. Strip foundation has already frozen under it, you can start working. For waterproofing, I glued 2 layers of roofing felt to the foundation tape, coating each layer with mastic. On top, along the roofing felt, I built a level retaining wall, 3 bricks high.

The retaining wall will not allow raindrops and water to fall onto the area under the canopy during irrigation.
Now there will be less dirt when watering and raining. And the canopy looks much nicer this way.

That's probably all. The shed was built. I implemented the entire project alone, but I did not notice any difficulties in the process. Subsequently, the area under the canopy was covered paving slabs. You can say that I have a covered terrace or an open gazebo - whatever you like, call it that. Although in terms of design, this is an ordinary canopy on poles, the construction of which took very little time.


The article will tell you how to make a canopy for your house with your own hands quickly and cheaply. You will learn what materials can be used and how to develop a drawing of a future structure. Below we will describe the most popular options for creating a gazebo and design, how to properly build the gazebo itself and solve some problems when creating it. Read the advice of experts, and you will be able to make a gazebo near your home yourself or properly supervise the process of its creation by qualified craftsmen.

Design
To figure out how to make a canopy, you first need to develop a project for the future construction, which takes into account the following parameters:
- site and structure;
- annual precipitation, wind and snow loads;
- purpose and dimensions of the building.
The project allows you to select the optimal solution and materials. A drawing and determination of the dimensions of the building help to correctly purchase materials and determine the required financial costs. If a carport is created for a car, then the passage of the car with a load must be taken into account.
A canopy attached to any building has a number of features. The height will be limited by the roof of the building. Such a solution excludes the creation of a full-fledged arch. In most cases, it is possible to make only a small structure, since there is usually not enough space near the house.

Basic moments
There are several ways to make a canopy in the courtyard of a private house with your own hands correctly, quickly, and so that it lasts as long as possible? To obtain the best result, it is necessary to take into account a number of important parameters.
Canopy
The shape of the canopy can be arched ( good characteristics, the elements must be identical to each other), gable (has all the characteristics of a roof for a house) and single-pitch (the simplest and most reliable option).
Purpose
The canopy can be used to protect:
- woodpiles, tools, boards and other similar materials;
- play area/relaxation area for adults;
- terraces, swimming pool;
- greenhouses, greenhouses;
- grill/grill;
- entrance group, car.
Construction type
The design itself comes in several types:
- closed - openings are closed various materials, there are windows;
- semi-closed - there are side parapets, a stationary roof;
- open - light roof and several supports.

Drawing
Verandas, canopies, gazebos: you can find out tips on how to build cheaply and beautifully below.
Supports
Basically, supports are made of wood or metal, but the most stable structure is obtained when using concrete elements. The holes for the supports should be below the freezing point of the soil, about about a meter, but in the northern regions more may be required. Sand is poured into the bottom, compacted, concrete is poured and a support is placed. It must be leveled and then the hole must be completely filled. You can make formwork on top so that the concrete level is higher than ground level.

It is not recommended to immerse wooden supports in the ground, even when using moisture-proof materials. Concrete supports with a depth of at least 50 cm are made for them; they act as original piles. Reinforcement is laid in the concrete and timber is attached. It is also possible to install stone supports on the foundation. building materials. Metal/wood is used for rafters. This option requires quite a lot of time to set up. Another method is asbestos-cement pipes: durable, not afraid of constant moisture or strong daily temperature fluctuations, and easy to install.
Frame
Mounted from wood/metal. It is easier to work with wooden elements. Connected with self-tapping screws or bolts. When using laminated veneer lumber and dry boards, a wooden canopy can last for many years. Metal elements mostly welded. A combination of both types of materials is less commonly used. When arranging a high and wide canopy, it is better to choose semi-arched or triangular shapes.

The supports are placed at intervals of at least 1.2 m; for a structure attached to the wall, two supports are enough. It is not advisable to frequently lay a profile or beam under polycarbonate; for tiles, it is the opposite. Supports, racks and rafters are often made from profiles of different thicknesses, depending on the purpose of the structural elements. This applies equally to timber. The pillars must be strictly vertical.
Wall support
How to make a canopy for a house? It is necessary to remember that canopies can be single-pitched, flat or with a bend. Fastening is carried out by inserting the rafters under the roof or to the wall using the selected fasteners. If there is a lot of snow in winter, the racks should have a rigid fastening. If the area under the canopy will be concreted before the canopy is built, then openings for the posts must be immediately made and water drainage must be considered, and the wood must be treated with protective agents.

Slope
The optimal slope is considered to be 50 degrees; snow practically does not accumulate. A slope of less than 7 degrees is considered horizontal. If it is not possible to make the required slope under the roof of the house, then the material is laid on top of the roof. We need to think about the right drainage. You can also set up a separate structure near the house.
Preparatory work
The first thing that needs to be done is to mark the designated area, remove all debris and plants, level it, add sand and gravel. When arranging heavy structures, you will need to prepare a foundation.
Recesses are made under the supports, so you can immediately lay the electricity cable. Depending on the weight of the frame and roof, the spacing of the supports is determined. The posts are concreted in the pits; if there is water nearby, then their ends must first be primed and waterproofed.

Materials
Having figured out how to make a canopy with your own hands, having prepared the project and the site, you need to purchase materials.
The following material options are used:
- Slate - used in several types. Fiber cement– durable, withstands heavy loads, rarely used in domestic construction. Asbestos-cement– corrugated/flat sheets are very popular when creating roofs for houses, outbuildings, and fences.

- Polycarbonate - cellular or cast. Experts recommend using the first option, since it is much stronger. Sheets come in matte/transparent, different shades.

- Corrugated sheets/metal tiles – have high strength. Powder coated, UV resistant, long term operation.

- Metal profile – hollow, rectangular, square or round. Depending on the size, it is used for rafters and supports.

- Lumber – plywood, boards, beams, OSB. They equip supports, rafters, beams, bars. Plywood/OSB is used for roofing.
Video description
Visually about the features of a slate canopy with wooden frame, watch the video:
Ruberoid and soft tiles. The roofing material itself is used quite rarely, mainly acting as waterproofing. Long-lasting and very light soft tiles are much more often used.

- Awning or moisture-resistant fabric. It is used very rarely and acts as a temporary or seasonal option.

The elements are fastened with metal/wood screws (with or without washer) and welding. Overlays, angles, and bolts are also used.
Important nuances of arranging a canopy
In most cases, metal profiles and polycarbonate are used to construct canopies. How to build a canopy from these materials is described below.
Metal profile
By metal profile we mean corrugated sheeting, which comes in several grades:
- “N” – roof, load-bearing;
- “NS” – finishing, roofing;
- “C” – finishing, fences.
For snowy areas and structures with large sheathing pitches, it is better to use “H” with reinforced ribs. In the opposite situation, the NS brand is suitable. It has a thickness of more than 1 mm, a wave of at least 35 mm. It should be noted that the wave can be trapezoidal, rectangular or wavy. For roofing, the first option is better - it is tougher.

When creating a canopy, it is very important to correctly calculate the weight of the entire structure. Taking this indicator into account, the frame is developed; it is recommended to use lighter materials.
Working with sheets:
- it is forbidden to work in strong winds;
- It is better to use scissors to cut the material;
- you should not install waterproofing if there is no insulation and walls;
- the roof must be level;
- the smaller the wave and slope, the smaller the pitch of the sheathing.
Video description
How is a semicircular created? arched canopy- in the following video:
The length of the profile must be secured to the bottom of the roof; an overlap must be made depending on the angle of the slope. In certain cases, mastic is used to seal joints. Fastening with self-tapping screws and seals. It must be attached to the sheathing at the lowest point: the step depends on the windiness of the region. Any scratches must be treated with paint.
Polycarbonate
The most popular option. Below we will talk about how to make a polycarbonate canopy, describing the main points and nuances of the work.
The material is light but durable, has UV protection, does not break under fairly heavy loads or falls, is easy to drill and cut, and is available in several brands and a large selection of colors.

There are several options for polycarbonate:
- profiled - rare in our country;
- cellular/honeycomb – have numerous stiffening ribs, light, durable, can bend, the best option for roofing, comes in different sizes and thicknesses, there is a reinforced version (stronger and thinner);
- monolithic - an alternative to glass, large sheets, mainly used for walls.
Consider the degree of transparency of the material. For gazebos and canopies, it is better to choose darkened ones so that it is not stuffy under them.
When laying sheets, it is important to remember that some brands can be laid with any side facing the sun, while others can only be laid with a certain side. The channels inside the sheets must be directed parallel to the slope. Installation using self-tapping screws with washers for this material and an end profile. The holes for the screws should be slightly larger than the fasteners themselves, do not overtighten them, be sure to step back from the edge, make holes only between the stiffening ribs.
Video description
The following video clearly shows how to install a canopy made of metal profiles and polycarbonate for a house:
Sheets are cut before installation with a knife, hacksaw or cutter (for sheets up to 4 mm), wider grades are cut with a power tool. The ends are covered with punched paper tape, aluminum film and end profile; do not use tape. The frame for this material can be lightweight, in the form of a semi-arch, but first you need to clarify the permissible level of bending of the sheets. The thickness of the sheet affects the sheathing of the structure - the thicker it is, the wider the sheathing. Don't forget what's on top protective film removed at the end of the work, and from below - at the beginning.
Tree
How to build a canopy for a house made of wood with your own hands? In fact, the whole procedure is not much different from other materials. Only in this case other fasteners are used. Wood has a number of important characteristics - the material is very easy to use and process. The design lasts a very long time proper care, environmentally friendly, accessible and inexpensive material.

Carport with forged elements Source static-eu.insales.ru
Conclusion
After installing the roof, you need to think about creating drain gutters. At the last stage, the site is being developed. The easiest way is to fill the area with gravel, but this is not a very convenient option. It is necessary to remove the top layer of soil, install a curb and then fill in crushed stone. You can also lay tiles or paving stones, fill the area with concrete, or use wood.
We will send the material to you by e-mail
An important part of the exterior country house is a canopy. It is designed to protect part of the yard from precipitation and ultraviolet rays, and also performs a decorative function. Small area, covered with material on top, are sheds attached to the house. Photos of similar structures can be seen in this review. In this case, the supports of the structure are brought to the required height. Attaching to the main structure involves attaching one side of the structure to the wall of the house.
The canopy structure allows you to create a magnificent outdoor recreation area
Sheds attached to the house can be made with your own hands. The photo shows the main stages of installation. The frame of the structure is often made of profiled pipe or timber. This structure is adjacent to the wall and takes on the load from the snow accumulated on the roof.
The roof is usually covered with corrugated sheets, slate or galvanized material. The metal for the frame structure has ductility and strength. It suits different design styles. Such structures can be erected with your own hands.

The wood frame system combines well with other materials. Wood suits most architectural solutions. Before use, this material should be treated with protective agents. Polycarbonate canopies attached to the house are becoming increasingly popular, photos of which can be viewed on the Internet.

Polycarbonate is easy to assemble and comes in a variety of colors
Polycarbonate enjoys the following advantages:
- plastic is characterized by durability. Mechanical impact is not scary for him;
- light weight of the material;
- polycarbonate transmits light well;
- flexibility of the canvas.
Helpful information! By purchasing a design kit for self-assembly, it is necessary to check the integrity and strength of all connections.

Sheds attached to the house: photos and design features
Sheds attached to the house, as shown in the photo, can be of two types. These are cantilever models and awnings on supports. The console version can be of any length, but its width should not be more than two meters. Support structures can be used for various purposes.

Awnings can have different purposes:


- awnings for car protection;

- various awnings: with posts, retractable or basket.

Related article:
Features of wooden canopies attached to the house: photos and design solutions
Homeowners often choose wood sheds. Such structures have an excellent set of characteristics:
- are distinguished by ease of construction;
- can withstand long periods of exposure to the open air, especially when properly processed;
- characterized by safety for human health;
- have an affordable price.
Helpful information! For comfortable use of the canopy, it is worth taking care of the installation of light and lighting fixtures.

Options for canopies attached to a house made of corrugated sheets: photos and design features
An awning made of corrugated sheets can be made in various configurations. Single-pitch, gable and arched structures are created from corrugated sheets. In addition, a structure made from this material has the following features:
- ease of manufacture;
- saving money;
- long service life.
Important! A canopy made of corrugated sheets is mounted only with galvanized self-tapping screws that have a rubber seal.

Creating a Project
When choosing a design project, it is worth deciding on the following parameters:
- dimensions and purpose of the structure;
- plot size;
- snow and wind loads;
- snow depth and expected annual precipitation;
- structural features of the main structure.

Before installation work The drawing must be completed. Based on the size of the building, it is determined required amount material.
Helpful information! When creating a carport, it is worth considering the passage of a loaded vehicle.
Preparatory work
Before planned sheds attached to the house are created, photos of which can be viewed on the website, it is necessary to preparatory work. For this purpose, a suitable area is marked out, and trees are uprooted from it. The clean area is leveled. At the same time, sand and gravel are added.

Recesses are drilled under the canopy supports. And at this stage it is worth considering laying the cable under the lighting sources. A certain step for placing supports is selected. It depends on the weight of the roof and frame part.

The stands are lowered into the prepared pits and filled with concrete mixture. The pillars are set according to level.
Important information! If they are located close groundwater, then the ends of the pillars need to be additionally waterproofed. Metal supports are pre-treated with a primer.
How to make a polycarbonate canopy attached to a house: photos and installation steps
12-15 days after the concrete has completely hardened, you can begin assembling the structure. Brackets are mounted on the wall, and then a transverse beam is mounted on top.

Creating a sheathing
The top trim is being done. The end parts of the racks are connected using a transverse beam and to each other. In this case, parallel laid profiles are used. The metal frame system is welded together, and the wooden frame system is tightened with steel corners.

Welding areas are cleaned, primed and painted. The rafters are mounted with transverse parts in increments of 600 mm. The structure is attached to the supporting beam using steel angles. The sheathing is laid across the rafters and mounted with self-tapping screws.
Roof installation
Sheets roofing material cut to size. Then they are attached to the sheathing. Holes for self-tapping screws are first made in the polycarbonate.

To facilitate water drainage, the cells should be directed downwards. When working with plastic, do not forget to leave gaps between. The dimensions of the holes should be made with a margin of 2-3 mm. There are some features of installing roofs made of other materials.

Wood beams can be used as beams. Over time, cracks may appear in the material, which will reduce the rigidity of the structure. After installation of the beams, they are installed cross boards, and then the metal tiles are fastened. Installation of this material produced from the bottom sheets. It is worth considering that there should be an overlap of the upper sheets on the lower ones.
Sooner or later, any homeowner needs to build a wooden canopy for their home. Many people are afraid to start building a wooden canopy for their house with their own hands, thinking that this process is complicated and time-consuming. But there is nothing complicated in the arrangement of this structure.
Design and decoration of a wooden canopy for the house
Let's look at several ways to attach a canopy to a building. Having understood the essence of the design, you can modify and build it yourself.
Wood is an environmentally friendly, affordable material, reliable and safe for humans, which is the main factor why this material has been in demand for many years; it is distinguished by its warmth, naturalness, and color. These factors allow this material to bring in uniqueness and beauty.
Of course, wood does not have high strength coefficients, unlike stone and iron structures. Wooden structures are subject to rot and attacks from insects and mice. But this can be avoided if done correctly and with fixing solutions. The varnish also has its own profound effect, and the varnished wood itself looks gorgeous.
 Wooden canopy design option
 When it comes to wooden sheds, some people think that they are simple, nondescript structures. But everything will depend on the imagination, the desire of the average person to correctly draw up a project. You can decorate the designs with filigree carvings, and. At the same time, take into account the image of the garden where the canopy will be located, next to the house or separately.
Important! The entire structure should look proportional and interesting. This is the only way a canopy attached to wooden house, will make you happy.
What types of canopies are there?
They are classified according to design features, and there are:
- single-pitched;
- inclined;
- straight;
- multifaceted.
Canopies can be divided according to location:

The material can also be different:
- stone;
- brick;
- combined;
- tree.
The most popular among ordinary people is a wooden canopy. This is not surprising, since the design is very simple to implement and does not require much effort or significant costs. Such work as making a canopy can be done by almost every homeowner. The first step is the project.
Project development
The design for the structure is mandatory, as it solves the main problems in analyzing the conditions of the structure. Especially if the device is attached to a finished building. Data about the base and wall of the house are extremely important, as are acclimatization conditions (wind load, amount of precipitation in winter, location relative to the cardinal directions in the location chosen for the construction).
 Scheme with dimensions of the canopy for the house
 In addition, it would not be superfluous to take care of the decorative details, types of roofing that are preferable in a particular situation, and select the roof shape and size. The more detailed the project, the easier it is to implement. Competent digital calculations will help you find out the amount of materials and mandatory construction costs. The easiest way.
Installation of supports
The first thing you need to take care of is what the canopy will stand on next to wooden house. Some craftsmen advise placing a canopy on simple wooden logs and making a sheathing and roof on them. This is a possible construction option, but it may happen that after a while there will be heavy rain, and then the canopy may simply move away from the building. And if the ground is loose, then the canopy can become very skewed. Don't forget to take this into account when you design your project.
 Scheme for installing canopy supports
 For this reason, the canopy should only be installed on, this will guarantee that no bad weather will harm the stability of the canopy. This will be a kind of foundation, and therefore its arrangement needs to be considered step by step.

After this, all that remains is to install decks with a diameter of 30 centimeters, along which the primary piping will go.
Support beam with vertical posts
Action plan:

Support posts can be installed in several ways:
- fasten the beam directly to the formwork;
- install the thrust bearing in the formwork, and then attach the timber to it;
- fixing the thrust bearing directly to the wooden or concrete base.
The mounting option is selected based on the specific weight of the structure. If you plan to build a small canopy, then the first method will be an excellent option. If the specific gravity is large, you need to choose the second or third option.
Installation of rafters
The rafter system requires care and precision. For rafters you need to take 150x50 mm timber. This section is taken for a span of six meters. It is necessary to take into account specific gravity designs and minimum slope. The step between the rafters should be no more than one meter. One side of the beam needs to be firmly secured to the support beam, the other is laid on the rack. The rafters must be positioned strictly perpendicular.
There are several ways to secure the rafter system:

The rafters should lie at the same level so that there is no distortion in the roof.
Lathing:
- You need to make markings on the rafters to cut out the grooves.
- Cut small grooves 4 cm deep.
- Insert the boards into the grooves of the supporting rafters.
- Once the sheathing is installed, you need to secure the entire system with corners.
Once the sheathing is assembled, you can begin attaching the roofing material.
Roof installation
Roofing material can be different, starting from ordinary slate and ending with polycarbonate.
 The process of installing a canopy roof on a house
 Let's look at how to cover a wooden canopy with the latest material. For installation, you need to prepare self-tapping screws with thermal washers, a trim profile, and connectors.
Procedure:

Interesting! Some owners of houses with a canopy do not cover the roof with roofing material, but simply plant it around the canopy, growing to form a natural and beautiful awning. Video about making a wooden canopy with your own hands.
Canopy over the porch
When starting to build a wooden canopy over the porch, carefully calculate everything and make a drawing. It is necessary not only to decide on the length of the beams, but also to calculate the angle of inclination. This is necessary so that during the construction process there is no large distortion.
There are no standard sizes for this structure; you need to calculate it individually based on the size of the porch. The height of the structure should be comfortable for residents.
The tallest person should stand quietly on the porch without touching the roof. The tilt angle cannot exceed 35 degrees. Advice. If you don’t know how to make calculations, then lay out the material on the ground with which you plan to cover it, the resulting rectangle needs to be measured - this will be the size of the canopy over the porch.
 Design and decoration of a wooden canopy over the porch
 Tools and materials
To build a canopy over the porch with your own hands, you need the following material:
- timber 150x150 mm, for rafter system and supports;
- a wooden block 7.5x7.5 cm for sheathing and a board 2.5 cm;
- As soon as the concrete hardens, you need to cut the beam to the desired height and attach a second beam for support.
Advice. You need to try to make the roof so that the snow does not cake on it; to do this, for every 1 meter of roof length we make supports 10 centimeters below the support beam attached to the wall.
Lathing:

Roof installation:
- as soon as the sheathing is ready, it needs to be treated against mold and rot;
- installation of roofing material begins from the free edge;
- secure with nails or screws;
- ready to decorate the canopy.