Surely everyone noticed that cats are very fond of putting themselves to sleep in various boxes (even the smallest ones) or bags. And it's no accident.
Where did this strange love come from?
- The main reason is security. Since the box is closed on four sides, and only the opening for entry remains, the animal can safely sleep and relax without worrying about its own safety.
- Cats are very fond of playing with paper. In addition, the natural odors attract them, and as you know, cardboard smells of wood, and therefore - nature. Such material perfectly preserves heat, which means a lot for a comfortable rest.
- Since cats often bear offspring in such boxes, for them, since birth, such a house is associated with comfort.
We develop and create the "right" cat's house
The owners of cats often complain that the animals spoil the interior: scratch the sofas, grind the claws on the wallpaper and leave their wool everywhere. It's worth acknowledging that people are to blame for this. Developing the interior of their homes, we absolutely do not think about how our pet will spend time.
Try to make not only a place to sleep, but also to allocate a small space for games. For this purpose logs, various strings with bows and shelves, on which the animal can jump, will do. Keep in mind that there should be no small parts or sharp objects in the animal's dwelling that it can swallow.

Design the project so that both it and the inner litter can be washed or washed easily if desired. It is better to use natural materials, so that the cat was pleased to be in the new house.
We offer you a detailed guide:


Time to create such a house for a cat from a cardboard box will take quite a bit, but you will be sure that your pet is comfortable and nice to be in his house.

Video how to make a house for a cat yourself
After buying any equipment - do not throw away the cardboard box! It can turn out great! Of course, its beauty and originality depends only on your creativity! Well, if the ideas are tight - we are ready to help you and with examples to prove that, armed with scissors, glue and imagination, you can become a real koto-architect!
Of course, it's good when there are several boxes, and they vary in their volume and shape. Small and large, square and rectangular! Look to see if there are boxes of shoes in your closet! They will also become a good building material for the house!
It is worth noting that the boxes should be chosen strong, made of thick cardboard. Those who can withstand the weight of your pet. For decoration out of the box, you can use a variety of napkins, newspapers, the remains of wallpaper, colored paper, and even trimming fabrics.
Among the advantages of a house made out of a box is the cheapness of the product, the manifestation of one's own creativity, and the use of materials that have long been worth throwing away, which is certainly a plus for the environment.
Among the drawbacks of the cardboard is its fragility.
Nevertheless, no matter what, such houses are worth doing! Its making by the whole family will bring joy, your cat - happiness!
Let's look at a few ideas!
Here, interesting in the form of a rocket. It is made of three boxes. Of the first two, two tiers turned out, and the third went on making a cone and wings at the base of the rocket.


An irreplaceable material for fastening cardboard blocks - plain or paper tape. With its help, all the details are connected. And that it was not visible, the product is decorated or painted with the help of all the same colored paper, wallpaper or paints!

And with the help of a construction knife or a knife, you can make original holes in the house, thanks to which windows, doors, arches, and various decorative cutouts will appear.

Decorative holes and additional details can turn the house into a real luxurious palace! This was used by the company's designers KEK from Amsterdam, and created such a wonder-house of cardboard!

Just take a look at these extraordinary cardboard wigwams! They will not leave indifferent any cat!

But the unusual houses, in their shape resembling milk boxes.

How to decorate such a box depends on you!

You will be surprised, but cardboard houses are so popular in Europe and the United States that some manufacturers are deliberately engaged in their manufacture.

A cat's cottage is primarily a necessity, because it is one of the most independent animals that should have its own personal space. I'm glad that everyone is able to make it on their own. There are a lot of different options, but the most optimal of them is a house made of cardboard box.
House for a cat out of the box and carpet
A cat's house from a box can be made very different. But I would like to start with a simple and maximally practical - out of the box and carpet. It will become not just a place to sleep, but also an opportunity to stream nails. So you not only create a cozy nest, but also save furniture in the apartment.
For work, take:
- Box
- Piece of old carpet
- Scissors
Take the box and make a hole for it with the help of scissors. To make it beautiful, you can first draw it in pencil, and then - cut it. Take care that the hole is not too small.

Now let's start the "finishing" of the new apartment. It takes a bit of logic and skill. Measure all sides of the box and write down the values. After that, transfer them to the carpet. In fact, you need to make a pattern. Be careful, after all, after you take the scissors in your hands, fixing something will be difficult.

Suppose the pattern is ready. Now it's time to paste it on the box. For this you can use a large stapler, but glue is better - it will be invisible, so that the box will turn out neat and beautiful.

Do not forget about the interior of the new house. Lay a mat or a waterproof mat, throw your favorite toy. But before that wait for a while - the house needs to dry thoroughly.

An easy way to make a house for a cat
You can create a real lock for your cat out of the box. This will be especially interesting with children. The scheme of work is simple and fascinating, so you will quickly cope.
You will need:
- Large cardboard box
- Stationery knife or scissors
- Pencil and ruler
- Pistol with staples
- Scenery, if you want
Imagine how you would like to make a future house for your cat. Pick up a pencil and transfer your plan to the box: draw, where there will be an entrance, windows, roof. Take a scissors or a clerical knife and start cutting.
Carefully fasten all parts using a pistol with staples. If you do not have a gun, you can always use glue, the process will take a little time, but the result will be no less successful.

Once everything is ready, you can decorate the house for the cat. You can decorate it with paint, or trim it with a cloth. It all depends on your imagination.

Be sure to place a soft litter inside, because the cats are gentle creatures, they love warmth and comfort.
These two ways will help to easily make a cozy cottage for the cat out of the box, which will perfectly fit into the interior of your apartment, and just like your pet.
Respectful owners of pets, simply can not leave their pet without a secluded place, where the latter spent time, peacefully snuffling on a cozy bedding. In this review, we will talk about cats, or rather about their dwelling. Yes, yes, not only dogs need house-kiosks, they are also necessary for cats. Only unlike the street dog booths, the house for the cat will be installed somewhere on the territory of the house, villa or apartment. This review will provide information on the independent production of the cat's house, as well as many photos of finished products.
Types of houses for cats.
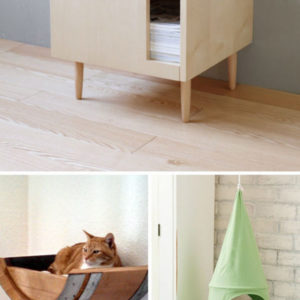
- Open. Under the open means various sunbeds, hammocks and suspended semicircular structures that can be fixed on walls or heating batteries.
- Closed. This house is completely closed on all sides, except for the front part where there is an open hole through which the animal can go in or out into its mansions.


From cardboard you can make really posh apartments for a cat, let's say in the form of a castle or lookout tower, only they do not last very long, his cat will sooner or later start gnawing and scratching with claws.
What are the houses made of.
In fact, the choice of materials is quite extensive, it can be tissue copies created from cardboard, finished plastic products woven from vines, made in the technique of felting out of wool, wood. In addition, they can be made from old household appliances (Soviet TV sets), pedestals, chests of drawers or padded stools. To all else on sale you can find very beautiful beds on the legs, which are mini sofas or armchairs.


In the shops you can find houses for cats visually similar to canine booths, covered with water-repellent fabric, such products can be put not only in the house, but also in the garden.
Where to put the cat's house.
Follow the behavior of the animal, many of them choose a place on the floor where they like to just lie around and do nothing. It is this area that is ideal for installing a house, but we still recommend placing the product 30-40 cm further from your favorite place so as not to disturb the habitual bias and lifestyle of the animal. In addition, it is important to understand that the house should not interfere with your movement around the apartment, you do not want to constantly stumble through her new home! But for a cat to become accustomed to its house, it is necessary inside the dwelling to throw her favorite toy and run the animal into a new apartment. You yourself will not notice how the cat will look around the house and will happily spend time there.


To the note: the house-lounger can be made from an old suitcase, to it from below it is necessary to screw up legs and to put a soft rug inside. Believe me, the cat will be happy to receive such a smart gift.
How to make a house for a cat.
Cocoon.
From a large amount of paper it is necessary to form an "egg", wrap it with a film and wrap it around with adhesive tape. After that, the cocoon must be pasted with pieces of newspaper, and then with napkins, immersed in PVA glue. Leave to dry, then cut the hole with a knife in front, and cut through the inner "egg", slowly pulling out paper and film through the hole. Next, the entire cocoon inside and outside should be painted with white acrylic paint, then from inside to put a layer of red paint. It remains to paste the upper part of the cocoon with pieces of cute paper and put the lounger inside.
Cat house out of the box.
Below on laughter you can learn how to quickly and easily make such a house.

Plywood house (video):
A bed for the cat with your own hands (video):
House made of cardboard, covered with cloth (video):
House for a cat, photo:


![]()


Whichever cat is domestic and manual, as well as the person needs his own space, so help her to find it.
Well, we also shared with you the information, concerning small houses for pets. Certainly, a house for a cat can be bought in a store, but you can also make it yourself with your own hands, using improvised material, like cardboard boxes. The choice is yours! Until new meetings on the pages of the site "Comfort in the House."
The simplest option - to build a cozy nest for a cat from the most ordinary cardboard box. For this case the box from under the printer, microwave, multivark, the TV and other dimensional home appliances is ideally suitable. Some owners of cats manage to use as a small house a box for parcels of the "Post of Russia". The most important thing is that the size of the box allows the cat to stand inside in full growth, and also turn around its axis.
Materials and Tools
To build a house for a cat will need:
Box of dense cardboard;
Carpet or old carpet;
Waterproofing material;
Sharp knife;
Pencil and ruler;
Wide Scotch tape.
As a waterproofing material can be a special litter under the roof and wooden floors. It can easily be found in almost any building supermarket. If you decide to use a new carpet and waterproofing material, keep in mind that they will first give off a sharp smell, which is unlikely to please the pet. That's why let the material "lie down". Usually it takes at least two weeks.
Cat house out of the box: walkthrough
entrance
In one of the walls of the box, carefully cut the hole. It will be the future entrance. This hole should be very spacious, so that the pet can easily climb into the house, but it is not too big for the cat to feel comfortable in its lair.
Fix all the flaps on the sides of the box with tape so that they can not open and prevent further work.
Interior finish
Carefully cut a piece of waterproofing material. Its width and length should be enough to wrap two side walls and the bottom of the box. The width of the material should correspond to the width of the box. Insert the material inside the box through the inlet. Unfold it and glue, gradually applying glue to the bottom and walls of the box. For these purposes it is better to use glue for hot gluing.
Cut three more pieces of waterproofing material. One of them glued on the ceiling of the house from the inside, the other - on the back wall, and the third - again on the floor, so that the cat was warmer. Then cut another piece of material of suitable size to cover the space around the entrance. It will be superfluous to paste a waterproofing material on the joint between the floor and the back wall of the house so that there are no gaps. Such insulation will keep heat inside the house.
Exterior decoration
Paint the outer part of the house with carpet. After gluing it on the front, let it dry well, and then gently prune the opening of the entrance with a sharp knife, slightly receding from the edges. Do in the corners of the "fake" contour diagonal incisions and bend the stripes of carpet in the interior of the house. Then glue them with glue.
Now let the house dry well. This takes 3-5 days. Put a warm blanket or a small pillow inside - and call the cat to do housewarming.
Of course, you can do much easier - do not use carpet for exterior decoration, but just paint the box with paint or paper over wallpaper. However, using the carpet, you will kill two birds with one stone: get both a shelter and a scratch for your pet in one bottle.
Tip 2: How to make a scratching carpet with your own hands
It is almost impossible to forbid a cat to sharpen its claws. This process is inherent in nature. However, it is quite possible to protect your furniture and carpets from the attacks of a domestic predator. In this you will help kogtetochka.
Shops with products for animals offer a huge selection of nails, ranging from the most simple in the form of a soft board, ending with whole cat houses in several floors. In fact, you can do the scratching yourself, and from the materials available.
Cushion in the form of a pillow
This is the simplest type of scratching machine. All you need is a board, foam rubber, a piece of carpet, glue and carnations.Dimensions of the nail clipper you choose yourself. Take a suitable plank, glue a thin layer of foam rubber to it. Use glue with a mild odor. Remember that the smell of cats is several times better than that of humans. From the top, wrap everything with carpet, fasten it with small studs or staples on the back. So the design will be more durable and reliable.
The resulting claw can be left in this form and placed on the floor. If desired, you can make a pillow in the form of a circle, a rectangle or something unusual, such as a mouse. Also, you can attach a nail to the wall so that the animal has the ability to sharpen its claws, stretching out to its full height.
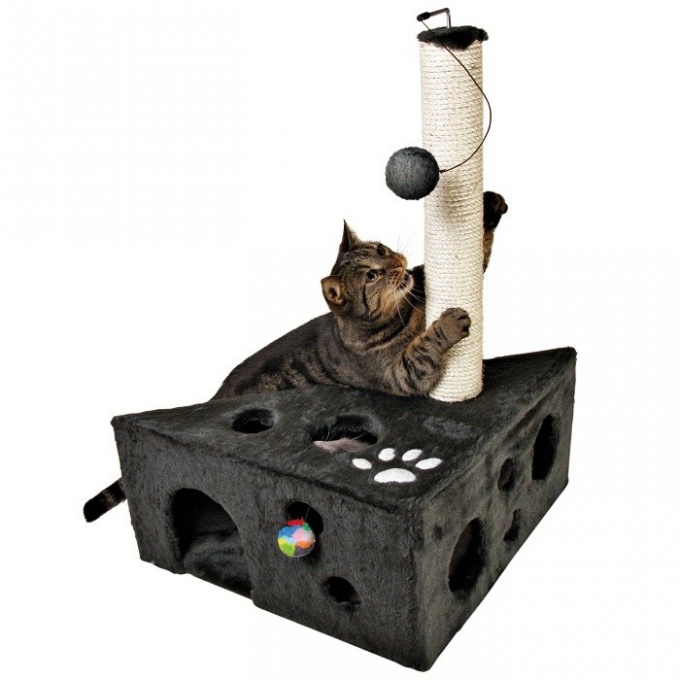
Cat house with scratching
Make your pet a multi-level scribe, and he will certainly stop torturing the furniture upholstery. At the heart of this design lie the same flat claws. Wrap the plates of different sizes with a thin layer of foam rubber and carpet. Carefully fix the material using nails or a furniture stapler.To a pet had the opportunity to hide from you in his home, make a couple of houses. To do this, fasten 4 sheets of plywood, pre-wrapped them with carpet and cut in one of them an opening-entrance. At the bottom of the house, lay something soft or fluffy. Take plastic or wooden pipes, apply a little glue on them and wrap them with thick ropes. Make sure that the ropes are as close as possible to the base.
Fasten the boards and pipes using corners or screws. Do not make the construction too high, 1-1.5 m will be enough. For better stability in the quality of the base of the nail clip, select plaques of a larger size, you can use two. Decorate "islands" with carpet balls on the ropes, toy arms and other accessories that will be of interest to the animal.
Multilevel scratching will require you more time and patience than the usual flat, but it will make the pet much happier. He can play, sharpen his claws and rest in his house, watching you from a height.
Related Videos
Cats are creatures who like to climb into boxes or hide in houses. In the pet store you can buy a house for a cat, but it is quite expensive and existing modifications may not really like both the configuration and appearance. There is a very simple way to make a cozy quality house for a cat from improvised materials.

You will need
- - a plastic rectangular container with a rim (the rim is mandatory!);
- - 0.5 square meters. plywood 10 mm;
- - carpet or artificial fur on a dense basis;
- - M5 bolts with countersunk head and nuts;
- - a soft rag for a lounger;
- - sewing kit;
- - set of tools.
Instructions
Cut a rectangle from the plywood, the size of which corresponds to the size of the top part of the container.

Treat the edges of the plywood with a file, remove the burrs and chamfers.
Cut out a rectangular piece of carpet or soft, durable fabric, the dimensions of which will correspond to the dimensions of the blank sheet of plywood. Wrap the edges of the carpet so that it does not dissolve during operation and operation. In addition to simple sewing, the edges can also be wrapped with a cloth and sewed with a solid seam.

Prepare the container with the door, turn it upside down, place it on the veneer with the carpet interlayer between them and fix it with screws. For this it was necessary to find a container with bumps. First you do not need to grab the screws. Just bait them to understand how the lid of the house will be attached.

Now you need to put the container inside with a carpet or something soft, so that the cat feels comfortable. Prepare the same obsolete workpieces of carpet for each wall and for the ceiling. On each wall and ceiling (it's the same as the container), you need to attach one corresponding to the size of the workpiece.
To fix the workpieces we will use bolts with a countersunk head. We place the nut on the outside, and the secret hat inside. We make holes through the carpet and fix the prepared fragments. Do not forget to put the big washers on the outside.

Now it remains only to fix the carpet-insulated container, securely fasten the bottom of the plywood to it and the house is ready!
note
Around the arch of the door you need to go through a lot of bolts than on a normal wall. Otherwise, the carpet will stick. Also, do not forget to fasten the door opening below with additional screws.
Helpful advice
Door arch as well as carpet blanks can be swept with a cloth. To do this, it is enough to make holes in the container and carpet, and cover it with a cloth.
To appear in house of a kitten , as well as the birth of a child, should be prepared in advance. Firstly, you need to stock up on all the accessories you need for your baby: a toilet, a bowl for food, a cup for water, a special cat's comb or a brush, a scratching pad and lots of different toys. Secondly, it is necessary to provide the pet with a house in which he can hide from others, relax and calmly sleep. House for a cat is easy to do with your own hands.

You will need
- - sheets of plywood;
- - plastic pipe, for example, sewer;
- - upholstery material;
- - self-tapping screws or screws;
- - rope made of natural fibers;
- - PVA glue;
- - 8 mounting brackets;
- - foam rubber
Instructions
The most convenient and functional is the cats' house, which includes a mink-box for sleeping, a high climbing column for climbing and a shelves for rest, lying on which the cat can freely view its territory, watch everything that is happening around it and feel " on high".
Try to use for making a house for a cat only natural and absolutely safe for animals materials that do not emit unpleasant odors. Especially it concerns glue. It should contain only organic solvents.
First of all, prepare the details of plywood, namely - the manufacture of mink-boxes and top shelf.
Determine the length and width of the shelf. These values directly depend on the size of the pet. The average size cat is quite enough pad size 50x60 cm. Prepared for the manufacture of the shelf sheet of plywood on both sides, glue foam and wrap around with a cloth.
In one of the plywood sheets, cut a round, oval or rectangular hole - the entrance to the house. The floor, the roof and the walls of the box are fixed with screws or screws.
The resulting box inside and outside should be covered with prepared material, for example, carpet. Just glue, and do not nail, otherwise clips or nails can seriously damage the claws of your cat. On the floor of the resulting box, lay a mat that can be washed or replaced if necessary.
To both ends of the prepared for manufacturing a column of plastic pipe, fix 4 fixing angles and connect the resulting structure with the roof of the mink box and the "survey tower".
The last stage of making a house for a cat is wrapping a plastic pipe with a rope. Do this as follows. Spread a small area of the pipe with glue and make several turns. After waiting a while, spread the next section and again make a few turns. And so on until the whole column is wrapped in a rope. Cottage for the cat ready.
Sources:
- make a cat lodge out of the box in 2017

You will need
- plywood sheets - 8-10 cm thick, PVA glue, screws, polyethylene pipe (1 m long, 11 cm diameter), rope, upholstery material, mounting angles, foam rubber.
Instructions
From the plywood, cut out the upper shelf 50x60 cm. Cover it with foam rubber and wrap it with a cloth.
We make a house-box. Cut out the plywood parts and assemble the box. Fix it with screws. The average size of the box is 60X40X40 cm.
Cover the box with the material. Inside put the foam lined with material.
Connect the pipe to the roof of the box and the upper shelf using the corners.
Wind the pipe with a rope. Get kogotochka.
Helpful advice
Put the house where the pet likes to spend time.
Some animals are very fond of sitting in the secluded corners of the apartment, hiding from its occupants. This is due to the nature of the cats. That's why they need a house that can be made with their own hands. It will be cheaper for you than buying a finished product.
You will need
- - a box;
- - glue;
- - Carpet.
Instructions
Take a tight cardboard box. Size select according to the complexion of your cat. The house should not turn out to be too big, but you also need to consider what animals like to stretch. In principle, enough boxes 50 to 50 cm, you can and a little more.
Cut a square, round or oval hole in the box into which the cat will slide unhindered. It is better to make it a bit more in diameter, because an animal can recover over the years.
Wipe the box of dust with a damp cloth and dry. Lay the foam on the bottom, and then coat the inside with a soft cloth or carpet. Use a furniture stapler. Be sure to check if there are sharp staples that can injure the animal. If you do not have a device, simply glue the material to water-based glue.
Top coat the same way. It is best not to use light material and it is desirable that it is dense, because cats are very fond of sharpening claws.
Place the box in a nook, on the wardrobe or on the shelf. If you put the house high, fix it with a rope or decorative rope so that it does not fall if the cat climbs to the top.