Plastering internal corners: permissible deviations.
Corners are one of the most difficult elements in wall decoration. Unlike plastering walls using beacons, the difficulty lies in the fact that even the most minimal deviation, imperceptible on the wall, is clearly visible in the corner.
The requirements for plastering are quite strict:
- Line must be perfectly flat with a deviation of no more than 1 mm.
Violation of the requirement leads to bending of the corner, difficulty in fastening wall-mounted furniture, and the external aesthetic unattractiveness of such finishing.
- No slopes: The walls are strictly vertical, the ceilings are horizontal.
A significant slope of the wall makes it difficult to fix hanging furniture and decorative elements, and does not allow objects to be placed close to the wall (there will definitely be an oblique gap at the top or bottom).
- Strictly 90 degrees. This is difficult to achieve in old buildings with skewed walls, in houses built with errors.
 Complicates the installation of rotating communication elements. For example, when carrying out heating, it is more difficult to lay a pipe, because standard “turns” are only 90 and 45 degrees.
It is more difficult to join plastic skirting boards.
Small deviations and distortions are acceptable, but only 1-2mm. With significant initial curvature, it is more difficult to achieve high-quality results. Therefore, plastering the corners of walls with your own hands is considered a difficult task.
How to make a right angle.
A slight slope of the wall that can be leveled with mortar is 15-20 mm. You can do the work yourself, you just need to follow the rules:

- Plastering walls according to lighthouses. Without correctly placed guidelines, it is difficult to complete the work efficiently. installed on a plumb line or level at a distance of 10-15 cm from the corner.
- Maintain consistency. Plaster on internal and external corners is not installed immediately. First, pour on a thin solution, let it set, and only then apply the main part.
If leveling involves the presence of a thick layer of mortar, then the work is done in two steps: throw on one layer, let it harden, then the second. The plaster on the walls along the beacons, applied at once in a thick layer, falls off, comes off the wall under its own weight, the connection of the layer with the base will be weak.
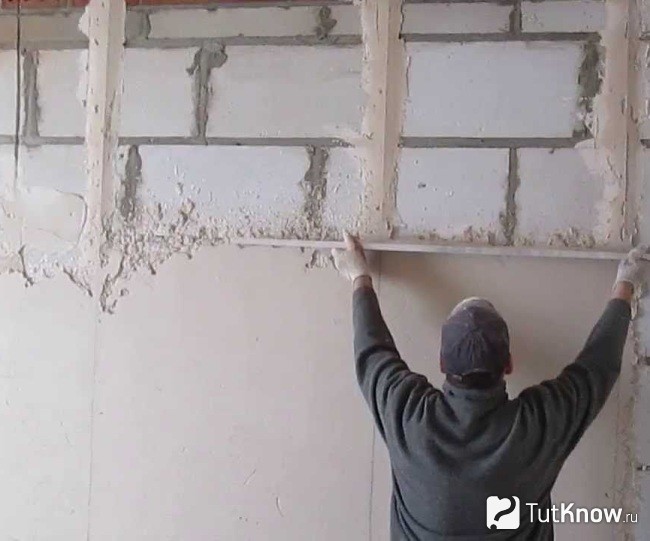
- Do not rush. You don't have to do everything at once. First, the wall is usually aligned along the beacons, not reaching the corner by 1-2 cm. Then, using the rule, the angle itself is leveled.
 Easy way make the plaster smooth - step-by-step work. First, treat one wall and let it dry. Then the second one adjacent to it is aligned. It’s easier to work this way, because one wall is already smooth and solid.
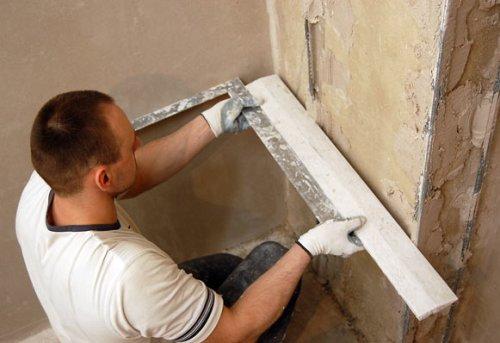
Even easier plastering corners using a large metal square. It is usually used to direct movement from bottom to top. The tool rests and slides on beacons mounted near the corners.
How to straighten a corner with a significant curvature of the wall.
If the walls slope by more than 1-2 cm, additional operations are necessary; it is impossible to level out a wall distortion of 5-7 cm!
"Weighing down."
The degree of wall deformation must be reliably assessed. To do this, the surface is studied using a plumb line - a heavy metal weight on a rope or a building level attached to a rule.
Installation of beacons.
It is better to prepare depressions that are too deep before installing the beacons so that the latter do not interfere with work. For small but deep distortions, you can plaster the walls along the beacons right away.
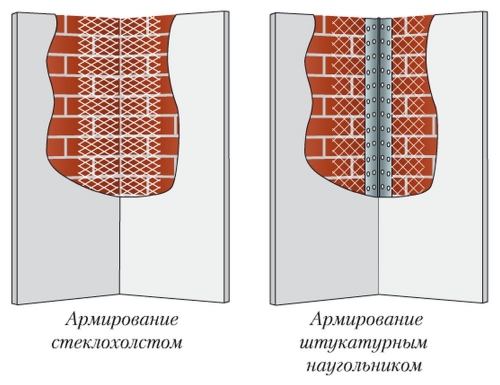
Reinforcement.
 Plaster that is too thick does not adhere well to the wall. Therefore, the places where the curvature of the wall is leveled using mortar are reinforced.
To do this, holes for dowels are drilled in the wall every 40-50cm. They reinforce reinforcement - reinforcing mesh. You can use pieces of wire that are braided around the screws.
The reinforcement must be located in the thickness of the future leveling layer. Therefore, it is placed no closer than 1-2 cm to the surface of the future plaster.
IN wooden houses plastering walls on beacons with a clay base; shingles and waste lumber are used as reinforcement. The cross-section of the slats should not exceed 4-5 cm square.
The shingles are simply nailed to the wall, positioned at an angle (45 degrees to the floor) with a distance of 3-5 cm.
Before removing the corner, the reinforced leveling inserts are allowed to dry completely.
Plastering.

Leveling plaster does not differ in composition from ordinary plaster, so it is applied according to standard rules:
- Primer. To ensure that the solution has strong adhesion to the wall, the latter is covered with a layer of primer.
- Splash – applying a liquid, creamy solution to the wall and fittings. For more reliable contact of the mortar with the wall, it is attacked with a blow, a kind of “slap”.
- Soil – main layer of plaster. For very curved walls, it is better to apply the primer in several (2-3) stages, allowing each layer to dry.
How to make straight corners with minimal plastering.
If the walls are slightly deformed (1-2 cm), you may not need to level the entire surface. If it becomes necessary to make repairs that are minimal in time and cost, only straighten the corners of the rooms and the joints of the walls with the floor and ceiling.
The plaster in the room remains crooked, but due to the perfectly straight corners, this is not noticeable.
Here's how to make a straight wall corner:
- Walls. The plaster is applied to the corners and leveled here. But further along the length of the wall, the layer of mortar is reduced to nothing. In order for the insert to be invisible, it is necessary to avoid creating sharp changes. For inserting thick 1-2cm width should be approx. 15-20cm.
- Floors. Here leveling is necessary for installing the baseboard.
- Ceilings. The leveling layer is applied only to the wall; if this is done on the ceiling, the insert will be noticeable.
However, the ceiling surface must also be made flat in the area adjacent to the wall, but with a minimum thickness.
This economical leveling method is applicable only when small inserts of 1-2 cm are needed. For deeper deformations, the inserts will be too noticeable.
Plastering rounded corners of walls with your own hands.
It is no more difficult to plaster rounded corners than ordinary ones:
- Alignment of walls. The walls are plastered and leveled using standard technology.
- Reinforcement. An ellipse of small diameter does not require reinforcement. But when creating significant curves (with a diameter of more than 10 cm), they are reinforced with reinforcing mesh and wire. You can get by by screwing in screws (steps of at least 20 cm).
- Spray.
- Applying a template. Apply the solution and remove its excess using the rule. In the case of curves, the role of beacons is played by the surface of both walls, and the rules are a specially made template.
This curved rule is done like this: they apply an easily bendable but strong wire to the rounding and press it into the ellipse. This is how you get an accurate drawing of the future template.
The wire is applied to plywood (at least 6mm thick) or sheet steel or tin. Trace with a pencil. Excess is trimmed along this line. The template is ready!
When the corner plaster is completely dry, apply the final covering layer using fine sand (fraction no more than 1 mm). This layer is rubbed with felt to make the wall as smooth as possible.
It is worth remembering that rounded corners are rubbed only with horizontal movements.
Necessary tools and equipment.
Plastering internal corners requires a standard set of tools and supplies. Some of them can be replaced, others cannot.
Lighthouses.
 Steel profile – the best option: metal elements They are not “afraid” of water, are easily strengthened, and are perfectly level. But they are not suitable for economical, minimal repairs.
Wooden lighthouses – slats of small cross-section (2.5x3cm and thinner). The difficulty of using them lies in a whole set of disadvantages:
- Curvatures. It is difficult to choose reliably even slats, because the wood is constantly deformed, absorbing moisture from the air and giving it away.
- Swelling. Wood increases in size and swells. In relation to lighthouses, this drawback is most relevant, because plastering is a “wet” job.
- Dismantling Galvanized steel beacons are considered optional. Wooden slats must be removed before leveling the corners with plaster. The resulting voids and furrows are filled with solution and leveled. This requires additional effort and time.
However, plank guides are much cheaper than metal ones and are sometimes used when the budget allocated for the renovation of the premises is tight.
Lighthouses from solution– fragments of the mixture applied to the wall with a convenient step rule for working. Such landmarks have the advantage: they do not need to be removed, and they are free. But working with them is not convenient, and it is quite difficult to align. This method is acceptable for small walls and is used mostly by experienced specialists.
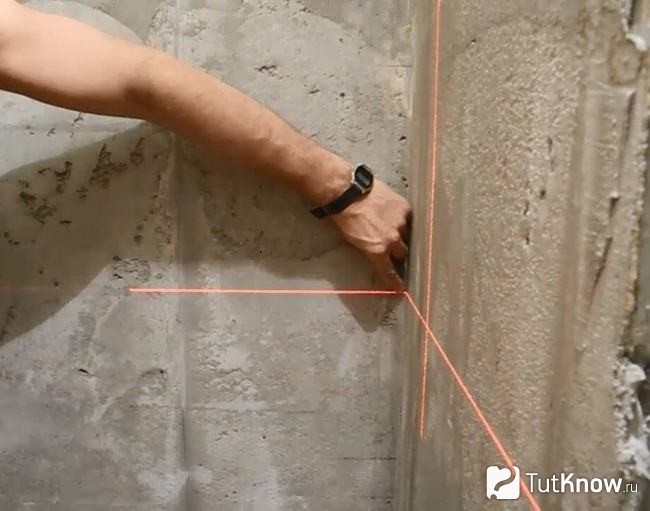
Checking angles with a laser plane builder.

A laser level is the most convenient and accurate control tool. To check the angle, it is enough to set it along the bisector line (approximately) and align the vertical plane of light with the vertical line being examined.
Tool.
Plastering walls along beacons will require the following, which are difficult to replace:
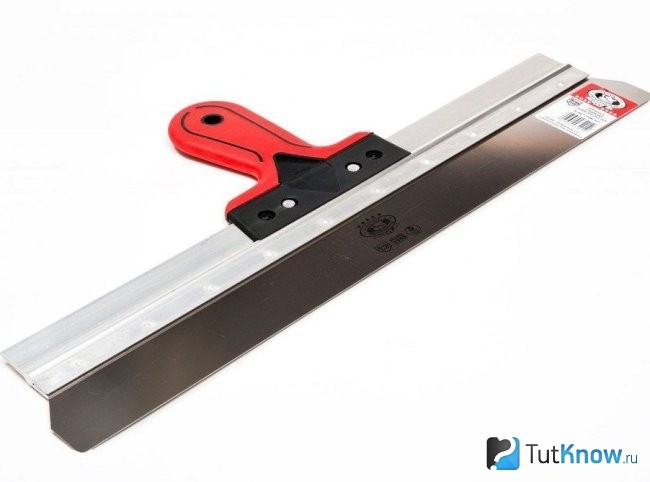
- Rule. Wide (10-12cm) rigid aluminum “rail” at least 130-150cm long. Allows you to accurately assess the condition of the plaster layer, its curvature, depressions and bulges.
- Poluterok. A wooden, plastic or steel “board” with a handle. Half grater length approx. 50-70cm. Used to level the mortar on the wall.
- Grater. The same as a grater, but small in size (20cm). Convenient in hard-to-reach places, as well as for leveling, covering and grouting.
- Corner – a metal or wooden device in the shape of a right triangle. Used to control evenness, and also as a template for plastering and drawing plaster mortar. Typically used.
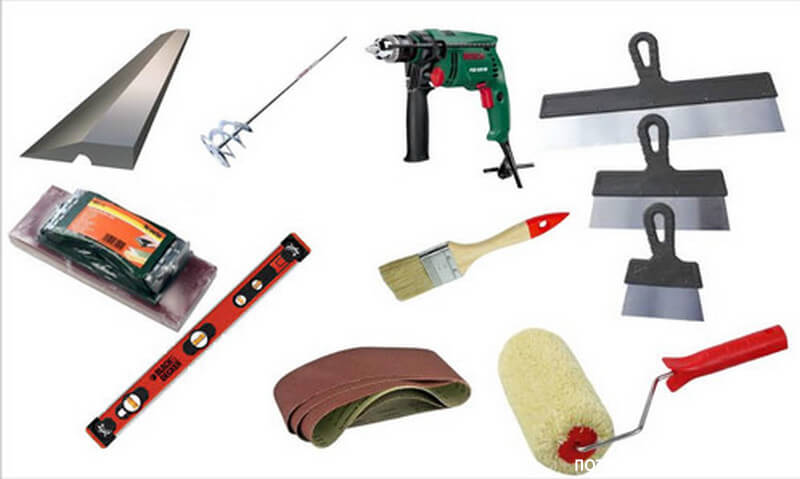
The larger the instrument, the more reliable the measurement result. For plastering work, a square with a leg length of 100 cm is most convenient, since it is easier to make a 90-degree angle with plaster, using the maximum area of the adjacent walls as a guide.
- Trowel, spatula. A trowel is needed to apply the mortar onto the wall. If the amount of work is small, it can be replaced with a spatula.
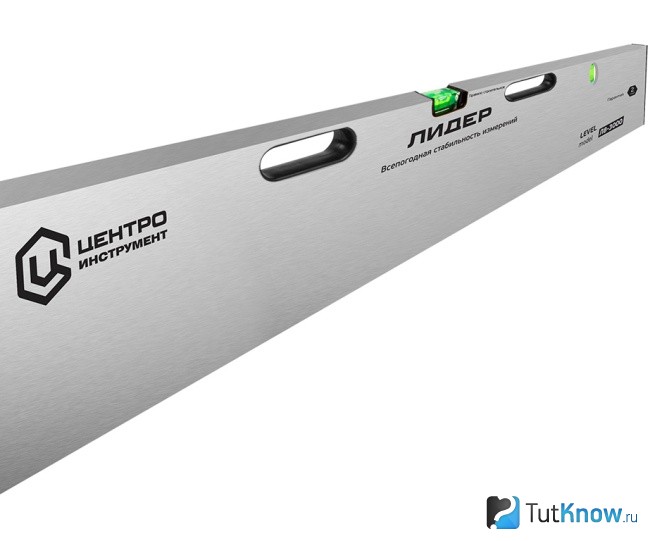
- Plumb line, building level. Using a plumb line, the work of studying the slope of the walls and installing beacons can be done faster (if you work together), since the rope can be stretched to the entire height of the room.
The level (spirit level) is more convenient, but it is short, which makes work difficult. However, it is difficult to do without it.
In addition, you may need devices and tools for preparing mortar - a trough, a sand shovel, buckets. If the plaster inserts are not related to the arrangement of corners, but only to their alignment, the solution is prepared in a bucket, stirring with a mixer (an attachment for an electric drill) or a spatula - onto the floor of the bucket of solution.
Is it possible to plaster the corners of walls with your own hands?
For a beginner, plastering walls using beacons is a difficult task. But leveling corners is considered to be the most difficult task, requiring high professionalism.
However, with the appropriate painstaking and conscientious approach, creating even corners is possible with your own hands. The difference with the work of professionals will be only in the time spent on completing the task.
Plastering corners, their diagnosis and leveling methods, preparation for work and processing technologies various types wall joints.
The content of the article:
Plastering the corners is a stage of preparing the walls to a smooth state for their further decoration. It is quite complex, because it involves working with surfaces located in different planes. However, this procedure is mandatory, since crooked corners can cause defects exterior finishing and cause complications when installing furniture or equipment. Having skills in construction, you can level the corners of walls with plaster yourself.
Measuring wall angles and how to align them
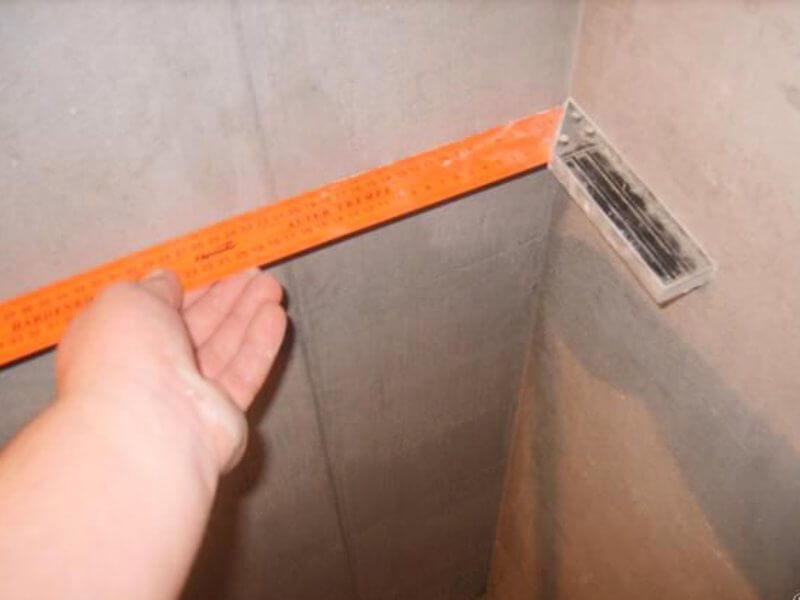
In order to measure the deviations of an angle from the vertical and horizontal, you will need a square, a plumb line or a building level, a flat piece aluminum profile at least 2 meters long and a ruler.
To determine the depressions and protrusions, you need to attach a piece of the profile to the corner. Then you need to install it in a vertical position, which is checked building level. After performing these steps, you should use a ruler to measure the maximum deviation of the angular line from the vertical of the installed profile - this will be the desired misalignment.
The horizontal deviation of the angle from 90 degrees can be measured with a large square. It should have long sides - almost from one wall to the other. You can make such a tool using the property of the Egyptian triangle and two long rules.
In the Egyptian triangle the presence right angle determined automatically by the aspect ratio - 3:4:5. Therefore, such a figure can be drawn on the floor, and then two rules can be aligned along its sides and fastened together in the form of a right angle. This tool may be useful for further work: beacons under plaster are installed on one wall using the usual method, and on an adjacent plane using a square.
The rectangular shape of the room can be checked in another way. To do this, measure the diagonals of the room. They should be the same.
If it turns out that after checking the walls have significant unevenness, forming angles that do not meet the norm, they can be leveled using plasterboard sheets that are attached to a frame that can correct any curvature, even half a meter. However, such technology will take away a certain part of the living space, which owners usually treat very carefully.
In case of small defects in the walls, their corners are leveled with plaster, while the usable area of the room is preserved as much as possible. This method is more labor-intensive and involves a rather dirty process, but is highly reliable, creating a monolithic coating.
Preparing wall corners before plastering
To perform high-quality leveling plaster on corners, you should have necessary tools, prepare the surface of the walls and know certain working rules. Now let's talk about all this in order.
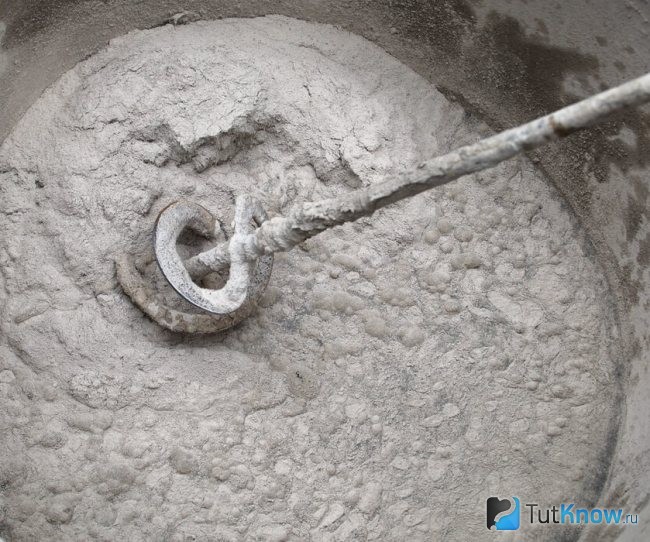
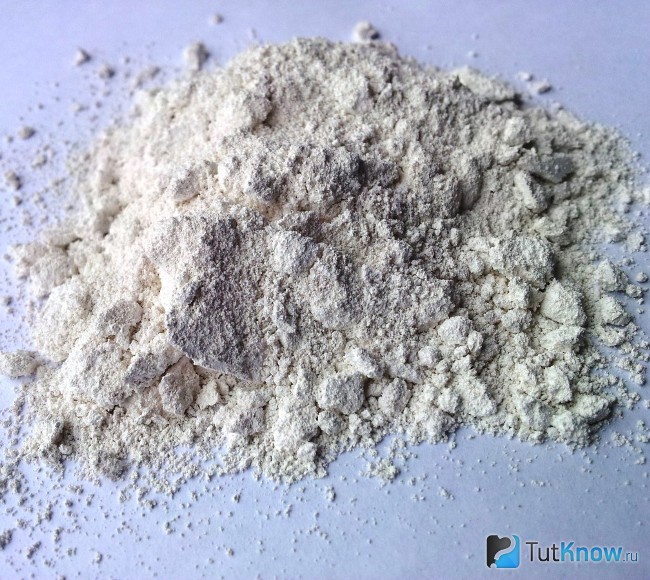
The ideal material for leveling corners and walls is gypsum-based plaster. It allows you to increase the thickness of the coating gradually by applying thin layers of the mixture to the surface. Due to the rapid polymerization of the material, the plastering process does not take a long time.
To work with such a mixture, you need to select the appropriate tools:
- Rule. They use a rigid aluminum rail 10-12 cm wide and at least one and a half meters long. It allows you to accurately assess the condition of the plaster layer: its texture, bumps and depressions.
- Poluterok. This is a wooden, steel or polyurethane board 500-700 mm long with a handle attached perpendicularly to its non-working surface. The tool is used to apply and level the plaster mortar.
- Grater. This is also a blade equipped with a handle, its length is 20 cm. The tool is used for grinding and grouting the surface. On graters used for finishing, work surface the canvases are covered with felt, rubber or foam rubber.
- Corner. A device in the shape of a right triangle. It is used as a measuring tool, a template when applying plaster and drawing mortar, performing the functions of a rule. To capture maximum area corner walls The size of the tool must be large enough.
- Trowel, spatula. These are a type of metal spatula equipped with a handle. A trowel is necessary for applying gypsum plaster to walls. This process involves using a triangular shaped spatula as it is most convenient. For a small amount of work, the trowel can be replaced with a spatula.
Before plastering an even corner of the wall, its surface should be cleaned of old peeling coating, paint, cladding, wallpaper and other finishing. In addition, you should pay attention to the presence of grease, bitumen or salt stains. If they are present, they must also be removed by available means.
After this, it is necessary to measure the deviation of the angle in two planes in the manner described above and check the surface of its adjacent walls using a rule or an even metal profile at least 2 m long. The longer the instrument, the more accurate the measurement result. Identified lumps should be knocked down with a chisel, and large depressions should be sealed with a solution and wait for it to dry completely. Then the surface of the walls adjacent to the corner must be treated with a primer to reduce its hygroscopicity and remove dust.
Basic rules for plastering wall corners
Before starting this work, you should familiarize yourself with some rules, knowledge of which will allow you to successfully complete it:
- The plaster can be applied to concrete, cement-sand, brick and gypsum wall surfaces. The adhesion of the mortar to the wooden base will not work without the use of sheathing made of slats or mounting mesh.
- The thickness of the plaster layer on the walls is allowed to be no more than 50 mm, for individual recesses - 70 mm.
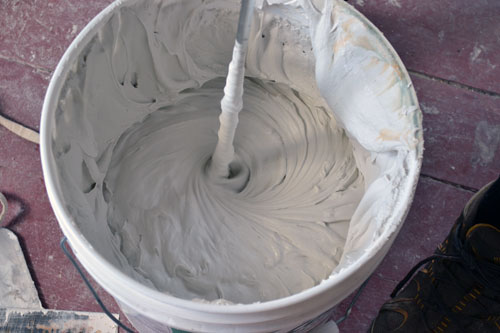
- The mixture is prepared according to the manufacturer's instructions. It indicates the ratio of water and dry powder, which must be observed when mixing the solution. A small amount of added liquid will result in insufficient plasticity of the mixture, make it difficult to work with and can cause cracks on the surface of the plaster after it dries. Too much water in the solution will not allow it to gain the required strength and properly fill the recesses on the walls. It is not recommended to use industrial water: it should not contain foreign impurities.
- After mixing, the solution must be worked out within half an hour. Therefore, it must be prepared in small portions. You should not try to “revive” the drying mixture with water, other than deteriorating the quality of the plaster, this will lead to nothing.
- The deviation of the angle line when plastering it should not be more than 1 mm, this will spoil appearance future finishing.
- The angle between adjacent walls must be straight and strictly 90 degrees. Violation of this rule will entail problems in laying the rotating elements of pipes, joining skirting boards and installing furniture.
Plastering internal wall corners
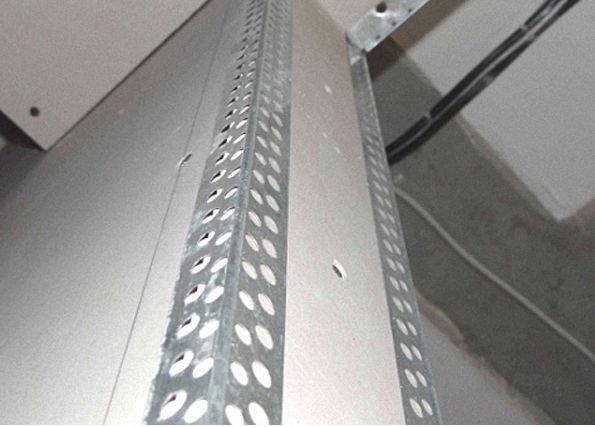
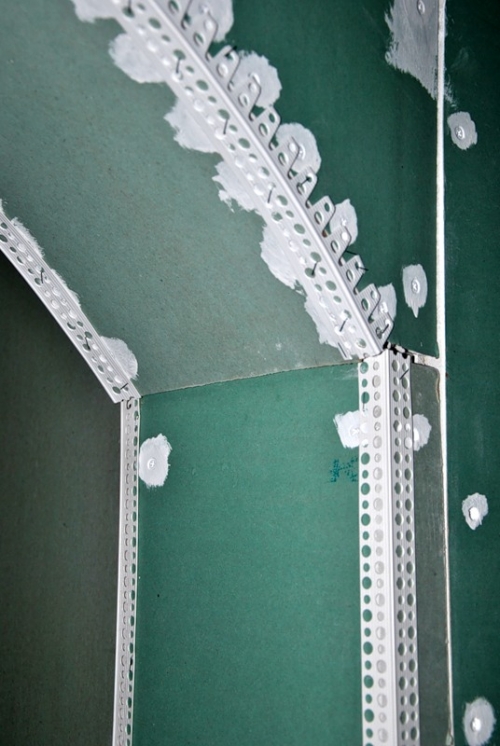
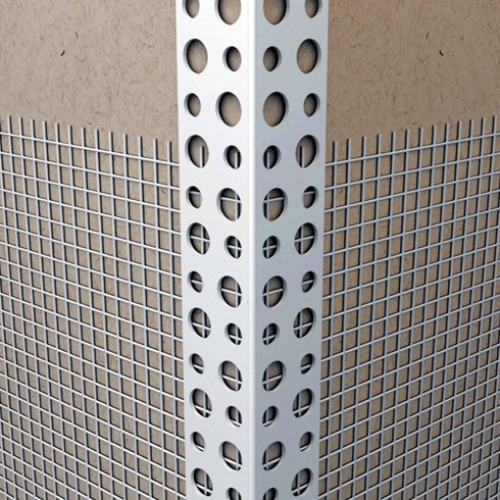
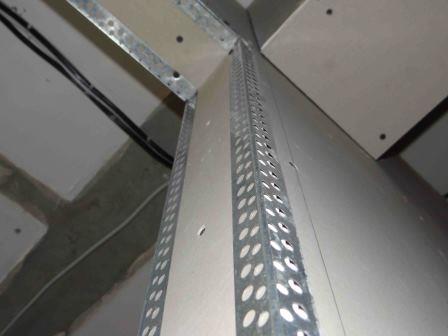
In case of significant surface defects, the corners of the walls are plastered along the beacons, and minor unevenness at the joints is corrected using a special corner profile, equipped with a reinforcing mesh - counter-shultz.
Plastering wall corners along beacons
This method of plastering corners is used when leveling walls around the entire perimeter of the room. To work, you will need a large square, the manufacture of which was mentioned above.
First of all, you need to select a supporting wall, mark the location of the beacons on it and fasten the screws according to it. By placing their caps at the same level, a base plane is formed. This procedure is performed using a plumb line.
The next step is to position the bottom and top screws away from the supporting wall. In fact, to obtain a right angle, it is enough to correctly install the nearest bottom screw. First, it should be screwed into the dowel as much as possible, taking into account the gap for the beacon of at least 6 mm.
After this, you need to attach the square to the pair of lower screws of the supporting wall and the far screw on the adjacent plane. It is necessary to determine what to do with the screw closest to the corner. If the rule of the square does not touch its head, the screw must be unscrewed until it touches. If the rule rests on the near screw, but does not touch the far beacon, you should unscrew the far screw. As a result, the heads of the four lower screws located on different walls should create a right angle.
The upper screws are already leveled, focusing on the height of the lower screws being unscrewed from the wall. After installing the lower and upper screws on both walls, you need to check the thickness of the plaster layer under the beacons. After the beacons have hardened, their location can be checked again with a square. There should be no step between beacons less length rules.
The solution is applied first on one side of the corner. The cavity between the beacons is filled with the mixture and then distributed according to the rule. After one wall of the corner has dried, you can move on to the adjacent wall.
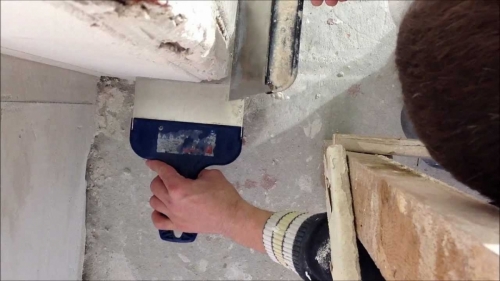
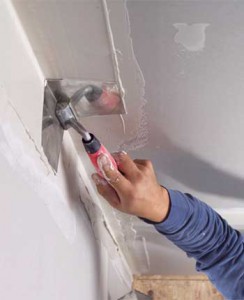
To smooth the joint of the walls, a special angled spatula is used, which greatly facilitates the work. Hand movements should be directed from the corner. During operation, the tool must be periodically moistened with water.
Plastering wall corners using a counter-shultz
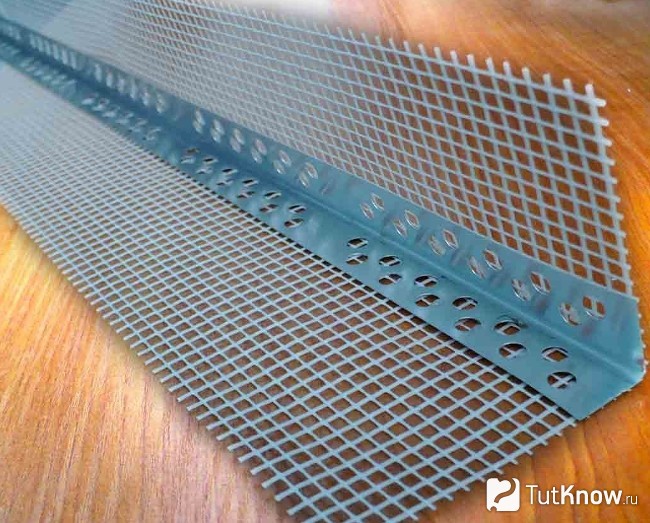
This method is good if the walls are already leveled and you only need to finish the corners. To perform this work, you need to cut off a piece of corner with reinforced mesh using metal scissors. Its length should be equal to the height of the corner. Aluminum contra-shultz is quite soft, for this reason you should not put much effort into it, so as not to disturb its shape.
Then apply a little gypsum mixture to the joint of the walls using a spatula and distribute it along the height of the corner. A piece of counter-shoulder must be applied to the corner and lightly pressed down using a long rule. The work should be done carefully, since the metal of the corner is quite thin and easily deformed.
Excess plaster mixture will be squeezed out through the profile perforations. This solution must be transferred with a spatula onto the counter-sharp mesh, smoothing it.
When the mixture has dried, the surface of the corner should be sanded with a fine-mesh abrasive mesh. If the surface is being prepared for painting, you need to apply a thin layer of fine-grained gypsum plaster to it, level it and rub it in after drying.
Plastering wall corners with reinforcing tape

With the help of plaster, an even angle of the walls can be obtained using a wide reinforcing serpyanka tape. This method is used only to form a joint between surfaces at an angle of 90 degrees and does not provide for their complete alignment.
For work you will need gypsum plaster, wooden block strictly rectangular section and 40-60 cm long, as well as reinforcing tape.
A small amount of plaster should be applied to the joint line of the walls, covering 10 cm from each adjacent surface. Then the edge of the serpyanka needs to be applied to the top of the corner and, holding it at this point, unwind the roll to the bottom, as far as the width of the arms allows. When performing this procedure, it is important that the serpyanka does not deviate from the given direction and evenly covers the joint.
After gluing the tape with plaster, you should take a block, and then, using pressing movements along the joint line and its planes, give the corner a straight shape. The crumpled tape on the walls can be leveled with a spatula, and the excess mortar can be transferred to the rest of the area, distributing it from the corner line. You need to work with a spatula carefully so as not to disturb the position of the tape at the joint. After the mixture has dried, the reinforced corner coating should be sanded with an abrasive mesh or sandpaper.
Plastering external corners of walls
Beautiful, ideally shaped external corners can be achieved with or without a perforated metal profile. In the first case, the strength of the corner will be higher.
Plastering the external corner of the wall without reinforcement
Before starting to work with this method, all protrusions on the wall surfaces adjacent to the corner should be knocked off with a chisel and large cracks should be sealed with mortar. The process begins with installing a flat board or wide strip on the side of the corner, which will serve as a kind of formwork. Fastening is done to the floor and ceiling, but if you choose the optimal length of the board, it can be installed by surprise.
The board should be wrapped with tape and protrude from the outside around the corner to a distance equal to the thickness of the plaster layer. The adhesive tape is designed to prevent the solution from sticking to the surface of the “formwork”.
Then plaster is applied to the surface adjacent to the corner and distributed over the entire height of the joint using a rule. Movements are made towards the corner with a slight downward inclination.
After no less than two days, you need to carefully dismantle the board and attach it in the same way to the already plastered side of the corner. Then you should repeat the above procedure with the other wall.
The finished corner is sanded with sandpaper or a grater equipped with an abrasive fine mesh.
Plastering the external corner of the wall with a profile
The metal profile forms a straight line of the corner and protects it from accidental mechanical damage. Calculating the number of aluminum corners is not difficult: you need to measure and sum up the lengths of all external wall joints and add 10% to the resulting figure, taking into account material waste during installation. The standard length of a corner is 3 m, and the height of the premises is from 2.5 to 2.8 m. Thus, 20–50 cm of profile in the form of scraps for each corner will be wasted. They can be useful for forming short corners on wall or ceiling projections.
To form a right angle when plastering walls on its adjacent surfaces, you first need to apply the prepared gypsum mixture.
A corner of the required length is attached using pressing movements to the area treated along the entire height of the joint. It is advisable to carry out this work using a rule that will prevent deformation of the corner from careless hand pressing.
Excess mixture squeezed out through the perforation of the profile is transferred with a spatula from its metal part to the mesh. Immediately after installing the corner, its position on the wall should be checked with a building level. While the mixture has not hardened, any adjustment is possible.
After the plaster has dried, the corner of the wall should be sanded with an abrasive material. The finishing of the corner is carried out in conjunction with the walls.
Plastering rounded corners of walls
It is not difficult to plaster rounded corners of walls. First, adjacent joint surfaces of enclosing structures should be leveled with a gypsum mixture using standard technology. When creating curves, the planes of adjacent walls act as beacons, and the rules are a special template.
It can be made like this: a strong plastic wire needs to be pressed into a rounded corner, the shape it acquires will give the outline of the future template. Then the sample must be attached to thick plywood and outlined with a pencil. Along the resulting line, you need to trim off the excess material. The template is ready.
Then you should throw a plaster solution over the corner along its entire height and remove its excess with a template. Small ellipses do not require reinforcement. But when making curves with a diameter of more than 100 mm, they need to be strengthened with wire or reinforcing mesh. You can get by using screws. They are screwed into the curve with a pitch of at least 200 mm.
After the corner plaster has dried, you need to apply the final finishing layer by adding fine sand to the solution. This coating is rubbed down with felt to create the smoothest possible surface for the rounded corner. Grouting should be done only with horizontal movements.
How to plaster the corner of a wall - watch the video:
Plastering and leveling corners is considered the most difficult task, especially for beginners. It requires quite a high level of professionalism. However, with a conscientious and leisurely approach to this matter, create in the room straight corners you can do it on your own. The difference when the work is performed by professionals lies in this case only in the time that will be spent on it.
Leveling walls using a metal corner
Every apartment renovation is accompanied by mandatory alignment of corners. This procedure can be done different ways, you just need to carefully follow the operating technology. The process is quite labor-intensive, and not every beginner can cope on his own. This article will look at how to align the corners of walls and what tools and materials to use for this.
Alignment methods
Smooth surfaces and corners in a home are a symbol of high-quality repairs. Any defects will be very noticeable, especially crooked walls, if you do not cover them with furniture or decorations. To get rid of imperfections, you will need to pay careful attention to aligning the corners.
The work will require certain knowledge and skills, so it will be difficult for beginners in the construction business. How to level a wall corner? There are various methods for leveling them, differing in operating technology, necessary materials, tools and other factors. The main ways are:
- leveling using drywall sheets;
- work using plaster mortar;
- the use of perforated corners made of aluminum;
- the use of marks that are determined by a level or plumb line.
Preparatory procedures
Before you begin leveling the corners, you will need to prepare your work surface. To do this you need:
- Clear the wall of various finishes such as old wallpaper, paint or tiles.
- The surface is treated with a primer. This will increase strength and prevent the formation of mold or mildew.
- Using cement mixtures, the corners will need to be cleaned and moistened before applying the solution.
Leveling with plaster
Specialists perform such procedures without any particular difficulties, especially if the surface has been well plastered. To level the corners of the walls with your own hands, you will need the following tools:
- laser or water levels (plumb);
- roller or brush for priming;
- drill and construction mixer;
- container for preparing the mixture;
- primer;
- building code;
- dry plaster mortar;
- perforated corners;
- low and wide spatulas.
Aligning the corners of the walls with plaster is carried out in the following order:
- The area is cleaned and prepared for work.
- The vertical level is determined using special beacons.
- The first layer of mortar is applied to the wall.
- The surfaces are being puttied.
- The corners are leveled using putty.
You need to start leveling the corners only after plastering the surface. The mixture is applied in the corners using brushes. This tool will allow you to process even hard-to-reach areas.
Using the following video, you can familiarize yourself with all the intricacies of leveling with plaster:
Many specialists use a special plaster solution that dries quickly and does not fall off the surfaces. Its use will significantly speed up and simplify the leveling process.
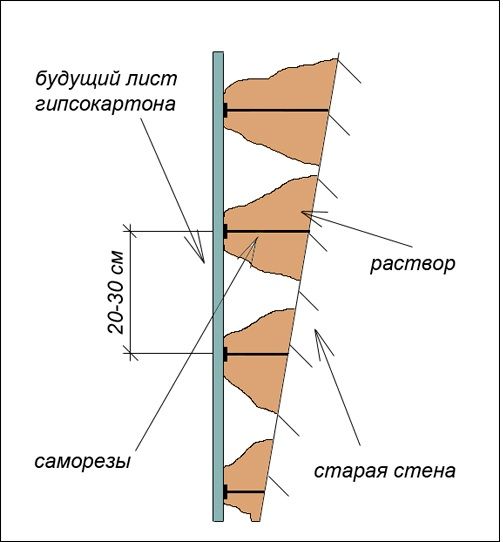
Leveling using drywall
Often leveling with drywall is used if the walls have not been pre-treated. This method will allow you to level the corners without extensive repair procedures. Installation of sheets is carried out using glue or dowels. You will also need the following materials and tools:
- spirit level;
- drywall in the required quantity;
- spatula for sealing joints;
- gypsum-based adhesive;
- tape measure for measuring material;
- construction knife for cutting drywall.
This method has a number of advantages over using plaster:
- No need to manufacture plaster mixture.
- When installing drywall, you do not need to clean the wall of the old finish.
- After installing the sheet, the surface can be puttied immediately; there is no need to wait for the plaster to dry.
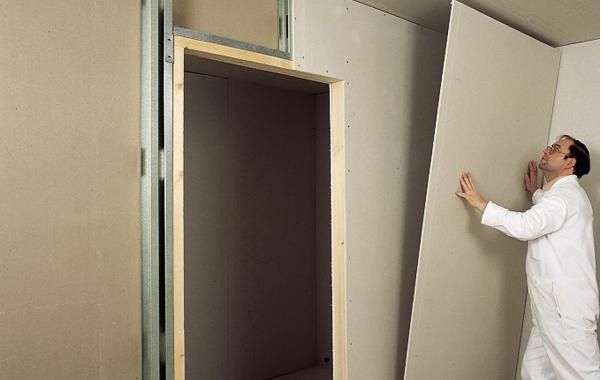 The process of installing drywall in corners
 There are also a small number of disadvantages. This method cannot be used when treating a room with a high moisture content. In addition, drywall is a rather fragile material and is highly susceptible to damage. The process of installing drywall can be seen in the following photo.
If the drywall is installed correctly, additional alignment of the corners will not be required.
After installing the drywall, the work area is plastered using reinforcing tape. If you are leveling an outer corner, the optimal solution would be to use perforated corners, which can simply be covered with putty.
When installing drywall, you need to make sure that cross-shaped holes do not form at the joints. In any case, before the solution hardens, the sheet can be leveled with a hammer or level.
The drywall installation diagram can be seen below.
Alignment using a mark
Aligning internal corners is often done using marks. The sequence of this procedure is as follows:
- Marks are made on the walls using a level.
- A solution for treatment is prepared.
- A layer of the mixture is applied according to the established marks.
- Using a spatula, the mixture is leveled and evenly distributed.
- After the solution has dried, the next work area is processed.
The process of high-quality alignment of corners is quite difficult, so it is not always possible to achieve the desired result. It is extremely important to align the corners as much as possible before laying the tiles, since with such material any defects will be quite noticeable.
Perforated corners for alignment
Leveling angles are the optimal solution for repairs. They are perforated products with an aluminum base. They can be used to seal both external and internal corners. The design of the product will protect the surface from various damages.
The procedure for such alignment consists of the following steps:
- After purchase, the structure is cut to the specified length.
- The plaster solution is prepared until a homogeneous mass is created.
- The mixture is applied to the corner. When aligning the internal corners, the composition is distributed along the entire length. For external treatment, the amount of solution is adjusted according to requirements.
- The corner is being installed; you will need to carefully monitor the evenness of the installation.
- Excess mixture is removed using a spatula.
- After installing the corners, they will need to be aligned with the wall.
 Installation of corner aluminum structures
 To ensure that the corners do not stand out against the background of the wall, it is necessary to apply the solution at a distance of about 50 or 80 cm from the corner. The entire mixture should be evenly distributed and smoothed over the surface using a wide spatula. After the solution has dried, the wall is primed. For greater efficiency, you need to use putty, which will hide all defects. See aluminum structures can be seen in the next photo.
The nuances of aligning external corners
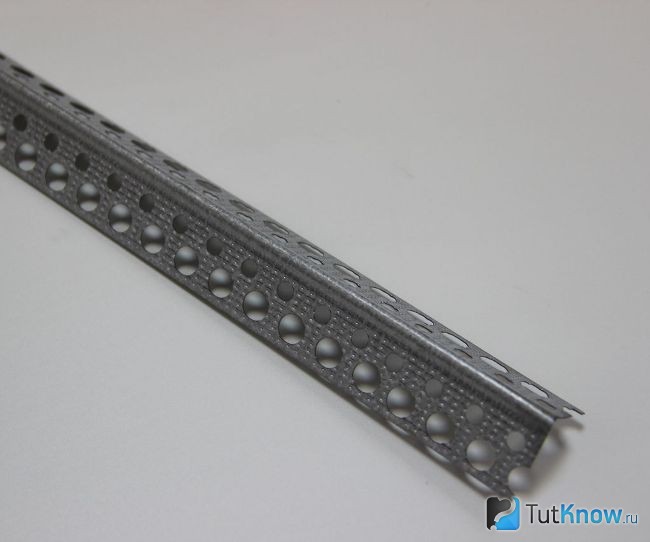
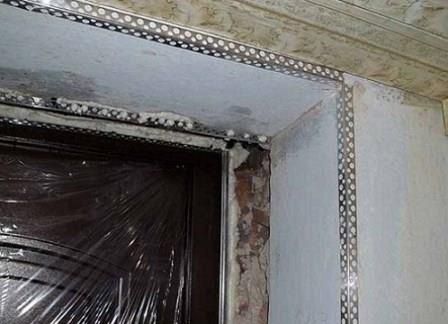
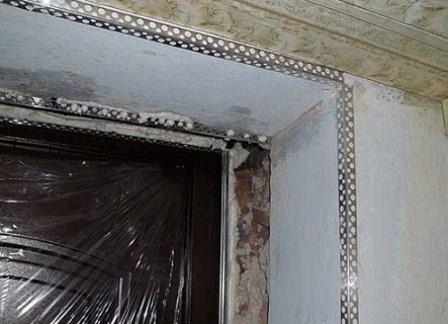
Repairing external corners is not very difficult, the main thing is to follow the instructions. For this work, a special corner with reinforced mesh is used. Its installation is carried out using self-tapping screws, after which it is treated with plaster.
 Aligning internal corners is the most difficult procedure
 Another leveling method is to initially apply plaster, which must be carefully distributed over the entire surface. A corner is installed on it. To ensure reliable installation, it is screwed on with self-tapping screws and pressed into the applied mixture. The protrusions of the composition are carefully smeared. If necessary, more mortar is added to completely mount the product into the wall.
Aluminum structures are used to prevent the material from rusting. They are flexible and easy to use. During procedures, you should always perform a level check to prevent possible unevenness.
The nuances of aligning internal corners
This procedure is more complicated than when leveling external surfaces. The employee will need skills and experience, so for a beginner this process is extremely difficult. The method begins with leveling the surfaces and checking with a level. If all measurements were taken correctly, the result should form an angle of 90°.
When working with corners, it is not always possible to achieve sharp symmetry, since the corner is often slightly rounded. This happens when using aluminum corners.
Some craftsmen use a special method, which consists of using 2 spatulas placed in parallel at an angle. This allows you to get rid of all errors when using the plaster mixture.
As can be seen from the article, the alignment procedure is not too complicated, but requires experience. If the work is carried out by a beginner, the result may not live up to expectations. With the help of photos, you can see this treatment in practice and implement it in your own home.
The curvature of walls and corners is typical for rooms in apartments and houses built in Soviet times, and new buildings. Aligning the corners is a mandatory procedure. Otherwise, the pattern on the wallpaper will inevitably become distorted, and for ceramic tiles you will need to use a decent amount of glue, and even then a positive result is not guaranteed. This article will talk about how to draw out corners when plastering.
Uneven corners will not allow furniture or household appliances to fit perfectly - all deviations will become visible even to the naked eye. In addition, paintings, family photographs or panels cannot be placed near the corner - they will “emphasize” the error of the wall joints in the best possible way. There are 2 ways to solve the problem, where each of them has advantages and disadvantages:
- plasterboard sheets. This method is applicable if the corners have significant irregularities. The sheets are installed on a frame that can correct a curvature of up to 0.5 meters. Although after installation you will have to putty the corners, it will be much easier to do. However, leveling technology takes away precious centimeters, or even meters, of living space;
- plastering work. This method is labor-intensive and suitable for small defects. Despite the rather dirty process, plastering makes it possible to level exactly in the corners of relatively flat walls, preserving the usable area as much as possible.
Leveling corners with plaster
- For finishing works A gypsum-based mixture is used. This material is easy to use; if the technology is followed, it will show its strength and last for many years. The thickness of the mortar on the walls can be about 50 mm, for single recesses - up to 70 mm. For ceilings, this figure should not exceed 30 mm.
- The plaster is applied to brick, concrete, gypsum, sand-cement surfaces. The solution is not intended for wooden bases; these materials simply do not adhere to each other.
- The surface is treated with impregnations and other compounds to prevent the formation and development of fungus and mold. Preliminary primer improves the adhesion of the surface to the components of the gypsum solution.
- When preparing the mixture, follow the manufacturer's instructions. The ratio of water to powder is indicated on each package. It is important to maintain the proportion of water and dry mixture; if you add little liquid, the solution will be difficult to apply and there is a high probability that the surface will crack after drying. Too much water will not allow you to fill the voids and gain the required strength for the solution.
- It is not recommended to use industrial water; it must be free of various impurities.
- Due to its thickness, it is recommended to mix the solution for 2-3 minutes using a mixer attachment inserted into a drill or hammer drill.
- There is no need to add additional plasticizers or additives to the mixture. All necessary components are present in the powder.
- The prepared solution should be used within 25-30 minutes. Therefore, it is stirred in small portions. A dried solution should not be re-diluted with water, as this will lead to deterioration in quality.
- Sometimes small depressions form on the surfaces. If you plan to glue ceramic tiles, then it is not necessary to correct errors. Before painting or wallpapering, the surface is brought to perfect condition.
Preliminary work
- The base is cleared of the weakly adhering previous coating. A rule is applied to the angle vertically and horizontally, and the longer it is (1-2 m), the more accurate the result will be. Lumps and bulges are knocked down by a chisel; what could not be removed will serve as a kind of starting point for leveling.
- If there are single cavities, then they must be filled with the mixture and wait for complete drying (at least two days). Next, the entire surface is plastered. It is not recommended to apply a thick layer of the mixture at once; it is better to carry out the work in several stages.
Tools and consumables:
- long level, plastering rule;
- straight and angled spatula;
- sandpaper, trowel;
- gypsum mixture, contraschultz (perforated corner).
How to level corners with plaster
You can get rid of the curvature of the internal joints of the walls by using a counter-shoulder with a reinforcing mesh or beacons. The first method is suitable for small irregularities, and the installation of beacons is relevant for significant flaws. External corners are leveled using a counter-sharp or a perfectly straight strip.
Plastering internal corners
Do-it-yourself plastering of corners with beacons
- The method with beacons is applicable if the walls are also leveled along with the joint. In this case, smooth metal or wooden slats are attached to the surface using screws or dowels, depending on the material. The step between the guides should be equal to the length of the rule. The beacon is installed in the corner 5-7 cm from the joint of the walls.
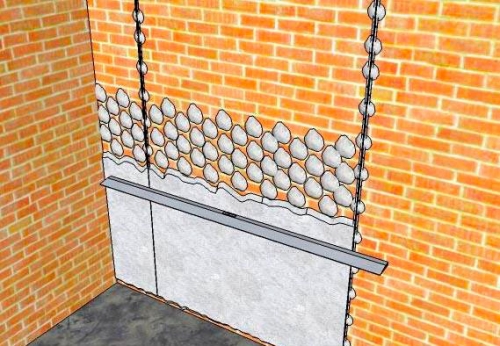
- Using a plumb line, marks are placed on the floor and ceiling at the location of the slats. When fixing, the accuracy of installation is checked both vertically and horizontally. If necessary, wedges are placed.
- The plaster mixture is applied on one side first. The solution is filled into the opening between the beacons and distributed evenly according to the rule. After the layer has completely dried, you can move on to the adjacent wall.
- When leveling, it is important to ensure that a large volume of gypsum mixture does not accumulate in the corner. If this happens, then after drying the excess is carefully removed with a spatula.
- To form the corner, an angle spatula is used, which makes the work easier. During the process, it must be regularly moistened with water. When using a straight spatula, movements should be jerky and directed away from the corner.
- After thorough drying, the beacons are dismantled. The resulting recesses are puttied with the same material.
Plastering corners with profile corner
- The method using a perforated corner with reinforced mesh along the edges is optimal for pre-leveled walls. The counter-shultz is cut according to the length of the joint using metal scissors.
- The aluminum product is quite soft, so when cutting you should not make any effort so as not to violate the geometry specified by the manufacturer. Apply a small amount of gypsum mixture with a flat spatula directly to the joint of the walls.
- A piece of the contra-shultz is applied to the corner and lightly pressed down with a long rule. This must be done extremely carefully due to its slight deformation. Excess mortar that has come through the holes is removed with a spatula (from the corner to the side, thus smoothing the mesh).
- After drying, the surface is sanded. If necessary, final leveling is performed by applying a thin layer of gypsum mixture. For convenience, you can use an angled spatula.
Plastering wall corners with serpyanka
- Another option for internal corners is to use a wide serpyanka. This method is relevant if you do not plan to carry out large-scale work on all surfaces, that is, there is only one task - to give the joint an angle of 90º.
- Here you will need reinforcing tape, a wooden block with a right angle 40-60 cm long and the gypsum mixture itself.
- Apply the solution in a small amount to the joint of the walls, covering 10 cm of adjacent surfaces.
- Apply the edge of the serpyanka to the upper part of the corner, holding the tape at a given point, the roll unwinds to the entire width of your arms. It is important to provide for the position of the reinforcing material in the lower part of the joint; there are often cases when the serpyanka “goes off course”.
- By pressing movements with a block, the joint is given the shape of a right angle. The jammed tape is leveled with a spatula, and the excess mixture is smoothed out with movements from the corner and reduced to nothing. You can use an angle spatula periodically soaked in water.
- Be careful not to change the position of the wet tape. But you cannot wait for the putty to dry, in which case adjustments will become impossible.
Plastering external corners
Slopes and external corners can be brought to perfect condition in 2 ways: using an aluminum perforated profile and without it.
Alignment without counter-alignment
- This method also knocks down the protrusions and fills large cracks and other depressions.
- An absolutely flat board or plank wrapped with tape is mounted on the adjacent side of the corner. It is fastened to the ceiling and floor; if you choose the optimal length, you can insert it in the form of a spacer.
- The protrusion of the plank from around the corner should be equal to the thickness of the plaster layer.
- The mixture is applied to the surface and distributed using a rule. The movements should go towards the corner with a slight downward inclination.
- After drying, the previous step can be repeated.
- After waiting at least two days, the board is carefully dismantled and applied to the plastered corner. All manipulations are carried out in the same sequence.
- The finished right angle is sanded with fine-grained sandpaper.
- You can also use two spatulas, but this method requires some preparation and hand steadiness.
Angle for plaster using a counter-sharp
- The corner profile will protect the slopes from mechanical damage and accidental chips, add strength and help form an even vertical line. Calculating the material is easy: to do this, the length of all angles is measured, and the results obtained are summed up. 10-20% for consumption is added to the final data.
- It should be noted that if, in addition to corners, you plan to level slopes, small protrusions or niches, then you can significantly save on the purchase of a counter-shoulder. Manufacturers offer this consumables the standard length is 3 m, and the ceiling height is usually 2.5-2.8 m, which means that 20-50 cm are taken into trimmings.
- The segments are just useful for forming corners on small areas. It is not recommended to use parts of the perforated corner at long lengths, as this may cause cracks.
- The prepared mixture is applied to the working area (on both sides of adjacent walls).
- Corner required length It is attached to the treated area using pressing movements. For this stage, it is advisable to use a rule that will not allow the counter to be deformed due to careless pressing.
- Excess gypsum mortar that comes through the holes is removed with a spatula.
- While the mixture has not hardened, the position of the corner is checked using a laser or level. If necessary, the position is adjusted.
- Having achieved the required result, excess putty is removed both from the end and adjacent sides of the profile.
- After complete drying, defects are eliminated using fine-grained sandpaper.
- The final leveling is carried out together with the application of the plaster mixture to the main surfaces (walls or ceilings).
Correct option
The simplest and cheapest way to level internal and external corners, as well as door and window openings, is a plaster mixture. Although this method is quite dirty, dusty and labor-intensive. However, for rooms of modest size, such as a hallway, kitchen or bathroom, this is the best option.
Some of the advantages of plastering include:
- application of the method to any type of surface, with the exception of a wooden base;
- high strength of the finished base;
- provides a wide range of possibilities for subsequent decoration: covering walls with wallpaper, tiles, applying decorative plaster or paint.
Plastering corners video
Aligning the corners is the final stage of finishing the walls before their subsequent finishing wallpaper or painting. It is not surprising that it is the most difficult, since making a 90° evenness is quite difficult.
Aligning the corners of walls requires some skill, especially for amateurs who try to do everything themselves.
Do we need 90°?
The question is rhetorical, since most apartment owners who are trying to achieve the geometric accuracy of all their corners with their own hands do not understand why this is even necessary, as in that saying: “So that it is.” But why, if you plan to decorate the walls with carpets and paintings the old fashioned way?
Perfect evenness of the corners is important if you plan to install modern stylish furniture or household appliances in them. In such cases, deviations will be noticeable to the naked eye, which, you see, is not very beautiful. If visually they seem straight, and a carpet hangs nearby, then no one will notice a deviation of a couple of degrees. However, leveling the corners of the walls is an important task when carrying out European-quality renovations in an apartment.
How will we level it?
There are two ways to solve the problem - using dry plaster or drywall and using wet plaster.
What are the advantages of each?
- Plasterboard sheets have an almost perfectly flat surface. With their help, you can level even walls that are completely “insane” along the curvature with your own hands. They are mounted on a frame that can hide irregularities of at least 10 centimeters, at least half a meter. The installation itself will not take much time, but then you will have to carefully putty all the joints and, interestingly, level the corners. But doing this on a flat surface is much easier.
- Wet plaster. A familiar and familiar way to everyone. There is always a lot of dirt from him, physically such work is also difficult. However, this method is perfect if the height difference on your walls is not too great. Therefore, if we level the corners of the walls with plaster, then we will be able to preserve such important square centimeters of the area of our home for all of us.
Step-by-step instructions for leveling corners with regular plaster
This method can be used if the deviation at a distance of two meters does not exceed a few centimeters. If it is larger, then you will have to work in several stages, which is completely impractical, since it is faster and cheaper to level the walls with plasterboard.
Now, in order.
- We will completely clean the walls of the old coating with our own hands, this is always better than cleaning in pieces, and we will walk along the wall with a level or make plumb lines and pull the thread.
- If the curvature of the walls has not changed after cleaning, we will prepare a cement mortar for work.
- Using a roller, prime the surface and let it dry.
- To properly level the walls with your own hands, you need to set up beacons.
- After installing the beacons, you can spray. As a rule, remove the excess and throw it into a bucket of solution.
- Let the layer dry and prime again.
- Let's apply another leveling layer. Often two layers are enough for high-quality leveling. Let's smooth it out, let it dry a little and rub it in.
- If the walls are made smoothly, then the corner appears by itself; no special work is required to bring it into proper shape.
- For convenience, you can use a counter-shultz - an internal corner, the same as for aligning external corners, with a reinforced mesh along the edges. In this case, first we “plant” it on thick putty, press it into it and remove the excess with a spatula. Then you can start leveling the walls with regular plaster.
Step-by-step instructions for aligning internal corners with drywall
In the case of drywall, everything is much simpler.
- To level the internal corners of such walls, it is enough to putty the corners with high quality, you can use counter-shultz, but, as a rule, ordinary serpyanka, which is glued to the internal corner, is sufficient.
- Cover with putty from one wall, then from the other wall.
- Then they run it over it with an angled spatula and check their work with a level.
Aligning outside corners
This is not the most time-consuming process. Take a special corner, even better if it has a reinforced mesh around the edges. It can be attached to the wall using self-tapping screws, and then carefully covered with plaster, or it can be placed on the plaster, additionally secured with self-tapping screws.
In the first case, everything is clear. In the second, we apply plaster mortar to the wall on both edges of the corner, carefully apply the corner and recess it into the mortar. We fix it with self-tapping screws for reliability and press the mesh into the plaster. Next, smear the protruding solution with movements from below/to the right and from below/to the left. You can add a little solution to completely cover the mesh and corner.
On a note. To align wall corners, choose aluminum corners. Firstly, they do not rust, and secondly, they are very flexible and convenient to work with. And don't forget to use a level to install them. This scheme of work is applicable both for ordinary plaster and for forming an outer corner after leveling the walls with plasterboard. Only in the latter case is the corner mounted on the putty mixture.
Aligning interior corners
Aligning interior corners is a more difficult task for the amateur or novice. Filigree precision is required here, otherwise all the work will be in vain.
Briefly, the order of work is as follows. One wall is leveled with plaster, checked for level, then the second. Ideally, if no miscalculations were made at the leveling stage, the angle should be 90°.
To get an idea of the process, watch the video on aligning wall corners. A visual aid never hurts.
It is worth noting that when working with ready-made corners, although we get an almost perfect internal or external corner, it will never be sharp, rather slightly rounded. This is due to the geometry of the aluminum profile.
Therefore, as one of the options for removing the outer corner, you can use two spatulas placed at right angles to each other. The work is carried out somewhat “by eye”, but the result is not bad. Plus, do not forget that after removing the corner with plaster, you also need to putty them. These works will allow you to finish off what didn’t work out when working with the plaster mortar. Tips on putty can be found here.
Now you know how to align the corners of the walls. In any case, it must be remembered that knowledge of certain points does not exempt you from making mistakes. Therefore, if finances allow, it is better to seek help from professionals. This will help you avoid annoying mistakes and waste your time.
If you decide to do everything yourself, do not forget to also pay attention to the plaster mixture you will be working with. If in the kitchen and bathroom it is best to work with cement compounds, which must be puttied after drying, then in dry rooms with an even temperature regime it is better to use gypsum. Firstly, they do not require puttying, and secondly, it is easier to remove the corner with them.
Finally, watch the video on aligning interior wall corners. Perhaps this will help you in choosing whether to work with your own hands or turn to the masters.
Other materials