There is no need to explain anything to anyone about the proximity of trees and water - everything is clear here as it is.
But you can want to make a wooden floor in the bathroom (specifically made of wood, not an imitation) for many reasons, the main of which are environmental friendliness and the natural warmth of wood felt when touched, which, unlike warm floors, remains so all year round. There are other reasons, for example, if the bathtub is finished, which is called “with a twist,” not like others. For example, under a tree.
It is very difficult to please two “masters” at once (tree and water). No matter what curtains you have in the bathroom, or no matter how carefully you wash, there will always be splashes, especially considering the modest size of our bathrooms.
And this will inevitably lead to swelling of the tree, and hence its subsequent deformation.
And after the wooden fragments of the floor are deformed, water will begin to flow under the floor by gravity, and then there will be fungus, mold, the smell of dampness and other “joys”.
So if we make parquet or any other wooden floor in the bathroom, we will need to solve three problems.
1) The material for the bathroom floor should be as moisture resistant as possible
2) Waterproofing wooden floor joints must be very reliable, and the front surface must be protected.
3) Water from the base side should not fall onto the wooden floor
In order to make a wooden floor in the bathroom you will need:
Laminate for damp areas
If, after reading the first half of the article, you have changed your mind about making a natural wood floor in the bathroom, there is a solution - this is a moisture-resistant laminate.
Its moisture resistance is due to the fact that each layer is waterproof.
The base of the waterproof laminate is made of a cellular, profiled PVC board, and melamine paper with a wood texture pattern (decor) is already applied to it, on top of which the manufacturer, in turn, applies acrylate resin, which gives the laminate additional moisture and wear resistance.
Installation of waterproof laminate is exactly the same as regular laminate - there is no difference. It is installed using a floating method, and installation can even be done on tiles. The only difference is sealing the wall and outer seams with silicone so that water does not flow under the flooring, but most home craftsmen already treat these places with silicone, even in ordinary rooms.
Do-it-yourself wooden floor in the bathroom - instructions for the photo
1.Apply the adhesive using a notched trowel (suitable with a tooth height of 5 millimeters). To maintain the required thickness of glue application, hold the spatula vertically.
2. We mentioned waterproof locks above - this is exactly the case. The parquet boards are equipped with glueless waterproof locks ( parquet board Nago, German). Simply line up the edges and press them into the glue. Using a tsulagi and a hammer, knock the halves off the ends.
3. Leave a deformation gap along the walls. Since we are talking about moisture, it will have to be made somewhat larger than in ordinary rooms - 10 millimeters. Fill the deformation gap with acrylic mass (to avoid staining the canvas, glue it with masking tape).
4. After installation, you will need to apply parquet oil to the floor, then wait a little (3-5 minutes) and rub it well into the floor. Typically, wood bathroom floors require oiling twice.
Laminate flooring in the bathroom - DIY installation.
1. If you did not dismantle the tiles, but decided to lay them with your own hands directly on the tiles, then first lay a layer of foil (foil insulation). Cover its joints with aluminum tape.
2. Be sure to (!) fill the seam around the perimeter of the bathroom with silicone, and seal the laminate itself.
3. The laminate must be installed from the longitudinal side; you can cut it with a jigsaw.
4. As mentioned above, the laminate itself has some water resistance; the seams of almost all brands are additionally sealed.
On a note:
How to keep a wooden bathroom floor longer
Although parquet boards and bathroom parquet (specialized) have versatile waterproof characteristics, following a few rules will help you keep the floor intact and beautiful for a long time.
Treat wood bathroom floors with oil at least three times a year. To do this, lightly sand it (120 abrasive grit), then apply oil and after a few minutes rub it in thoroughly.
You won’t be able to protect yourself from splashes completely, but the curtain will reduce their amount to a level that will not damage the wooden floor.
Stagnant water on wooden floor should not be in the bathroom - this is an axiom. If a puddle appears, wipe it up. This minimal action compensates you for the environmental friendliness and natural warmth of wood.
Wood, as a building material, accompanies man throughout his entire history of existence. A wooden floor in a bathroom is superior in its performance properties and aesthetic perception to all floor coverings made from artificial materials.
It’s not for nothing that in “proper” saunas the floors are made only of wood. There is a misconception that wooden floors in the bathroom wooden houses have a short service life due to moisture. In this article we will tell you how to do it correctly flooring made of wood in rooms with high humidity.
 Properly selected wood, high-quality waterproofing - all this will ensure a long service life of the flooring in the sanitary room.
The table shows the most popular materials for wooden coverings in bathrooms:
| № | Wood species | Advantages | Flaws |
|---|---|---|---|
| 1 | Larch | Ease of processing | Requires additional waterproofing |
| 2 | Cork | The surface does not slip | Low wear resistance |
| 3 | Teak | Waterproof | Rarely found on sale |
| 4 | Thermowood | Property of plastic | High price |
| 5 | Waterproof laminate | - « - | - « - |

Installing a wooden floor in the bathroom
 The principle of constructing boardwalks is that the boards are laid on logs (support bars).
Much depends on the type foundation base wooden house. Let's consider the option of locating plumbing cabins on the 1st floor of the building.
In private housing construction, bathrooms are often located on the upper floors.
The floor covering must be reliably protected from leaks in the event of an emergency.
 In any case, a solid foundation needs to be installed under the bathroom. The base of the floor is prepared depending on the type of structure of the building’s foundation:
- Concrete grillage. In this case, the floor base already exists in finished form. All that remains is to begin installing the floor structures.
- Open ground. The ground area is filled with sand 100 - 150 mm thick. Crushed stone is poured on top with a layer height of 50 mm to 100 mm. A concrete screed is laid over the entire surface of the site.
It should be said that the options for constructing the base floor may be different in the sequence of laying materials and the thickness of layers. It all depends on the individual construction conditions. It is important to obtain an even, solid base with a sufficient degree of load-bearing capacity.
Wood flooring technology
 Fastening with wooden cotter pins will add special aesthetics to the floor.
 To successfully complete the assigned tasks, you should strictly adhere to the following sequence.
Bathroom floors must invariably be resistant to high humidity, otherwise their service life will be minimal and their aesthetic qualities will be lost in the first days of use.
If we talk about the most common option, then most floors in bathrooms are finished with tiles, since this material has a low cost and at the same time has excellent resistance to high humidity. Nowadays, a wooden floor in this room should no longer surprise anyone, as it is a common practice.
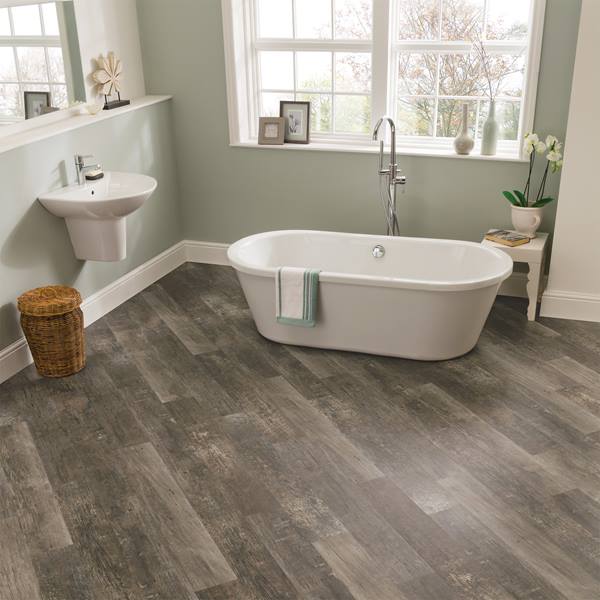
Wooden floor in the bathroom
From an aesthetic point of view, such a solution will look attractive, but many are also concerned about the technical component of this issue. It is important to immediately remember that bathhouses are built from natural wood, so moisture resistance can be combated. Today we will consider the question of how this natural material can be effectively used at the stage of finishing the floor area in the bathroom.
Wooden floors in the bathroom - how possible is this?
Wood is a natural and harmless material that does not need any special introduction. Many people finish their bathroom floors with it solely because this solution makes it possible to achieve maximum comfort.
![]()
Wooden floors in the bathroom will provide maximum comfort
All objects located in this room will always have approximately the same temperature, which is important. It is known that the peculiarity of tiles is that they constantly remain cold, so you invariably have to use numerous rugs or make forced heating floor. As for the wooden floor, it is completely devoid of this drawback and has long been positioned as energy-saving.

Wooden floors are warmer than tiled floors
By choosing this option, you can significantly save on electricity and at the same time make the room as comfortable as possible. If you are a fan of unusual solutions at the stage of interior design, you can combine natural wood with other materials to achieve unusual results.
How to choose a tree type?
It is important to note that for many centuries it was wood that was used for the construction of ships, so there is no point in saying that it is impossible to make a floor from it in a room with high humidity. In many ways, the longevity of the innovative flooring will depend in the future on what type of wood you use. Of course, it is important to choose one that can be exposed to high humidity for a long time. Most often, the floors in these rooms are made of teak, since this variety has an unprecedentedly high density and can 100% withstand humidity without special treatment. At the installation stage, you will still have to adhere to certain rules so that the coating can maintain its functional and aesthetic qualities for several decades.

Teak flooring resists moisture without special treatment
The first thing you need to pay attention to is the joints between all the boards. They must be sealed with appropriate sealants. To achieve the best result, it is advisable to use marine analogues, since in the end it will be possible to create a coating that will not absorb moisture during operation and will not yield to anything tiles. Teak has only one drawback – its rather high cost.

All joints between boards must be carefully sealed with sealant
If it is not possible to use it, then it does not matter, because there is an analogue - larch. The main feature of the material is that it is very durable and is also not susceptible to moisture. Over the years, it has been actively used in the construction of ships, as well as bridge supports. There are other options when you don't have to spend a lot of money. For example, oak, ash or elm. Often the floors in this room are finished with cork, since it is low cost and environmentally friendly.
![]()
Larch bathroom floor
Please note that it is cork that is used to make the coating base, that is, it is first crushed, and only after that it is pressed at high temperatures. As for the top part of the covering, it is sometimes made of the same material, but veneer or vinyl can be used. This floor will not be afraid of high humidity, so it can be safely installed in bathrooms.

Cork flooring is resistant to high humidity
It also makes sense to use thermowood as a finishing material - an innovative material that has recently appeared on the market, but has managed to prove itself excellently in different countries peace. It is made by steam treatment of wood at a temperature of more than two hundred degrees, but the main condition is the complete absence of contact with oxygen. As a result, it is possible to obtain a material that, under the influence of high humidity, will not deform and absorb water. Another advantage of this option is that this coating is not susceptible to fungi.

Thermowood is not susceptible to fungi
Installation features
If you decide to install a floor made of wood material in your bathroom, you need to adhere to certain rules, which will be discussed below. Work should begin with the preparatory stage. Any material must be mounted on a properly prepared surface. It should be ensured that it is strictly geometrically even and does not have any significant defects. A number of requirements are invariably presented to the basic foundation and they must be taken into account. The floor should be as level as possible, and differences should not exceed one millimeter.

Before laying wood, the floor must be leveled
As for the screed, it must always be extremely strong, since during operation it will have to take on very significant loads. The density must be strictly uniform over the entire floor area, and there should be no chips. At the stage of foundation formation, you can use not only cement screed, but also a number of other products. For example, the most common moisture-resistant plywood is perfect for solving this issue.

Moisture-resistant plywood for flooring
It happens that you need to ensure maximum thermal insulation of the floor area and for this you should use appropriate materials. There are a huge variety of insulation materials on the construction market, so choosing the best option will not be difficult. The main thing is that these materials do not change their characteristics when exposed to high humidity.
Waterproofing should also be given special attention. If you decide to insulate the floor, then you need to use waterproofing materials. Once the base is completely leveled, you can begin this work. You can use rolled materials or mastics that are sold ready-to-use. It is important to place the material so that it covers the lower part of the walls. A gap of ten centimeters is enough to achieve the desired result. A number of waterproofing mastics, which are applied in several layers with a construction brush.

Treating the bathroom floor with sealant
It is strongly recommended that even the highest quality material from reputable manufacturers be kept in a special room before installation at a constant temperature, so that it is sort of “acclimatized” and is ready for further full use.
On initial stage styling finishing material you need to mark using a special tool. It is not advisable to rush, because you need to complete this stage with maximum accuracy. Don’t forget to mark the locations of all kinds of communications in order to protect yourself from unnecessary work in the future. As a rule, installation begins in the direction from the door to the far wall. In many ways, the installation technology will depend on what kind of material you decide to use.

Laying a wooden floor in a bathroom
When installation work Once completed, you should visually inspect the surface and identify defects. If they are still found, it is recommended to immediately repair chips and cracks using special mastics. As you already understand, floors made of natural wood can be installed in rooms where high humidity is invariably observed. There are many materials that are not afraid of this circumstance and can last for a long time. If you choose the material for finishing properly and install it efficiently, you won’t have to redo the floors for a long time.
About aesthetic qualities
Wood floors attract attention with their beauty. It is known that each individual tree has a certain structure and grain pattern. It cannot be repeated and it is this uniqueness that captivates all connoisseurs of original interiors.

A wooden floor will make your bathroom interior unique
It is not easy to install such material on your own, but if you take into account all the recommendations provided in this article, then completing the work will not be so difficult. We can talk about the color of the flooring for quite a long time, but we need to take into account the main interior of the room. If the bathroom is already decorated in a certain style, then the floors should be done in the corresponding style. Oak boards, for example, are dark in color and have a distinct grain pattern. If you choose cork wood, then the floor area will be lighter. There are many options, and if you give preference to thermowood, then endless scope opens up for the implementation of the most daring ideas.

The color of the wooden floor in the bathroom should match the interior
Let's sum it up
Currently, many people still finish floors in rooms with high humidity using tiled and ceramic tiles. As for wood, many are put off by this option because it seems short-lived and expensive. In fact, the situation is different and you will not have to burden yourself with significant expenses for the purchase of finishing materials. Tile can also have a high price, but retain standard characteristics. If you don’t want to overpay, then you can simply choose a cheaper natural material; fortunately, in the modern construction market it is presented in a wide range.

Thanks to the large assortment, finding suitable wood will not be difficult
It is recommended to entrust installation work to qualified professionals, since if you make a mistake that seems insignificant at first glance, everything will go down the drain, and the floor covering will soon become unusable.

Use only high-quality materials for the bathroom floor
It is important to use high-quality material, as well as mastics, to protect the wood from moisture penetration. You can realize any of your design ideas by using this material without spending a lot of time or effort on implementing your plans. Contact the professionals, and they will quickly install a floor covering that can last for decades.
Photo gallery – wooden floor in the bathroom


![]()


Despite the assurances of skeptics that a wooden floor in the bathroom is far from the best option Because these two components are incompatible, wood is being used as a floor covering in rooms with high humidity more and more often. And there are good reasons for this. The floor in the bathroom should be environmentally friendly, warm and breathable; is it possible to find a material other than wood that would fully meet these requirements? Hardly. Only wood can provide comfort, safety and “living” energy, which are so lacking in modern apartments.
The bathroom is a special room, which means it is necessary to choose materials for flooring more carefully. Not every tree can cope with “extreme conditions” while maintaining the benefits bestowed by nature. So which samples should you pay attention to first?
The best option for a wooden bathroom floor is teak. Amazing properties waterproof properties have been known since the 15th century - the British preferred to use teak for the construction of sailing ships.
You need to know this!
Teak - variety decking boards, ideal for rooms constantly in contact with water and high temperatures.
Teak grows in India, Myanmar, Thailand, and the Malaysian Peninsula; its height reaches 150 feet and its diameter is 5 feet. Mature wood is dark brown, almost black.
This record holder for wear resistance does not slip at all, is able to accumulate and release heat, and is resistant to chemicals, which is extremely important for maintaining the necessary microclimate in a humid room.
A less expensive option, but no less attractive in quality and appearance, we can consider larch, which is also not afraid of water and will wonderfully decorate the floor of your bathroom.

It is possible to use elm, oak, ash; their cost is much cheaper, but in terms of water-repellent qualities they are absolutely not inferior to the recognized favorites.
Recently, you can hear the term “thermowood” - this is wood treated at high temperatures without access to oxygen, which is resistant to fungi and rot and “gets along” well with steam and moisture.
Installing a wooden floor step by step
Arranging a wooden floor in a bathroom with your own hands is not an easy task, but it can be done if you have the desire, supported by theoretical foundations. So let's begin.
Surface preparation
First, you need to use a hammer drill to clean the floor from old tiles, screed and waterproofing. We especially carefully treat the places where the walls and floor come into contact. If cracks and holes are found, we seal them with “tile” glue. If this is not done, the screed and waterproofing in these places will quickly become unusable. After finishing the work, the floor should be swept.
Waterproofing
Waterproofing is one of the most important stages in installing wooden floors in the bathroom, on which the success of the entire event depends. To increase the adhesion strength of waterproofing materials to the surface, the clean floor must first be moistened and then primed.
It is important!
To achieve ideal primer viscosity, you should take the main components (dry mixture and water) in a 1:1 ratio.
The correct ready-made primer composition has a creamy consistency. After applying the mixture, the floor must dry. A special tape is glued to the corners and joints to ensure a tight seal.
![]()
There are several types of waterproofing. The most common is coating, which is not difficult to implement.
Mix the dry mixture of waterproofing raw materials with the liquid component in a 1:1 ratio, mix until smooth. The resulting mixture is applied with a roller to the floor; if necessary, use a spatula or brush.

In parallel with coating the floor, you need to form a “trough”, i.e. Apply waterproofing to the walls so that it is 10 cm above the level of the future floor.
Waterproofing is applied in 2 layers with an interval of 4-6 hours. After applying the second layer, a day should pass.
A more affordable and easier alternative to the coating method can be painting waterproofing, which involves applying a protective solution (bitumen emulsion, “Knauf”) with a brush or roller.
The main disadvantage of the method is its fragility; waterproofing properties are maintained only for 3-5 years.

Leveling the floor
Regardless of the type of flooring chosen, the bathroom floor should be level. Self-leveling mixtures based on non-shrink cement will help with this.
Using a water level, we apply marks along the entire perimeter at the same height - this will be the level of our floor. Next, we install beacons - slats in the shape of the letter “T”, which we align with the help of a cord in accordance with the marks.
Mix the self-leveling mixture and mix it with a drill. After 15 minutes, pour the solution onto the floor and distribute it over the entire area with a spatula or rule.
It is important!
To eliminate air bubbles you will need a needle roller.
The drying time depends on the brand of leveling mixture, so you should carefully read the instructions. The first few days are the most important - avoid drafts and maintain the regime recommended on the label.
Laying boards
Now you can begin installing the flooring. By the way, do not forget about acclimatization of the tree, which should lie in the bathroom for several days to “get used” to the temperature regime.

When cutting boards, mark the holes for communications, which should be larger than the diameter of the pipes. The flooring starts from the door. Using a construction gun, we pierce the edge of the first beam and lay the boards diagonally through the tenons. We hide the nail heads behind the next board. We push the boards into place using a rubber mallet; when selecting gaps, we use a lever or wedges. To avoid damaging the tenon, we insert a piece of board between it and the wedge.
It is important!
It is extremely necessary to know where the pipe runs - we mark this area.
Carefully adjust the boards around the niches and wall projections. Leave a gap of 10 mm between the board and the wall. The flooring will go much faster and easier when you reach the middle of the bath. Use the longest boards in areas of high traffic, and use shorter ones under the bathtub or shower.

In a place where several pipes pass, you first need to cut a board and then join it on the opposite side.
We lay the remaining boards in the same way. Ready. Now you need to fill up small bumps and cracks, for which putty wax sticks are great.
We clean the surface, apply acrylic varnish and... admire the result - a beautiful and reliable wooden flooring that will serve faithfully for many years.

Result of work
Agree, the expression “wooden floors in the bathroom” sounds somewhat contradictory. Well, we are not used to combining the incompatible - water and a material that easily fails under its influence. Why do bad work that will have to be redone after a while? Not everyone thinks this way. There is one golden rule in construction - if finishing material is not suitable for work, which means its characteristics can be improved. Wood is no exception, the properties of which can be changed using special impregnations. In this article, together with the website, we will study the technology that allows you to lay a wooden floor in the bathroom. We will get acquainted with the features of this technology and learn how to implement it ourselves.
Wood flooring for bathroom photo
Wooden floor in the bathroom: wood and its meaning
It's no secret that the bathroom is a room in which almost everything Construction Materials are subjected to extreme loads - they are exposed to high humidity and sudden temperature changes. In addition, if we talk specifically about the floor, then this part of the living space can be called one of the most visited places in a house or apartment; it is not without reason that they are even selected for a bathroom with increased wear resistance. It is precisely these qualities that the wood for the bathroom floor should more or less correspond to. Do you think it will be difficult to find one? You are wrong. Expensive? This one yes. But in return you will receive a beautiful, durable, and most importantly environmentally friendly floor covering.
![]()
Wooden floor in the bathroom photo
So which tree should you choose? The best option is teak. The British noticed its waterproof qualities back in the 15th century and began building sailing frigates and other ships from it. In addition to moisture resistance, this wood is resistant to abrasion and temperature changes. And that's not all - teak, even when polished, does not slip. As they say, you can’t imagine anything better for a bathroom. There are also less expensive wood options that are suitable for use in rooms with high humidity - larch. Like teak, this wood is also not afraid of water, but unlike it, it is a little softer - when choosing this wood for making a bathroom floor, you should purchase boards with a larger cross-section.

Wooden bathroom floor photo
And quite a budget option The materials that allow you to make a bathroom floor from wood are ash, elm and oak. In addition, you can pay attention to creation modern technologies– the so-called thermal wood is not inferior even to teak in its qualities. In principle, any wood, even the most unsuitable for use in a humid environment, can be exposed to high temperatures without access to oxygen - as a result, a board is obtained that can resist rot, fungus and withstand contact with water or steam perfectly.
We have sorted out the material, now we can safely move on to solving the question of how to make a wooden floor in the bathroom?

How to make a wooden floor in a bathroom
Installation of wooden floors in the bathroom: technology features
Work on installing a wooden floor in the bathroom must begin with careful preparation of the base. Don't think that you can just install joists and put a board on them. Everything is a little more complicated - at this stage of work you need to take care of protecting the wood from below - if this is not done, then you can hardly count on the long life of such a floor.
The floor must be completely cleared of construction layers - knock down the old screed, scrape off the leaky waterproofing. In general, the floor needs to be cleaned down to the floor slabs, after which the dust must be thoroughly removed and the surface primed. After the primer has dried, carefully repair all potholes and cracks - special attention should be paid to the fit of the floor to the walls, the seams between the floor slabs (if any) and the places where they pass.

How to make a wood floor photo
The next step is making the wooden floor in the bathroom, or rather the floor slabs located underneath it. Here everything is as usual - the best option in terms of financial costs and the possibility of an independent device, there will be gluing technology roll material"Aquaizol". First, the floor slabs are covered with bitumen mastic - we pay special attention to the corners, pipeline communications and seams between the slabs. The mastic must be poured directly into these places. In addition, mastic is applied to the lower part of the walls - the height is approximately 5-10 cm higher than the level of the future wooden floor. It should look like a trough. When the mastic has cooled, strips of aquaizol are laid on top. The principle is the same - we overlap the walls and between the individual strips waterproofing material. After it is laid, this entire cake is heated with a gas burner (or a hairdryer, if we are talking about small volumes of the room) and is pressed firmly onto the base. After drying, you can proceed to further work on arranging the wooden floor in the bathroom.
This waterproofing of floor slabs will prevent moisture from penetrating from the concrete and will keep the underground dry.
To learn how to make a wooden floor, watch the video.
Now you can tackle the wooden flooring itself - there are few subtleties here.

And in conclusion, a few words about ventilation, without which such wooden flooring will not last long. The underground should always be ventilated, so that excess moisture will be removed from there. The approach to solving this issue as in ordinary premises will not be entirely correct. Agree, making holes in the floor and exposing the underground to water penetration in advance is the wrong decision. It is better to drill ventilation holes at the bottom of the walls, from the side of adjacent rooms. There is no need to drill many holes - a couple on opposite sides of the floor is enough. From the outside, they can be covered with decorative grilles, selected in accordance with the interior.
This is how a wooden floor is installed in a bathroom; there are not many differences from similar coatings in other rooms, but they are significant. And failure to comply will certainly lead to a reduction in the service life of the floor.